Record Receipt Transactions in TallyPrime
Use a Receipt voucher to record cash or bank receipts. You can record receipts in Single Entry or Double Entry mode.

Ensure that:
- The required Cash, Bank, Party, and Income ledgers are created.
- The required bank ledger is created for recording bank payments and receipts.
- The Discount ledger is created for recording receipt with discount.
- You have enabled F11 (Features) > Enable Bill-wise Entry, to reference the receipt against a sale.
Record a Cash Receipt

- Press Alt+G (Go To) > Create Voucher > F6 (Receipt).
- Press Ctrl+H (Change Mode), if needed, to change the default single entry mode of receipt to double entry mode.
- Select the required ledgers for the receipt.
- For Single Entry mode:
- Select the Cash ledger under Account
- Select the income or party ledger under Particulars.
- For Double Entry mode:
- Under Particulars, debit the income or party ledger.
- Credit the Cash, or Petty Cash ledger, as applicable.
- For Single Entry mode:
- If you are tracking the payment against a purchase or expense bill, in the Bill-wise Details screen, select Agst Ref as the Type of Ref and select the sales voucher number.
- Press Ctrl+A to save the voucher.
In TallyPrime, you can also print the Receipt transactions immediately after saving.
Record Cheque Receipts
In the Receipt voucher:
- Under Account, select the required Bank ledger.
- In the Bank Allocations screen, set Transaction Type to Cheque.
- Enter the required Amount.
- In the Inst No. field enter the cheque number and set the Inst Date.
- Enter the Bank Name and press Enter.
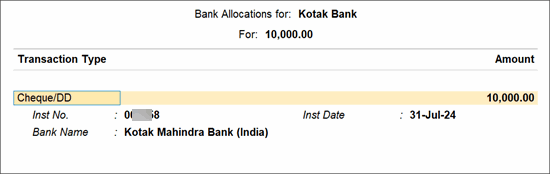
- Press Ctrl+A to save.
Record Receipts Through e-Fund Transfer
In the Receipt voucher:
- Press F12 (Configure) and set the option Set Ledger-wise Bank Allocations during voucher creation to Yes, to view the bank details defined in the party ledgers.
- Under Account, select the Bank ledger that is used for tracking receipt.
- In the Bank Allocations screen, set Transaction Type to e-Fund Transfer.
- Enter the required Amount.
- In the Inst No. field enter the bank’s transaction reference number and set the Inst Date.
- Enter the Bank Name and press Enter.
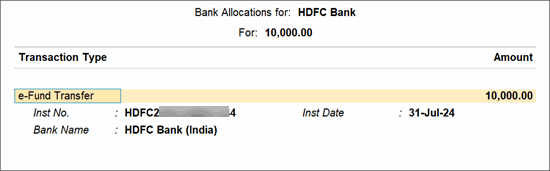
- Press Ctrl+A to save.
Record Advance Receipt
If you receive an amount from a customer before recording the sale, you can record it as an advance and later adjust it.
In the Receipt voucher:
- Under Account, select the Bank ledger.
- In Bill-wise Details screen, select Advance as the Type of Ref.
- In the Bank Allocations screen, set Transaction Type as required.
- Enter the necessary details, and press Ctrl+A to save the voucher.
Record Receipt with Discount
If you give a discount when a customer settles one or more outstanding bills, you can record the discount along with the receipt.
In the Receipt voucher:
- Under Account, select the Bank ledger.
- Select the discount ledger and enter the amount with a negative sign.
- In the Bank Allocations screen, set Transaction Type as required.
- Enter the necessary details, and press Ctrl+A to save the voucher.
View Receipt Register
- Press Alt+G (Go To) > type or select Receipt Register > and press Enter.
- To compare payment data across periods:
- Press Alt+C (New Column) to add a column and compare payment transactions for another period.
- Press Alt+A (Alter Column) to modify the period or settings of an existing comparison column.
- Press Alt+N (Auto Column) to automatically create multiple period-based columns for quick trend analysis and comparison.
- Select the required month and press Enter. To analyse the report in different views, press Ctrl+H (Change View) and select the required view:
- Columnar: Displays payment vouchers in a column-based format, making it easier to compare voucher details across periods or categories.
- Extract: Displays a summarised view of voucher information, helping you quickly review the recorded payment vouchers.
- To view the list of cancelled vouchers and post-dated vouchers, press Ctrl+J (Exception Reports).
Is this information useful?
YesNo