Create, Alter, and Delete Ledgers
A ledger is a date-wise record of all the transactions related to a particular account such as cash, sales, purchase and so on. Learn about the predefined ledgers in TallyPrime, and along with that learn to create ledgers for different contexts. After you create the ledgers, you can alter or delete them. You can track the altered or deleted ledgers. Finally, you can learn to view the report showing the transactions of your ledgers.
In your business, you record each transaction, and later such transactions are classified into separate accounts and get posted to the ledger. Each account has, an opening balance or carry forward balance, transactions recorded either as debit or credit and a closing balance. Ledgers contain the necessary information to prepare financial statements. The ledgers in TallyPrime or in the Books of Accounts affect assets, liabilities, income, or expenses. Once the transactions are posted to the ledgers, considering the closing balance of each account the Trial Balance is prepared. TallyPrime provides flexibility to the users to generate Profit & Loss A/c and Balance Sheet. It can also generate a range of comprehensive financial statements and reports.
In TallyPrime, there are two predefined ledgers, Cash & Profit and Loss accounts. Apart from the predefined ledgers, you can create as many ledgers as required for your business. You can create the ledgers before recording the transactions. In case you come across a new expense head or a new debtor or creditor while recording the transaction, then you can also create the ledger while you are recording them. Apart from creating a ledger, you can also alter or delete them as per the need.
You can view the Ledger vouchers report in the browser and also view, print, or export the opening balance of all ledgers. In TallyPrime, you also have the option to track changes made to the ledgers through Edit Log.
Predefined Ledgers in TallyPrime
In TallyPrime, there are two predefined ledgers, Cash & Profit and Loss accounts. You can record all the cash-related transactions using the Cash account and the Profit and Loss account reflects the previous year’s profit or loss as the opening balance of the ledger.
|
Cash Ledger |
Profit and Loss Ledger |
|
The Cash Ledger is grouped under the Cash-in-Hand group. |
The Profit and Loss account ledger is grouped under the Primary group. |
|
You can enter the opening balance as on the books beginning day. |
The profit or loss from the previous year is carried forward as the opening balance of the ledger. It is shown in the balance sheet under liabilities. |
|
This ledger can be altered and deleted. |
This ledger cannot be deleted but it can be altered. |
Create Ledgers in TallyPrime
You can create ledgers in different contexts such as from an account master, transaction, or report as per your preference. If you are aware of the ledgers to be created before recording the transaction, then you can create them in the account master. Similarly, you can create the ledgers while recording the transaction, if you come across any expense or party ledger which was not created earlier. You can create ledgers with basic details and later you can add the details as and when it is available. Ledgers are created under specific groups depending on your business process. For example, you can create a Bank ledger under Bank Account, a Sales ledger under Sales Account, or a Tax ledger under Duties and Taxes. Similarly, you can create a Party ledger under Sundry Creditor or Sundry Debtor depending on your sales and purchase needs.
If you deal with the same party for sales and purchase needs, the Party ledger created as creditor or debtor appears in the List of Ledgers whether you are billing for sales or purchase.
In this section
- Create a Ledger
- Create a Ledger from Transactions or Reports
- Create a Ledger under Primary groups
- Create a Tax Ledger
Create a Ledger
Once the company is created, you can create ledgers to account for the expenses, incomes, assets and liabilities of your business. In TallyPrime, you can create ledgers one at a time or create ledgers in one go.
- Press Alt+G (Go To) > Create Master > type or select Ledger and press Enter.
Alternatively, Gateway of Tally > Create > type or select Ledger and press Enter. - Name: Enter the name of the ledger account you want to create.
You cannot create two ledger accounts with the same name. - Alias: Enter the alias of the ledger account, if required. You can access the ledgers using the original name or the alias name.
Alias is the alternate name for the ledger accounts. You can create Alias at the time of creation or also can modify the respective ledger later. While selecting the ledger, you can choose the Alias name and the same ledger account gets selected. - Under: Enter the group from the List of Groups under which the ledger is created.
All the ledgers must be grouped correctly to record the transaction under the proper heads. For example: If you are creating a ledger for Office Expenses, then you need to create the ledger under the Indirect Expenses group.
Note: To create a new group from this field, press Alt+C. You can alter a ledger account to change its group classification at any time. - Fill in the other necessary details such as Mailing Details, Banking Details and Tax Registration Details.
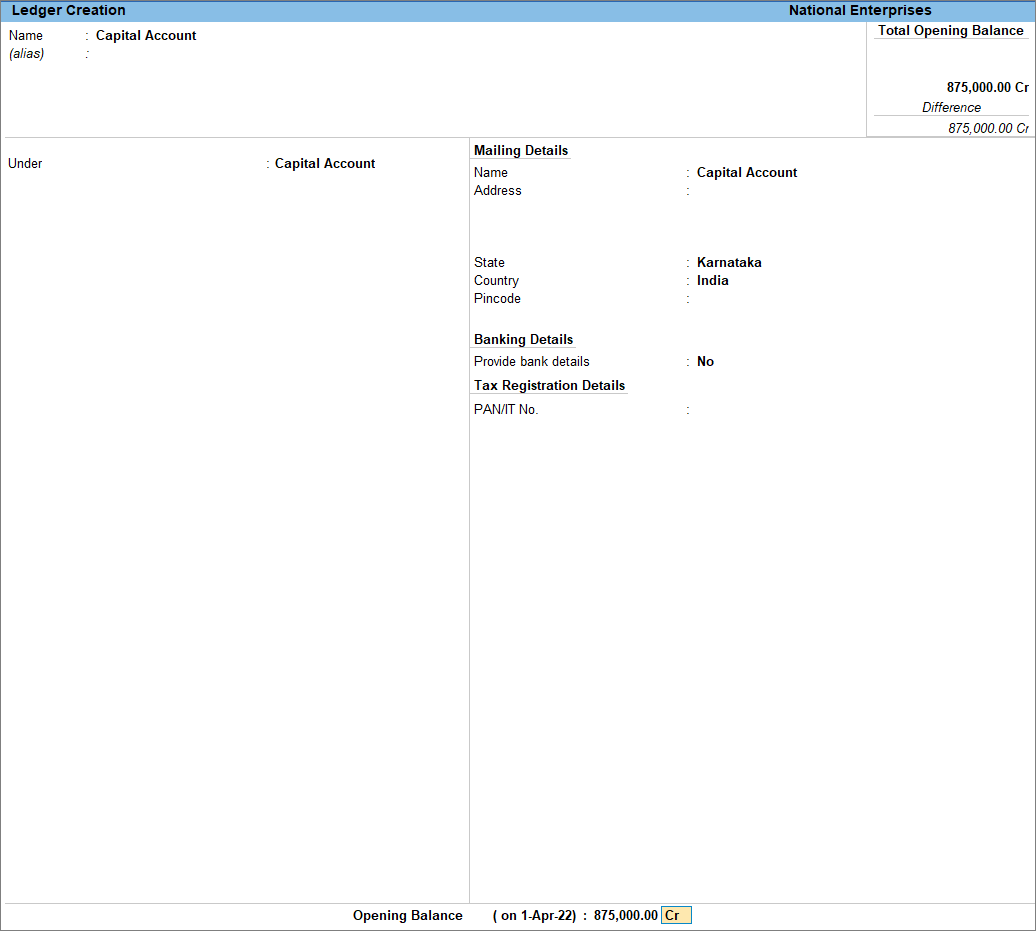
- Opening Balance: Enter the carry forward balance from the previous year as the opening balance.
Opening Balance is applicable when the ledger is an asset or a liability, and also if it has a closing balance in the account at the end of the period.
- As always, press Ctrl+A to save.
Now that you have created ledgers one at a time, similarly, you can create any other ledgers by selecting the correct group under which the ledger is created. You can also create multiple ledgers in one go, to know more Click here.
Create a Ledger from Transaction
While recording a voucher, you may come across certain expense or income heads or any other ledger which is not created earlier. Instead of going back to Gateway of Tally to create the ledgers, you can create those during voucher creation from all the voucher types available in TallyPrime. From the transaction, you can create ledgers for all the masters. Depending on the screen on which you are pressing Alt+C, TallyPrime understands which is the master you want to create and therefore it opens a corresponding creation screen.
- From Voucher Creation/Alteration screen, press Alt+C in the field where you want to create the ledger.
The Ledger Creation (Secondary) screen appears. - Create the ledger.
Create a Ledger under Primary groups
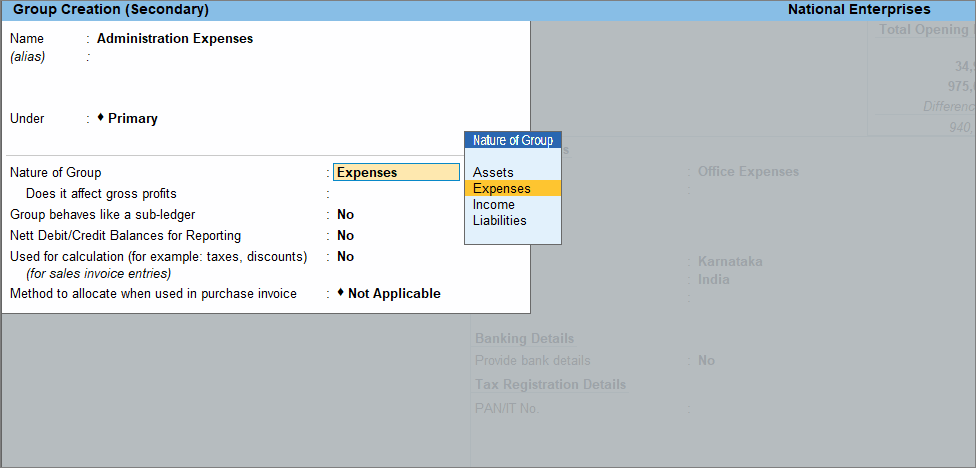
Ledgers can be created under the 28 predefined groups but you may not want to create the ledgers under these 28 predefined groups. In such cases, the ledgers can be created under Groups created under the Primary group. While creating the group under Primary Group, you need to select the Nature of Group between Liabilities, Assets, Expenses and Income. As per your selection, your group and the ledgers mapped under that group get classified between Balance Sheet items and Profit & Loss account items.
Below is the procedure for creating a ledger under the group created for expenses.
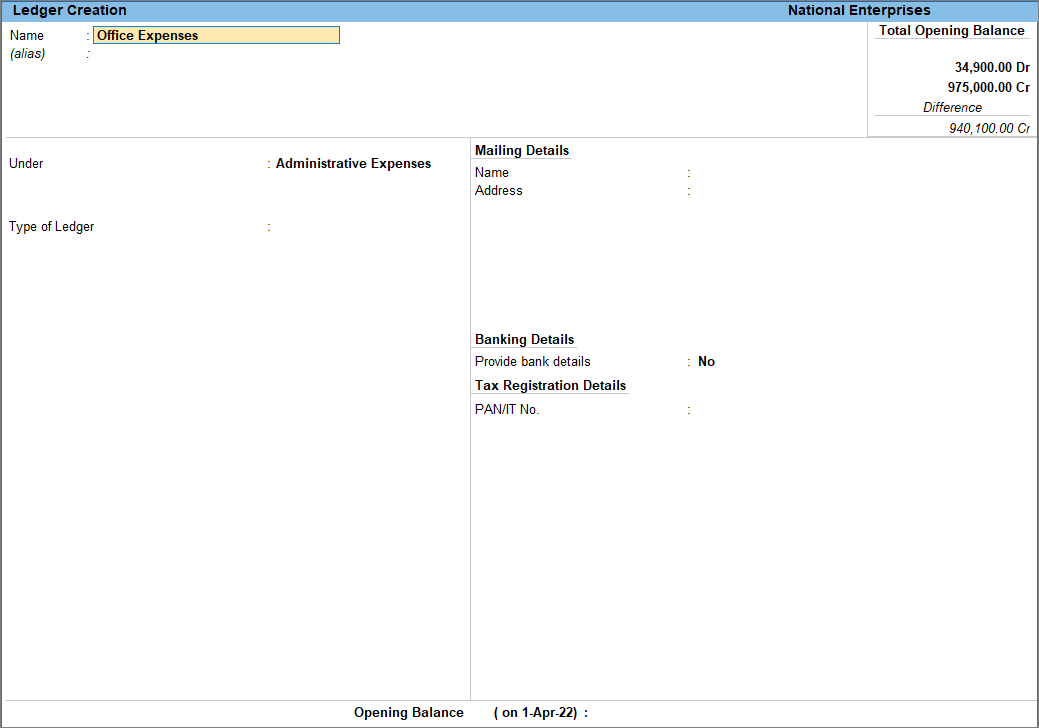
- In the Ledger Creation screen, in the field Under, select the group from the List of Groups created already or create a group under Primary group.
Select Create from the List of Groups, to create a new Group.
- In the Group Creation (Secondary) screen, create the group under Primary and select the Nature of Group as Expenses.
- Press Ctrl+A to save the Group Creation (Secondary) screen.
- Fill in the other necessary details and press Ctrl+A to save the ledger.
Similarly, you can create ledgers under groups created for Liabilities, Assets and Income.
Creation of Tax Ledger
Tax Ledgers in TallyPrime should be created under the Duties & Taxes group which contains all tax accounts like GST, VAT, CENVAT, Excise, Sales, and other trade taxes and total liability.
- In the Ledger Creation screen, specify Duties & Taxes group in the field Under.
- Enter other details as below.
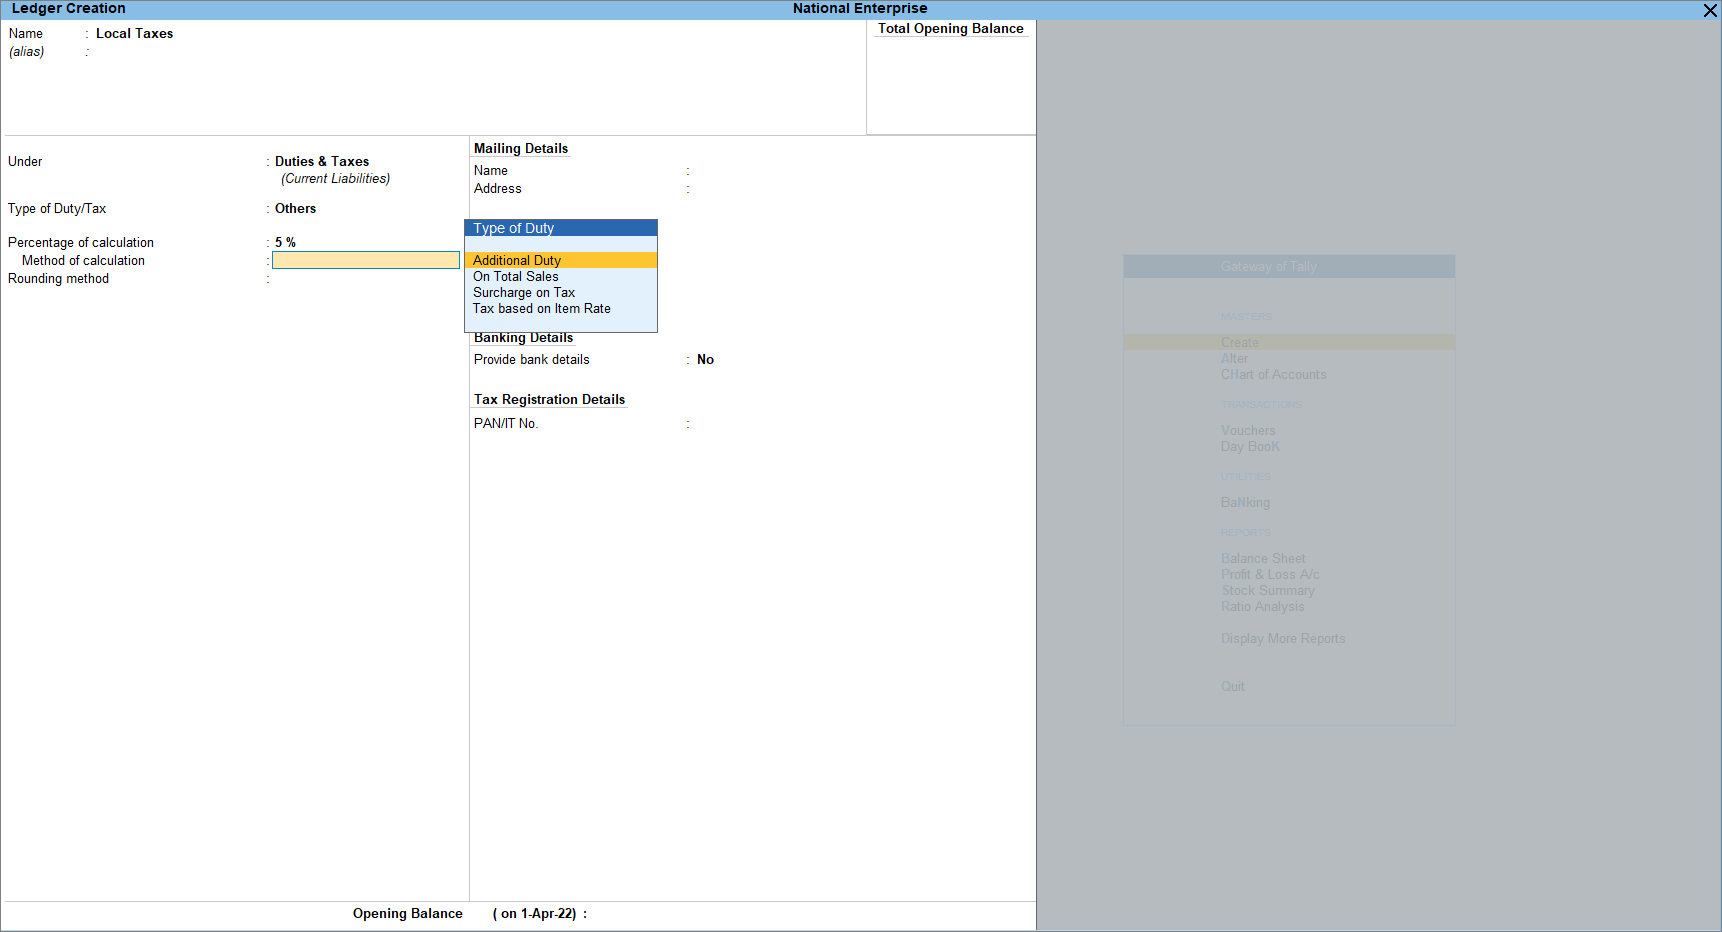
- Type of Duty/Tax: Select based on statutory compliance applicable to your Company. For Indian statutory, Others is displayed by default.
- Percentage of Calculation: Select the rate of tax e.g. 5%, 10%, 12.5%, as applicable.
Once you select Percentage of Calculation, the Method of Calculation field appears. - Method of Calculation: Select the tax calculation method from the Type of Duty list.
- Additional Duty: If there is another tax ledger and you want to calculate tax on that tax value then you need to select this option.
- On Total Sales: This method is used to calculate tax on the total item value in the invoice.
- Surcharge on Tax: It is similar to Additional Duty, the difference is it is used for the purpose of Income Tax.
- Tax based on Item Rate: This method is used to calculate tax based on the Item rates specified on the items.
- Rounding Method: Select the Rounding Method to round off the tax values.
For example:
For duty value 123.33 and rounding Limit is 1. In this case:- Downward rounding shows as 123.
- Normal rounding shows as 123.
- Upward rounding shows as 124.
For Duty value 125.55 and rounding Limit is 1. In this case:
- Fill in the other necessary details and press Ctrl+A to save the ledger.
Alter and Delete Ledgers
After you create the ledgers as per your requirement, you can alter the details of such ledgers. You can even alter the group under which the ledger was created. Apart from altering the ledger, you can also delete ledgers which are not required. You can alter or delete ledgers one at a time or in one go. You can alter or delete the ledgers and other masters from the Chart of Accounts as well. Using Chart of Accounts, you can alter multiple masters in one go and delete masters from a single screen.
In this section
Alter the ledger
After you create the ledgers, you may want to update certain details. For instance, you may update GSTIN/UIN or the Mailing Details, based on the information you receive from your customer or vendor. In TallyPrime, you can alter the details in the ledgers and use them as needed. You can alter the ledger one at a time or you can also alter multiple ledgers from the Multi Alter screen in the Chart of Accounts. However, you cannot alter all fields of ledgers through the Multi Alter screen. to know more, Click here.
- Press Alt+G (Go To) > Alter Master > type or select Ledger and press Enter.
Alternatively, Gateway of Tally > Alter > type or select Ledger and press Enter.
The Ledger Alteration screen appears. - Alter the details, as required, and save the ledger.
You can alter any information provided in the ledger master with the exception of the closing balance under the group Stock-in-Hand.
Delete the ledger
You can also delete ledgers from your Company Data if you are no longer using the ledgers or you have accidentally created any ledgers. You can delete ledgers one at a time or delete multiple ledgers from the Chart of Accounts. To know more, Click here.
However, there are certain situations where deleting a ledger has the following dependencies.
- You cannot delete a ledger that is already used in a voucher. Therefore, you need to first delete all the vouchers related to the ledger and then delete that ledger.
- You cannot delete a ledger that is referenced in any voucher class, configurations, or other masters. You need to remove the references of the ledger from all such cases, before deleting that ledger.
To delete a ledger one at a time:
- From the Ledger Alteration screen, press Alt+D to delete the ledger.
The Edit Log option in TallyPrime helps to track the ledgers which were altered or deleted.
View Edit Log for Ledgers
You may be making changes in the ledgers as per your requirement. Edit Log tracks all such changes made by you. You can view the details of changes made in the selected version of the ledger as compared to its previous version which TallyPrime highlights in red text. Similarly, you can drill down to any version and view the comparison between it and its previous version. If you drill down on a deleted Ledger from the Chart of Accounts, then the Edit Log report opens.
If you want to enable Edit Log in TallyPrime, then refer to the Create a Company section in the Setup Your Company topic.
You can view the altered or deleted ledgers from the Chart of Accounts, refer to Validate Changes and Deletion of Masters.
To view the changes made to the ledger:
- Open the required Ledger.
Press Alt+G (Go To) > type or select Chart of Accounts and press Enter > select Ledger and press Enter.
The Ledger Alteration screen appears. - Press Alt+Q (Edit Log).
Alternatively, press Ctrl+O (Related Reports) > Edit Log and press Enter.
The Edit Log report displays the Version, Activity, Username, and Date & Time.

Update the Mobile No. for Party
In TallyPrime Release 4.0, you can update the mobile nos. of your parties by calling out their primary mobile no. and default WhatsApp No. You can also set multiple mobile nos. for a single party and share a single document with all of them in the blink of an eye.
Update Primary Mobile No.
The mobile no. that you had entered in the earlier TallyPrime release (TallyPrime 3.0.1 or earlier) will be updated as the Primary Mobile No. and also set as the default WhatsApp No. in TallyPrime 4.0. You can either confirm the same or change your Primary Mobile No. by opening the Ledger in the alteration mode.
- Open the ledger you want to edit in alteration mode.
- In the Ledger Alteration screen, update the Primary Mobile No. field.
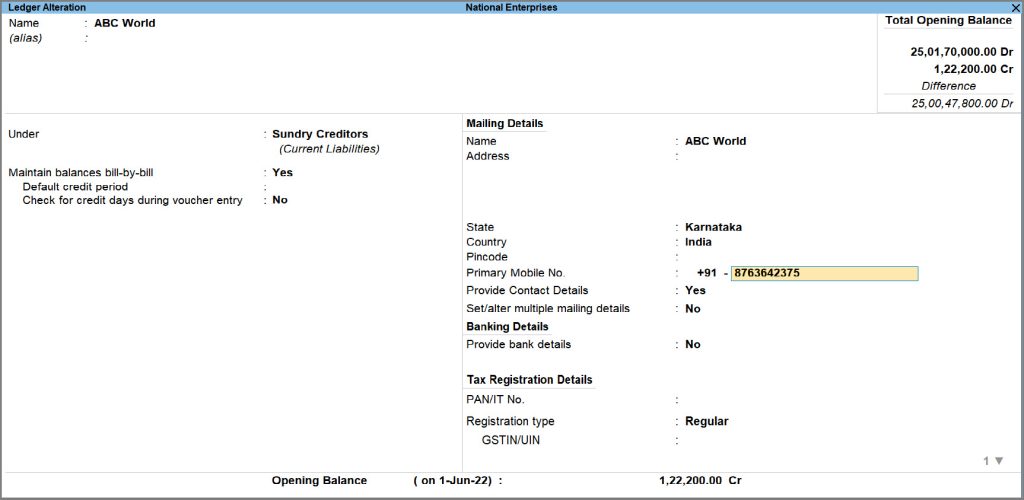
- Press F12 (Configure), and Set Default WhatsApp No. to Yes.
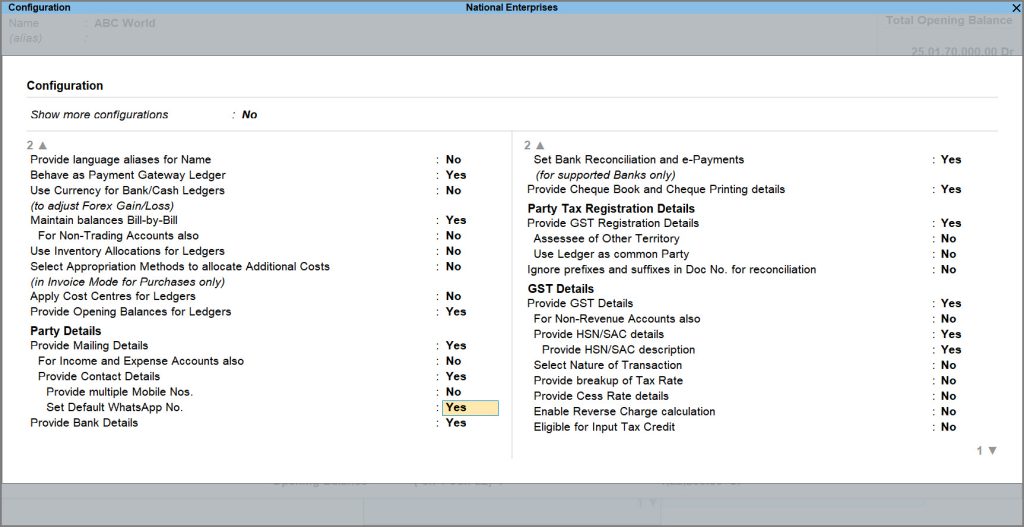
If you have more than one mobile number that you wish to specify for the particular ledger,you can set Provide Multiple Mobile Nos to Yes. - You can set the Default WhatsApp No. of your party as Primary or select Multiple Mobile Nos. You can also select Not Applicable, if you do not wish to specify any particular Mobile No. as Default WhatsApp No.
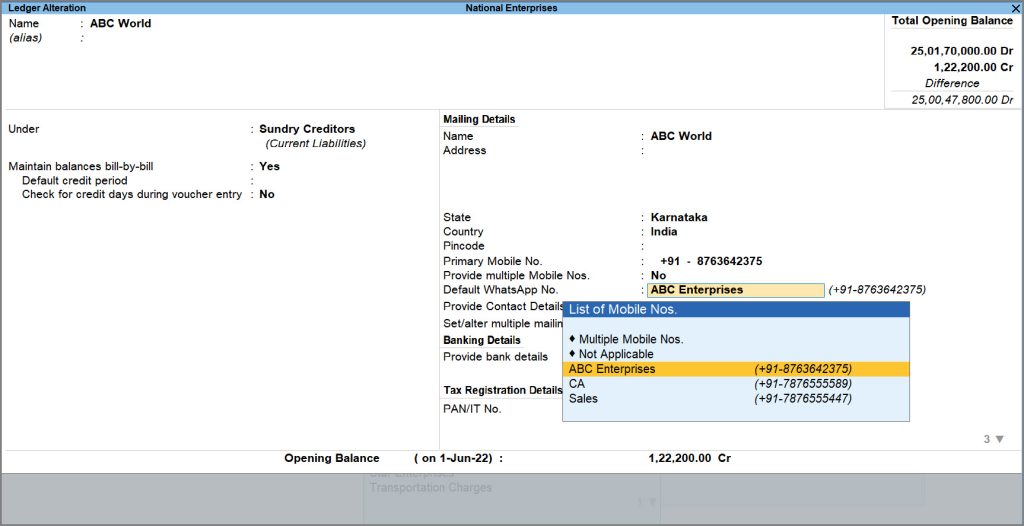
- Accept the screen. As always, you can press Ctrl+A to save.
Update contact details for multiple parties
You can update the party’s default WhatsApp No. from the Ledger Contact Details Screen as well. From Ledger Contact Details screen, you can view and update contact details for multiple parties and there are more than one way to do so, giving you amazing flexibility as an user.
- Press Alt+G (Go To) > type or select Ledger Contact Details under Ledger Reports.

- Select the Ledger Group from the List of Groups.
- In the Ledger Contact Details screen, details of all the ledgers created for the particular group appear.
- If you have already entered different mobile nos. for your party, (As specified in master) appears under Multiple Mobile Nos. column.

- Select the ledger you wish to change Contact Details for and press Enter to open Contact Details page for the particular ledger.
- In the Ledger Contact Details screen, fill in the details as per your requirement.
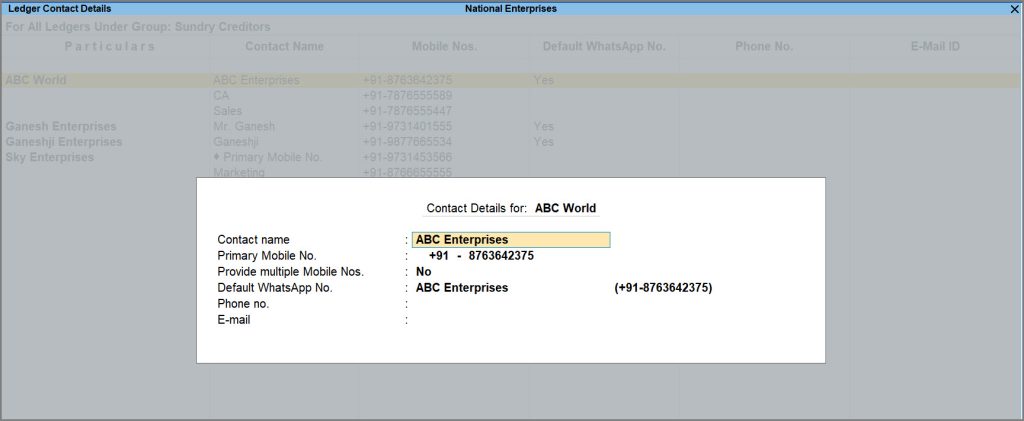
- Accept the screen. As always, you can press Ctrl+A to save.
- In the Ledger Contact Details screen, fill in the details as per your requirement.
- You can also specify your default WhatsApp No. from the Ledger Contact Details by pressing Alt+L or clicking on Update Contact Details.
- In the Ledger Contact Details screen, fill in the details as per your requirement.
- Accept the screen. As always, you can press Ctrl+A to save.
- You can also specify your default WhatsApp No. from the Ledger Contact Details by pressing Alt+H or clicking on Multi Alter.
Ledger Vouchers Report
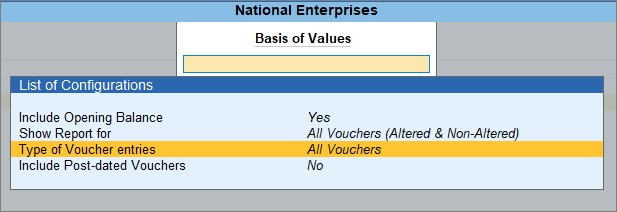
You can view a ledger account with the corresponding voucher details and view this report in browser too. TallyPrime provides you with the option to configure your ledger vouchers report by using the Basis of Value. You can view Debit or Credit entries, include post-dated vouchers, or include Opening Balance. TallyPrime also allows you to change the view of your report, you can view it in the columnar, daily breakup, or monthly summary and save the preferred view.
- Open the Ledger Vouchers report and select the period.
- Press Ctrl+B (Basis of Value) to view the report with either Debit or Credit Values, including post-dated vouchers or the opening balance.
You can also view Altered and Non-Altered vouchers.
To know more, refer to Working with Reports.
Cumulative balances or running balances for Ledger Voucher report
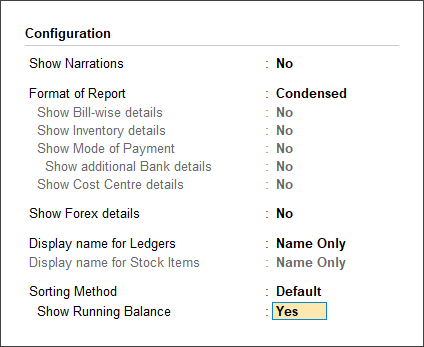
You can configure your Ledger Voucher report to show the cumulative or running balances.
- In the Ledger Vouchers screen, press F12 (Configure) > set the option Show Running Balance to Yes to see the running balances for the Ledger Voucher report.
- Press Enter to save the changes.
A sample Ledger Vouchers report with a running balance column appears as shown below.

You can also access Ledger Vouchers reports by drilling down from different statements, such as Group Summary and Monthly Summary.
View Contact Details for Ledger Accounts
From the Ledger Vouchers report, it is possible to view the contact details of the ledgers in TallyPrime for reference. You can view the contact details for other ledgers as well and configure in the ledger creation or alteration screen the option for providing the mailing details.
- Press Alt+G (Go To) > type or select Ledger Vouchers and press Enter.
Alternatively, Gateway of Tally > Display More Reports > Accounts Books > Ledger and press Enter and select the ledger for which you want to see the contact details. - Select the required Ledger from the Select Item screen appears.
- Press Alt+S (Contact).
The Ledger Contact Details screen appears.
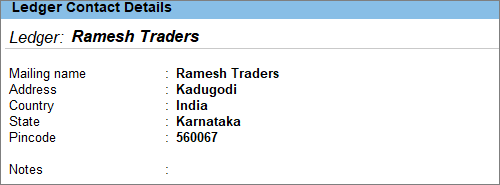
You can see the Mailing details and the account details on the screen.
View, Print, and Export Opening Balances of all the Ledgers
You can view the opening balances of all the ledgers on a single screen, and share the same by printing, exporting or emailing them.
- Press Alt+G (Go To) > type or select Chart of Accounts > Ledger > and press Enter.
Alternatively, Gateway of Tally > Chart of Accounts > Ledger > and press Enter.
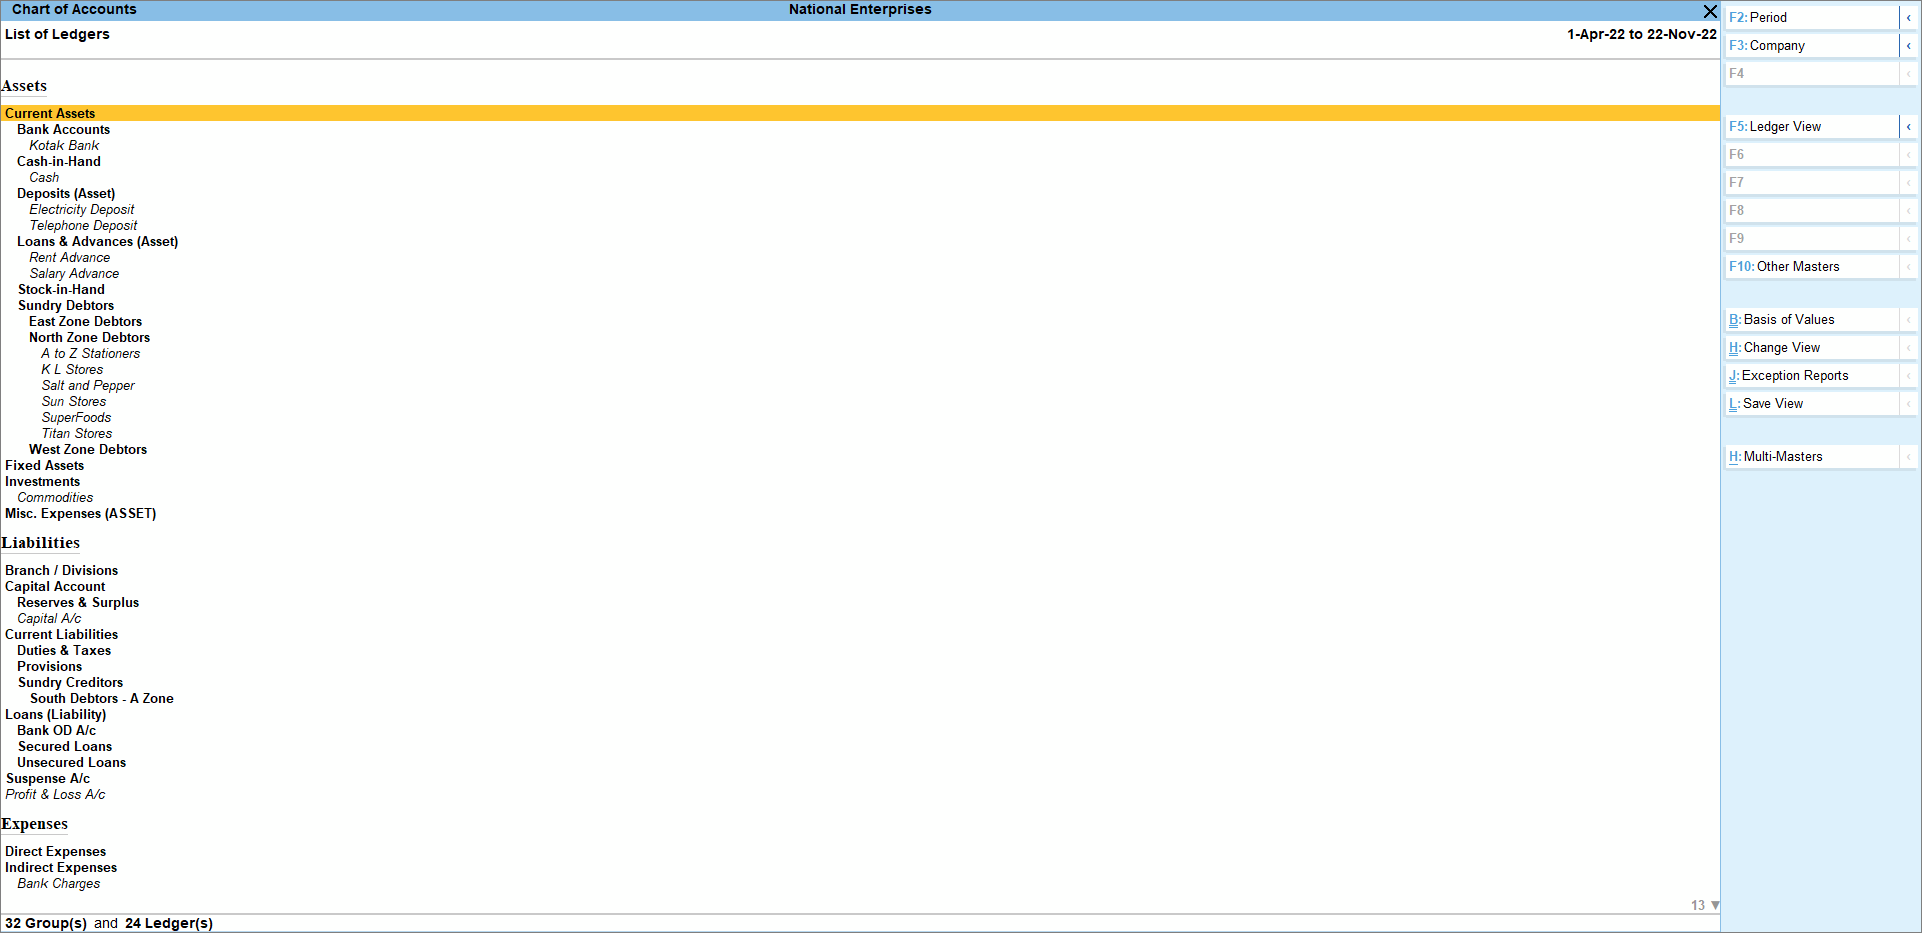
- Press Alt+H (Multi-Masters) > select Multi Alter > and press Enter.
- Select All Items from the List of Groups. In the Multi Ledger Alteration screen, you can view the Opening Balance of all the ledgers which are Balance Sheet Items.
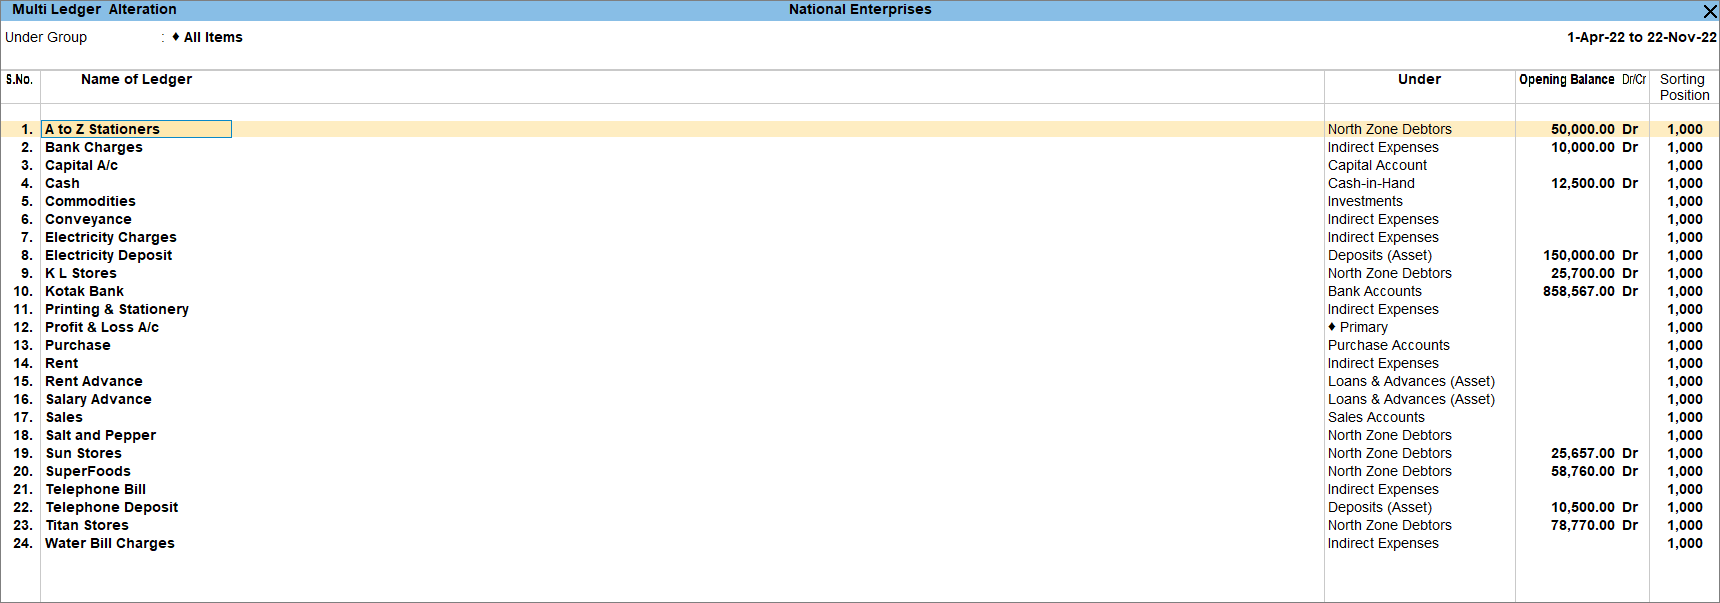
From the Chart of Accounts, you can view the opening balances of each ledger in one single screen.
Additionally, you can print, export or email the opening balances of all ledgers from Trial Balance with the necessary configurations. To know more, Click here.

