
Payments and Receipts
Tracking your expense and income is necessary to get a clear picture of cash flow. Whether you are paying or receiving money via cash or bank, TallyPrime gives you the facility to record payments and receipts with all the details, easily trackable in reports.
If you record your payments and receipts based on transactions in your bank statement, you can simply import your bank statements in TallyPrime instead of recording them manually. You can import your bank statements, which is supported for 145+ banks. Thereafter, you canauto-create vouchers using bank statements.
In TallyPrime, you can:
- Record your payments and receipts in the Single Entry or Double Entry mode.
- Convert a Payment Voucher to a Journal Voucher.
- Write a narration for the transaction entered for future reference.
- Record Contra entries for money withdrawn from the bank.
- View monthly payments and receipts with the Payment and Receipt Register.
- View all cash or bank transactions in the Payments and Receipts report.
Record a Payment Voucher
You can use a Payment voucher to record cash and bank payments using Single Entry or Double Entry mode.
In this section
- Cash payment in Single Entry mode
- Bank payments in Single Entry mode
- Payments in Double Entry mode
- Provide narration for each ledger in the payment voucher
Cash payment in Single Entry mode
In business, you can pay daily wages, regular business expenses like stationery, printing, postage, and other miscellaneous expenses, or payments to your suppliers with cash as it is an instant payment method. In TallyPrime, you can record such cash payments in single entry mode. If you are unfamiliar with the accounting rules, you can use the single-entry mode of accounting. Once you select the ledgers correctly, TallyPrime automatically records your transaction as per the accounting rules.
Suppose you want to make payment through Cash for Conveyance and Telephone expenses incurred in your business. You need to select Cash account under the Account field and under Particulars select the conveyance and telephone accounts and enter the respective amounts. Similarly, you can make payments to your suppliers. You have to select your supplier account under Particulars, and you can record the transaction.
In the below example, let’s record cash payment for Conveyance and Telephone expenses in single entry mode.
![]()
- Open the Payment Voucher in single entry mode.
- Press Alt+G (Go To) > Create Voucher > press F5 (Payment).
Alternatively, Gateway of Tally > Vouchers > press F5 (Payment). - Press Ctrl+H (Change Mode) > select Single Entry.
- Press Alt+G (Go To) > Create Voucher > press F5 (Payment).
- Select the Cash account, and Expenses account.
- In the Account field, select the Cash ledger.
- UnderParticulars, select the Conveyance and Telephone ledgers, and enter the corresponding amounts.
- Accept the screen. As always, you can press Ctrl+A to save the payment voucher.
Bank payments in Single Entry mode
You can make bank payments and record them using the Payment voucher. In the Receipt voucher, select the Bank account under the Account field and expenses or party ledger under Particulars. You can make payments for more than one expense or to more than one supplier through a single voucher in case they are sister concerns.
Select more than one Transaction Type and allocate the amount to each Transaction Type by providing the required details. In this case, let us make payment for a Furniture purchased.
![]()
- Open the Payment Voucher and in single entry mode.
- Press Alt+G (Go To) > Create Voucher > press F5 (Payment).
Alternatively, Gateway of Tally > Vouchers > press F5 (Payment). - Press Ctrl+H (Change Mode) > select Single Entry.
- Press Alt+G (Go To) > Create Voucher > press F5 (Payment).
- Press F12 (Configure) and set the option Set Ledger-wise Bank Allocations during voucher creation to Yes, to view the bank details defined in the party ledgers.
- Select the Bank account and Furniture account.
- In theAccountfield, select the Bank ledger.
- UnderParticulars, select the Furniture ledger, and enter the corresponding amount.
- Provide the bank details in the Bank Allocations screen.
- Select the required Transaction Type.
The Transaction Type is by default set to Cheque in the Bank Allocations screen. You can change it as needed, for example, e-Fund Transfer, Electronic Cheque, and so on.
If you do not find the required Transaction Type, select Show More in the Transaction Types list and press Enter.
You can configure the Bank Allocation screen, by pressing F12 (Configure).
When you change the Transaction Type from Cheque to any other type in the voucher creation/alteration screen, the instrument number will be removed if a cheque range was used. The instrument number entered without using cheque range, will be retained.
- Enter the details in the remaining fields.
- Press Ctrl+A to save the Bank Allocations screen.
In the case of a Cheque, you can choose the same or different cheque range. If you choose the same range, the subsequent cheque numbers automatically get filled in the Inst No. field.
- Select the required Transaction Type.
- Accept the screen. As always, you can press Ctrl+A to save the payment voucher.
Similarly, you can do payments towards capital expenditure also.
View Bank Status during Voucher Creation or Alteration
TallyPrime Release 6.0 onwards, you can view the Bank Status of a voucher during voucher creation and alteration.
- In the Bank Allocations screen, press F12 (Configure).
- Show Bank Date: Yes.
- Show Bank Status: Yes.
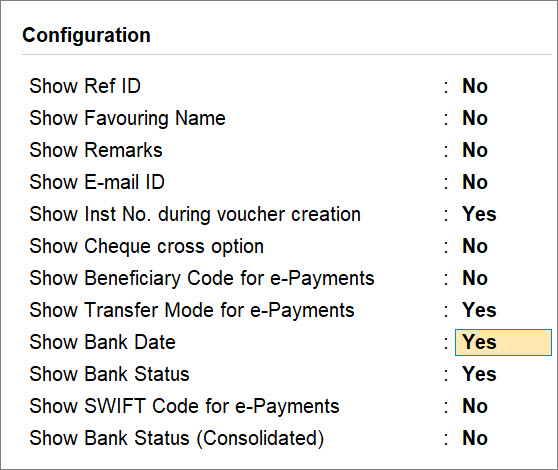
- Press Ctrl+A to save.
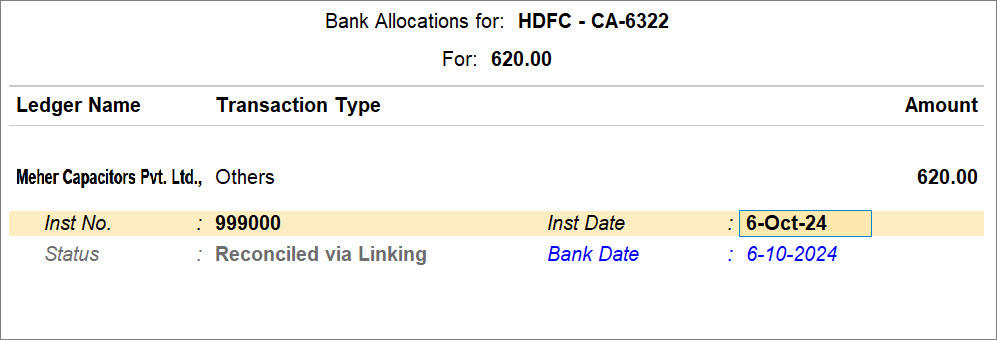
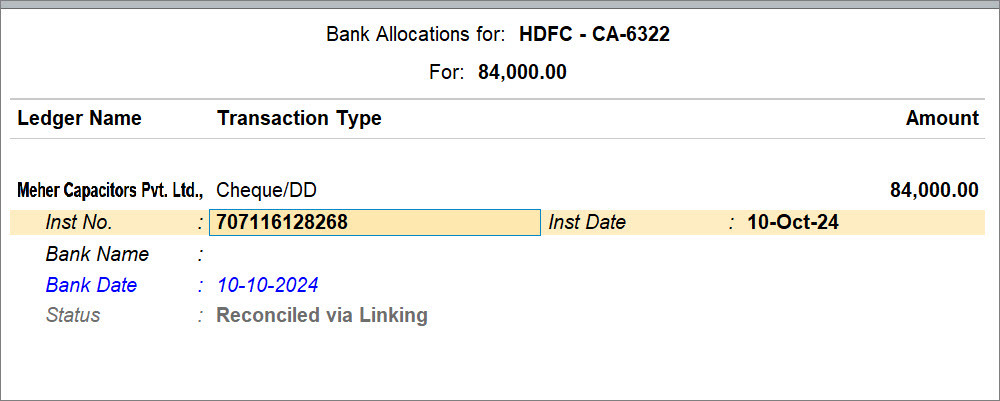
The Bank Date and Status get displayed in the Bank Allocations screen.
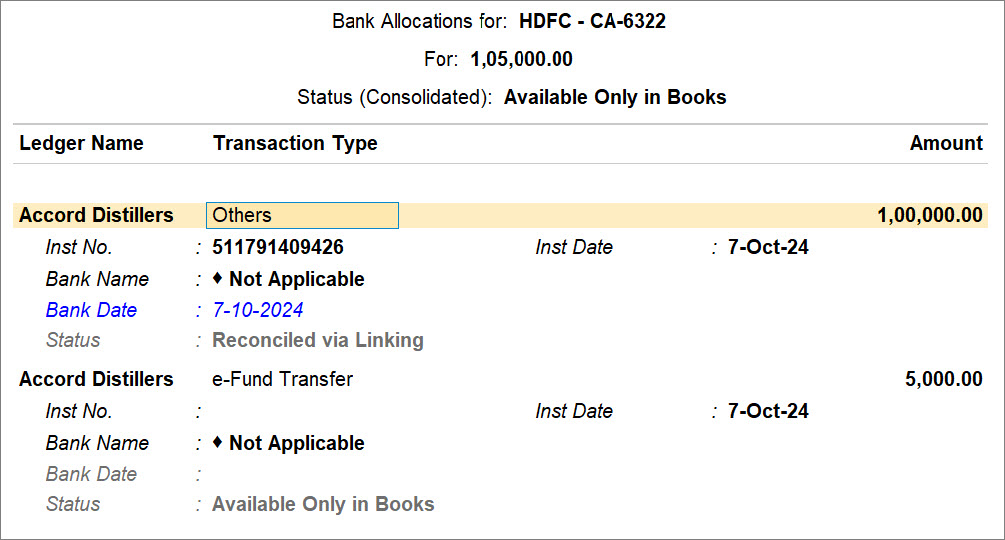
If you have multiple bank allocations in a voucher, then you can also view a consolidated bank status.
- In the Bank Allocations screen, press F12 (Configure).
- Show Bank Status (Consolidated): Yes.

- Press Ctrl+A to save.
The Status (Consolidated) gets displayed, based on the action you need to take on the voucher. If one of the transactions is On Hold, then the consolidated status will be On Hold, even if the other transaction is Processed.
In the following screen, the status of a transaction is Reconciled via Linking, while the status of the other transaction is Available Only in Books. So, the Status (Consolidated) is Available Only in Books, because you need to reconcile the other transaction.

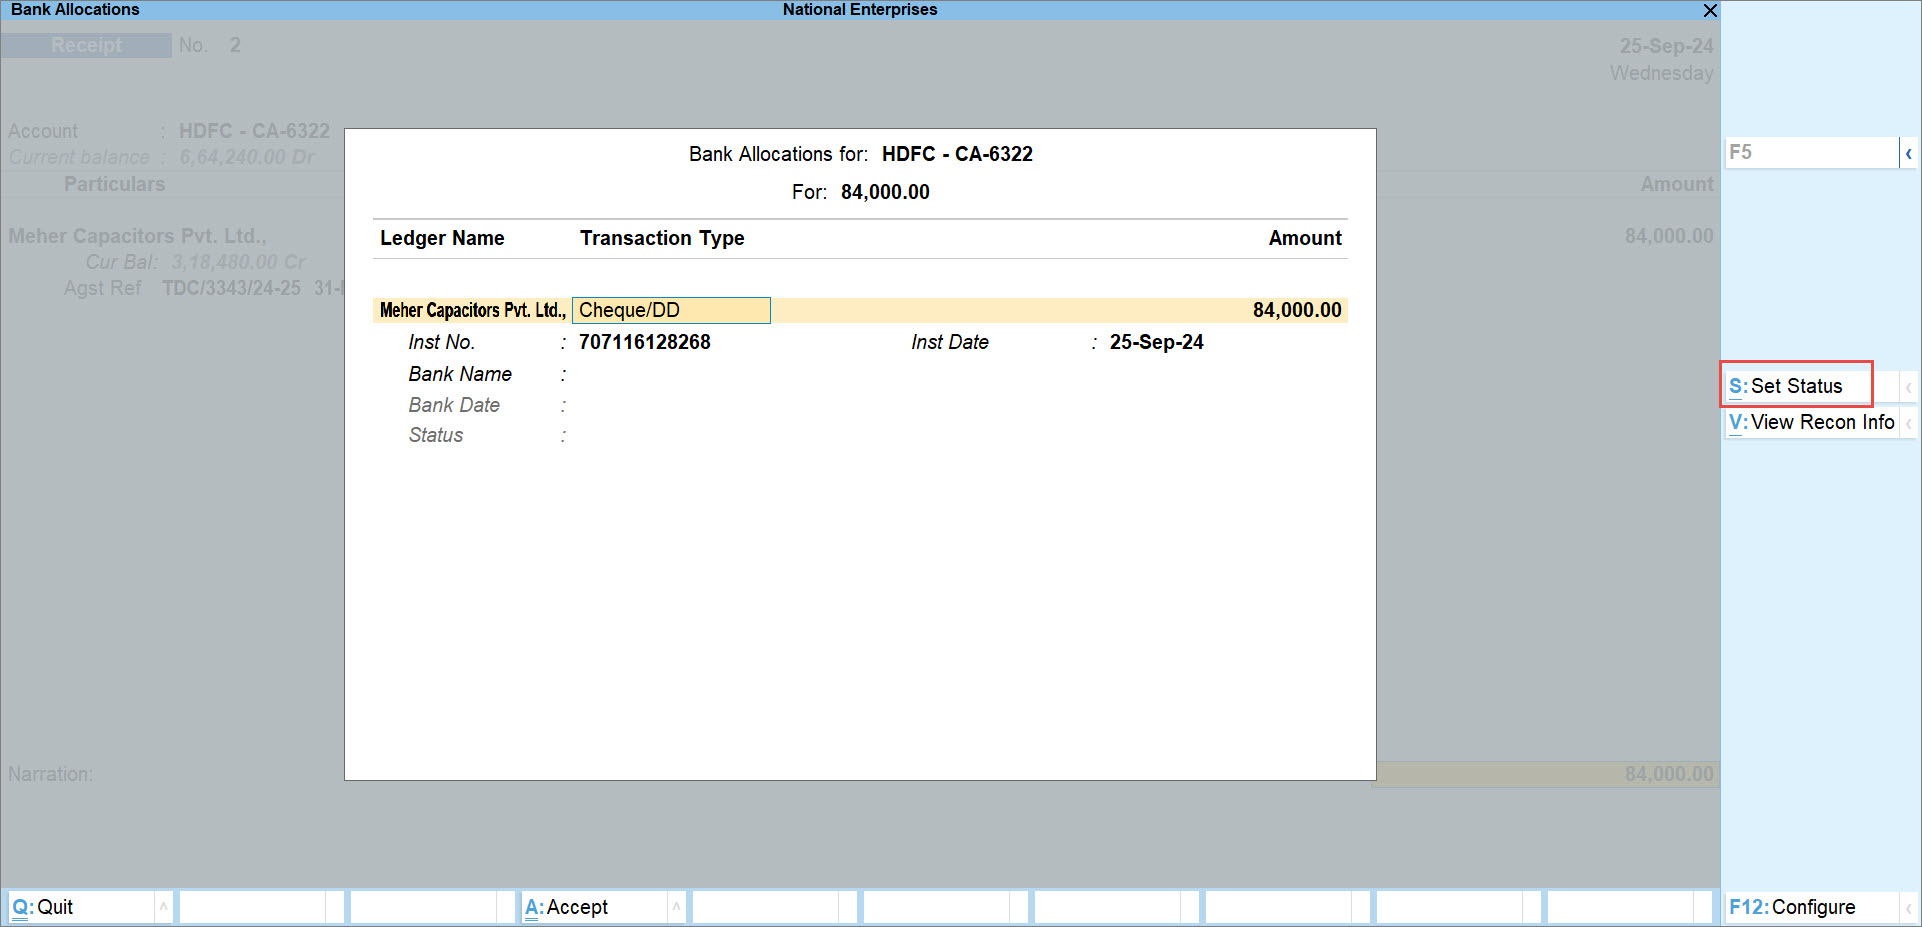
Set the Bank Status of a voucher
- In the Bank Allocations screen, press Alt+S (Set Status).
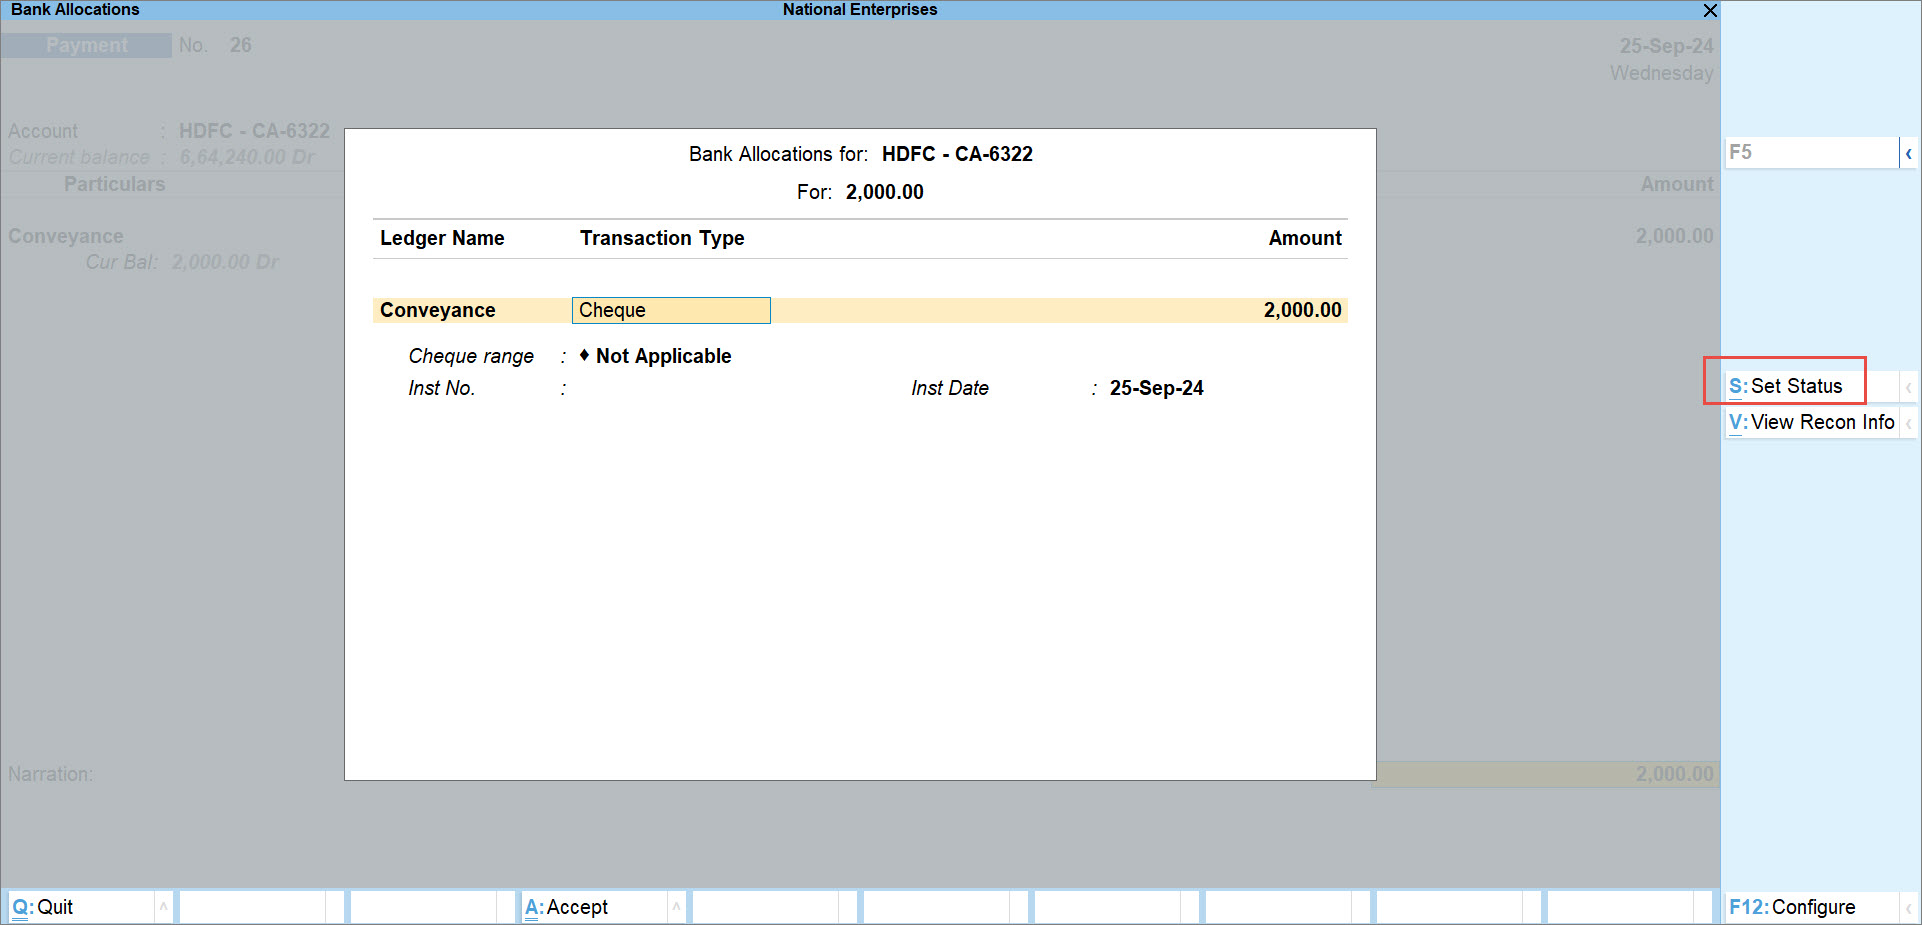
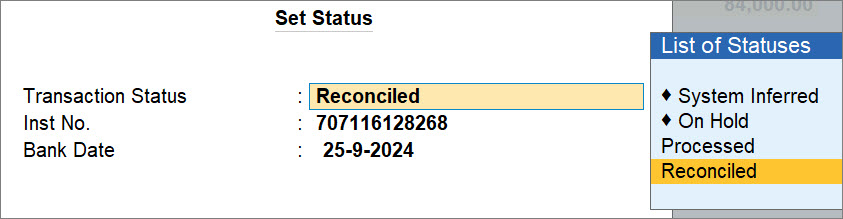
- Set the Transaction Status, as applicable.
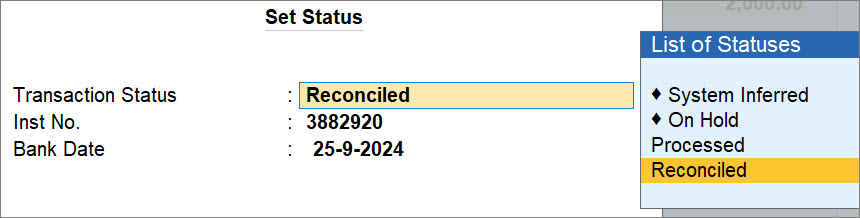
- On Hold: A data entry operator might be recording the voucher, after which the accountant might want to review the information entered.
Enter an appropriate comment and press Ctrl+A to save. - Processed: You might be creating or altering the voucher after the transaction is processed on the bank portal.
Enter the Inst No. and press Ctrl+A to save. - Reconciled: You can mark the transaction as reconciled.
Enter the Inst No. and press Ctrl+A to save.
- On Hold: A data entry operator might be recording the voucher, after which the accountant might want to review the information entered.
As a result, the Bank Status gets displayed, as per the Transaction Status.

View Transaction Reconciliation Info
- In the Bank Allocations screen, press Alt+V (View Recon Info).
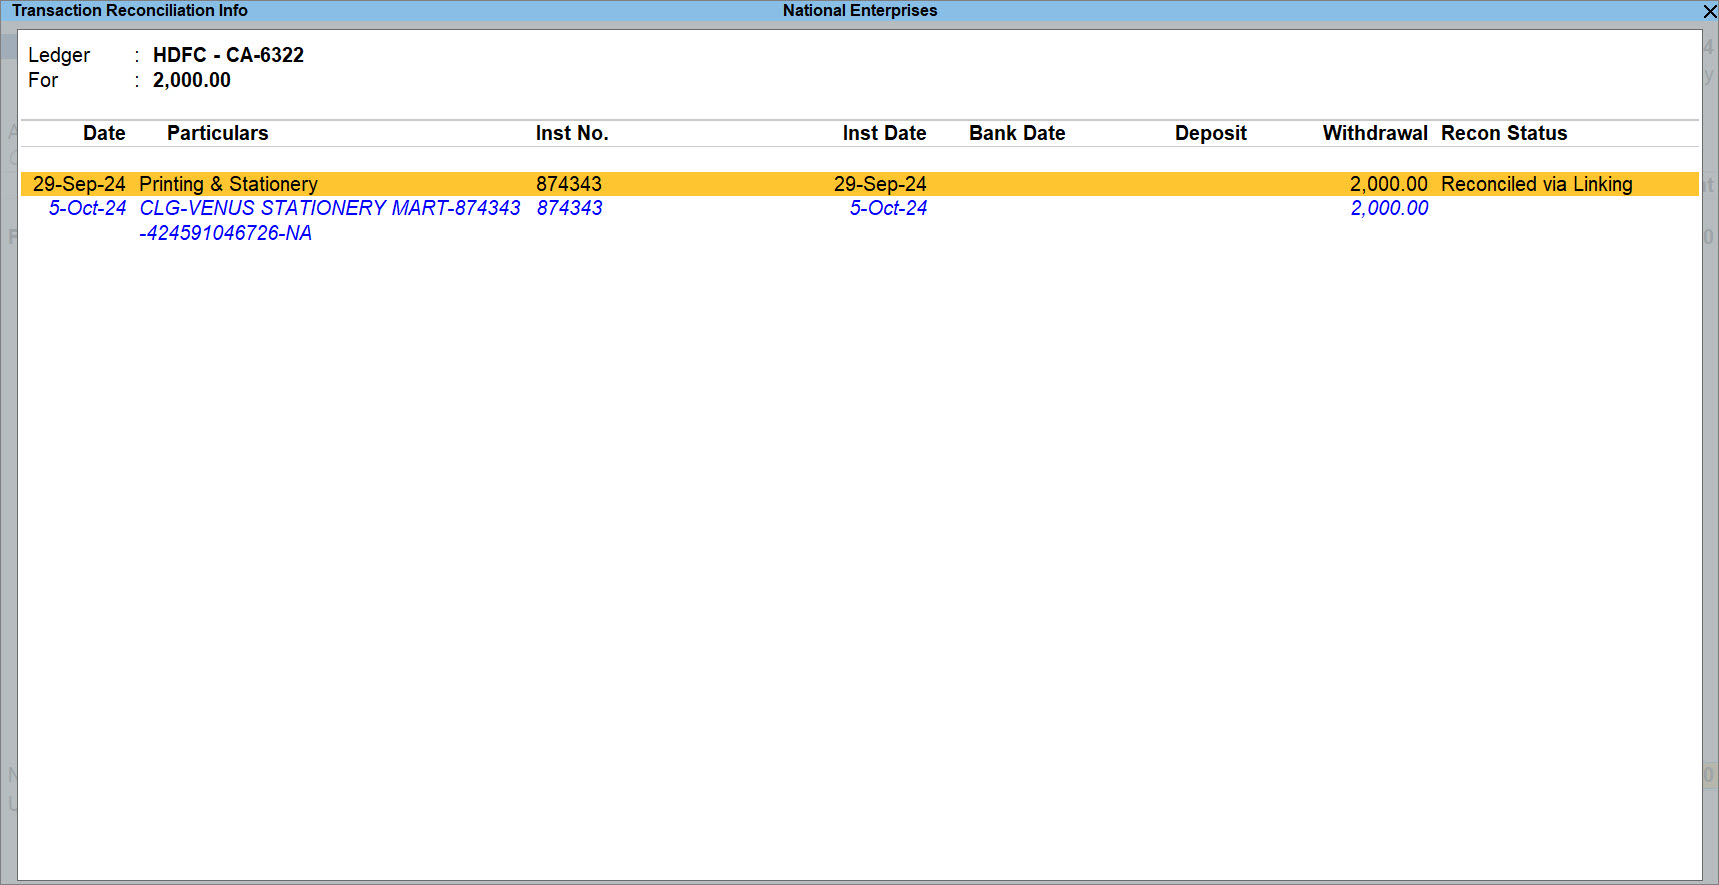
You can view the Favouring Name, Transaction Type, and other relevant options.
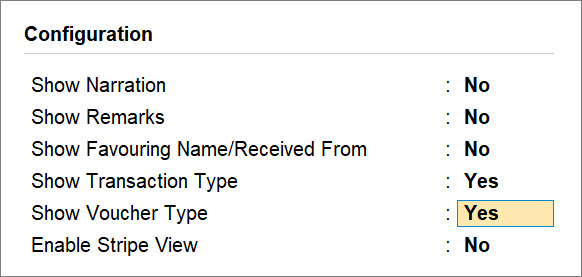
- Press F12 (Configure).
- Show Favoring Name/Received From: Yes.
- Show Transaction Type: Yes.
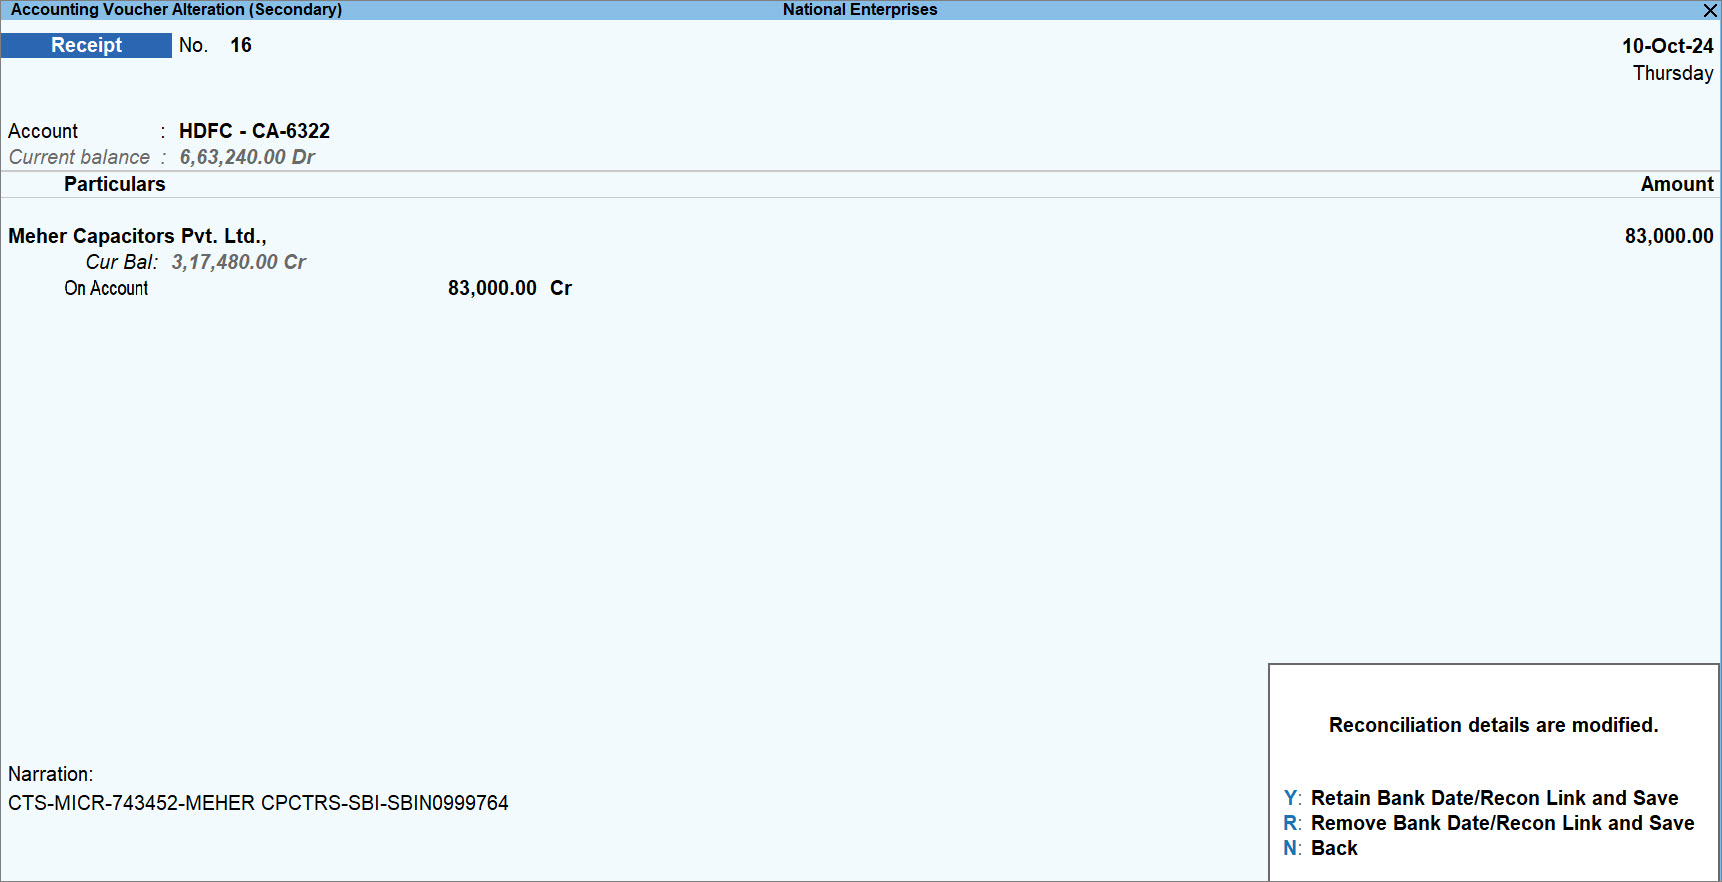
Retain or Remove Bank Reconciliation details while altering a voucher
You might alter the Amount or Instrument No. in a reconciled voucher. In such a case, you can choose to remove or retain the Bank Date or other details of the linked transaction.
- In the Voucher Alteration screen, press F12 (Configure).
- Remove Bank Date/Recon Link while altering Reconciled Vouchers: Yes.
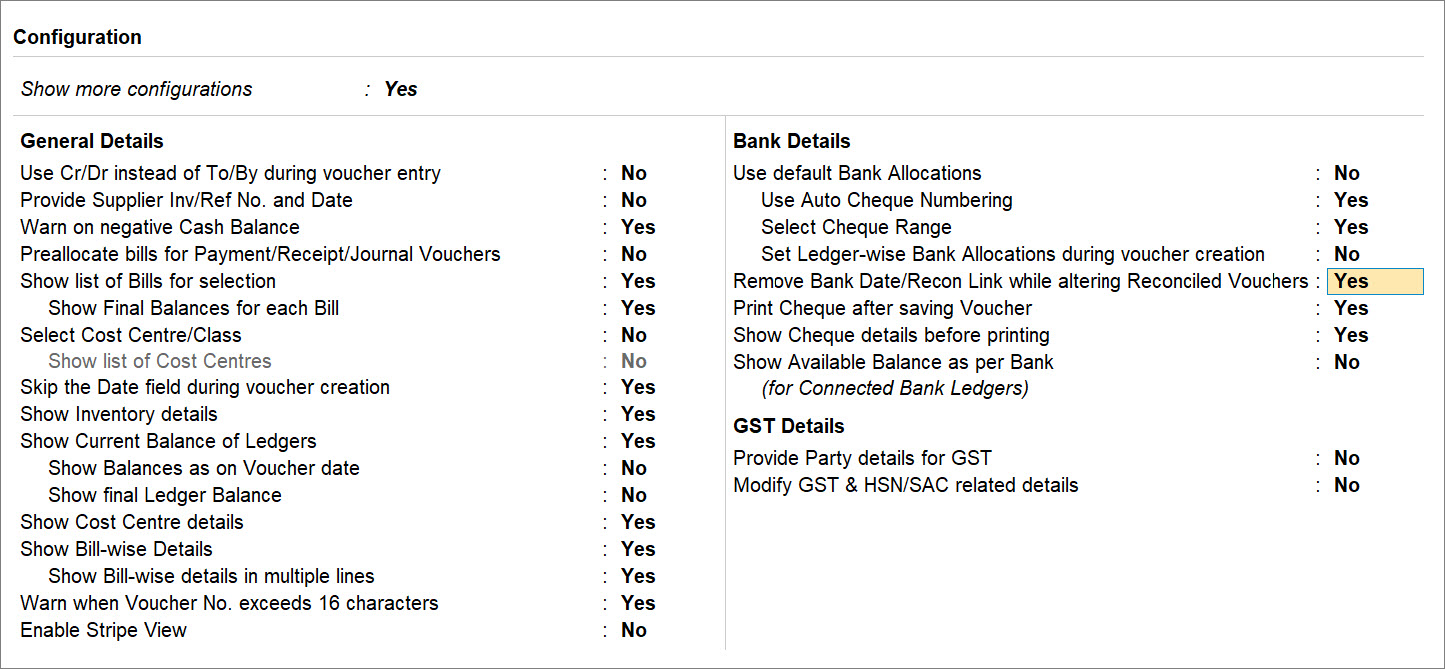
The Bank Date gets removed if the voucher is manually reconciled. If the voucher is reconciled via linking, then the reconciliation link with the bank transaction gets removed from the voucher.
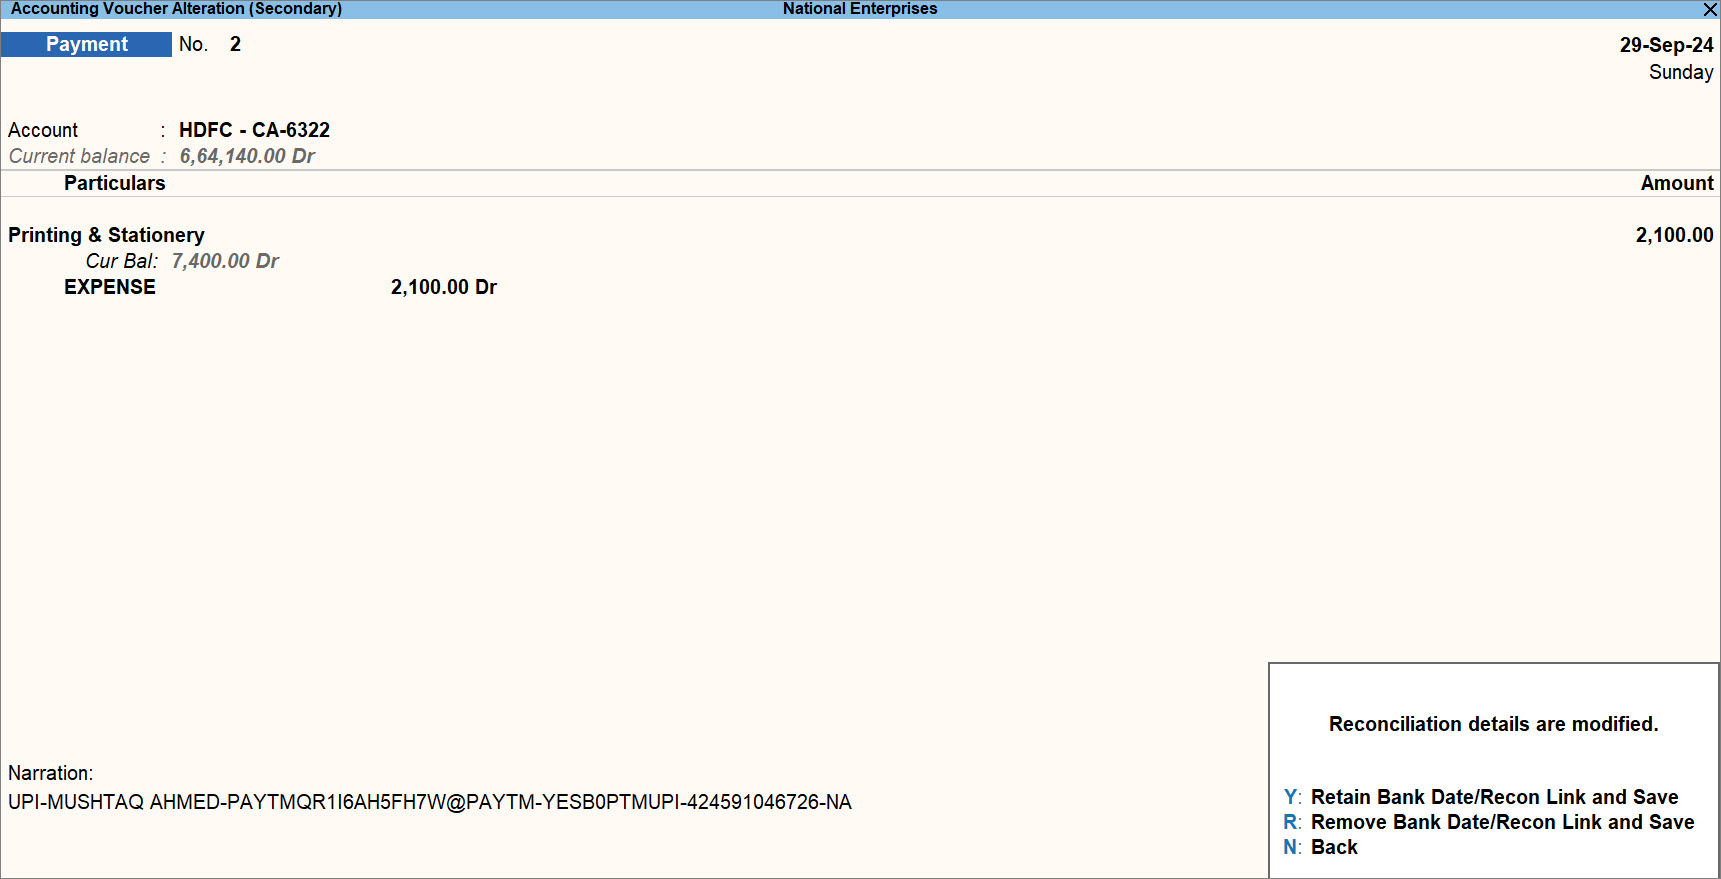
When you save the voucher, you will get the following options to retain or remove the Bank Date/Recon Link. - Press A to retain the Bank Date/Recon Link.
- Press R to remove the Bank Date/Recon Link.
- Press B to go back to the Voucher Alteration screen.
Payments in Double Entry mode
You can record your payments using double entry mode in TallyPrime. In double entry mode, you need to decide which account to debit and which account to credit. You can use double entry mode if you are familiar with the accounting rules. Suppose you are making a payment for your regular business expenses. You need to debit the expense ledgers one after the other along with their corresponding amounts and credit the cash, bank, or petty cash account from where you are making the payment.
You can record all entries in double-entry mode by selecting the ledger to be debited and credited correctly. In TallyPrime, you can also convert a payment voucher to a Journal Voucher by pressing F7, and you can see the entry in the double-entry mode under the Journal Voucher as well. In this example, we are recording payment of regular business expenses through Petty Cash.
In TallyPrime, when you switch a voucher to double-entry mode, this setting will be saved, and all future vouchers will open in double-entry mode by default. However, to ensure that any changes you make are retained, you must have full access to the configuration file located in the Tally installation folder. Without this access, your settings modifications won’t be preserved. Once you have complete access to the Tally installation folder, any adjustments or setting changes you make in TallyPrime will be saved permanently.
![]()
- Open the Payment Voucher in double entry mode.
- Press Alt+G (Go To) > Create Voucher > press F5 (Payment).
Alternatively, Gateway of Tally > Vouchers > press F5 (Payment). - Press Ctrl+H (Change Mode) > select Double Entry.
- Press Alt+G (Go To) > Create Voucher > press F5 (Payment).
- Select the Bank/Cash accounts and Party or Expenses accounts.
- Debit the Expense ledgers and enter the corresponding amounts.
- Credit the Petty cash ledgers, and enter the corresponding amounts.
- Accept the screen. As always, you can press Ctrl+A to save the payment voucher.
Provide narration for each ledger in Payment voucher
When you are recording any transaction in TallyPrime, you can write a narration for the transaction entered for future reference. But TallyPrime also provides you with the option to enter narration for each ledger while you are recording the transaction.
Suppose you are making a payment for wages from a single wage account, and you have debited the wages account and credited the cash or bank ledger. In this scenario, you cannot understand to whom you have paid the wage, so you can enable the option of providing narration for each ledger from the Payment Voucher Type and mention the name of the person to whom you paid the wages in the narration section of the ledger. This option is available for all the accounting voucher types.
![]()
- In the Voucher Type Alteration screen for Payment, enable Provide narrations for each ledger in voucher and save.
- Open the Payment Voucher.
Press Alt+G (Go To) > Create Voucher > press F5 (Payment).
Alternatively, go to Gateway of Tally > Vouchers > press F5 (Payment). - Select the Ledgers. The Narration field appears for each ledger.
- Enter the required Narration, and the amount for each ledger.
- Accept the screen. As always, you can press Ctrl+A to save the payment voucher.
Print Payment Vouchers for Expenses
After recording a payment voucher, you can print the voucher to keep a record of the sundry payments made by you. In TallyPrime, you can choose to print a voucher later or immediately after saving the voucher. If you want to print the payment vouchers immediately, you can enable the option Print voucher after saving from the Voucher type alteration screen. In your business, you might be paying daily wages to your employees through cash, you can print the payment voucher and get it signed by your employees as proof of payment made to them.
![]()
To print the Payment Vouchers:
- Record the payment entry.
- In the payment voucher, press Ctrl+P and the Print screen appears.
You can select C (Configure), I (Preview), or P (Print).
To print vouchers immediately after saving:
- In the Payment Voucher Type, enable Print voucher after saving.
- Record a payment voucher and accept the screen.
The Print screen appears, and you can select C (Configure), I (Preview), or P (Print).
Payment Register
In TallyPrime, you can go to the Payment Register to view the payment entries recorded. It is a monthly report and shows the number of transactions recorded per month. You can drill down and view the transactions recorded, and you can also make changes to the vouchers if required. If you use a Journal Voucher to record your payment transactions, you can view them in the Journal Register.
![]()
- Open the Payment Register.
Press Alt+G (Go To) > type or select Payment Register > and press Enter.
Alternatively, Gateway of Tally > Display More Reports > Account Books > Payment Register.

- Select the required month and press Enter.
You can see the list of transactions for that particular month. You can further drill down and see the vouchers recorded.
You can configure the report and view it as per your requirement. You can see the related reports as well as exception reports.
- Press Ctrl+H (Change View) to see the Payment Register in columns with all the expenses ledgers as headers and extract the report. You can view related reports such as Post-Dated Bank Transactions.
You can also press F8 (Columnar) to view the report in columns.

- Press Ctrl+J (Exception Reports) to see the Optional Vouchers, Cancelled Vouchers, Post-Dated Vouchers.
Record a Receipt Voucher
You can use a receipt voucher to record cash and bank receipts. You can record using Single Entry or Double Entry mode.
In this section
Cash receipts in Single Entry mode
In business, you might want to record receipts for Commission, Bank Interest, Discounts Received, Receipts from Customers, and so on. TallyPrime allows you to record such cash receipts using Receipt Voucher in single-entry mode. You can use a single-entry mode of accounting if you are unfamiliar with the accounting rules. Once you select the ledgers correctly, TallyPrime automatically records your transaction as per the accounting rules.
Suppose you want to record receipts through Cash for Commission. You need to select the Cash account under the Account field, and under Particulars, select the Commission Received ledger and enter the respective amount. Similarly, you can record receipts from your customers. You have to select your customer account under particulars, and you can record the transaction.
![]()
- Open the Receipt Voucher in single entry mode.
- Press Alt+G (Go To) > Create Voucher > press F6 (Receipt).
Alternatively, Gateway of Tally > Vouchers > press F6 (Receipt). - Press Ctrl+H (Change Mode) > select Single Entry.
- Press Alt+G (Go To) > Create Voucher > press F6 (Receipt).
- Select the Cash account and Income account.
- In the Account field, select the Cash ledger.
- Under Particulars, select the Income ledgers, and enter the corresponding amounts.
- Accept the screen. As always, you can press Ctrl+A to save the receipt voucher.
Bank receipts in Single Entry mode
You can receive bank receipts and record them using Receipt Vouchers. Select the Bank account under the Account field and income or party ledger under Particulars. In the Bank Allocation screen, you can specify the transaction type as well as other details such as the instrument number if you received the funds by cheque.
![]()
- Open the Receipt Voucher in single entry mode.
- Press Alt+G (Go To) > Create Voucher > press F6 (Receipt).
Alternatively, go to Gateway of Tally > Vouchers > press F6 (Receipt). - Press Ctrl+H (Change Mode) > select Single Entry.
- Press Alt+G (Go To) > Create Voucher > press F6 (Receipt).
- Press F12 (Configure) and set the option Set Ledger-wise Bank Allocations during voucher creation to Yes, to view the bank details defined in the party ledgers.
- Select the Bank account and Party account.
- In the Account field, select the Bank ledger.
- Under Particulars, select the Party ledgers, and enter the corresponding amounts.
- Provide the bank details in the Bank Allocations screen.
- Select the required Transaction Type.
The Transaction Type is by default set to Cheque in the Bank Allocations screen. You can change it as needed, for example, e-Fund Transfer, Electronic Cheque, and so on.
If you do not find the required Transaction Type, select Show More in the Transaction Types list and press Enter.
When you change the Transaction Type from Cheque to any other type in the voucher creation/alteration screen, the instrument number gets removed if a cheque range is used. The instrument number entered without using cheque range, is retained.
You can configure the Bank Allocation screen, by pressing F12 (Configure). - Enter the details in the remaining fields.
- Press Ctrl+A to save the Bank Allocations screen.
- Select the required Transaction Type.
- Accept the screen. As always, you can press Ctrl+A to save the Voucher.
View Bank Status during Voucher Creation or Alteration
TallyPrime Release 6.0 onwards, you can view the Bank Status of a voucher during voucher creation and alteration.
- In the Bank Allocations screen, press F12 (Configure).
- Show Bank Date: Yes.
- Show Bank Status: Yes.
- Press Ctrl+A to save.
The Bank Date and Status get displayed in the Bank Allocations screen.
If you have multiple bank allocations in a voucher, then you can also view a consolidated bank status.
- In the Bank Allocations screen, press F12 (Configure).
- Show Bank Status (Consolidated): Yes.
- Press Ctrl+A to save.
The Status (Consolidated) gets displayed, based on the action you need to take on the voucher. If one of the transactions is On Hold, then the consolidated status will be On Hold, even if the other transaction is Processed.
In the following screen, the status of a transaction is Reconciled via Linking, while the status of the other transaction is Available Only in Books. So, the Status (Consolidated) is Available Only in Books, because you need to reconcile the other transaction.
Set the Bank Status of a voucher
- In the Bank Allocations screen, press Alt+S (Set Status).
- Set the Transaction Status, as applicable.
- On Hold: A data entry operator might be recording the voucher, after which the accountant might want to review the information entered.
Enter an appropriate comment and press Ctrl+A to save.
- Processed: You might be creating or altering the voucher after the transaction is processed on the bank portal.
Enter the Inst No. and press Ctrl+A to save.
- Reconciled: You can mark the transaction as reconciled.
Enter the Inst No. and press Ctrl+A to save.
- In the Bank Allocations screen, press Alt+S (Set Status).
- Set the Transaction Status, as applicable.
- On Hold: A data entry operator might be recording the voucher, after which the accountant might want to review the information entered.
Enter an appropriate comment and press Ctrl+A to save. - Processed: You might be creating or altering the voucher after the transaction is processed on the bank portal.
Enter the Inst No. and press Ctrl+A to save. - Reconciled: You can mark the transaction as reconciled.
Enter the Inst No. and press Ctrl+A to save.
- On Hold: A data entry operator might be recording the voucher, after which the accountant might want to review the information entered.
As a result, the Bank Status gets displayed, as per the Transaction Status.

View Transaction Reconciliation Info
- In the Bank Allocations screen, press Alt+V (View Recon Info).
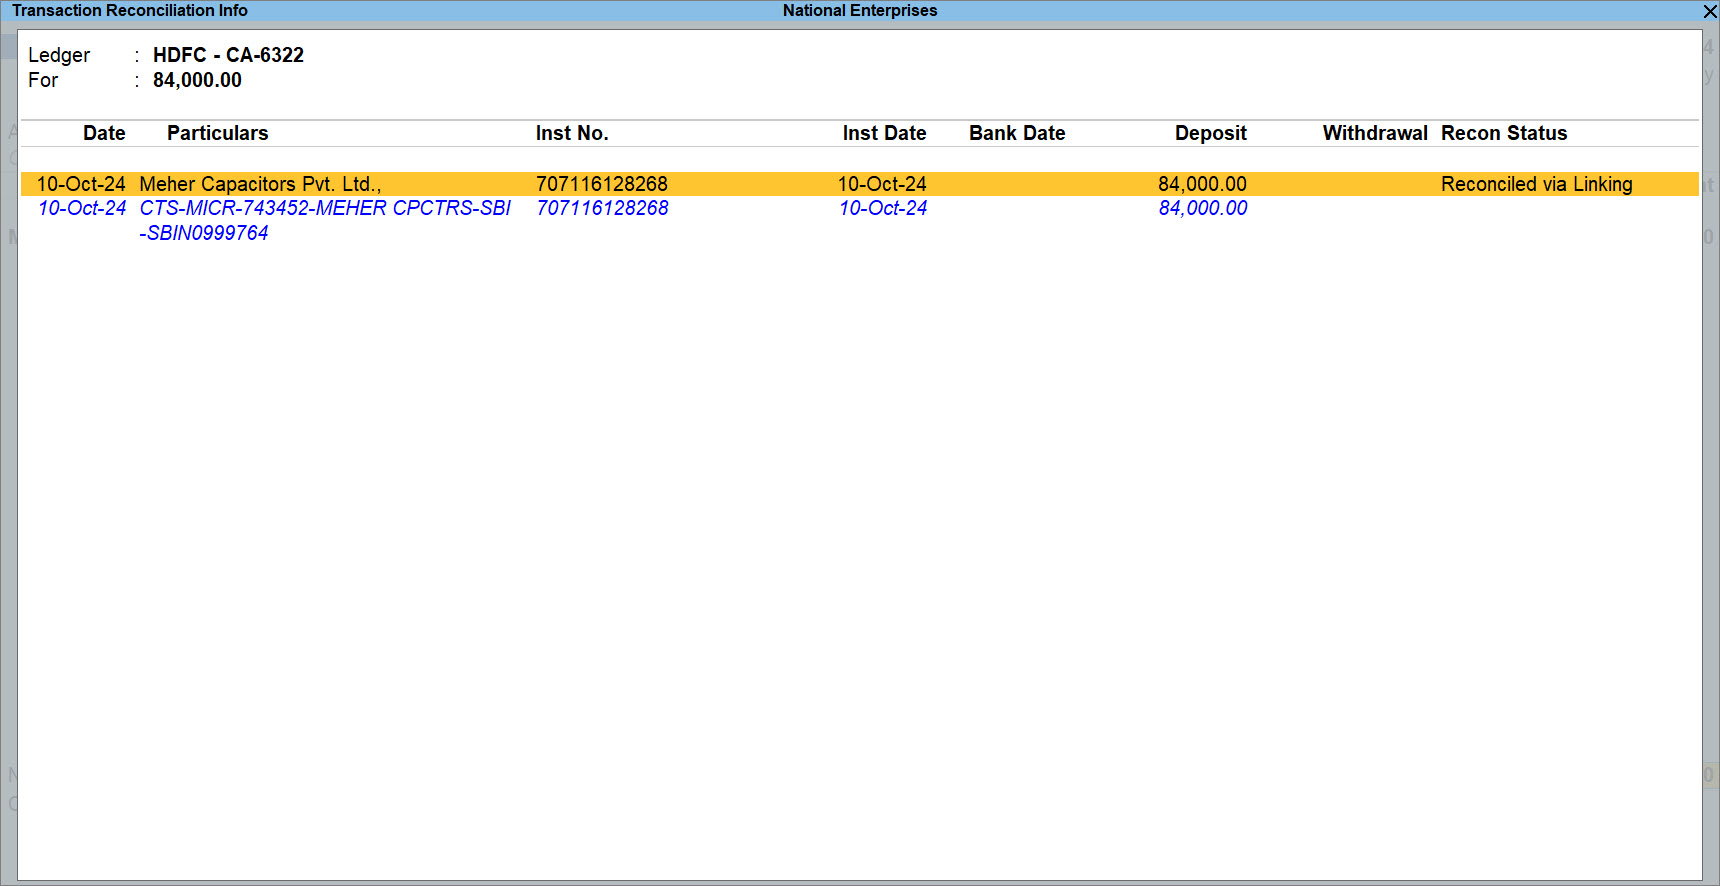
You can view the Favouring Name, Transaction Type, and other relevant options.
- Press F12 (Configure).
- Show Favoring Name/Received From: Yes.
- Show Transaction Type: Yes.
Retain or Remove Bank Reconciliation details while altering a voucher
You might alter the Amount or Instrument No. in a reconciled voucher. In such a case, you can choose to remove or retain the Bank Date or other details of the linked transaction.
- In the Voucher Alteration screen, press F12 (Configure).
- Remove Bank Date/Recon Link while altering Reconciled Vouchers: Yes.
The Bank Date gets removed if the voucher is manually reconciled. If the voucher is reconciled via linking, then the reconciliation link with the bank transaction gets removed from the voucher.
When you save the voucher, you will get the following options to retain or remove the Bank Date/Recon Link. - Press A to retain the Bank Date/Recon Link.
- Press R to remove the Bank Date/Recon Link.
- Press B to go back to the Voucher Alteration screen.
Receipts in Double Entry mode
You can record your transactions using double entry mode in TallyPrime. In double entry mode, you need to decide which account to debit and which account to credit. You can use double entry mode if you are familiar with the accounting rules.
Suppose you are recording a receipt for an Interest Received. You need to debit the Cash or Bank ledger with the corresponding amount and credit the Interest Received account. You can record all entries in double-entry mode by selecting the ledger to be debited or credited correctly. In TallyPrime, you can also convert a receipt voucher to a Journal Voucher by pressing F7, and you can see the entry in the double-entry mode under the Journal Voucher as well.
![]()
- Open the Receipt Voucher and select the double entry mode.
- Press Alt+G (Go To) > Create Voucher > press F6 (Receipt).
Alternatively, go to Gateway of Tally > Vouchers > press F6 (Receipt). - Press Ctrl+H (Change Mode) > select Double Entry.
- Press Alt+G (Go To) > Create Voucher > press F6 (Receipt).
- Select the Bank/Cash account and Income account.
- Credit the Income or Party ledgers and enter the corresponding amounts.
- Debit the Cash or Bank ledgers, and enter the corresponding amounts.
- Accept the screen. As always, you can press Ctrl+A to save the receipt voucher.
Printing a Receipt
After recording a receipt voucher, you can print it immediately or print it later. In order to print the voucher immediately, you can enable the option in the Receipt Voucher Type. You can also print a formal receipt and hand it to your customer as an acknowledgement of the money received.
In this section
Print the receipt immediately after saving the voucher
As a business practice, you need to issue receipts when you receive money. You can configure your Receipt Voucher type and enable the option of Print voucher after saving. This will directly take you to the printing page once the entry is recorded. You can decide whether to configure your receipt or to directly print it. The option helps you to save time from printing the vouchers later.
![]()
- In the Receipt Voucher Type, enable Print voucher after saving.
- Record a Receipt Voucher and accept the screen.
The Print screen appears, and you can select C (Configure), I (Preview), or P (Print).
You can configure your receipt voucher and enter the bank details while printing.
To enter the bank details,
- Open the Receipt voucher and press Ctrl+P.
- On the Print screen, press C (Configure). The Print Configuration screen appears.
- In the Voucher Details section, set the options Show Bank Transaction Details and Show Additional Details to Yes.
You can configure your receipt voucher even if you have enabled the option to print immediately after saving a voucher.
Print the Receipt Voucher as a Formal Receipt
You can print the receipt voucher for your records, and you can also give your customers a formal receipt to show that you have received the payment for a certain invoice. The formal receipt includes the amount received along with the party name and also shows the Bank name through which you received the amount. The formal receipts are issued if the customer asks for them, you can also issue the formal receipt in the case of an Advance receipt.
![]()
- In the Receipt Voucher Type, enable Print formal receipt after saving.
- Record a Receipt Voucher and accept the screen.
The Print screen appears with the Title as Receipt Voucher. You can press P (Print) to print the voucher. - Press C (Configure) if you want to configure the voucher.
- If you want to change the report title, in the Print Configuration screen, type or select Title > change the Title and Sub-title under Header information.
For example, Formal Receipt.

- If you want to print specific details in the formal receipt.
- Under Print Configuration, set the options as needed.
- Press Ctrl+A to accept the Print Configuration screen.
- Under Print Configuration, set the options as needed.
- If you want to change the report title, in the Print Configuration screen, type or select Title > change the Title and Sub-title under Header information.
- Press P (Print) to print the voucher as a formal receipt.
Receipt Register
In TallyPrime, you can go to the Receipt Register to view the receipt entries recorded. It is a monthly report and shows the number of transactions recorded per month. You can drill down and view the transactions recorded and also make changes to the vouchers if required. If you use Journal Voucher to record your receipt transactions, you can view them in the Journal Register.
![]()
- Open the Receipt Register.
Press Alt+G (Go To) > type or select Receipt Register > and press Enter.
Alternatively, go to Gateway of Tally > Display More Reports > Account Books > Receipt Register.

- Select the required month and press Enter.
You can see the list of transactions for that particular month. You can further drill down and see the voucher recorded.
You can configure the report and view it as per your requirement. You can see the related reports as well as exception reports.
- Press Ctrl+H (Change View) to see the Receipt Register in columns with all the income ledgers as headers and extract the report. You can also view related reports such as Post-Dated Bank Transactions.
You can also press F8 (Columnar) to view the report in columns.

- Press Ctrl+J (Exception Reports) to see the Optional Vouchers, Cancelled Vouchers, Post-Dated Vouchers.
Allocate Bills for Payments or Receipts
You can settle your customers’ or suppliers’ accounts as you pay or collect money from them by keeping track of payments and receipts against the relevant bill numbers. By using the Bill-wise Details option in TallyPrime, you can adjust those bills even before entering the amount received or paid.
Once you have selected your creditor for payment, TallyPrime lists out all the outstanding bills you have to pay to determine the current payment amount. The total immediately appears beneath the amount column once you’ve chosen the bills you want to pay. Depending on your business practices, you can choose to view the pending bills based on the order of their due dates, or bill dates or the balances and allocate the payment/receipt amount against an existing bill reference.
Sort Bills | Sorting Method for Pending Bills in Vouchers

Using TallyPrime Release 5.0, you can now sort pending bills when recording a voucher.
- Press F1 (Help) > Settings > Display > set the required method under the Sorting Method for Pending Bills in Vouchers.
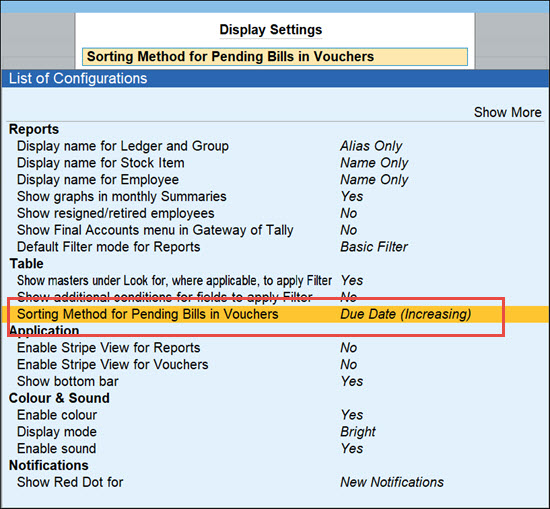
The selected sorting method is applied next time you record a voucher against the pending bills.
Record a Payment or Receipt voucher | Adjust amount based on due date
When recording a Payment or Receipt voucher, you can apply the sorting method based on due dates for your pending bills. TallyPrime will automatically adjust the older bills against the amount received or paid.
If you prioritise not adjusting the bills based on due dates, you can also adjust the bills by selecting other sorting methods.
- Set the sorting method of your pending bills based on due date.
- Press F1 (Help) > Settings > Display > set Due Date (Increasing) under the Sorting Method for Pending Bills in Vouchers.
- Record the receipt or payment voucher.
- In F12 (Configure) set the option Preallocate bills for Payment/Receipt/Journal Vouchers to No.
- Select the party and enter the amount received or paid.
- In the Bill-wise Details screen, select Type of Ref as Agst Ref.
Press Ctrl+A to accept the Bill-wise Details screen to automatically adjust the bills based on due date for the voucher amount.
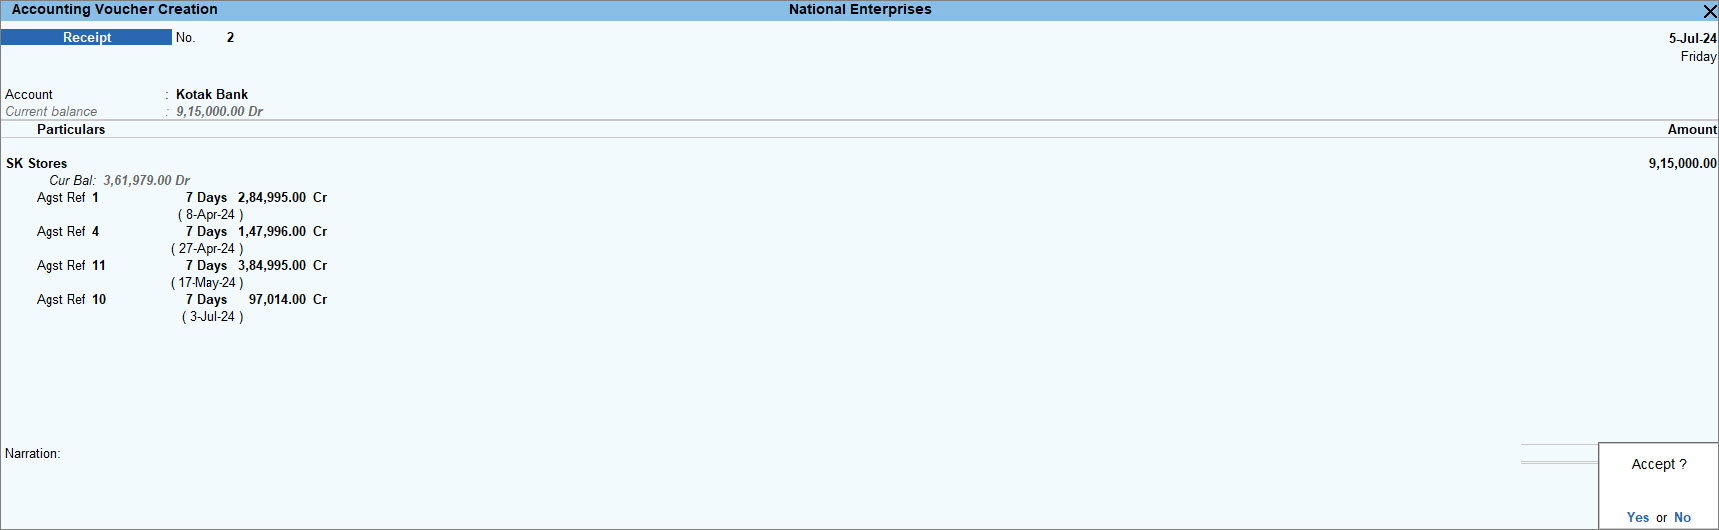
- As always, press Ctrl+A to save the voucher.
As you can see, the receipt got auto adjusted based on the due dates.
Record a Payment or Receipt voucher | Preallocate amount for pending bills
![]()
- When recording a Payment or Receipt voucher, press F12 (Configure) to configure for Bill-wise details.
- Set the option Preallocate bills for Payment/Receipt/Journal Vouchers to Yes, to select the bills immediately after selecting the party ledger.
- Set the options Show list of Bills for selection and Show Final Balances for each Bill to Yes, to view the list of pending bills with Due Date, Balance, and Final Balance for each bill.
As always, press Ctrl+A to save the configurations.
- In the Bill-wise Details screen, allocate one or more bills against any existing bills.
- Under Type of Ref, select Agst Ref
- Under Name, select the name of the existing bill against which you are allocating this bill.
If you had specified sorting of pending bills as per their Due Dates, the Bill-wise details would display the pending bills as per the order of the due dates.
You can view the Name of Pending Bills that is yet to be settled against the party along with their Due Dates and the corresponding balance for each date.
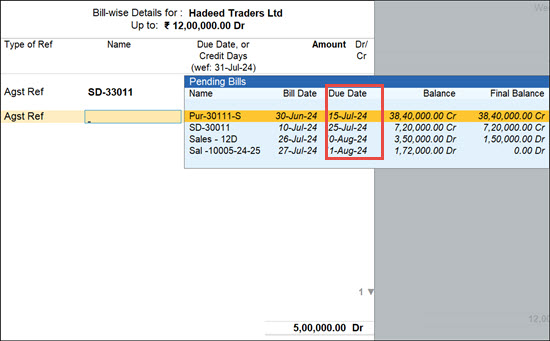
If you have specified any credit days for the party in the master, the due dates will be displayed including the credit days.
In case you have enabled the options Show Bill-wise Details and Show Bill-wise details in multiple linesto Yes for the voucher, you can view the pending bills details on the voucher screen itself.
- Provide any other details, including narration, as needed. As always, press Ctrl+A to save the voucher.
Based on the bill allocation, the amounts gets settled for the selected party. You can view any remaining outstandings from the party in the Ledger Outstandings report.
Record Contra entry using Payment / Receipt voucher
TallyPrime allows you to record a contra entry using a payment or receipt voucher, where you can record transactions like cash withdrawn from a bank or even a bank-to-bank transfer.
If you are withdrawing cash from the bank,
- In the Payment Voucher, under Account select the respective bank account.
- Under Particulars, select Show More > select Cash from List of Ledger Accounts.
You can record the same entry in a receipt voucher,
- In the Receipt Voucher, under Account select Cash account.
- Under Particulars, select Show More > select Bank account from List of Ledger Accounts.
Cash or Bank ledger does not appear for selection by default under List of Ledger Accounts. You need to either select Show More or start typing Cash to see the ledger option.
Receipts and Payments Report
A Receipts and Payments report is a report of cash and bank transactions recorded in a specific period. You can use it in place of an income and expenditure statement.
- It is a consolidated summary of the cash book prepared for the required period.
- It starts with the opening balance of cash and the bank and ends with the closing balance of cash and the bank.
- It does not take into account outstanding receivables and payables.
- It may be of a capital or revenue nature and relate to the current, previous, or subsequent year, so long as they are received or paid.
The Receipts and Payments account displays information based on default primary groups. It is updated with every cash or bank transaction or voucher entry.
![]()
View Receipts and Payments Report
The Receipts and Payments report displays the opening and closing cash and bank balances for a specified period. It also shows the transactions recorded during that period, where you made the payments and recorded the receipts. To view the report, change the date or period to suit your needs.
- Open the Receipts and Payments report.
Press Alt+G (Go To) > type or select Receipts and Payments > and press Enter.
The Receipts and Payments report is generated and updated from the opening of books until the last voucher entry date.
- Select the required group and press Enter to view the Receipts and Payments Summary reports.
You can further drill down to the Ledger Monthly Summary, Ledger Vouchers, and finally to the voucher alteration screen.
Apart from the default view of the Receipts and Payments columns along with the details of the ledgers, you can also customise the report.
- Press Ctrl+B (Basis of Values) to view the Nett Balances and you can also change the Scale Factor.
- Press Ctrl+H (Change Views) to view the report vertically and ledger-wise.
- Press Ctrl+J (Exception Reports) to view the Negative Ledgers.
- Press Alt+N (Auto Column) to compare your data Quarterly, Weekly, Monthly and so on.
To know more, refer to Working with Reports.
Receipts and Payments Summary Report
This report displays the summary of groups or sub-groups of the selected primary group from the Receipts and Payment report.
In this section
- Cash/Bank Opening/Closing summary
- Receipts & Payments Summary
- Receipts and Payments Ledger Monthly Summary
Cash/Bank Opening/Closing summary
In TallyPrime, you can view the Opening, and Closing balances of your cash and bank accounts, along with the transactions during the period. You can also configure the display of the report as per your business requirements.
- Press Alt+G (Go To) > type or select Receipts and Payments > and press Enter.
- In the Receipts and Payments report > click Opening Balance.
- Press F12 (Configure) to set the options as needed. Set Show Transactions as Yes and Show Closing Balance as No.
By default, the options Show Opening Balances and Show Closing Balances are set to Yes.
The Cash/Bank Opening Summary screen appears as shown below.
Receipts and Payments Summary
The Receipts and Payments report allows you to pick groups, and the report then displays information about the groups you chose. The report shows how much is the receipt and payment amount for that particular group. Additionally, you can customize the report and make modifications based on your needs.
- Select the required primary group from the Receipts and Payments report (for example, Current Liabilities). The Receipts and Payments Summary screen of the selected group appears as shown below.
This report displays all the receipt and payment transactions of the groups/sub-groups and ledgers of the selected primary groups for the period. - To configure the report, press F12 (Configure).
You can select the required group/sub-group or ledger and drill down to view the Ledger Monthly Summary.
Receipts and Payments Ledger Monthly Summary
You can select any ledger from the Receipts and Payments report and view the monthly receipts and payment transactions for that particular ledger. You can configure the report and set the display of the report as per your requirements.
- Select the required ledger from the Receipts and Payments Summary report. The Ledger Monthly Summary screen of the selected ledger appears as shown below.
This report displays the selected ledger’s monthly receipt and payment transactions summary. - To configure the report, press F12 (Configure).
- Select the required month to view the Ledger Vouchers screen, as shown below.
There are various reports in TallyPrime that provide insights about your payments and receipts. You can view them along with other necessary details depending on your business needs to analyse and make informed decisions.


