
Chart of Accounts in TallyPrime
Having a consolidated list of all the accounting masters in TallyPrime can save a lot of time while looking for a particular accounting master or any information related to it. To make your job easier, the Chart of Accounts in TallyPrime provides you with an index or list of all masters, such as accounting, inventory, payroll, and so on, created within the Company along with the information related to those masters. What’s more? You can also stay abreast with the necessary information about the party, opening balance in masters, quantity and value of stock items, and other masters.
In the Chart of Accounts of TallyPrime, you can create multiple masters from a single screen, which speeds up your data entry process. Furthermore, the facility to alter multiple masters helps you avoid the need to open specific masters to enter the data. The Chart of Accounts also helps you to identify the unused masters and delete them in one shot. Moreover, if Edit Log is enabled, then you can view masters that were altered or deleted from your Company.
View Financial Accounts with Chart of Accounts
You can view Chart of Accounts in TallyPrime for any type of master such as ledgers, stock items, stock groups, and others, and you can also change the view, as needed.
For instance, you can view Chart of Accounts for ledgers.
- Press Alt+G (Go To) > type or select Chart of Accounts > select Ledgers and press Enter.
At the highest level, accounts are classified into Capital or Revenue – and more specifically into Assets, Liabilities, Income and Expenditure.
Moreover, the report opens as per the accounting groups under which the ledgers are created. - Press F2 (Period) to change the Period, if needed.
- View the report, as needed.
- Press F12 (Configure) and view with Name Only, Alias Only, Name (Alias), and Alias (Name), as needed.
- Press F10 (Other Master) > select the master for which you want to view the report and press Enter.
- Press F5 (Ledger View).
Alternatively, press Ctrl+H (Change View) > Ledger View and press Enter.
This helps you get information such as accounting groups of the respective ledgers, State Name, GST Registration Type, GSTIN/UIN, and Opening Balance.
The Change View option using F5 or Ctrl+H is provided for Ledgers (Ledger View) and Stock items (Stock Item View). In all other masters, Ctrl+H (Change View) is not relevant and therefore, inactive. However, pressing F5 enables you to view report in the Condensed and Detailed form.
- Press F5 (Group View) to switch back to the default view.
To know more about the default groups, Click here
Capital Account: Use this to account for Capital and Reserves of the company. Examples of ledgers that can be created under this group are Share Capital, Partners’ Capital A/c, Proprietor’s Capital Account.
Reserves and Surplus [Retained Earnings]: Use these to account for Capital Reserve, General Reserve, Reserve for Depreciation, etc.
Current Assets: Under Current Assets you can group assets that do not fall under the following sub-groups:
-
Bank Accounts: For Current, savings, short term deposit accounts, etc.
-
Cash-in hand: TallyPrime automatically opens one Cash A/c under this group. You can open any number of cash ledgers, as needed.
Note: An account under Cash-in-hand group or Bank Accounts/Bank OCC A/c group is printed as separate Cash Book in the traditional Cash Book format and does not form part of the Ledger.
-
Deposits (Asset): Use this to group ledgers of Fixed Deposits, Security Deposits, or any deposit made by the company (not received by the company, which is a liability).
-
Loans & Advances (Asset): Use this for all loans given by the company and advances of a non-trading nature, for example, advance against salaries, or purchase of Fixed Assets. It is not recommended to group the ledger of advance paid to Suppliers under this group. Because, doing so will lead to difficulty in ascertaining the advance position of a particular supplier, and to adjust the future bills against such advances.
-
Stock-in-hand: This is a special group. You can group ledgers of Raw Materials, Work-in-Progress and Finished Goods. How the balances are controlled depends on whether you opted to maintain an integrated account-cum-inventory system in the company features.
Integrated Accounts-cum-Inventory
When you record inventory transactions, the account balances appear automatically as Closing Stock in the Balance Sheet. You can change the closing balance of an account under this group.
Non-integrated Accounts-cum-Inventory
Accounts that fall under this group cannot be used in any transactions. You can maintain only the opening and closing balances. Since vouchers cannot be recorded using these accounts, you can alter the closing balances, as needed.
Sundry Debtors: Create ledgers of your customers under this group. Do not create customer accounts under Sales Account group, as sales is a revenue account.
Current Liabilities: You can create ledgers of Outstanding Liabilities, Statutory Liabilities, and other liabilities under this group. The sub-groups under Current Liabilities are Duties and Taxes, Provisions and Sundry Creditors.
-
Duties and Taxes: You can group all the tax liabilities (or asset in case of advances paid) under this group, as well as the break-up of individual items and all the tax accounts like VAT, GST, Excise, and other taxes.
-
Provisions: Use this for provisional accounts like Provision for Taxation, Provision for Depreciation, etc.
-
Sundry Creditors: Use this for trade creditors of the company. Do not create supplier accounts under the Purchases Account group, as purchase is a revenue account.
Fixed Assets: use this to group the fixed assets accounts like Land & Buildings, Plant & Machinery, Furniture & Fixtures, etc.
Investments: Use this to group the investment accounts like Investment in Shares, Bonds, Govt. securities, long term Bank deposit accounts, etc.
Loans (Liability): Use this to account for long term loans taken by the company.
-
Bank OD Accounts [Bank OCC Accounts]: There are two distinct types of Bank Accounts in TallyPrime. The Bank OCC A/c is provided to record the company’s overdraft accounts with banks. For example, Bill Discounted A/cs, Hypothecation A/cs etc.
Note: An account grouped under Bank OCC A/c, is printed as a separate Cash Book in the traditional Cash Book format, and does not form part of the Ledger.
-
Secured Loans: For term loans and other long/medium term loans that have been obtained against security of some asset, TallyPrime does not verify the existence of any security. Typical accounts would be Debentures, Term Loans, etc.
-
Unsecured Loans: Use this for loans obtained without any security. For example, Loans from directors/partners or outside parties.
Suspense Account: Use this to track money paid or recovered, of an unknown nature. The most common example is money paid for Travelling Advance whose details would be known only upon submission of the bill. Some companies may prefer to open such accounts under the Loans and Advances (Asset) group.
Suspense Account appears in Balance Sheet. Any expense account to be used as ‘suspense’, should be created under a Revenue group like Indirect Expenses, and not under the Suspense Account group.
Miscellaneous Expenses (Asset): Use this for legal disclosure requirements, like incorporation and pre-operative expenses. Companies would write off a permissible portion of the account every year. A balance would remain to the extent not written off in Profit & Loss Account. TallyPrime does not, however, show a loss, carried forward in the Profit & Loss Account, under this group. The Profit & Loss Account balance will be shown in the Balance Sheet.
Branch/Divisions: Use this group to maintain ledger accounts of your company’s branches, divisions, affiliates, sister concerns, subsidiaries, etc. Hence, you can record Sales and Purchases using ledgers grouped under this account. This is a group provided for convenience. Hence, you need not utilise it in this manner. If you need to maintain the books of that branch/division as a company, and not as transactions with your supplier/customer, you must open a separate company.
Revenue Primary Groups
Sales Account: Use this to account for sales. For example, you can create the following sub-groups under Sales Accounts:
-
Domestic Sales
-
Export Sales
Now under Domestic Sales you can create the following ledgers:
-
Sales (12%)
-
Sales (18%)
-
Sales (exempt)
Do not create your customers’ ledgers under this group, as this is a revenue account.
Purchase Accounts: Use this to account for purchases.
Direct Income [Income Direct]: Use this for non-trading income accounts that affect Gross Profit. All trade income accounts would be part of Sales Accounts. For example, under this group you can create a ledger for:
-
Servicing Contract Charges that follow the sales of equipment.
-
Professional Fees if yours is a professional services company.
Indirect Income [Income Indirect]: Use this for Miscellaneous non-sale income accounts, for example, Rent Received and Interest Received.
Direct Expenses [Expenses Direct]: Use this for manufacturing or direct trading expenses, to view the Gross Profit.
Indirect Expenses [Expenses Indirect]: Use this for all other administrative, selling or non-direct expenses.
TallyPrime automatically opens the Profit & Loss Account which is a Reserved Primary account. You can use this account to record adjustment entries through Journal Vouchers. For example, Transfer of Profit or Loss to Capital or Reserve account.
Validate Changes and Deletion of Masters
In TallyPrime Edit Log and TallyPrime Release 2.1 and later releases, when Edit Log is enabled, your auditor or you can view altered and deleted masters in Chart of Accounts.
If you want to enable Edit Log in TallyPrime, then refer to the Create a Company section in the Setup Your Company topic.
- Open Chart of Accounts.
- Press Alt+G (Go To) and type or select Chart of Accounts and press Enter.
Alternatively, Gateway of Tally > Chart of Accounts > Ledgers and press Enter. - Type or select Ledger press Enter.
- Press Alt+G (Go To) and type or select Chart of Accounts and press Enter.
- Press Ctrl+B (Basis of Values).
The Basis of Values sub-screen appears.
By default, the report is configured for All Ledgers (Altered & Non-Altered). - Configure Chart of Accounts to view Altered ledgers.
- Select Show Report for and press Enter.

The Report Details screen appears. - Press Enter on Altered Ledgers.
Consequently, the option Include Deleted Ledgers will also be set to Yes. This will include the ledgers that you have deleted in TallyPrime with Edit Log enabled. Press Enter to set it as No, if you do not want to view the deleted ledgers.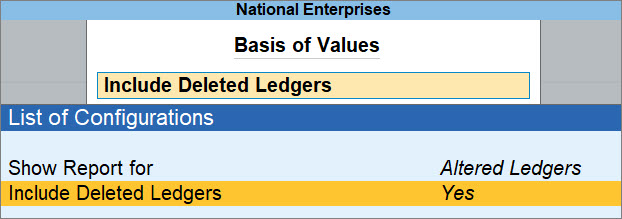
- Press Enter on Non-Altered Ledgers and the report will open for ledgers that are never altered in TallyPrime.
Consequently, the option Include Deleted Ledgers will be set to No. You cannot set it to Yes, if you are viewing the report for Non-Altered Ledgers, as deletion is also a form of alteration. - Press Ctrl+A.
The List of Altered Ledgers appears as shown below.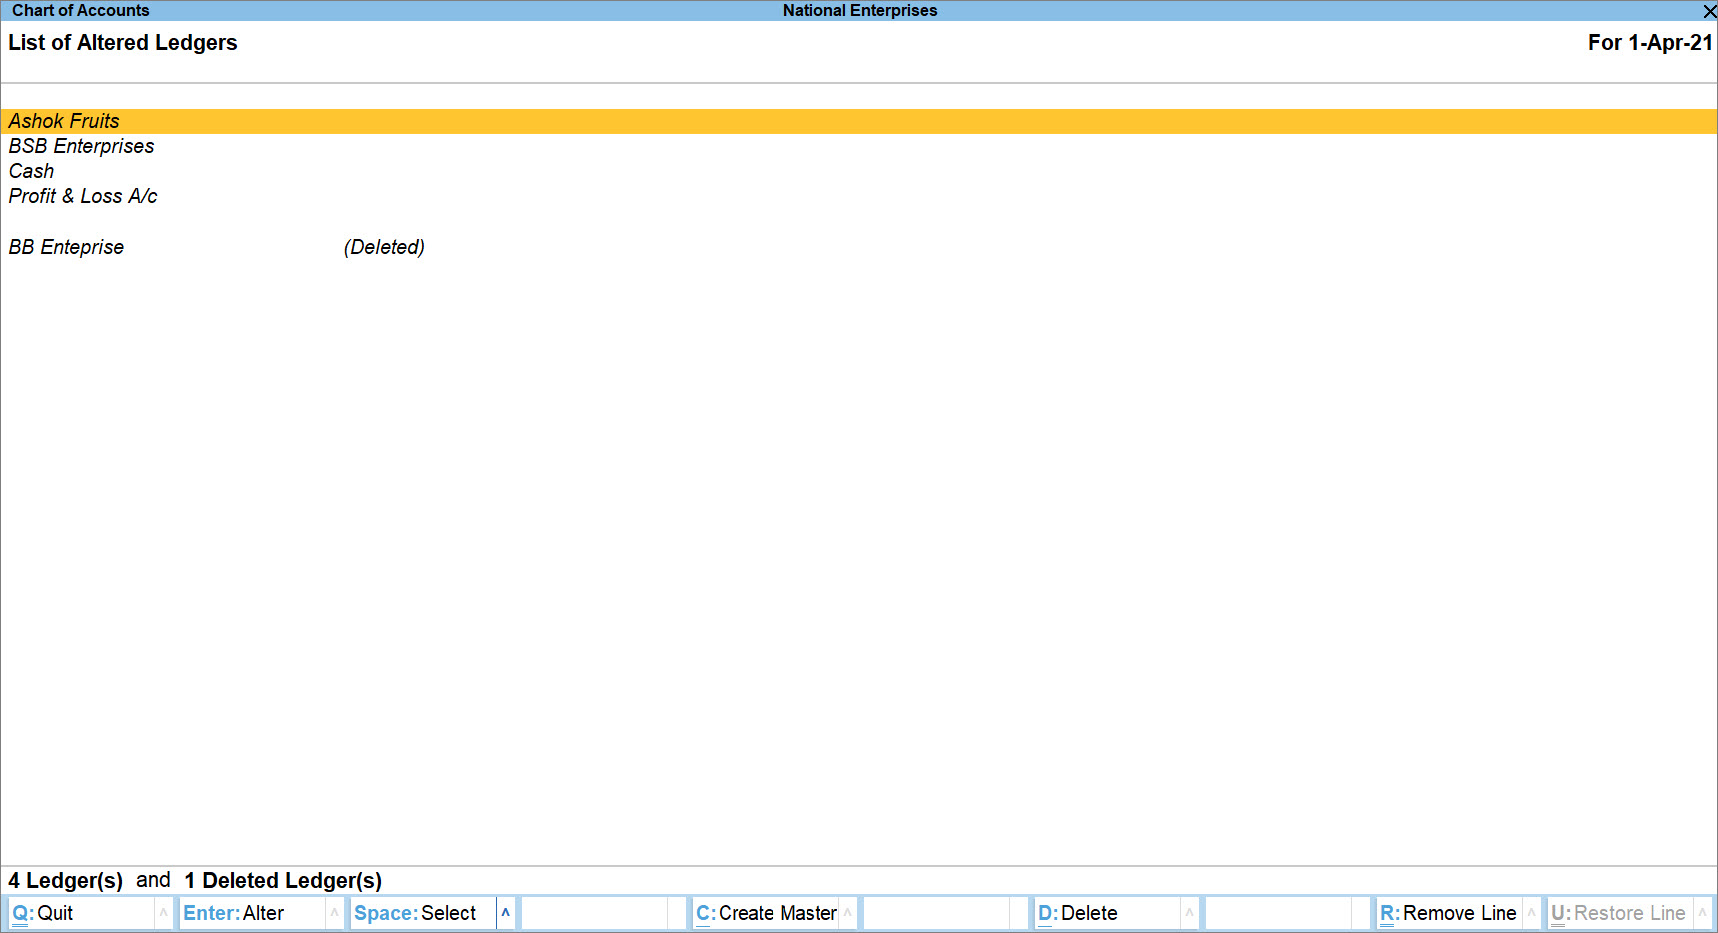
- Select Show Report for and press Enter.
Similarly, you can view the Chart of Accounts for Altered and Deleted stock items and groups.
To view Edit Log for masters, refer to the following sections:
- View Edit Log for Ledgers section in the Ledgers in TallyPrime topic.
- View Edit Log for Stock Items section in the Manage Your Stock Items topic.
- View Edit Log for Groups section in the Groups in TallyPrime topic.
Create/Alter Multiple Masters on Single Screen
You may have a list of Ledgers or Stock Items to be created in a Company. Chart of Accounts provides you with a facility so that you can create multiple masters on a single screen, thereby easing the data entry process and saving a great deal of time. It also provides you with the flexibility to create masters of different types based on the parent group.
Quickly set up Opening Balance Sheet
- Press Alt+G (Go To) > Chart of Accounts > Ledgers > press Enter.
Alternatively, Gateway of Tally > Chart of Accounts > Ledgers and press Enter.
- Press Alt+H (Multi-Masters) > Multi Create and press Enter.
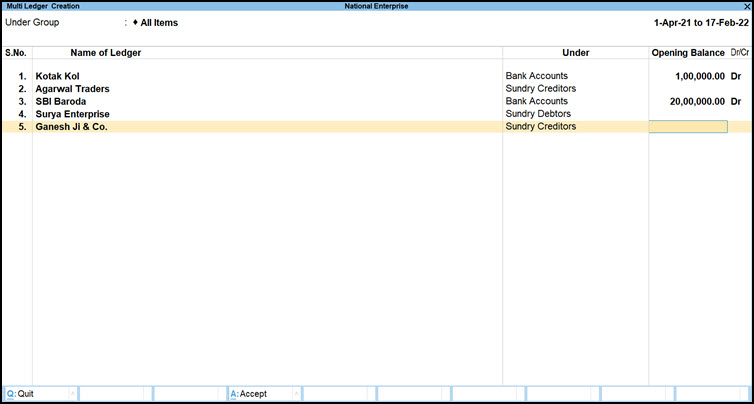
- In the Multi Ledger Creation screen, provide the required ledger details.
- Under Group: Press Backspace to change the parent group, if needed. By default, the primary group for ledger creation is set as All Items. You can also press Alt+H (Change Parent Group) to alter the group.
- Name of Ledger: Enter the ledger name.
- Under: Select the parent group for that ledger from the List of Groups.
If you have selected a specific parent group in Under Group, the Under field gets prefilled in each row without you having to select the group again. Press Alt+C to create a parent group if needed.
- Enter the Opening Balance.
- To provide other details based on the ledger you have created, press Ctrl+I (More Details).
- If you are creating a Bank ledger, under More Details, select Bank A/c Details or Bank Configurations.
- If you are creating a Party Ledger, you can similarly select Mailing Details or Contact Details.
The details will be added to the selected ledger.
- Once you have provided the details for all the ledgers, as always, press Ctrl+A to save.
Quickly Setup Opening Stock Summary
- Press Alt+G (Go To) > type or select Chart of Accounts > Stock Items and press Enter.
Alternatively, Gateway of Tally > Chart of Accounts > Stock Items and press Enter. - Press Alt+H (Multi-Masters) > select Multi Create.
- Select the stock group in the field Under Group.
- All Items: If you need to assign different stock groups for each stock item that you are creating.
- An existing group: If you are creating multiple stock items under an existing stock group.
- Create: If you need to create a new stock group under which you will be creating multiple stock items.
You can add any number of sub-groups to an already created or selected group. The sub-groups inherit the characteristics of the parent groups.
- Enter the Name of Items, Units, Opening Qty, Rate, and Amount, as applicable to the stock items you want to create.
- Accept the Multi Stock Item Creation screen.
As always, press Ctrl+A to save.
Alter Multiple Masters
You may want to update the details such as Opening Balance of ledgers or Opening Quantity of stock items. You may also want to update the group of specific ledgers or assign units to some stock items in which the unit was not specified at the time of stock item creation. You do not have to go to each master individually.
Chart of Accounts has a facility to alter multiple masters on a single screen, which eases the data entry process and saves a great deal of time.
Say you want to change the Bank A/c Details for your bank ledger.
- In Chart of Accounts, press Alt+H (Multi-Masters) > Multi Alter > press Enter.
- Select the bank ledger, press Ctrl+I (More Details) > Bank A/c Details > alter the required details.
Similarly, you can alter other details quickly without having to open the ledgers individually.
You can also select a ledger name, press Ctrl+Enter to open the Ledger Alteration screen and make necessary alterations.
Use Ledgers from another Company
In your business, you might be opening a new branch or office at a specific location and therefore, want to maintain the transactions from the new branch separately. In this case, if you need to use the same set of ledgers and stock items that you are already using in the main branch, you can reuse them without any hassle. Simply export the existing company masters and import them to the new company for the new branch. Remove the opening balances from all the ledgers and stock items in one shot. Thereafter, enter the opening balances applicable to the new branch or office.
- Press Alt+G (Go To) > type or select Chart of Accounts > Ledgers and press Enter.
Alternatively, Gateway of Tally > Chart of Accounts > Ledgers and press Enter. - Press Alt+H (Multi-Masters) > Multi Alter > All Items or select the group from the List of Groups and press Enter.
The Multi Leger Alteration screen appears. - Press Alt+B (Zero Opening Balance).
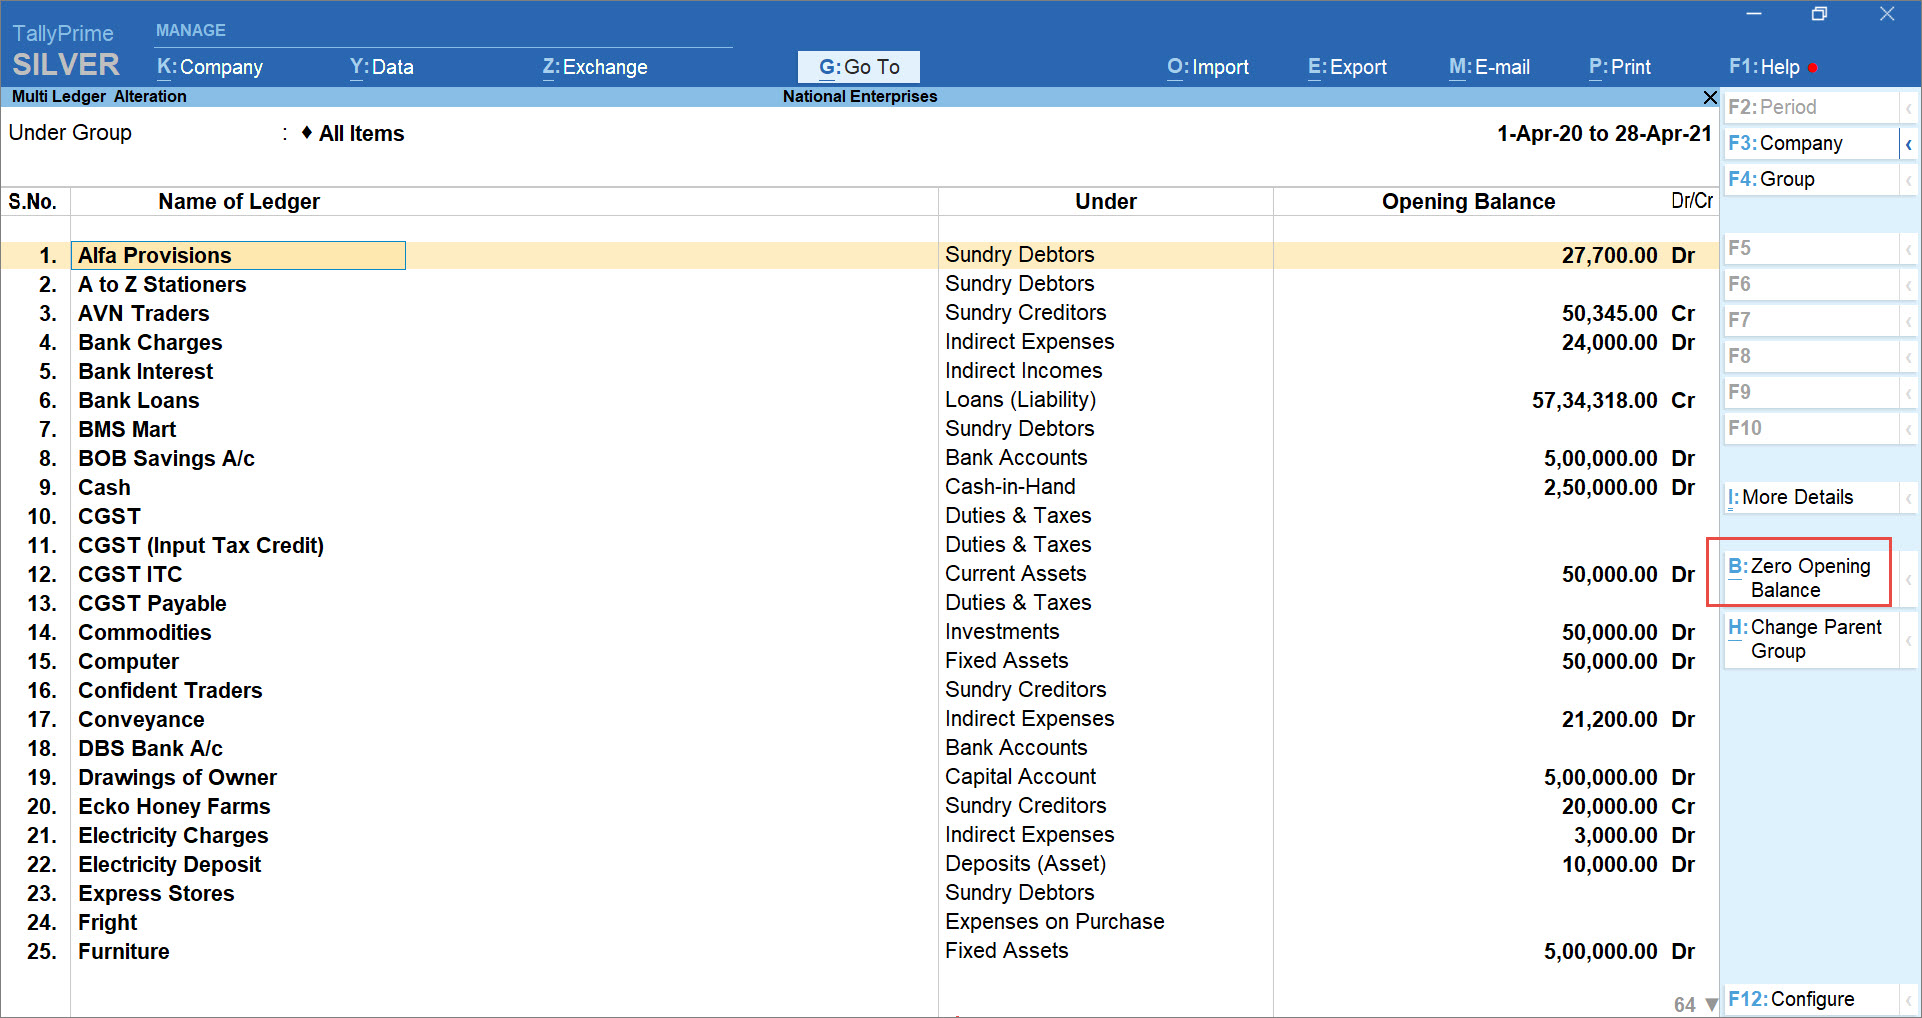
- Press Ctrl+A to save.
Once the Opening Balances for all ledgers are zero, you can enter the applicable Opening Balance for the new branch or office and continue working.
You can alter multiple ledgers to provide opening balances. To know how to do it, refer to Alter Multiple Masters.
Use Stock Items from other Company
You can remove opening quantity from all stock items in one shot and then use those items in a new Company.
- Press Alt+G (Go To) > type or select Chart of Accounts > Stock Items and press Enter.
Alternatively, Gateway of Tally > Chart of Accounts > Stock Items and press Enter. - Press Alt+H (Multi-Masters) > Multi Alter > All Items or select the group from the List of Groups and press Enter.
The Multi Leger Alteration screen appears. - Press Alt+B (Zero Opening Balance).
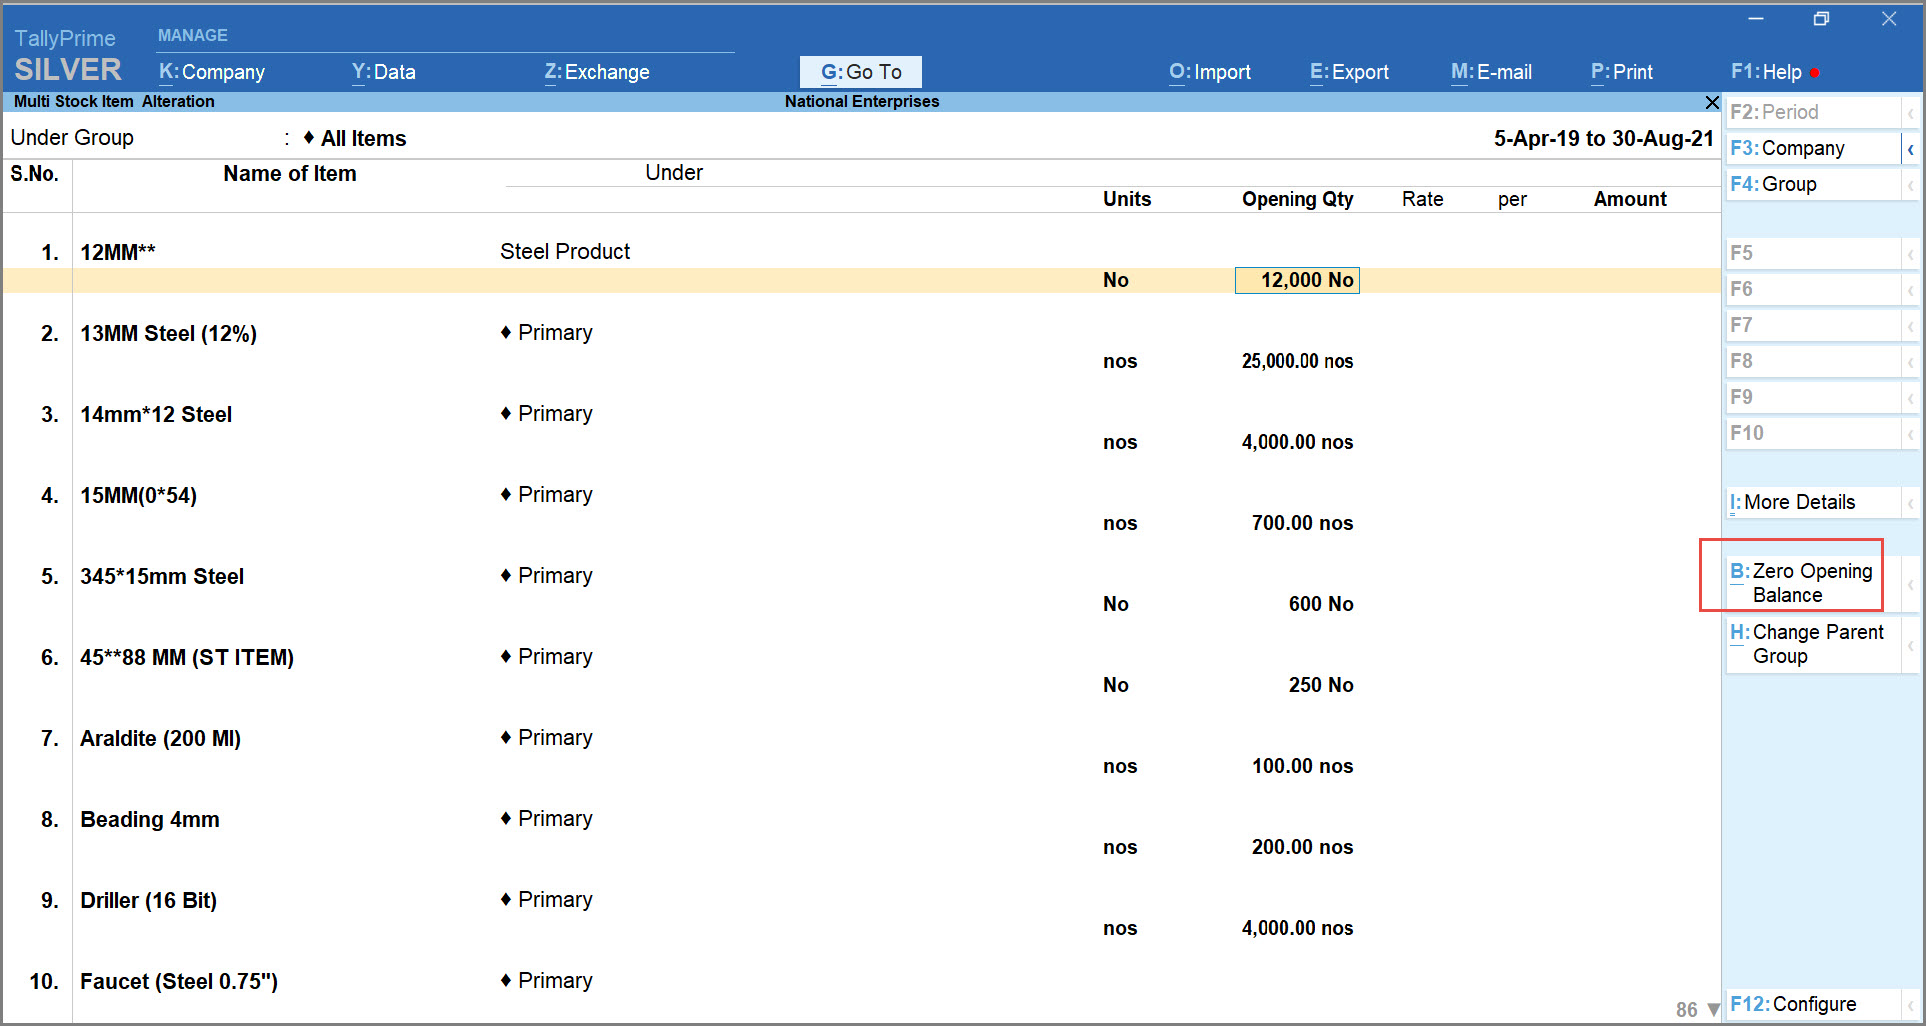
- Press Ctrl+A to save.
Change Parent Group of Ledgers
You may have created all your ledgers under Sundry Debtors or Sundry Creditors, as applicable. However, your business has grown to different regions and you want to update the existing ledgers under parent groups created based on their region like Sundry Debtors North, South, East, or West.
You can do this while altering multiple ledgers, which helps you to quickly change the group of a set of ledgers in one go.
- In Chart of Accounts > press Alt+H (Multi-Master) > Multi Alter.
- Select the group, say Sundry Debtors.
- Press Alt+H > select the respective group created for the ledgers and press Enter.
If you have not created the group already, then press Alt+C to create it on the fly.
- Press Ctrl+A to save.
Set Credit Limits for parties
You might be having some parties with who you do business on a regular basis. Considering your business practice and relationship with your parties, you can set a credit limit in Chart of Accounts. The same Credit Limit will be applicable when you make a sale to the parties.
- In Chart of Accounts, press Alt+H (Multi-Master) > Credit Limits > select the group.
You can set credit limits for ledgers created under Sundry Creditors, Sundry Debtors, and Branch / Divisions. - In the Credit Limits column against each party name, enter the desired amount. This means, you have allowed the party to purchase items on credit up to the limit set here.
- As always, press Ctrl+A to save.
View and Delete Multiple Unused Masters
If there are certain masters such as party ledgers with no recorded transactions or no possibility of a business transaction in the future, then you can delete those ledgers.
In TallyPrime, you do not need to look around for such masters. Chart of Accounts displays all such masters so that you can delete those in one shot.
Delete Unused Ledgers at once
- In Chart of Accounts, press Ctrl+J (Exception Reports) > Show Unused and press Enter.
TheList of Ledgers (Unused) appears.

- Delete the ledgers.
- Select the ledgers you want to delete using Spacebar.
- Press Alt+D.
- Press Y to accept deletion.
Similarly, you can delete any set of masters in Chart of Accounts.
If you want to view Ledgers Already used in transactions, then press Ctrl+J (Exception Reports) > Show Unused and press Enter.
Delete Unused Stock Items at once
If you want to delete the unused stock items that you do not trade with anymore, then you can so in Chart of Accounts.
- Press Alt+G (Go To) > type or select List of Accounts > type or select Stock Items and press Enter.
Alternatively, Gateway of Tally > Chart of Accounts > type or select Stock Items and press Enter. - Press Ctrl+J (Exception Reports) > Show Unused > and press Enter.
The unused stock items appear.
- Select the stock items to be deleted. To select multiple stock items, press Spacebar, and select the required stock items.
- Press Alt+D > select Yes to confirm deletion.
The selected stock items will be deleted.
Validate Contact Details of Ledgers
You can easily validate if the contact details entered in the ledgers with the data real-time data available with you.
- In Chart of Accounts, press Ctrl+J (Exception Reports) > E-mail Validations and press Enter.
- Drill down to the respective ledgers and update the contact details, if needed.
Update Party GSTIN/UIN
If there are some parties with Regular GST registration, and you have not provided the GSTIN/UIN in the ledger, then you can easily identify such ledgers in Chart of Accounts. Moreover, you can update the GSTIN/UIN of the respective parties on a single screen.
- In Chart of Accounts, press Ctrl+J (Exception Reports) > Update Party GSTIN and press Enter.
- Select Group and Ledgers for which you want to update GSTIN.
- Name of Group: select the group from the list or All Groups, as needed.
- Name of Ledger: select All Ledgers.
The Update Party GSTIN/UIN screen appears.
- Enter GSTIN/UIN of the parties, based on the availability of the data with you.
- Press Ctrl+A to save.
Validate UoM with UQC
If you are a GST-registered dealer, then you will be filing returns along with HSN Summary to the tax department at the end of the return period. As per the department, it is mandatory that the units of measurements (UoMs) in the HSN Summary are mapped to the department’s Unit Quantity Code (UQC). Mapping the UoM with UQC ensures that the HSN Summary reported in the return is correct.
- Press Alt+G (Go To) > type or select Chart of Accounts > Stock Items and press Enter.
Alternatively, Gateway of Tally > Chart of Accounts > Stock Items and press Enter. - Press Ctrl+J (Exception Reports) > Map UoM – UQC and press Enter.
The report appears with units that are not mapped with UQC. - Press F5 (Update UQC) > type or select from List of UQCs and press Enter.
- Press Ctrl+A to save, once you have updated UQC for all the UoMs.
Accounting Masters in Chart of Accounts
Accounting masters are the pre-defined masters for your accounting information system. For instance, a ledger is a pre-defined master in the report, and the groups are the pre-defined masters under which ledgers are classified. TallyPrime has several accounting masters for recording transactions.
Prerequisites for creating party and expense ledger
- Create party accounts under Sundry Debtors, Sundry Creditors, or Branch/Divisions and not under Sales or Purchase groups.
- Maintain a single ledger per party; the same account can reflect debit or credit balances.
- Group expense ledgers under Indirect Expenses (not Duties & Taxes).
- Use sub-groups only when required (two or more ledgers), and ensure every ledger belongs to an appropriate group/sub-group.
Groups
Groups are a collection of ledgers of the same kind that are maintained to determine the hierarchy of ledger accounts. This helps in presenting reports that are meaningful and compliant with the government and department laws. Chart of Accounts displays all the ledgers.
To know more about Groups in TallyPrime, refer to the topic Groups in TallyPrime.
Ledgers
Ledgers are used to store bookkeeping entries and affect assets, liabilities, income, or expenses in the Balance Sheet. Cash, accounts receivable, investments, and expenses are some examples of ledgers. Ledgers help in maintaining all the transactions. Once you record a transaction with appropriate ledgers, you can view the impact on Balance Sheet and Profit & Loss A/c. The report displays all the ledgers.
To know more about Ledgers in TallyPrime, refer to the topic Ledgers in TallyPrime.
Voucher Types
TallyPrime has a total number of 24 pre-defined Voucher Types for recording accounting entries, inventory vouchers, payroll transactions, and sales & purchase orders. You have the flexibility to create more voucher types in TallyPrime under the pre-defined ones as per your requirement. You can view Voucher Types in the report.
To know more about Voucher Types in TallyPrime, refer to the topic Voucher Types in TallyPrime.
Cost Categories
By default, all the cost centres created in TallyPrime are under Primary Cost Category. However, you can create a cost category to allocate the same incomes and expenses to parallel sets of cost centres or profit centres. Chart of Accounts displays all the Cost Categories created in TallyPrime.
To know more about Cost Categories, refer to the Use Cost Category for Parallel Allocation section in the topic Cost Centre or Profit Centre Allocation.
Cost Centres
With cost centres in TallyPrime, you can maintain your incomes and expenses as per different business units, departments, projects, and so on. You can create one or more cost centres in TallyPrime and allocate the breakup of incomes and expenses to different cost centres or profit centres. Thereafter, you can view your incomes and expenses under the cost centres using various reports provided in TallyPrime. You can view cost centres in Chart of Accounts too.
To know more about Cost Centres in TallyPrime, refer to the topic Cost Centre or Profit Centre Allocation.
Currencies
Your business may be having multi-currency transactions, especially when a foreign party (customer or supplier) is involved. You can record transactions either in the base currency or foreign currency based on your requirement. All the currencies created in TallyPrime are displayed in the report.
To know more about Currency in TallyPrime, refer to the topic Create, Alter, and Delete Currencies in TallyPrime (Multi-Currency Accounting).
Budgets
In your business, you may be preparing a plan for the flow of funds containing financial guidelines for the future or a selected period. Budgeting helps you to use your funds effectively and also provides information for an evaluation of financial activities in your organization. You can prepare budgets in TallyPrime for specific purposes. You can view budgets in the report.
To know more about Budgets in TallyPrime, refer to the topic Budgets in TallyPrime.
Scenarios
TallyPrime provides a management tool that you can use for projecting the accounts and inventory-related information. You can create, select, and include only certain types of vouchers without affecting the source data and create scenarios in TallyPrime. You can also use the management tool to forecast the expenses by recording provisional vouchers and including them in your reports. The report displays all the scenarios created in TallyPrime.
To know more about Scenarios in TallyPrime, refer to the topic Scenarios in TallyPrime.
Inventory Masters in Chart of Accounts
Your business may involve movement, sales, or purchase of a set of stock items. The inventory masters in TallyPrime enable you to manage your inventory and track the movement of stock items.
Stock Groups
Stock Groups help you in managing stock items and locating them, especially when a set of stock items share a common feature such as brand, product type, the material used, and others. In TallyPrime, you can get a consolidated view of total stock items available under a specific stock group and the report displays all the stock groups.
To know more about Stock Groups in TallyPrime, refer to the section Classify Stocks Items | Stock Groups and Stock Categories in the topic Manage Your Stock Items.
Stock Items
You may be selling or purchasing a set of stock items in your business, because of which you need to manage your inventory. In TallyPrime, you can create stock items so that you can manage your inventory. Furthermore, you can view all the stock items in chart of accounts.
To know more abut Stock Items in TallyPrime, refer to the topic Manage Your Stock Items.
Stock Categories
There can be stock items under different groups with some common properties such as cost, material used, or brand. In such cases, you can create Stock Categories and assign the same to related stock items to manage your inventory. Chart of Accounts displays all the Stock Categories created in TallyPrime.
To know more about Stock Categories in TallyPrime, refer to the section Classify Stocks Items | Stock Groups and Stock Categories in the topic Manage Your Stock Items.
Units
You may be selling or purchasing stock items measured as per specific units, depending on your business practice. In TallyPrime, you can create units and also alternate units to manage stock items and the report displays all the units created in the product.
To know more about Units in TallyPrime, refer to the section Create Units for Stock Items in the topic Manage Your Stock Items.
Godowns
You may be storing stock items in warehouses or godowns. In TallyPrime, you can create godowns and manage the movement of the incoming or outgoing stock item as per the actual movement of items from the corresponding godowns. You can view Godowns in the report.
To know more about Godowns in TallyPrime, refer to the topic Manage Inventory Storage Using Godowns/Locations in TallyPrime.
Payroll Masters in Chart of Accounts
Your business may be involving a number of employees to which you must be making payment on a particular date as per the salary cycle followed in your business. In TallyPrime, you can maintain payroll of employees using Payroll masters. This enables you to keep an account of sum transferred to your employees.
Employee
The Employee master in TallyPrime helps you record all the payments made to a particular employee in your organisation. Along with basic details, you can also enter the details of Payment, Statutory, and Contract details. Chart of Accounts displays all the Employees created in TallyPrime.
To know more about Employee master in TallyPrime, refer to the topic Create Employees in TallyPrime (Payroll).
Employee Groups
Employee Groups in TallyPrime help you classify employees based on their function or roles that they perform in your organisation. You can also define salary structures at the employee group level to apply a common salary structure to a set of employees in your organisation. You can view all the Employee Groups in the report.
To know more about Employee Groups in TallyPrime, refer to the topic Create Employee Groups in TallyPrime (Payroll).
Employee Categories
Employee categories help you classify employees so that you can track salary paid to employees working on a particular project or region. This helps you analyse the cost of the project or a particular region/office. The report displays all the Employee Categories created in TallyPrime.
To know more about Employee Categories in TallyPrime, refer to the topic Create Employee Categories in TallyPrime (Payroll).
Pay Heads
Basically, pay head is the salary components constituting an employee’s pay structure. You can define Pay Heads in TallyPrime, which you can use while processing payroll of employees. You can view all the Pay Heads in Chart of Accounts.
To know more about Payheads in TallyPrime, refer to the topic Create Pay Heads and Define Income Tax Details in TallyPrime (Payroll).
Attendance/Production Types
Attendance/Production Type is the basic unit used to calculate the pay of employees. This helps you track productivity of employees. Attendance/Production Types depend on the Pay Heads that comprise of the employees’ pay structure. All the Attendance/Production Types created in TallyPrime can be viewed in the report.
To know more about Attendance/Production Types in TallyPrime, refer to the topic Create Attendance or Production Types in TallyPrime (Payroll).


