Accounting Entry in TallyPrime
As per the accounting practice of journaling, you can record all transactions using Journal Vouchers (JV) in TallyPrime. However, there are specialised accounting Voucher Types for different types of transactions like payments, receipts, sales, purchases, contra, debit notes, credit notes, and so on to ease data entry. Once you know how to enter a transaction in TallyPrime, you can enter any transaction in a similar way. Voucher Types in TallyPrime can be categorised as journals, purchases, sales, payments, receipts, contra, inventory vouchers, order vouchers, and non-accounting vouchers. In this topic, you will understand how to record a transaction in TallyPrime or say, do accounting entry in TallyPrime and learn more about the voucher types provided for accounting in TallyPrime.
Apart from the 28 default voucher types for accounting entry in TallyPrime, you can also create your own voucher types under the default voucher types for easy accounting. For example, you can create Cash Sales under Sales voucher type so that you can identify and sequentially number all your cash sales.
For faster data entry operation, you can also use voucher class in TallyPrime.
Record Transactions
Recording transactions for accounting entry in TallyPrime follow a simple pattern. You can record a transaction with the following steps. A transaction for payment of rent (expenses) is used as an example.
- Press Alt+G (Go to) > Create Voucher > press F5 (Payment).
Alternatively, Gateway of Tally > Vouchers > press F5 (Payment). - Press F2 (Date) to change the transaction date, if needed.
When you press F2 to change the date, the date shown is for the subsequent day of the current date. This is done to avoid manual entry of date for the next day as the immediate next day is the most common business day. You can however enter any date, even a date before the current date. - In the Account field, select the Cash or Bank ledger.
When you create a Company in TallyPrime, the system creates two ledgers by default – Cash and Profit & Loss A/c. - Provide the payment details.
- Under Particulars, select expense ledger for which you are making this payment.
As always, press Alt+C to create a ledger under Indirect Expenses, on the fly, if an expense ledger does not exist. - Amount: Enter the payment amount.
- Under Particulars, select expense ledger for which you are making this payment.
- Provide Narration, if any, and accept the voucher creation screen. As always, press Ctrl+A to save.
Edit Log for Transactions
In TallyPrime Edit Log Release 2.1 and TallyPrime Release 2.1 with Edit Log enabled, all the activities related to a particular transaction are recorded as Edit Log for that transaction. These activities include Creation, Alteration, and Deletion which can happen in various scenarios such as changing the rate of the stock item in the transaction, adding narration, changing voucher number, and other such activities that affect the Company data.
In this section
- View Edit Log for transactions
- Impact of re-numbering voucher number
- Impact of deleting a voucher
- Impact of other activities
View Edit Log for transactions
You may want to view Edit Log to track changes made in a voucher. To view Edit Log for a transaction:
- Open the transaction from Day Book.
- Press Alt+G (Go To) > type or select Day Book and press Enter.
Alternatively, Gateway of Tally > Day Book. - Select the transaction and press Enter.
The Voucher Alteration screen appears. If you have opened Day Book to view altered/deleted vouchers and drill-down on a deleted transaction, then the Edit Logreport appears.
In Voucher Creation screen, press PgUp to open the previous transaction, and press Alt+Q to open Edit Log.
- Press Alt+G (Go To) > type or select Day Book and press Enter.
- In the transaction, press Alt+Q (Edit Log).
Alternatively, press Ctrl+O (Related Reports) > Edit Log and press Enter.
The Edit Log report displays Version, Activity, Username, and Date & Time.
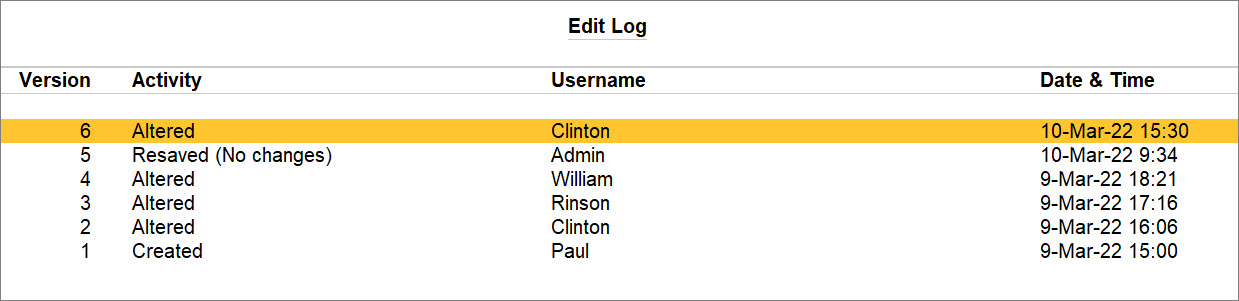
Refer to Activities Tracked Under Edit Log to know more. - Select any version and press Enter.
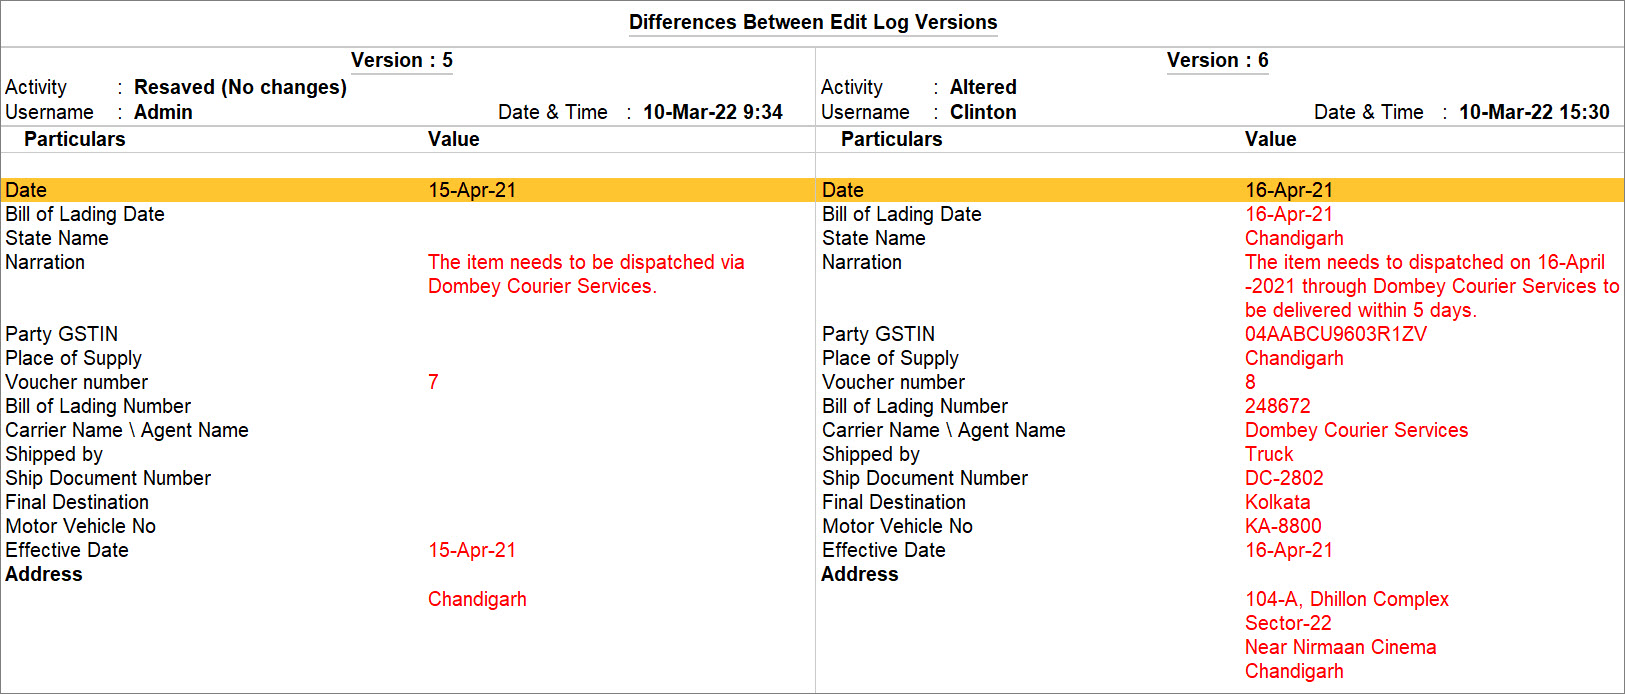
The Differences Between Edit Log Versions screen appears.
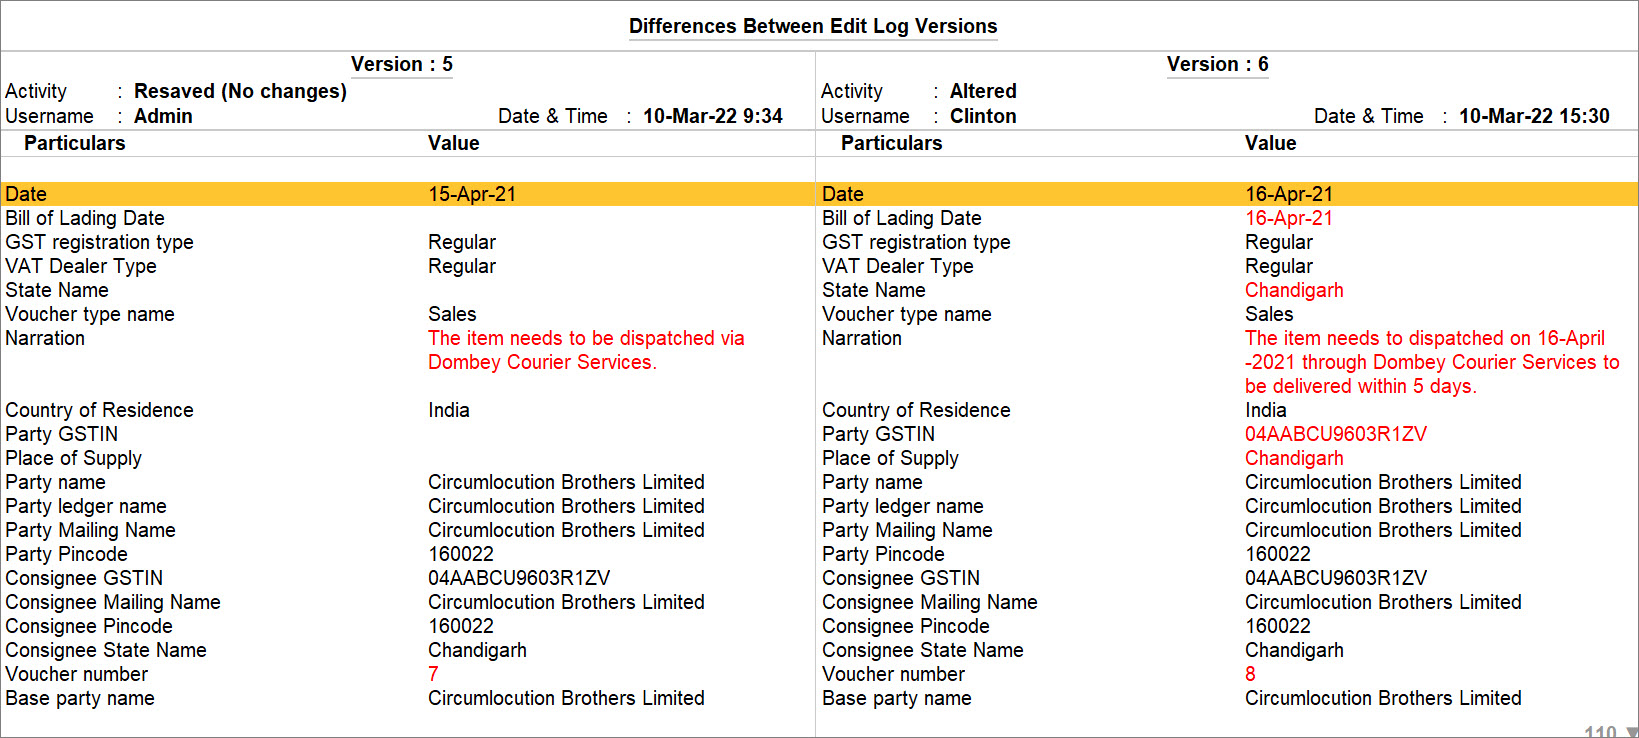
You can view the details of changes made in the selected version of the transaction as compared to its previous version.
TallyPrime highlights the changes made in the transaction as compared to its previous version in red text.
Similarly, you can drill down to any version and view the comparison between the version and its previous one.
You will not be able to drill down on the Resaved version as there are no data of changes between the versions.
To know more about the report, refer to Differences Between Edit Log Versions.
You can also view Edit Log of all the vouchers under a specific voucher type, organised by the voucher date in the Voucher Type-wise Summary section in the Edit Log Summary.
- Configure the report to compare the versions, as needed.
- Press F12 (Configure).
- Show altered values only: Yes.
Subsequently, only the values that you have changed in the transaction will be highlighted in red text.
For instance, if you had changed Party A/c, Rate of a Stock Item, Date, and others, then you will be able to view it.
Set it as No, if you do not want to view those values. - Show configuration-based value (such as Yes/No, or change from blank to Not Applicable/Primary): Yes.
Subsequently, you will be able to view the difference in the configurations of both the versions.
For instance, If you had changed values of fields which is enabled by the F12 configurations of the voucher, then you will be able to view it.
Set it as No, if you do not want to view the difference in the configurations of both the versions. - Show internal fields updated by the application: No.
As a result of alteration, a few internal fields get updated in the application.
Set is as Yes only if you want to view such fields in the report.
After configuring, as shown above, a sample report appears as shown below.
Impact of re-numbering voucher number
If the method of voucher numbering is set as Automatic or Multi-user Auto in a particular Voucher Type, then a few activities such as deleting the voucher or changing the date will create a log for the subsequent vouchers.
Impact of deleting a voucher
When you delete a voucher, the following message appears.
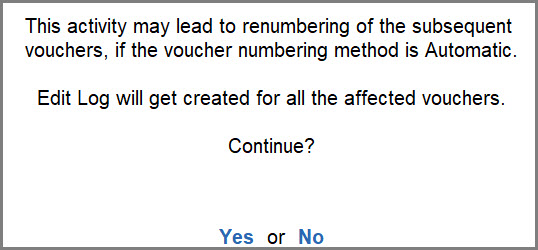
Once you delete a voucher, the voucher number of the subsequent vouchers change because of which a log gets created for those vouchers too. However, TallyPrime does not retain the log for deleting an entry/voucher.
To view the impact of adding, inserting, or duplicating a transaction, refer to Add, Insert, or Duplicate a Transaction.
Impact of other activities
When you change the date of a voucher, TallyPrime displays a message.
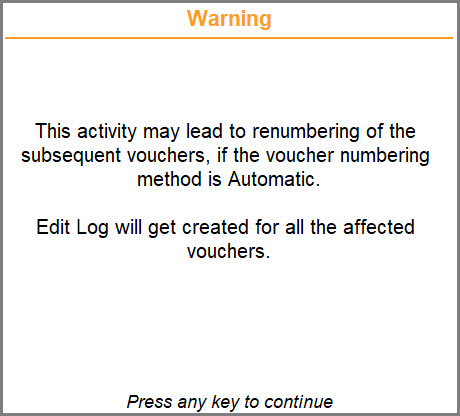
If you change the date of a voucher, its voucher number changes. Therefore, the voucher number of the subsequent vouchers also change.
The change in voucher number leads to the creation of log for those vouchers.
Other activities that can lead to creation of log for affected vouchers due to voucher renumbering are listed below.
- Making a voucher Optional
- Making an Optional voucher a regular one
- Changing the voucher type of a voucher
- Creating a back-dated transaction
The message is displayed only when you accept the voucher by pressing Enter on the total amount.
Accounting with Journal Voucher
If you are accounts-savvy, you can use Journal voucher for accounting entry in TallyPrime to record any type of transaction. In a Journal voucher, you will see the By & To/Dr & Cr entries that you are familiar with when doing entries in the account books.
Though you can use JV for any kind of accounting transaction, it needs good knowledge of accounting principles. For ease of recording, you may choose the corresponding specialised voucher type.
In this section
- Record Journal entries
- Record depreciation for Fixed Assets
- Adjustment entries using Journal vouchers
- Journal vouchers in day book
- Journal register
Record Journal entries
You can use Journal voucher in TallyPrime to record the payment you did in the previous transaction.
- Press Alt+G (Go to) > Create Voucher > press F7 (Journal).
Alternatively, Gateway of Tally > Vouchers > press F7 (Journal). - Press F2 (Date) to change the transaction date, if needed.
When you press F2 to change the date, the date shown is for the subsequent day of the current date. This is done to avoid manual entry of date for the next day as the immediate next day is the most common business day. You can however enter any date, even a date before the current date. - Specify the payment details.
- In Dr, select the expense ledger, and specify the Debit amount.
For example, you can select an Expense ledger for rent and enter the rent paid.
As in other transactions, you can create the ledger on the fly by pressing Alt+C.
By default, in a journal voucher, you need to first specify the Dr (debit side). - In Cr, select the payment mode. and specify the Credit amount.
If you are unable to see the Cash ledger, click on Show More under List of Ledger Accounts.
If the amount is not equivalent to the debit amount, you need to select another Credit ledger.
- In Dr, select the expense ledger, and specify the Debit amount.
- Provide Narration, if any, and accept the voucher creation screen. As always, press Ctrl+A to save.
You have recorded a Payment transaction in TallyPrime as a Journal entry. In a similar manner, you can use a Journal voucher to record any type of accounting transaction.
As you have seen, though you can use a Journal voucher in TallyPrime to record a payment transaction, the specialised voucher type Payment helps ease the data entry.
Record depreciation for Fixed Assets
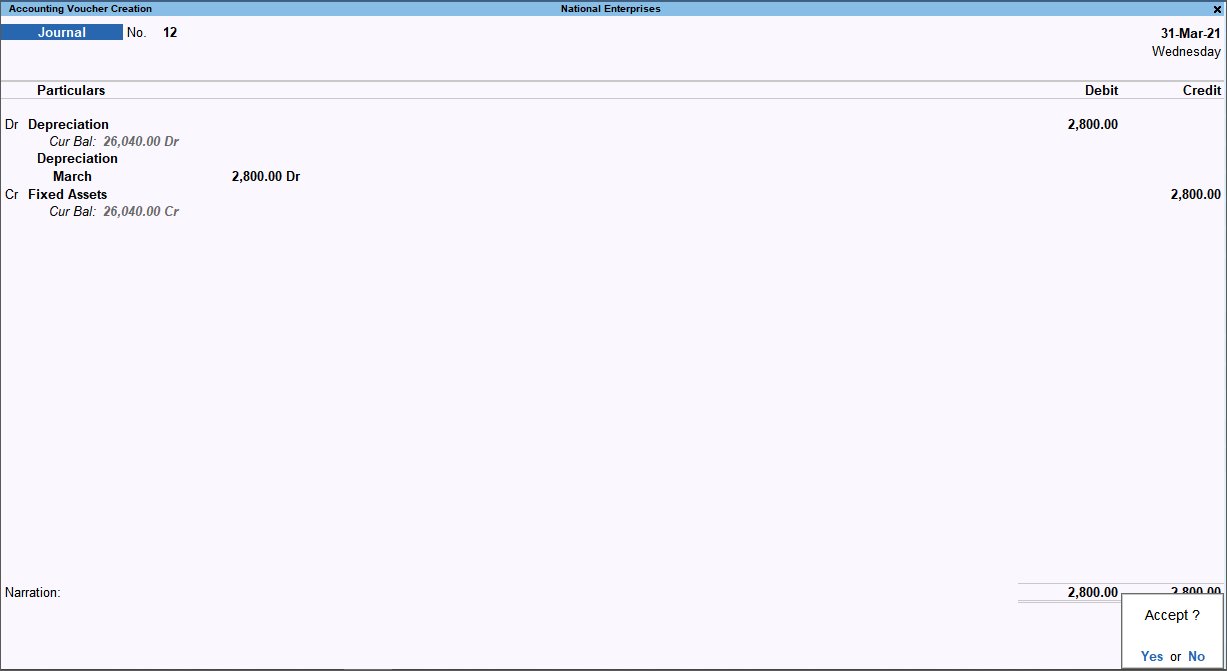
In TallyPrime you can record the depreciation of fixed assets using a journal voucher. To do this, create a Depreciation ledger under Indirect Expenses.
-
Press Alt+G (Go To) > Create Voucher > press F7 (Journal).
-
Select the Depreciation ledger in the Debit field, and enter the depreciation amount in the Amount field.
-
Credit the fixed asset ledger for which depreciation is recorded. The credit amount appears automatically.
The Accounting Voucher Creation screen appears as shown below:
-
Save the journal voucher by pressing Ctrl+A.
You can record the journal voucher at the end of each month or year. Further, you may create separate depreciation ledgers for individual fixed assets or maintain a single ledger to record depreciation for all fixed assets.
The Depreciation Chart provides a periodic break-up of depreciation amounts for one or more assets. This chart can be generated by maintaining Cost Categories and Cost Centres.
To view a periodic depreciation chart, create a Cost Category and Cost Centres using the following hierarchy:
|
Cost Category |
Under |
|
Depreciation |
Primary Cost Category |
|
Cost Centre |
Select Category |
Under |
|
Fixed Assets |
Depreciation |
Primary |
|
April |
Depreciation |
Fixed Assets |
|
May |
Depreciation |
Fixed Assets |
Once this hierarchy is set, allocate the depreciation amount in the journal voucher to the Cost Category (Depreciation) and the respective Cost Centre (e.g., July).

This set of ledgers and cost centres created in a hierarchy will give you the Depreciation Chart. You can view the same from Cost Category Summary.
-
Press Alt+G (Go To) > type or select Cost Category Summary > and press Enter.

Adjustment entries using Journal Vouchers
If you have understanding of accounting principles, you can use JV for any kind of accounting transactions, including adjustment entries. JVs are mostly used for adjustment entries for finalisation of books.
Journal Vouchers in Day Book
To view entered Journal vouchers, you can go to Day Book. Day Book is a report to view transactions recorded in the Day.
- Press Alt+G (Go To) > type or select Day Book > and press Enter.
Alternatively, Gateway of Tally > Display More Reports > Day Book.
By default, Day Book displays all vouchers recorded for the day. - Press F2 (Date) to change the date, if needed.
When you press F2 to change the date, the date shown is for the subsequent day of the current date. This is done to avoid manual entry of date for the next day as the immediate next day is the most common business day. You can however enter any date, even a date before the current date. - Press F4 (Voucher Type) and select Journal Voucher.
The Day Book displays the list of all Journal Vouchers recorded as per the selected date.
In Day Book you can also see transactions for a date range by pressing Alt+F2 (Period) and mention From and To date to view transactions of that period.
Journal Register
Journal register displays all the Journal vouchers recorded for each month. You can view this report in the application and in a browser.
- Press Alt+G (Go To) > type or select Journal Register > and press Enter.
Alternatively, Gateway of Tally > Display More Reports > Account Books > Journal Register.
The Journal Register appears:
- Select the required month and press Enter.
You can also press F8 (Columnar) and set the options as required, to view the journal columnar register.- Set the options Show voucher reference number and Show voucher reference date as Yes to view these details in separate columns.
- Accept the screen. As always, you can press Ctrl+A to save.
The columnar Voucher Register of Journal vouchers appears as shown:
Purchase
For accounting entry in TallyPrime there are specialised accounting voucher types for purchase-related transactions:
Apart from these, the following voucher types also participate in inventory transactions, under the purchase cycle:
- Receipt Note and Rejection Out: To record the inventory changes that are part of the purchase cycle
- Purchase orders: Non-accounting voucher type
For more details, refer to Purchase Process.
Sales
TallyPrime provides theses specialised accounting voucher types for sales-related transactions:
Apart from these, the following voucher types also participate in inventory transactions, under the sales cycle:
- Delivery Note and Rejection In: To record the inventory changes that are part of the sales cycle
- Sales order: Non-accounting voucher type
For more details, please refer to Sales Process.
Payments
Recording Payment transactions for accounting entry in TallyPrime follow a simple pattern. You can record a transaction with the following steps. A payment transaction for Rent expenses is used as an example.
- Press Alt+G (Go to) > Create Voucher > press F5 (Payment).
Alternatively, Gateway of Tally > Vouchers > press F5 (Payment). - Press F2 (Date) to change the transaction date, if needed.
When you press F2 to change the date, the date shown is for the subsequent day of the current date. This is done to avoid manual entry of date for the next day as the immediate next day is the most common business day. You can however enter any date, even a date before the current date. - In the Account field, select the Cash or Bank ledger.
When you create a Company in TallyPrime, the system creates two ledgers by default – Cash and Profit & Loss A/c. - Provide the payment details.
- Under Particulars, select expense ledger for which you are making this payment.
As always, press Alt+C to create a ledger under Indirect Expenses, on the fly, if an expense ledger does not exist. - Amount: Enter the payment amount.
- Under Particulars, select expense ledger for which you are making this payment.
- Provide Narration, if any, and accept the voucher creation screen. As always, press Ctrl+A to save.
Payment for purchases can also be recorded similarly. For detail explanation on how to record payment for purchases please refer to Payment for Purchase.
As in the case of other voucher types, you can mark a payment voucher as optional and post-dated.
For more details, refer to Payments and Receipts.
Receipts
Recording Payment transactions for accounting entry in TallyPrime follow a simple pattern. You can record a transaction with the following steps. A receipt transaction for Commission Received income is used as an example.
- Press Alt+G (Go to) > Create Voucher > press F6 (Receipt).
Alternatively, Gateway of Tally > Vouchers > press F6 (Receipt). - If you want to change the voucher date, press F2 (Date).
When you press F2 to change the date, the date shown is for the subsequent day of the current date. This is done to avoid manual entry of date for the next day as the immediate next day is the most common business day. You can however enter any date, even a date before the current date. - In the Account field, select Cash, which is already available.
When you create a Company in TallyPrime, the system creates two ledgers by default – Cash and Profit & Loss A/c. - Select the ledger for which you are making the receipt and specify the amount. For example, Commission Received.
- Under Particulars, select income ledger (Commission Received) for which you are making this receipt.
In case the ledger is not available, press Alt+C to create a ledger on fly. In Ledger Creation (Secondary) screen, give ledger name Commission Received and select Indirect Income in the Under field. - Under Amount, specify the commission amount.
- Under Particulars, select income ledger (Commission Received) for which you are making this receipt.
- Provide Narration, if any, and accept the voucher. As always, you can use Ctrl+A to accept.
Receipt against sales can also be recorded similarly. For detail explanation on how to record receipts against sales please refer to Receipt of Money.
As in the case of other voucher types, you can mark a receipt voucher as optional and post-dated.
For more details, refer to Payments and Receipts.
Contra
Fund transfers within different accounts of your company, such as transfers from one bank account to another, deposits of cash to bank account, cash withdrawals from ATMs, or withdrawals from banks using Cheque or DD, can be recorded using Contra Voucher in TallyPrime. Such fund transfers from one account to the other – say Cash A/c to Bank A/c or vice versa – appear on the same side of the company’s balance sheet, and do not impact your company books. This does not include transferring money to any third-party account as part of a payment. Keeping a record of the contra entries helps to track internal fund transfers done month-wise or voucher-wise, for different business needs. You can get a periodic view of the contra entries to have a better understanding of the fund transfers from one account to the other using Contra Register in TallyPrime.
In this section
- Record transfer of funds within your accounts
- Contra voucher in Single-Entry mode
- Contra voucher in Double-Entry mode
- Contra vouchers in Day Book
- Contra register
- Other reports showing Contra entries
- Data representation in reports
Record transfer of funds within your accounts
When you record transfer of money to the bank account, TallyPrime internally keeps a record of such deposits. You can print these deposit slips, as needed.
- Press Alt+G (Go To) > Create Voucher > press F4 (Contra).
Alternatively, Gateway of Tally > Vouchers > press F4 (Contra).
You can use single-entry or double-entry mode of data entry to record contra vouchers. Single-entry mode helps you in faster data entry and allows multiple credits against a single debit. The double-entry mode gives you the flexibility of multiple debits and multiple credits in a single transaction.
Record Contra Voucher in Single-Entry Mode
- Press Alt+G (Go to) > Create Voucher > press F4 (Contra).
Alternatively, Gateway of Tally > Vouchers > press F4 (Contra). - If you want to change the voucher date, press F2 (Date).
When you press F2 to change the date, the date shown is for the subsequent day of the current date. This is done to avoid manual entry of date for the next day as the immediate next day is the most common business day. You can however enter any date, even a date before the current date. - Debit the destination account and credit the source account. For example, if you are withdrawing cash from your bank’s ATM, the Cash ledger should be debited and bank ledger should be credited.
- Select the ledger account that you want to debit in the Account field.
- Under Particulars, select the account that you want to credit and enter the amount. You can deposit money from more than one account to a single destination account.
As in other transactions, you can create the ledger on the fly by pressing Alt+C. Alternatively, press Alt+G (Go To) > Create Master> type or select Ledger > and press Enter.
- Specify the bank, cheque, or cash details, as required.
- For banks and cheques, you can specify the details in the Bank Allocations screen.
- For cash, you can specify the denomination details in the Bank Allocations > Cash Denominations screen.
A sample image is shown below:
What you see on the screen can vary based on your choices. Press F12 (Configure) to change the options and F11 (Features) to enable or disable features.
- Provide Narration, if any, and accept the voucher. As always, you can use Ctrl+A to accept.
Record Contra Voucher in Double-Entry Mode
- Press Alt+G (Go To) > Create Voucher > press F4 (Contra).
Alternatively, Gateway of Tally > Vouchers > press F4 (Contra). - If you want to change the voucher date, press F2 (Date).
When you press F2 to change the date, the date shown is for the subsequent day of the current date. This done to avoid manual entry of date for the next day as the immediately next day is the most common business day. You can however enter any date, even a date before the current date.
As in any other vouchers, you can create the number series for the contra vouchers, as you need for your reference. - Press Ctrl+H (Change Mode) to select the Double-Entry mode.
- Debit the destination account and credit the source account. For example, if you are withdrawing cash from your bank’s ATM, the cash ledger should be debited and bank ledger should be credited.
- Under Particulars in the Cr field, select the source ledger account that you want to Credit.
- In the Dr field, select the destination ledger account that you want to Debit.
As in other transactions, you can create the ledger on the fly by pressing Alt+C. Alternatively, press Alt+G (Go To) > Create Master > type or select Ledger > and press Enter.
A sample image is shown below:
What you see on the screen can vary based on your choices. Press F12 (Configure) to change the options and F11 (Features) to enable or disable features.
- Provide Narration, if any, and accept the voucher. As always, you can use Ctrl+A to accept.
In case you have received payment in a different currency, say in Dollars, and now you want to deposit this amount to your company’s bank account. You can create currency master and record the foreign currency amount by prefixing the currency symbol in the Amount field.
As in other vouchers, you can define the current rates of exchange if needed while recording the Contra voucher.
If you deposit cheques in the bank for internal money transfer and collect the deposit slip, you can track such deposit slips in TallyPrime and print them when needed.
As in the case of other voucher types, you can mark a contra voucher as optional and post-dated. - Print Cheque after saving voucher.
Contra Vouchers in Day Book
To view entered Contra vouchers, you can go to Day Book. Day Book is a report to view transactions recorded in the Day.
- Press Alt+G (Go To) > type or select Day Book > and press Enter.
Alternatively, Gateway of Tally > Day Book. - If you want to change the date, press F2 (Date).
- When you press F2 to change the date, the date shown is for the subsequent day of the current date. This is done to avoid manual entry of date for the next day as the immediate next day is the most common business day. You can however enter any date, even a date before the current date. You can see Contra vouchers along with all other vouchers recorded in the day here.
- If you want to see only particular voucher types press F4 (Voucher Type) and select the voucher type to view.
In Day Book you can also see transactions for a date range by pressing Alt+F2 (Period) and mention From and To date to view transactions of that period.
Contra Register
If you record the transfer of funds between your company accounts, you will need to keep a track of all such transfers periodically. By default, Contra Register shows the number of contra vouchers recorded month-wise.
- Press Alt+G (Go To) > type or select Contra Register > and press Enter.
Alternatively, Gateway of Tally > Display More Reports > Account Books > Contra Register. - Press F6 (Quarterly) to get a quarterly view of the contra vouchers.
- Press Enter on the selected period to view the Voucher Register report. All the Contra vouchers recorded in that period are displayed in this report.

What you see on the screen can vary based on your choices. Press F12 (Configure) to change the options and F11 (Features) to enable or disable features. Alternatively, press Ctrl+I (More Details) to enter any of the values without activating the options in F12 (Configure).
Other reports showing Contra entries
Memorandum Vouchers
Memorandum Vouchers are those vouchers that do not impact your books of accounts. It is used when the actual purpose of an expense is not sure and can be converted to any voucher type. It will not impact the accounts unless converted to a normal voucher type. The impact of a Memorandum voucher can be seen by creating scenarios.
In this section
- Making suspense payments
- Vouchers not verified at the time of entry
- Items given for approval
- Memorandum Voucher Register
- Memorandum Vouchers in Day Book
- Exception Reports with Memorandum Vouchers
Making suspense payments
Consider that a company gives its employees cash to buy office supplies, the exact nature and cost of which are unknown. For this transaction you can enter a voucher for the petty cash advance, a voucher to record the actual expenditure details when they are known, and another voucher to record the return of surplus cash.
However, a simpler way of doing it is to enter a Memorandum voucher when the cash is advanced, and then turn it into a Payment voucher for the actual amount spent, when the details are known.
For example, the Company pays its employees Rs. 1000 as petty cash advance for Office Expenses.
- Press Alt+G (Go to) > Create Vouchers > press F10 (Other vouchers) > type or select Memorandum Voucher.
Alternatively, Gateway of Tally > Vouchers > press F10 (Other vouchers) > type or select Memorandum Voucher. - In case the voucher is inactive, you will be prompted to activate the Memorandum voucher type. Select Yes or press Y to proceed.
- If you want to change the voucher date, press F2 (Date).
When you press F2 to change the date, the date shown is for the subsequent day of the current date. This is done to avoid manual entry of date for the next day as the immediate next day is the most common business day. You can however enter any date, even a date before the current date. - Enter the transaction details.
- Debit Office Supplies Account.
- Credit Cash Account.
- Provide Narration, if any, and accept the screen. As always, you can press Ctrl+A to save.
Vouchers not verified at the time of entry
If there is no clarity with the details of a voucher you are entering, you can enter it as a Memorandum voucher and amend it later when the details are available.
Open a Memorandum Voucher and press the required Function Key to amend the voucher. For example, press F5 (Payment) to amend the Memorandum Voucher to Payment voucher.
Items given for approval
Generally completed sales are entered into books. In case items are given on approval, use a Memo voucher to track and convert it into a proper Sales voucher. You can cancel/delete the Memorandum Voucher if the sale is not made.
Memorandum Voucher Register
- Press Alt+G (Go To) > type or select Memorandum Register > and press Enter.
Alternatively, Gateway of Tally > Display More Reports > Exception Reports > Memorandum Register. - Press Enter on the selected period to view the Voucher Register report. All the Memorandum vouchers recorded in that period are displayed in this report.
You can also view Memorandum Vouchers from the Day Book.
You can alter and convert a Memorandum voucher into a regular voucher when you decide to consider the entry into your books. Use Scenarios to see the effect of Memorandum entries on reports and statements.
Memorandum Vouchers in Day Book
To view entered Memorandum vouchers, you can go to Day Book. Day Book is a report to view transactions recorded in the Day.
- Press Alt+G (Go To) > type or select Day Book> and press Enter.
Alternatively, Gateway of Tally > Day Book. - If you want to change the date, press F2 (Date).
When you press F2 to change the date, the date shown is for the subsequent day of the current date. This is done to avoid manual entry of date for the next day as the immediate next day is the most common business day. You can however enter any date, even a date before the current date. - You can see Memorandum vouchers along with all other vouchers recorded in the day here.
- If you want to see only Memorandum voucher types press F4 (Voucher Type) and select Memorandum voucher type to view.
In Day Book you can also see transactions for a date range by pressing Alt+F2 (Period) and mention From and To date to view transactions of that period.

Exception Reports for Memorandum Vouchers
- Press Alt+G (Go To) > type or select Memorandum Register > and press Enter.
Alternatively, Gateway of Tally > Display More Reports > Exception Reports > Memorandum Register. - In Memorandum Register you can also see transactions for a date range by pressing F2 (Date) and mention From and To date to view transactions of that period.
You can also view Memorandum vouchers from the Day Book. You can alter and convert a Memorandum voucher into a regular voucher when you decide to consider the entry into your books.
Use Scenarios to see the effect of Memorandum entries on reports and statements.
Creation of Scenarios for Memorandum Vouchers
Scenario management is a management tool that enables projecting accounts and inventory related information by including certain types of vouchers without affecting the source data. It is also a useful forecasting tool i.e. you can forecast the expenses using provisional vouchers such as Memorandum Voucher.
In this section
Create a Scenario
- Press Alt+G (Go To) > Create Master > type or select Scenario> and press Enter.
Alternatively, Gateway of Tally > Create> Scenario. - Enter a suitable scenario Name.
- Enable the option Include actuals and set preferences for Forex Calculations and Inventory Calculations.
a. Set Exclude Forex Gains/Losses Calculations to Yes if you do not want the Unadjusted Forex Gain/Loss element to reflect in the scenario.
b. Set Exclude Inventory Tracking Calculations to Yes if you do not want the Sales/Purchase Bills Pending element to reflect in the scenario.
- Select the vouchers to Include (these vouchers will affect the scenario created) and select the vouchers to Exclude (these vouchers will not affect the scenario created).
- Accept the screen. As always, you can press Ctrl+A to save.
Use Memorandum Voucher in Scenarios
Recording transactions for accounting entry in TallyPrime follow a simple pattern. You can record a transaction with the following steps. A Company pays its employees Rs. 37000 as cash advance for Office Expenses is used as an example.
- Press Alt+G (Go to) > Create Voucher > press F10 (Other vouchers) > type or select Memorandum Voucher.
Alternatively, Gateway of Tally > Vouchers > press F10 (Other vouchers) > type or select Memorandum Voucher. - In case the voucher is inactive, you will be prompted to activate the Memorandum voucher type. Select Yes or press Y to proceed.
- If you want to change the voucher date, press F2 (Date).
- When you press F2 to change the date, the date shown is for the subsequent day of the current date. This is done to avoid manual entry of date for the next day as the immediate next day is the most common business day. You can however enter any date, even a date before the current date.
- In Dr, select Office Supplies account and specify the amount.
As in other transactions, you can create the ledger on the fly by pressing Alt+C. Alternatively, press Alt+G (Go To) > Create Master > type or select Ledger > and press Enter. - In Cr, select payment mode, for example, Cash and specify the amount.
If the amount is not equivalent to the debit amount, you need to select another Credit ledger.
6. Provide Narration, if any, and accept the voucher. As always, you can use Ctrl+A to accept.
Use Scenarios in Reports
You can use scenarios in statements (not registers) to compare the actuals with the provisional details by using the Alt+C (New Column) button.
- Press Alt+G (Go To) > type or select Balance Sheet > and press Enter.
Alternatively, Gateway of Tally > Balance Sheet. - Press Alt+C (New Column).
- Select the scenario required. The Balance Sheet with the scenario appears as shown below:
Reversing Journals
Reversing Journals are those vouchers that do not impact your books of accounts. Similar to the optional voucher, it has an “Upto” date to check the impact on account for certain expenses until the actual voucher is passed. The impact of a Reversing Journal can be seen by creating scenarios.
Accounting entries in TallyPrime follow a simple pattern, you can record a transaction with the following steps.
For example – On 30th June you want to view the Balance Sheet as of today but June salaries are not paid until the first week of July. Thus, there is a large liability, which would not be reflected in the Balance Sheet. To overcome this, you enter a Reversing Journal Voucher dated 30th June, which would look like this:
- Press Alt+G (Go to) > Create Voucher > press F10 (Other vouchers) > type or select Reversing Journal.
Alternatively, Gateway of Tally > Vouchers > press F10 (Other vouchers) > type or select Reversing Journals. - In case the voucher is inactive, you will be prompted to activate the Reversing Journal voucher type. Select Yes or press Y to proceed.
- If you want to change the voucher date, press F2 (Date).
- When you press F2 to change the date, the date shown is for the subsequent day of the current date. This is done to avoid manual entry of date for the next day as the immediate next day is the most common business day. You can however enter any date, even a date before the current date.
- In Dr, select Salary Account and specify the amount.
As in other transactions, you can create the ledger on the fly by pressing Alt+C. Alternatively, press Alt+G (Go To) > Create Master > type or select Ledger > and press Enter. - In Cr, select Provision for Salary Account and specify the amount.
- In the Applicable Upto field specify the date.
This is the date up to which the Reversing Journal is available for inclusion in a scenario report.
Applicable Upto: This is the date up to which the Reversing Journal is available for inclusion in a scenario report. The Reversing Journal can be created as of a particular date and made applicable up to a different date. For example, the depreciation entry could be dated October 1, 2008 and applicable up to October 31, 2008. The journal will be available for inclusion in a scenario for any day from October 1, 2008 till October 31, 2008. It will not exist before 1st Oct and will be reversed automatically after 31st Oct and consequently unavailable.
- Provide Narration, if any, and accept the voucher. As always, you can use Ctrl+A to accept.
In this section
Reversing Journals in Day Book
To view entered Reversing Journals vouchers, you can go to Day Book. Day Book is a report to view transactions recorded in the Day.
- Press Alt+G (Go To) > type or select Day Book > and press Enter.
Alternatively, Gateway of Tally > Day Book. - If you want to change the date, press F2 (Date).
- When you press F2 to change the date, the date shown is for the subsequent day of the current date. This is done to avoid manual entry of date for the next day as the immediate next day is the most common business day. You can however enter any date, even a date before the current date. You can see Reversing Journals vouchers along with all other vouchers recorded in the day here.
- If you want to see only Reversing Journal voucher types, press F4 (Voucher Type) and select Reversing Journal voucher type to view.

In Day Book you can also see transactions for a date range by pressing Alt+F2 (Period) and mention From and To date to view transactions of that period.
Exception Reports for Reversing Journal
All vouchers are maintained in a Reversing Journal Register. These are not posted to any books of accounts and cannot be included in regular reports. You can view or alter Reversing Journals from the register.
- Press Alt+G (Go To) > type or select Reversing Journal Register > and press Enter.
Alternatively, Gateway of Tally > Display More Reports > Exception Reports > Reversing Journal Register. - Select a month to view the Voucher Register report.
- In Reversing Journal Register you can also see transactions for a date range by pressing F2 (Date) and mention From and To date to view transactions of that period.
Creation of Scenarios for Reversing Journal
Reversing Journals are special journals that are automatically reversed after a specified date. They exist only till that date and are effective only when they are included in reports. These are used in interim reporting in the course of the financial year where accruals are to be reported. These accruals are usually short-term and are cleared in the subsequent period. However, to get a proper perspective, decision-makers require the reports with full impact of all aspects and transactions.
In this section
Create a Scenario
- Press Alt+G (Go To) > Create Master > type or select Scenario > and press Enter.
Alternatively, Gateway of Tally > Create > type or select Scenario. - Enter a suitable scenario Name.
- Enable the option Include actuals and set preferences for Forex Calculations and Inventory Calculations.
- Set Exclude Forex Gains/Losses Calculations to Yes if you do not want the Unadjusted Forex Gain/Loss element to reflect in the scenario.
- Set Exclude Inventory Tracking Calculations to Yes if you do not want the Sales/Purchase Bills Pending element to reflect in the scenario.
- Select the vouchers to Include (these vouchers will affect the scenario created) and Exclude (these vouchers will not affect the scenario created.).
- Accept the screen. As always, you can press Ctrl+A to save.
Use Reversing Journal Voucher in Scenarios
Recording transactions for accounting entry in TallyPrime follow a simple pattern. You can record a transaction with the following steps. Since provision for depreciation is made at the end of the year, you can create scenarios to include them for monthly reporting or a specific period to give more accurate status or position.
- Press Alt+G (Go to) > Create Voucher > press F10 (Other vouchers) > type or select Reversing Journal.
Alternatively, Gateway of Tally > Vouchers > press F10 (Other vouchers) > type or select Reversing Journal. - In case the voucher is inactive, you will be prompted to activate the Reversing Journal voucher type. Select Yes or press Y to proceed.
- If you want to change the voucher date, press F2 (Date).
When you press F2 to change the date, the date shown is for the subsequent day of the current date. This is done to avoid manual entry of date for the next day as the immediate next day is the most common business day. You can however enter any date, even a date before the current date. - In Dr (Debit) side, select Depreciation and specify the amount.
As in other transactions, you can create the ledger on the fly by pressing Alt+C. Alternatively, press Alt+G (Go To) > Create Master > type or select Ledger > and press Enter. - In Cr side, select Provision on Depreciation and specify the amount.
If the amount is not equivalent to the debit amount, you need to select another Credit ledger.
- Provide Narration, if any, and accept the voucher. As always, you can use Ctrl+A to accept.
Use Scenarios in Reports
You can use scenarios in statements (not registers) to compare the actuals with the provisional details by using the Alt+C (New Column) button.
- Press Alt+G (Go to) > type or select Balance Sheet > and press Enter.
Alternatively, Gateway of Tally > Balance Sheet. - Press Alt+C (New Column).
- Select the scenario required. The Balance Sheet with the scenario appears as shown below:
Mark Vouchers as Optional
Any voucher in TallyPrime can be marked as Optional by pressing Ctrl+L (Optional) during voucher entry or in alteration mode.
Marking voucher as Optional will remove the accounting impact of the transactions from the books of account. Some transactions are recurring in nature like rent, repayment of loan, and so on. You can pass all such transactions and mark them as optional. Once the actual date of such transaction occurs you can regularise the transaction by opening it and pressing Ctrl+L (Regular).
Recording transactions in TallyPrime follow a simple pattern. You can use an example – On 15th August you want to view the Balance Sheet as of that date, but August rent is not due for payment until the first week of September. This liability is not reflected in the Balance Sheet. To overcome this, enter an Optional Voucher dated 15th August.
- Press Ctrl+L (Optional) to make the voucher as Optional Voucher.
- Pass the Debit – Rent Account and Credit – Cash/Bank Account.
- Accept the screen. As always, you can press Ctrl+A to save.
In this section
Optional Vouchers Register
- Press Alt+G (Go to) > type or select Optional Vouchers > and press Enter.
Alternatively, Gateway of Tally > Display More Reports > Exception Reports > Optional Vouchers. - Press Enter on the selected period to view the Voucher Register report. All the Optional vouchers recorded in that period are displayed in this report. You can view them from the Day Book as well.
Creation of Scenarios for Optional
How to create Scenario for Optional? It follows the same process as the Creation of Scenarios for Reversing Journal.
In the Balance Sheet, to see the impact of Optional vouchers you need to use Scenario created for Optional voucher.
Use Scenarios to see the effect of Optional voucher entries on reports and statements.
Mark Vouchers as Post-Dated
While entering vouchers, you can mark them as post-dated, as a result these vouchers are not updated in the ledgers till the date specified in the voucher. After you pass a voucher, when the DATE OF LAST ENTRY surpasses the Post-Dated voucher, it gets updated automatically. This is useful for entering transactions that take place on a regular basis. For example, if you issue post-dated cheques towards payment of installments, you can set up the payments in advance, and TallyPrime will only update them in the ledgers on the due date.
Mark vouchers Post-Dated by pressing Ctrl+T (Post-Dated) button from the Button Bar. This button toggles with Current.
Post-Dated Payment Voucher entry is displayed as shown:
In this section
Post-dated Vouchers Register
All Post-dated vouchers are maintained in a Post-Dated voucher Register.
- Press Alt+G (Go to) > type or select Post-Dated Vouchers > and press Enter.
Alternatively, Gateway of Tally > Display More Reports > Exception Reports > Post-Dated Vouchers. - Press Enter on the selected period to view the Voucher Register report. All the Post-Dated vouchers recorded in that period are displayed in this report.
The major difference between post dated vouchers and other unconventional vouchers are:
- Post-Dated Vouchers affect regular books of accounts on the date of the voucher.
- Post-Dated vouchers are not available for selection in Scenarios.
Including Post-dated Vouchers in Ledger Vouchers Report
Using the ledger option under the Accounts Book in TallyPrime, you can include post-dated vouchers in the ledger voucher report.
- Press Alt+G (Go to) > type or select Ledger Voucher > and press Enter.
Alternatively, Gateway of Tally > Display More Reports > Account Books > Ledger. - Select the required Ledger. The Ledger Vouchers screen appears.
- Press Alt+F8 (Incl Post-Dated) to include the values for post-dated transactions in the report. The voucher number of these transactions will have the prefix (Post-Dated), and the period of the report will automatically include the date of the post-dated transaction.
Create Voucher Types
For accounting entry in TallyPrime, it has 28 Pre-defined Voucher Types to record transactions, which uses a voucher type for each transaction type. Apart from default voucher types that Tally Provides, you can create new voucher types to serve your custom needs.
In this section
- Creation of voucher type
- Alteration of voucher type
- View the pre-defined voucher types
- Voucher class for voucher types
- Use Voucher classes for Sales & Purchases Cycles
- Create Voucher class for Sales or Purchase
- Record Sales or Purchase transactions using voucher class
- Use voucher classes for Receipts, Payments and Contra entries
Creation of voucher type
TallyPrime allows to create new voucher types to serve your custom needs. For example, Illustration, GST Sales, Tax Invoice can be created under Sales Accounts for easier transaction.
- Press Alt+G (Go to) > Create Master > type or select Voucher Type > and press Enter.
Alternatively, Gateway of Tally > Create > type or select Voucher types.
The Voucher Type Creation screen appears as shown below:
Alteration of voucher type
A pre-defined voucher type can be altered to customise it. For example, to control their numbers.
- Press Alt+G (Go to) > Alter Master > type or select Voucher Type > and press Enter.
Alternatively, Gateway of Tally > Alter > Voucher types.
The Voucher Type Alteration screen appears as shown below:
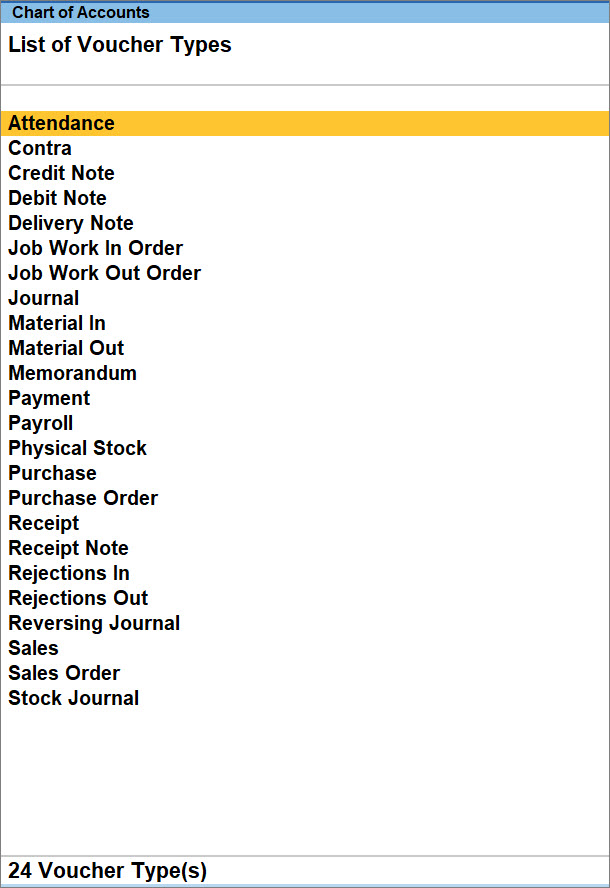
View the pre-defined voucher types
- Press Alt+G (Go to) > type or select Charts of Accounts > Voucher Types > and press Enter.
Alternatively, Gateway of Tally > Charts of Accounts > type or select Voucher Types > and press Enter.
The List of Voucher Types screen appears as shown below:
Voucher class for voucher types
Voucher classes are templates for voucher types. Used Voucher class aids in faster data entry, appropriate allocation of stock item to ledgers, helps eliminate mistakes of wrong ledger selection, and invoice level rounding. You cannot use a voucher class in voucher alteration.
Use voucher classes for Sales & Purchases cycles
A sample voucher class creation for sales transaction is as given below. You can use separate voucher classes for each type of sales for error-free and faster data entry while ensuring the following.
- Selection of appropriate party in each type of sale.
- Usage of specific ledgers for accounting allocation of stock items.
- Inclusion of appropriate tax ledgers in the voucher by default.
- Uniform calculation of additional charges.
- Application of similar invoice level rounding off.
Create voucher class for sales or purchase
- Press Alt+G (Go to) > Alter Master > type or select Voucher Type > Sales > and press Enter.
Alternatively, Gateway of Tally > Alter > type or select Voucher Type > Sales > and press Enter. - Enter the Name of Class and identify the parties for which the class can be used. If you do not see this option use F12 (Configure) to get the option.
- Under Include these Groups, select the required group to be made available in Party A/c Name while creating vouchers. Alternatively, you can use Exclude these Groups if the number of groups to exclude is lesser.
- Allocate the accounting ledger for stock items.

- Select the sales ledger to allocate stock items and set the allocation percentage. You can also select other ledgers along with sales and divide the stock item allocation among the selected ledgers. If tax ledgers need not be shown separately in the voucher, you can include those here.
- Set Override using Item Default to No so that for all items the allocation is to the selected ledger. In case you want to use the default allocation in the stock item master for some cases, set Override using Item Default to Yes.

This screen shows the allocation of items with 5% commission, where the rate includes commission.
The allocation shown is calculated as “Sales = (100/105)*100 = 95.238” and “CGST & SGST = ((100/105)*5)/2 = 4.762”
- Set the Additional accounting entries like tax, transportation charge, loading charge, and invoice rounding off.
- Select the additional ledgers to be included in the voucher, to avoid selection each time. Include tax ledgers at the end of the list to ensure that tax gets calculated for the other additional ledgers.
- Select the Type of Calculation. If you select As User Defined Value, you need to enter the value during voucher entry. For GST ledgers, automatically the Type of Calculation is set as GST. In all other cases you need to provide the Value Basis for calculation.
- Set Remove if Zero as needed.

Here, different ledgers are used, and the ledgers will not be shown in the invoice if the calculated value is zero as Remove if Zero is set to Yes.
When using voucher class you cannot select additional ledgers during transaction.
In a similar way, you can create a voucher class for a purchase voucher type. In case of interest, the calculation is not needed for credit notes and debit notes. You can create voucher classes for these two in the same way. If you have setup your ledger for interest calculation, your sales transactions automatically calculates the interest accordingly and the same gets reflected in the Interest Calculation reports.
Record Sales or Purchase transactions using voucher class
Using a voucher class for a sample transaction (sales voucher) is as follows.
- Press Alt+G (Go to) > Create Voucher > press F8 (Sales).
Alternatively, Gateway of Tally > Vouchers > press F8 (Sales). - Select the voucher class and the party. You can select only the parties satisfying the condition set in the voucher class.
- Enter the item details.
The ledgers specified in the voucher class are displayed. You can enter the values, or the values are calculated as set in the voucher class. In case tax ledgers are included in the voucher class, taxes are calculated as per ledger definition.
- Provide Narration, if any, and accept the sales voucher screen. As always, you can press Ctrl+A to save.
In a similar way you can use voucher classes for creating sales order, purchase, purchase order, delivery notes, and receipt notes.
Use voucher classes for Receipts, Payments and Contra entries
Use voucher classes for receipts to pre-fill the specific source of money as cash or bank. Similarly, you can specify the destination of money in the case of payments and contra entries.
The following image shows a sample voucher class for cash Payments using a Payment Voucher Type.