Top Queries
Import Data
No, currently, TallyPrime only supports horizontal mapping for data import. Vertical mapping is not possible.
No, TallyPrime does not apply automatic rounding off after import. If rounding off is required, you must add a separate column for rounding adjustments in the Excel file before importing.
Currently, TallyPrime does not support importing bank transactions via the Import Data from Excel feature.
This error appears when the total of Debit and Credit amount is not equal in a voucher. Ensure that the total of the Debit and Credit amount is equal while making ledger entries.
When importing a transaction with a round-off ledger through Excel Import, you must include details such as the ledger name, ledger amount, and whether the ledger amount is a debit (Dr) or credit (Cr). During data mapping, you can align these details with the corresponding fields in TallyPrime.
Note that TallyPrime does not apply automatic rounding off after import. If rounding off is required, you must add a separate column for rounding adjustments in the Excel file before importing.
Transactions may appear in the “Uncertain Transactions” bucket if essential Buyer/Supplier details are missing while importing sales transactions. To ensure accurate classification in the GSTR report, make sure to provide complete Buyer/Supplier details for each voucher during the import process.
GST-India
To learn how to manage your B2C (Large) Invoices as per Notification No. 12, refer to B2C (Large) Invoices as per Notification No. 12 – Workaround.
In some cases, transactions accidentally appear in the Marked for Deletion on Portal section of GSTR-1 due to some changes in the transaction details, as explained below. You can easily address such cases by making the suggested updates.
This exception occurs when the Voucher No. or Document No. is duplicate. In case of duplicate voucher numbers, drill down to the voucher and update the voucher number. In case of duplicate document numbers, you can update the voucher numbering from the respective voucher type master. Refer to Duplicate Voucher No./Document No. for the detailed procedure.
This error may appear while uploading the JSON file to the GST portal. Below are the possible solutions.
- Copy the data as a backup.
- Download and install the latest release of TallyPrime.
- Open the company data in TallyPrime.
- Ensure all Incomplete/Mismatch in information in GSTR-1 are resolved, and all masters GSTIN including HSN details are validated.
- In case, e-Invoice is applicable to your business, you need to open the GSTR-1 report in CSV format, and upload the files created for sections other than B2B, and exports. For more information, refer to the Use the GST Offline Tool.
If the error appears again, and the Status is Processed with Error, then error report is generated in the GST portal.
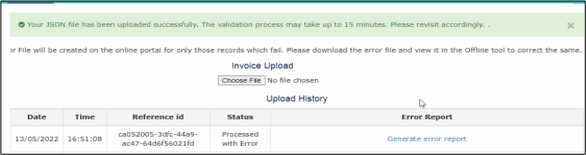
To know the cause, under the Error Report column click Generate error report.
- Download the error report from the GST portal.
- On GST portal > Downloads > Offline Tools > Returns Offline Tool.
- Click Download to download the error report.
-
Open the downloaded error report file. Refer to the Use the GST Offline Tool.
The errors are listed for transactions. While filing GSTR-1, the common errors and solutions are mentioned on the table below:Error Cause & Solution Invalid UQC Cause: UQC for HSN is blank or not valid or created New UQC where GSTIN accepts values only from the recommended list. Solution:
- Gateway of Tally> Alter > Unit.
- Press Enter to select the Unit Quantity Code (UQC) from the list of Units.
- On Unit Quantity Code (UQC) field, select the UQC from List of UQCs.
The list is published as per the GSTIN updates. If a new UQC is selected from the list, press Ctrl+A to save and try to upload on GSTR-1.
Inactive GSTIN Cause: According to GST norms, if your GST Registration is cancelled, your GSTIN is no longer valid. Solution: Make a note of the inactive GSTINs and follow the steps below to convert those transactions (where inactive GSTIN was used) from B2B to B2C sales.
- Press Alt+G > search GSTR-1.
- Press Enter on B2B Invoices 4A, 4B, 4C, 6B, 6C.
- Select the inactive GSTIN and change the nature of transactions as Sales to Consumer – Taxable.
Note: In case you need to move multiple transactions to B2C, then alter the party master’s Registration Type as Consumer and remove the GSTIN to avoid the same error for upcoming Transactions billed for the customer.
State code is not available.
or,
The place of supply and state code of the supplier should be different for Inter State Supply.Cause:
- New state created by the users instead of selecting state from List of States
- Data is imported from other software
- Due to spelling errors while creating a new state
- Letters of the state is created with upper case
- The state code starting and Place of supply are different
Solution:
- TallyPrime has listed all the states and their state code as per the GSTN Master sheet. Recommend selecting the state from List of states, so that the respective state code can be assigned accordingly while exporting returns.
- In case the place of supply is modified during voucher entry, ensure the place of supply is the same as the supplier state when IGST is collected, or the place of supply code is the same as the supplier state when CGST / SGST is collected. For example, when the place of supply is Karnataka, GSTIN / State Code should be always starting with 29.
HSN does not belong to the service/Goods
or,
Invalid HSN/SACCause: Type of supply is wrongly configured in inventory or accounting Master. Solution:
In case of Services, HSN/SAC should begin with the number 99, which identifies the code as a SAC and not an HSN. Click here to know the correct HSN details. Make a Note of HSN/ SAC for reference.
- Gateway of Tally > Alter > select the Ledger, and press Enter.
- Under Statutory Details, ensure the Type of Supply is selected as Goods, and HSN/SAC starting with other than 99, and if the Type of Supply is Services, the HSN/SAC is starting from 99. In case of incorrect HSN code, validate the details from HSN code and enter the appropriate HSN/ SAC.
Voucher number not maintained for invoices.
or,
Invoice number does not exist.Cause: An invoice number is must for any GST transactions not exceeding 16 characters, containing alphanumeric with/without special characters including “-“or “/” for any financial year. Generally, this is found in Journal or Receipt vouchers wherein GST is levied and doesn’t have voucher number series. Solution:
- Check the voucher type and ensure that all Invoices with GST have Invoice Numbering set.
- In GSTR-1, select Document Summary and check the serial number for any voucher type. If it is blank, provide the voucher number in the relevant vouchers and try to upload with a new JSON.
IGST is mandatory for interstate supply and CGST & SGST should not be present. Cause:
- The nature of transactions is overridden.
- The place of supply is changed during the entry.
- In case the transaction supplies covered under section 7 of IGST Act, SGST and CGST, and IGST are counted as wrong for the interstate supply. Wherein IGST to be charged although supplier and buyer in the same state in case of courier services.
Solution: Follow the steps below to resolve the error:
- Make a note of the invoice number displayed in error report.
- Check the place of supply and the State of the Buyer to whom goods are billed.
- Select the appropriate nature of transaction if the nature of transaction is overridden.
- In the Statutory Details screen, set the option Supplies under section 7 of IGST Act to Yes. For more information, click here.
Date is invalid, the invoice date cannot be before the registration date. Cause: The invoice date is earlier than the date buyer obtained for GST registration or GSTIN. Solution: Before the date of GST registration, all such transactions should be B2C sales. After confirming the date from the customer, or check the effective date of registration from Goods & Services Tax (GST) | Services, create a new party with GSTIN Number and then start issuing GST invoice. Please enter some value in IGST tax amount field / Export Sales Transactions. Cause: Sales invoice for a foreign party with a Nil Rated item, wherein by default the nature of the transaction will Export Nil Rated, and GST Payment type should capture as WOPAY instead of picking WPAY. Solution:
- From the error report, note the transaction.
- Open JSON file through Notepad and search for exp_typ:WPAY.
- Update WPAY to WOPAY.
- Save the file and re-upload the JSON file.
Error in JSON structure validation. Cause: The GSTN portal cannot recognize the uploaded JSON file, or there are structural errors in the uploaded JSON file. Solution: Follow the steps below to resolve the error:
- Ensure that the GSTIN is specified on the JSON file. If the same is blank or not available,
- Gateway of Tally > press F11 > set Enable Goods and Services Tax (GST) as Yes.
- Check whether the Company GSTIN is provided, if not provide the same and re-export the JSON file.
- Secondly, ensure that the uploaded JSON file is the latest and has been exported from the latest TallyPrime Release.
Errors encountered while uploading the file. Cause: Due to multiple users accessing the GSTN portal to upload the file. Solution: Try to upload the JSON file after some time or login to the GST portal from another browser and retry.
This exception occurs when certain GST Registration Details are missing or invalid for your party.
You can resolve this exception using any one of the following:
This exception occurs when the Tax Ledger is missing in the transaction. To resolve this exception, you can update the relevant tax ledgers in the transactions. Refer to Tax Ledger is not specified for the detailed procedure.
This exception occurs when the Taxability Type is missing or invalid in the GST details for stock items. You can resolve this exception using any one of the following:
This exception occurs when the HSN/SAC is missing or invalid in the GST details for stock items.
You can resolve this exception using any one of the following:
This exception occurs when the Tax Rate is missing in the GST details for stock items.
You can resolve this exception using any one of the following:
This exception occurs when an incorrect Tax Ledger is selected in the transaction. You can resolve this exception by updating the transaction with the correct tax ledger. To learn more, refer to Incorrect Tax Ledger is selected for a detailed resolution.
e-Invoice-India
The duplicate IRN error occurs when an IRN for an e-invoice has already been generated and canceled, and then reused for another voucher. It also appears while creating a new voucher using the same voucher number as the canceled e-invoice.
Say, for voucher number 1, you generated an e-invoice and canceled it later. If you are now generating an e-invoice for another voucher with the same voucher number, you will be prompted with a duplicate IRN error.
In this case, record the new voucher with a different voucher number. Also, remove the IRN from the e-invoice details and then generate the e-Invoice using the new voucher.
- If the IRN/QR code does not exist for the said invoice, you can use “Get IRN” instead of re-generating. This can be done within 72 hours of IRN generation.
- In case of auto-numbering, it is recommended not to delete the voucher. But in case you have deleted the voucher, insert the same voucher and select ‘Get IRN’. If more than 72 hours have passed, you will need to issue a credit note for the transaction.
You can easily mark an e-Invoice for cancellation from the e-Invoice – Voucher Register and then send the e-Invoice for cancellation from the Exchange menu. Refer to Cancel IRN/e-Invoice for the detailed procedure.
e-Way Bill
To enjoy the benefits of e-Way Bill in TallyPrime, you have to enable the e-Way Bill facility in your company features under the GST details. Once configured, you can easily generate an e-Way Bill while saving your invoice. Refer to Enable e-Way Bill in TallyPrime and Generate e-Way Bill for the detailed procedures.
If you’re on TallyPrime Release 3.0 or later, you can access the portal directly from the product to calculate the distance.
- During voucher creation, set Provide e-Way Bill details to Yes.
The e-Way Bill Details screen appears. - Press Alt+L (Calculate Distance on Portal).
You will be redirected to the portal on which you can calculate the distance between the pincodes.
However, if you are using TallyPrime Release 2.1 or earlier, then you can open the following link in a browser and calculate the distance between the pincodes:
The facility of generating e-Way Bills on saving a voucher is provided for Sales Invoice and Delivery Note so that you can conveniently generate an e-Way Bill at the time of voucher creation. For other voucher types, including Credit and Debit Notes, Sales-POS, Journal Voucher, Receipt Note, and others, you can use the Send for e-Way Bill option under Exchange, which is on the top menu. The option enables you to upload multiple transactions for e-Way Bill activities.
This error occurs in the following scenarios,
- a foreign party is selected in both the Bill to and Ship to sections of the Party Details or Additional Details screen
- you may have specified the Pincode as 999999 and the State as Other Territory in the Ship to section
- you may have skipped the necessary Ship to details.
You can easily fix this error by updating the necessary details in the recorded transaction’s Party Details or Additional Details screen. Refer to Error description: Ship to details are mandatory for export transactions to generate EWB for the detailed procedure.
Licensing
Your TallyPrime license might have turned to Educational Mode on the server or client computer.
On the server computer, this might have happened due to a compromised license, a change of computer, or missing TallyPrime.lic file, and so on. Refer to TallyPrime Turned to Educational Mode on the Server Computer for the detailed procedures.
On the client computer, TallyPrime may have gone into Educational Mode due to inappropriate license configured, interrupted network connectivity or license blocked by Windows firewall, and so on. Refer to TallyPrime Turned to Educational Mode on the Client Computer for the detailed procedure.
You can surrender the license directly from TallyPrime or through the Tally website. Refer to Surrender License for the detailed procedure.
If your license has switched to Educational Mode, you must reactivate it on the same computer. Refer to Reactivate License for the detailed procedure.
You can activate a new license, whether single-site or multi-site, directly in TallyPrime from the startup screen. Refer to Activate License for the detailed procedure.
You can update your license in TallyPrime by updating the License Information details which can be accessed from the F1 (Help) menu. Refer to Update License for the detailed procedure.
Accounting and Finance
TallyPrime provides you the flexibility of reusing the voucher number of a deleted voucher in a new entry. You can follow the steps listed below:
- Open the voucher where you want to apply the unused voucher number and press Ctrl+I (More Details).
- Select Voucher No. Details > Select Unused Voucher Nos.
- From the List of Unused Voucher Nos., select the voucher number you wish to reuse.
- Press Enter to apply the selected voucher number to the new voucher entry.
This process allows you to efficiently reuse voucher numbers that were previously deleted.
For more information, refer to show unused vch nos. in transactions for Retain Original Voucher No. behaviour.
There may be a difference in opening balances in the Trial Balance report due to the following reasons:
- When you create a new company in a new financial year, there may be a mismatch in the total of debit and credit opening balances. This can either be due to the manual entry of Opening Balance or due to the import of data from the previous company or removal of opening balances from certain ledgers.
- When the data is split, and you have tried to change the carried forward opening balances.
- Importing or sync of ledger opening balances which will overwrite the existing balances.
To know more about how to adjust these differences in the opening balance, refer to Balancing Difference in Opening Balances.
There are two types of unadjusted Forex gain or loss –
- Realised unadjusted Forex gain or loss
- Unrealised unadjusted Forex gain or loss
Realised unadjusted Forex gain or loss
Realised unadjusted Forex gain or loss show the actual gain or loss incurred during bill setting off.
Let us take an example.
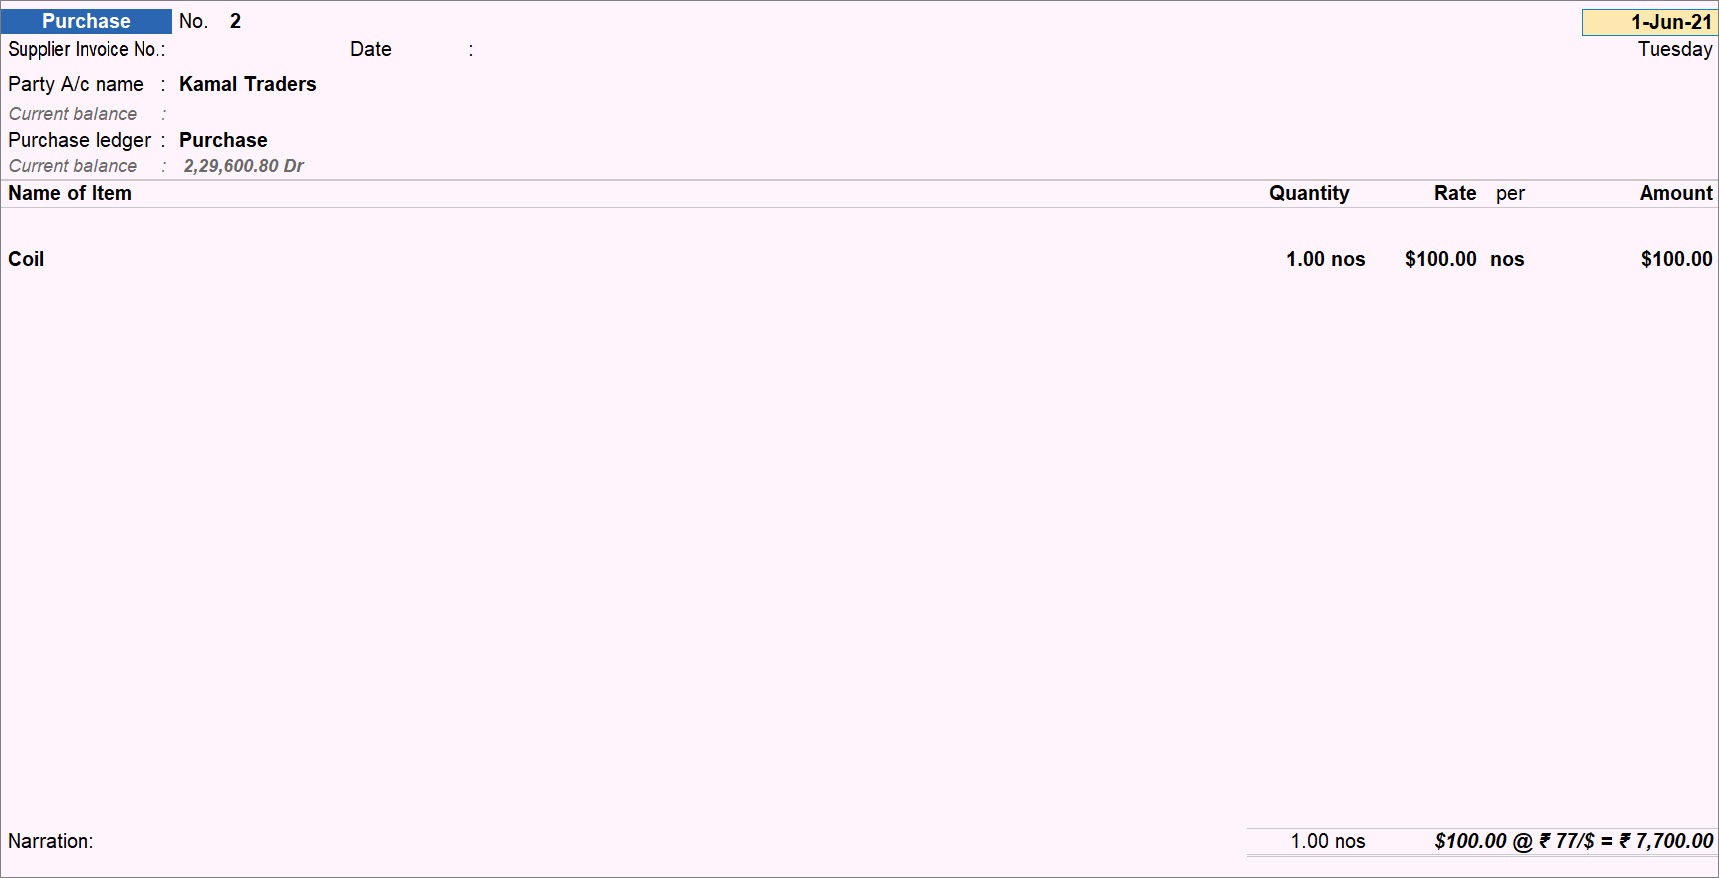
Create a purchase voucher as of 1-June-21 of $100 with exchange rate of Rs 77/$.
- Press Alt+G (Go To) > Create Voucher > press F9 (Purchase).
- Enter all the details as shown in the image below.
The purchase amount will be equal to Rs 7700.
The purchase voucher appears as shown below.
Now, on 2-June-21, the amount against the purchase voucher thus made was being paid. However, the exchange rate has changed to Rs. 78/$.
Create a Payment voucher for the same.
- Press Alt+G (Go To) > Create Voucher > press F5 (Purchase).
- Enter all the details as shown in the image below.
The Payment amount happens to be Rs. 7800, which Rs. 100 more than the amount in the purchase voucher.
The payment voucher appears as shown below.
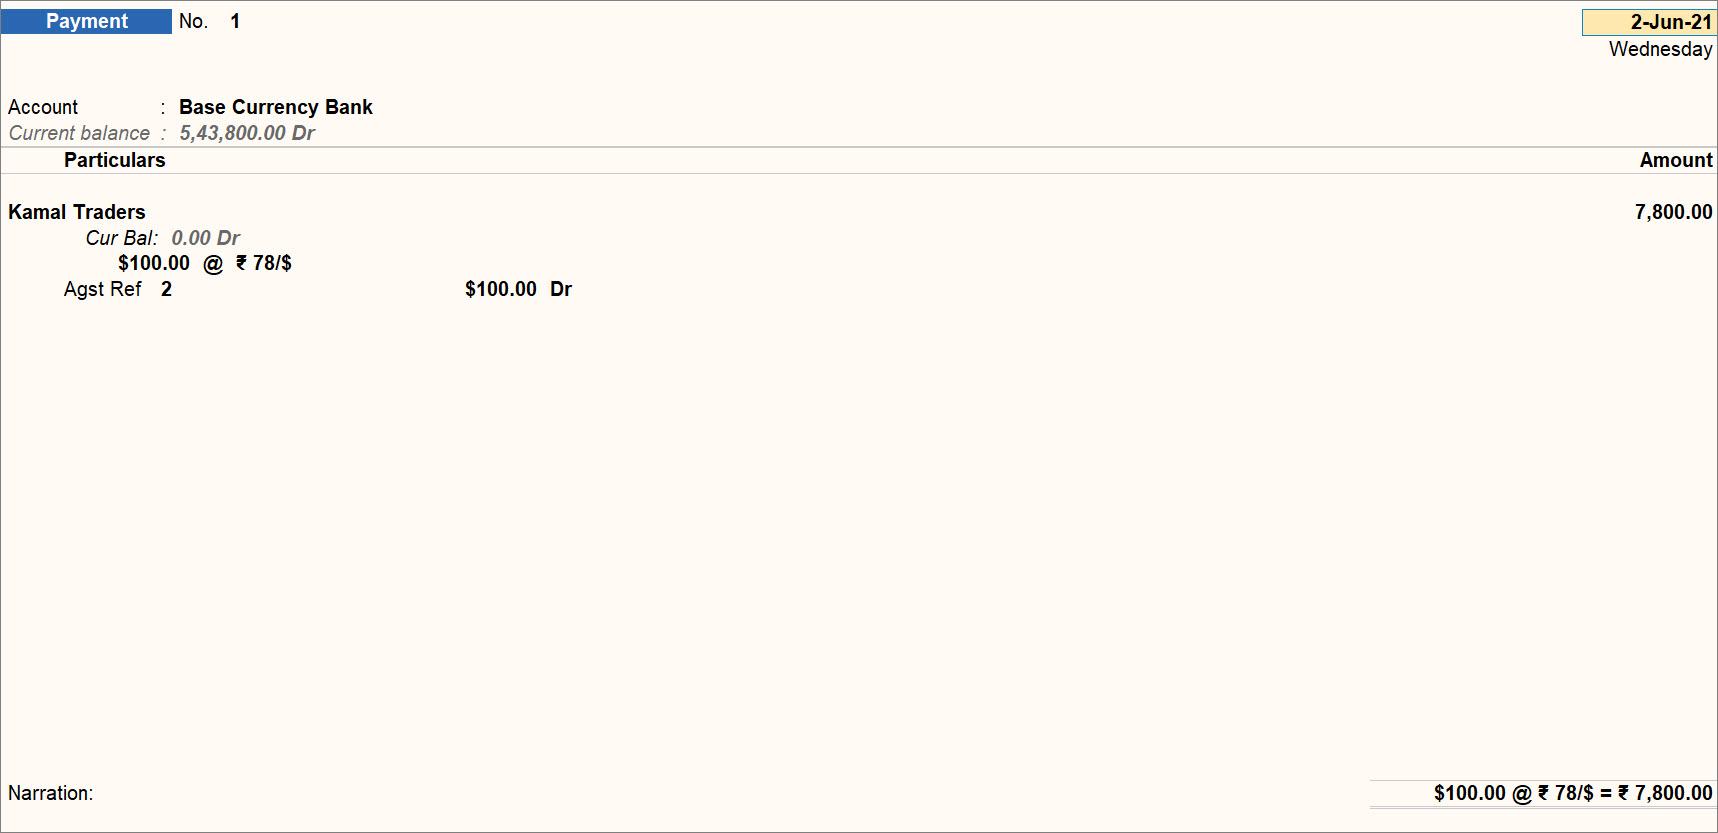
Here, the Realised Forex Loss is Rs. 100.
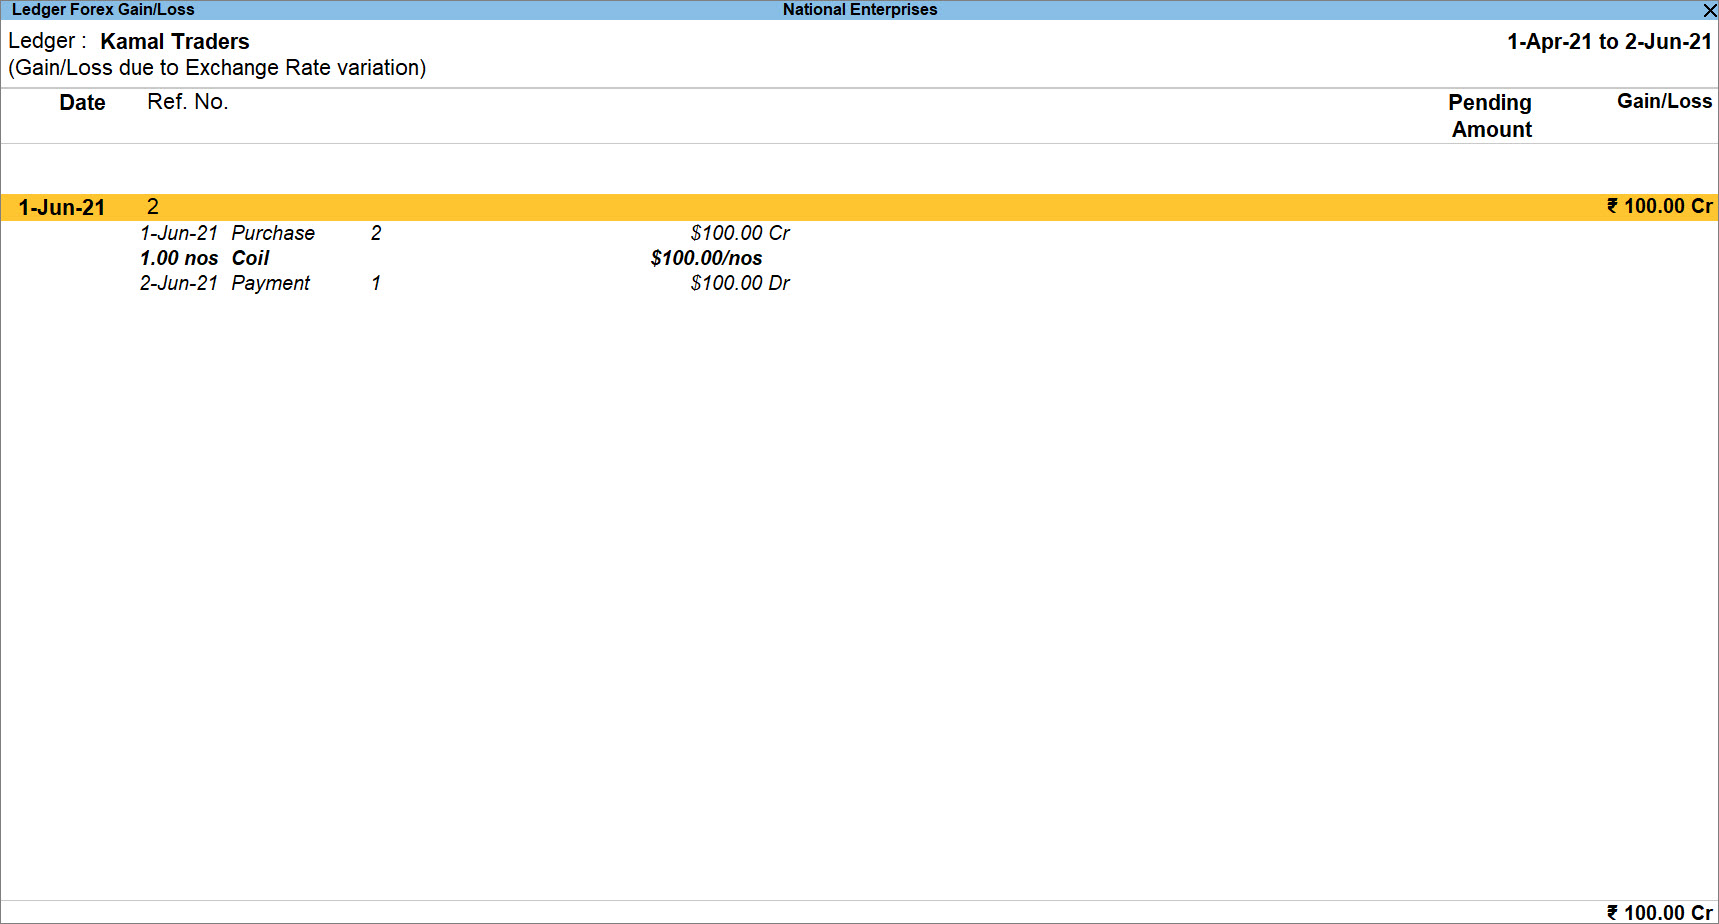
Now, open Ledger Forex Gain/Loss Statement for the ledger.
- Press Alt+G (Go To) > type or select Ledger Forex Gain/Loss Statement and press Enter > type or select the name of the ledger and press Enter.
The Ledger Forex Gain/Loss report screen appears. - Press Enter on the respective date, which is 1-Jun-2021 in this case.
You can see that the Realised Forex Gain/Loss is Rs. 100.
Unrealised unadjusted Forex gain or loss
This amount shows the expected Forex Gain or Loss incurred for unadjusted Bills within a specified period.
For example:
On 1st July 2021 – Purchase voucher worth $100 was recorded with exchange rate as Rs.70/$. The amount will be Rs.7000.
On 5th July 2021 – Purchase voucher worth $100 was recorded with exchange rate as Rs.75/$. The amount will be Rs.7500.
Unrealized Bill for 1st July 2021 Purchase – Forex Gain is Rs.500/- [$100@Rs.75/$ – $100@Rs.70/$].
On the contrary, unrealized Bill for 5th July 2021 Purchase – Forex Gain is NIL [$100@Rs.75/$ – $100 @Rs. 75/$].
A summary of transactions mentioned above is tabulated below.
|
On 5-July-21 |
||||||
| Date | Particulars | Forex Amount | Rate of Exchange | Forex Rate | Forex Gain/ Loss | |
| 01-July-21 | Purchase | $100 | Rs.70/$ | Rs.75/$ | Rs.5/$ | Rs.500 |
| 05-July-21 | Purchase | $100 | Rs.75/$ | Rs.75/$ | NIL | NIL |
Determining Rate of Exchange
Rate of Exchange is determined based on the following aspects:
- TallyPrime checks for the Standard Rate of Exchange on a given date.
- If the Standard Rate of Exchange is not provided by you, then TallyPrime checks for Buying Voucher Rate.
- If Buying Voucher Rate is not available, then TallyPrime checks for Buying Specified Rate.
- If Buying Specified Rate is not available, then TallyPrime checks for Selling Voucher Rate.
- If the Selling Voucher Rate is not available, then TallyPrime checks for Selling Specified Rate.
If a party ledger has no recorded transactions and no future business is expected, you can delete it. To delete such type of unused ledgers at once, refer to Delete Unused Ledgers at once.
You can disable Cost Centres in TallyPrime when you do not need to use the feature anymore. You can refer to the section Disable Cost Centre in TallyPrime in the topic Cost Centre or Profit Centre in TallyPrime.
Purchase and Inventory
When a company wants to maintain inventory separately or when the stock reports in the system and godown are different, the opening and closing of stock are usually entered manually.
To do this in TallyPrime:
- Disable the accounts and inventory integration option.
- Press F11 (Features) > set the option Integrate Accounts with Inventory to No.
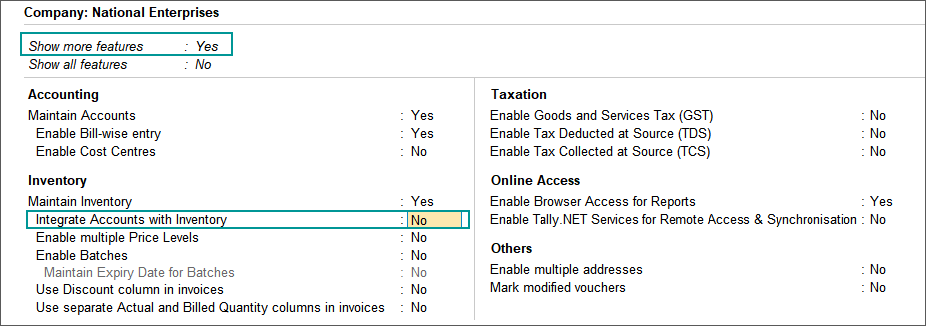
- Accept the screen.
- Press F11 (Features) > set the option Integrate Accounts with Inventory to No.
- Create a Stock-in-Hand ledger and enter the opening stock amount.
- Press Alt+G (Go To) > Create Master > Ledger > and press Enter.
Alternatively, Gateway of Tally > Create > Ledger. - Enter the Name and select Stock-in-Hand in the Under field.
- Enter the amount of stock in Opening Balance field as shown below:
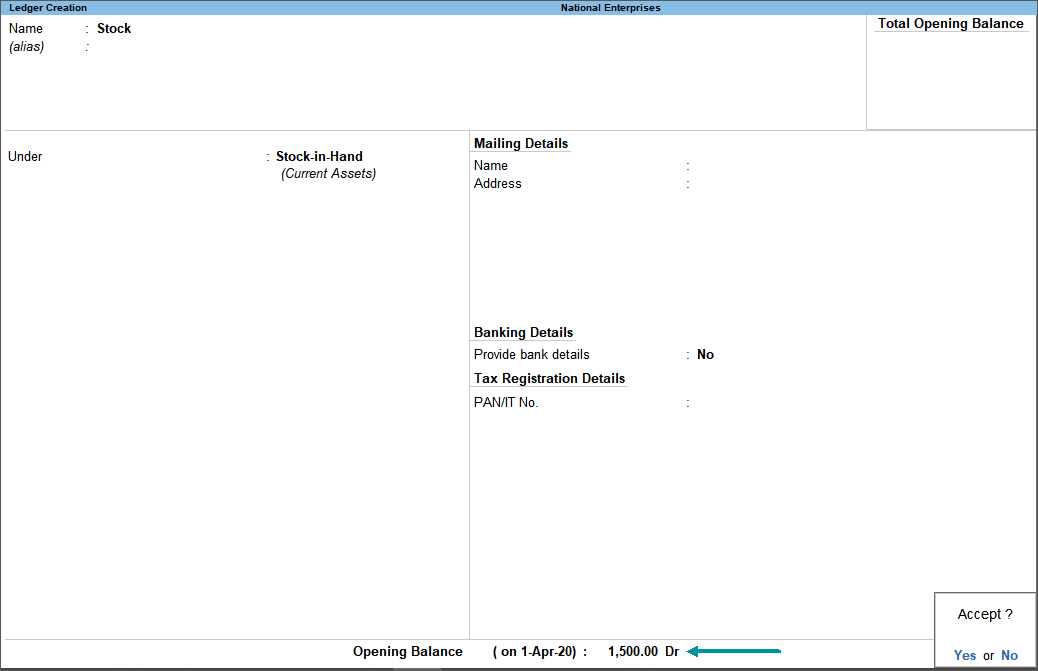
- Accept the screen. As always, you can press Ctrl+A to save.
- Press Alt+G (Go To) > Create Master > Ledger > and press Enter.
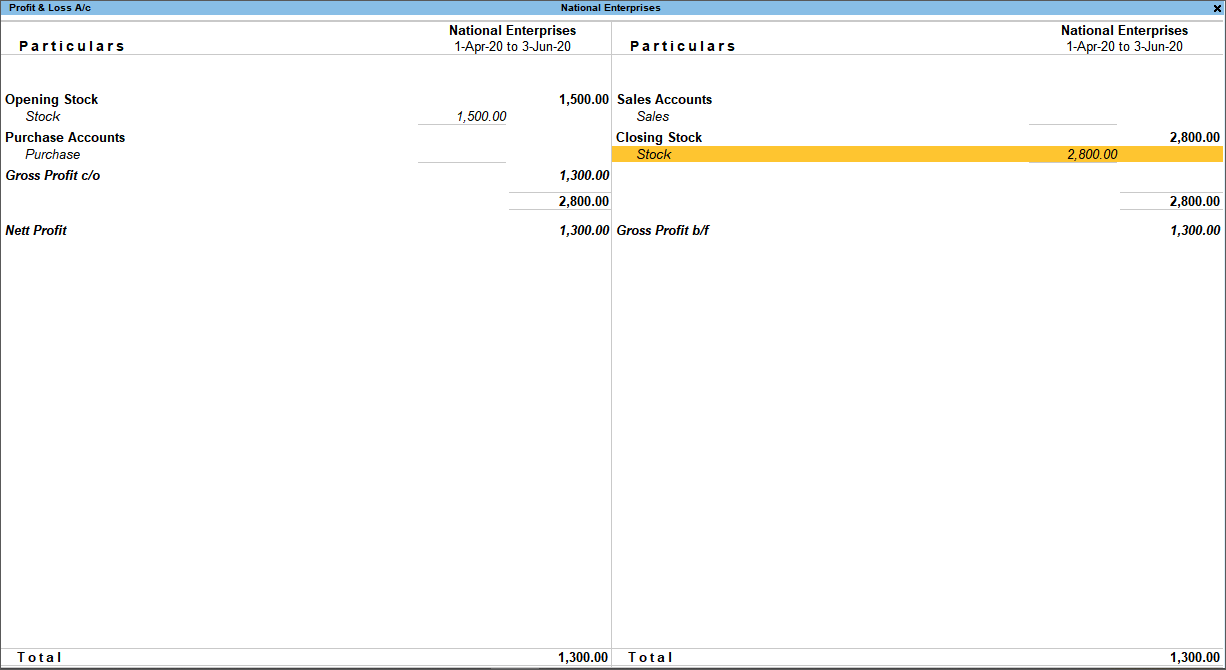
- For closing stock, open the Stock-in-Hand ledger in alteration mode, and specify the closing date and amount.
- Press Alt+G (Go To) > Alter Master > Ledger > select the Stock ledger > and press Enter.
Alternatively, Gateway of Tally > Alter > Ledger > select the Stock ledger > and press Enter. - Enter the closing date and the amount of closing stock balance as shown below:

- Accept the screen.
- Press Alt+G (Go To) > Alter Master > Ledger > select the Stock ledger > and press Enter.
Now, you can view the opening and closing stock balance in Balance Sheet and Profit & Loss Account.
To view the Balance Sheet, press Alt+G (Go To) > type or select Balance Sheet > and press Enter. Alternatively, Gateway of Tally > Balance Sheet.
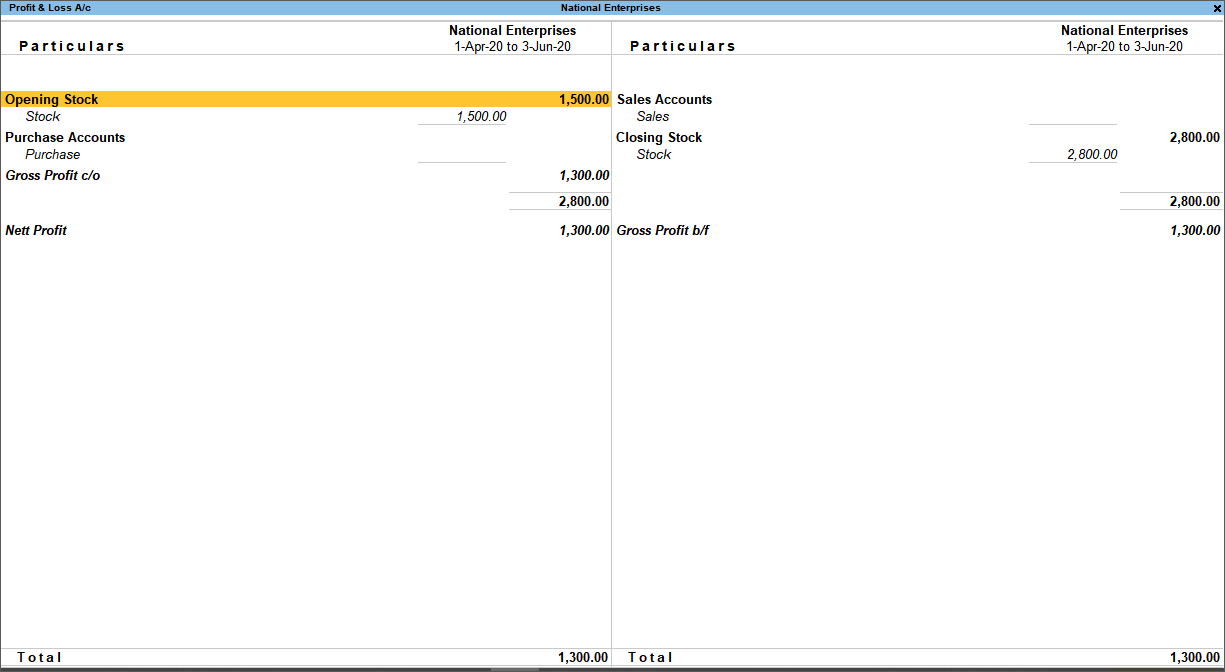
Notice that the opening balances and closing stock displayed are the exact amount entered manually at the Ledger Creation and Alteration screens respectively.
Similarly, the manually entered opening and closing stock balances will be displayed in the Profit & Loss Account. To view the same, go to Gateway of Tally > Profit & Loss A/c.
You can delete a master only when it is not used in another master or transactions.
Stock Item
A stock item cannot be deleted due to the following reasons:
- Stock items are used in transactions.
- The stock item has been configured as component in BOM (bill of material creation) or BOM transaction is recorded.
- The stock item has been configured in voucher class by enabling default accounting allocation for stock item.
Stock Group
A stock group or unit of measure (UoM) cannot be deleted due to the following reasons:
- The stock item which is grouped under a stock group having the unit of measure, has been used in transactions.
- The stock group is used as a sub-group or main group for any set of groups.
Unit of Measure
The unit of measure (UoM) cannot be deleted due to the following reasons:
- The stock item in which the UoM is defined, has been used in transactions.
- The stock item which is grouped under a stock group having the unit of measure, has been used in transactions.
- The stock item in which the UoM is used, has been configured as component in BOM (bill of material creation) or BOM transaction is recorded.
- The stock item in which the UoM is used, has been selected in the voucher class by under default accounting allocation for stock item.
Godowns
You cannot delete godowns if:
- They are linked to excise unit.
- The data has been continued from excise regime.
- It is the parent godown for other godowns.
- Godown is selected in transactions or in the Opening balance allocation of stock item master.
- Godown is selected in the Bill of Material screen.
This occurs when incorrect godowns or batches are selected in the Stock Item Allocations screen while recording sales or a purchase invoice.
For example, National Enterprises records a sales invoice for a stock item by selecting Chennai godown, with batch – B2, where no stock items exist. The Stock Summary displays negative balance in the Chennai godown, as shown below:

Therefore, when you select an incorrect godown where no stock items exist, the Stock Summary displays negative balance in the godown.
No. Once the stock item is used in any transaction or if the Compound Unit containing this UOM is used in any of the transactions then the UOM of that stock item cannot be altered.
Note: Please ensure to take the data backup before deleting the transactions. The deleted transactions cannot be retrieved.
Watch the video How to Alter UOM & Number of Decimal Places in TallyPrime
In the alteration mode of a Unit of Measurement (UoM), you can increase Number of decimal places in TallyPrime at any point in time.
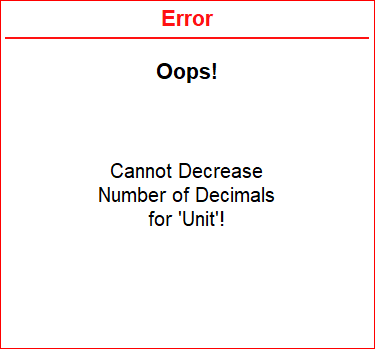
However, you can decrease Number of decimal places for a UoM only if you have not used it in a transaction.
If you decrease Number of decimal places for a UoM after using it in a transaction, you will see an error message.
The Stock Item Allocations screen gets enabled when you enable any of the following features/voucher types. You can then allocate the stock items to the respective godowns/locations, batches, or provide the tracking details.
- Godowns/Locations
- Batches
- Item Cost tracking
- Sales Order or Purchase Order vouchers
- Delivery Note or Receipt Note vouchers.
- Rejection In or Rejection Out vouchers
If you do not want the Stock Item Allocations screen to appear, check if any of the above features/voucher types are enabled in the company data. Take the data backup, and then disable the features/voucher types.
Memory Access Violation (MAV Errors)
This error might occur due to corrupted data or printer driver.
Corrupt Printer Driver
While TallyPrime is opening, it loads the local drivers such as ODBC drivers and printer drivers, to ensure they are available for printing Vouchers & Reports. If the printer driver is corrupted, the error Memory Access Violation appears while opening TallyPrime. To resolve this issue, follow the steps given below:
- Press Windows+R > type Services.msc in the Run command.
- Search for Print spooler > right-click Print spooler > and Stop Print spooler.
- Once the print spooler stops, open TallyPrime to check for the MAV error.
If TallyPrime opens without Memory Access Violation, this indicates that the Printer driver is corrupted, and needs to be reinstalled/updated with the latest available printer drivers.
Note: Updating/installing printer drivers depends on the Printer Name which is being used.
Corrupt Data
After following the steps to fix the printer driver, if the Memory Access Violation error persists while opening TallyPrime, open the tally.ini file, and set Default Companies to No.
Note: When the option Default Companies is set to Yes, only the default company will be loaded. If this data is corrupted due to system-specific issues, the MAV error will appear while opening TallyPrime.
Follow the steps given below, to set the Default Companies to No:
- From Desktop, right-click the TallyPrime shortcut icon > Open file location.
- Open the tally.ini file, and set Default Companies to No.
- Save the changes and close the tally.ini file.
Now open TallyPrime and select the company. If you observe Memory Access Violation while loading the company, then it indicates that the data is corrupted.
Some of the reasons for data corruption are given below:
- File size of Manager.900 file (which stores all the masters such as ledgers, stock items, stock groups, and so on) is 1 KB.
- System-specific issues, for example, hard disk issues or bad RAM.
- System memory is not available when TallyPrime is trying to access it while opening the company.
Check the size of Manager.900 file
If the file size of Manager.900 file is 1 KB, restore the earlier backup if any, and continue. To check the size of Manager.900 file, open the data folder, and follow the steps given below:
- From Desktop, press Windows+R > specify the data path, for example, D:TallyPrimeData.
- Open the specific data folder, for example, 10002 and check the file size of Manager.900.
If the file size of Manager.900 is more than 1 KB then (approx. more than 5MB based on the data volume) the data requires a repair. To perform data repair, follow the steps given below:
- Take a backup of the data folder (copy the company data folder to a different location). For example, if the data folder is D:TallyPrimeData, then open D:TallyPrimeData and copy and paste the data there itself.
- Open TallyPrime > press F1 (Help) > Troubleshooting.
- Select Repair > select the company that needs to be repaired.
- Complete the repair process.
Disable TDL Add Ons
If you are facing the Memory Access Violation error while opening TallyPrime, it is recommended to disable the TDL Add-Ons.
- Gateway of Tally > F1 (Help) > TDLs and AddOns.
- Press F4 (Manage Local TDLs) > set Load selected TDL files on startup as No.
This error may appear while loading a company in TallyPrime if the data is corrupted. The reasons for data corruption are as follows:
- File size of Manager.900/.1800 file (which stores all the masters such as ledgers, stock items, stock groups, and so on) is 1 KB.
- System-specific issues, for example, hard disk issues or faulty RAM.
- Insufficient system memory when TallyPrime attempts to access it while opening the company.
Resolution:
- Check the file size of Manager.900/.1800 file.
- Click the window icon on your computer > type Run and press Enter.
- Specify the Data Path, for example, D:\TallyPrimeData.
- Open the specific data folder, for example, 10002, and check the file size of Manager.900/.1800.
- If the file size of Manager.900/.1800 file is 1 KB, restore the earlier backup, if any, and continue.
- If the file size of Manager.900/.1800 is more than 1 KB (approx. more than 5MB based on the data volume), the data requires a repair.
- Take a backup of the data folder (copy the company data folder to a different location). For example, if the data folder is D:TallyPrimeData, open the folder and copy and paste the data there. This will create a copy of the corrupted data.
- Open TallyPrime > press F1 (Help) > Troubleshooting.
- Under Company Data > select Repair > select the company that needs to be repaired.
To know more about repairing data in TallyPrime, refer to repair the data topic.
This error occurs primarily because:
- The company data folder is not restricted/secured and you accidentally delete the folder, subfolders or files under it.
- Data is corrupted.
You can resolve this issue by:
- Checking for earlier backup if available, restore it and continue.
- If the data backup is unavailable, recreate the data and continue.
To avoid this from happening again, you can deny delete permissions to specific users:
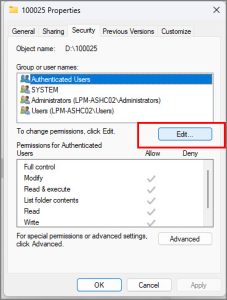
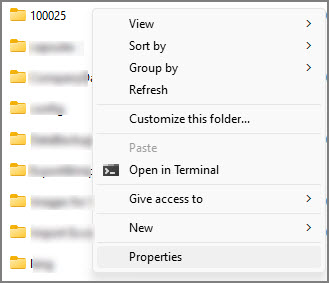
- Open the TallyPrime data folder, right-click on it > Show more options > Properties.
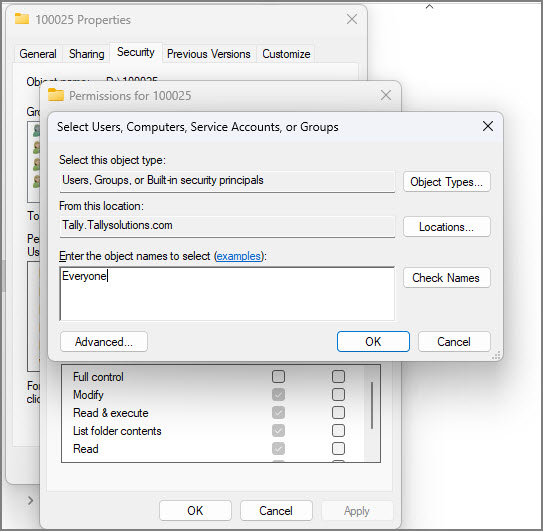
- Under Security > click Edit > Add.
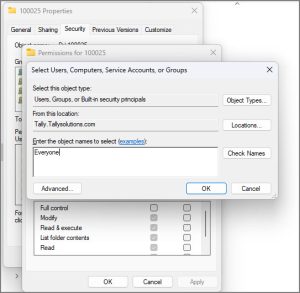
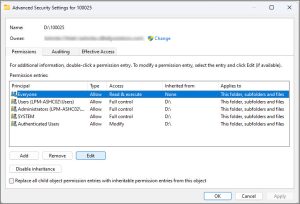
Let’s say you want to restrict everyone from deleting the company data folder, subfolders and files under it. - Under Enter the object name to select > type Everyone > click OK to save the changes.
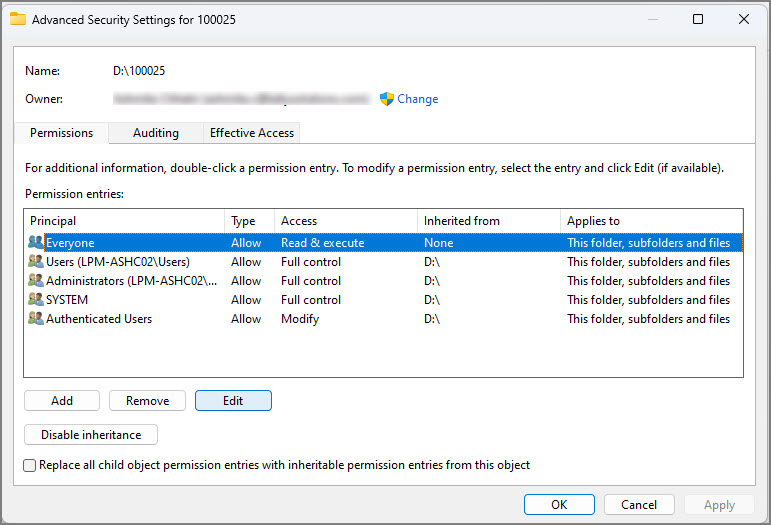
- Now, click Add > select Everyone > Advanced.
- In the Advanced Security Settings screen, select Everyone > Edit.
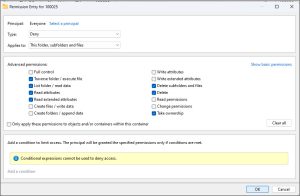
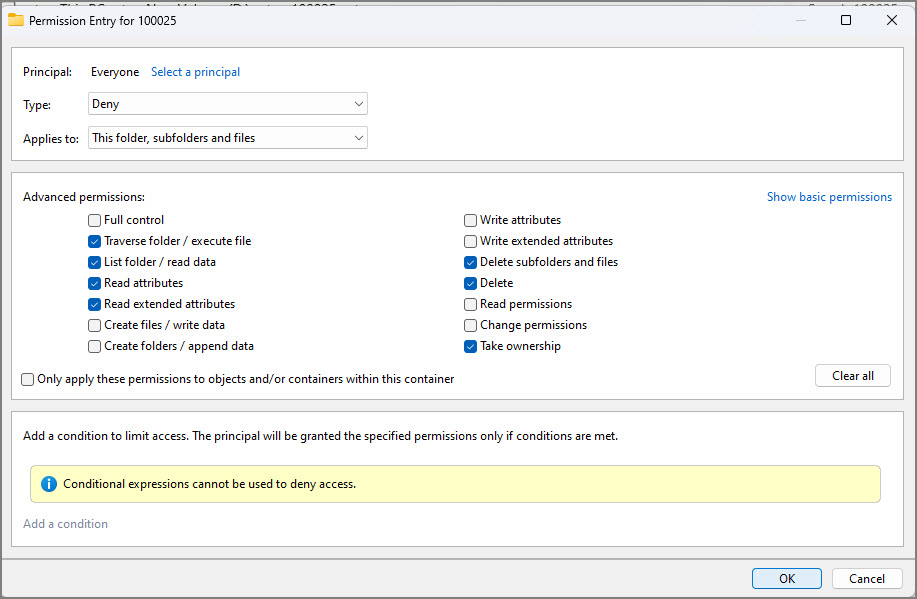
- In the Permission Entry screen, set the deny permissions entry for Everyone.
Note: This will be applicable to the selected folder, subfolders and files under it.- Set the Type to Deny.
- Select Show advanced permissions and ensure the Delete subfolders and files, Delete, and Take ownership options are selected.
- Click Ok to save the changes.
The Advanced Security Settings screen appears, as shown below:
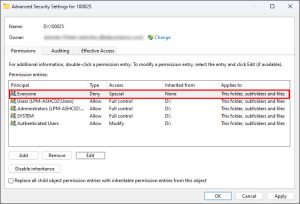
- Click Ok to set the deny permissions entry.
A warning message appears on the screen, as shown below:
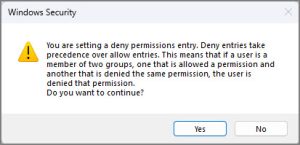
- Click Yes and proceed.
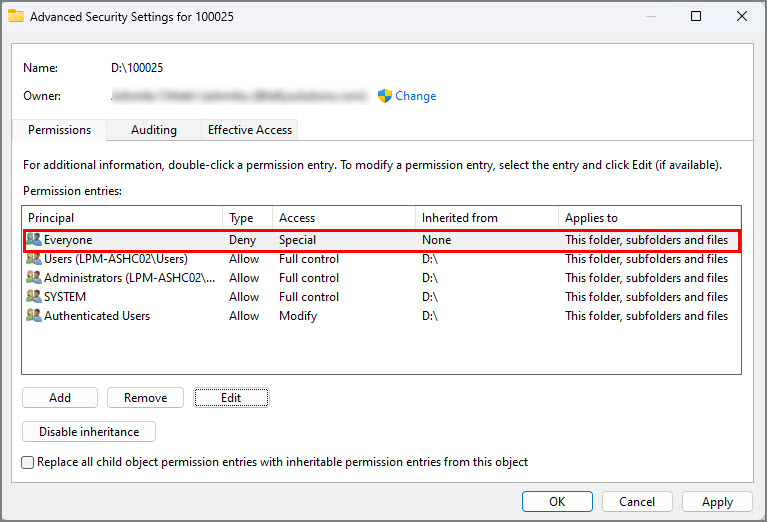

Furthermore, any attempt to delete a company data folder, subfolders or files will result in a File Access Denied error, preventing auto-deletions.
If the Memory Access Violation error appears, perform an advanced repair by following the steps given below:
- Take a backup of the data folder (copy the company data folder to a different location).
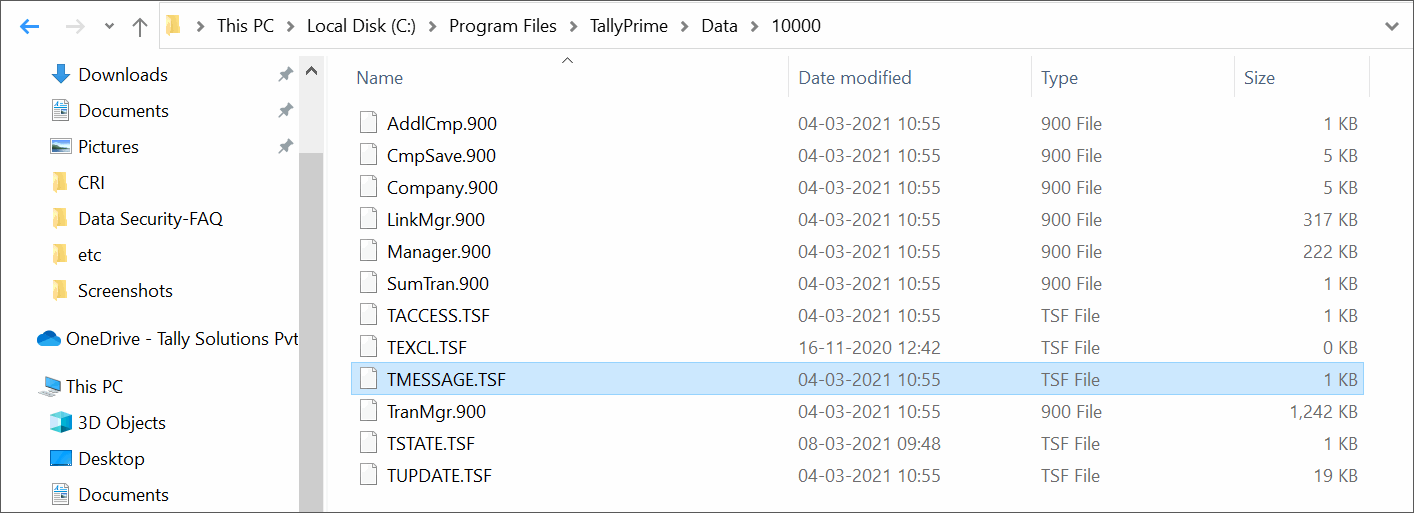
- Delete the files – TSTATE.TSF, TUPDATE.TSF, TEXCEL.TSF, TACCESS.TSF. Rename the data Tmessage.TSF available in the respective data folder.
- Right-click the TallyPrime shortcut icon > copy the TallyPrime Path from Target path.
- Copy the TallyPrime application path to the Run Command, followed by a space, and provide data path, for example, C:TallyPrimetally.exe Data. If the data is stored in a different drive or folder, enter the specific data path within double quotes.
- Once TallyPrime is opened, press F1 (Help) > Troubleshooting.
- Select Repair > select the data to be repaired.
- Post completing the repair process open the company and check.
You need to first take a backup of the data (copy the company data folder to a different location), and then repair the existing data.
Follow the steps given below to repair the data.
- Open TallyPrime > press F1 (Help).
- Select Troubleshooting > Repair.
- Select the company in which the MAV error is appearing, and proceed with the Repair.
If MAV persists even after repair, perform the following steps for advance repair.
- Take a backup of the data folder (copy the company data folder to a different location).
- Delete the files – TSTATE.TSF, TUPDATE.TSF, TEXCEL.TSF, TACCESS.TSF. Rename the data Tmessage.TSF available in the respective data folder.
- Right-click the TallyPrime shortcut icon > copy the TallyPrime Path from Target path.
- Copy the TallyPrime application path to the Run Command, followed by a space, and provide data path, for example, C:TallyPrimetally.exe Data. If the data is stored in a different drive or folder, enter the specific data path within double quotes.
- Once TallyPrime is opened, press F1 (Help) > Troubleshooting.
- Select Repair > select the data to be repaired.
- Post completing the repair process open the company and check.
If the MAV error occurs while printing an invoice, follow the checklist given below.
- Ensure the selected printer is online.
- If the printer is of HP series, and the OS is Windows 7, rename the base currency symbol from new Rupkara to RS.
- If there are multiple printer trays, select any other printer and check.
- Reinstall the printer driver and check.
Data Management – Errors & Resolutions
You can easily migrate your data to TallyPrime Release 3.0 by pressing Alt+Y (Data) > Migrate > select a company.
If you are migrating the company data from TallyPrime Release 2.1 or earlier, TallyPrime migrates the data to a new company with a 6-digit Company Number. A copy of the company with a 5-digit Company Number from the previous release is retained as is in case you need to use the data in the previous release of TallyPrime.
To learn how to migrate your data in TallyPrime, refer to Migrate data to the latest TallyPrime release.
While using TallyPrime in a multi-user setup, all client and server nodes must be updated to the latest release to ensure seamless data functionality and synchronization across all nodes. If you’re experiencing issues locating your company data, it’s advisable to upgrade your TallyPrime server license. For guidance on updating your server, please refer to the Update TallyPrime Server License topic.
In certain cases, after migrating company data from TallyPrime 2.1 to TallyPrime 3.0, you might encounter an issue where the data is not visible in TallyPrime 2.1. This occurs because TallyPrime 2.1 backs up the company data folder during migration, adding a suffix (migrated to 3.0) to the folder name. To make this data visible in TallyPrime 2.1, simply remove the added string (migrated to 3.0) from the data folder name.
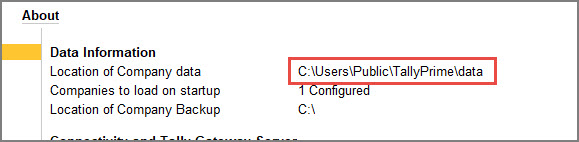
- Gateway of Tally > F1 (Help) > About and press Enter.
About screen opens.
Under Data Information you can see Location of Company data.

- Note down the company data location path and open it on the desktop.
- Rename the required company data folder by removing the string (migrated to 3.0).
Once removed, the company data will be visible in TallyPrime 2.1.
Cause
This error appears while opening a company if the file size of TranMgr.900 is 1 KB.
You will not be able to use this data.
Solution
The company will open only when the file size of TranMgr.900 is more than 1 KB, depending on the data entered.
Restore the data backup taken earlier, and check the file size of TranMgr.900. Based on the data entered, if the file size is more than 1 KB, you can open the company. If not, try to restore the data backup taken prior to that.
Cause: Record Insertion Failure in database occurred while loading a company/saving a voucher in TallyPrime.
Solution:
When this Record Insertion error is displayed, it is suggested that you follow the steps given below:
- Backup your data.
- Press Alt+F1 (Help) > Settings > Startup > set Load companies on startup to No.
- Perform a simple repair by pressing Ctrl+Alt+R.
Alternatively, you can press Alt+F1 (Help) > Troubleshooting > Repair. - In case the problem persists, it is suggested to perform a Zero command rewrite.
We suggest to upgrade to the latest release. In case the problem persists contact Tally Support.
Cause:
This error may occur while opening TallyPrime in the following scenarios:
- TallyPrime data files (such as .tsf or .900/.1800 files) are locked by another process, such as third-party backup software or any other application that accesses the TallyPrime data files. At the same time, TallyPrime attempts to store the data to the database, but it fails.
- Since the Ransomware protection feature is enabled, the antivirus software blocks access to the TallyPrime data.
Resolution:
- Avoid accessing the TallyPrime database by copying or double-clicking the .tsf files.
- Schedule backups when no user is accessing the TallyPrime data.
- Exclude .tsf files from the Exclusion menu of backup tool.
- Add TallyPrime data files to the Exception list of the antivirus software’s Ransomware protection feature.
You can avoid this error by upgrading to the latest release of TallyPrime.
Cause:
This error occurs when the TMESSAGE.TSF file is damaged.
Solution:
To fix this issue
- Right click on the TallyPrime icon and select Open File location.
- Open the Data folder from the file location.
- Open the folder in which the company’s data are stored.
- Delete the TMESSAGE.TSF file if its size is between 0 and 1 KB. If the file size is more than 1 KB, move the file to another location.
- Reload the company in TallyPrime.
Cause: This error occurs due to the duplication of masters (ledgers) in your company.
Solution:
Recommended: Upgrade to the latest release of TallyPrime to prevent this error.
Interim Fix
To fix this issue in your current release, you need to Repair your company data. After Repairing the data, the duplicated masters (ledgers) will be removed from your company data.
- Take a backup of the company data.
- Go to Gateway of Tally > F12 (Configure) > Data Configuration.
- Set Load Companies on startup? to No.
However, if the option Load Companies on startup? was set to Yes by default, then you have to modify the tally.ini file (Tally configuration settings).
To modify the tally.ini file:- Go to the TallyPrime application folder on your computer.
- Open the tally.ini file.
- Set Default Companies= No.
- Press Ctrl+S to save the settings.
- Close TallyPrime.
- Use Command Prompt to enter the path where Tally.exe is located, followed by the data path and the ID number in the error message.
For example, C:Program FilesTallyPrimetally.exe data 1284.
If your data is stored in a different folder or drive (for example, D:TallyPrimetally.exe “D:client data” 1234), enter the relevant path.TallyPrime now starts in the Command Prompt. - Press Ctrl+Alt+R to repair the company data.
To resolve this error, follow the steps below:
- Upgrade to the latest version of TallyPrime.
- Backup your existing company data, and Repair.
This error can be resolved by following the steps below:
- Create a Data Backup.
- Check file size of Transmgr.900/1800. If the file size is 1 KB, restore the earlier backup, if any.
- If the Transmgr.900/1800 file size is large, follow the steps of Repair below:
- Take the existing backup of the corrupted data and perform Zero Command Repair.
- Check the bad sectors on the Hard Disk as well. Click here to view the procedure.
If your company data becomes corrupted, TallyPrime will prompt you to repair it. If the data is from the latest version, you can repair it directly. For older versions, you’ll need to migrate the data, and TallyPrime will repair it internally during the process. Repairing quickly reduces data loss, though some damage might not be fixable. TallyPrime saves important data for you to resolve, and the Repair feature lets you access data in earlier versions after migration. To know more, refer to Repair Company Data in TallyPrime.
Data Configuration in TallyPrime
If you have a single-user license of TallyPrime and want to share a data folder with other users, you can open the TallyPrime data folder to configure the settings and provide access to the required users. After doing so, the data folder will be shared with the users you have given the permission to share. To know more, refer to Data Configuration to share data in single-user mode.
If you are using TallyPrime in a multi-user environment and want to access the shared data in a different Client/Server, you can share the data folder and the shared data will now be available to access from the Client/Server. To know more, refer to Data Configuration to share data in multi-user mode.
In one particular system data is not getting shared/displayed. The system could be a laptop which has not been configured to the same domain. If there is mismatch between the domain, the data won’t get shared. To resolve this:
- From desktop, click on Start > Control panel > Network and Internet.

- Click on Home Group.
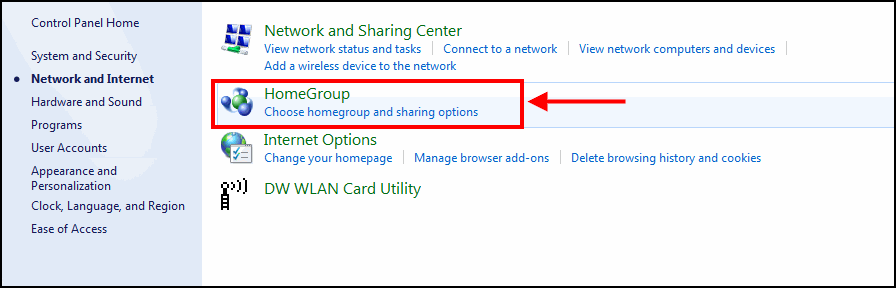
- Click on Change advanced sharing settings.
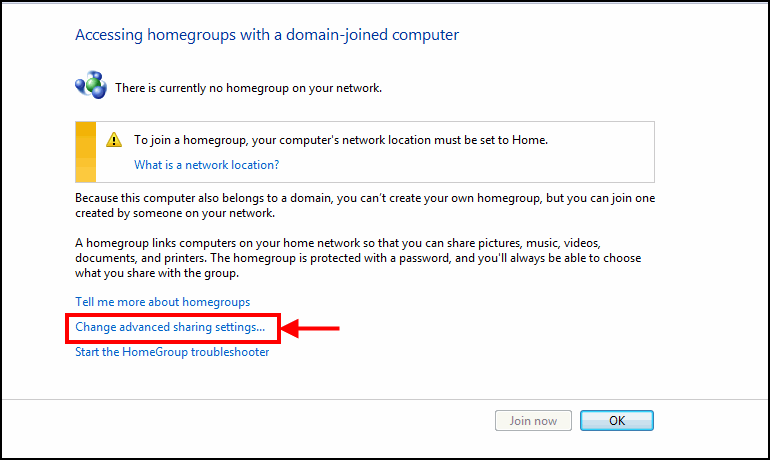
- Under Domain, select Turn off the password protected sharing.
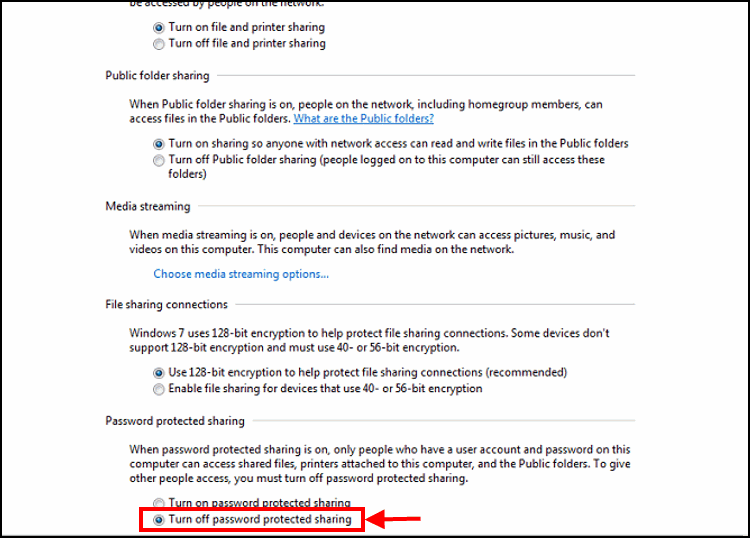
- Click on Save Changes and re-login to system. Now you will be able to share/display the data.