
Create, Alter, & Delete Groups in TallyPrime
In TallyPrime, you can create groups and sub-groups in addition to the existing predefined groups. You can alter groups, if needed. However, altering predefined groups is not recommended because it may cause ledger grouping, reporting, and data interchange issues. Only user-created groups can be deleted; you cannot delete the predefined groups in TallyPrime.
You can create, alter, and delete multiple groups at once from the Chart of Accounts, saving time and effort.
When you create, alter, and delete a group, all three activities are recorded in the Edit Log.
Create Group
- Open the Group Creation screen.
- Option 1: Press Alt+G (Go To) > Create Master > Group and press Enter.
Alternatively, Gateway of Tally > Create > select Group and press Enter. - Option 2: On the fly while creating a ledger.
In the Ledger Creation screen, when your cursor is on the Under field, press Alt+C.
- Option 1: Press Alt+G (Go To) > Create Master > Group and press Enter.
- Enter a suitable Name for the ledger.
- To print the Group name in your preferred language, provide language alias for name.
- Press F12 (Configure) and enable Provide language aliases for Name.
- In the Group Creation screen, press Enter after selecting Name, select your preferred language and add the alias.
- Under: Select Primary or any other predefined groups, based on your requirement.
Press Alt+C to create a new group, if needed.
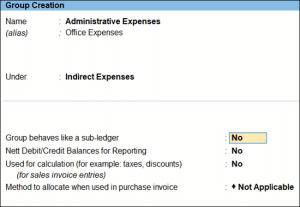
- Nature of Group: Appears only if the group is created under Primary.
- To display the group in the Balance Sheet, select Assets or Liabilities.
- To display it in the Profit & Loss report, select Expenses or Income.
- To classify the group as a direct expense or direct income, enable Does it affect Gross Profits.
- Group behaves like a sub-ledger: Enable this option to treat this group as a ledger under the parent group that does not appear by default in your Chart of Accounts..
- To display the net balance, either debit or credit, whichever is higher, in the report, enable Nett Debit/Credit Balances for Reporting.
- To use percentage-based calculations for ledgers under this Group, enable Used for calculation (for example: taxes, discounts).
- Method to allocate when used in purchase invoice: Select from the List of Allocation Methods to allocate the expense of the item in the ratio of the quantity or value.
- Not Applicable: Keep the expense as a regular expense without allocating it to item costs.
- Appropriate by Qty: Allocate the expense across items based on their quantities.
- Appropriate by Value: Allocate the expense across items based on their values.
Alter Group
Let’s assume you want to move the group Office Expenses from Indirect Expenses to Direct Expenses.
- Press Alt+G (Go To) > Alter Master > Group and press Enter.
- Select the group Office Expenses from the List of Groups.
- In the Group Alteration screen, change the Under field from Indirect Expenses to Direct Expenses.
- Press Ctrl+A to save.
Delete Group
You can delete a group if it is no longer required, created by mistake, or is a duplicate.
In TallyPrime, you cannot delete a group, if:
- The group has sub-groups.
- The group has ledgers created under it.
- The group is a predefined master.
- Press Alt+G (Go To) > Alter Master > Group and press Enter.
- Select the group from the List of Groups.
- In the Group Alteration screen, press Alt+D to delete the group.
Questions & Answers
Can I copy groups from one company to another in TallyPrime?
Yes, you can copy groups from one company to another in TallyPrime.
To copy a single group from one company to another:
- Press Alt+K (Company)> select Company to open another Company.
Ensure that both the source and destination Companies are open in TallyPrime. - In the source Company, press Alt+G (Go To) > Alter Master > Group and press Enter.
- Select a group from the List of Groups and press F3 (Company) to switch over to the destination company.
- Press Ctrl+A to save.
If the parent of the group does not exist, you will not be able to save without selecting a parent in the destination company.
To copy multiple groups together from one company to another in one go:
- Press Alt+K (Company)> select Company to open another Company.
Ensure that both the source and destination companies are open in TallyPrime. - In the source company, press Alt+G (Go To) > Chart of Accounts > Group and press Enter.
- Press Alt+H (Multi-Masters) > select Multi Alter and Press Enter.
- Select a group or All Items from the list.
- Press F3 (Company) to switch over to the destination company.
- Press Ctrl+A to save.


