
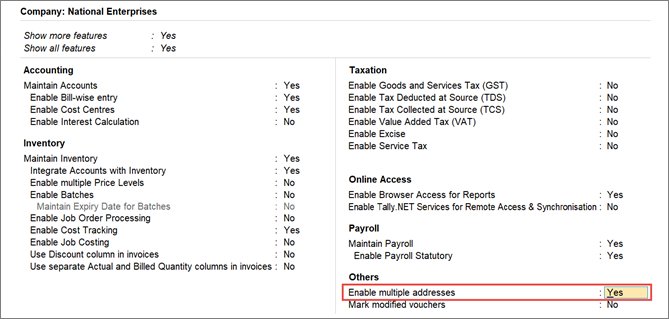
Company Features in TallyPrime (F11)
In TallyPrime, when you create a company, the key features required to record your business transactions are set by default. As per your business requirements – such as inventory management, tax-based invoicing, payroll management – you can set your preferences using the Company Features.
As per the preferences set, you can enter transaction data accordingly. In most of the cases, you can incrementally enable or disable other features by pressing F11 at any point you need.
Maintain your books of accounts: Depending on your bookkeeping needs for your company, you can enable other accounting features, such as cost centre and interest calculations. Additionally, if your sales transactions need to be maintained bill-by-bill, TallyPrime helps with all such business preferences and many more.
Manage your stock/inventory: If you are using inventory in your business, you can set up your inventory-related preferences. In TallyPrime, you can manage your Inventory independently or choose to update your books of accounts with stock details. You can set up other Inventory features – Price Levels, Batches, Job Work, Job Costing, and so on – depending on your business practices.
Set up statutory features: If your business needs to comply with statutory requirements, you can set up your tax details for invoicing purpose. With TallyPrime, you can define details for GST, VAT, Excise, Service Tax, TDS or TCS, as applicable to your business. All invoices that you create will continue to refer to the statutory details you define here.
Tally Software Services (TSS): If you also need to access your Company data on the go, especially when you are travelling or at a client location, TallyPrime has it all. You can enable the Reports in Browser feature to view key reports from any other device. Additionally, you can access your Company data remotely and also synchronise data available at different locations.
Payroll management: Does your business require you to manage salary and pay heads for employees? If yes, you can enable the Payroll feature for your company, including the related statutory features.
Other features: If your business has multiple addresses and you need to use them in invoicing, you can add as many company address as needed. Also, you can keep track of different users’ interactions with the vouchers for auditing purposes. All such needs can be set up at the company level.
F11 Features for Company
| Features | Description |
| Accounting | |
| Maintain Accounts |
Is set to Yes, by default. When you create a company in TallyPrime, the key features required for your bookkeeping needs are all set. You can create a ledger, record sales/purchase transactions, and view the transaction details in your reports. |
|
Enable Bill-wise entry |
Is set to Yes, by default. You can maintain your credit sales and purchase amounts in separate bills for tracking against the payments and receipts. When this option is Yes, the ledger master displays Maintain Balances bill-by-bill for sundry debtors and creditors. Refer to Maintain Credit Sales Bill-by-Bill for more information. You can also use this option for bills related to non-Revenue accounts. |
|
Enable Cost Centres |
Set Show more features to Yes. Is set to No, by default. Enable Cost Centres if you need to allocate expenses to different cost centres. Refer to Cost Centre Allocations for more information. |
|
Enable Interest Calculation |
Set Show more features to Yes. Is set to No, by default. Enable Interest Calculation to calculate interest automatically based on the interest rate and the calculation parameters. This is useful when interest rates change from time to time. Refer to Interest Calculations for more information. |
|
Inventory |
|
|
Maintain Inventory |
Is set to Yes, by default. TallyPrime provides the basic inventory features by default to maintain your stock or inventory. You can create masters such as stock items, stock groups, units and so on. If you do not need to track any inventory, set this option to No. Refer to Inventory Management for more information. |
|
Integrate Accounts with Inventory |
Is set to No, by default. Using TallyPrime, enable this option to include the stock or inventory balance from your inventory records. Stock records may contain errors caused by wrong allocation to items. Using this feature, you can finalise your financial reports without having to wait for the reconciliation of stocks. You can drill down from Balance Sheet to Stock Register. Disable this option to maintain accounts and inventory separately. |
|
Enable multiple Price Levels |
Set Show more features to Yes. Is set to No, by default. If you maintain different prices for your stock items, depending on your business type, you can create multiple price levels for your stock items. Refer to Using Price Lists for more information. |
|
Enable Batches |
Set Show more features to Yes. Is set to No, by default. If you sell or purchase your stock in different lots or batches, you will need to store them accordingly. In TallyPrime, you can assign batches to your stock when recording transactions. Refer to Manage Inventory Batch-wise for more information. |
|
Maintain Expiry Date for Batches |
Set Show more features to Yes. Is set to No, by default. Depending on the kind of inventory your business deals with, you may need to specify expiry dates for the batches. For perishable goods like medicines or food items, you can specify the date of expiry for each batch. |
|
Enable Job Order Processing |
Set Show all features to Yes. Is set to No, by default. If your business manages Job Work, you will need to track movement of your materials. In Job Work, you need to maintain record of raw materials, scraps and by products and view their details. Refer to Job Work for more information. |
|
Enable Cost Tracking |
Set Show all features to Yes. Is set to No, by default. If you want to analyse the running cost and profitability of the item being tracked through manufacturing, sales, purchase, and so on, set this option to Yes. Item cost tracking helps you effectively track and ascertain the procurement cost, landing costs, manufacturing or production costs, order cost or profit, and job cost or profit. Refer to Item Cost Tracking for more information. |
|
Use Discount column in invoices |
Set Show more features to Yes. Is set to No, by default. If you provide discounts to your parties on sale or purchase of items, you can manage trade discount for each item during the corresponding voucher entry. |
|
Use separate Actual and Billed Quantity columns in invoices |
Set Show more features to Yes. Is set to No, by default. In case the billed quantity is usually different from the actual quantity of stock items when recording transactions, you can track such details by setting this option to Yes. |
|
Taxation |
|
|
Enable Goods and Services Tax (GST) |
Is set to No. by default. If your business is under the GST regime, you can specify the GST Details for your company. You can set this option to No, if your business does not require to follow GST norms. |
|
Enable Tax Deducted at Source (TDS) |
Is set to No. by default. If your business is under the TDS regime, set this option to Yes and specify the TDS details for your company. |
|
Enable Tax Collected at Source (TCS) |
Set Show more features to Yes. Is set to No, by default. If your business is under the TCS regime, set this option to Yes and specify the TCS details for your company. |
|
Enable Value Added Tax (VAT) |
Set Show all features to Yes. Is set to No, by default. If your business is under the VAT regime, set this option to Yes and specify the VAT Details for your company. |
|
Enable Excise |
Set Show all features to Yes. Is set to No, by default. If your business is under Excise, set this option to Yes, and provide the Excise details for your company. |
|
Enable Service Tax |
Set Show all features to Yes. Is set to No, by default. If you pay service tax as part of your business transaction, set this option to Yes. You can specify the Service Tax details for your company. |
|
Online Access |
|
|
Enable Browser Access for Reports |
Set Show more features to Yes. Is set to Yes, by default. TallyPrime facilitates viewing reports on browser using any devices. You can view the reports supported for viewing on browser when you are travelling or at the client’s place – away from your office computer. Refer to Reports in Browser for more information. |
|
Enable Tally.NET Services for Remote Access & Synchronisation |
Set Show more features to Yes. Is set to No, by default. If you need to access your company data from a location away from your office or synchronise company data available on different computers, set this option to Yes. You can use the Tally.NET services to connect your company to a centralised server. Refer to Remote Access and Synchronisation for more information. |
|
Payroll |
|
|
Maintain Payroll |
Set Show more features to Yes. Is set to No, by default. The Payroll features in TallyPrime help you maintain the payroll information, such as employees, salaries, pay heads and so on. Set this option to Yes, to record payroll-related details and the track them through the payroll statements. Refer to Payroll for more information. |
|
Enable Payroll Statutory |
Set Show more features to Yes. Is set to No, by default. If your business maintains payroll information and you also need to track payroll-related statutory information, set this option to Yes. |
|
Others |
|
|
Enable multiple addresses |
Set Show more features to Yes. You may be operating your business from multiple location, based on your business type. In such cases, you can add multiple addresses for your company. Depending on the location of your business transaction, you can print the required address on the invoices. Refer to Set Up Multiple Address for Company for more information. Once you enable multiple address, you can also add multiple addresses for your party and use the required address for billing and shipping. |
|
Mark modified vouchers |
Set Show more features to Yes. For auditing purposes, you will need to track the details of modified vouchers, including the user that made changes. Using this option, you can view all vouchers that are altered after creation. |
|
Mailing details in local language |
Set Show more features to Yes. You can update your company mailing address in Arabic and print your invoices in Arabic or Bilingual. To know more, refer to Print Invoices with or Without Tax in Arabic or Bilingual |
Multiple Addresses | Company & Party
The multiple address feature in TallyPrime allows you to maintain multiple mailing details for your company and parties. Create multiple addresses for your company and print them in invoices and reports. Also, you can print the addresses of your branches or locations in your commercial invoices and reports as required.
To create multiple addresses for the company, follow the steps below:
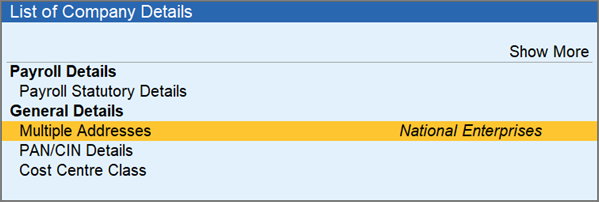
- Press F11 > set the option Enable multiple addresses to Yes.
Alternatively, from the Company Features Alteration screen, press Ctrl+I (More Details) > Multiple Addresses.
The Address Type screen appears as shown below.
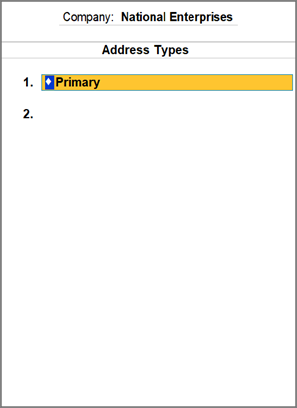
- In the Address Type screen, provide multiple addresses for your company.
- While your cursor is on Primary, press Enter to view or update the address if needed.
Note: The Primary Address type has the Mailing Details provided in the Company Creation screen. You can alter the primary mailing details from this screen, if required. - On moving to the next line, type a name (for example, Branch Office) for the Address Type, and Enter, and type the address details (Mailing name, Address, Pincode, and so on).
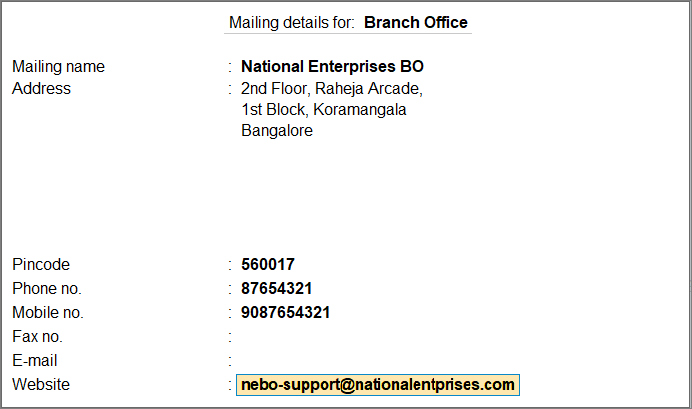
- Press Enter to accept the screen. As always, you can press Ctrl+A to save.
- While your cursor is on Primary, press Enter to view or update the address if needed.
You can add as many addresses as per your business requirement. After adding multiple addresses, you can use the address in the invoices while printing, exporting, and e-mailing.
Multiple addresses for party: Similar to creating multiple address types for the company, you can also have multiple addresses for your party, depending on your business needs.
While creating a party ledger:
- Set/alter multiple mailing details: Yes
- Enter the Address Type and address details.
You can create as many address types as you need and select the required address type for the party while recording a transaction.
For more information, refer to Multiple Addresses for Party.
F11 Feature Changes: Tally.ERP 9 vs TallyPrime
In TallyPrime, with the primary focus being enhanced product experience, options under F11 Features in Tally.ERP 9 have been reorganised in TallyPrime. The following table is a comparative view of the company features.
Accounting Features
| In Tally.ERP 9 | In TallyPrime | ||
| Option | Option | Navigation/Screen | Remarks |
|
Maintain accounts only |
Maintain Accounts |
Press F11. |
|
|
Integrate accounts with inventory |
Integrate Accounts with Inventory |
Press F11. |
|
|
Use Income and Expenses A/c instead of Profit and Loss A/c |
|
Press Alt+G (Go To) > Alter Master > Profit & Loss A/c. |
|
| Enable multi-currency |
|
Press Alt+G (Go To) > Create Master > Currency. |
Currency is available by default based on the company’s country. |
|
Maintain bill-wise details |
Enable Bill-wise entry |
Press F11. |
|
|
For non-trading accounts also |
For Non-Trading Accounts also |
Press Alt+G (Go To) > Create Master > Ledger > F12 (Configure). |
|
| Activate interest calculation | Enable Interest Calculation | Press F11. | |
| Use advanced parameters | Activate interest calculation | Press Alt+G (Go To) > Create Master > Ledger. | |
| Maintain Payroll | Maintain Payroll | Press F11. | |
| Maintain cost centres | Enable Cost Centres | Press F11. | |
| Use cost centre for job costing | Enable Job Costing | Press F11. | |
| Maintain more than one payroll or cost category | Press Alt+G (Go To) > Create Master > Cost Category. | Cost Centre Class is auto-enabled when you enable Cost Centres. | |
| Use pre-defined cost centre allocations in transactions | Press Alt+G (Go To) > Create Master > Cost Centre Class. | Cost Centre Class is auto-enabled when you enable Cost Centres. | |
| Show opening balance for revenue items in reports | Show Opening Balance for Revenue Items in Reports | Press Alt+G (Go To) > Create Master > Cost Centre > F12 (Configure). | |
| Enable invoicing | Press Alt+G (Go To) > Create Voucher. | Invoice mode is the default for Vouchers. | |
| Record purchases in invoice mode | Press Alt+G (Go To) > Create Voucher > F9 (Purchase). | Invoice mode is the default for Vouchers. | |
| Use debit and credit notes | Press Alt+G (Go To) > Create Voucher > F10 (Other Vouchers) > Credit Note/Debit Note. | Debit Note and Credit Note voucher types are available by default. | |
| Record credit notes in invoice mode | Press Alt+G (Go To) > Create Voucher > F10 (Other Vouchers) > Credit Note. | Invoice mode is the default for Vouchers. | |
| Record debit notes in invoice mode | Press Alt+G (Go To) > Create Voucher > F10 (Other Vouchers) > Debit Note. | Invoice mode is the default for Vouchers. | |
| Maintain budgets and controls | Press Alt+G (Go To) > Create Master > Budgets. | Budget and Scenarios are enabled by default. | |
| Use reversing journals and optional vouchers |
Press Alt+G (Go To) > Create Voucher > F10 (Other Vouchers) > Reversing Journal. |
You need to activate the Reversing Journal when you create it the first time. You can also activate it from the Voucher Type screen. Optional appears as a button option by default for vouchers. |
|
| Enable cheque printing |
Enable cheque printing |
Press Alt+G (Go To) > Create Master > Ledger > Bank Configuration. |
|
| Set/alter transaction types |
Press Alt+G (Go To) > Create Voucher > Bank Allocation > Transaction Type. |
Transaction types are available in the Bank Allocation screen. |
|
| Set/alter banking features | Banking features are available across different screens. | ||
| Enable beneficiary code | Enable beneficiary code | Press Alt+G (Go To) > Create Voucher > Bank Allocation > Transaction Type > F12 (Configure). | |
| Enable bank details for cost centers | Set Bank Details for Cost Centres | Press Alt+G (Go To) > Create Master > Cost Centre > F12 (Configure). | |
| Export/upload payment instructions on voucher creation |
Export/Upload Payment Instructions on voucher creation |
Press Alt+G (Go To) > Create Master > Ledger > Set/alter e-Payments configuration. |
The e-Payment option appear when you create the ledger under Bank Accounts/Bank OD a/c and select a bank supported for e-Payments in TallyPrime. |
| Ignore transactions with information mismatch |
Ignore transaction with information mismatch in report |
Press Alt+G (Go To) > Create Master > Ledger > Set/alter e-Payments configuration. |
|
| Set/alter post-dated transaction features | Use as notional bank for post-dated vouchers | Press Alt+G (Go To) > Create Master > Ledger. | |
| Enable zero-valued transactions | Allow zero-valued transactions | Press Alt+G (Go To) > Create Master > Voucher Type. | |
| Maintain multiple mailing details for company and ledgers | Enable multiple addresses | Press F11. | |
| Set/alter company mailing details | Press F11. | Address Type is auto-enabled when you enable multiple addresses | |
| Enable company logo | Show Company Logo | Press Alt+P (Print) > Configuration. | |
| Mark changed vouchers |
Mark changed vouchers |
Press F11. |
|
Inventory Features
| In Tally.ERP 9 | In TallyPrime | ||
| Option | Option | Navigation/Screen | Remarks |
| Integrate accounts with inventory | Integrate Accounts with Inventory | Press F11. | |
| Enable zero-valued transactions | Allow zero-valued transactions | Press Alt+G (Go To) > Create Master > Voucher Type. | |
| Maintain multiple godowns / Excise Units |
Press Alt+G (Go To) > Create Master > Godowns/Excise Units. |
Godown/Excise Units are available by default. |
|
| Maintain stock categories |
|
Press Alt+G (Go To) > Create Master > Stock Category. |
Stock Category is available by default. |
| Maintain batch-wise details | Enable Batches | Press F11. | |
| Set expiry dates for batches | Maintain Expiry Date for Batches | Press F11. | |
| Use separate actual and billed quantity columns |
Use separate Actual and Billed Quantity columns in invoices |
Press F11. |
|
| Enable purchase order processing |
|
Press Alt+G (Go To)> Create Voucher > F10 (Other Vouchers) > Purchase Order. |
You need to activate the Purchase Order voucher type when you create it the first time. |
| Enable sales order processing |
|
Press Alt+G (Go To) > Create Voucher > F10 (Other Vouchers) > Sales Order. |
You need to activate the Sales Order voucher type when you create it the first time. |
| Enable job order processing (Enable the options ‘Maintain multiple godowns’ and ‘Use material in and out vouchers’) |
Enable Job Order Processing | Press F11. | |
| Enable invoicing | Press Alt+G (Go To) > Create Voucher. | Invoice mode is the default for Vouchers. | |
| Record purchases in invoice mode | Press Alt+G (Go To) > Create Voucher > F9 (Purchase). | Invoice mode is the default for Vouchers. | |
| Use debit and credit notes | Press Alt+G (Go To) > Create Voucher > F10 (Other Vouchers) > Credit Note/Debit Note. | Debit Note and Credit Note voucher types are available by default. | |
| Record credit notes in invoice mode | Press Alt+G (Go To) > Create Voucher > F10 (Other Vouchers) > Credit Note. | Invoice mode is the default for Vouchers. | |
| Record debit notes in invoice mode | Press Alt+G (Go To) > Create Voucher > F10 (Other Vouchers) > Debit Note. | Invoice mode is the default for Vouchers. | |
| Use separate discount column in invoices |
Use Discount column in invoices |
Press F11. |
|
| Track additional costs of purchases |
Track Additional Costs for Purchases |
Press Alt+G (Go To) > Create Master > Voucher Type. |
Available by default for Purchase, Debit Note, Journal, Payment and Stock Journal voucher types. |
| Use multiple price levels |
Use multiple Price Levels |
Press F11. |
|
| Use tracking numbers (enable delivery and receipt notes) | Tracking number is auto-enabled when you activate Delivery note, Receipt note, Rejection In or Rejection Out voucher types. | ||
| Use rejection inward and outward notes |
Press Alt+G (Go To) > Create Voucher > F10 (Other Vouchers) > Rejection In/Rejection Out. |
You need to activate the Rejection In/Rejection Out when you create it the first time. |
|
| Use material in and out vouchers |
Press Alt+G (Go To) > Create Voucher > F10 (Other Vouchers) > Material In/Material Out. |
You need to activate the Material In/Material Out when you create it the first time. |
|
| Use cost tracking for stock item | Enable Cost Tracking | Press F11. | |
Taxation Features
| In Tally.ERP 9 | In TallyPrime | ||
| Option | Option | Navigation/Screen | Remarks |
|
Enable Goods and Services Tax (GST) |
Enable Goods and Services Tax (GST) | Press F11. | You can set/alter GST details when you set Enable Goods and Services Tax (GST) to Yes. |
|
Enable Value Added Tax (VAT) |
Enable Value Added Tax (VAT) | Press F11. | You can set/alter VAT details when you set Enable Value Added Tax (VAT) to Yes. |
|
Enable excise |
Enable Excise | Press F11. | You can set/alter Excise details when you set Enable Excise to Yes. |
| Enable service tax Set/alter service tax |
Enable Service Tax | Press F11. | You can set/alter Excise details when you set Enable Excise to Yes. |
| Enable Tax Deducted at Source (TDS) Set/alter TDS details |
Enable Tax Deducted at Source (TDS) | Press F11. | You can set/alter Excise details when you set Enable Tax Deducted at Source (TDS) to Yes. |
| Enable Tax Collected at Source (TCS) Set/alter TCS details |
Enable Tax Collected at Source (TCS) | Press F11. | You can set/alter Excise details when you set Enable Tax Collected at Source (TCS) to Yes. |
| Enable payroll statutory Set/alter payroll statutory details |
Maintain Payroll Enable Payroll Statutory |
Press F11. | |
| Enable Local Body Tax (LBT) Set/alter LBT details |
Not Available | It has been deprecated in TallyPrime. | |
TSS Features
|
In Tally.ERP 9
|
In TallyPrime
|
||
|---|---|---|---|
|
Option
|
Option
|
Navigation/Screen
|
Remarks
|
| Connection Details > Connect name: | Company Display Name | Press Alt+K (Company) > Online Access > Contact Details. | |
| Connectivity Features > Connect For Browser access | Enable Browser Access for Reports | Press F11. | |
| SMS Access Details > Enable SMS access | Not Available | It has been deprecated in TallyPrime. | |
| Name of contact person | Contact Person | Press Alt+K (Company) > Online Access > Contact Details. | |
| Contact number | Contact Number | Press Alt+K (Company) > Online Access > Contact Details. | |
| Connect to Tally.Net Services | Enable Tally.NET Server for Remote Access & Synchronisation | Press F11. | |
| Connect company on loading | Connect Company on loading | Press Alt+K (Company) > Online Access. | |
| Company Name for SMS | Not Available | It has been deprecated in TallyPrime. | |
Audit Features
| In Tally.ERP 9 | In TallyPrime |
|
| Enable audit working paper | Not Available | It has been deprecated in TallyPrime. |
| Enable audit priorities and categories | Not Available | It has been deprecated in TallyPrime. |
Add-On Features
In TallyPrime, the Add-on features area available from the customer portal, as in the case of Tally.ERP 9.


