
Manage Inventory Batch-wise in TallyPrime
If you maintain inventory or stock items in lots, you can store them using the Batches feature in TallyPrime. Batches help in better management of stock items with limited shelf life or perishable goods. In TallyPrime, you can create a batch on the fly by only specifying a batch name. You can assign manufacturing and expiry dates and allocate the stock items to one or more batches as per your business need. With batches, you can identify stock items by referring to the batch details at any given time.
Maintain perishable goods or stock items with limited shelf life: Goods with a set manufacturing and expiry dates – such as medicinal products – can be maintained using Batches in TallyPrime. Stock items that have a designated expiry date can be maintained using batches or lots. In such cases, you will need to store your inventory in different batches with their manufacturing
and expiry dates. For example, when dealing with food items or medicines you can segregate the stock items into batches or lots based on their expiry dates. This will help you to ensure that such stock items are sold out before their expiry date.
If you are maintaining stock items with a limited shelf life, you can use batches to keep them based on their manufacturing date. Such stock items do not necessarily have an expiry date mentioned on the product. However, the shelf life period is usually mentioned on the product – such as 6 months or 1 year from the date of manufacturing.
Use batches for rate-wise categorisation of stock items: When you have a stock item available at different rates, you can keep such items in separate batches based on their rates. For example, you have 100 numbers of Item A purchase from a supplier at Rs. 75 each, and 150 numbers of the same item – Item A – from a different supplier at Rs. 60 each. You can create two different batches for Item A with different prices. By doing so, you can not only decide the selling pricing for Item A for each of the batches, but also choose the stock item from the appropriate batch when recording transactions, depending on your selling price.
Identify stock item details from batches: After sales of your stock items, you may sometimes receive a return or figure out that a stock item was reported defective or expired. With batches, you can track back the batch which the stock item belonged to and find the details. In such cases, it is helpful to also verify other items from that batch before you make a sale.
All of these can be managed using the Batches feature in TallyPrime. Once you start maintaining your stock items in batches, you can view the total number of stock items allocated to each of the
batches. You can get to know how much of stock is left in a batch, and if you need to refill the stock and store enough for the upcoming sales orders.
Set Up Batches for Stock Items
Maintaining stock items in batches will help in ensuring old stock is moving out first. Whether it is a perishable item, or items launched recently, batches help you keep track of items and also identify which batch they belong to. You can configure your stock item master to allocate items to one or more batches. For better tracking, you can also provide the manufacturing or expiry date depending on the type of stock your business has.
While making a purchase entry, you can directly allocate the stock item into one or more batches depending on your business situation.
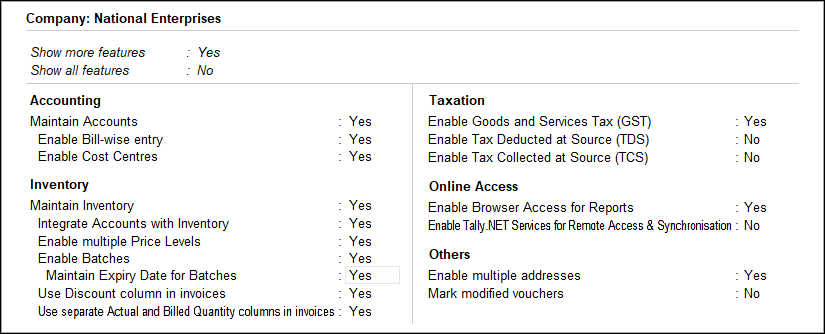
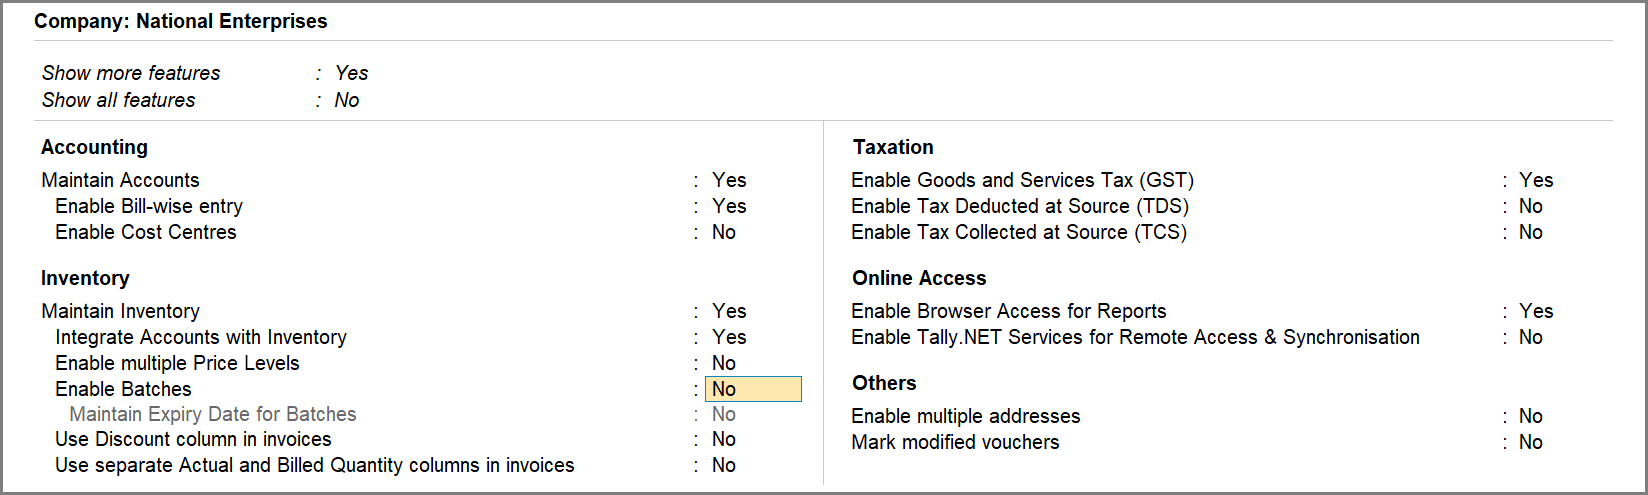
- Enable Batches in TallyPrime for your Stock Items: press F11 (Features) > set the option Enable Batches to Yes.
- If you do not see this option:
- Set Show more configurations to Yes.
- If you are dealing with perishable goods, you can enable the option Maintain Expiry Dates for Batches in the F11 (Features).
- Configure Stock Items for Allocating Batches.
- Press Alt+G (Go To) > Create Master > type or select Stock Item and press Enter.
- Select Primary or an existing Stock Group in the Under field.
- Ensure that the Unit of Measurement is selected for the stock item.
- In the Stock Item Creation screen, press F12 (Configure) > Maintain Stock Item in Batches to Yes.
If you need to use this option only for the current master, press Ctrl+I (More Details) > type or select Maintain in Batches > and press Enter.
- In the Stock Item Creation screen, press F12 (Configure) > Maintain Stock Item in Batches to Yes.
- In the Batches Setup screen, select the appropriate unit and set Maintain in Batches to Yes.
- In the Stock Item Creation/Stock Item Alteration screen, set the option Maintain in batches to Yes. You can enable options in the stock item screen for using batches either while creating a new stock item or altering an existing stock item.
- Track date of manufacturing: Track date of manufacturing to Yes. This is required if you are dealing with perishable goods (which have both manufacturing and expiry dates) or stock items with limited shelf life (which have only manufacturing date and its shelf life period).
- Use expiry dates to Yes: This is mostly required for perishable goods.
- Allocate Batches for Stock Items.
When you configure the stock item for allocating batches, before saving the batch, enter the Item allocation details.- Batch Number
- Manufacturing Date
- Expiry Date
- Accept the screen. As always, you can press Ctrl+A to save.
Sell Stock Items from Batches or Lots
If you have stored your stock items in batches or lots, it is convenient to choose stock items based on your sales policy. Whether you have segregated the stock items based on their manufacturing and expiry dates or based on different rates for a stock item, when passing a sales entry, you can choose to sell items from the batch as you need.
- Ensure that you have done the following:
- Enable batches.
- Configure your stock item master.
- In the stock item screen, specify other details as you need, and press Enter.
- In the Stock Item Allocation screen, specify a Batch name. You can keep it unique to avoid any confusion with other batches.
- Record a sales transaction.
- Alt+G (Go To) > Create Voucher > press F8 (Sales).
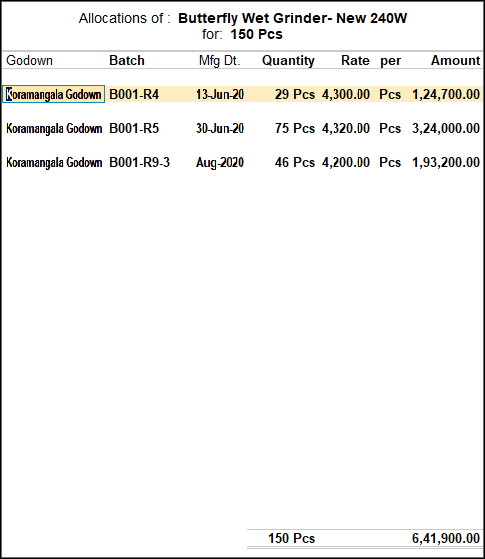
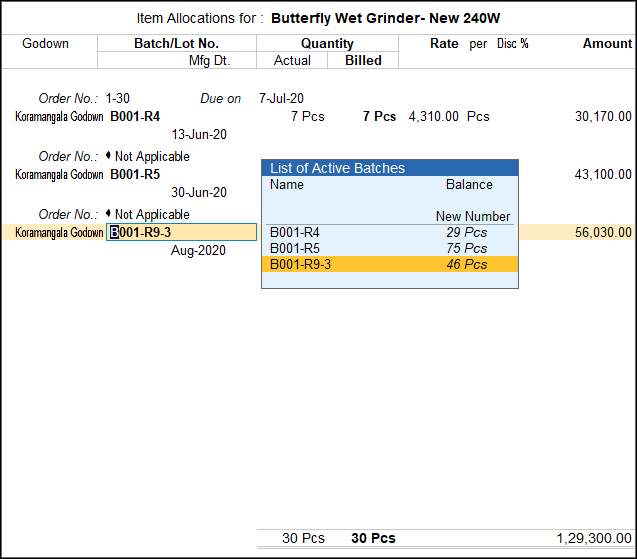
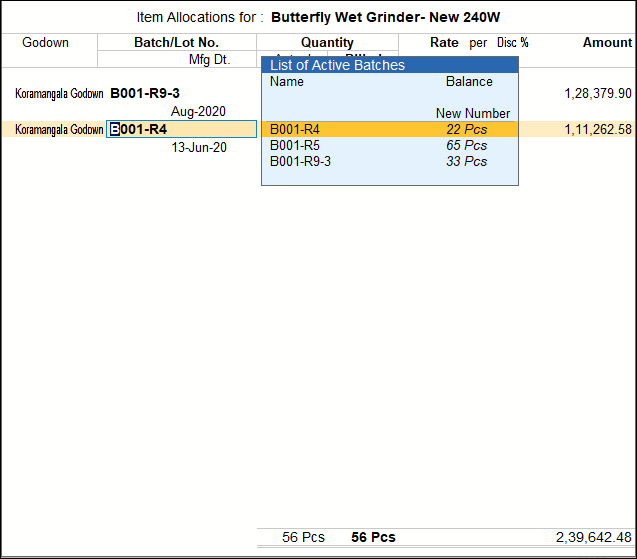
- Select the stock item and press Enter, in the Stock Item Allocations screen, select the active Batches or create New Number. Specify the Quantity, Rate and Amount field.
- Complete the transaction by entering other details, and accept the voucher. As always, you can use Ctrl+A to save.
Batches for Purchased Stock Items
When you purchase a stock item from a vendor, based on its manufacturing or expiry date, you can store the stocks in one or more batches. For example, you have purchased 100 Pcs of an Item
A that has an expiry date of 30-April-2019 and 200 more pcs of the same item with an expiry date of 31-Jul-2019. As you make a transaction entry for the purchased quantity of Item A, you can allocated the 100 Pcs to Batch 1 and the other 200 Pcs to Batch 2. Similarly, when you sell Item A to your parties, you can choose to sell Item A from Batch 1 – with an earlier expiry date, that is 20-April-2019.
In this section
Assign batches to purchased stock items
- Enable batches.
- Configure your stock item master.
- In the stock item screen, specify other details as you need, and press Enter.
- In the Stock Item Allocation screen, specify a Batch name. You can keep it unique to avoid any confusion with other batches.
- Record a purchase transaction.
- Alt+G (Go To) > Create Voucher > press F9 (Purchase).
- Select the stock item and press Enter, in the Stock Item Allocations screen, select the active Batches or create New Number. Specify the Quantity, Rate and Amount field.
- Complete the transaction by entering other details, and accept the voucher. As always, you can use Ctrl+A to save.
Track stock item details batch-wise
Looking for stock items details for each batch? Using reports in TallyPrime, you can view details of the stock allocated to each of the batches. You can choose to view a batch-wise summary of a particular Stock Item for a given period. If you have recorded transactions using the stock items available in batches, TallyPrime provides report of the number of stock items maintained in different batches in a periodic manner – say weekly, monthly, quarterly and so on. In addition, you can view the vouchers involving transaction of stock items allocated to different batches.
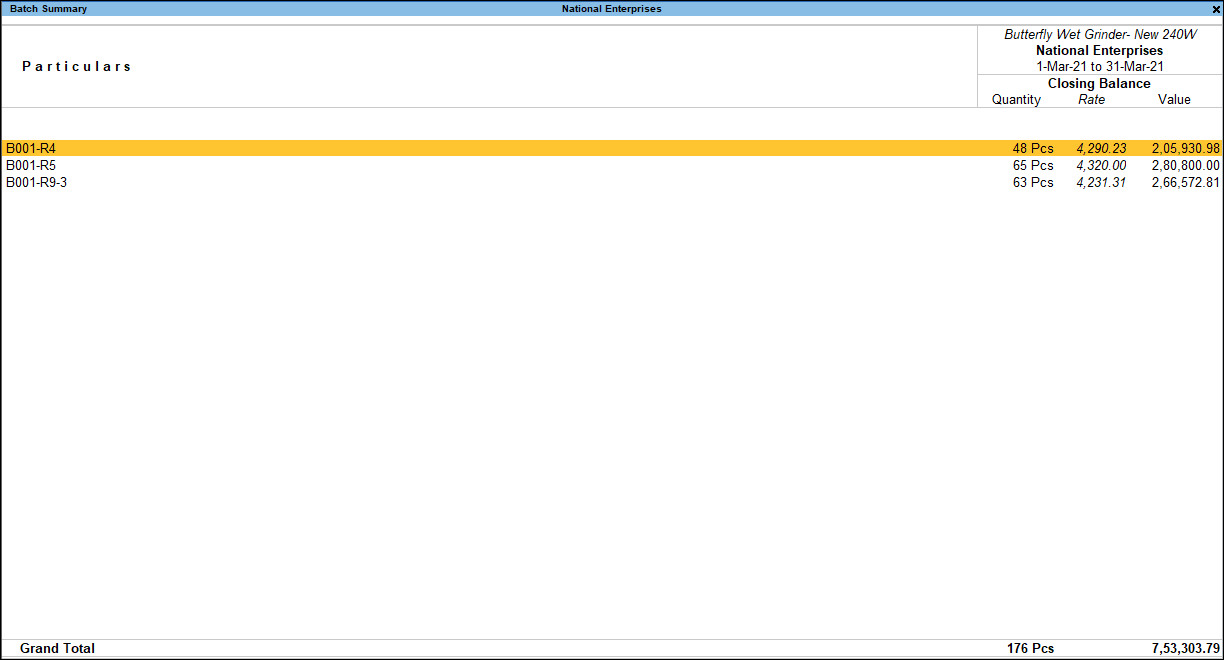
Batch Summary
Batch Summary is a summary of all the batches of a particular Stock Item for the given period. You can select the required batch and further drill down to view the Batch Monthly Summary and then further to Batch Voucher Report of the selected batch of an item.
The Batch Summary will be available when Maintain Batches is enabled in F11 (Features) of your company.
In this section
View Batch Summary
To view Batch Summary
- Gateway of Tally > Display More Reports> Inventory Books > Batch.
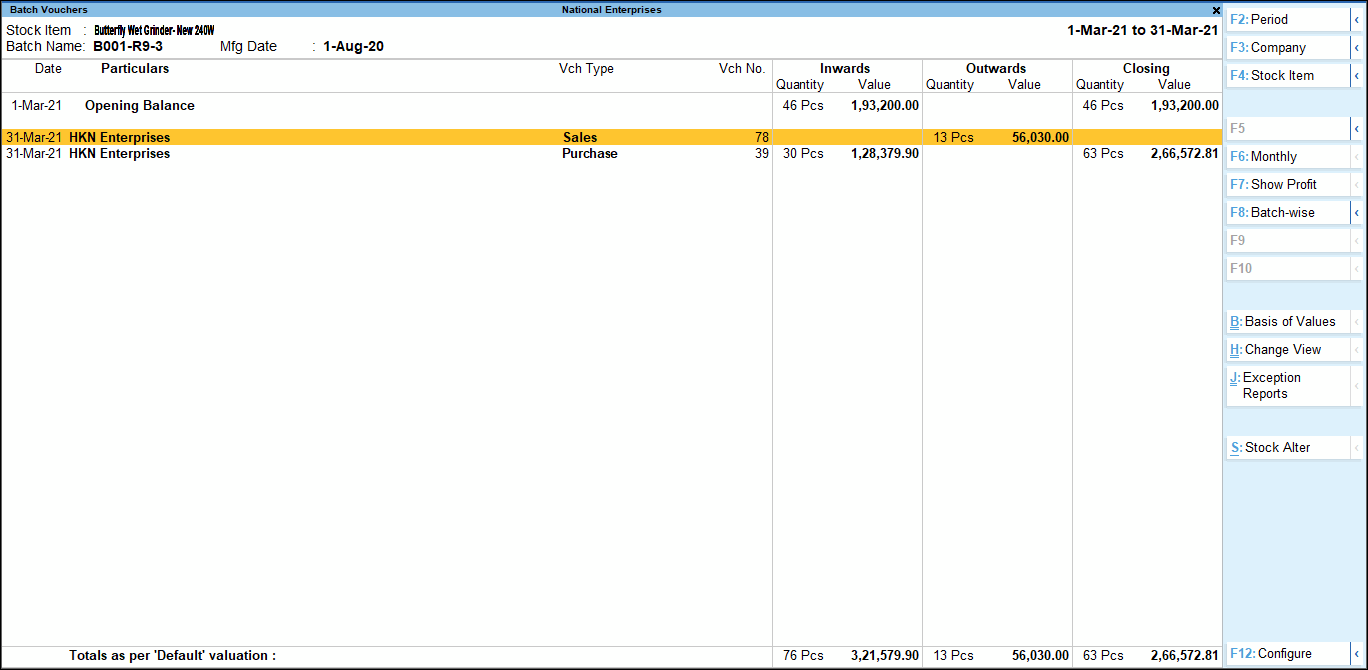
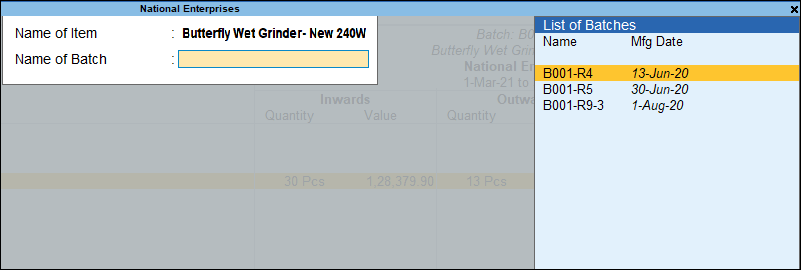
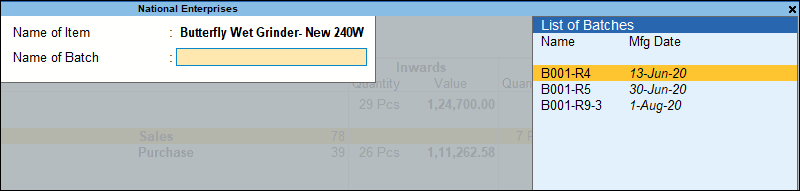
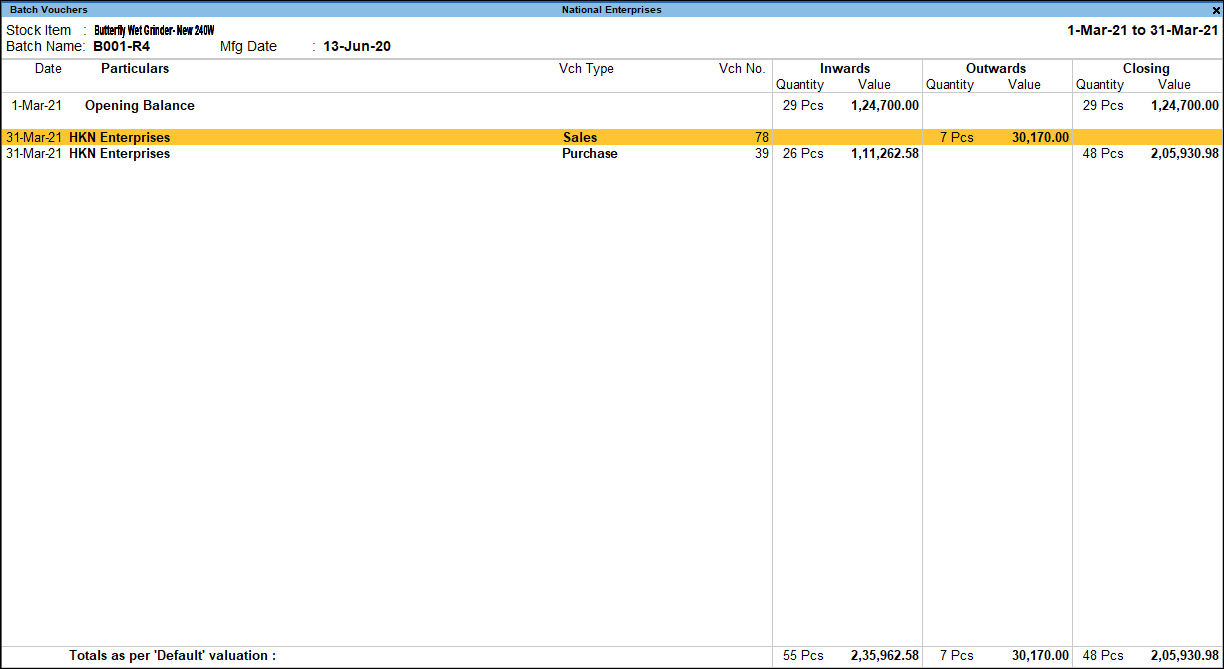
Alternatively, press Alt+G (Go To) > type or select Batch Voucher > and press Enter. - Select the required Name of Item and select the Name of Batch from the List of Batches.
The Batch Voucher report appears as shown:
- Press F8 (Batch-wise), the Batch Summary of the selected item appears.
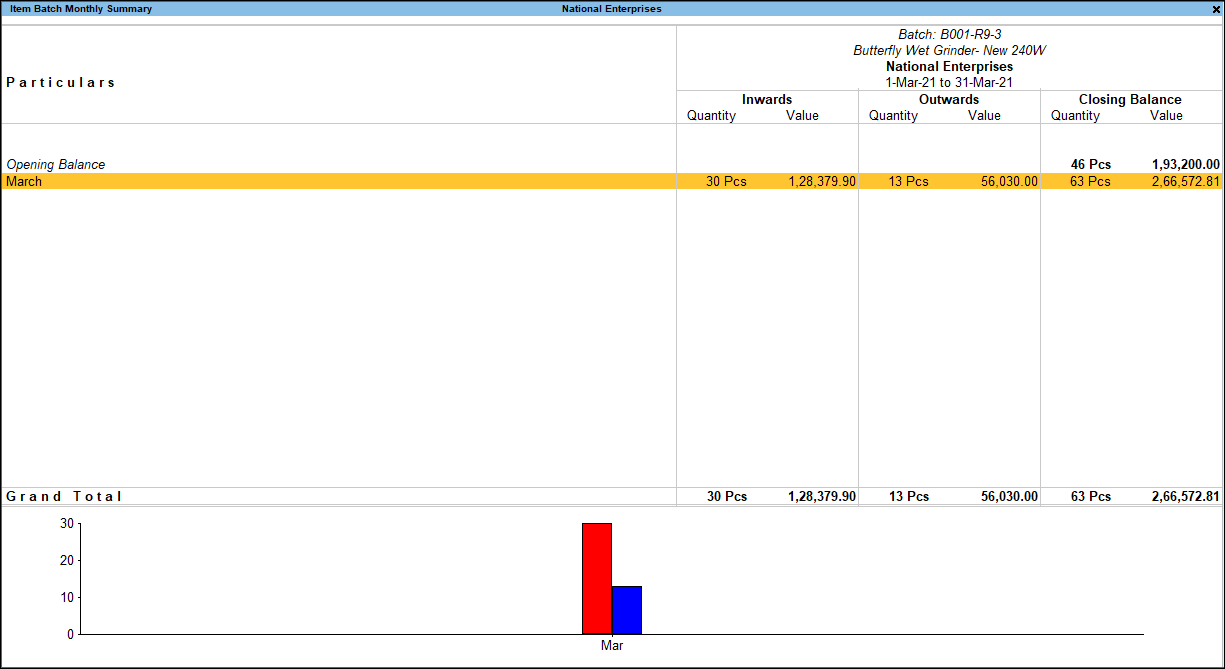
- Select the required batch and press Enter to view the Item Batch Monthly Summary as shown below:
- Drill down further to view the Batch Vouchers report.
Note: The Batch summary displays the report of the month on which the last transaction entry was passed for the selected item. Press F2 (Period) to change the period.
Configure Batch Summary
Press F12 configurations in Batch Summary Report.
- Show Quantity: Set this option to Yes to view the report with quantity for all transactions.
- Show Rate: Set this option to Yes to view the report with rate for all transactions.
- Show Value: Set this option to Yes to view the report with value for all transactions.
- Show Opening Balance: Set this option to Yes to display Opening balance in the report.
- Show Goods Inwards: Set this option to Yes to display all Inward details, like inward quantities, inward rate and inward value.
- Show Goods Outwards: Set this option to Yes to display all Outward details, like outward quantities, outward rate and outward value.
- Show Gross Value for Outwards: Gross value of Outwards refers to that value which is inclusive of the values of VAT/any other allowed ledger under accounting allocation screen of the stock item. By default this option will be set to No, when it is set to Yes, it will display the gross value of the outwards.
- Show Consumption and Gross Profits: By default, this option will be set to No. Press F7 (Show Profit) in the button bar or enabling this option in F12 (Configuration) will display gross profit / loss of batch selected. For detailed explanation on each column click here.
- Show Gross Profit on Gross Value: By default this option will be set to ‘No’. When this option is set to Yes, the gross profit will be calculated on the Gross Value which is inclusive of the values of VAT/any other allowed ledger under accounting allocation screen of the stock item.
- Show Closing Balance: Set this option to Yes, to display closing quantity, rate and value.
- Show Manufacturing Date: By default, this option is set to No. Set this option to Yes to view the Manufacturing date(s) of the batch(es) of a selected stock item.
- Show Expiry Date of Batches: By default, this option is set to No. Set this option to Yes to view the Expiry date(s) of the batch(es) of a selected stock item.
- Show Number of days for Expiry: By default, this option is set to No. Set this option to Yes to view the number of days to expire against each batch for a selected stock item.
- Show Stock Items with Zero Quantity or Balance: By default, this option is set to No. Set this option to Yes to view only the expired batches.
- Format of Report: Display the report in Condensed or Detailed mode.
- Show Base Currency: Display the values of the report along with the corresponding base currency symbol.
- Sorting Method: This will help the user to sort the report based on the Sorting Methods listed, namely, Alphabetical, Amount-wise, Expiry date, Mfg date, Quantity-wise and Rate-wise all in increasing and decreasing.
Button options in Batch Summary
- F4 (Stock Group): Navigation to other Stock Group to view the Batch Summary of the same.
- F7 (Show Profit):Displays batch-wise stock item profitability.
Ctrl+B (Basis of Values)
In Batch Summary report, you can display the amounts in reports in Millions or Hundreds. Press Ctrl+B (Basis of Values) > Scale Factor > select Millions. Press Esc to view the default values.
Similarly, you can enable the followings:
- Expired Batches only: By default, this option is set to No. Set this option to Yes to view only the expired batches.
- Show Batch Manufacture Details From, To: By default, the From and To fields will be blank. You may filter to view the Manufacturing dates of the batches based on the date range mentioned in these fields. For example From: 1-4-2020 To: 31-7-2020 will display only those batches which were manufactured during this period.
- Show Batch Expiry Details From, To: By default, the From and To fields will be blank. You may filter to view the Expiry dates of the batches based on the date range mentioned in these fields. E.g. From: 1-4-2020 To: 30-9-2020 will display only those batches which expire during this period.
Ctrl+H (Change View)
You can display the details of a report in different views with additional details or for a specific period. You can also view other reports related to the current report.
- To view the Monthly Summary, press Ctrl+H (Change View) > type or select Monthly Summary > press Enter. Press Esc to view the default report.
Ctrl+J (Exception Reports)
You can view the exceptions related to the data displayed in the current report by pressing Ctrl+J (Exception Reports), without closing the report.
- To view the Negative Batches, press Ctrl+J (Exception Reports) > type or select Negative Batches > and press Enter. Press Esc to view the default report.
Batch Vouchers
Batch Vouchers provides a list of all vouchers for a stock item of the same batch for a specific period. The report comprises of both inwards and outwards transactions along with quantity, rate and closing value details for the selected batch.
The Batch Vouchers report is available when the option Maintain Batches is enabled in F11 (Features).
To view Batch Vouchers report
- Gateway of Tally > Display More Reports > Inventory Books > Batch.
Alternatively, press Alt+G (Go To) > type or select Batch Voucher > and press Enter. - Select the required Name of Item and select the Batch from the List of Batches.
The Batch Vouchers report appears as shown below:
Alternatively, Batch Vouchers report can also be viewed from the Stock Vouchers screen. To view Batch Vouchers report
- Gateway of Tally > Batch Summary.
Alternatively, Alt+G (Go To) > type or select Batch Summary > and press Enter. - Press Enter and drill down to the Batch Voucher screen.
- Press Ctrl+F4 (Batch) and select the required batch for the selected item.
The Batch Vouchers Report appears as shown below:
To view Profitability and Consumption details, press F7 (Show Profit) button from Batch Vouchers screen. The report will display quantity and value of the opening stock, inward goods, outward goods, closing stock and the value of consumption (using
the cost method.
Press F12 (Configure) for the configurations in Batch Vouchers.
- Show Narrations: Set this option to Yes to view the report with narration for all transactions.
- Show Quantity: Set this option to Yesto view the report with quantity for all transactions.
- Show Rate: Set this option to Yesto view the report with rate for all transactions.
- Show Value: Set this option to Yes to view the report with value for all transactions.
- Show Opening Balance: Set this option to Yesto display Opening balance in the report.
- Show Goods Inwards: Set this option to Yes to display all Inward details, like inward quantities, inward rate and inward value.
- Show Goods Outwards: Set this option to Yes to display all Outward details, like outward quantities, outward rate and outward value.
- Show Gross Value for Outwards: Gross value of Outwards refers to that value which is inclusive of the values of VAT/any other allowed ledger under accounting allocation screen of the stock item. By default this option will be set to No, when it is set to Yes, it will display the gross value of the outwards.
- Show Consumption & Gross Profit for ‘Outwards: By default this option will be set to No. Press F7 (Show Profit) button or enable this option in F12 (Configuration) will display gross profit/loss of batch selected. For detailed explanation on each column click here.
- Show Gross Profits on Gross Value: By default this option will be set to ‘No’. When this option is set to Yes, the gross profit will be calculated on the Gross Value which is inclusive of the values of VAT/any other allowed ledger under accounting allocation screen of the stock item.
- Show Closing Balance: Set this option to Yes to display closing quantity, rate and value.
- Closing Quantity = Opening quantity + inward Quantity – Outward Quantity
- Closing Rate = Closing Value / Closing Quantity
- Closing Value = The Closing
Stock Value will be based on the Costing Method adopted for each item.
- Use default Valuation Method for closing values: Set this option to Noto display the closing value using the formula ‘Closing value = Opening value + Inward value – Outward Value’. Transaction value is only for reporting purpose to compare with default valuation. It will not show it in Profit and Loss account.
- Format of Report: View the report details in Condensed or Detailed format.
- Show Description for Stock Item: Display the description provided for the stock item.
- Show Cost Center details: Display the cost centre details for the stock items.
- Display name for Stock Items: Select from the Display Name Types to view the stock item name as per the provided alias, part no., and so on, as per the selection.
- Sorting Method: This will help the user to sort the report Alphabetical wise increasing / decreasing.
Button Options in Batch Voucher
- F4 (Stock Item): Navigation to other stock item and batches from the same report is possible.
- F7 (Hide Profit): By default, this report displays Batch-wise stock item profitability. Press F7 (Hide Profit) to hide the same.
- F8 (Batch-wise): Displays the Batch Summary of all the batches for the selected Stock Item. Click here for more details.
- Ctrl+B (Basis of Values): In Batch Voucher report, you can display the values based on the type of entries made. Press Ctrl+B (Basis of Values) > Type of Voucher Entries > select Inward Entries only. The Batch Voucher report will display details of the Inward entries only. Press Esc to return to the default report.
- Ctrl+H (Change View): You can display the details of a report in different views with additional details or for a specific period. You can also view other reports related to the current report.
To view the Monthly Summary, press Ctrl+H (Change View) > type or select Monthly Summary > press Enter. Press Esc to view the default report. - Ctrl+J (Exception Reports): You can view the exceptions related to the data displayed in the current report by pressing Ctrl+J (Exception Reports), without closing the report.
To view the Negative Batches, press Ctrl+J (Exception Reports) > type or select Negative Batches > and press Enter. Press Esc to view the default report. - You can alter the details in the Stock Item Masters, by pressing Alt+S (Stock Alter).
Explanation for each column is displayed as below:
|
Columns |
Details |
|
Inwards |
All the goods Inward item are captured here. |
|
Outwards |
All the goods Outward item are captured here. |
|
Consumption |
Cost of Goods Sold of respective outward entry. Cost of Goods Sold derived as per |
|
Gross |
Outward Value – Cost of Goods Sold. |
|
Perc |
Gross Profit / Outward Value x 100 |
|
Closing |
Outward Quantity – Inward Quantity |
|
Closing |
Closing Value / Closing Rate |
|
Closing |
Stock item closing value. This value is derived as per valuation method specified in item master. If Transaction value is enabled in F12 then Closing value = Opening value + Inward Value – Outward Value. This transaction value is only for reporting purpose to compare with default valuation. It will not show it in Profit and Loss account. |
|
Total |
Opening + Total Inward entries |
|
Total |
Total Outward entries |
|
Total |
Total Inward Value – Total Closing Value |
|
Total |
Total consumption – Total Outward Value |
|
Total |
Closing value derived as per valuation method specified in item master. If Transaction value is enabled in F12 then Closing value = Opening value |
Disable Batches for Stock Items in TallyPrime
You might be maintaining Stock Items in batches to ensure that the previously manufactured item moves out first, as per the First In, First Out (FIFO) method. This especially helps when you are a manufacturer of perishable goods.
It may also be possible that you do not use batches. However, batches are enabled in some stock items that are a part of the Company Data. This can happen when you are using a shared Company Data in which batches are enabled.
In any case, while the batches may be enabled for some stock items, later on, you may want to disable them, as maintaining those stock items with batches may not be required anymore.
In TallyPrime, you can disable batches for stock items at Company and Stock Item level, as per your requirement.
If you do not want to maintain batches for any stock item, then you can disable batches at the Company level in TallyPrime.
However, if you want to disable batches for specific stock items, then you will need to disable them from the Stock Item level. This will ensure that when you disable batches for a specific stock item, the other stock items in which batches were enabled remain unaffected.
Disable Batches for Stock Items at the Company level
In TallyPrime, batches are first enabled under F11 (Company Features) before you enable them at the Stock item level. You can disable batches using F11 (Company Features) whenever required.
However, if you had recorded one or more transactions for a Stock Item in which batches were enabled, then you will not be able to disable batches at the Company level.
Now, if you still want to disable the batches at the Company level, then you need to delete those transactions permanently from your Books of Account. It is recommended to ensure that those transactions are not essential to your business, you may need to include them in returns for a specific period.
To disable batches for stock items at the Company level, follow the steps given below.
- Press F11 (Company Features) > set Enable Batches to No.
If you do not see this option, then set Show more features to Yes.
- As always, press Ctrl+A to save the setting.
Henceforth, batches will be disabled for all the Stock Items.
Disable Batches at the Stock Item level
There can be a scenario wherein you are a manufacturer that produces perishable goods and non-perishable goods both. However, the batches are enabled also for non-perishable goods, which may not be required.
It is also possible that your business does not need batches for a particular set of items. However, batches are enabled for those items. In such a case, you will want to disable batches for those stock items.
In TallyPrime, you can disable batches at the Stock Item level. However, you may have already recorded one or more transactions containing the stock item for which you want to disable the batches. In this case, you will not be able to disable batches for that stock item.
To disable batches at the Stock Item level, follow the steps given below.
- Press Alt+G (Go To) > Alter Master > Stock Item > type or select the name of the Stock Item and press Enter.
Alternatively, Gateway of Tally > Alter > Stock Item > type or select the name of the Stock Item and press Enter.
The Stock Item Alteration screen appears. - Under Additional Details, set Maintain in batches to No.
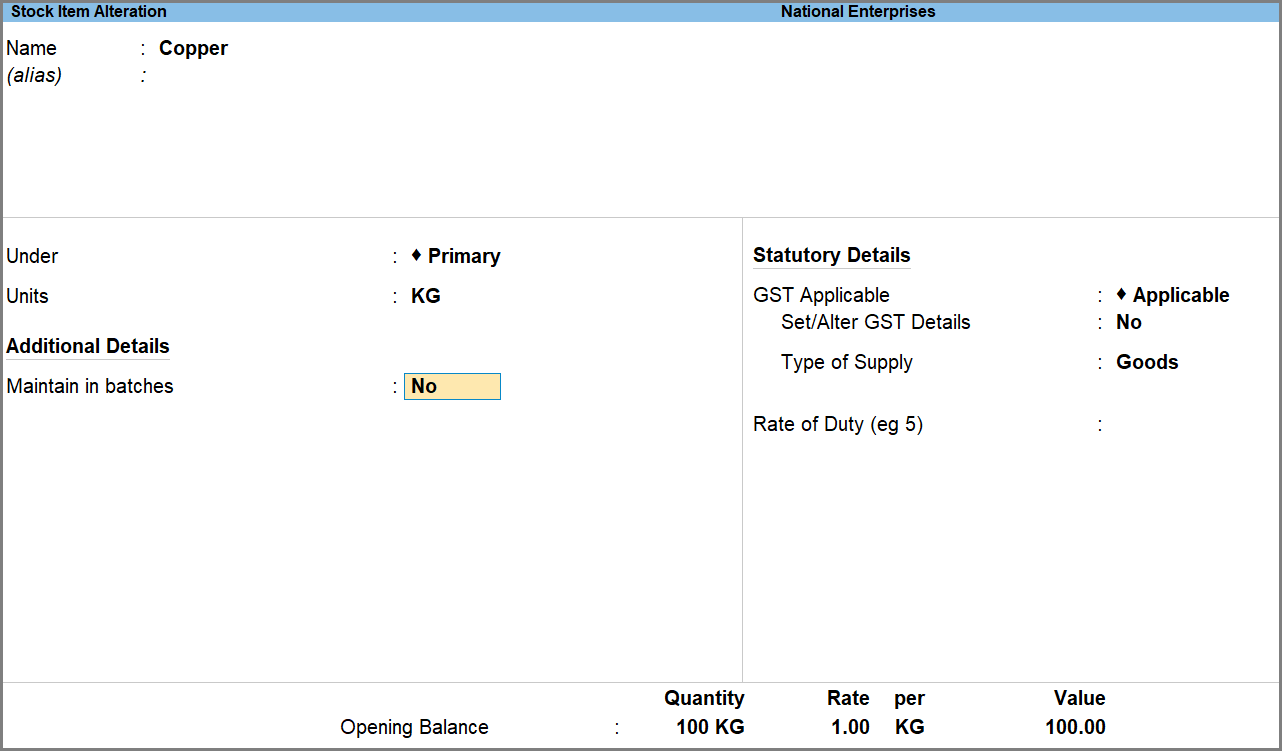
- As in other masters, press Ctrl+A to save.
Under F12 (Configuration), if you set Maintain Stock Items in Batches to No, then the option Maintain in batches will not be displayed on the Stock Item Alteration screen.
However, this action will not disable batches in the Stock Items for which batches are enabled.
You can again enable the batches for Stock Items, whenever required.


