
Cost Centre or Profit Centre Allocation
In any business, the Cost Centre or Profit Centre plays an important role in tracking the expenses incurred and profit earned by each department. You can create Cost or Profit Centres and allocate expenses and incomes to them. Along with Cost Centres, you can create a Cost Category and use them in Cost Centres for parallel allocation. You can view the same expense allocation between the Cost Centres of two Cost Categories through parallel allocation. For example, with parallel allocation, you can view the allocation of Travel expenses incurred by an Employee and for any Sales schemes. You can also create a Cost Centre Class with the Cost Category and Cost Centres along with the predefined percentage allocation. While recording the transaction, once you select the Cost Centre Class, automatically the expenses and incomes get allocated to the respective Cost Centres based on the percentage of allocation defined.
In any organisation, it is crucial to keep track of expenses incurred and the profit earned by each department. This helps you to understand which department is incurring more expenses or which department has generated profit. These details help you to decide the action to be taken at the right time. TallyPrime makes it easy for you to track the expenses and profits made by your company. You can maintain your incomes and expenses, as per different business units, employees, projects, departments, and so on, using the Cost Centre capability in TallyPrime.
You can have multiple Cost Centres or Profit Centres in your company, as needed, and allocate the breakup of incomes and expenses to different Cost Centres or Profit Centres. Such Cost Centres can be created in a hierarchical structure to get a consolidated view of the allocation. For example, you can create Cost Centres like Sales Department, Marketing Department and so on. Further, you can create Cost Centres with employee names under projects where employees from different departments work or the same employee works on different projects. While viewing the report you can view the hierarchy of the Cost Centres under the Cost Category. You can also allocate the same income or expense to different sets of Cost Centres in parallel, say employee-wise as well as project-wise, for reporting purposes by using Cost Categories for the respective Cost Centres.
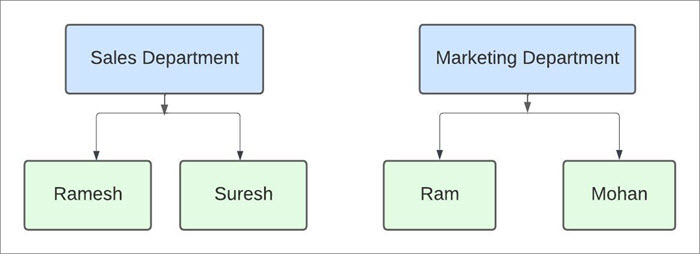
In the following diagram, you can see how an organisation uses Cost Centres to track their expenses and incomes. Each employee is represented by a Cost Centre. For each department separate Cost Centres are created to consolidate the expenses incurred and incomes created by all employees in the department.
In TallyPrime, you can view the reports that help you to track income and expenses that are incurred Cost Centre-wise. In case you do not want to use Cost Centres, you can disable them as well. To disable the Cost Centres, you need to delete them. In case expenses are allocated to Cost Centres, then those allocations need to be moved to other Cost Centres before deleting the Cost Centres. You can also delete a Cost Category if no Cost Centre or Profit Centre has been grouped under it.
Use Cost Centres or Profit Centres for Allocation of Incomes and Expenses
If you have incomes and expenses, such as commission, interest received, staff welfare, employees, payment recovery, conveyance, and so on, and want to maintain them as per business unit, employee, project, department, and so on, you can use the Cost Centre (also known as Profit Centre) capability in TallyPrime. This enables you to allocate incomes and expenses to Profit Centres or Cost Centres in your business.
In this section
Create Cost Centres
The main function of Cost Centres (also known as Profit Centre) is to keep track of the expenses incurred. Suppose, you have multiple departments and you want to know the expenses incurred or revenue generated by the employees under the departments. You can track such expenses and incomes by creating Cost Centres of the employees.
![]()
- Press Alt+G (Go To) > Create Master > Cost Centre > press Enter.
Alternatively, Gateway of Tally > Create > Cost Centre > press Enter.
If the feature is inactive, you will be prompted to activate the Cost Centres feature. Select Yes or press Y to proceed. - Name & alias: Provide a name. As in other masters, you can specify multiple aliases.
- Under: Select Primary or an existing Cost Centre.
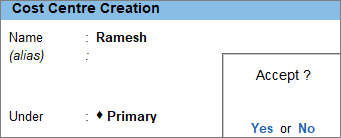
- Accept the Cost Centre Creation screen. As always, you can press Ctrl+A to save.
Click here to see the possible F12 Configurations.
|
Options |
Descriptions |
|
Provide aliases for Name |
Allows to provide the additional name for the cost centre or profit centre you are creating. You can enter multiple unique aliases. |
|
Provide language aliases for Name |
Allows to enter additional name and alias name in different languages for the Cost Centre. |
|
Use grouping for Cost Centres |
Allows to group the cost centre under an existing cost centre. |
|
Set Opening Balance for Revenue Items in Reports |
Displays an option to show the opening balance of revenue items in reports. |
|
Set Bank details for Cost Centres |
Display the option to select the bank transaction type for the cost centre. |
|
Provide E-mail ID |
Display the option to enter the E-mail ID. |
Similarly, you can create any other Cost Centre as needed.
Once you create a Cost Centre, TallyPrime prompts you to allocate your income or expenses to the relevant Profit Centres or Cost Centres when recording transactions.
You can create and alter multiple Cost or Profit Centres from one screen. Use the multi-master creation and alteration feature to create or alter multiple Cost or Profit Centres from the Chart of Accounts.
Allocation of expenses to Cost Centres
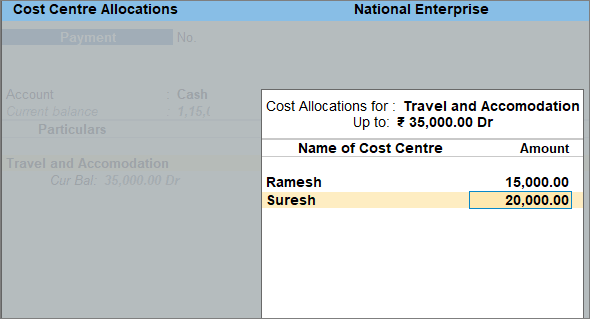
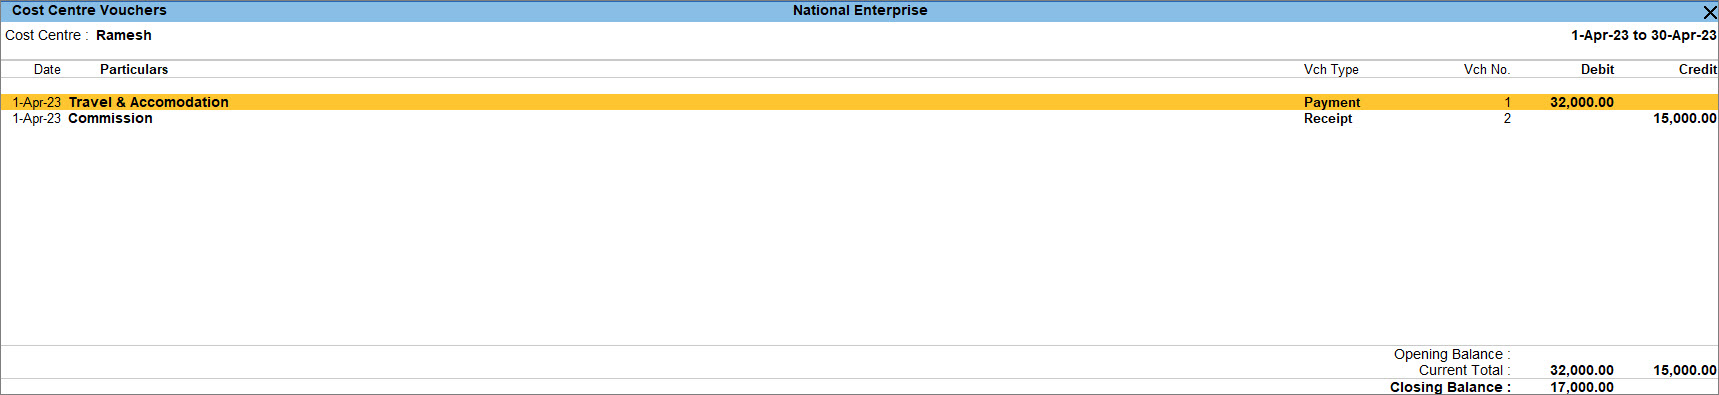
Consider the example of employees – Ramesh and Suresh – travelling across the country to conduct events, such as training and demo sessions at the client location. The expenses incurred by Ramesh and Suresh are:
|
Expense Head
|
Ramesh
|
Suresh
|
|---|---|---|
| Travel and Accommodation | 15,000 | 20,000 |
| Stationery | 6,000 | 4,000 |
| Advertisement Expense | 11,000 | 9,000 |
These expenses can be recorded by allocating the amounts to the respective Cost Centres – Ramesh and Suresh.
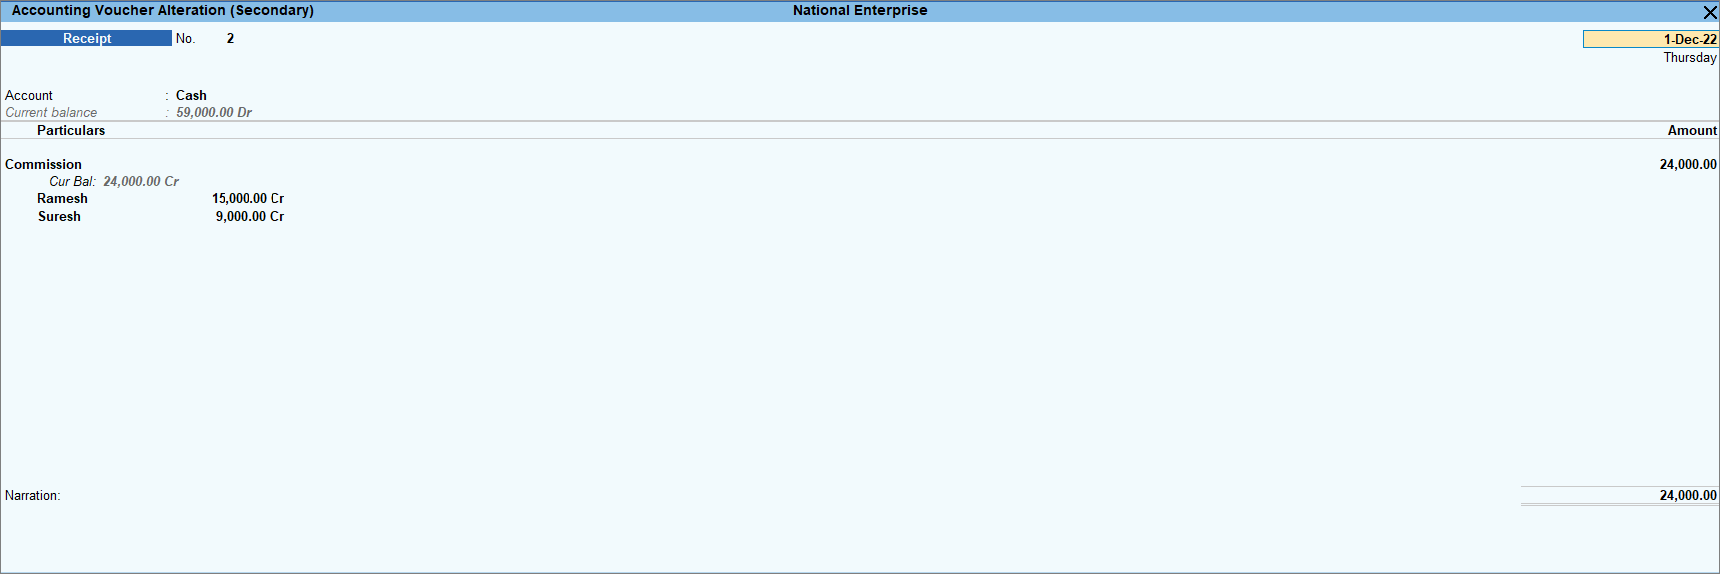
At the same time, the company also received a commission as income.
|
Income Head
|
Ramesh
|
Suresh
|
|---|---|---|
| Commission | 15,000 | 9,000 |
By default, this option is set to Yes in the income and expense ledgers, whereas it is set to No in the asset and liability ledgers.
![]()
- In the Payment Voucher, in Single Entry mode, select Cash or Bank in the Account field.
- Enter the expense ledger Travel and Accommodation and the corresponding amount and press Enter.
The Cost Centre Allocations screen appears. - Provide the Cost Centre details.
- Enter the employee name under Name of Cost Centre.
- Enter the allocated amount for that employee under Amount.
You need to allocate the total expenses against one or more Cost Centres. - Press Ctrl+A to save the Cost Centre Allocations screen.
- Enter the expense ledgers Stationery and Advertisement with their amount and Cost Centres.
The payment voucher with expenses allocated to Cost Centre, as shown below:
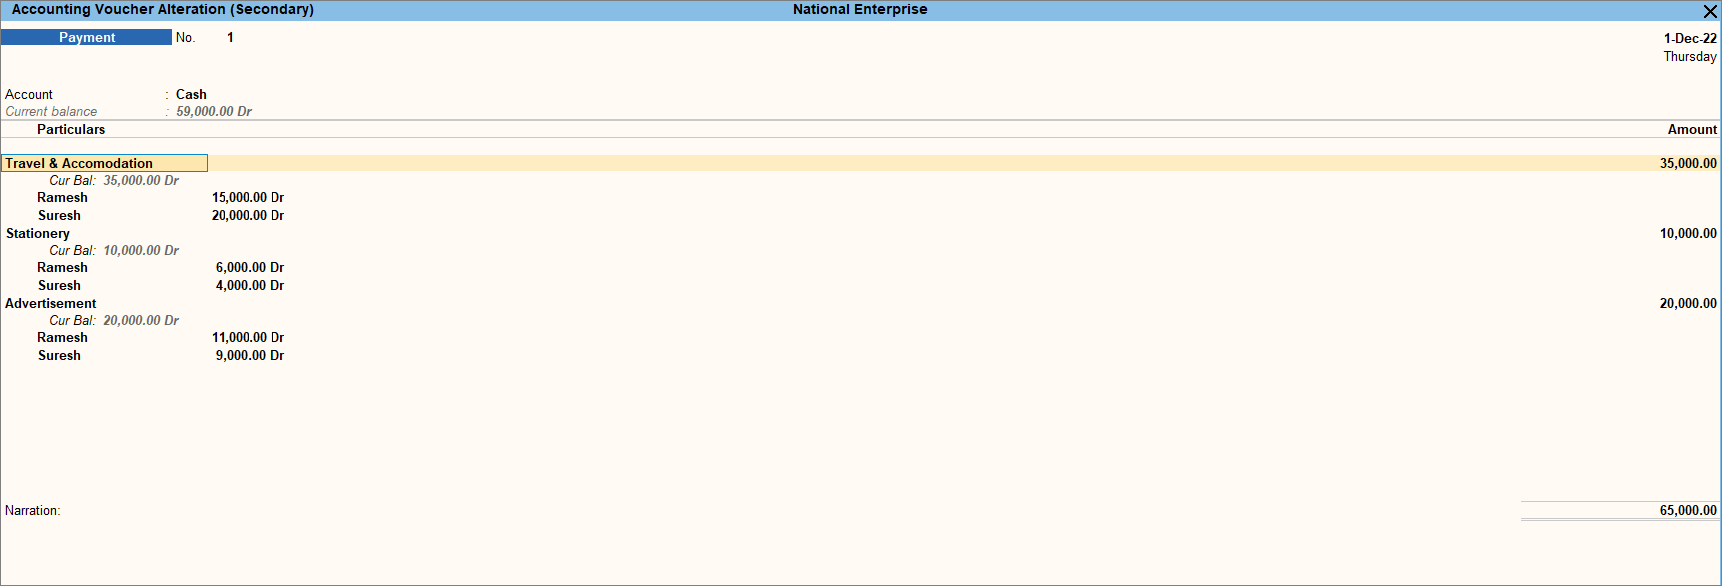
- Accept the screen. As always, press Ctrl+A to save the Payment Voucher.
The receipt voucher for Commission with Profit Centre allocation appears, as shown below:
Once the expenses and incomes are recorded with the Cost Centres, you can open the Cost Centre report to view the overall expenses and income Cost Centre-wise.
Consolidate Allocations to Cost Centres for Unit-wise Expenses
You can create multiple Cost Centres (also known as Profit Centres) in a hierarchy to get a consolidated view of the allocations made to each business unit, employee, project, department, and so on.
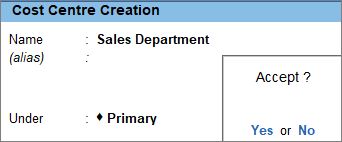
To get a hierarchy of Cost Centres you just need to group the required cost centre under the cost centre created for the group. For example, you can create Cost Centre like Sales Department or Marketing Department and further create cost centres as employee names under each department to form the hierarchy.
![]()
- Create a Cost Centre named as Sales Department.
- Move the cost centres Ramesh and Suresh under the cost centre Sales Department.
- Press Alt+G (Go To) > Alter Master > Cost Centre > Ramesh > press Enter.
Alternatively, Gateway of Tally > Alter > Cost Centre > Ramesh > press Enter. - Select Sales Department in the Under field.
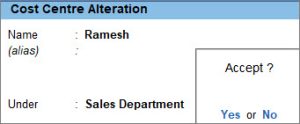
- Alter the Cost Centre Suresh and keep it under Sales Department.
Similarly, create other Cost Centres.
- Press Alt+G (Go To) > Alter Master > Cost Centre > Ramesh > press Enter.
- Go to the Cost Centre Summary report to view the consolidated expenses and incomes of the Cost Centres created under the Sales Department.
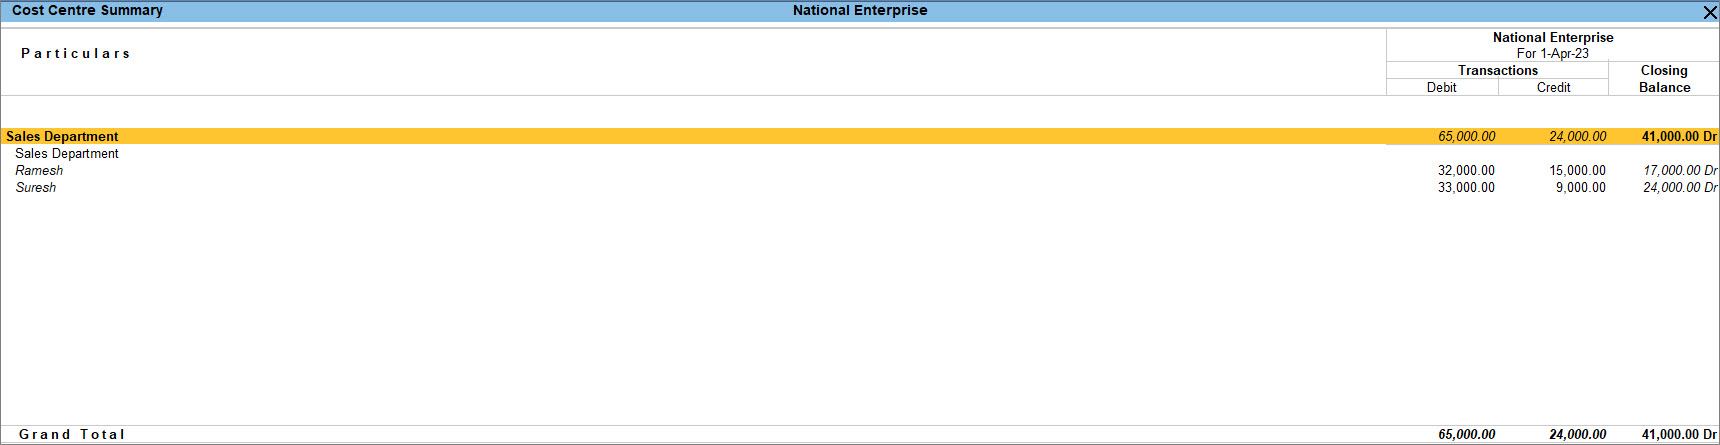
Once the hierarchy is created whenever you allocate an expense to any of the employees, it would also become part of the relevant department.
Track Income and Expenses Incurred Cost Centre-Wise
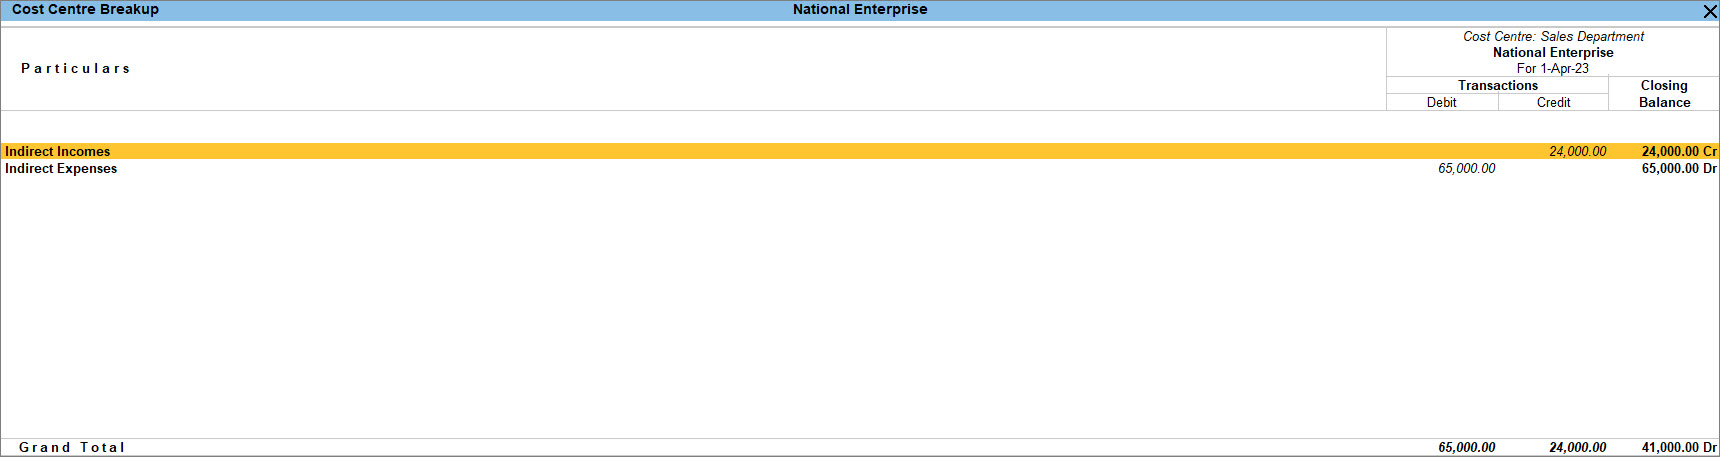
The Cost Centre Breakup report gives you the income and expense allocated to the selected Cost Centre or Profit Centre. As in any other report, you can explore and drill down to view the details for a particular Cost Centre. At the last level of drill-down, you can alter the contributing transactions, if needed.
In the section
- Cost Centre Breakup in Ledger Reports
- Cost Centre Breakup
- Cost Centre Summary
- Cost Centre Monthly Summary
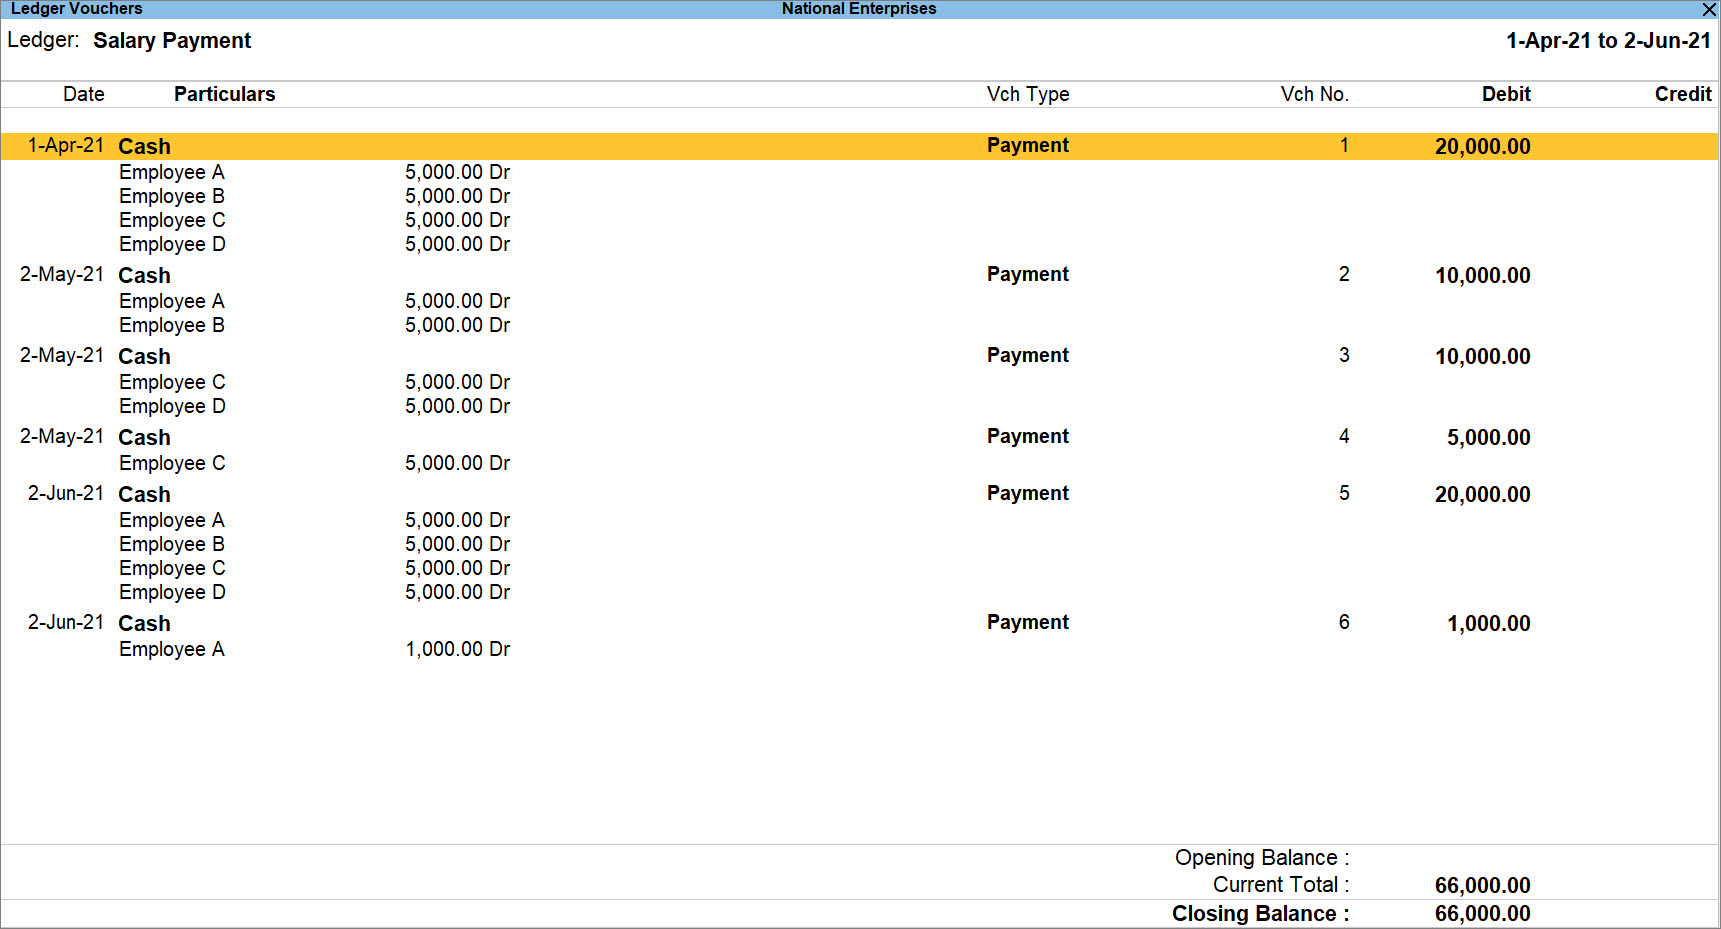
Cost Centre Breakup in Ledger Reports
- Press Alt+G (Go To) > Ledger Vouchers > type or select ledger name and press Enter.
- Press F2 (Period) > enter From and To
The Ledger Voucher report for the selected report will be displayed. -
Press F12 (Configure) and set the following:
-
Format of Report : Detailed.
-
Show Cost Centre details: Yes
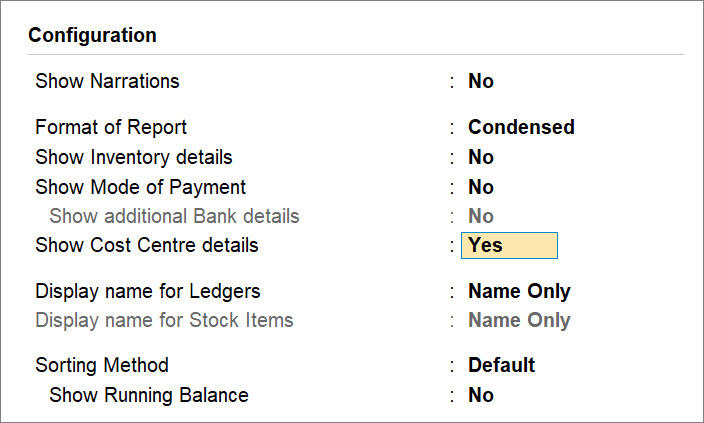
The Ledger Vouchers report appears as shown below:
-
Cost Centre Breakup
The Cost Centre Breakup report gives you the ledger-group-wise view of incomes and expenses incurred and allocated to the selected Profit Centre or Cost Centre.
![]()
- Press Alt+G (Go To) > type or select Breakup of Cost Centre.
Alternatively, Gateway of Tally > Display More Reports > Statements of Accounts > Cost Centres > Cost Centre Break-up.
Comparison using Auto Column
In TallyPrime, you can compare incomes and expenses incurred in a particular Cost Centre or Profit Centre to the others. You can compare the Cost Centre details by adding columns.
For example, if you want to compare the ledger-wise details of Ramesh and Suresh, open the Cost Centre Breakup report for Ramesh.
- Press Alt+C (New Column), and select Suresh.

- Press Alt+N (Auto Column) to repeat the columns of the current report based on the selected option.
- If you want to compare data of more than one company using the auto column button, select Company as the type. The Company option is available when more than one company is open.
- Additionally, you can alter the columns using Alt+A (Alter Column) and delete columns using Alt+D (Delete Column).
- You can include the Opening Balance along with the Transaction and Closing Balance by pressing F12 (Configure).
To know more about the reports feature in TallyPrime, refer to Working with Reports.
Cost Centre Summary
This report displays the summary of incomes and expenses allocated to different Profit Centres or Cost Centres.
![]()
- Press Alt+G (Go To) > type or select Cost Centre Summary.
Alternatively, Gateway of Tally > Display More Reports > Statements of Accounts > Cost Centres > Cost Centre Summary.
The detailed view (press Alt+F5) of the report appears as shown:
You can also compare the Cost Centre Monthly Summary by pressing Alt+N (Auto Column).
To know more about the reports feature in TallyPrime, refer to Working with Reports.
Cost Centre Monthly Summary
You can view the monthly breakup of income and expense details along with the closing balance for the selected Cost Centre.
![]()
- Press Alt+G (Go To) > type Cost Centre Monthly Summary.
Alternatively, you can drill down from the Cost Centre Summary report.
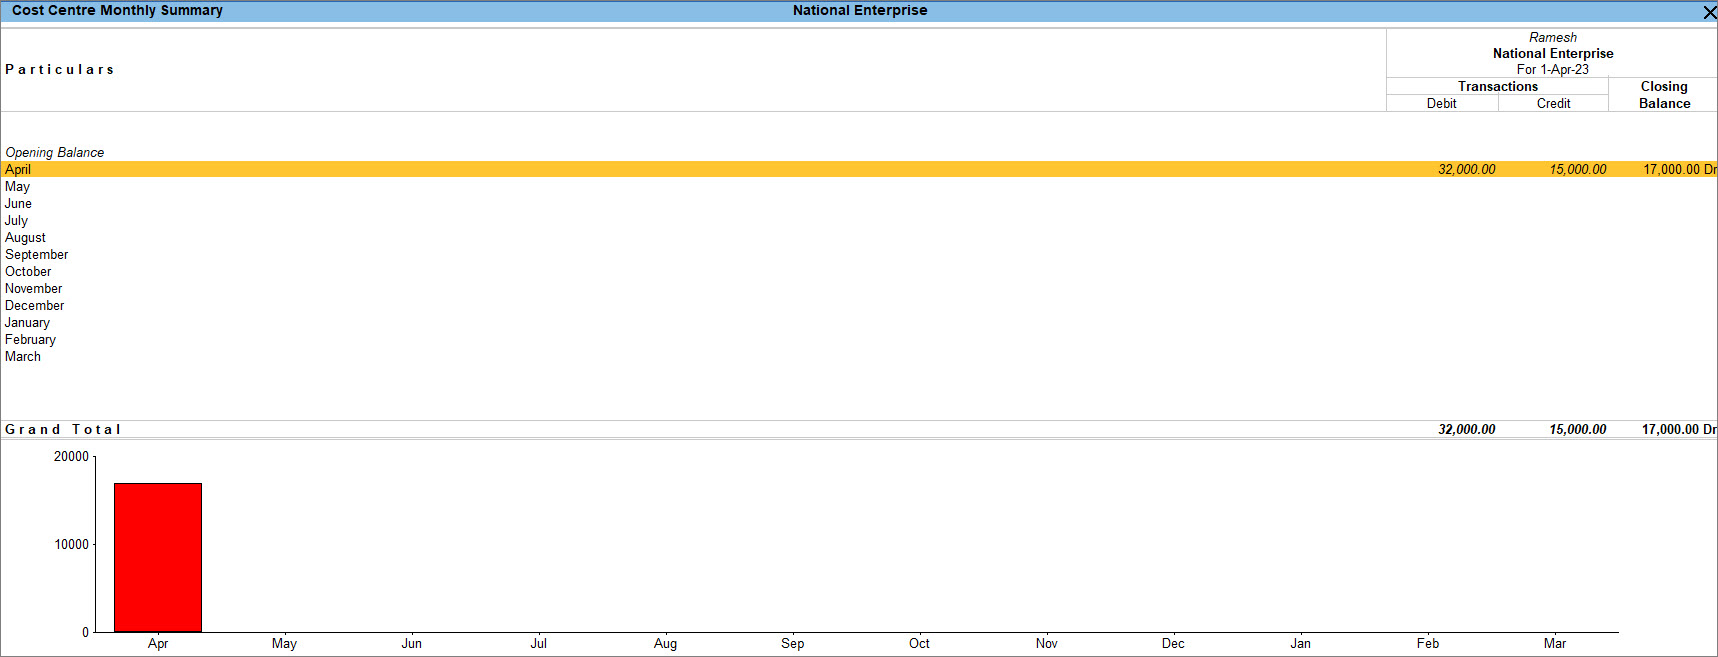
- Select the required month and press Enter, to view the Cost Centre Vouchers report.
From Cost Centre Monthly Summary, you can view related reports such as the Breakup of Cost Centre and Cost Centre Summary by pressing Ctrl+H (Change View). You can also compare the Cost Centre Monthly Summary by pressing Alt+N (Auto Column).
To know more about the reports feature in TallyPrime, refer to Working with Reports.
Use Cost Category for Parallel Allocation
To allocate the same income and expense to multiple Cost Centres or Profit Centres, you can create a Cost Category for parallel allocation. You can create a Cost Category and classify Cost Centres to get a better analysis of your cost and revenue.
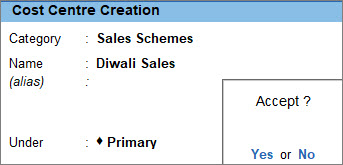
Consider an organisation running multiple Sales Schemes to boost sales. For example, Diwali Sales, New Year Sales, and so on.
From the below table, we can see the representation of how the same expenses incurred under Travel and Accommodation and Stationery can be allocated to Employees – Ramesh & Suresh and to the Sales Schemes – Diwali Sales and New Year Sales with parallel allocation.
| Cost Category | Employees | Sales Schemes | |||
|---|---|---|---|---|---|
| Cost Centre | Ramesh | Suresh | Diwali Sales | New Year Sales | |
|
Expenses (ledgers) |
Total Amount | ||||
| Travel and Accommodation | 35,000 | 10,500 | 24,500 | 14,000 | 21,000 |
| Stationery | 10,000 | 6,000 | 4,000 | 3,000 | 7,000 |
By default, TallyPrime considers all Cost Centres under an internal category called Primary Cost Category. You can rename the Primary Cost Category at any time. As in the case of other masters, if you alter anything in Cost Category Masters, the changes will reflect in corresponding transactions and reports.
You can create any number of Cost Categories as needed. You can maintain Cost Centres under Primary Cost Category or under the Cost Categories that you create.
You can create Cost Category for both revenue and non-revenue items and then allocate the expenses to the respective cost centres. Revenue Items refer to all your expenses and incomes. Non-revenue items refer to Assets and Liabilities.
When you record transactions after creating a new Cost Category, in the Cost Centre Alteration screen you need to select the required Cost Category.
In this section
Rename Primary Cost Category and Create Cost Category
The Cost Category is used to classify or group similar or related costs for the purpose of reporting.
![]()
- Press Alt+G (Go To) > Create Master > type or select Cost Category > press Enter.
Alternatively, go to Gateway of Tally > Create > type or select Cost Category > press Enter. You can also create a Cost Category from Gateway of Tally > Chart of Accounts.
If you are creating a new Cost Category for the first time, you will be prompted to create a new Cost Category or alter the existing Primary Cost Category. - Select Alter Existing or Create a New Category, as needed.
- Click Alter Existing to rename Primary Cost Category.
- In the Cost Category Alteration screen, update the new Cost Category name in place of the Primary Cost Category.
On renaming the Primary Cost Category, the existing Cost Centres will show the new name as the name of Cost Category.
- In the Cost Category Alteration screen, update the new Cost Category name in place of the Primary Cost Category.
- Click Create a New Category to create a new Cost Category.
- Name & alias: As in other masters, you can specify multiple aliases.
- Allocate Revenue Items & Allocate Non-revenue items – You can enable both options if the Cost Category is created for both items. However, it is mandatory to enable either one of the options to create the Cost Category.
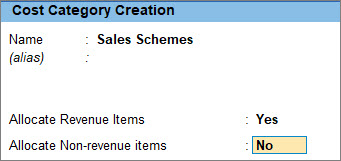
- Accept the Cost Category screen. As always, you can use Ctrl+A to save.
- Click Alter Existing to rename Primary Cost Category.
Similarly, you can create other Cost Categories.
Once the Cost Category is created, you can allocate expense or income to more than one Cost Centres or Profit Centres created under the Cost Category.
You can also create multiple Cost Categories from one screen. Use the multi-master creation and alteration feature for this from Chart of Accounts
Attaching Cost Centres to Cost Category
Once you have created a Cost Category, you can alter the Cost Centres and attach those Cost Centres to the newly created Cost Category.
By default, the cost centres are tagged to Primary Cost Category. If you rename the Primary Cost Category, the existing Cost Centres show the new name.
![]()
- In the Cost Centre Creation/Alteration screen, in Category, select the Cost Category of your choice.
Press Backspace on the Name field to move to the Category field.
You can delete a Cost Category if no Cost Centre or Profit Centre has been grouped under it.
Cost Category for Parallel Allocation of Expenses and Incomes to Cost Centres or Profit Centres in Transactions
When you create more than one Cost Category and have Cost Centres (also known as Profit Centres) under it, the Cost Categories along with their respective Cost Centres appear for selection during the parallel allocation of incomes and expenses.
![]()
For example, below are the expense allocation details for Cost Category Employees and Sales Schemes.
- In the Payment Voucher, record the payment entry for Travel and Accommodation.
- Enter the corresponding Amount and press Enter.
The Cost Centre Allocations screen appears. - Provide the details in the Cost Centre Allocations screen.
- Select the Cost Category, say Employees.
- Select the Name of Cost Centre, say Ramesh and Suresh
- Enter the amount for each Cost Centre.
A sample Cost Centre Allocations screen appears, as shown below: - Do the same for Cost Category – Sales Schemes and Cost Centres – Diwali Sales and New Years Sales.
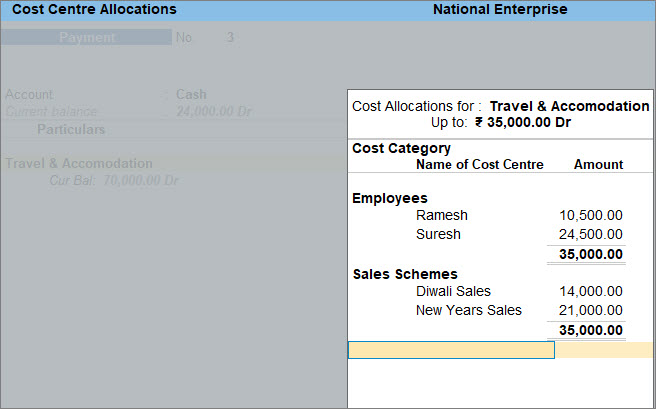
- Accept the Cost Centre Allocations screen.
- As always, press Ctrl+A to save the Payment Voucher.
With the creation of Cost Categories, you can allocate the same expenses to the Cost Centres created under multiple Cost Categories through parallel allocation.
Cost Category Summary
This report displays the summary of incomes and expenses allocated to a parallel set of Profit Centres or Cost Centres in your business.
![]()
- Press Alt+G (Go To) > type or select Cost Category Summary.
Alternatively, Gateway of Tally > Display More Reports > Statements of Account > Cost Centres > Category Summary.
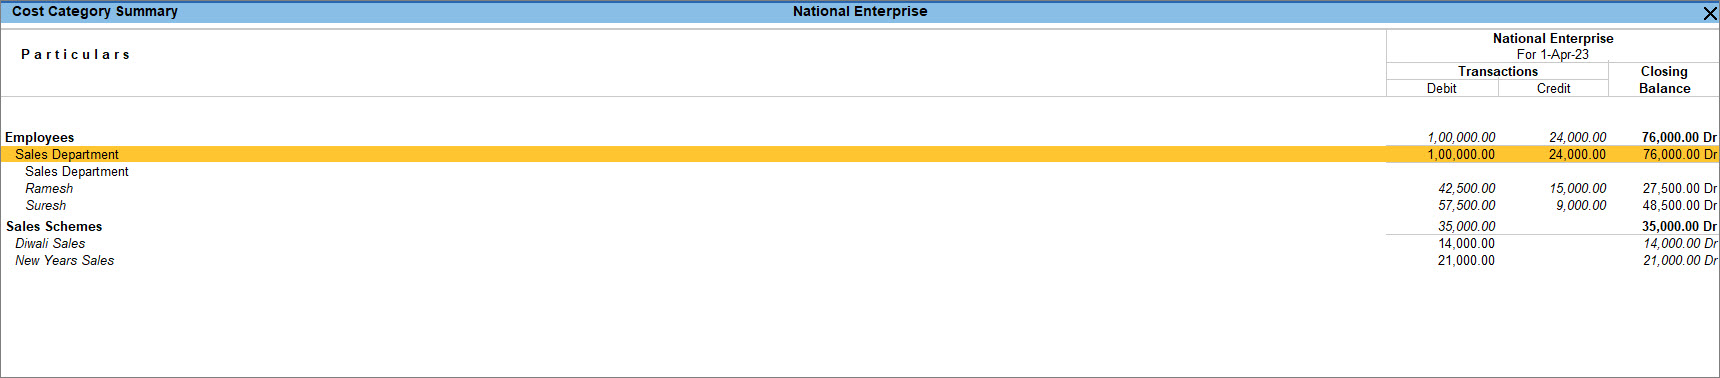
You can compare different Cost Categories to see the variance by pressing Alt+N (Auto Column) and change the Scale Factor by pressing Ctrl+B (Basis of Value).
To know more, refer to the Working with Reports topic.
Cost Centre Class
You may want to predefine the percentage allocation of incomes and expenses to each Cost Centre or Profit Centre, which can be automatically applied during voucher entry. You can do this in TallyPrime using the Cost Centre Class. While recording the voucher, the allocation will be automatically done as per the details defined for the Cost Centre Class.
For example, you can create a Cost Centre Class as Travel Expenses and do a parallel allocation of Travel and Accommodation expenses between the Employees and Sales Schemes along with Ramesh and Suresh. You don’t have to manually allocate the expenses any further. After the Class is created, while recording the Payment voucher, if you select the Cost Centre Class as Travel Expenses, then the expenses will automatically get allocated between the Employees and the Sales Schemes and Ramesh and Suresh as per the percentage defined in the Cost Centre Class.
In this section
Create Cost Centre Class
To predefine the Cost Centres and Cost Category along with the percentage allocation for an easy recording of transactions you need to create a Cost Centre Class.
![]()
- Press F11 (Features) > Ctrl+I (More Details) > type or select Cost Centre Class.
If the feature is inactive, you will be prompted to enable the Cost Centres Class feature. Select Yes or press Y to proceed. - Type the Class Name, and select the Category and the respective Cost Centres created for your business. Specify the percentage of allocation.
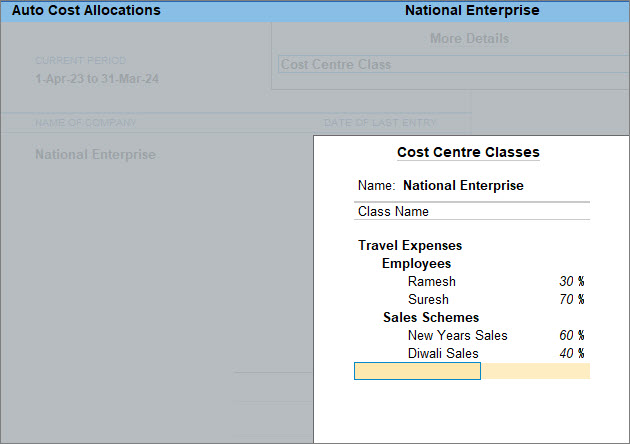
In the above example, the Cost Centres (Diwali Sales & New Years Sale and Ramesh & Suresh and Cost Categories Employees & Sales Schemes) are allocated at predefined percentages for:
- Cost Centre Class – Travel Expenses.
- Cost Category – Employees (with cost centres Ramesh and Suresh) and Sales Schemes (with Diwali Sales and New Year Sales).
Use Cost Centre Class
With the creation of the Cost Centre Class, the allocation of expenses and incomes to the Cost or Profit Centres is done automatically as soon as the Cost Centre Class is selected in the respective Vouchers. For example, let us use the Cost Centre class, Travel Expenses in the Payment Voucher.
![]()
- Enable Cost Centre Class in Payment Voucher.
- In the Payment Voucher, press F12 (Configure).
- Set Select Cost Centre/Class to Yes.
- Accept the Configuration screen.
- Record the Payment Voucher entry.
- Select Cash or Bank in the Account field.
- Select the Cost Centre Class, for example, Travel Expenses.
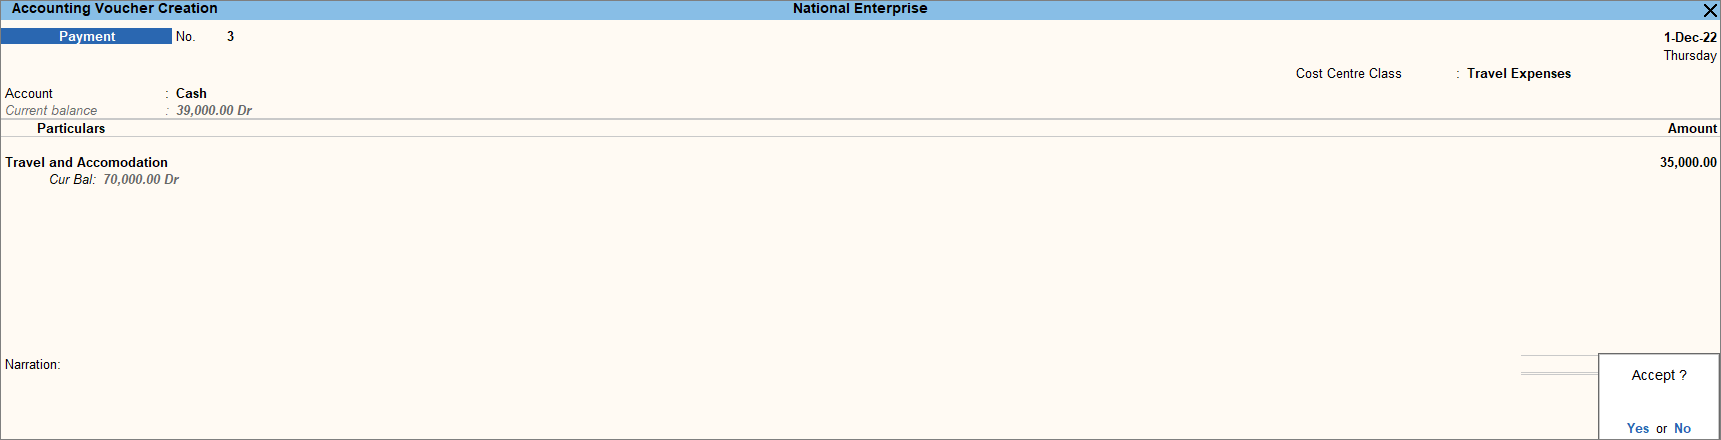
- Select the expense ledger under Particulars and Amount.
You do not have to allocate the expenses to the Cost Centres. It gets allocated as defined in the Cost Centre Class. - Accept the voucher. As always, press Ctrl+A to save the Payment Voucher.
- Check the allocation of expenses as per the class.
- Open the Voucher in alteration mode to view the Cost Centre allocation or press Page Up.
The cost centre allocation will be displayed.
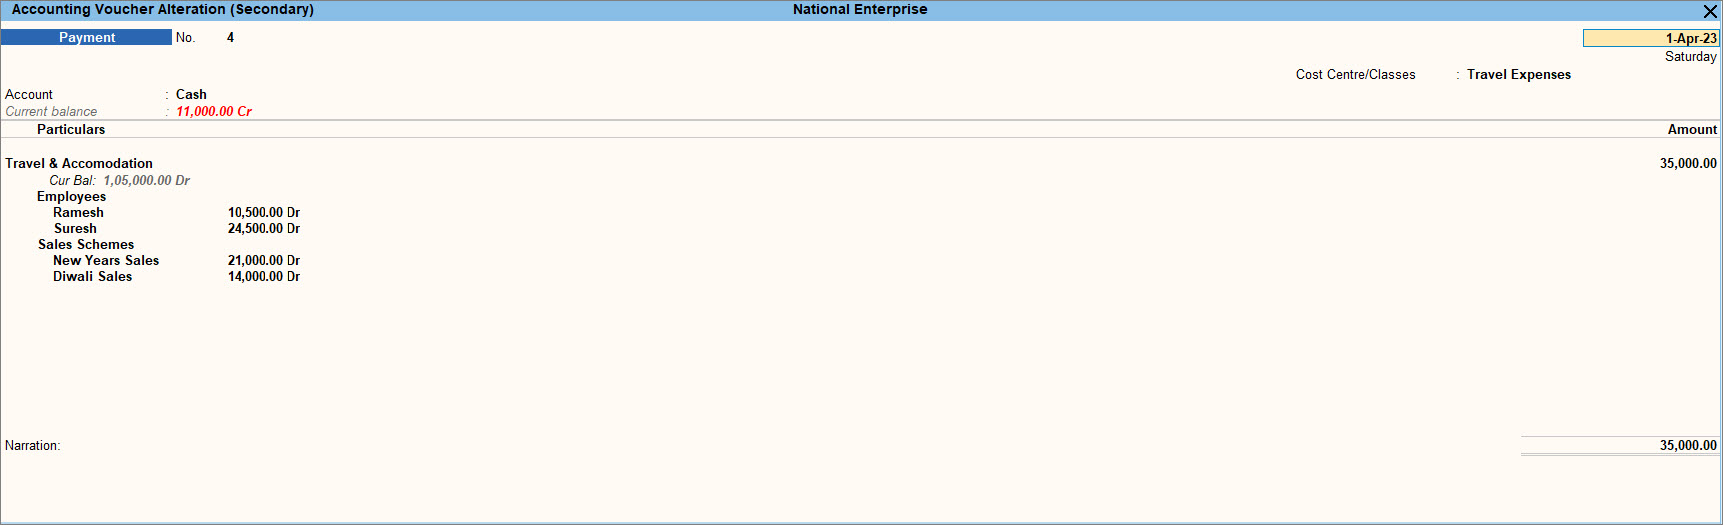
- Open the Voucher in alteration mode to view the Cost Centre allocation or press Page Up.
Similarly, you need to create the required Cost Centre Class, if you want to record a Sales Voucher and want to see the expense allocation to Cost Centres based on the percentages defined in the Cost Centre Class.
Cost Centre Class allows you to allocate the expenses and income to the respective Cost Centres based on the percentages decided at the time of creating the Class. You do not have to manually allocate the expenses to the Cost Centres if you have enabled Cost Centre Class.
Disable Cost Centre in TallyPrime
In TallyPrime, you may choose to apply Cost Centres for specific ledgers. Once you enable the Cost Centre feature, you can view the allocation of expenses. However, if you need to disable the Cost Centre, you cannot view the Cost Centre-wise report. To view the report for the period when Cost Centre was used, you need to enable the Cost Centre again.
You may want to disable Cost Centres for ledgers in the following scenarios:
- You do not need a Cost Centre for a specific ledger anymore.
- You do not need a Cost Centre for any ledger.
- An executive had mistakenly enabled the Cost Centre for a specific ledger.
As a result, while recording transactions containing the ledger, you will need to specify the Cost Centre.
In all the scenarios mentioned above, you have the option to disable Cost Centres. To disable a Cost Centre, you need to first delete the Cost Centre. However, you cannot delete a Cost Centre if there is an allocation of expenses to the Cost Centre. In such cases, you need to move the allocation of expenses from the Cost Centre that you want to delete to another Cost Centre and then delete it.
Disable cost centre for a specific ledger
It may be possible that you have enabled Cost Centres for the Advertisement ledger. However, later on, you realise that you do not need Cost Centres for the advertising cost. In such a case, you may want to disable the Cost Centre for the advertising cost.
![]()
To disable the Cost Centre for a specific ledger, follow the steps given below.
- In the Ledger Alteration screen, set Cost centres are applicable as No.
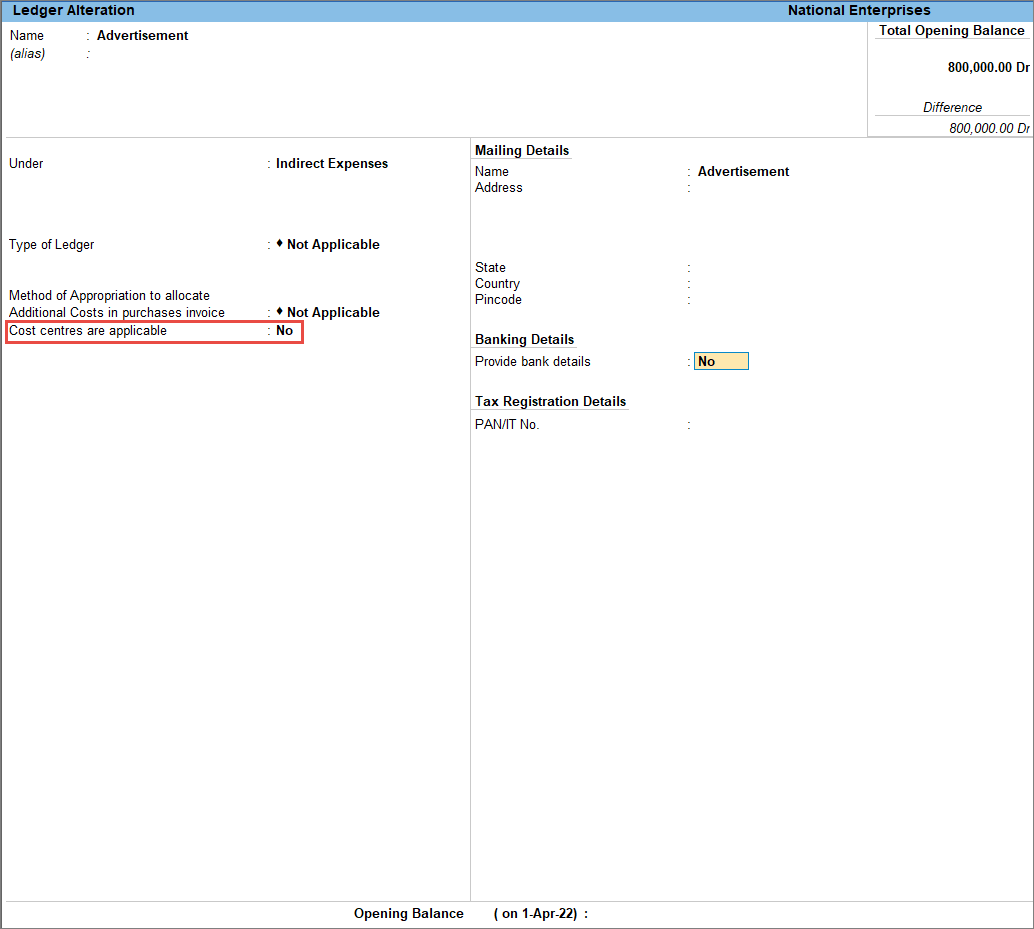
- As always, press Ctrl+A to save the Ledger Alteration screen.
Henceforth, Cost Centres will not be applicable to this ledger, and you will not have to select a Cost Centre for this ledger while recording transactions.
Disable cost centre for all ledgers
You may want to disable Cost Centres for all the ledgers, as you do not need to assign Cost Centres to the ledgers anymore. In such a case, you can disable Cost Centres for all the ledgers in TallyPrime. If the Cost Centres are already used in any transaction then before you disable the Cost Centre you need to move the allocation to another Cost Centre and then you can disable it.
![]()
Follow the steps given below.
- In the Ledger Alteration screen, press F12 (Configure) and set Apply Cost Centres for Ledgers as No.
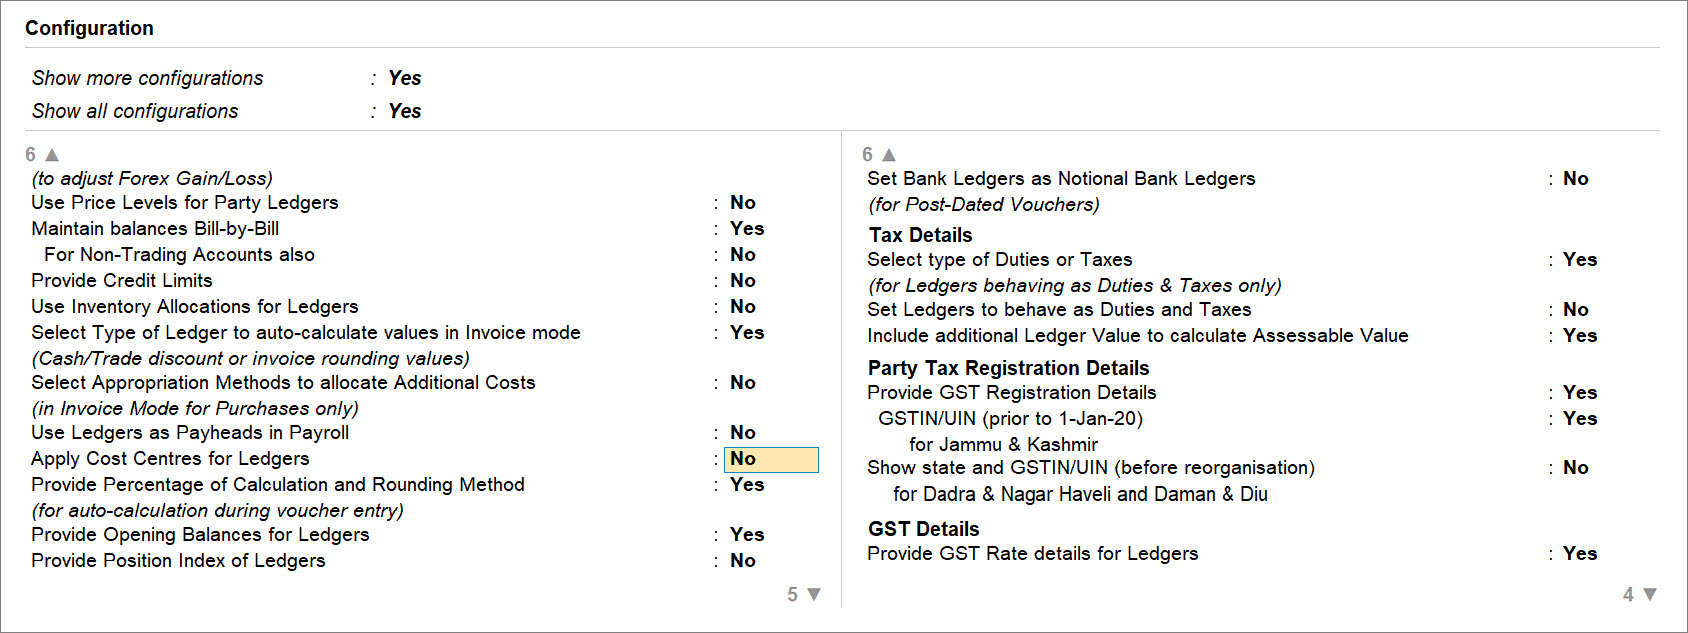
- As always, press Ctrl+A to save the Ledger Alteration screen.
Once the Cost Centres are disabled, you will not be able to see the Cost Centre Breakup report.


