
Track Item Cost in TallyPrime
In businesses dealing with stock items, it is pivotal to understand the overall expenses that occur while managing a stock quantity. By doing so, you will be able to accurately identify the cost of the stock quantity and sell it at a profitable price. In TallyPrime, you can enable the cost tracking feature to track costs associated with a particular stock and track its revenue, profit or loss, and balance at cost.
To identify the accurate cost of a stock, let us say, for a retail business, you must know the landing cost, delivery charges, packaging cost, and so on. Once item cost tracking is enabled in TallyPrime, you can create a tracking number for a particular stock quantity and mention it in all vouchers relevant to the stock. Let us say, you have received a sales order of 100 laptops and created a cost tracking number while recording the sales order voucher. So, while recording a payment voucher for any expense incurred while fulfilling the order, you can mention the cost tracking number in it. By doing so, the transport expense per price will be added to the existing item rate that can be viewed in the item cost analysis report.
Tracking item costs can be crucial in any business for various instances, including:
Profit Margin Analysis: By knowing the cost of each item, businesses can calculate their profit margins accurately. It helps them in making better pricing decisions to optimise profitability. For example, in a retail business, expenses can be analysed to assess profit margins. Tracking the cost of expenses can aid in making decisions on expenses to maximise profitability.
Budgeting: Accurate cost tracking enables businesses to forecast expenses more effectively and allocate budgets appropriately for purchasing, production, and other operational activities.
Pricing Strategy: By knowing the accurate cost of items, businesses can set competitive prices that cover expenses while remaining attractive to customers. It also helps in analysing past deals and making calculative pricing strategies for the future.
In TallyPrime, the option to track cost is available in stock item masters, and accounting ledgers grouped under Expenses & Incomes (Direct/Indirect), Purchases & Sales accounts. You can view the Item Cost Analysis report to track the overall expense of that stock and check the cost price per piece. Balance at cost is also available in the report along with expense and revenue of stock items or stock groups. You may choose to stop cost tracking if you do not wish to track costs from the report itself.
Enable Cost Tracking for Masters and Ledgers
You can enable cost tracking in stock items and ledgers to track the costs associated with a particular quantity of a stock item.
In this section
Configure stock items for cost-tracking
Cost tracking can be enabled in the stock item master to track costs related to a particular quantity of that stock item. Note that the option to enable cost tracking will not be displayed in the stock item master if the unit of measure for the stock item is not selected.
![]()
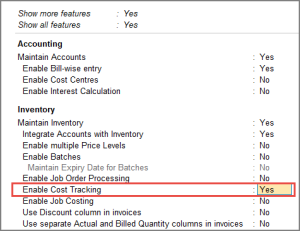
- Enable Cost Tracking in your company to track expenses related to stock items.
- Press F11 (Features) > set Enable Cost Tracking to Yes.
If you do not see this option, set the options Show more features and Show all features to Yes. - Accept the screen. As always, you can press Ctrl+A to save.
- Press F11 (Features) > set Enable Cost Tracking to Yes.
- Enable cost tracking in the stock item master.
- Press Alt+G (Go To) > Create Master/Alter Master > type or select Stock Item > and press Enter.
Alternatively, Gateway of Tally > Create/Alter > type or select Stock Item > and press Enter. - In the Stock Item Creation screen, press F12 (Configure) > set Is Cost Tracking applicable for Stock Items to Yes.
If you need to use this option only for the current stock item, press Ctrl+I (More Details) > type or select Cost Tracking > set Enable Cost Tracking as Yes and press Enter. - Set the option Enable Cost Tracking to Yes.
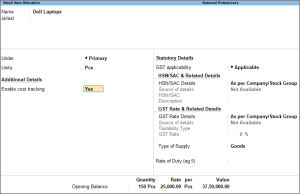
- Enter other details as required and accept the screen. As always, you can press Ctrl+A to save.
- Press Alt+G (Go To) > Create Master/Alter Master > type or select Stock Item > and press Enter.

Once cost tracking is enabled, you can track various costs associated with this stock in the item allocation screen of transactions.
Configure ledgers for cost-tracking
Cost tracking can be enabled for accounting ledgers grouped under Expenses & Incomes (Direct/Indirect), Purchases & Sales accounts. Once enabled, you can use these ledgers to track expenses incurred for the stock.
![]()
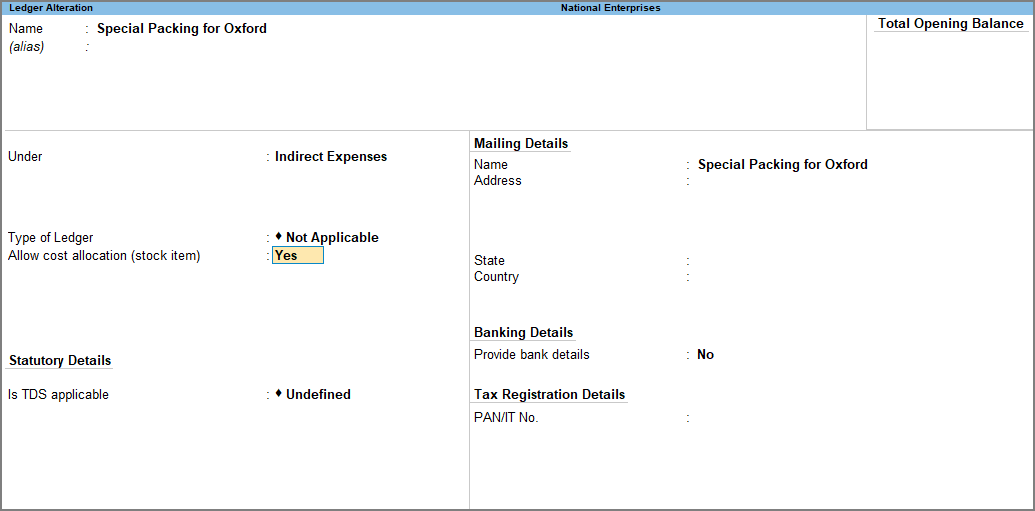
- Enable cost allocation of stock item in the ledger.
- In the Ledger Creation screen, press F12 (Configure).
- Set the option Apply Cost Tracking of Stock Items for Ledgers to Yes.
This will show the option Allow cost allocation (stock item) in the Ledger Creation screen.
If you need to use this option only for the current voucher, press Ctrl+I (More Details) > type or select Allow cost allocation (stock item) set it to Yes, and press Enter.
If you do not see this option, set the options Show more configurations and Show all configurations to Yes.
- Set Allow cost allocation (stock item) to Yes.

- Enter other details as required and accept the screen. As always, you can press Ctrl+A to save.
Similarly, you can create other expense ledgers and sales and purchases ledgers, and enable cost allocation for stock items to track expenses.
Track Item Cost in Transactions
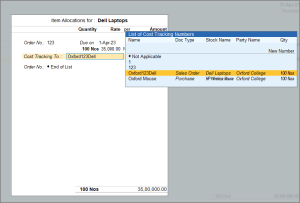
In TallyPrime, you can create a cost tracking number to track the expenses incurred for a stock right from anywhere in the purchase to the sales cycle. Let us say, you have received an order from a customer and raise a sales order against that. Now, to track the cost, revenue, and profit and loss for this order, you can create an item cost tracking number while recording the sales order voucher and mention it in all the related documents involved in fulfilling the order, like purchases, payment vouchers towards expense, sales, and so on. TallyPrime has a report named Item Cost Track Breakup, which has the complete details of income and expenses for each item in the order.
![]()
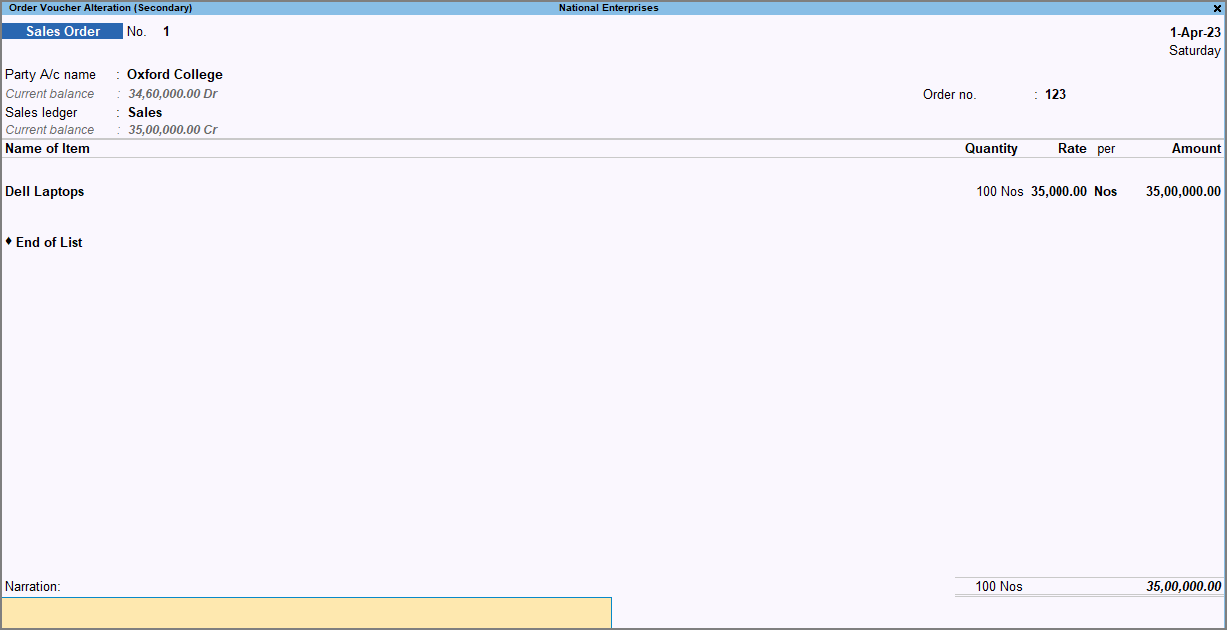
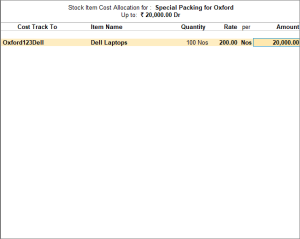
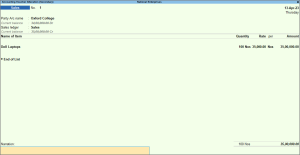
Let us say, you have received an order of 100 Dell Laptops and you have incurred a packaging cost of INR 20,000 while fulfilling this order.
- Create a sales order voucher with cost tracking enabled stock item and ledger.
- Press Alt+G (Go To) > Create Voucher > press F10 (Other Vouchers) > type or select Sales Order.
Alternatively, Gateway of Tally > Vouchers > press F10 (Other Vouchers) > type or select Sales Order.
In case the voucher type is inactive, you will be prompted to activate the Sales Order voucher type. Select Yes or press Y to proceed. - Select the Party A/c name and specify buyer details in the Party Details screen.
- Select the Sales ledger with cost allocation enabled.
To know how to create a ledger with cost tracking enabled, refer to the configure ledger for cost-tracking section. - Select the item and include details like Quantity and Rate, and press Enter.
The List of Cost Tracking Numbers appears. - Specify the New Number in the field List of Cost Tracking Numbers.
- Press Enter to return to the voucher.

- Provide Narration, if any, and accept the voucher. As always, you can use Ctrl+A to save.
- Press Alt+G (Go To) > Create Voucher > press F10 (Other Vouchers) > type or select Sales Order.
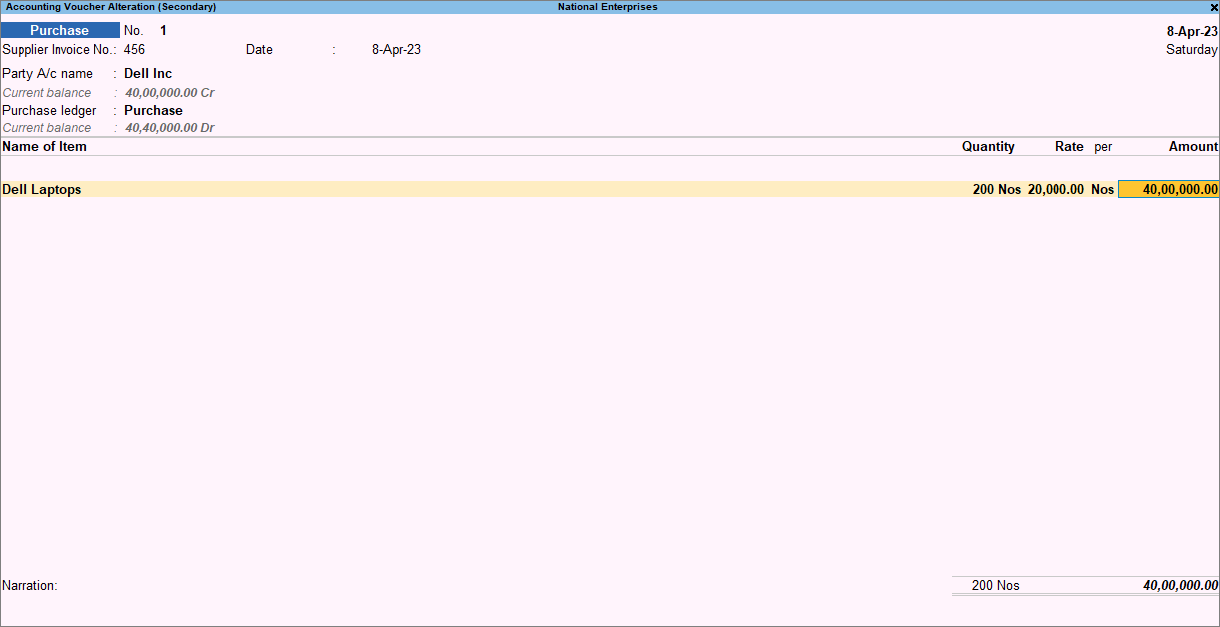
Now, let us record a purchase from a supplier to fulfill the sales order you have received and attach the cost tracking number.
- Create a purchase voucher using the cost tracking enabled stock item and ledger.
- Press Alt+G (Go To) > Create Voucher > press F9 (Purchase).
Alternatively, Gateway of Tally > Vouchers > press F9 (Purchase). - Select the Party A/c name and specify buyer details in the Party Details screen.
- Select the Purchase ledger with cost allocation enabled.
To know how to create a ledger with cost tracking enabled, refer to the configure ledger for cost-tracking section. - Select the item and include details like Quantity and Rate, and press Enter.
The List of Cost Tracking Numbers appears. - Specify the New Number in the field List of Cost Tracking Numbers.
- Press Enter to return to the voucher.
- Provide Narration, if any, and accept the voucher. As always, you can use Ctrl+A to save.
- Press Alt+G (Go To) > Create Voucher > press F9 (Purchase).

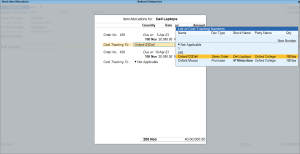
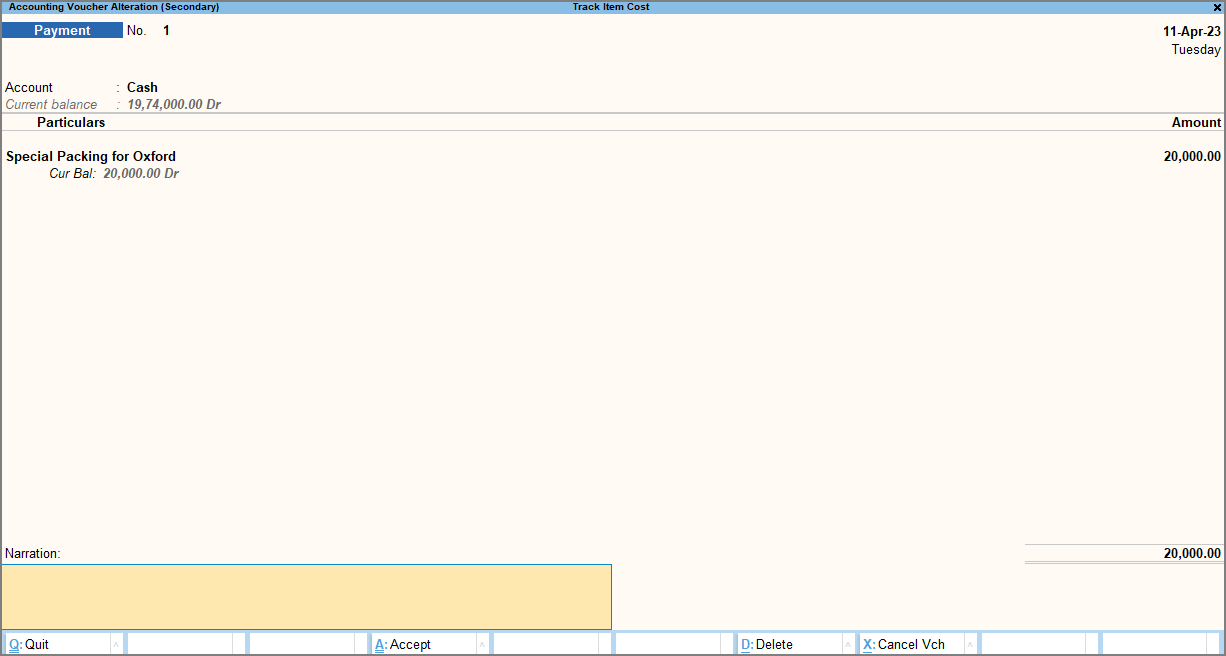
Now, let us say that you have incurred an expense while fulfilling this order. You can record the payment of expenses incurred and mention the cost tracking number in the payment voucher.
- Open a Payment voucher to record an expense for the stock.
- Enter the date and Account.
- Under Particulars, select the expense ledger with cost allocation enabled.
To learn how to enable cost allocation in a ledger, refer to the Configure ledgers for cost tracking section on this page. - Mention the Amount and press Enter.
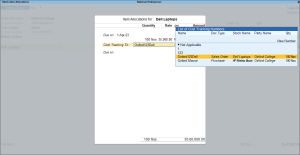
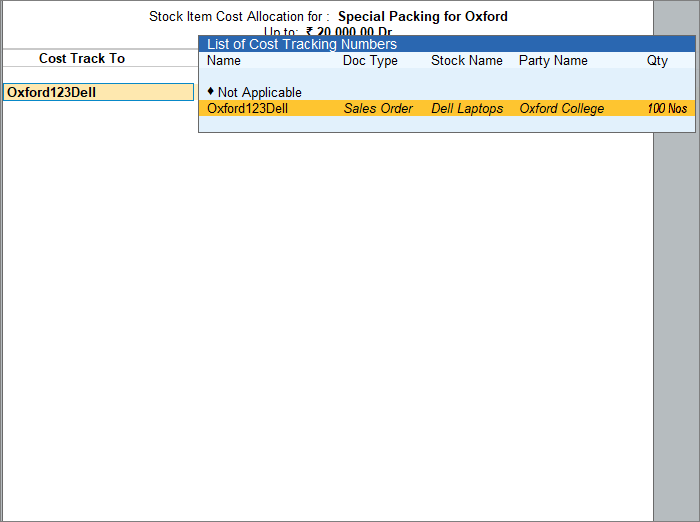
The Stock Item Cost Allocation screen appears as shown below:

- Enter the cost tracking number details.
- Select the cost tracking number from the List of Tracking Numbers created for this stock and press Enter.
- Enter the Item, Quantity, and Rate.
The Amount gets prefilled as entered earlier.
- Press Ctrl+A to save the stock item cost allocation screen and return to the voucher creation screen.

- As always, press Ctrl+A to save the payment voucher.

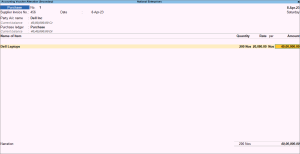
And finally, let us book a sales voucher attaching the item cost tracking number.
- Create a sales voucher using the cost tracking enabled stock item and ledger.
- Press Alt+G (Go To) > Create Voucher > press F5 (Sales).
Alternatively, Gateway of Tally > Vouchers > press F5 (Sales). - Select the Party A/c name and specify buyer details in the Party Details screen.
- Select the Sales ledger with cost allocation enabled.
To know how to create a ledger with cost tracking enabled, refer to the configure ledger for cost-tracking section. - Select the item and include details like Quantity and Rate, and press Enter.
The List of Cost Tracking Numbers appears. - Specify the New Number in the field List of Cost Tracking Numbers.
- Press Enter to return to the voucher.
- Provide Narration, if any, and accept the voucher. As always, you can use Ctrl+A to save.
- Press Alt+G (Go To) > Create Voucher > press F5 (Sales).

Once you have recorded the sales voucher for that stock, you will be able to see the expense, income, balance at cost, and profit or loss for this stock in the Stock Item Cost Analysis report.
Item Cost Analysis Report
You can track the overall profitability or cost of the stock item with the Item Cost Analysis Reports. This report is effective in tracking the overall profitability or cost for the Stock Item, without affecting the stock values during the entire process. The Item Cost Analysis report provides detailed information as per Stock Group and Stock Item via various transactions. You can also stop cost tracking if you no longer wish to track any cost related to a stock.
![]()
In this section
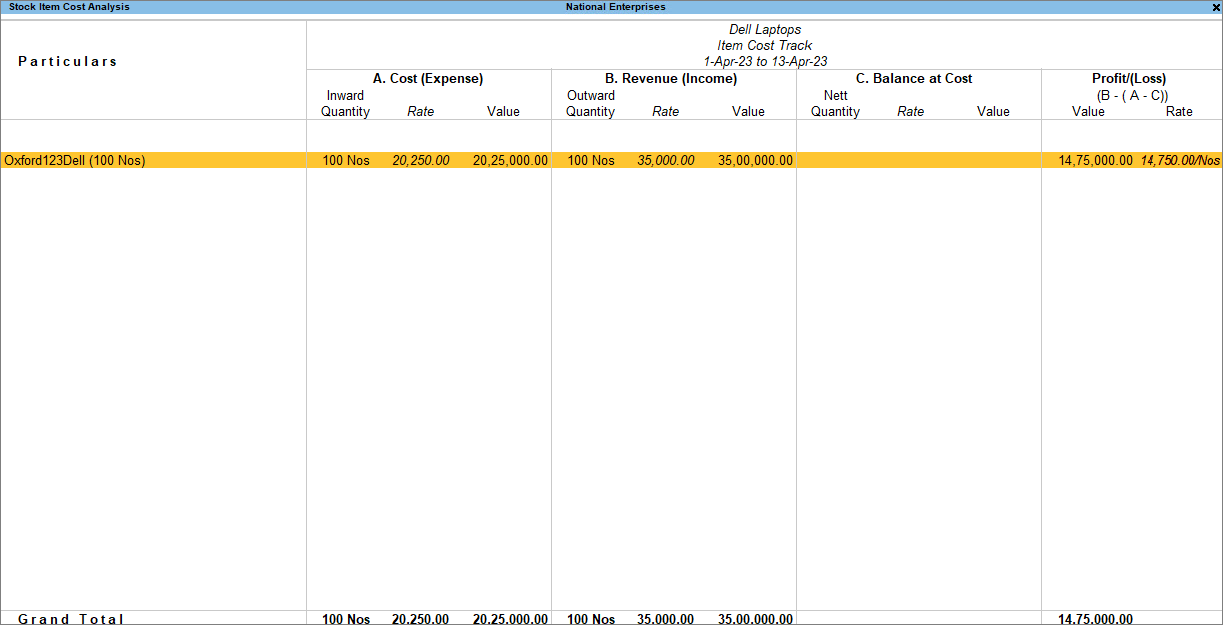
Stock item/group cost analysis
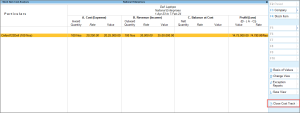
You can view the stock item cost analysis report to view the cost (expense), revenue (income), balance at cost, and profit/loss of a particular lot of a stock item.
- Press Alt+G (Go To) > type or select Stock Item Cost Analysis > press Enter.
Alternatively, Gateway of Tally > Display More Reports > Statements of Inventory > Item Cost Analysis > Stock Item. - Select the Stock Item from the List of Stock Items.
The Stock Item Cost Analysis screen appears as shown below:
Similarly, you can view the Stock Group Cost Analysis report.
- Press Alt+G (Go To) > type or select Stock Group Cost Analysis > press Enter.
Alternatively, Gateway of Tally > Display More Reports > Statements of Inventory > Item Cost Analysis > Stock Group. - Select the Stock Group from the List of Stock Groups.
The stock item/stock group report displays the,
Cost (Expense): This column displays the total cost incurred for the selected Stock Group, such as Purchases, Expenses (Direct and Indirect), and Consumption Cost.
Revenue (Income): This column displays the total revenue earned for the selected Stock Group, such as Sales, and Incomes (Direct and Indirect).
Balance at Cost: This column displays the balance cost (closing stock) available for the selected Stock Group (A – B)
Profit/Loss (B-(A-C)): This column displays the Profit earned or Loss incurred for the selected Stock Group.
You can also configure the reports based on your requirements by using the right buttons.
Press F4 (Stock Item) to view the report for particular stock items.
Press Ctrl+B (Basis of Values) to configure the report with the type of cost track.
Press Ctrl+J (Exception Reports) to view the report based on the sales and purchase orders.
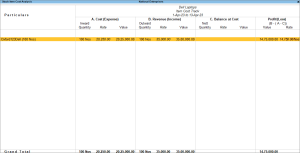
Item cost track breakup
The Item Cost Track Break-up report displays the details of Cost, Revenue, Balance at Cost, and Net Profit/Loss for the selected Item Cost Track. It also displays the Item Movement Summary which contains the details of Item Movement Inward/Outwards, such as Order Placed/Received, Material Received/Delivered, Materials Billed, and Materials Manufactured.
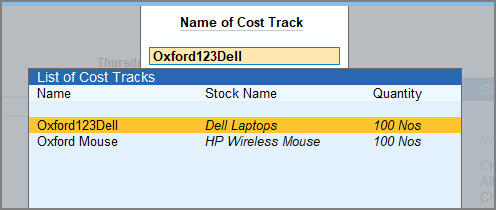
You can drill down on the cost tracking number in the Stock Item Cost Analysis report to open the item cost track breakup report or,
- Press Alt+G (Go To) > type Cost Track Break-up > press Enter.
Alternatively, Gateway of Tally > Display More Reports > Statements of Inventory > Item Cost Analysis > Cost Track Break-up. - Select the Cost Trackfrom the List of Cost Tracks.

The Item Cost Track Breakup report of the selected Cost Track appears as shown:

Press F5 to view the report Group-wise or Ledger-wise.
Close cost track
You can also choose to close cost track if you no longer wish to track the costs of an item. Once you close cost tracking, the cost tracking number will no longer be available under the list of cost tracking numbers while recording transactions.
On the stock item cost analysis report,
- Press Alt+S (Close Cost Track).
The Cost Track Closure Details screen appears. - Press Spacebar and select the required rows.
- Press Alt+S to close the selected tracks.
- Press F8 (Show All) to list all the cost tracked items.

Note: In the Cost Track Closure Details screen, Alt+S (Close Cost Track) will be active only on selecting one or more rows.
Configure the reports
Press F12 (Configure) to configure the Stock Item Cost Analysis report as required.
|
Options |
Description |
|
Show Quantity |
Displays the quantity of the stock groups. |
|
Show Rate |
Displays the rate for each stock group. |
|
Show Value |
Displays the total amount for the quantities displayed. |
|
Show Cost |
Shows the Cost (Expense) column with the details of inward quantity. |
|
Show Revenue |
Shows the Revenue (Income) column with the details of inward quantity. |
|
Show Balance at Cost |
Shows the Nett Quantity details as the Balance at Cost. |
|
Display name for Stock items |
You can choose to display the alias name, stock item name, or a combination of these in any order. |
|
Show Base Currency |
Enabling this option will display (on the top-right corner of the report) the base currency symbol set for your company, irrespective of what currency you have used in your transactions. |
|
Format of Report |
You can choose to view the Detailed or Condensed format of the report. |
|
Expand all levels in Detailed format |
Displays information for each stock item or group until the last level. |


