
Remote Access in TallyPrime
You can securely access your TallyPrime from anywhere to record transactions, or view reports when working from a client’s office, or other remote locations. All you need at the remote location is a TallyPrime installation, and an internet connection. In your office you need to have a valid TallyPrime license, an active TSS, an internet connection, and your company connected to Tally.NET services. Server and remote systems must have the same release of TallyPrime.
Know more...Anywhere, Any TallyPrime Installation: You can access your TallyPrime companies from anywhere using even a TallyPrime in Educational Mode, and an internet connection. When your employees are at clients’ locations, they can view the stock availability and commit delivery dates to the clients or check the pending receivables from the clients. This will ensure availability of the latest details at that moment.
Security and Control: You have complete control on who can access your companies, and which features are available to the user. Further, your data will always be in your computer. Whenever a user connects to your company, based on the access permissions you have provided, the user can access the required features. If your employee is at a client’s place and want to print an invoice or purchase order placed by the client, it can be done. However, the employee will not view your financial reports unless you have given the permission. If you want to check your financial reports when you are away from your office, you can use any computer with a TallyPrime installation and view the reports.
Record or Alter Vouchers: The user with the required permissions can create or alter vouchers. If you or your employee meets a supplier, and strike a favourable deal, a purchase order can be raised immediately from your TallyPrime company.
Audit Accounts: You can allow your auditor to do verification of your books using remote access. For this, you just need to allow remote access to your company for the auditor’s Tally.NET ID. Like you or your employees logging in to the company, auditor also can log in and do the work.
Print Reports and Vouchers: Users can open a voucher or report and print it at the remote location. When your employee is at a client’s place to collect receivables, after collection a receipt can be recorded, and a voucher can print for the client.
Easy Setups: Connect your company and allow users to access your company from anywhere. Note that only users with valid Tally.NET IDs are allowed to access your company remotely. Your account ID (e-mail ID used to activate your license) is a valid Tally.NET ID. You can create Tally.NET IDs for users who need to log in to TallyPrime remotely, allow access to these IDs. Similarly, you can allow your accountants or auditor who have their Tally.NET IDs to log in remotely.
Get Started with Remote Access
To allow remote access to your company, you need to enable the feature. You can allow access to Tally.NET IDs to access your company remotely. You need to connect your companies to Tally.NET services to allow users to log in remotely.
In this section
- Connect Company to Tally.NET services
- Possible errors while selecting a company
- Disconnect Company
- Log in to TallyPrime from anywhere
Connect Companies to Tally.NET services
In your business, if users need to access your company remotely, you can connect your company to Tally.NET Services. Once you connect your company, any user with valid Tally.NET credentials can access your company and perform all day-to-day tasks. If you have multiple companies, you can connect all of them one by one as the need arises or all of them at the same time so that different users can work on different companies if needed. Similarly, when you need to disconnect a company or all companies, you can do so one by one or all of them simultaneously. To connect your company ensure that you have proper internet connection on the computer where TallyPrime is installed.
![]()
- Complete the one-time setup to connect the company anytime to the Tally.NET Services.
- Press F11 (Features) > Online Access > set Tally.NET Services for Remote Access and Synchronisation to Yes.

- Ensure that the company that you want to connect is security enabled with appropriate credentials.
For more information, refer to the User Management topic.
- Press F11 (Features) > Online Access > set Tally.NET Services for Remote Access and Synchronisation to Yes.
- Connect the company.
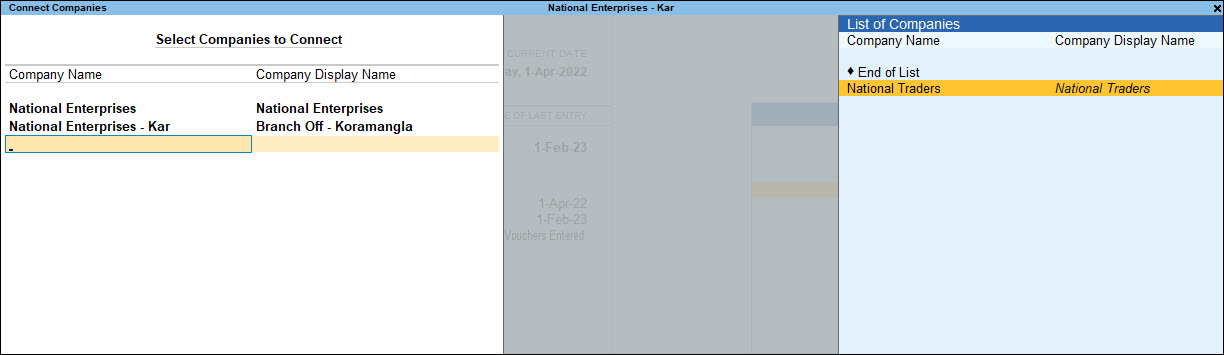
- Press Alt+K (Company) > Connect.
- In the Connect Companies screen, select one or more companies from the List of Companies.
If you are on TallyPrime Release 2.1 or earlier, selection of multiple companies in one go to connect is not supported. You will need to connect the companies one after the other.
- The List of Companies will display only those companies that you have loaded. TallyPrime allows you to select more than one company from the same screen.
- If you have loaded a few companies and the Connect option does not appear for some companies, it means those companies are not configured for online access. Those companies will not be listed in the Connect Companies screen.
- Select End of List, once you have selected the companies that you want to connect.
- Accept the screen. As always, press Ctrl+A to save.The selected companies are now connected to the Tally.NET services. On Gateway of Tally, the companies you have connected appears with (c), indicating that the companies are connected.
- Configure the users for Remote Access.
- Press Alt+K (Company) > Users and Password.
- Select the company in case you have loaded more than one company.
- Select the Security Level as NET Owner. Click here to know more about creating Security Levels.
- In Username, enter a valid Tally.NET ID for which you want to give access.
You can check for valid Tally.NET IDs on the Tally portal, by logging in with account administrator’s e-mail ID. You can also create more Tally.NET IDs, if needed. Click here to know more about creating Tally.NET IDs.
- Set Allow Remote Access to Yes for the user, and as always, press Ctrl+A to save.
Connect Company to Tally.NET services (Rel 2.1 & earlier)
Click here.
You can decide when to connect your company for users to access remotely and disconnect the same when it is not needed. You need to have internet connection on the computers where TallyPrime is installed.
- Click on F11: Features and set Show more features” to Yes. Now under Online Access section set Enable Tally.NET Services for Remote Access & Synchronisation to Yes
- Press Alt+K (Company) or click on Company menu from Top menu bar > Press O (hotkey for Connect) or click on Connect

- If you have enabled Control User Access to Company Data for your company, move to point 3 below.
In case you have not enabled Control User Access to Company Data feature for your company, TallyPrime will prompt you for the same.- In the Security and User Access screen, the option Control User Access to Company Data is set to Yes
- Provide the administrator details. This login credential is for the company data.
- Specify E-mail ID which needs to be provided for Browser Access or it can be left None.
If you use a Tally.NET id for Browser Access same will not work for Remote Access.
- Accept the screen and Company is connected to Tally.NET Server for Remote Access
- Once the company is connected, a sign (c) appears against the company name in the List of Selected Companies in the Gateway of Tally.
- If you have enabled Control User Access to Company Data for your company, move to point 3 below.
- Provide Remote access to Tally.NET users.

- Configure the user for Remote Access from Alt+K (Company) or click on Company menu from Top menu bar > Users and Passwords
Authorised users can login to a remote instance using TallyPrime Installation and use the connected company.
For users to remotely access the companies that are connected to the Tally.NET services, ensure the following:
- Open Users and Password.
- For the users, set Allow Remote Access as Yes.
Possible errors while selecting a company
When you attempt to save the Connect Companies screen, you may encounter the following error.
Cause 1: One or more companies do not have the security feature enabled.
Resolution: Alter the company and enable the security feature
- Alt+K (Company) > Alter > set Control User Access to Company Data to Yes.
- Provide Username and Password and save.
- Reconnect the company: Alt+K (Company) > Connect.
Cause 2: You do not have Internet connectivity.
Resolution: Check your internet connection. Ensure that you have proper Internet connectivity before you connect the company to Tally.NET Services.
Cause 3: The same Connect Name is used for more than one company. Alternatively, the Connect Name is invalid.
Resolution:
Identify the companies that have the same Connect Name and change the display name as needed.
- Press Alt+K (Company) > Online Access > select the company for which you want to change the Connect Name.
- From the Online Access Configuration screen, select Contact Details > alter Company Display Name > press Ctrl+A to save.
- Reconnect the company.
Next when you attempt to access a company remotely in TallyPrime, you will be prompted to use the Tally.NET ID and password for remote login. Refer to Log in to TallyPrime from anywhere.
Disconnect Company
When there is no need for users to access your company remotely, you can disconnect one or more companies.
- Press Alt+K (Company) > press D (hotkey for Disconnect) or click Disconnect.
- Similar to connecting multiple companies, you can select multiple companies and disconnect them in one go.
- In the Disconnect Companies screen, select one or more companies from the List of Companies.
Note: The List of Companies will display only those companies that you have connected to the Tally.NET services. - As always, accept the screen. Press Ctrl+A to save.
- In the Disconnect Companies screen, select one or more companies from the List of Companies.
If you are on TallyPrime Release 2.1 or earlier, selection of multiple companies for disconnecting is not supported. In this case, you will need to disconnect each company separately.
Log in to TallyPrime from anywhere
In TallyPrime at the remote location, log in using your Tally.NET ID and password.
- Select Remote Company from Select Company screen
- In case the company is loaded during startup,
Press Alt+K (Company) or click on Company menu from Top menu bar > click on Select
Alternatively, press Alt+F3 from Gateway of Tally - Enter your Tally.NET ID and password.

- Select the required remote company. On successful authentication, the remote user details are displayed in the Gateway of Tally screen.
- The Remote Serial number is displayed in About screen: Click F1 > About
The selected company is available for use based on the access rights given to you.
Once a remote session is created in the Tally.NET server, a unique identification number is assigned to it, and the session remains valid till the user logs out. A remote user can access only one company data at a time.
Manage Access Rights of Users
You can add many Tally.NET users and allow them to access TallyPrime companies remotely. You can also decide who can access which feature.
In this section
- Create Tally.NET IDs
- Allow users to access your company remotely
- Create Security Levels to provide limited access to your company
Create Tally.NET IDs
You can create Tally.NET IDs directly on the Tally portal.
Click here to know more about creating Tally.NET users.
Once the Tally.NET IDs are created, you need to allow remote access to your company for these users. Then they can log in from anywhere and access your company.
Allow users to access your company remotely
You can allow many users to access your company remotely. Based on your TallyPrime edition, number of concurrent users will vary.
- Press Alt+K (Company) or click on Company menu from Top menu bar > Users and Passwords
- Select the Security Level as Tally.NET Owner, Tally.NET User, or Tally.NET Auditor. You can also create Security Levels, if needed. Click here to know more about creating security levels.
- In Username, enter the required Tally.NET ID. Or select the Tally.NET ID from List of Users in Account.
- Set the option Allow Remote Access to Yes, and accept.
- Set the option Allow Local TDL to Yes to allow the remote user to access local TDLs.
- Set the option Allow Browser Access to Yes to allow user to access reports in browser feature.
In case you need to disallow remote access for this company for a user, set Allow Remote Access to No.
These users can access your company remotely, whenever the companies are connected.
Create Security Levels to provide limited access to your company
You can create multiple Security Levels to manage user access to different features in TallyPrime. If Tally.NET IDs are added under such Security Levels, you can control who can access which feature remotely.
Add Tally.NET IDs under this Security Level to allow these users to access your company. Click here to know more about allowing users to access your company remotely.
Once the Tally.NET IDs are created, you need to allow remote access to your company for these users. Then they can log in from anywhere and use your company.
Manage Company for Remote Access
You have complete control and flexibility on the company setting for remote access, including when the access is needed.
In this section
Enable/Disable remote access for your Company
You can enable or disable remote access to your company as per your needs.
- Press F11: Features > If you have already enabled remote access, you will see that Enable Tally.NET Services for Remote Access & Synchronisation is set to Yes under Online Access.
- If you need to disable remote access, set this option to No.
When there is no need for users to access your company remotely, you can disconnect one or more companies. To know more, refer to Disconnect Company.
Connectivity Status report in TallyPrime
This report gives you details of all the companies connected for Browser Access and Tally.NET Services. This report is active when at least one company is connected.
Press Alt+K (Company) or click on Company menu from Top menu bar > Press V (hotkey for Connectivity Status) or click on Connectivity Status

The Connectivity Status report displays the company name, the company’s connect name, and the status of connection for Browser Access and Tally.NET Services.


