Essentials for Your GST Journey
The GST era started in India on 1st July, 2017, and Tally has walked every mile of that journey with you and your business. And this page is here to help you prepare for that journey, by telling you all about the essentials of GST.
For example, if you are wondering how to get started with GST, or if you are not sure how to classify your goods or services and apply the tax rates, then we have got all the answers for you.
Applicability for GST
First things first, you have to figure out if GST is applicable for your business. The GST department (GSTN) has defined certain rules and criteria depending on the nature, the turnover, and the location of the business. If your business meets the criteria for GST, then you can proceed to register your business. To know more about GST applicability, refer to our blog.
Register for GST
GST registration is a fairly simple process. You have to apply for GST registration by submitting the necessary documents, which will depend on the nature of your business. Then the GSTN will verify the documents and approve the registration, if all your documents are in order. GSTN might reach out to you if any clarification is needed. The registration process is very transparent and you can track the status at any point. Once the registration is complete, GSTN will provide a GST Registration Certificate along with a unique GST identification number (GSTIN) for your business. To know more about GST registration, refer to our blog.
Understand GST Rates
The next order of business is identifying the nature of goods or services that your business deals with. Subsequently, you will be able to identify the GST rates applicable. All goods and services under GST are classified under the HSN and SAC systems, respectively. Depending on the HSN/SAC, GST will be levied on your goods or services at a certain rate. To know more about GST rates, refer to our blog.
Let TallyPrime Know Your GST Registration Details
As you know the first step to identify yourself as a Regular dealer registered under GST, you need to get a GST registration. This is handled by the department and hence not a procedure in TallyPrime. To know more about obtaining a GST registration, contact your CA.
Once you obtain a GSTIN, you can record it in the TallyPrime Company, whether it is a new Company or an existing one. However, TallyPrime will not stop you from proceeding until you get the number. When you are sure about the type of registration that you are going to get, you can get started – a flexibility that TallyPrime provides! You can record the GSTIN later.
Talking about the GSTIN, from TallyPrime Release 3.0 onwards you can record multiple GSTINs in one TallyPrime Company. This will allow you to record transactions under different registrations, generate returns for each registration, and file returns. However, all MIS reports will be for the Company, and not GSTIN-wise. You can also maintain separate voucher number series for each registration and voucher type.
To know more, refer to the Set Up GST Details of Your Company.
After defining your GST registration type and other details in TallyPrime, you can start recording your transactions. You can also do a one-time setup of masters. To know more, refer to Create/Update Masters for GST.
Set Up Connected GST for Your Business
Connected GST opens up a world of possibilities and flexibilities for you and your business. You can stay connected to the GST portal like never before and easily perform activities such as GSTR-1 filing and upload and download of returns. To get started, you need to perform a few simple steps on the GST portal and on TallyPrime, which will set the foundation for your Connected GST journey.
The first step is to ensure that API requests are enabled for your profile on the GST portal. Subsequently, you can set up the details for Connected GST in TallyPrime, as per your details on the portal.
Connected GST also provides you with many avenues through which you can easily manage your GST profile in TallyPrime. You not only get a pleasant experience with GST Login & Logout but also have the option to reset your GST credentials, whenever needed.
In this section
Enable API Requests on the GST Portal
To start with Connected GST, you must first enable API requests for your profile on the GST portal. This will ensure that you can seamlessly file GSTR-1, upload and download your returns, or perform other Connected GST activities right here in TallyPrime.
- Log in to the GST portal.
- Click your username in the top right corner.
- Select My Profile from the list of options.
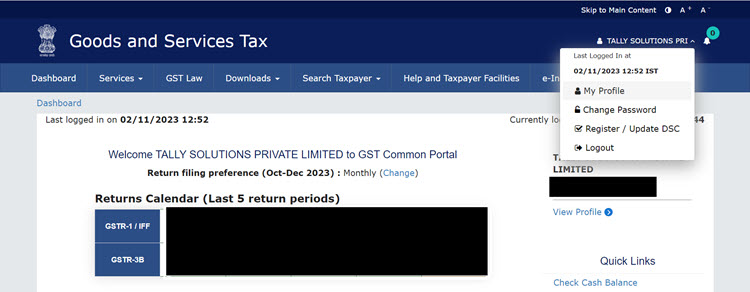
- In the My Profile screen, under Quick Links, click Manage API Access.
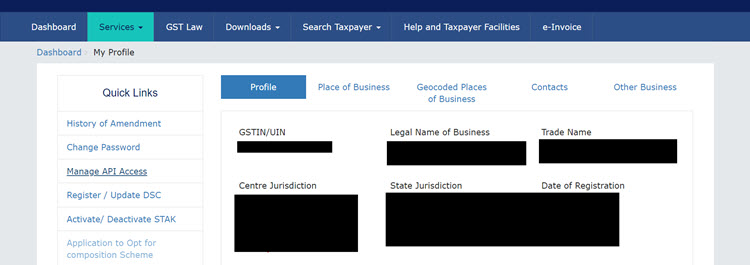
- Set the Enable API Request option to Yes.
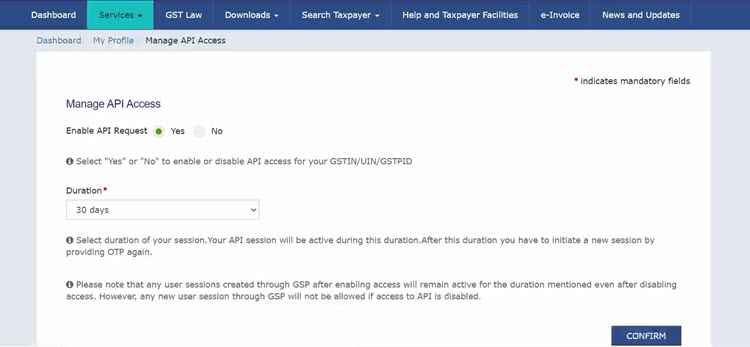
- Set the Duration to 6 hours, as this is the current recommendation.
This will ensure that your session remains safe and secure for 6 hours, after which you can log in again, as per your requirements.
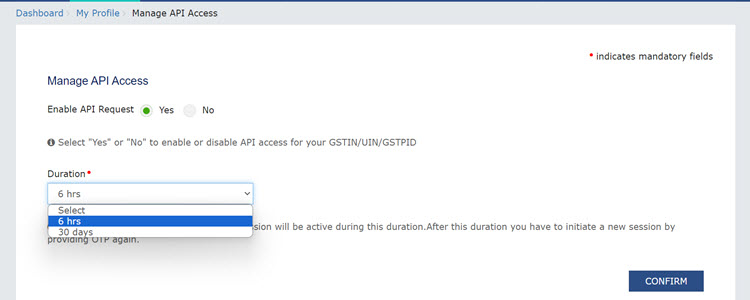
- Click Confirm.
Now you can proceed to manage the credentials in TallyPrime and reap the benefits of the Connected GST experience.
Manage GST Profile in TallyPrime
Once you have enabled API requests on the portal, you can easily set up your GST profile in TallyPrime. Subsequently, the GST Login & Logout experience in TallyPrime will help you in managing your GST sessions, as per your available GST registrations.
In this section
Specify Connected GST Details
To enjoy the benefits of Connected GST in TallyPrime, you can set up your GST details, such as GST Username and Mode of Filing, in your company features. Once you have specified the details here, they will appear in the flow of Connected GST activities such as upload, download, and filing.
However, TallyPrime also provides you with the flexibility to specify the same details directly in the flow of the Connected GST activities.
- Press F11 and set Enable Goods and Services (GST) to Yes. The GST Details screen opens.
- Under Connected GST Details, specify the GST Username that was registered on the GST portal.
- Specify the Mode of Filing as either Digital Signature Certificate (DSC) or Electronic Verification Code (EVC), as per your business requirements.
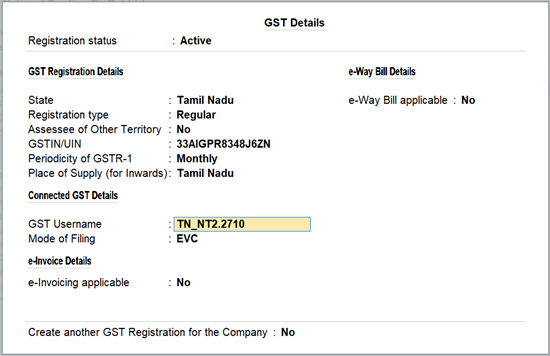
- Press Ctrl+A to save the details.
Now you are all set to experience the trailblazing features such as upload, download, and filing.
Manage GST Login & Logout
GST Login & Logout is a handy report where you can view the GST sessions for all your GST registrations. You can see both the active as well as inactive sessions, along with the validity of the sessions.
This report also provides you with the great flexibility to log out of all your sessions at one go.
- Press Alt+Z (Exchange) > GST Login & Logout.
- Log in to your GST profile.
- Enter your GST Username.

- Enter the OTP received on your registered mobile number, after which your vouchers will be exported to the GST portal.

Once you have logged in, the session will be valid for six hours, which will ensure the safety and security of your activities.
The GST Login & Logout screen appears, where you can view the details of your GST sessions, such as the name of the registration, GSTIN/UIN, and the validity.
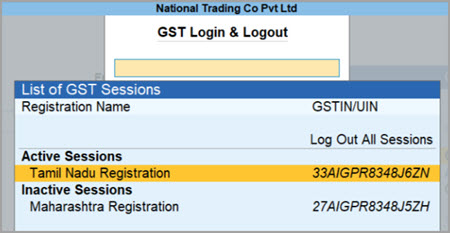
- Enter your GST Username.
- Log out of all your GST sessions, anytime you want to, using the Log Out All Sessions option in the top right corner.
Reset GST Login
If you want to reset your existing GST credentials and start with a clean slate, then you can make use of the Reset GST Login feature. This will clear all of your GST login details saved so far, along with your active and inactive sessions.
However, if you do not want to reset all your existing GST credentials, you can simply log out of the sessions.
- Press F1 (Help) > Troubleshooting > Reset GST Login.
You can choose to either log out of the session or reset your GST login details.
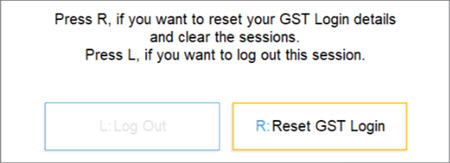
- Press R to reset your GST login details.
Alternatively, you can press L, if you only want to log out of the current session. - Press Enter to proceed with the reset.

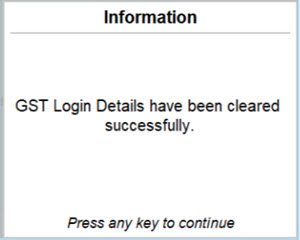
The GST login details will be cleared, after which you can enter your fresh details, as needed.
Set Up Tax Rates in Your Preferred Hierarchy
Setting up tax rates at the right place is an important aspect of recording GST transactions. Whether you have multiple stock items with their corresponding tax rates or a single stock item attracting a single tax rate, TallyPrime bring for you the flexibility to specify the tax rates as per your business practice. This means, you can set the tax rates at the company, ledger, or stock item level. Irrespective of the level where you define, TallyPrime does not stop you from recording a transaction with a different tax rate altogether.
You might have end up defining the tax rates for your goods and services at different levels at different times in your business. If you are worried about how to bring in a consistent approach that you can follow while recording transactions, relax! You do not have to do any manual changes in your masters. Setup the stock item masters to follow a preferred tax rate hierarchy and that is all.
Record Your Transactions, and Report to GST
All you need to do for recording transactions that comply with GST rules are:
- Ensure that for parties that are businesses, the Party Ledgers have the right GST details.
- Provide the required GST details like HSN/SAC and tax rates for items/services.
- Create and use tax ledgers for CGST, SGST and IGST as applicable.
Though you have the flexibility to create/alter party details and create tax ledgers any time, and provide GST details of items/services during voucher creation, it will be tedious for you. Additionally, chances of making mistakes are high. To address these, you can setup ledgers and Stock Items/Service Ledgers at one go. Utilise the different options that TallyPrime provides to specify the GST details of items and services. You need to decide which option to choose based on your business needs.
Purchases & Sales: Once you have the ledgers and stock items in place, you can easily record your purchases and sales under GST in TallyPrime. Here also, TallyPrime helps you handle various business scenarios with ease. While recording GST transactions you can avail the flexibility offered by TallyPrime to create vouchers in different modes. Similarly, you can follow your business practices of using orders, delivery notes, debit/credit notes, and so on.
RCM transactions and tax liabilities (ITC): The options in TallyPrime are built such that they cater to various of your business practices. If your business receives goods/services that fall under reverse charge mechanism (RCM), then you need to pay GST for such purchases to the department. You can also avail Input Tax Credit (ITC) for the amount from the department. In TallyPrime, you can record purchases under RCM with appropriate GST, raise tax liability, and avail ITC. When you are using TallyPrime, tax liability and ITC are calculated automatically just by recording the required RCM purchase entries. However, you can record journal vouchers for tax liability depending on your business practices.
GST payments to department: You will need to identify the GST payables to the department, considering the ITC claims, and make the necessary tax payments. At times due to unavoidable situations in your business, you might need to pay late fees, penalties or interests as well. If you are wondering how to keep your books updated in such cases, then no worries! Once you make the payments to the department, recording a payment voucher for the period in which the tax is paid helps you to keep your books updated.
Advance payments and receipts: Receiving or paying advances is part and parcel of any business, and TallyPrime understands how critical it is for you to keep track and set them off at the right time. As per Section 12 to 14 of the CGST Act, 2017, suppliers are liable to pay GST on the advance payments received from their customers. In TallyPrime, you can make your preferences the way you want to adjust advances and set off the advances with the right set of transactions. TallyPrime provides you varied options to not only record such advances, but also raise the required tax liability for the advance amount. Furthermore, if you have not been able to adjust all the advance amounts in transactions before filing the returns, you can update the remaining unadjusted amount as the available opening balance for transactions – the way you do it for the masters.
File Returns and Reconcile
One of the critical steps in businesses under the tax regimes is to file their returns successfully. All your transactions will finally need to show up in the returns as per the requirements by GSTN. If you have not provided all the details while recording the transactions, the transactions are moved to the respective buckets in the GSTR-1 and GSTR-3B returns for you to validate and ensure that any missing information is updated. TallyPrime facilitates you with different ways of filing your returns – Generating the JSON file and upload to the portal, or use the GST offline tool, or provide the details directly on the portal.
To know more, refer to:
If you are a registered buyer, then the details of all your purchases will appear in GSTR-2A once your sellers have uploaded their respective GSTR-1 details. Similarly, TallyPrime provides you with GSTR-2B that is automatically generated from a seller’s filed return, after the due date. Once your sellers or suppliers file the relevant return, such as GSTR-1, GSTR-5, or GSTR-6, then the details of all your purchases as well as Input Tax Credit (ITC) will appear in GSTR-2B.
After you have uploaded or filed your returns, it is always recommended that you reconcile the portal data with the data in your company books.
To know more, refer to:
You only have to import your returns data into TallyPrime, and the relevant details from the portal will appear seamlessly in the reconciliation reports. You can compare the values of the imported data with your books of account, update your records if you find any mismatches and stay up-to-date.


