
File GSTR-1 Directly from TallyPrime
Upload | Reconcile | FILE
You can file your GSTR-1 directly from TallyPrime using EVC or DSC, without visiting the GST portal. TallyPrime guides you through the process, helps you verify summaries, and allows you to continue filing even if it was interrupted earlier.
You can also file GSTR-1 manually on the GST portal using TallyPrime.
-
Resolve all uncertain transactions and conflicts in GSTR-1.
-
Upload the required vouchers to the GST portal.
-
Enable API access on the GST portal.
-
Select the required filing method in F11 (Company Features).
- Press Alt+Z (Exchange) > All GST Options > File GSTR-1.
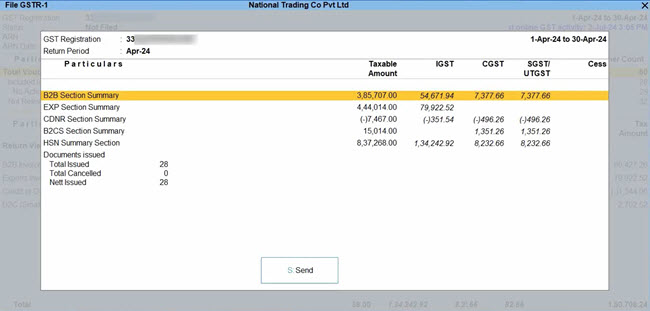
For TallyPrime 5.0 & earlier, press Alt+Z (Exchange) > File GSTR-1. - Verify the Return summary.
- Press S (Send) to initiate filing.
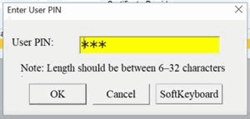
- Log in to your GST profile, if needed.
- Enter your GST Username.

- Enter the OTP received on your registered mobile number and e-mail address.
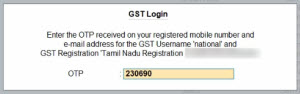
Once you have logged in, the session will be valid for six hours, which ensures the safety and security of your activities.
- Enter your GST Username.
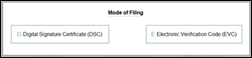
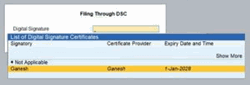
- Select the Mode of Filing.


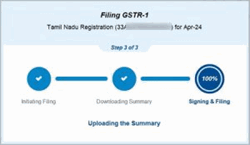
As GSTR-1 is being filed, you can easily track each step of the process.
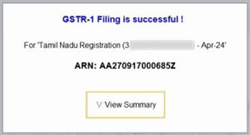
Once GSTR-1 filing is successful, an ARN will be generated for your filing activity, which you can note for future reference.
View the filing details
- To view the details filed in this session, press V (View Summary).
- To view the summary of all filed returns, including ARN and filling date:
- Press Alt+G (Go To) > GSTR-1 Filed Summary – Downloaded.
Alternatively, you can open GSTR-1 and press Ctrl+H (Change View) > GSTR-1 Filed Summary – Downloaded. - Drill down to the required month to view the filing details.
In this way, you get a clear view of the registration and filing details as well as the records (or vouchers) in each summary.
- Press Alt+G (Go To) > GSTR-1 Filed Summary – Downloaded.
Questions & Answers
- My filing process could not be completed, as there was some network issue. What should I do?
You can continue filing from the point the process was stopped.
- Press Alt+Z (Exchange) > All GST Options > File GSTR-1.
- Log in to the portal, if needed.
- Press C (Continue Filing) to complete the filing process.
- You can choose to Restart Filing, if needed.
Is this information useful?
YesNo


