
Reconcile GST Challan Payment in TallyPrime
GST FAQ | Errors and Resolutions
For the GST challan payment made on the portal for taxes, interest, penalties, or fees, you can record a payment voucher in TallyPrime to update your books and complete challan reconciliation.
You can reconcile the challan amount in either of the following ways:
- While recording the payment voucher
- By using the GST Challan Reconciliation report, if payment if the payment was already recorded without the challan details.
You can know the exact value of GST payable for a particular period, say a month, on the GST portal.
- You have generated a challan on the GST portal and made the GST payment.
- You have the CPIN (generated at the time of challan creation).
- You have the CIN (generated by the bank after successful payment).
Reconcile GST Challan Using Payment Voucher
While recording the payment voucher,
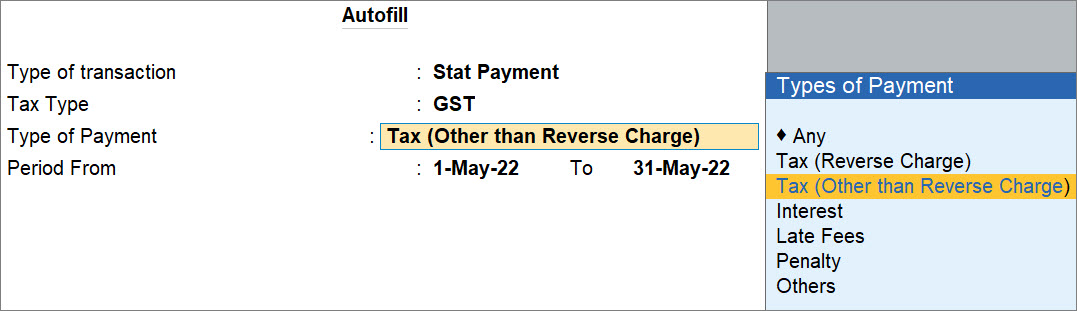
- Press Ctrl+F (Autofill) and enter the statutory payment details.
- Select Tax Type as GST.
- Type of Payment: After viewing the tax payable on the GST portal, select the option, as applicable, such as tax, interest, late fees, penalty, and so on.
-
-
-
Others: For statutory payments arising from non-compliance, such as non-registration, short TDS/TCS, or other regulatory violations.
-
Any: For GST payment covering multiple types of payment, such as both RCM purchases and outward sales, for the same period.
-
-
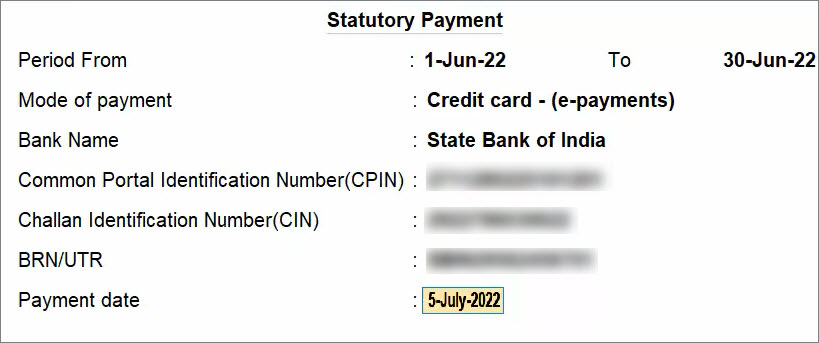
Period From: By default, TallyPrime considers the first and last dates of the previous month, based on the voucher date.
You can change the Period, if the tax was paid in some other month.
-
-
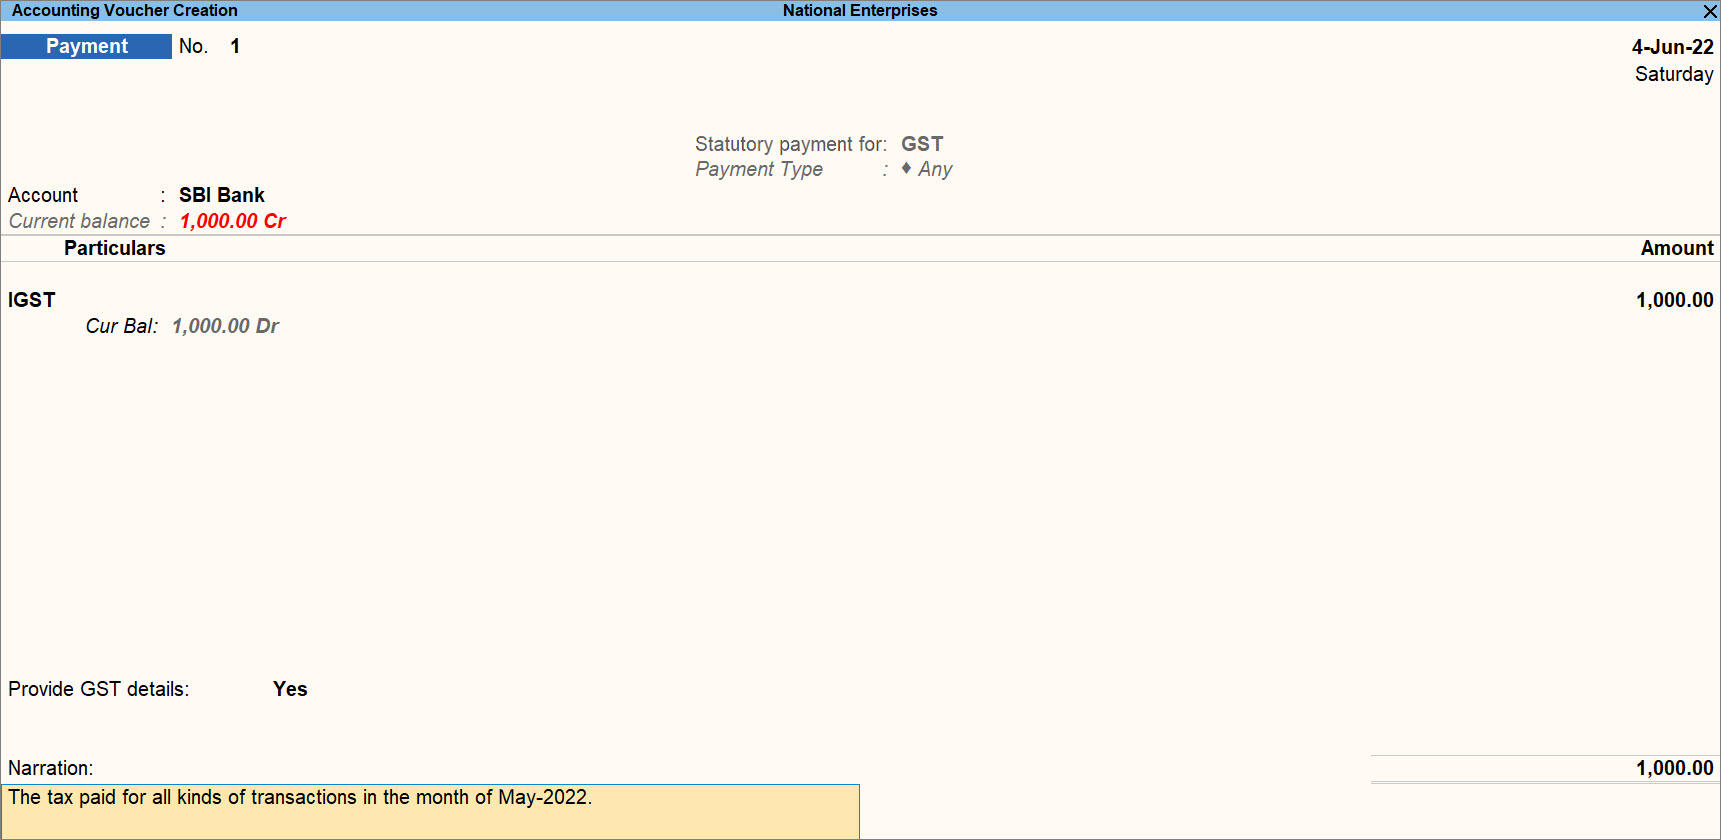
Under Account, select Cash or Bank ledger, as applicable.
- Under Particulars, select the IGST or SGST & CGST ledgers, as applicable and enter the Amount.
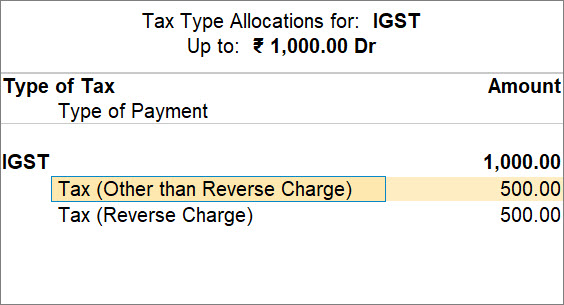
If you had selected Any under Type of Payment in the Autofill screen for GST payment covering multiple types of payment, then the Tax Type Allocations screen appears. You can select the different Type of Payment as required.
-
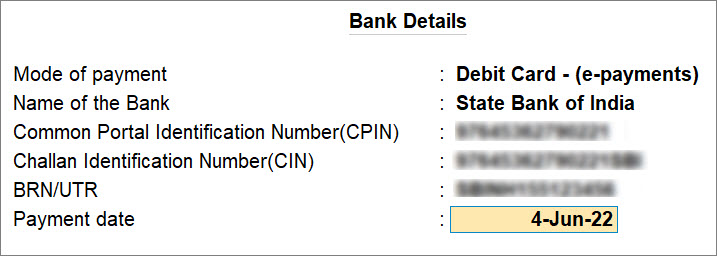
Enable Provide GST Details to enter the challan payment details.
-
Mode of payment: Select the mode through which you have made the GST payment, as applicable.
-
Name of the Bank: Specify your bank name through which you have made the payment.
-
Common Portal Identification Number (CPIN): Enter the 14-digit CPIN provided at the time of challan generation.
-
Challan Identification Number (CIN): Enter the 17-digit CIN provided by the bank after successful payment on the GST portal.
-
BRN/UTR: Enter the number provided by your bank, applicable only for National Electronic Funds Transfer (NEFT)/Real Time Gross Settlement (RTGS) transactions.
Note: In case of Cheque and Demand Draft as mode of payment, enter the Instrument number and date. -
Payment date: Enter the date on which you made the GST payment.
-
Press Ctrl+A to accept the screen.
-
-
Enter the Narration, if required, and press Ctrl+A to save the voucher.
You can view the reconciled transaction in the GST Challan Reconciliation report.
In the report, press Ctrl+B (Basis of Values), and set the Include transactions having Challan details option to Yes. The transaction will be available under the Reconciled section.
Reconcile GST Challan Using GST Challan Reconciliation Report
-
Press Alt+G (Go To) > type or select GST Challan Reconciliation and press Enter.
-
Select the voucher for which you want to update the challan details.

-
Press Alt+S (Update Details).
-
Enter the Statutory Payment details.
-
Period From: By default, TallyPrime considers the first and last dates of the previous month, based on the voucher date.
You can change the Period, if the tax was paid in some other month. -
Mode of payment: Select the mode through which you have made the GST payment, as applicable.
-
Bank Name: Specify your bank name through which you have made the payment.
-
Common Portal Identification Number (CPIN): Enter the 14-digit CPIN provided at the time of challan generation.
-
Challan Identification Number (CIN): Enter the 17-digit CIN provided by the bank after successful payment on the GST portal.
-
BRN/UTR: Enter the number provided by your bank, applicable only for National Electronic Funds Transfer (NEFT)/Real Time Gross Settlement (RTGS) transactions.
Note: In case of Cheque and Demand Draft as mode of payment, enter the Instrument number and date. -
Payment date: Enter the date on which you made the GST payment.
-
-
Press Ctrl+A to save the payment details.
Once you provide the details, the voucher will be reconciled. To view reconciled transactions, press Ctrl+B (Basis of Values) and enable the option set Include transactions having Challan details.
Questions & Answers
Can I record a payment voucher before generating the challan on the GST portal?
Yes, you can record the payment voucher without challan details. Once the challan is generated and payment is completed, update the details from the GST Challan Reconciliation report to reconcile the voucher.
How long is a CPIN valid for GST challan payment?
A CPIN is valid for 15 days from the date of challan generation. If not used within this period, the challan expires and you must generate a new one.
Can I modify challan details after reconciliation?
Yes, you can update challan details from the GST Challan Reconciliation report even after reconciliation.


