
Verification of Balances
Verification of Balances report in TallyPrime will help you check the differences in Opening Balance and Transaction details for a Group/Subgroup/Ledger.
In this section
View the Verification of Balances report
Button options in the Verification of Balances report
View the Verification of Balances report
Gateway of Tally > Display More Reports > Analysis & Verification > Data Analysis > Verification of Balances.
Alternatively, Alt+G (Go To) > type or select Verification of Balances > and press Enter.
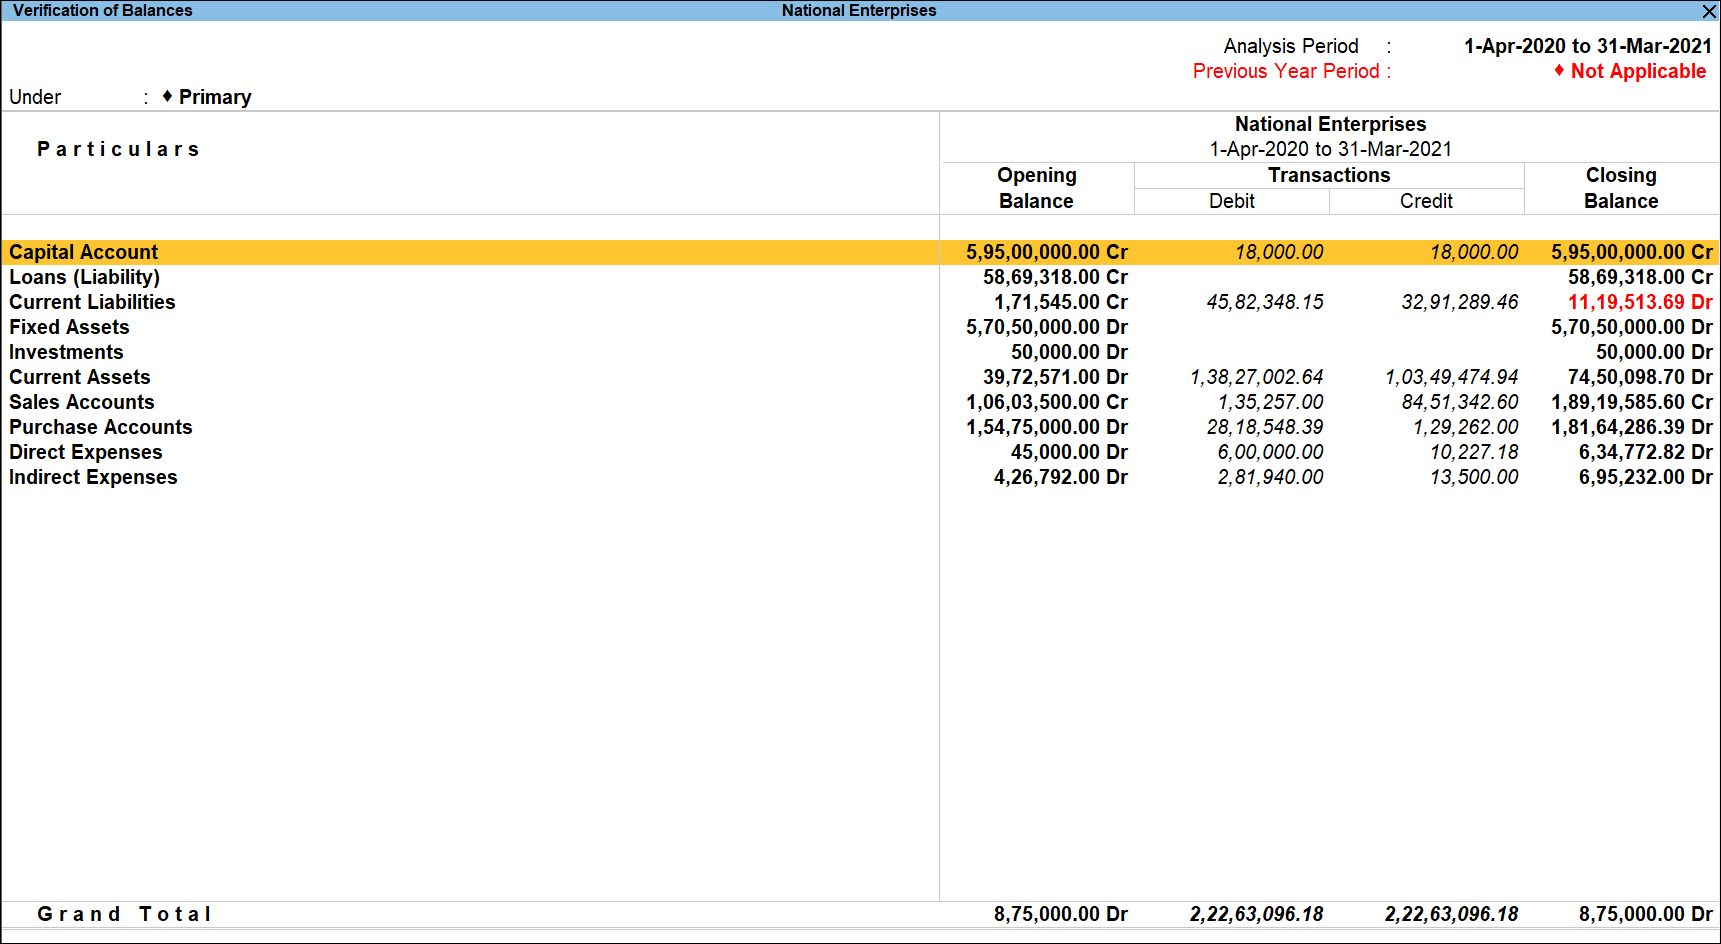
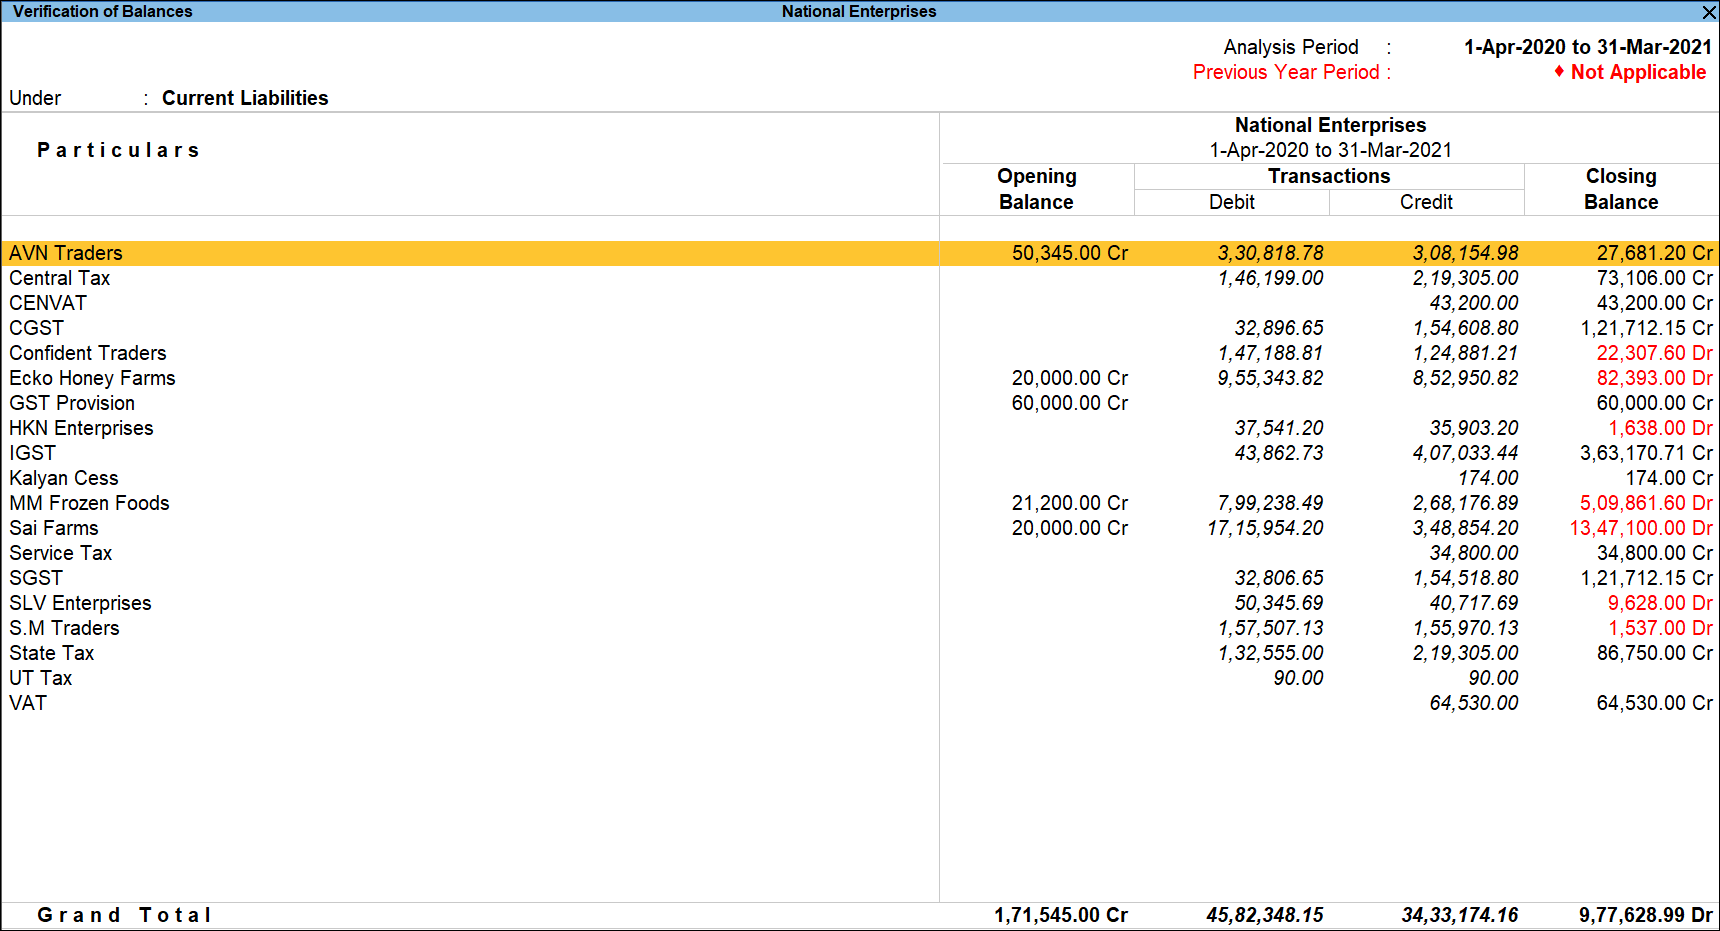
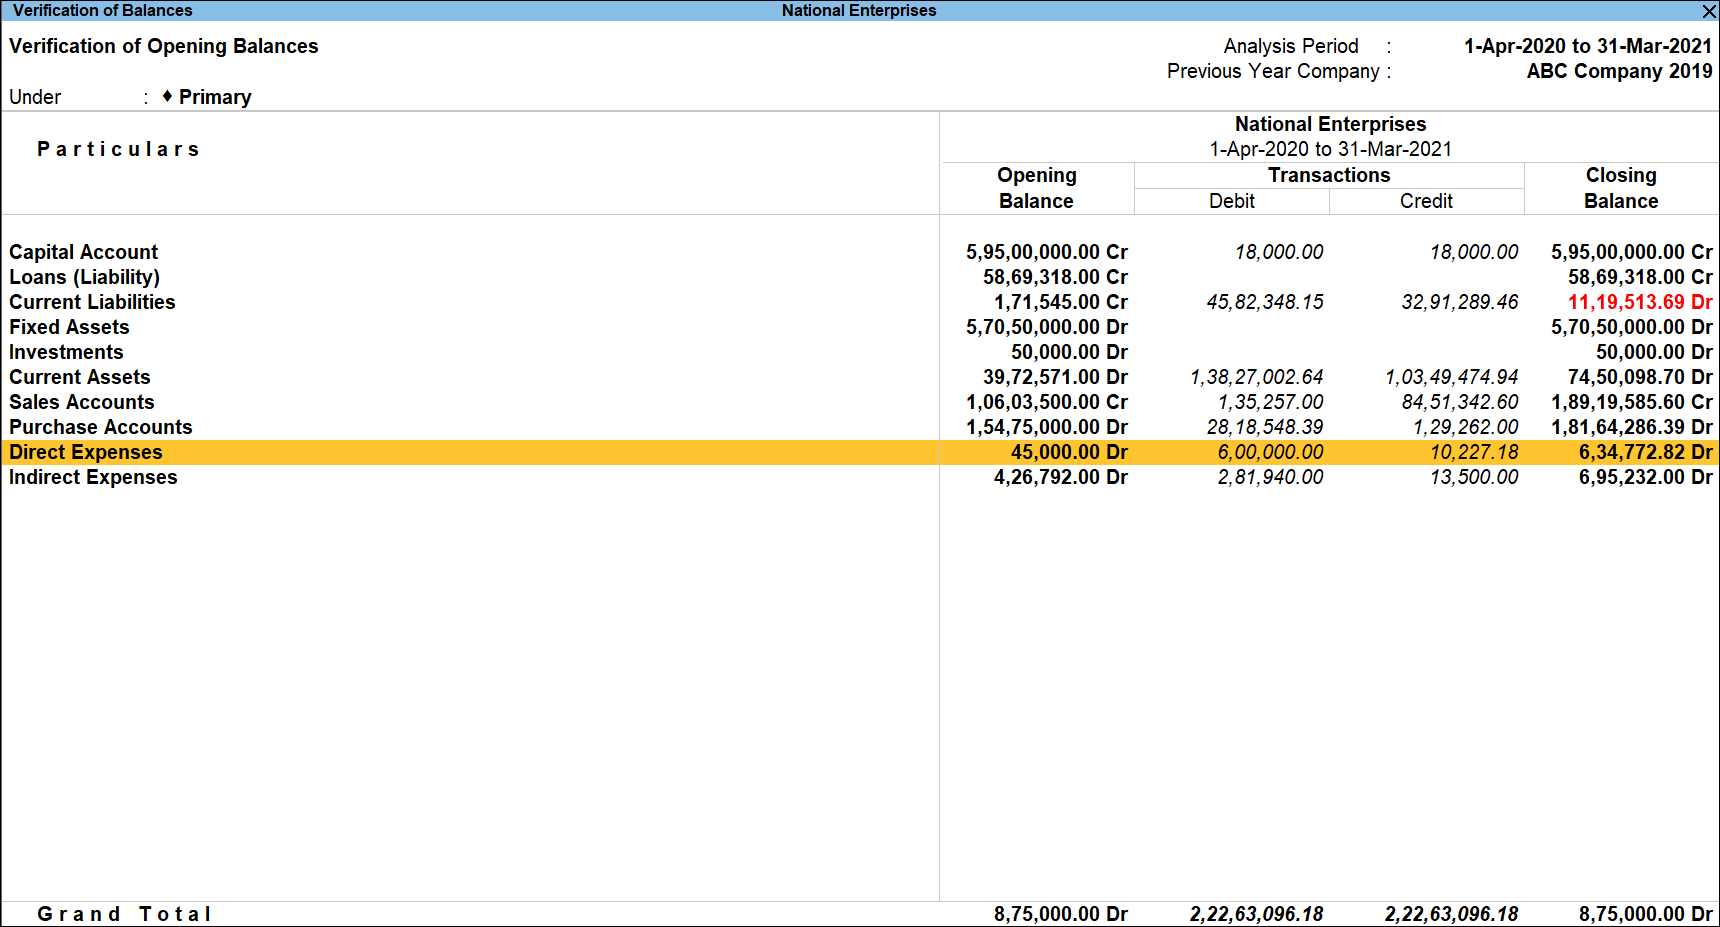
The name of the Groups appears on the left side under Particulars. The Opening Balance, Closing Balance, and the Difference for each Group, appears on the right side of the report.
The right side of the screen displays the transactions details along with the Opening Balance and Closing Balance. The Closing Balance amount is highlighted in red when the Closing Balance for the respective Group is against the default Group behavior. For example, if the Current Liabilities Group shows Debit Balance instead if Credit Balance and so on.
Previous Year Period: Not Applicable, displayed below the Analysis Period, will be highlighted in red to indicate that the previous year’s company has not been loaded.
From the above report, the user can press Enter on the required group to drill down into the group level Verification of Balances report:
Button options in the Verification of Balances report
- Press F3(Company): to change the company.
- Press F4 (Group): to view the Verification of Balances report for the selected Group.
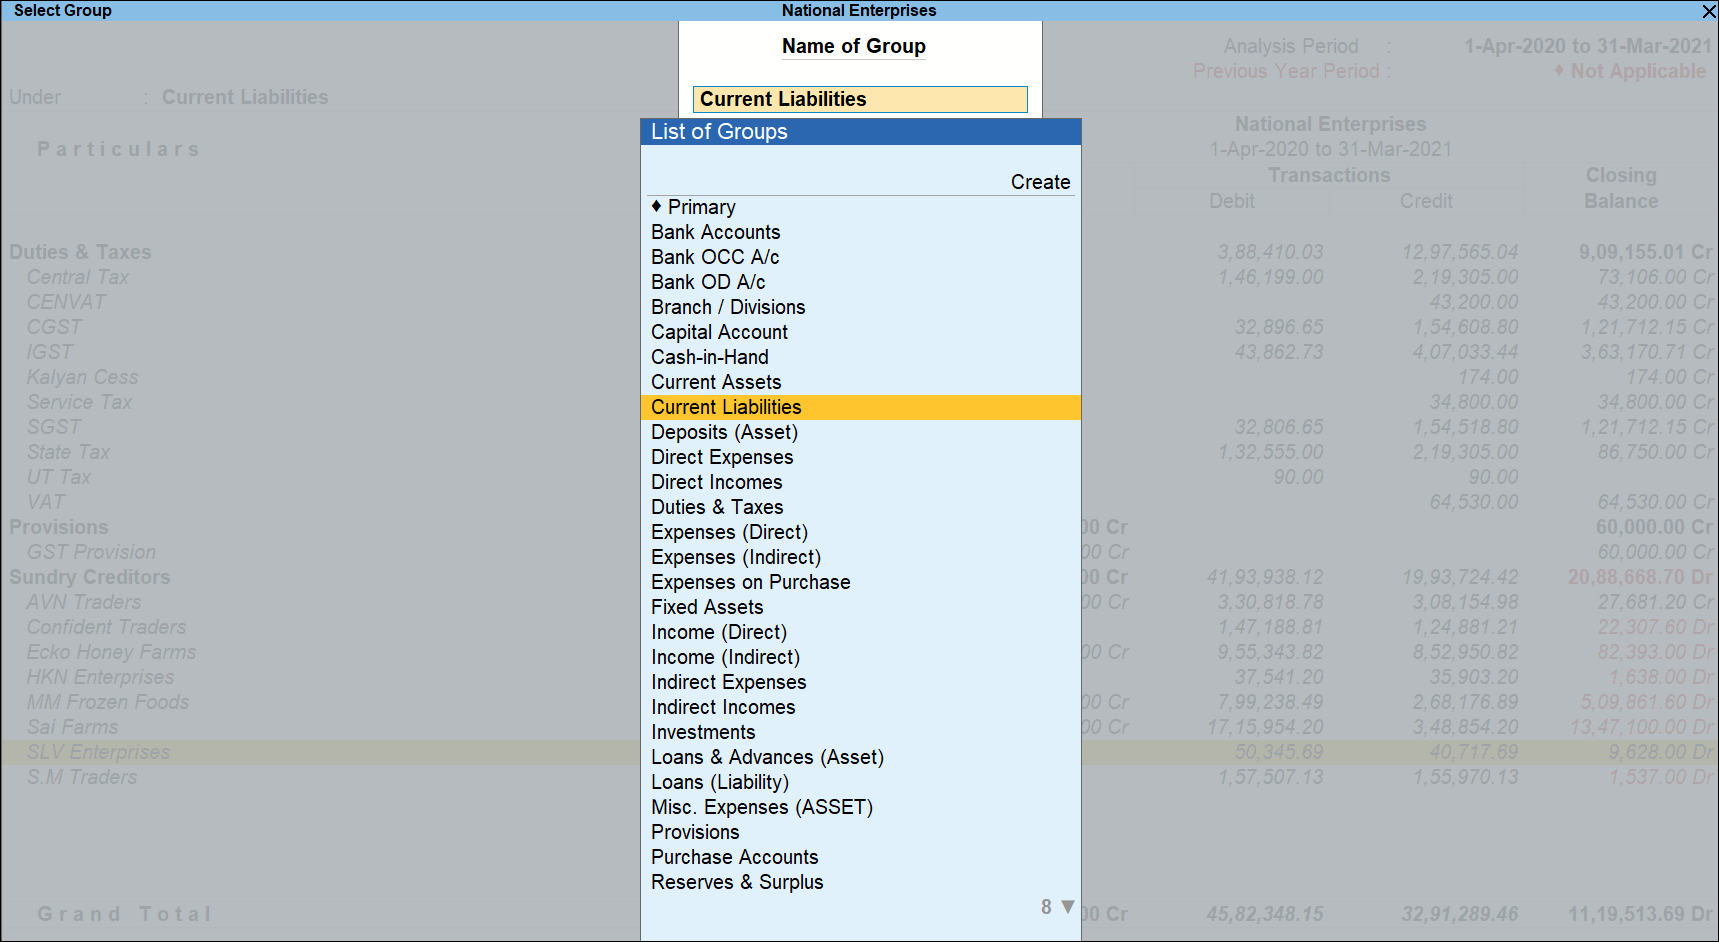
- Select the required Group from the List of the Groups and press Enter.
- Press F5 (Ledger-wise): To view the Ledger wise report for Verification of Balances press F5.
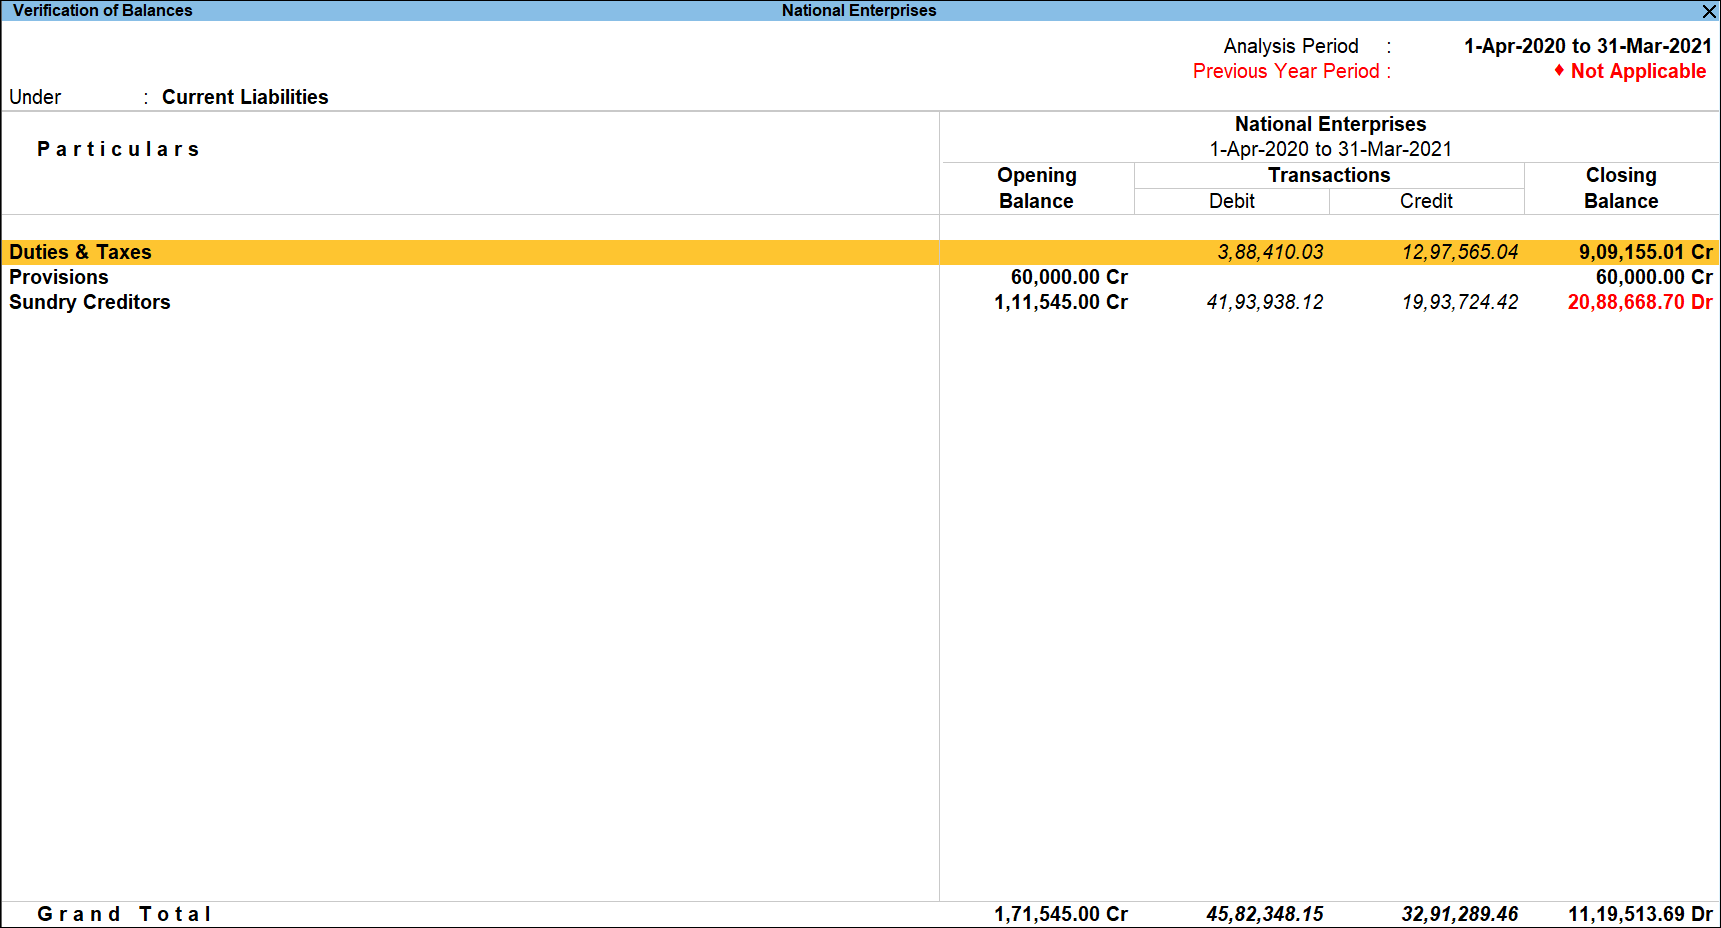
- Press Alt+F5 (Detailed): to view the detailed view to view the details of the Subgroups and Ledgers.
- Press F7 (Compare Company): to load the company that contains the data for the year prior to the analysis period.
- Press F9 (Analysis & Ver Reports): type or select Pending Advances > and press Enter.
You can follow this step to open any of the Accounting, Inventory, and Analysis Reports from the list. - Press F10 (Balance Variance): to view the Ledger Balance Variance report.
- Press Alt+V (Master Configuration): to identify the parties as Related Party, Periodic Payments and Receipts and Sampling Methods for analysis.
- Press Ctrl+F10 (Exception Only):to view the exceptional items only.
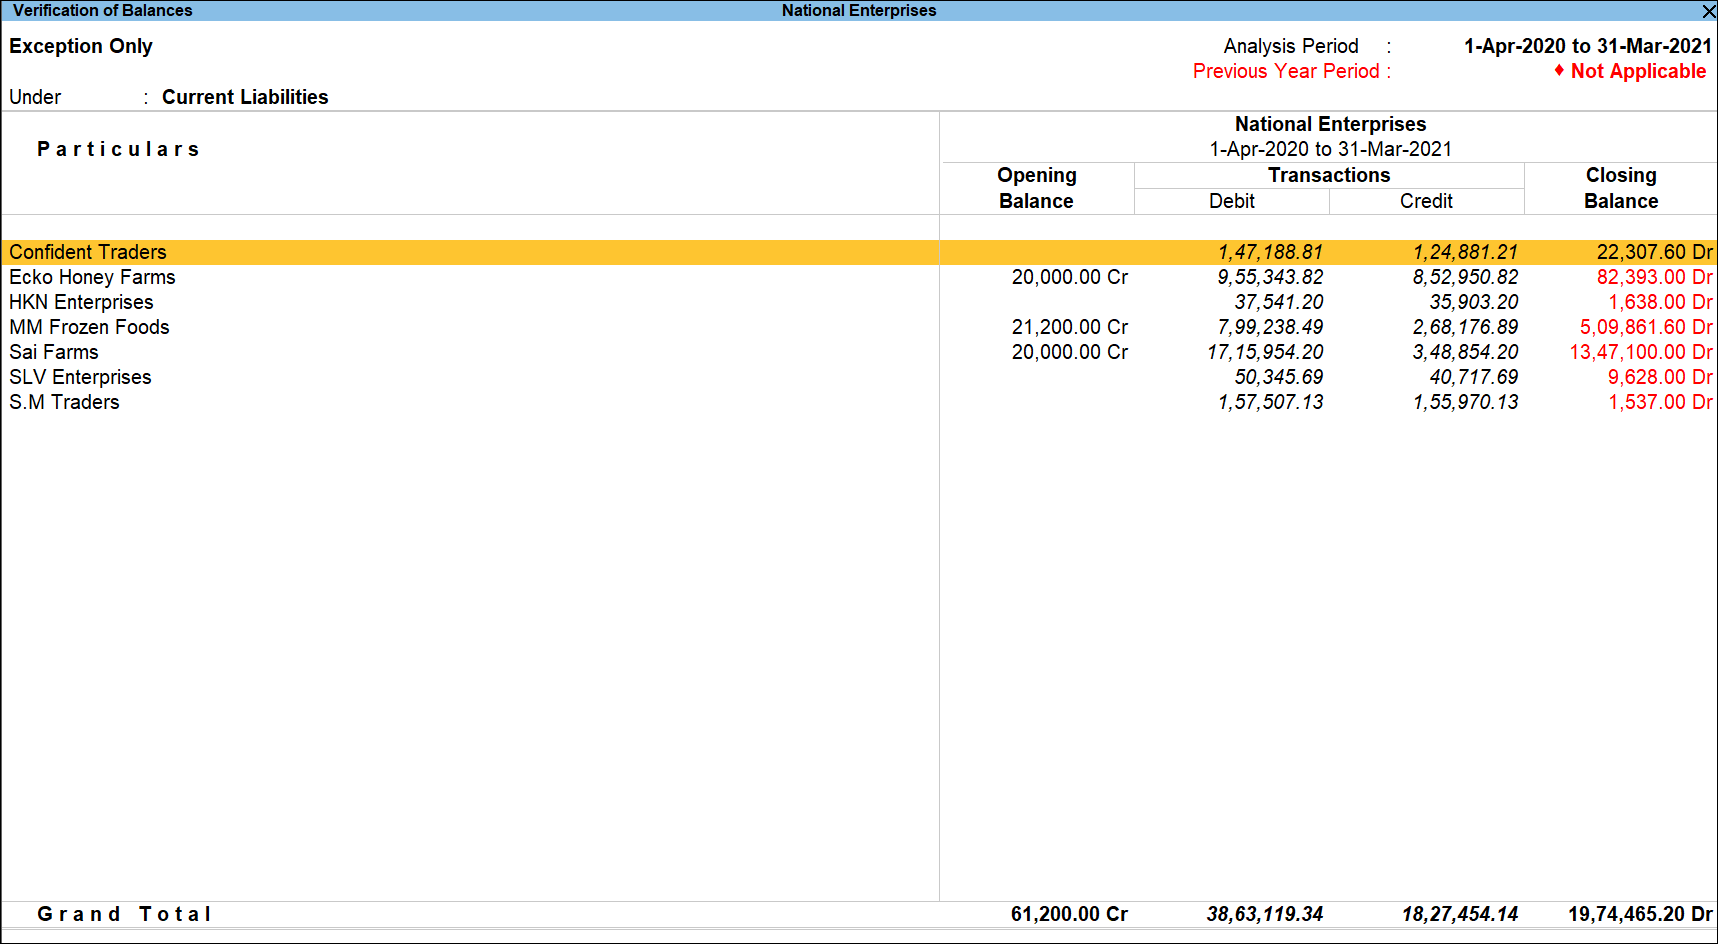
Note: The closing balances of all the exceptional items are highlighted in red for the user's attention. - Press Alt+F10 (Verification of Opening Bal): to view Verification of Opening Balances report.
Press F12 (Configure): to change the default display for the Verification of Balances report.
Sorting Method: Select the required Sorting Method from Default, Alphabetical (A to Z), Alphabetical (Z to A), Amount (Decreasing) and Amount (Increasing) for the Group names. For detailed explanation of each option in the above screen, refer to F12 (Configuration) in Trial Balance report.
Drill down to Ledger Vouchers report is provided from the above report by keep pressing Enter on the group name or a subgroup name and then ledger name.
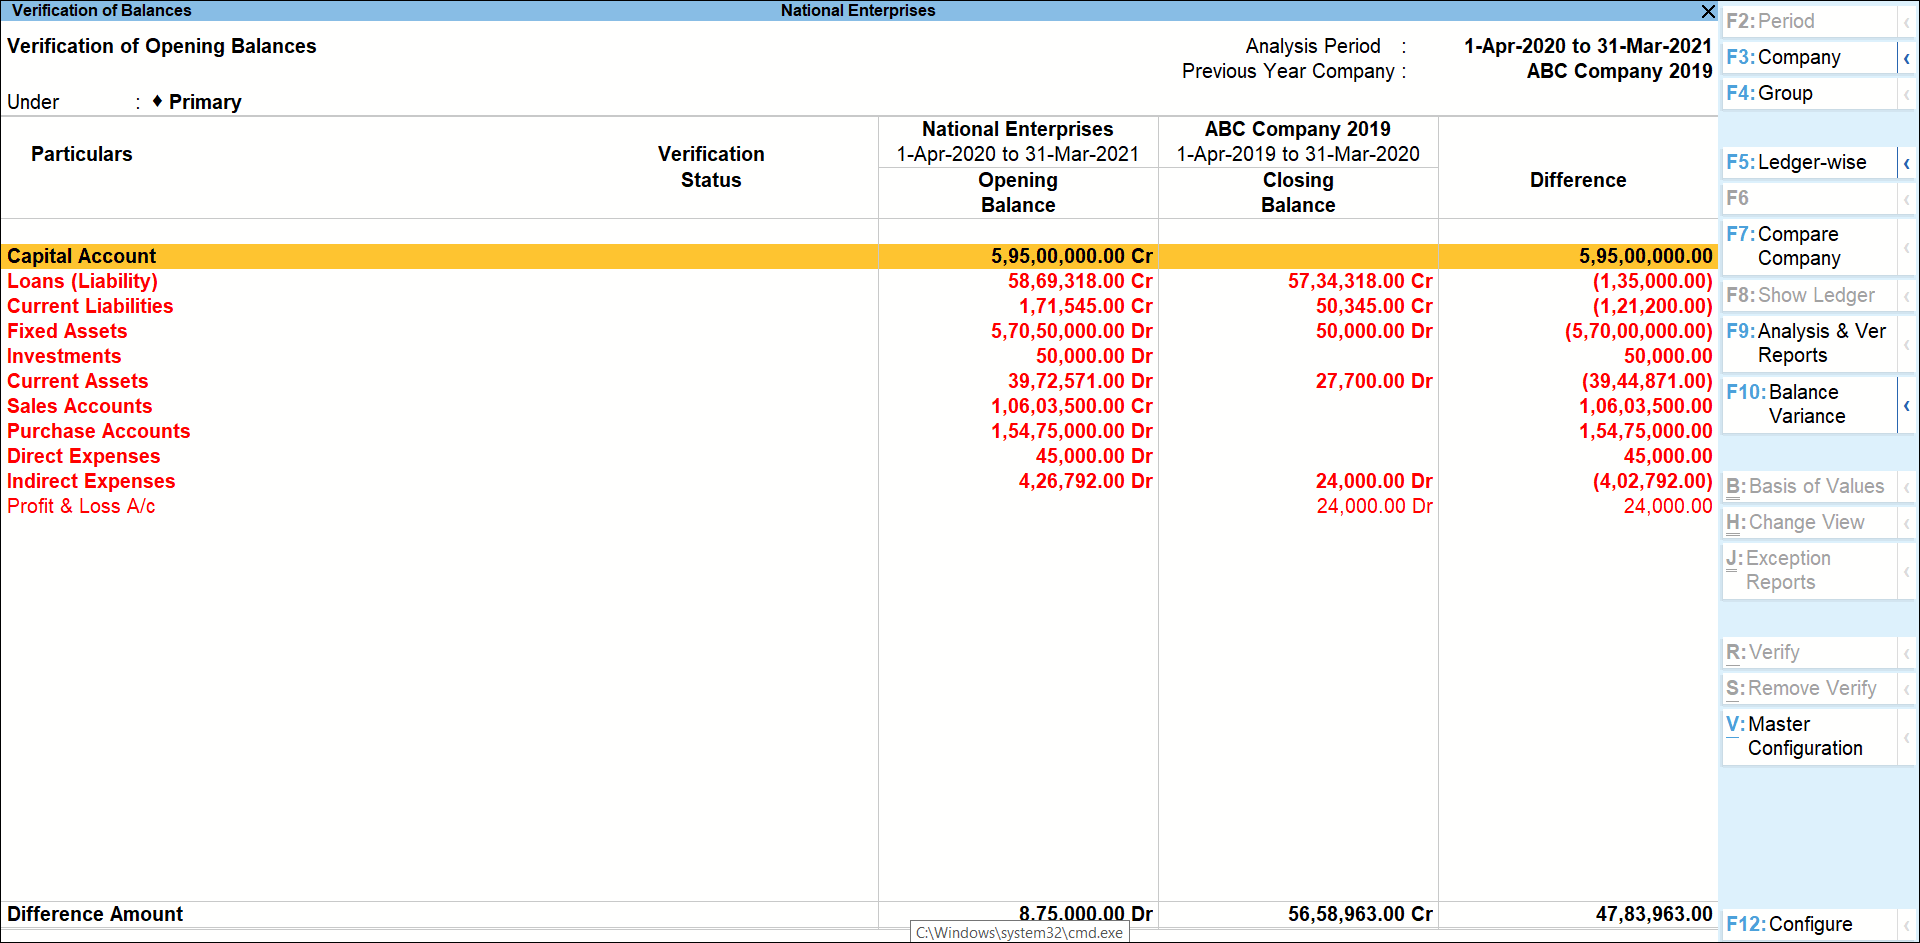
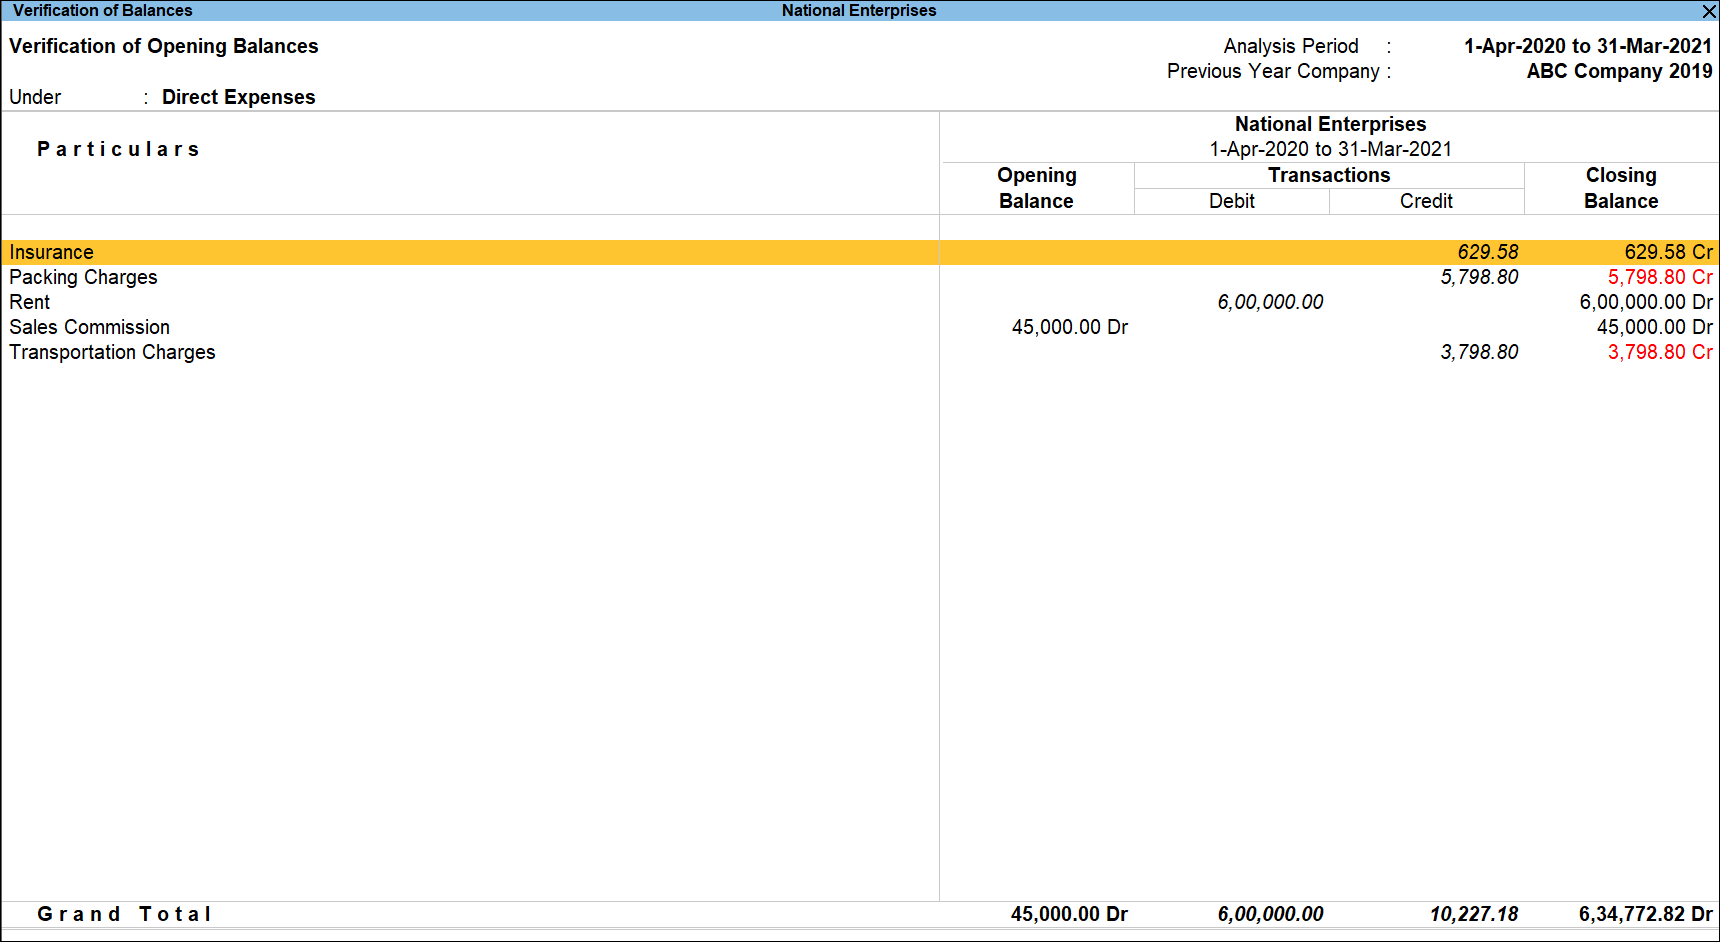
Verification of Opening Balances
Verification of Opening Balances report will help the user to check and fix the Opening Balance differences between different Groups/Subgroups/Ledgers when the Analysis Year and Previous Year company data are available as separate companies on TallyPrime.
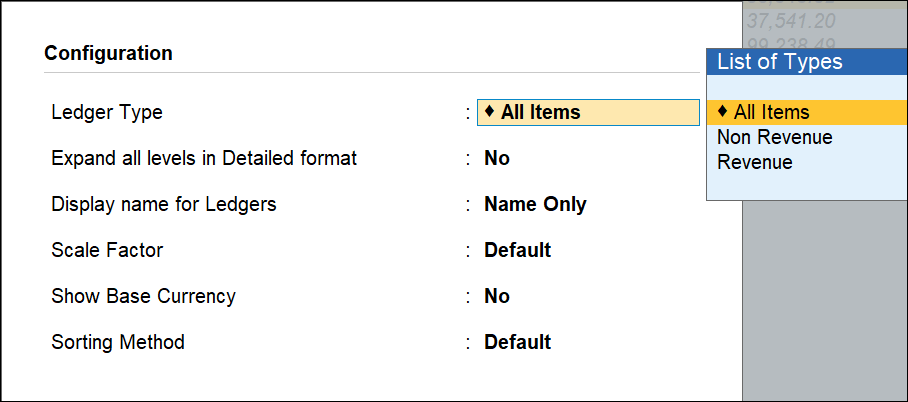
By default this report will show Opening Balance differences between different Groups/Subgroups/Ledgers of Non Revenue type. The user can include Revenue type of Groups/Subgroups/ Ledgers for verification by F12 (Configuration).
If the company data is of multiple years, then the report will by default be Verification of Balances. In the case of, split company data to view the Verification of opening Balances report, the previous year company data have to loaded.
In this section:
View the Verification of Opening Balances report
Button options in Verification of Opening Balances report
View the Verification of Opening Balances report
- Gateway of Tally > Display More Reports > Analysis & Verification > Verification of Balances.
Alternatively, Alt+G (Go To) > type or select Verification of Balances > and press Enter. - If previous year company is not loaded, press F7 (Compare Company) to load the company that contains the data for the year prior to the analysis period
- Press Alt+F10 (Verification of Opening Bal) to view Verification of Opening Balances report. The Verification of Opening Balances report appears:
- Select any of the groups displayed, and press Enter to view the Verification of Opening Balances report for that Group:
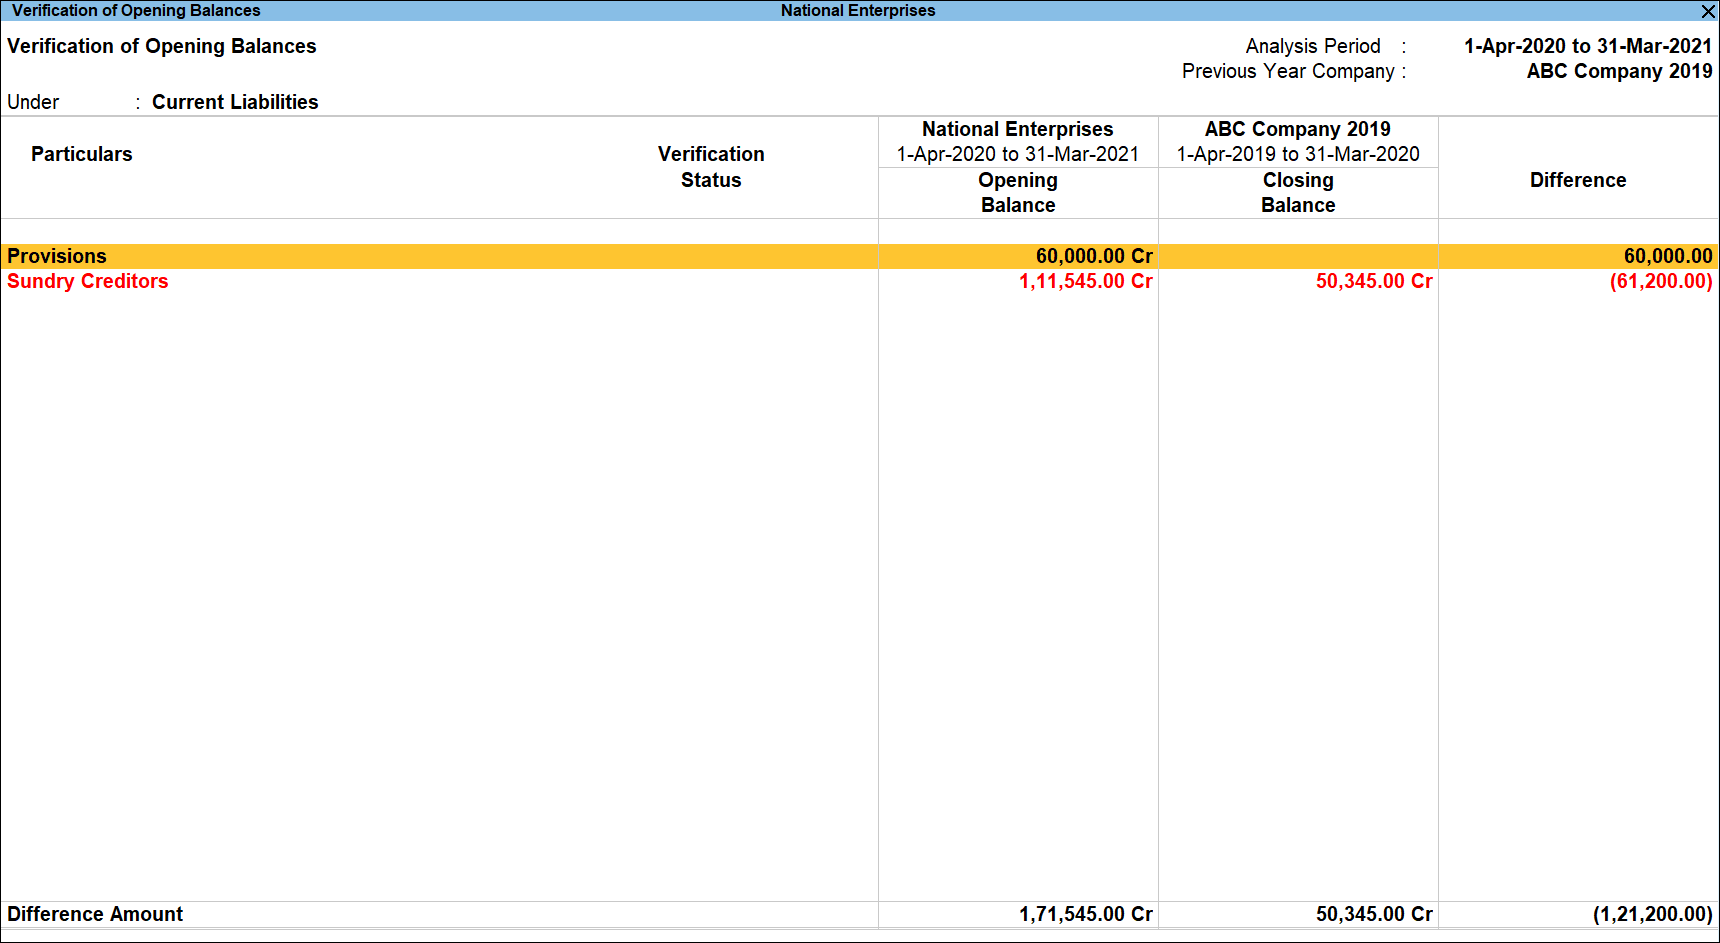
Where the previous year company is loaded, Verification of Opening Balances report appears by default.
To fix the differences in the Opening Balances, you can press Ctrl+Enter on the respective ledger and change the Opening Balance details.
Button options in Verification of Opening Balances report
- F3 (Company): press F3 to change the company.
- F4 (Group): press F4 to view the Verification of Opening Balances report for a particular Group.
- F5 (Ledger-wise): To view the Ledger wise report for Verification of Opening Balances press F5.
- Alt+F5 (Detailed): The user can further drill down to subgroups and ledgers by pressing Enter on the required Groups from the above screen. The information can also be viewed in detail by pressing Alt+F5 from the above report.

- F7 (Compare Company): press F7 to load the company that contains the data for the year prior to analysis period.
- F8 (Show Ledger): press F8 to view the ledger voucher report.
- F9 (Analysis & Ver Reports): press F9(Analysis & Ver Reports) > type or select Pending Advances> and press Enter.
You can follow this step to open any of the Accounting, Inventory, and Verification reports from the list. - F10 (Balance Variance): press F10 to view the Ledger Balance Variance report.
- Alt+R (Verify): press Alt+R to mark any ledger as Verified or On hold.
Note: The facility to mark a Ledgers as Verified is provided only for those ledgers which are present in the Analysis Year. - Alt+S (Remove Verify): press Alt+S to change the verification status for the selected vouchers as not verified.
- Alt+V (Master Configuration): press Alt+Vto identify the parties Related Party, Periodic Payments and Receipts and Sampling Methods for analysis.
- Ctrl+F10 (Exception Only): press Ctrl+J to view the exceptional items only.
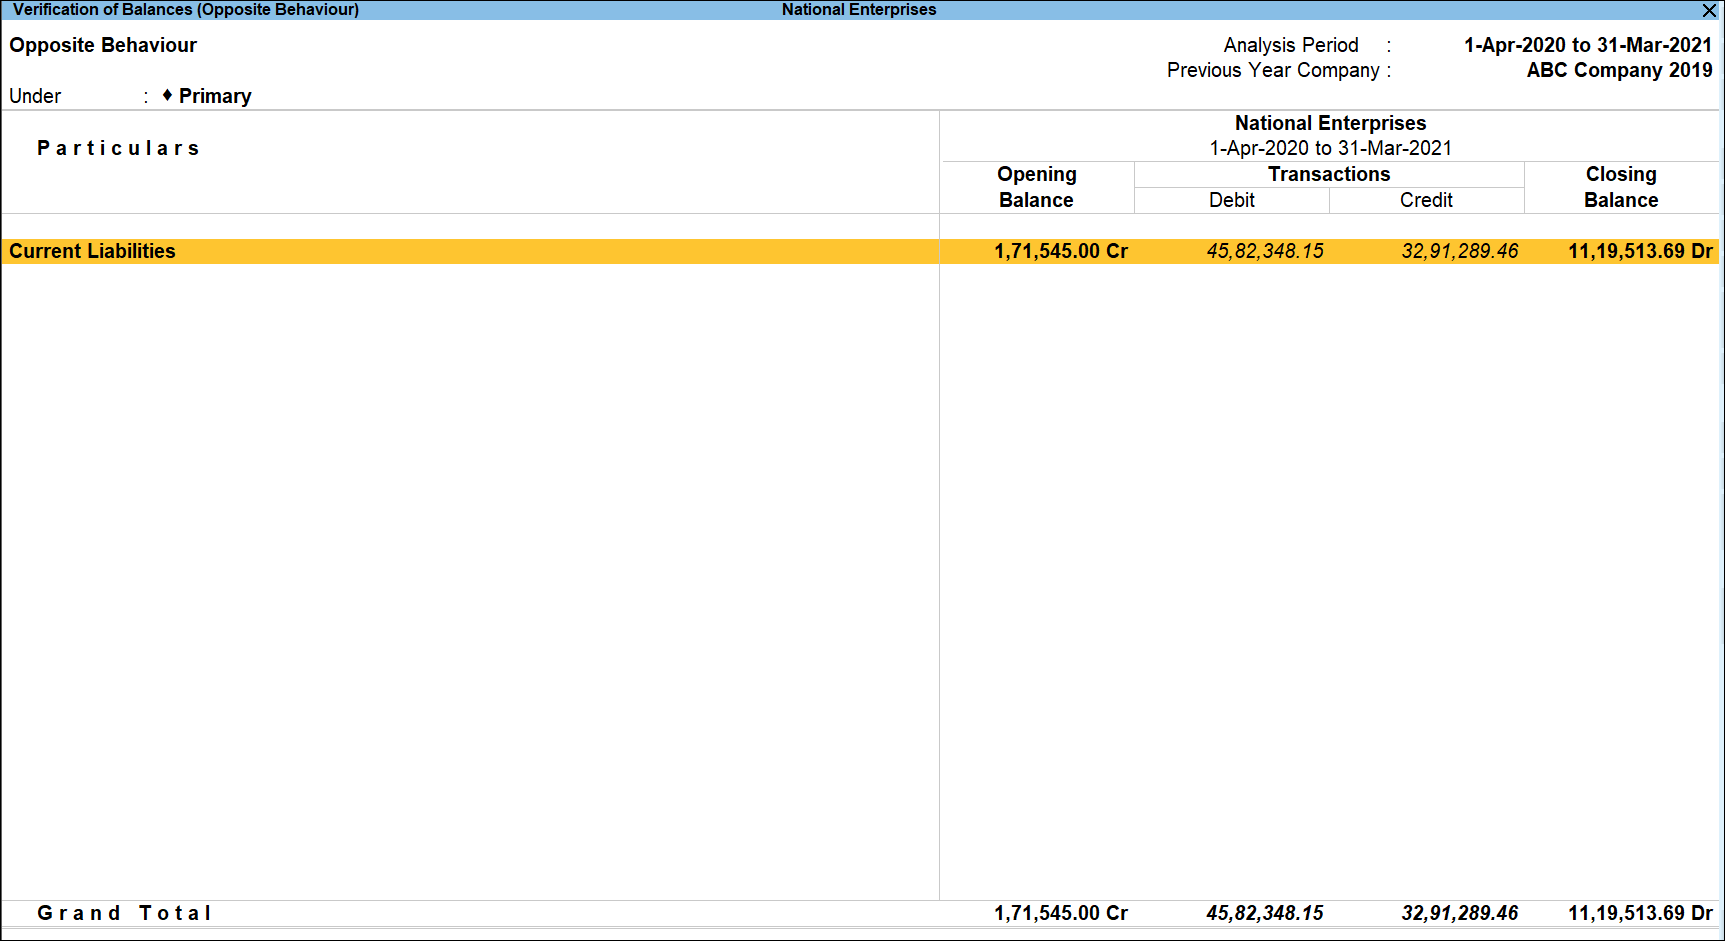
- Alt+F10 (Opp Behaviour): To view the groups which have balances of the opposite nature, that is, if a group that should normally have, say, a Debit balance has a Credit balance, press Alt+F10. The Verification of Balances (Opposite Behaviour) appears:
Configuration Options
Press F12 (Configure)to change the default display.
- Ledgers Type: In this field select the appropriate ledger Type – Non Revenue or Revenue or All Items to configure the report respectively.
- Show Verification Note: Set this option to Yes to display the verification note entered by the user.
- Show Exception First: Set this option to Yes to show all the exceptions in the top of the Group/Ledger Listing.
- Expand all levels in Detailed Format: Set this option to Yes to expand all level – Groups, Sub-groups and Ledgers in detailed format.
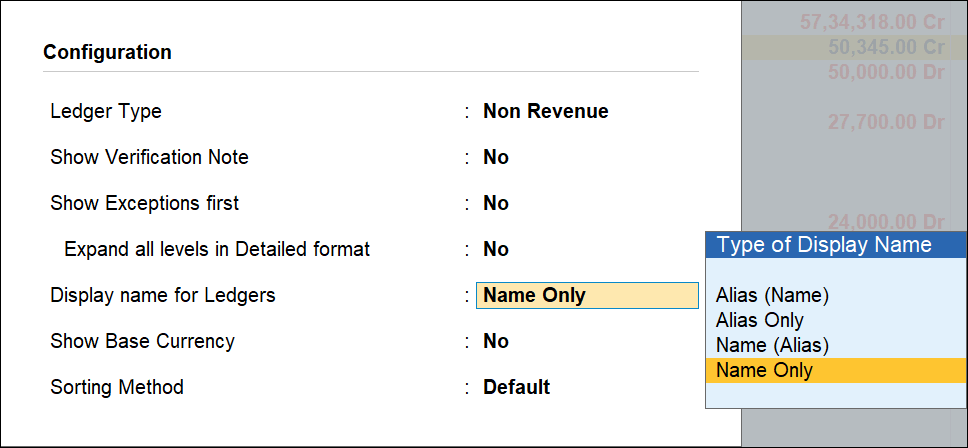
- Display names for Ledger: Select the appropriate appearance Name for the Groups.
- Sorting Method: Select the required sorting method for the transactions from the list of Sorting Methods.
- Display names for Stock Items: Select the appropriate appearance Name for the Stock Items.
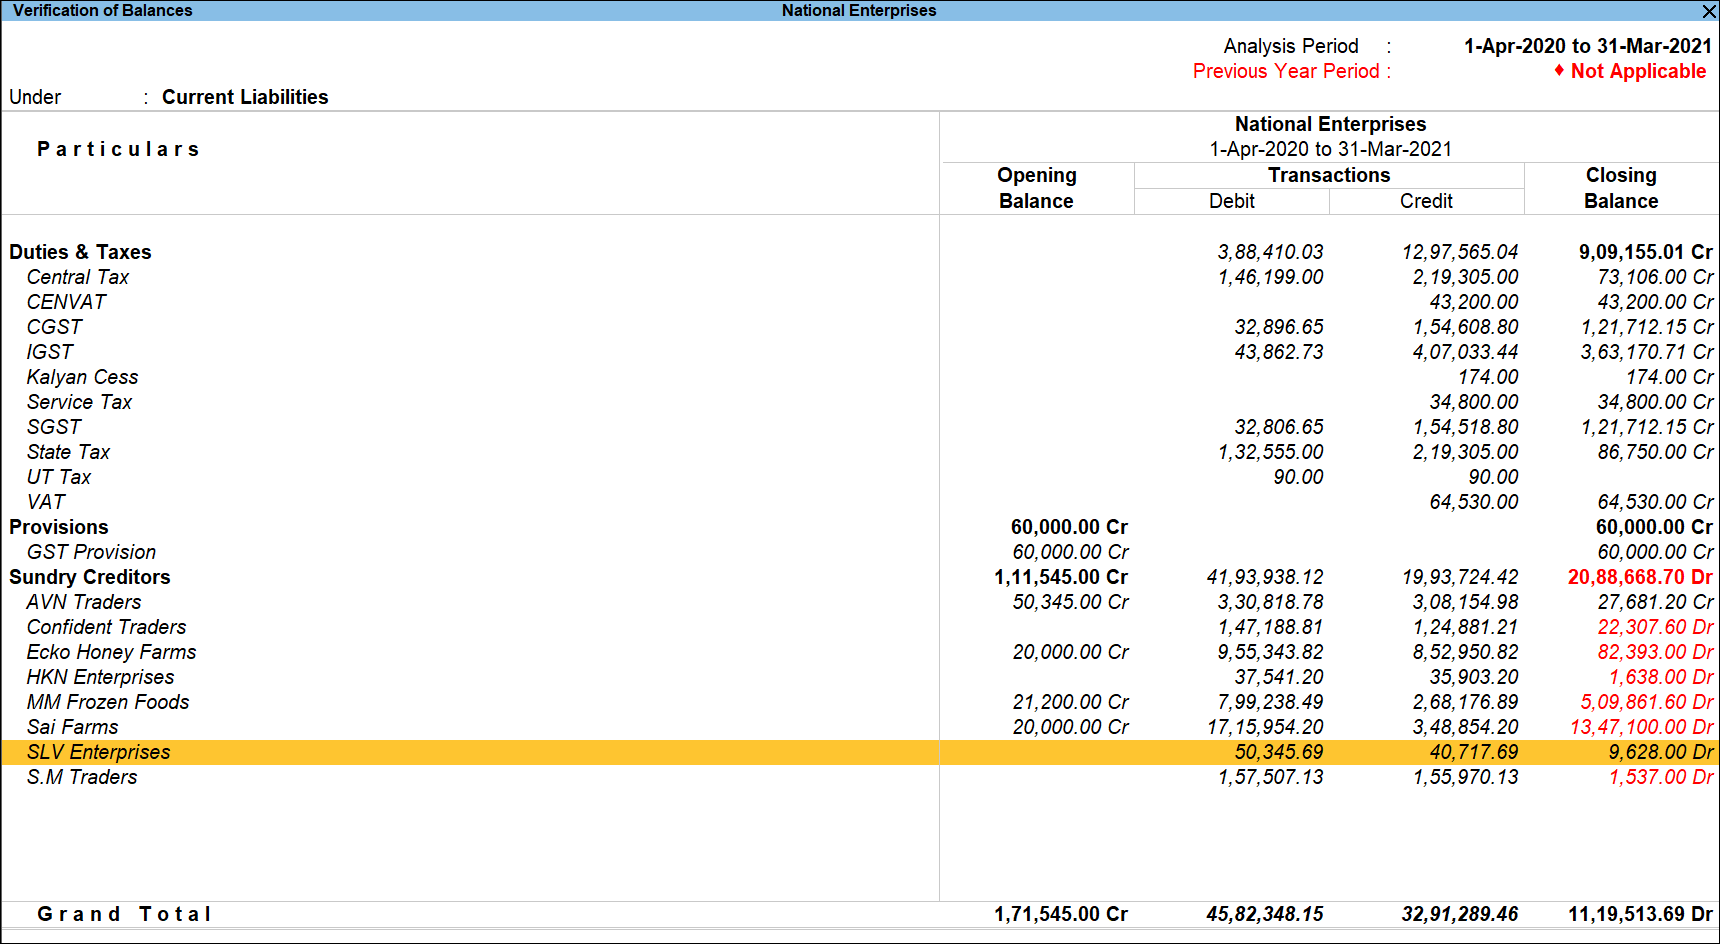
Verification of Balances for Group
To view details of transactions along with the Opening Balance and Closing Balance the user can drill down to the Verification of Balances report for the selected Group.
- Gateway of Tally > Display More Reports > Analysis & Verification > Verification of Balances.
Alternatively, Alt+G (Go To) > type or select Verification of Balances > and press Enter. - Bring cursor on the Amount field for the required Group as shown:
- Press Enter. The Verification of Balances report for the selected group will be displayed as shown:
The drill down reports and button options are same as the Verification of Balances report.
Drill down to Ledger Vouchers report is provided from the above report by keep pressing Enter on the Group name or a subgroup name and then ledger name.
Ledger Vouchers – Verification of Balances
While verifying the balances, the user may need to check the vouchers belonging to any of the ledgers.
In this section:
View the Ledger Vouchers report for Verification of Balances
Button options in the Ledger Vouchers report for Verification of Balances
View the Ledger Vouchers report for Verification of Balances
- Gateway of Tally > Display More Reports > Analysis & Verification > Verification of Balances.
Alternatively, Alt+G (Go To) > type or select Verification of Balances > and press Enter. - Select the Amount field for the required Group.
- Drill down by pressing Enter on the Group Amount field or a Subgroup Amount field and then Ledger name.
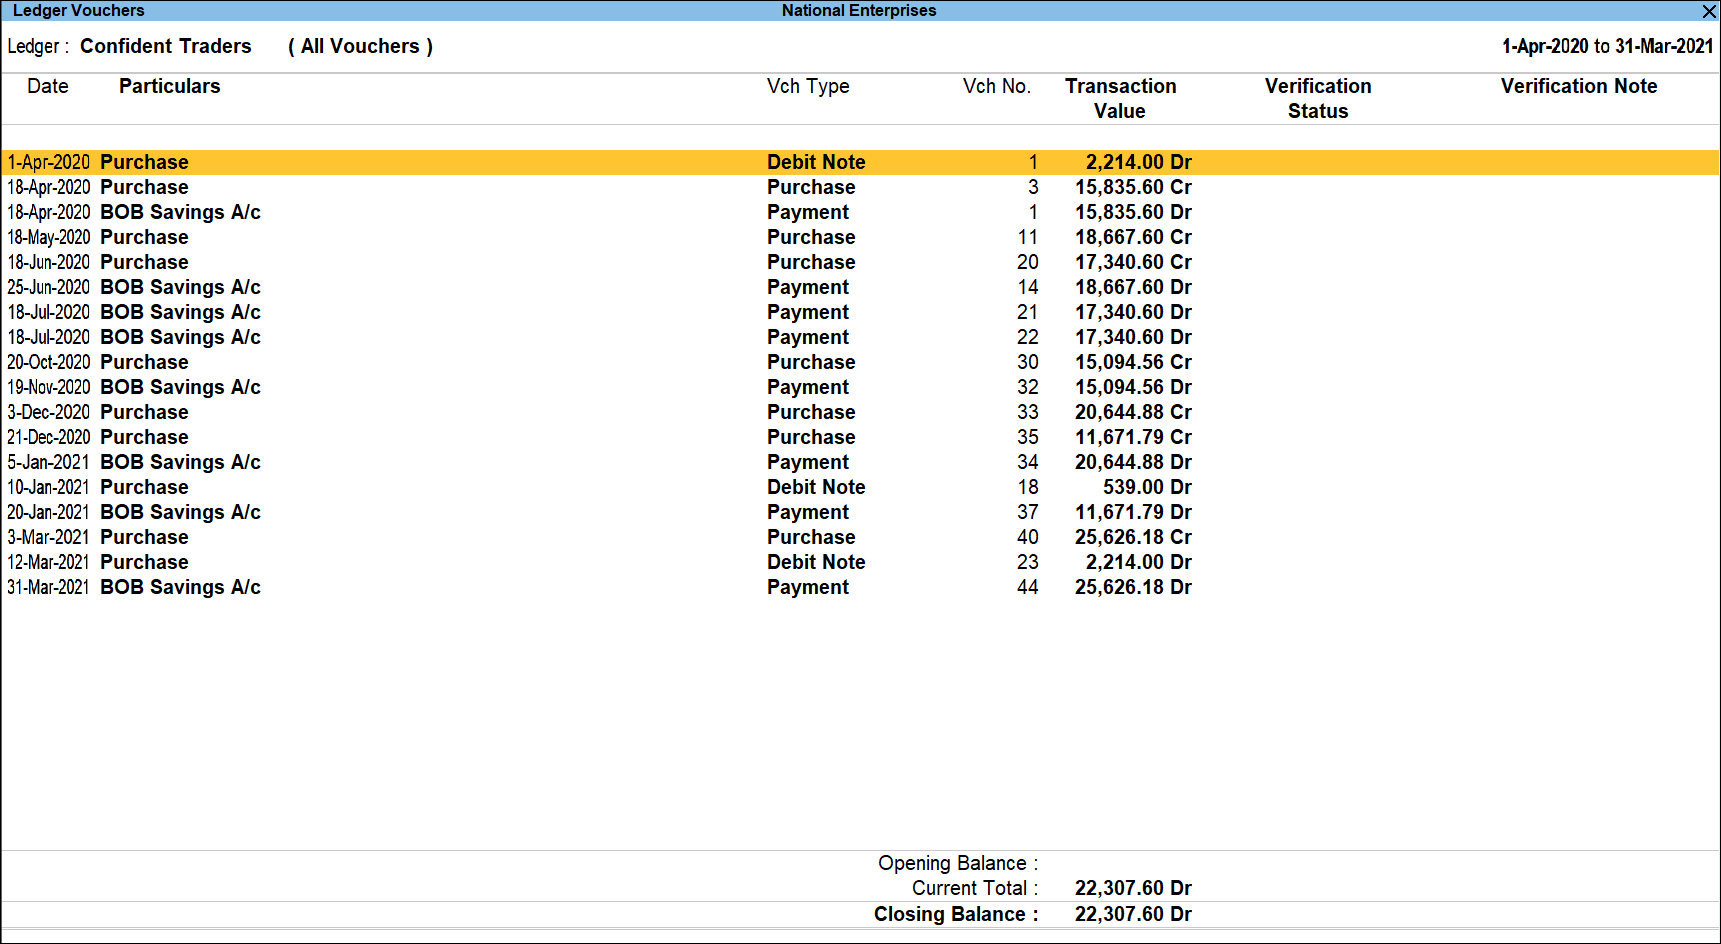
While generating the Ledger Vouchers report for the Cash Ledger, the Daily Breakup can be viewed by pressing Ctrl+F6 (Daily) button provided.
Button options in the Ledger Vouchers report for Verification of Balances
- F2 (Period): press F2 to change the selected period.
- F3 (Company): press F3 to change the company.
- F4 (Ledger): press F4 to view the Ledger Vouchers for a different Ledger.
- Alt+F5 (Detailed): press Alt+F5 to viewed the detailed Ledger Vouchers report.
- F9 (Analysis & Ver Reports): Press F9 (Analysis & Ver Reports) > type or select Pending Documents > and press Enter.
You can follow this step to open any of the Accounting, Inventory, and Analysis Reports from the list. - F10 (Other Info): press F10 to view the other Ledger Information like if its a Is Related Party and the details of the Sampling Method applied.
- Alt+J (Set Manual Sampling): press Alt+J to mark the selected Vouchers (using spacebar) as sampled. The manual sampling method will get applied to all such Vouchers and they will appear under the sampled column on the dashboard.
- Alt+L (Delete Manual Sampling): press Alt+L to delete the Manual sampling method already applied for the selected Vouchers (using the spacebar).
- Alt+R (Verify): press Alt+R to verify the selected Vouchers. For more details on verification refer Verification Status.
Note: The Alt+R (Verify)button will be highlighted when one or more Vouchers are selected for verification using Spacebar. - Alt+S (Remove Verify): press Alt+S to change the status for the selected vouchers as not verified (blank).
- Alt+F12 (Range): press Alt+F12 to use the Range Filter option to search the specific vouchers from the list of Ledger Vouchers displayed.
- Ctrl+F12 (Value): press Ctrl+F12 to filter the vouchers and calculate the balances as per the specified conditions.
Configuration Options
Press F12 (Configure) to change the default display.
- Show Narrations: Set this option to Yes to show the Narrations as entered at the time of voucher entry.
- Show Verification Status: Set this option to Yes to show the analysis status selected by the user.
Note: If this option is set to No, then the Alt+R (Verify) button will be disabled. - Show transactions with Verification Status: Select any Verification Status and the vouchers that have been marked with the chosen verification status will be filtered and displayed (Any, On Hold, Altered, Clarified, External Clarification, Internal Observation, Internal Observation Clarified, Not Verified, Verified).
- Show Verification Note: Set this options to Yes to show the verification Note as entered by the user.
- Show Client’s Clarification Note: Set this option to Yes to view the Clarification provided by the Client for the vouchers with Verification Status as Clarified.
- Show Date and Time: Set this option to Yes to view the Analysis Date and Time.
- Show Verified By: Set this option to Yes to view the person who has performed verification of the vouchers.
- Show Clarification from: Set this option to Yes to view the user who has provided clarification, if any, for the Vouchers.
- Show Category: Set this option to Yes to view the Category of Clarification alongside the Vouchers.
- Type of Category: This will appear when the Show Category option is set to Yes. The list of Categories include All Items, Authorization, High Value, Not Connected to Business, Supporting.
- Show Priority: Set this option to Yes to view the priority. Type of Priority: Set this option to Yes to view the Priority of the clarification required (High/Medium/Low).

- Sorting Method: Select the required sorting method for the transactions from the list of Sorting Methods.
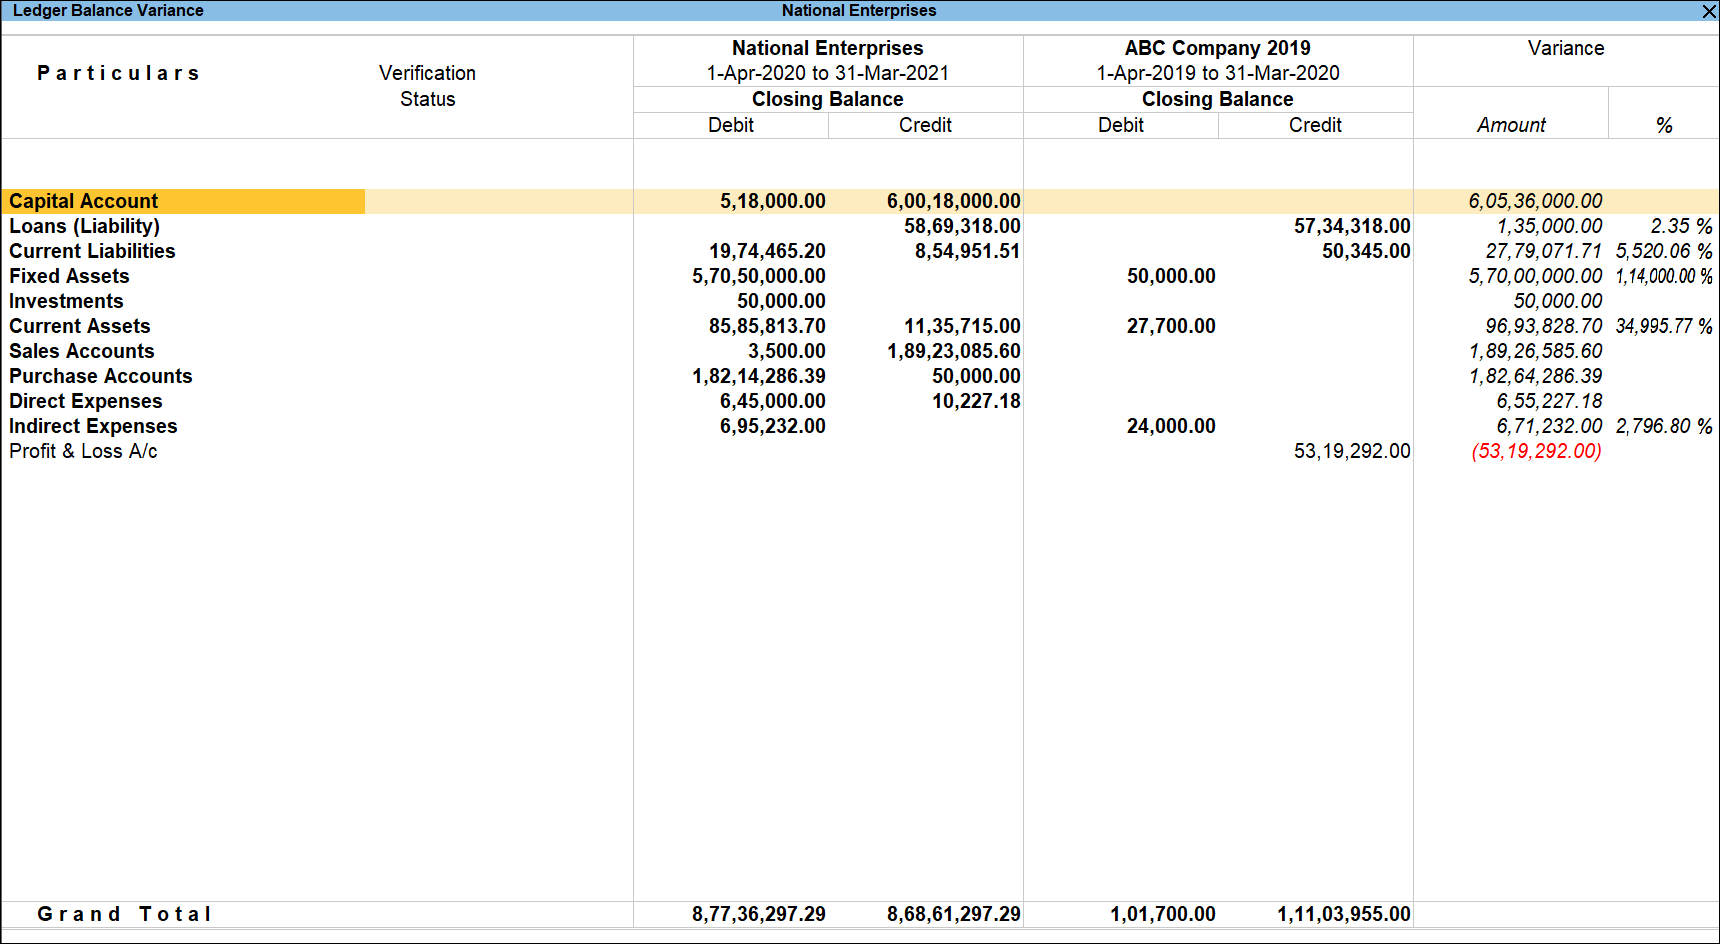
Ledger Balance Variance
The Ledger Balance Variance report displays a detailed comparison between the Ledger Closing Balances between the Current Year and Previous Year. The Ledger to Ledger comparison will help in checking the deviations between the years.
In this section:
View Ledger Balance Variance report
Button options in the Ledger Balance Variance
View Ledger Balance Variance report
- Gateway of Tally > Display More Reports > Analysis & Verification > Verification of Balances.
Alternatively, Alt+G (Go To) > type or select Verification of Balances > and press Enter. - Press F10 (Balance Variance) to view Ledger Balance Variance screen.
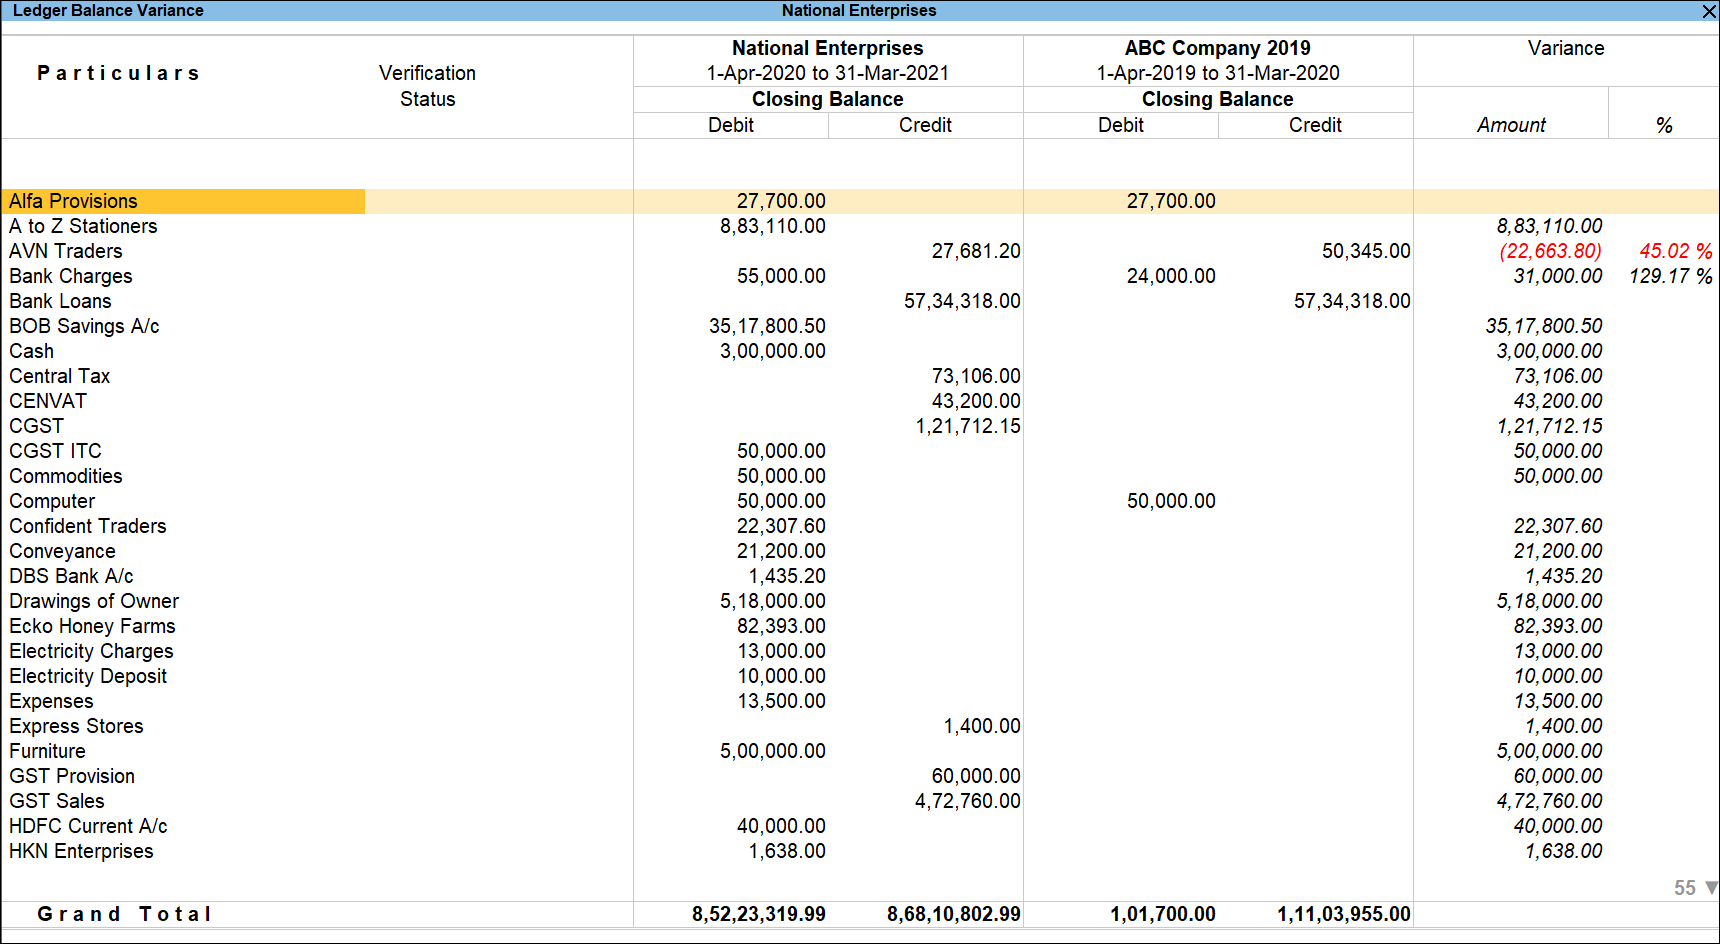
The above displays the Ledger wise Closing Balance values for Previous Year and Analysis Year (Current Year) along with the Variance in Amount and Percentage. The above report also displays the Verification Status for the Ledgers which are already checked and verified.
Button options in the Ledger Balance Variance
- F3 (Company): press F3 to change the company.
- F4 (Group): press F4 to view the above report only for the selected Group.
- F5 (Group-wise): press on F5 to view the Group wise Balance Variance report.
- F9 (Analysis & Ver Reports): Press F9 (Analysis & Ver Reports) > type or select Pending Advances> and press Enter.
You can follow this step to open any of the Accounting, Inventory, and Analysis Reports from the list. - Alt+R (Verify): press Alt+R to mark any Ledger as Verified.
- Alt+S(Remove Verify): press Alt+S to change the verification status for the selected vouchers as not verified.
- Alt+V (Master Configuration): press Alt+V to identify Periodic Payments and Receipts, Related Party and Sampling Methods for verification.

Configuration Options
Press F12 (Configure)to change the default display for the above report.
For more details on the F12 (Configure) options, see Trial Balance report.
Additional options in the above report are explained below:
- Show Verification Note: Set this option to Yes to display the verification note entered by the User.
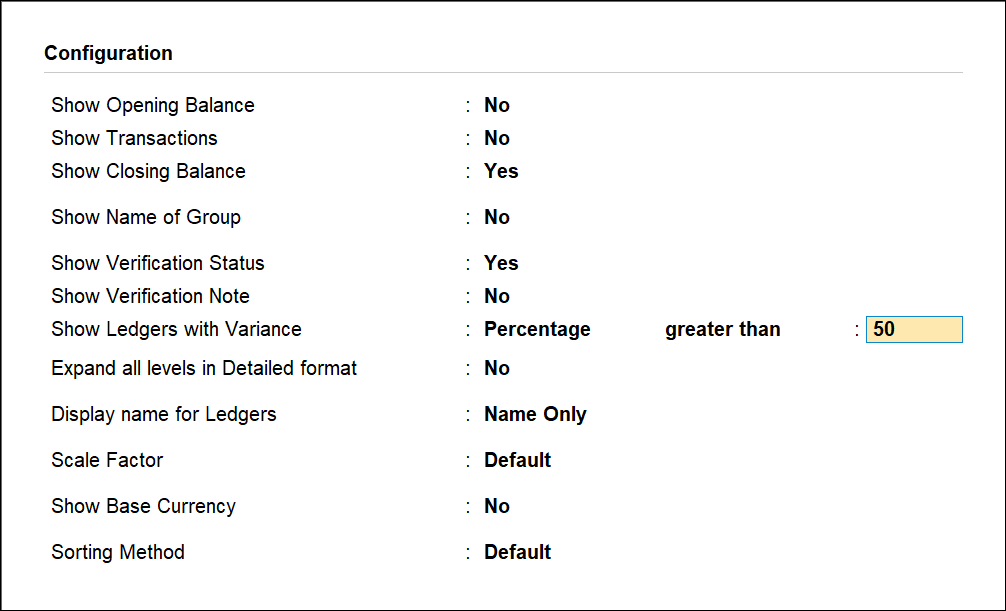
- Ledgers with Variance Status as: This is a filter option to display the Ledgers with Variance Greater than, Less than or Equal to the entered value. The details can be filtered based on the Percentage or Amount.
- Sorting Method: Select the required Sorting Method from Default, Alphabetical (A to Z), Alphabetical (Z to A), Variance % wise (Decreasing), Variance %wise (Increasing), Difference Amount-wise (Decreasing) and Difference Amount-wise (Increasing) for the Ledgers.
Negative Cash Variance
From Verification of Balances report, the user can drill down to the Daily Breakup for Cash Ledger to view the Negative Cash Balance during the analysis year.
- Gateway of Tally > Display More Reports > Analysis & Verification > Data Analysis > Verification of Balances.
Alternatively, Alt+G (Go To) > type or select Verification of Balances > and press Enter. - Select the Transactions section on the right side of the Verification of Balances drill down report and press Enter on Current Assets.
- Press Enter on the Cash-in-Hand from the Transactions section.
- Press Enter on the Cash Ledger.
- Press Ctrl+F6 (Daily). The Daily Breakup for Cash Ledger is displayed as shown:

The above report provides the day wise balance for the Cash Ledger. - Press Ctrl+F10 (Exceptions Only): to view the report only for negative cash balance.
The user can press Enter to view the Ledger Vouchers report for each day for Cash Ledger.


