
Relative Size Factor (RSF)
The Relative Size Factor report in TallyPrime compares the Highest Value transactions for each ledger voucher to the Second Highest Value and compare the variance which can lead into further investigation.
In this section
View the Relative Size Factor report
Button options in the Relative Size Factor report
View the Relative Size Factor report
Gateway of Tally > Display More Reports > Analysis & Verification > Data Analysis > Relative Size Factor (RSF).
Alternatively, Alt+G(Go To) > type or select Relative Scale Factor (RSF)> and press Enter.
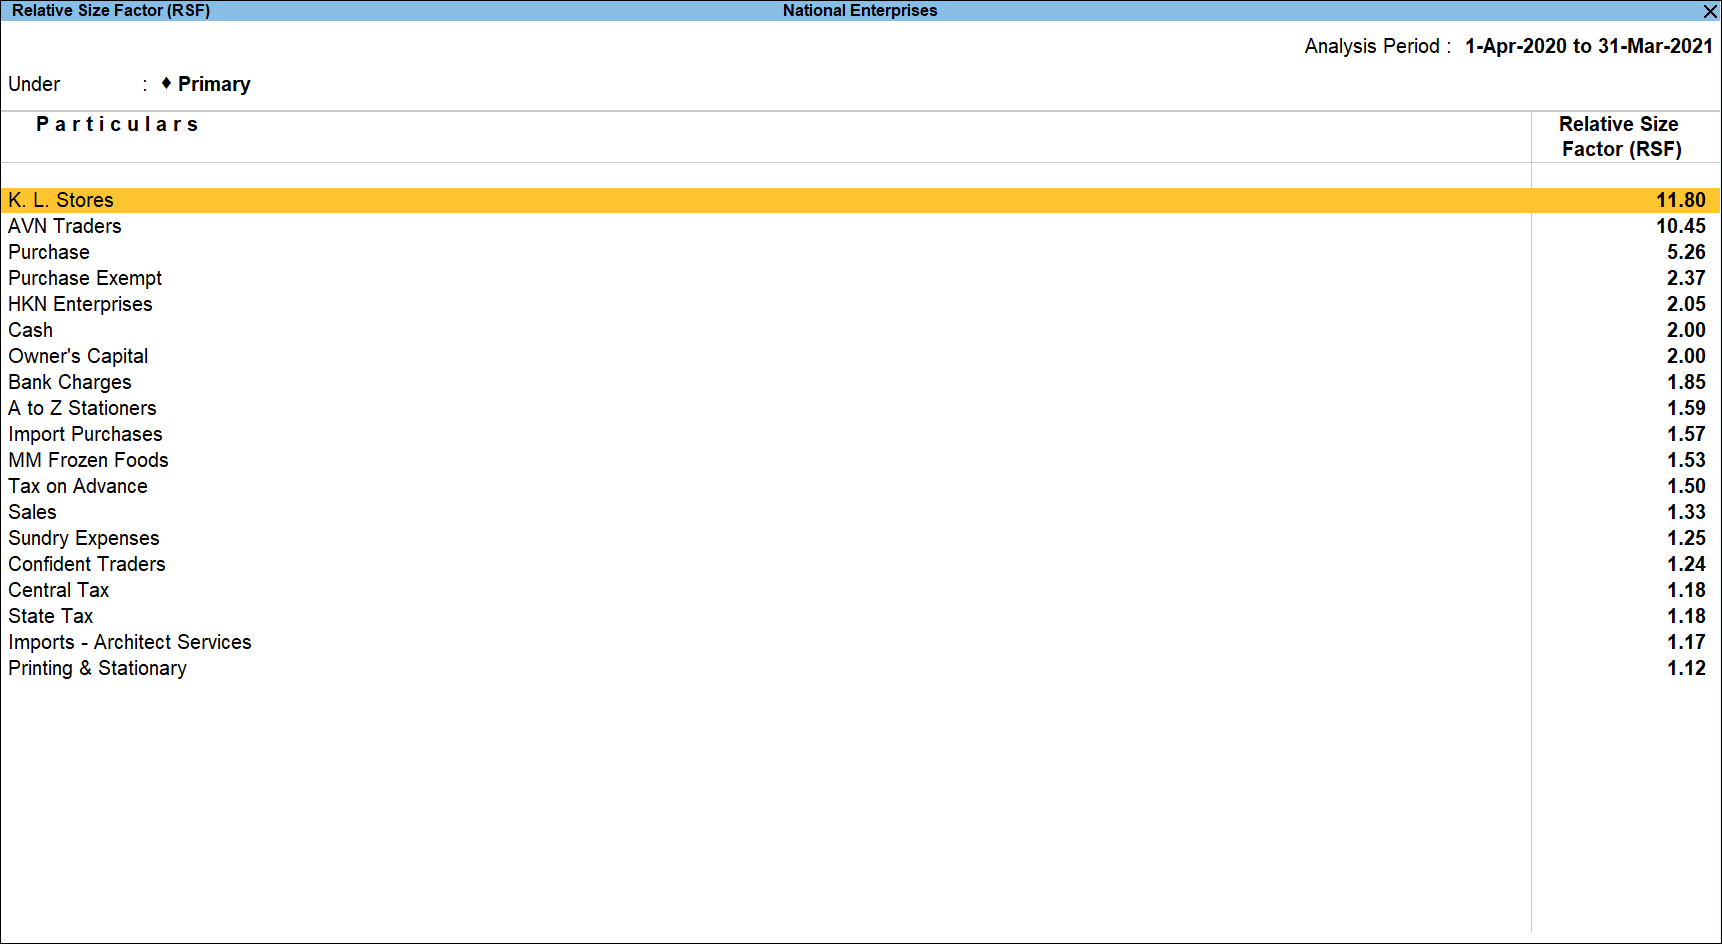
The Relative Size Factor report displays the ledger wise RSF value as shown above. The user can drill down from the above report to view the details of the ledger vouchers where the details of the Relative Size Factor computation can be viewed.
The configured Relative Size Factor report is displayed as shown:

The Relative Size Factor report displays the ledger wise Highest, Average and RSF Value along with the count of vouchers as shown above. The user can drill down from the above report to view the details of the ledger vouchers where the details of the Relative Size Factor computation can be viewed.
Note: Average Value will be calculated by considering the total of the ledger divided by the number of transactions of that ledger.
Button options in the Relative Size Factor report
- Press F2 (Period): to view the Relative Size Factor report for any required period.
- Press F3 (Company): to change the company.
- Press F4 (Group): to filter the view the Relative Size Factor report for the selected Group.
- Press F9 (Analysis & Ver Reports): type or select Analytical Procedures > and press Enter.
You can follow this step to open any of the Accounting, Inventory, and Verification reports from the list.
Configuration Options
Press F12 (Configure): to change the default display for the above report.
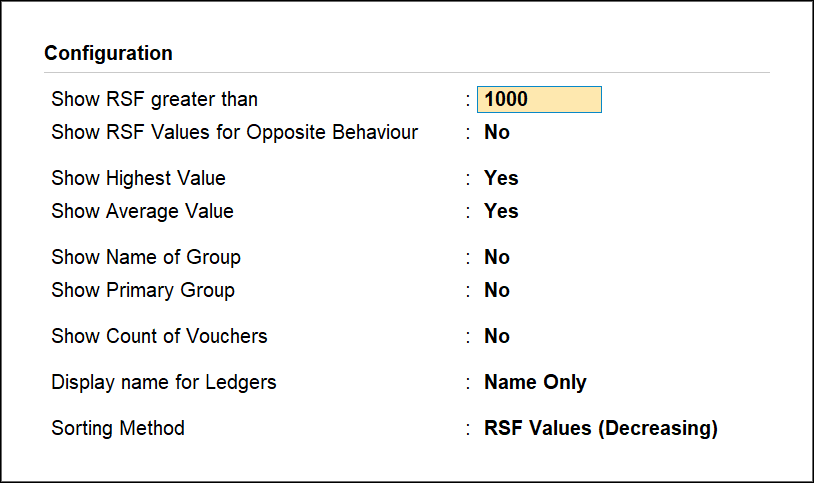
- Show RSF greater than: Specify the value to view the report for RSF greater than mentioned in this field.
Note: In the above screen, all the vouchers where total amount is greater than 1000 will be displayed in the report once the configuration is saved. - Show RSF Values for Opposite Behaviour: Set this option to Yes to view the RSF for transactions having either Debit or Credit balance.
- Show Highest Value: Set this option to Yes to display the Highest Value Transaction for each Ledger.
- Show Average Value: Set this option to Yes to display the Average Value Transaction for each Ledger.
- Show Name of Group: Set this option to Yes to display the name of the immediate Group/Subgroup.
- Show Primary Group: Set this option to Yes to display the name of the Primary Group.
- Show Count of Vouchers: Set this option to Yes to display the count of the vouchers for each Ledger.
- Display name of Ledgers: Select the required Display Name for the Ledgers.
- Sorting Method: Select the required sorting methods from RSF values increasing/decreasing, alphabetical increasing/decreasing or default method.
Ledger Vouchers – Relative Size Factor (RSF)
The Ledger Vouchers report for the Relative Size Factor (RSF) report displays the vouchers for the selected ledger along with the RSF computation details.
In this section
- View the RSF – Ledger Vouchers report
- Button options in RSF – Ledger Vouchers report
- Configuration Options
View the RSF – Ledger Vouchers report
- Gateway of Tally > Display More Reports > Analysis & Verification > Data Analysis > Relative Size Factor (RSF).
Alternatively, Alt+G (Go T0) > type or select Relative Scale Factor (RSF)> and press Enter. - Select the required Ledger and press Enter.
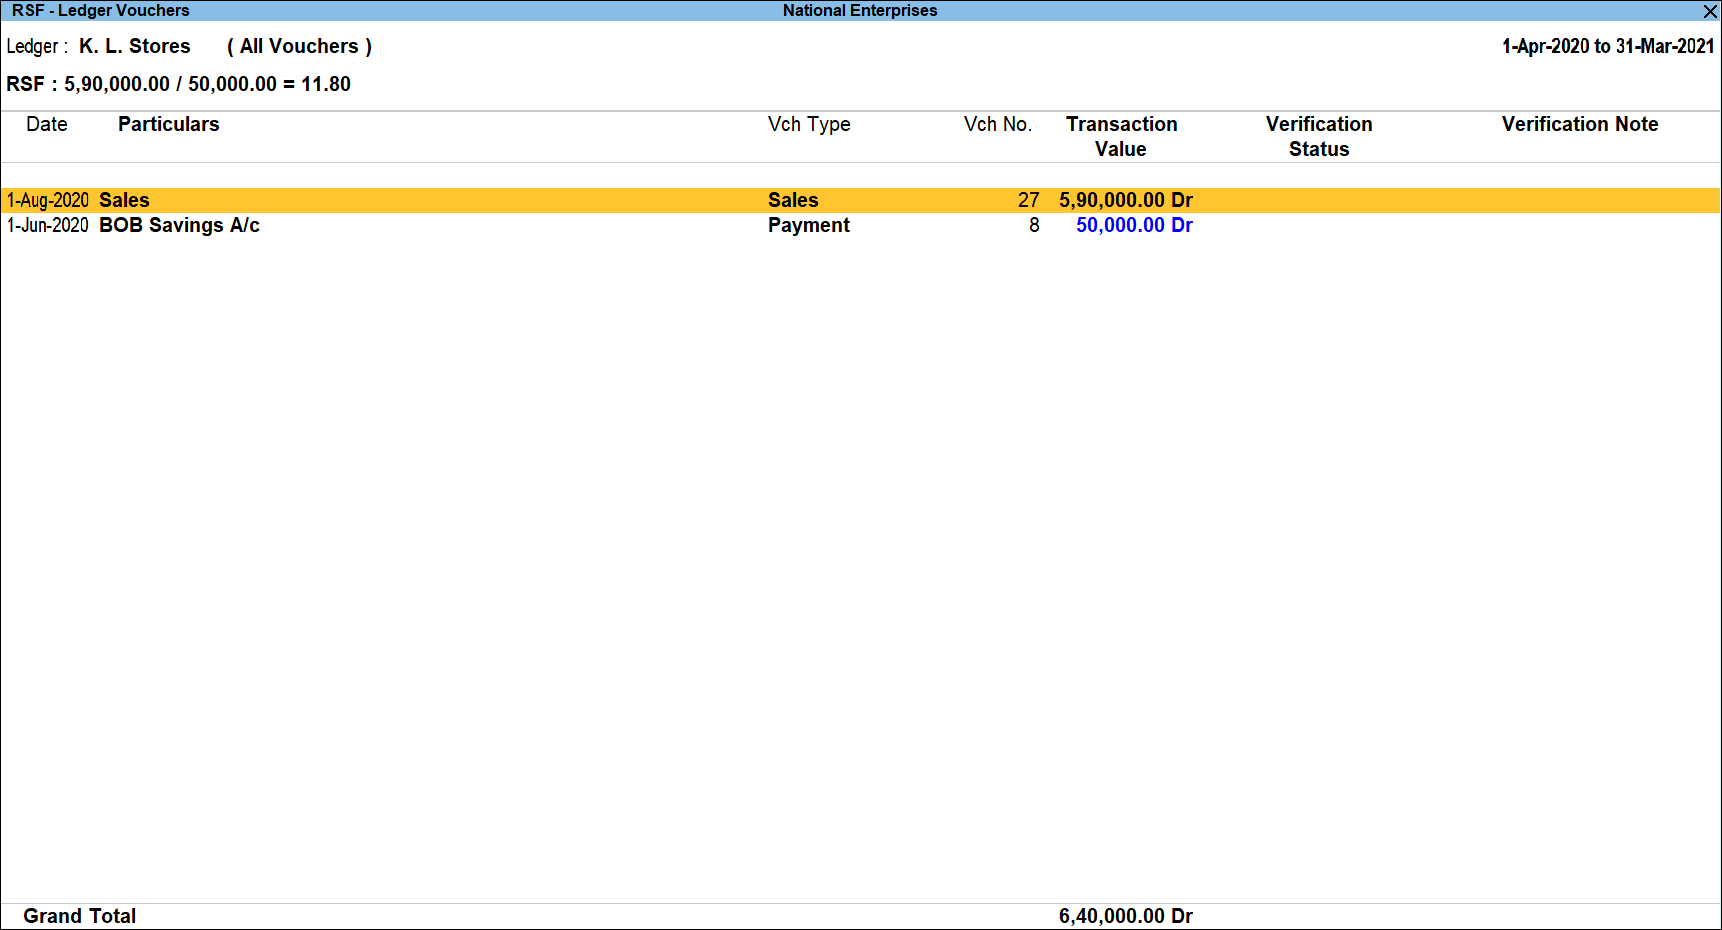
The Ledger Vouchers screen displays all the transactions for the respective Ledger. The highest and second highest transaction values are shown in blue for clear identification.
The Computation for the Relative Size Factor (RSF) is also shown on top of the screen.
Button options in RSF – Ledger Vouchers report
- Press F2 (Period): to change the period selected.
- Press F3 (Company): to change the company.
- Press F4 (Ledger): to select a different Ledger and display the RSF – Ledger Vouchers report for the selected Ledger.
- Press Alt+F5 (Detailed): to view the detailed Ledger Vouchers report.
- Press F8 (Show Ledger): to display the Ledger Vouchers report for the selected Ledger.
- Press F9 (Analysis & Ver Reports): type or select Pending Advances > and press Enter.
You can follow this step to open any of the Accounting, Inventory, and Verification reports from the list. - Press F10 (Other Info): to view the other Ledger Information like if its an MSME, is a Related Party and the details of the Sampling Method applied.
- Press Alt+J (Set Manual Sampling): to mark the selected vouchers (using spacebar) as sampled. The manual sampling method will get applied to all such vouchers and they will appear under the sampled column on the dashboard.
- Press Alt+L (Delete Manual Sampling): to delete the Manual sampling method already applied for the selected Vouchers (using the spacebar).
- Press Alt+R (Verify): to verify the selected vouchers. The process of verification is similar to Verification Status report.
Note: The Alt+R (Verify) button will be highlighted only when one or more vouchers are selected for verification using Spacebar. - Press Alt+S (Remove Verify): to change the verification status for the selected vouchers as not verified.
- Press Alt+F12 (Range): to use the Range Filter option to search the specific vouchers from the list of Ledger Vouchers displayed.
- Press Ctrl+F12 (Value): to filter the vouchers and calculate the balances as per the specified conditions.
Configuration Options
Press F12 (Configure), to change the default display for the above report.
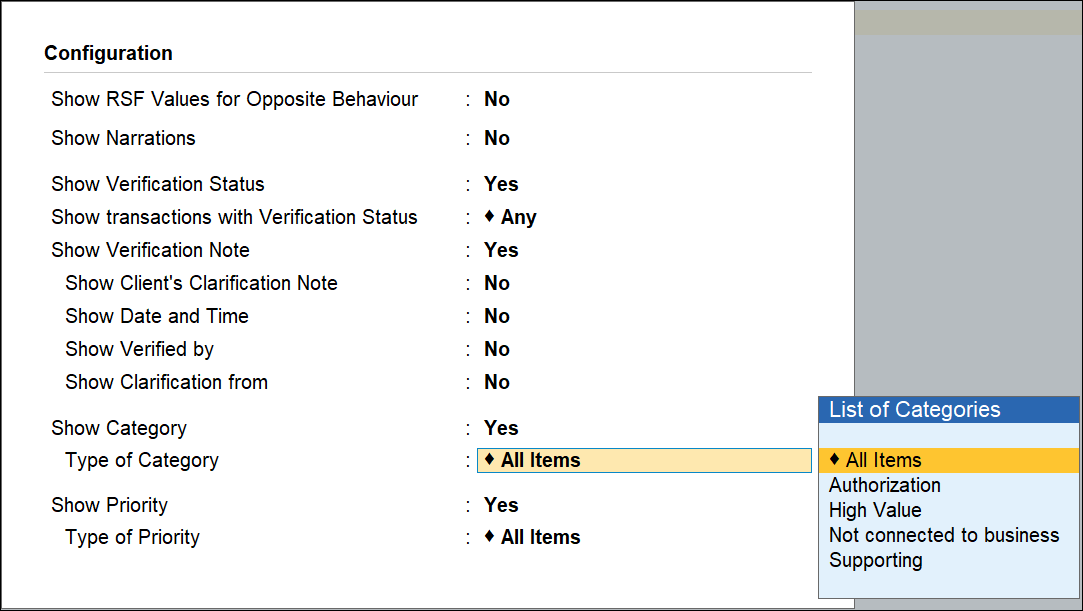
- Show RSF Values for Opposite Behaviour: Set this option to Yes to display the RSF for transactions with both Credit and Debit values.
- Show Narrations: Set this to Yes option to view the Vouchers along with their respective narration.
- Show Verification Status: Set this option to Yes to view the vouchers alongside the respective Verification Status (On Hold/Altered/Clarified/Internal Observation/External Observation/Internal Observation Clarified/Not Verified/Verified).
Select an Verification Status and the vouchers that have been marked with the chosen Verification Status will be filtered and displayed. - Show transactions with Verification Status: Set this option to Yes to view the transaction along with respective Verification Status.
- Show Verification Note: Set this option to Yes to view the vouchers along with their respective Verification Note.
- Show Client’s Clarification Note: Set this option to Yes to view the Clarification provided by the client for vouchers that have been marked for Internal Observation/External Clarification.
- Show Date and Time: Set this option to Yes to view the date on which, and time at which, clarification was provided for the listed Vouchers.
- Show Verified By: Set this option to Yes to view the person who has performed verification on the Vouchers.
- Show Clarification from: Set this option to Yes to view the user who has provided clarification, if any, for the Vouchers.
- Show Category: Set this option to Yes to view the category of clarification alongside the Vouchers.
- Show Priority: Set this option to Yes to view the priority.
- Type of Priority: Set this option to Yes to view the Priority of the clarification required (High/Medium/Low).


