GSTR-1/GSTR-3B Exceptions & Resolutions
This page lists down the frequently occurring conflicts and exceptions displayed in the GSTR-1 report. Each section provides the list of related conflicts/exceptions and the step-by-step process to resolve them.
Exception/Conflict Resolution in TallyPrime Release 5.1
As per your business requirements, you might need to change the GST Registration details or the Tax Rate details in a master. You might have to manage your inventory differently and need to change the stock group for a stock item. If you have already recorded transactions using such masters, the Returns will display the conflicts between masters and transactions. Note that the conflicts will not impact the GST Status of the vouchers. You can still upload the Returns and file your returns. However, it is recommended that you resolve the conflicts after analysing the data and avoid any discrepancies before and after filing the Returns.
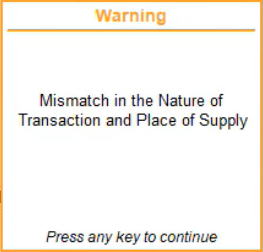
Mismatch in the Nature of Transaction and Place of Supply
This conflict appears in transactions if the Nature of Transaction or Place of Supply is overridden while recording the transactions. This will create a conflict with the details that are already stored in the masters or company.
Let’s see how to resolve the conflict in the transaction.
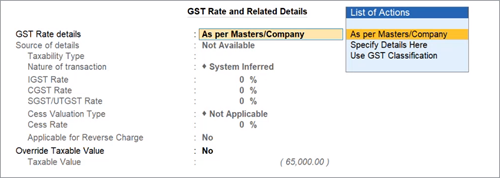
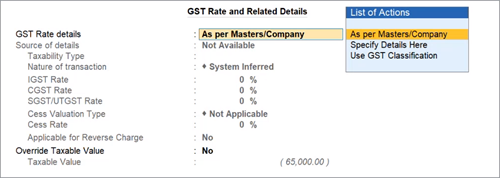
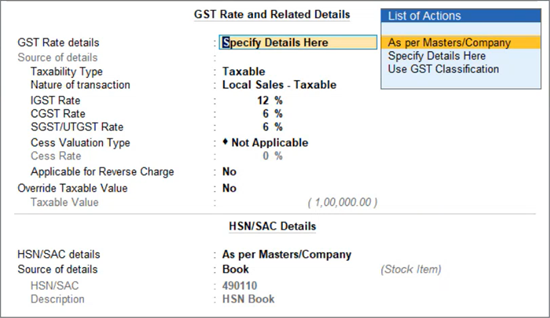
- In the transaction, open the GST Rate and Related Details screen.
- Under GST Rate Details, select As per Masters/Company.
This will ensure that the details are captured as per the masters or company, and there will be no conflict.
- Press Ctrl+A to save the details.
HSN/SAC is invalid, mismatched, or not specified
This exception occurs when the HSN/SAC is missing or invalid.

You can resolve this exception using any one of the following methods, as per your convenience.
Update transactions Ledger-wise or Stock Item-wise
This is a convenient way for updating all your transactions at once for a particular stock item or ledger.
- Drill down from the exception to view the transactions that have to be updated.

- Press F5 (Stock Item-wise) or Ctrl+F5 (Ledger-wise), as per your business needs.
The transaction details will be listed as per the relevant stock items or ledgers.

- Select the required stock item or ledger, and press Alt+S (Update GST Details).
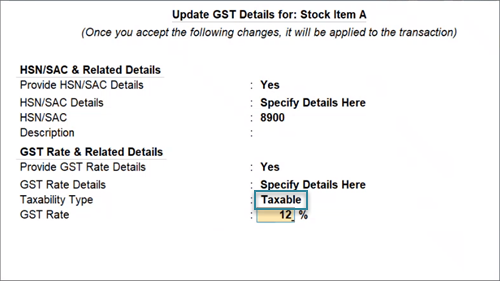
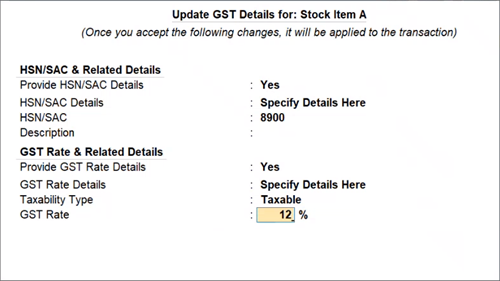
The Update GST Details screen appears. - Update the HSN/SAC.
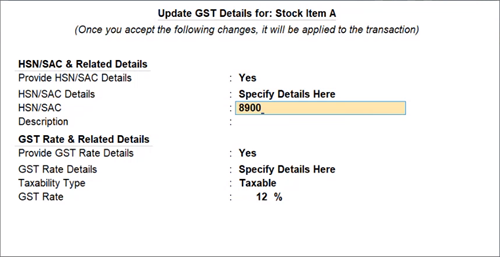
- Press Enter to save the details.
It is recommended that you press Enter here, and not Ctrl+A, to ensure that the proper Effective Date is applied. Refer to the Effective Date section, to know more.
The Effective Date screen appears.

- Specify the Effective Date for revised GST details.
- Press Enter to accept the details.
All the transactions recorded with the stock item or ledger will be resolved with the updated details.
Update transactions one by one
You also have the choice to update the HSN/SAC for your transactions one by one, if needed.
- Drill down from the exception to view the transactions that have to be updated.

- Press Enter on the required transaction, and update the HSN/SAC.
- Press Enter to save the details.
It is recommended that you press Enter here, and not Ctrl+A, to ensure that the proper Effective Date is applied. Refer to the Effective Date section, to know more.
The Effective Date screen appears.

- Specify the Effective Date for revised GST details.
- Press Enter to accept the details.
The transaction will be resolved with the updated details. Similarly, you can resolve the other transactions one by one.
Mismatch in Information Between Master and Transaction
This conflict appears in the Returns if you have changed the GST Registration or Tax Rate details of the party master. Say you have changed the party registration from Regular to Regular SEZ, and updated the Tax Rate.
Let’s see how to resolve the conflicts in the GSTR-1 report.
- Press Alt+G, type or select GSTR-1 and press Enter.
- Press F2 (Period) to change the period, if needed.
The GSTR-1 report displays the option Check Vouchers Having Potential Conflicts with Masters based on the Registration, Return, and Return period.
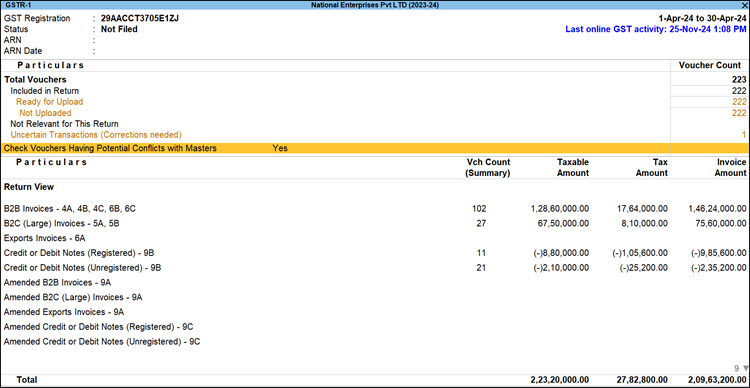
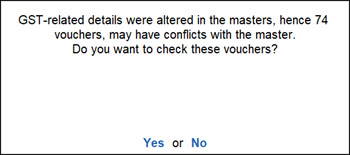
- Drill down from the option for TallyPrime to check the transactions with conflicts, and press Enter or Y to confirm.
The GSTR-1 – Vouchers Having Conflicts report displays the following types of conflicts, under the Mismatch in Information Between Masters and Transactions section.- Mismatch in GST Registration Details between the Party and the transaction
- Mismatch in Tax Rate Details between the master and the transaction
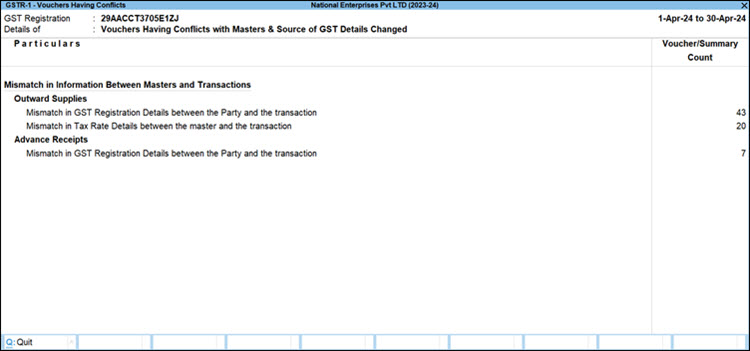
- Resolve the conflicts.
Resolve Mismatch in GST Registration Details between the Party and the transaction
To view the impacted vouchers, drill down from the conflict type. The affected vouchers for the selected conflict type appear. You can resolve a single transaction or multiple transactions together.
Resolve the conflict for one or more transactions in one go | Update as per Masters
- Select one or more transactions, and press Alt+W (Update as per Masters).
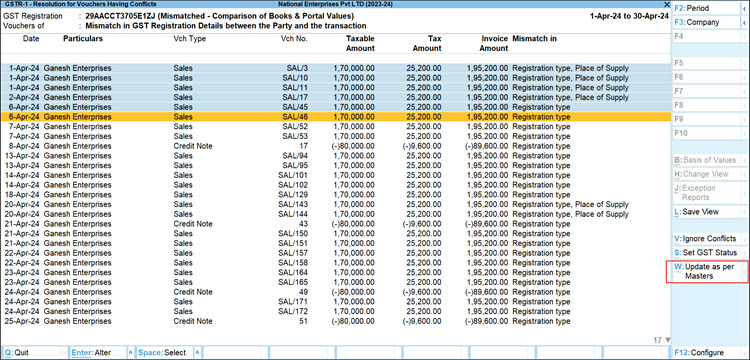
- Press Enter to confirm the update for the selected transactions.
In case you want to skip resolving the transaction now, you can select Ignore Conflicts.
- Select the transactions and press Alt+V (Ignore Conflicts).
- Press Enter to confirm.

You can view the report with all the transactions for which you had ignored the conflict.
- In the GSTR-1 report, press Ctrl+J (Exceptions Report) > Vouchers Ignored for Conflicts.
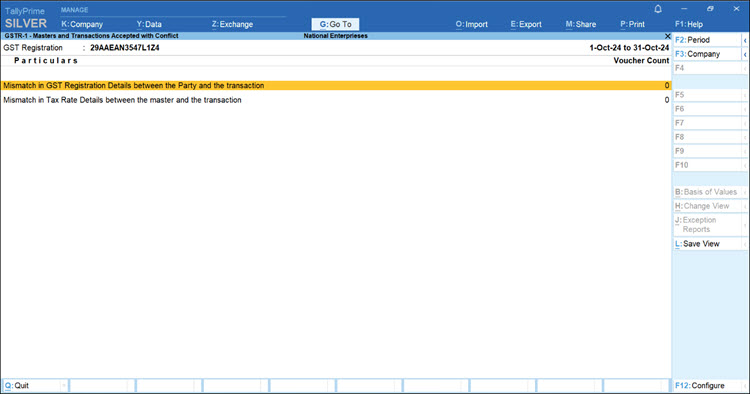
- Drill down from the selected mismatch line to view the details of the vouchers for which the conflicts were ignored.
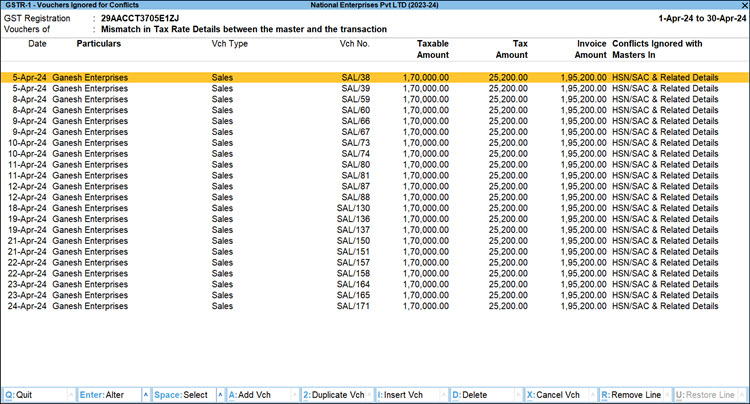
- Press Alt+W (Update as per Master), if needed, to resolve the ignored conflicts.
Apply changes from Master to Transaction or Transaction to Maters
- Drill down from the transaction entry for which you want to resolve the conflict.
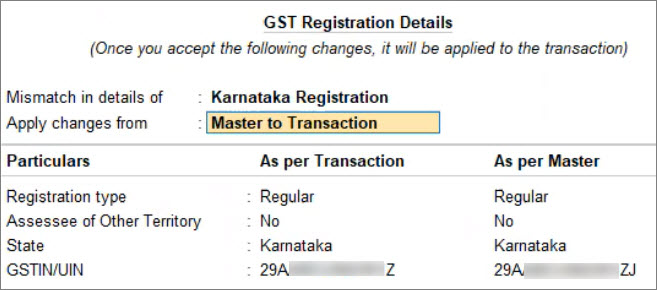
- In the Party GST Registration Details screen, validate the differences under As per Transaction and As per Master.
- Resolve the conflict.
- If the master details are correct, retain Apply changes from as Master to Transaction.
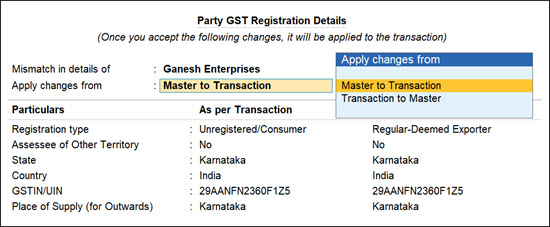
- If the transaction details are correct and you want to update the master, press Backspace, and under the Apply changes from option, select Transaction to Master.
- If the master details are correct, retain Apply changes from as Master to Transaction.
- Set the Effective Date, and press Enter to update the transaction or master as per your choice.
Resolve Mismatch in Tax Rate Details between the master and transaction
Similar to resolving the conflict in Party Registration Details, you can solve mismatch in Tax Rate details between a stock item and the affected transaction.
- In the GSTR-1 report > drill down from the Mismatch in Tax Rate Details between the master and transaction conflict type.
- Resolve the conflict in one of the following ways:
Invalid Source of GST Details
This conflict appears if you changed the source of GST Details for a stock item already participating in a transaction. Say you have changed the Group of a stock item from Fabric to Fabric-Main Godown.
Let’s see how to resolve such conflicts in the GSTR-1 report.
- Press Alt+G, type or select GSTR-1 and press Enter.
- Press F2 (Period) to change the period, if needed.
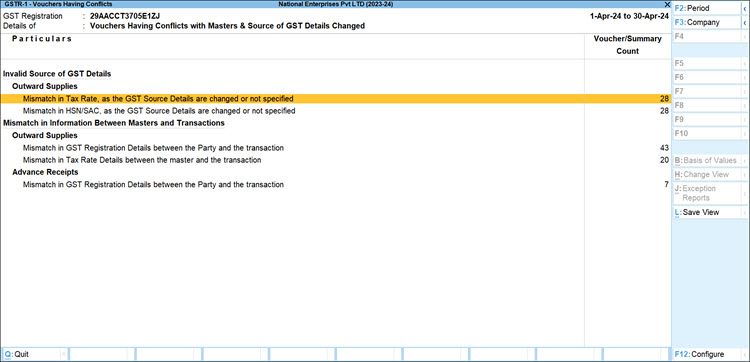
The GSTR-1 report displays the option Check Vouchers Having Potential Conflicts with Masters set to Yes.
Note: This option appears if you have updated the GST details or source of GST Details for a master participating in the transaction of that Return period. - Drill down from the option for TallyPrime to check for the transactions with conflicts, and press Enter or Y to confirm.
The GSTR-1 – Vouchers Having Conflicts report displays the following types of conflicts, section-wise, under the Invalid Source of GST Details section.- Mismatch in Tax Rate, as the GST Source Details are changed or not specified
- Mismatch in HSN/SAC, as the GST Source Details are changed or not specified
- Resolve the conflicts.
Note: Resolution of conflict due to invalid source of GST details is the same for both mismatch in Tax Rate and mismatch in HSN/SAC.- Drill from the required conflict type.
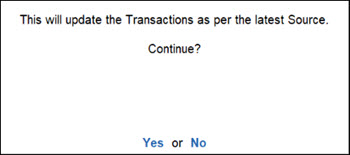
- Select one or more transactions and press Alt+W (Update Latest Source).
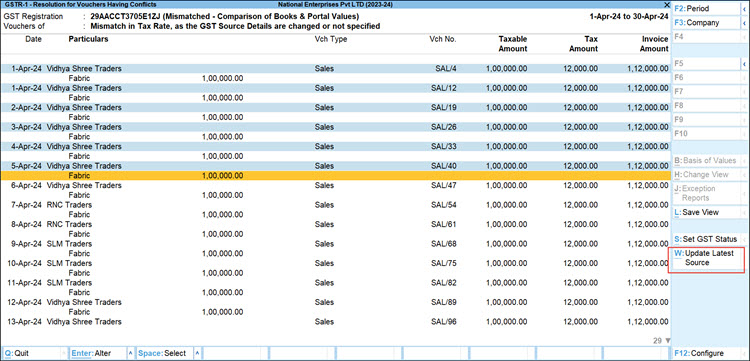
The transactions are updated with the latest source of GST details.
Check conflicts while uploading GSTR-1 and performing other exchanging activities
For illustration purpose, let’s considering Uploading GSTR-1.
- Press Alt Z (Exchange) and select Upload GST Returns > GSTR-1 > Enter.
- In the Upload GSTR-1 screen, select Send (Online).
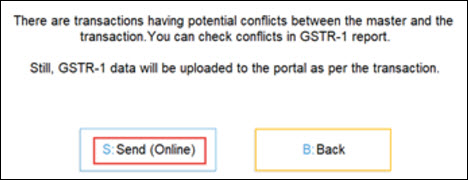
If the transactions participating in the Return have any conflicts with Masters, TallyPrime displays the following message:
- Select the appropriate option:
- Press B (Back) to exit.
You can first resolve all the conflicts between your masters and transaction and upload the Return again. - Press S (Send (Online)).
If your transaction data is correct, you can continue to upload the transactions to the portal and update the masters based on the transaction details anytime later.
- Press B (Back) to exit.
The same applies to all such exchange activities, such as uploading GSTR-3B, sending for e-Invoicing, sending for e-Way Bill, and so on.
Check conflicts between masters and transactions for the current Return period or all Return periods
Conflicts between masters and transaction may appear if you change GST details at the company level, for say any compliance reasons. It may also impact the GST Status of the vouchers and move transactions into the Uncertain Transaction section of your Returns.
Say you changed the HSN/SAC details or disabled the e-Invoicing feature in the GST Details for the company. You can view the affected transactions for that Return period or All Return periods.
- Update the GST Details for your company.
- Press F11 to open the Company Features.
- Under Set/Alter Company GST Rate and Related Details: Yes, make changes to the HSN/SAC details, set the Effective Date, and save.
- Press Alt+G (Go To) type or select GSTR-1 and press Enter.
A message window appears displaying the impact on vouchers caused due to the change in GST details of the company.
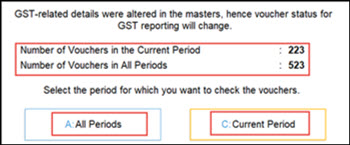
- In the message window, review the impact and select the required option.
- Press C (Current Period) to check impacted vouchers of the current Return period.
- Press A (All Periods) to check the impacted vouchers for all Return periods.
It is recommended that you resolve the issues for the impacted vouchers before proceeding with filing your returns.
Incorrect Registration Type or Tax Ledger is selected in the Bank transaction
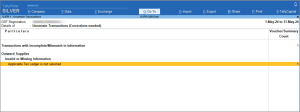
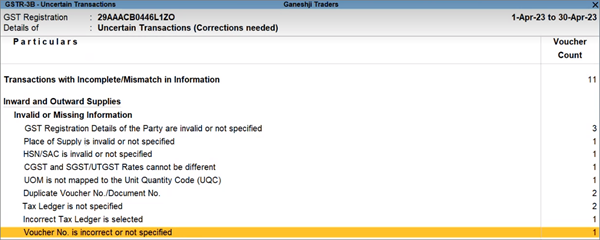
In TallyPrime Release 3.0, when bank charges including GST are recorded with tax ledgers, such transactions appear under Uncertain Transactions (Corrections needed) section as Incorrect Tax Ledger is selected in the GSTR-3B, GSTR-2A and GSTR-2B reports. This happens because by default the bank transaction is considered as Unregistered transaction.
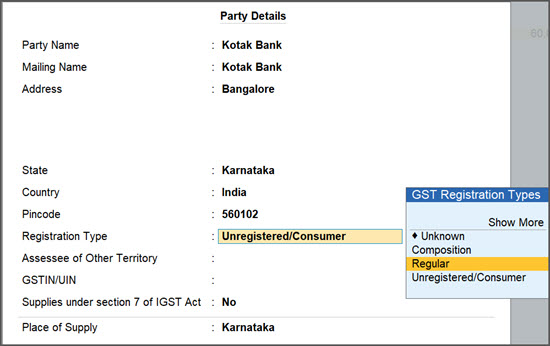
Even with the GST number provided for the Bank, it is considered as an Unregistered/Consumer instead of Regular.
From TallyPrime Release 5.1, you can resolve this conflict by changing the Registration Type of the Bank from Unregistered/Consumer to Regular.
- Record the bank charges with tax ledgers.
- Select Provide GST details and press Enter.
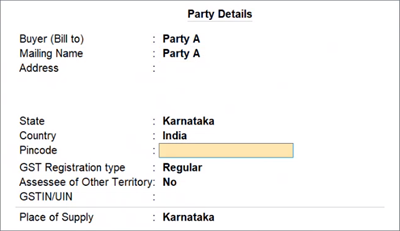
The Party Details screen appears. - Update the GSTIN/UIN and Registration Type to Regular.
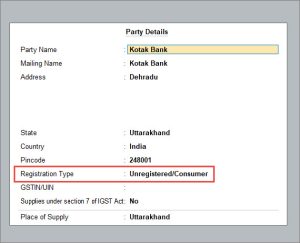
- Press Ctrl+A to accept the screen and voucher.
Once you update the Registration Type the voucher will appear under Included in Returns. However, if you have not updated the Registration Type, you will see the voucher under a new Uncertain Exception.
From TallyPrime Release 5.1, such vouchers will appear under Uncertain Transactions (Corrections needed) section as Incorrect Registration Type or Tax Ledger is selected in the Bank transaction in GSTR-3B, GSTR-2A and GSTR-2B reports.
Exceptions in TallyPrime Release 3.0
This page lists the uncertain transactions that occur in GSTR-1 and GSTR-3B, along with the corresponding resolution.
Resolve Transactions Accidentally Marked for Deletion
The Marked for Deletion on Portal section of GSTR-1 provides you with an overall picture of the vouchers that have to be deleted from the portal, due to any changes in the transactions in your books. For such transactions, this section will help you identify the original entry on the portal, so that you can re-upload the transaction with the revised details.
However, in some cases, the transactions might accidentally appear in this section due to some changes in the transaction details, as explained below. You can easily address such cases by making the suggested updates.
In this section
- Change in company GSTIN
- Change in party
- Change in party GSTIN/UIN
- Change in GST amount
- Change in voucher number
- Deletion of transaction from books
Change in company GSTIN
In some cases, the GSTIN of your company might have been changed after the return was exported. The affected transactions will appear in the Marked for Deletion on Portal section.
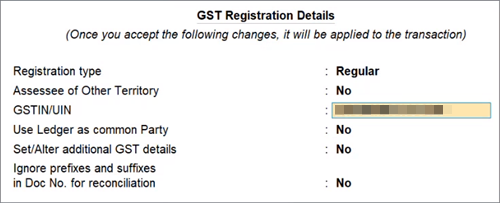
You can find the same voucher under Uncertain Transactions as Mismatch in GST Registration Details between the GST Registration master and the transaction.
Press Enter on the voucher.
If the voucher has the correct information, select the option Apply changes from Transaction to Master. The transaction will be removed from the Marked for Deletion on Portal section and moved to the B2B Invoices or relevant section.
Alternatively, you can also update the GSTIN/UIN as per the original details to resolve this issue.
- In TallyPrime, press F11 to open the Company Features Alteration screen.
- Set the option Enable Goods and Services Tax (GST) to Yes.
- Select the required GST Registration.
The GST Registration Alteration screen appears. - Update the GSTIN/UIN, as per the original details.
- Press Ctrl+A to accept the details.
Change in party
In some cases, the party might have been changed in the transaction after the return was exported. In such cases, the affected transactions will appear in the Marked for Deletion on Portal section.
- Open the GSTR-1 report and drill down to the Marked for Deletion on Portal section.
- Drill down from the relevant entry to open the original transaction.
- Update the party ledger in the Party A/c Name field as per the original transaction.
- Press Ctrl+A to save the transaction.
The transaction will no longer appear in the Marked for Deletion on Portal section.
Now, consider that you could not identify the original party.
You can mark this voucher as cancelled.
Press Spacebar to select the voucher, and press Alt+X (Cancel Vch).
Thereafter, you can record a new voucher whenever you identify the original party.
Change in party GSTIN/UIN
In some cases, the GSTIN/UIN of the party might have been changed after the return was exported. The affected transactions will appear in the Marked for Deletion on Portal section.
You can find the same voucher under Uncertain Transactions as Mismatch in GST Registration Details between the Party and the transaction.
- Open the GSTR-1 report and drill down to the Mismatch in GST Registration Details between the Party and the transaction exception.
- In the Party Details screen, update the GSTIN/UIN of the party as per the original transaction.
Note: You can also update the GSTIN/UIN directly in the party ledger. - Press Ctrl+A to save the transaction.
As a result, the voucher moves from the Uncertain Transactions to the B2B Invoices or relevant section. Also, the transaction will no longer appear in the Marked for Deletion on Portal section.
Change in GST amount
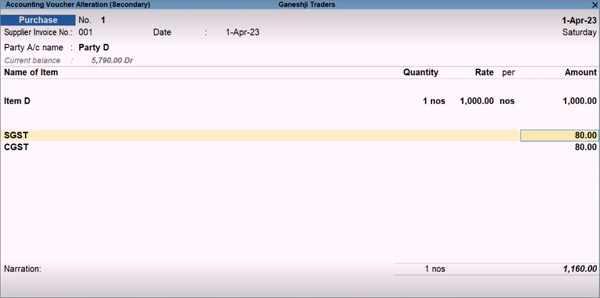
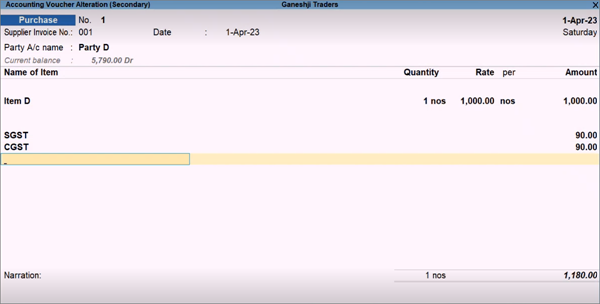
In some cases, the CGST or SGST amount might have been altered in the transaction after the return was exported. Such transactions will appear in the Marked for Deletion on Portal section.
You can find the same voucher under Uncertain Transactions as a Mismatch between Expected Tax Amount and Modified Tax Amount in the transaction.
- Open the GSTR-1 report and drill down to the Mismatch between the Expected Tax Amount and the Modified Tax Amount in the transaction exception.
- Drill down from the relevant entry to open the original transaction.
- Select the relevant GST ledgers (CGST/SGST/IGST).
The tax amount will be automatically recalculated as per the defined tax rates. You can also press Spacebar to remove the GST duty ledgers and select the relevant GST ledgers again, to refresh the details. - Press Ctrl+A to save the transaction.
As a result, the voucher moves from the Uncertain Transactions section to the relevant section. Also, the transaction will no longer appear in the Marked for Deletion on Portal section.
Change in voucher number
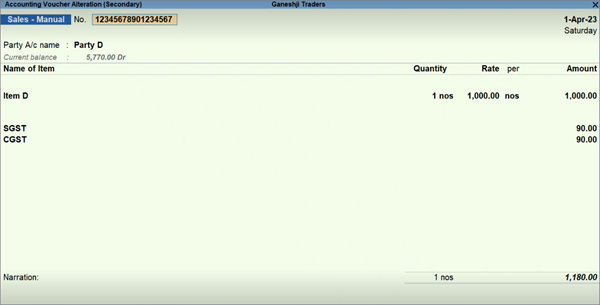
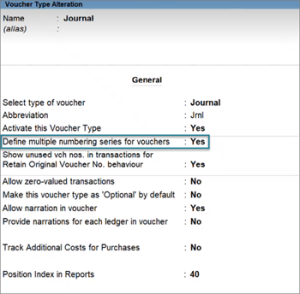
In some cases, the voucher number might have been manually updated in the transaction after the return was signed. Moreover, the voucher numbering method might have been updated from Automatic to Manual. For such transactions, the voucher number will appear blank, and the transactions will appear in the Marked for Deletion on Portal section.
- Open the GSTR-1 report and drill down to the Marked for Deletion on Portal section.
- Drill down from the relevant entry to open the original transaction.
- Update the voucher number as per the original transaction.
- Press Ctrl+A to save the transaction.
The transaction will no longer appear in the Marked for Deletion on Portal section.
However, if you wish to retain the revised voucher number, then you can undo the signing (by pressing Alt+F10) and then sign the return (by pressing F10). This will save the revised voucher number while removing the transaction from the Marked for Deletion on Portal section.
Deletion of transaction from books
In some cases, the transaction might have been deleted from the books after the return was signed or exported. Such transactions will appear in the Marked for Deletion on Portal section.
- Open the GSTR-1 report and drill down to the Marked for Deletion on Portal section.
- Select the entry for (Delete) Outward Supply (Non-Accounting) and press Alt+D to delete it.
The transaction will no longer appear in the Marked for Deletion on Portal section.
However, the HSN Summary (Deleted) and Document Summary (Deleted) might appear in the Marked for Deletion on Portal section, which cannot be deleted at the moment.
Invalid or Missing Information
| Exception | Report | Solution |
|---|---|---|
| Unable to determine the transaction Type |
GSTR-3B |
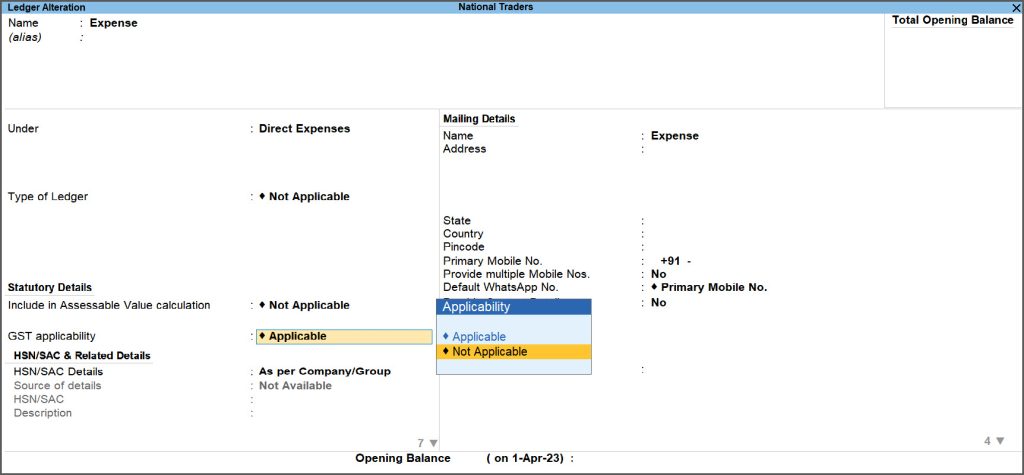
When a ledger with GST applicability is used in a transaction, and it is unclear if the transaction is a Sale or Purchase, the uncertain ‘Unable to determine transaction type’ is detected. Typically, the adjusted transactions that are passed for non-compliance purposes are detected as ‘Unable to determine transaction type’, for example, Expense booking. These conflicts can be resolved in the following three ways:
To resolve the conflict: Exclude the voucher from GST return
Mark the ledger as GST not Applicable Open the particular ledger in the alteration mode and set the GST applicability as Not Applicable.
Change the voucher into a Purchase or Sale voucher You can change the particular voucher into a Purchase or Sale by adding the necessary party details and tax ledgers.
|
| GST Rate Details are overridden in transaction | GSTR-1 & GSTR-3B |
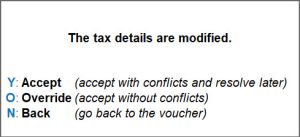
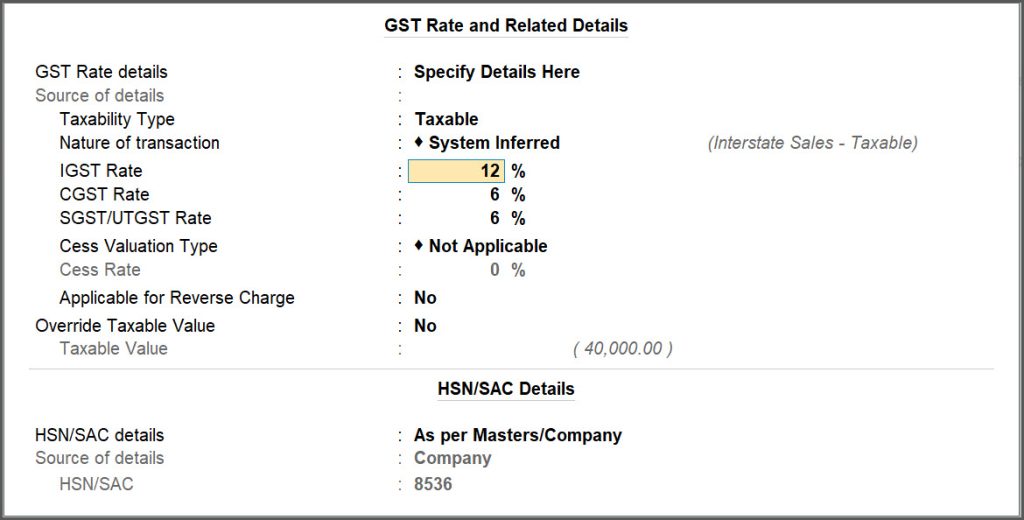
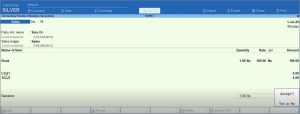
This uncertainty is detected while passing a sales voucher if you have changed the Taxable value in the GST Rate and Related Details screen. The GST rate details are prefilled based on stock items or ledgers, but TallyPrime allows you to change them during data entry. If you do, you will see a prompt to save the transaction with Conflict (Y: Accept), which can be verified later during return filing. If the change is intentional and no further review is needed, you can save the voucher by selecting O: Override. As you try to save the voucher, a screen appears in the bottom right corner, as shown below:
If you press O (Override), the voucher will not come up in the GSTR-1 report under the uncertainties and will be listed under Included in Return. If you press Y (Accept), you can accept the conflicts and resolve later. To resolve the conflicts:
Now the voucher is listed under Included in Return. |
| Unable to determine original sales value | GSTR-1 & GSTR-3B |
When a Credit Note is passed against an interstate B2C sale, information of original sale value is needed to determine the section to which the Credit Note belongs to (B2C Small Invoices or Credit or Debit Notes (Unregistered)). If the value of sales is greater than 2.5 lakhs, the corresponding credit note is to be reported in Credit or Debit Notes (Unregistered) – 9B. If the value of sales is less than or equal to 2.5 lakhs, the corresponding credit note is to be reported in B2C Small Invoices – 7. Hence, while passing a credit note against interstate B2C sales, it is mandatory to provide the original sales value. You can press Ctrl+I (More Details) for additional details. However, in case the same is not provided, it is detected as uncertain. To resolve the conflict:
Now the voucher is listed under Included in Return in GSTR-3B report. If you select Less Than or Equal to 2.5 Lakhs, then the voucher will be listed under B2C Small Invoices – 7. If you select More than 2.5 Lakhs, then the voucher will be listed under Credit or Debit Notes (Unregistered) – 9B. |
| GST Registration Details of the Party are invalid or not specified | GSTR-1 & GSTR-3B |
This exception occurs when certain GST Registration Details are missing or invalid for your party.
Drill down from the exception to view the transactions that have to be updated.
Now you can resolve this exception using any one of the following methods, as per your convenience. Update transactions party-wiseThis is a convenient way for updating all your transactions at once for a particular party.
All the transactions recorded for the party will be resolved with the updated details. Similarly, you can resolve the GST registration details for the other parties. Update transactions using Multi AlterTallyPrime also provides you with the additional flexibility to update the transactions details for multiple parties at one go.
In this way, all the transactions recorded for all the parties can be easily resolved with the updated details. Similarly, you can also use Multi Alter to update the exceptions for individual transactions (Transaction-wise). Update transactions one by oneYou also have the choice to update the GST registration details for your transactions one by one, if needed.
The transaction will be resolved with the updated details. Similarly, you can resolve the other transactions one by one. |
| Place of Supply is invalid or not specified | GSTR-1 & GSTR-3B |
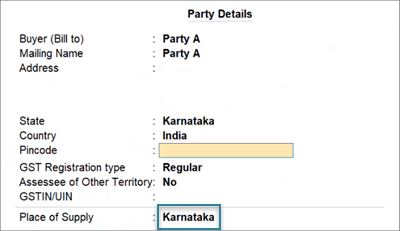
This exception occurs when the Place of Supply is missing or invalid.
The transaction will be resolved with the updated details. Similarly, you can resolve the other transactions. |
| Taxability Type is invalid or not specified | GSTR-1 & GSTR-3B |
This exception occurs when the Taxability Type is missing or invalid.
You can resolve this exception using any one of the following methods, as per your convenience. Update transactions Ledger-wise or Stock Item-wiseThis is a convenient way for updating all your transactions at once for a particular stock item or ledger.
All the transactions recorded with the stock item or ledger will be resolved with the updated details. Update transactions one by oneYou also have the choice to update the Taxability Type for your transactions one by one, if needed.
The transaction will be resolved with the updated details. Similarly, you can resolve the other transactions one by one. |
| Tax Rate is not specified | GSTR-1 & GSTR-3B |
This exception occurs when the Tax Rate is missing.
You can resolve this exception using any one of the following methods, as per your convenience. Update transactions Ledger-wise or Stock Item-wiseThis is a convenient way for updating all your transactions at once for a particular stock item or ledger.
All the transactions recorded with the stock item or ledger will be resolved with the updated details. Update transactions one by oneYou also have the choice to update the Tax Rate for your transactions one by one, if needed.
The transaction will be resolved with the updated details. Similarly, you can resolve the other transactions one by one. |
| HSN/SAC is invalid or not specified | GSTR-1 |
This exception occurs when the HSN/SAC is missing or invalid.
You can resolve this exception using any one of the following methods, as per your convenience. Update transactions Ledger-wise or Stock Item-wiseThis is a convenient way for updating all your transactions at once for a particular stock item or ledger.
All the transactions recorded with the stock item or ledger will be resolved with the updated details. Update transactions one by oneYou also have the choice to update the HSN/SAC for your transactions one by one, if needed.
The transaction will be resolved with the updated details. Similarly, you can resolve the other transactions one by one. |
| UOM is not mapped to the Unit Quantity Code (UQC) | GSTR-1 & GSTR-3B |
This exception occurs when the UOM is not mapped to the Unit Quantity Code (UQC).
You can resolve this exception using any one of the following methods, as per your convenience. Map multiple UOM to UQCThis is a convenient way for updating all your transactions at once for a particular UOM.
All the transactions recorded with the UOM will be resolved with the updated details. Map UOM to UQC one by oneYou also have the choice to map the UOM to UQC for your transactions one by one, if needed.
The transaction will be resolved with the updated details. Similarly, you can resolve the other transactions one by one. |
| Tax Ledger is not specified | GSTR-1 & GSTR-3B |
This exception occurs when an incorrect tax ledger is selected in the transaction.
The transaction will be resolved with the updated details. Similarly, you can resolve the other transactions. If you are on TallyPrime Release 4.1 or earlier, such transactions will appear under ‘Tax Ledger is not specified’ in GSTR-1. |
| Incorrect Tax Ledger is selected | GSTR-1 & GSTR-3B |
Scenario 1: In the GSTR-3B – Uncertain Transactions (Corrections Needed), you can see the transaction appearing as Tax Ledger is not specified, if you have selected incorrect Tax ledger while passing the transaction. Resolution:
The transaction will be resolved with the updated details. Similarly, you can resolve the other transactions. Scenario 2: If you have recorded bank charges with GST using tax ledgers, then these transactions show up as Incorrect Registration Type or Tax Ledger is selected in the Bank transaction under the Uncertain Transactions (Corrections Needed) in the GSTR-3B, GSTR-2A, and GSTR-2B reports. This happens because the selected bank is treated as an Unregistered party by default, instead of Regular. Resolution: In TallyPrime Release 5.1 and later versions, you can update this uncertain transaction in the GSTR-3B, GSTR-2A, and GSTR-2B reports by changing the Registration Type of the bank to Regular.
|
| Voucher No. is incorrect or not specified | GSTR-1 & GSTR-3B |
This exception occurs when the voucher number is missing or incorrect.
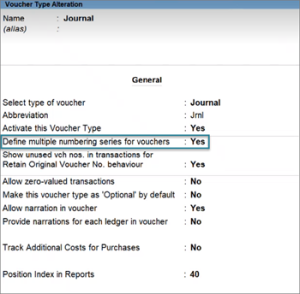
The transaction will be resolved with the updated details. However, if the voucher numbering method is not manual, then you have to add a prefix or suffix by altering the voucher type master.
The transaction will be resolved with the updated details. |
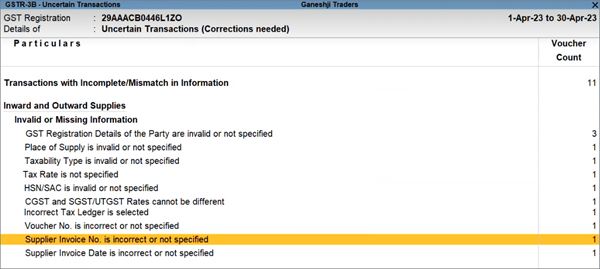
| Supplier Invoice No. is incorrect or not specified | GSTR-3B |
This exception occurs when the Supplier Invoice No. is missing or incorrect.
The transaction will be resolved with the updated details. Similarly, you can resolve the other transactions. |
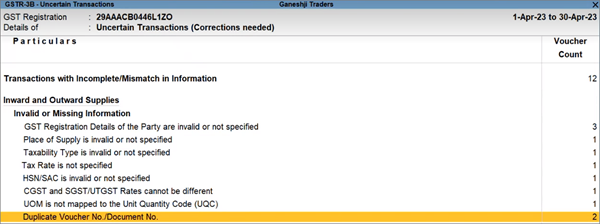
| Duplicate Voucher No./Document No. | GSTR-1 & GSTR-3B |
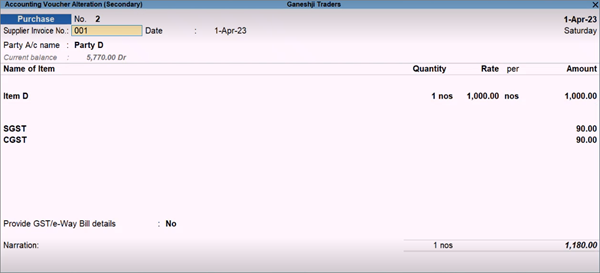
This exception occurs when the Voucher No. or Document No. is duplicate.
For inward supplies
The transaction will be resolved with the updated details. For outward supplies
The transaction will be resolved with the updated details. |
| GST Registration Details of the Company are invalid or not specified |
GSTR-1 |
The transaction becomes a part of the Return. |
| Transaction cannot be added in this Return period, as the Return is filed. Such transactions cannot be uploaded | GSTR-1 |
This happens when you create a voucher with the Voucher Date that falls in a Return Period for which you have already signed the Return. Under Uncertain Transactions, you will find the voucher with the exception.
The transaction becomes the part of the Return. If you want to move the transaction to the subsequent month, then you can provide the Effective Date of the relevant month. Refer to the Effective Date section, to know more.
The transaction becomes a part of the Return in the subsequent period. |
| Effective Date of the Amendment is not specified or invalid | GSTR-1 |
When you alter a transaction after signing the Return, it becomes an Amendment invoice, which cannot be added in the current period. However, you can move it to the subsequent return period. So, you will need to provide the effective date for amendment of the invoice in the subsequent period.
When you open the Return report for the subsequent period, you will find the transaction under Amendment B2B Invoices – 9A. |
| Interstate Supply by Composition Dealers is not allowed | GSTR-3B |
As per Section 10 – Composition Levy, Composition Dealers should not be engaged in making any interstate outward supplies of goods. Therefore, you need to ensure that the purchases from the Composition Dealers are within the state. |
| No Tax Ledger is debited | GSTR-3B |
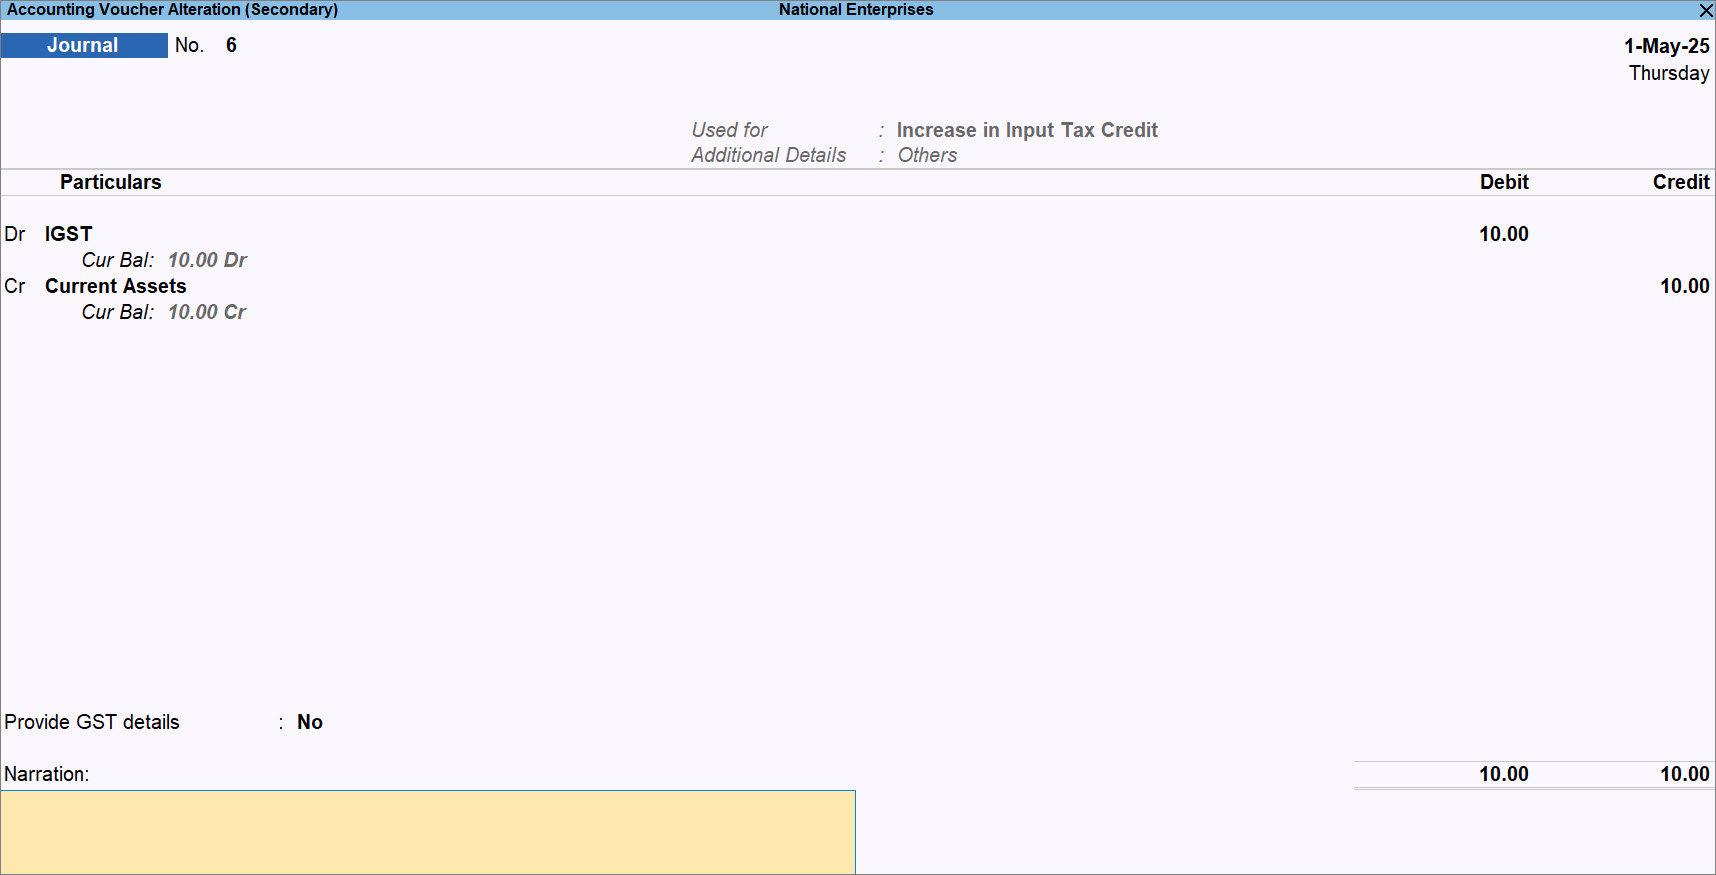
While record a journal voucher against GST adjustment, you might have selected the GST ledgers under Credit. You need to alter the voucher and ensure that the GST ledgers are always select under Debit.
|
Mismatch in Information Between Masters and Transactions
| Exception | Report | Solution |
|---|---|---|
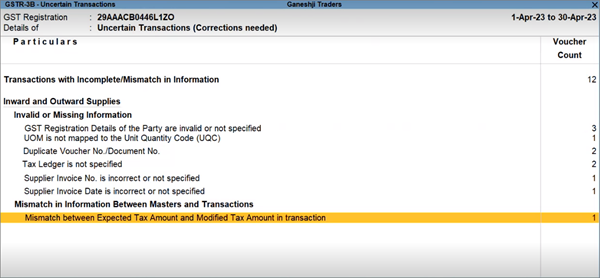
| Mismatch between Expected Tax Amount and Modified Tax Amount in transaction | GSTR-1 & GSTR-3B |
This exception occurs when then there is a mismatch between the calculated tax amount and the applied tax amount.
The transaction will be resolved with the updated details. Similarly, you can resolve the other transactions. |

