
TallyPrime Turned to Educational Mode on the Server Computer or Client Computer
Your TallyPrime license may turn to Educational Mode due to different reasons. You can resolve the issue in most of the situations by referring to the solutions listed on this page.
Change in Microsoft Windows Version
If you have upgraded to Microsoft Windows 11 or later versions, you might experience licensing issues, where the TallyPrime license can turn to Educational Mode.
Here is what you can do to get your license up and running again.
- Delete the license file:
- Press F1 (Help) > About, and click Application path. The TallyPrime folder will open.
- Delete the license file (tallyprime.lic).
- Restart Tally Gateway Server:
- Press Windows + R to open the Run command window.
- Enter services.msc. The Services window will open.
- Go to Tally Gateway Server, right-click, and select Restart.
- Reactivate your license:
After deleting the License file and restarting Tally Gateway Server, you only have to reactivate your TallyPrime License, and you are good to go!
TallyPrime Turned to Educational Mode on the Server Computer
Your TallyPrime may turn to Educational Mode on the server computer due to the reasons listed below. You can check the cases one after the other to identify your situation and follow the instructions to resolve the issue. These cases are applicable for Silver and Gold editions.
Case 1: Message – The license is compromised
Reason: Reactivated the same license for multiple instance of TallyPrime on the same computer or on different computers.
Single User
- You cannot use a single user license concurrently on different computers. If you want to use the license on another computer, configure the license on the second computer by closing all instances of TallyPrime on the computer on which the license is active.
Multi-User
- If you have a Multi-user license, activate the license on a Server and configure all the clients to point to the server computer.
- If there are multiple releases, always activate the license on the latest release and configure all other clients to it.
Case 2: Change of computer
Reason: Server computer is formatted, hard disk is changed, and so on.
Solution: Reactivate the license.
Case 3: Missing TallyPrime.lic file
Reason: The file TallyPrime.lic is not available or is deleted from the TallyPrime installation folder.
Solution: Reactivate the license.
Case 4: Change in Windows version (other than Windows 11)
Reason: Windows upgraded to a newer version.
Solution: Reactivate the license.
Case 5: Message – Unable to access the license. The license is offline.
This message appears on the start-up page or on License info screen.
Reason: License is inactive as the system was not connected to the internet.
Solution: Connect to the Internet and refresh the license.
Case 6: Message – The Rental license has expired.
Solution: Renew your rental license or upgrade to a regular license and reactivate your license.
Case 7: Message – License invalid in this release.
Reason: TSS has expired and license is reactivated on a later version, which you are not eligible for based on your TSS.
Solution: Renew the TSS to reactivate in the latest release or roll back to an eligible release.
Case 8: Message – Silver license with serial number “xxx” is in use on “System name”. Exit all instances of TallyPrime & try again.
Reason: The Silver license is used on another computer in the network.
Solution: Close the TallyPrime application running on the other computer, and refresh the license on your computer.
Case 9: The Gateway service is not running
You can follow either of the two methods given below to ensure that the gateway service is running.
Method 1: If the Tally Gateway Server is stopped, start the service
- Press Windows+R > type services.msc and press Enter. The service management window opens.
- Check the status of Tally Gateway Server. If it has stopped, right-click and Start the service.
If more than one Tally Gateway Server exists, uninstall the unused gateway servers.
Method 2: If the gateway service stops intermittently, configure the recovery options at the Service level
- Go to Start > Run > type Services.msc.
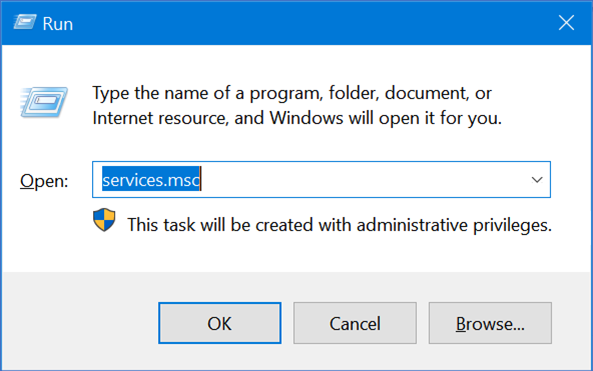
- Click OK.
- In the Service management screen, search for Tally Gateway Service > right-click and select Properties.
- Click the Recovery tab, and make the below changes.
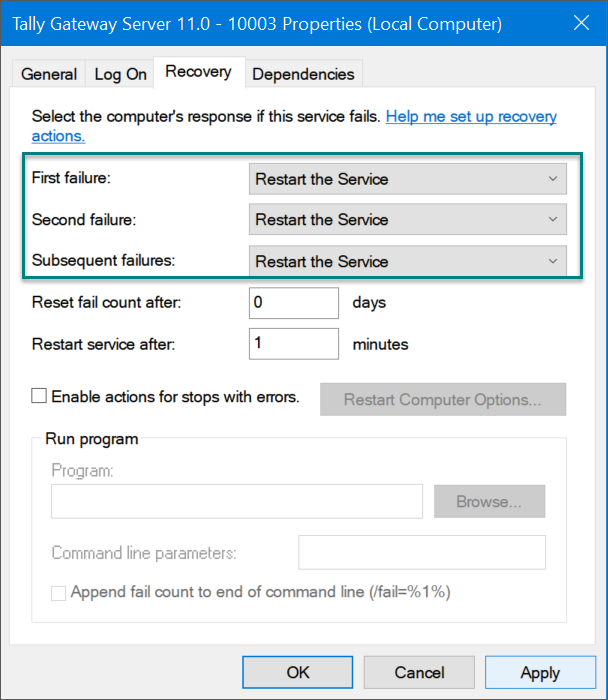
- Click Apply to restart the service.
In case there are multiple gateway services, uninstall the unused gateway services.
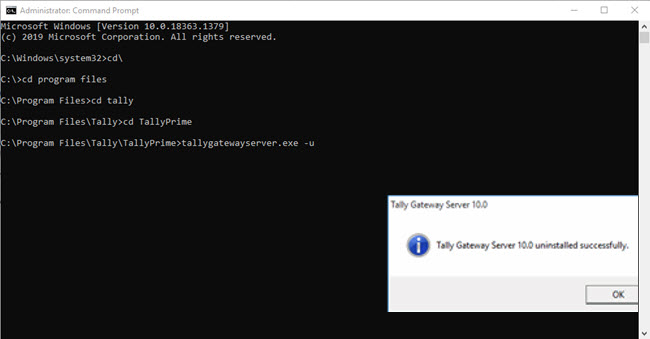
Uninstall Tally Gateway Server
- Open the Command Prompt in administrator mode.
- In the Command Prompt, navigate to the folder where Tally Gateway Server is installed.
- Type tallygatewayserver.exe – u and press Enter to uninstall the Tally Gateway Server.
You will get a confirmation as shown below.
Case 10: Message – Unable to find any license at the configured Tally Gateway server
Reason: Configured gateway service is invalid or does not have a license.
Solution: Configure the license to an active gateway server, or reactivate the license.
If you do not experience any of the above scenarios then search for the available Tally Gateway Servers and configure your license to access it, or reactivate the license.
TallyPrime Turned to Educational Mode on the Client Computer
Your TallyPrime may turn to Educational Mode on any client computer due to the reasons listed below.
When license is available on the server machine and one or more clients are in Educational Mode, you can check the cases one after the other to identify your situation and follow the instructions to resolve the issue.
Case 1: Appropriate License is not configured
- Start TallyPrime.
- Press F1 (Help) > Settings > License > Manage License.
- From the Manage License screen, press F4 (Use License From Network) > select Configure License Manually.
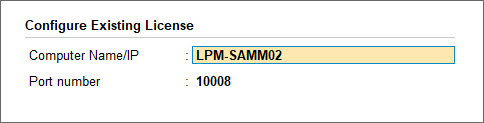
- Enter the Compute Name/IP and Port , where the license is activated.
- Press Enter.
A message Restart TallyPrime to apply the changes? is displayed. - Click Yes to save the configuration and restart.
Case 2: Network connectivity is interrupted
You can check the connectivity within TallyPrime
- F1:Help > About.
- Check Local Area Network Connectivity under the section Connectivity and Tally Gateway Server.
If the Local Area Network Connectivity shows Yes, check if the client is communicating with the server computer.
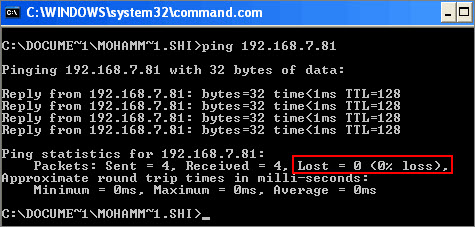
- Go to the Start menu > Run > Command Prompt.
- Enter Ping <IP Address>.
For example, enter Ping 192.168.7.81. If the network is connected, you will get a response as shown below.
- Click the close button to exit.
Case 3: The IP address and Subnet mask are not identical on the client and server
You may take help from your system administrator, or follow the instructions from Microsoft to check the IP range.
To check the IP address and Subnet Mask of the computer:
- Go to the Start menu > Run > Command Prompt.
- Enter ipconfig in Command Prompt.
- Check the IP Address, Subnet Address, and the Default Gateway.
The IP and the subnet addresses should be identical on the server and the client computers.
Example
| IP Address | Subnet Mask | Range of IP Addresses | License Sharing | |
| Case 1 | ||||
| Server | 192.168.2.1 | 255.255.255.0 | 192.168.2.1 – 192.168.2.254 |
In this scenario, the range of IP addresses is different. Hence, the license will not be served. |
| Client | 192.168.1.1 | 255.255.255.0 | 192.168.1.1 – 192.168.1.254 | |
| Case 2 |
||||
| Server | 192.168.2.1 | 255.255.240.0 | 192.168.0.1 -192.168.15.254 |
In this scenario, the range of IP addresses is same, though the subnet mask is different. Hence, the license will be served. |
| Client | 192.168.1.1 | 255.255.255.0 | 192.168.1.1 – 192.168.1.254 | |
Case 4: Windows firewall on server computer blocking license access
You need to add tally.exe, tallygatewayserver.exe and TallyGateway port details to Inbound and Outbound rules in the Windows firewall exceptions list. For more details on how to add, refer to the topic Add TallyPrime EXE & Ports to Firewall Exceptions List.
Post adding these to the Windows firewall exceptions list on the server computer, try accessing the license on the client computer. If you still face the issue, repeat the same steps on the client computer.


