
Voucher Types in TallyPrime
To drive a car, you don’t need to be a mechanic, similarly, to maintain your books of account in TallyPrime, you don’t need to be an accountant. TallyPrime’s 24 pre-defined voucher types for accounting, inventory, payroll, and orders make accounting entry a layman’s job. No matter if you are recording a sales invoice, a payment entry, or a receipt of payment, you can simply open the required voucher type in TallyPrime, select the ledgers and other details, and record the transaction.
To record several types of transactions in your business like sales, payment, contra, journal, and so on, it becomes imperative to have a sound knowledge of accounting so that your books are error-free. A slight mistake can impact the books and show inaccurate reports that can have grave consequences for your business. TallyPrime with its vouchers takes care of all the etiquette of accounting.
For example, for cash payments and bank payments, the predefined voucher type is Payment Voucher. Similarly, Sales for recording sales transactions. Furthermore, you can create and have two or more sales voucher types in TallyPrime for different kinds of sales transactions. For example, Credit Sales, Cash Sales, and so on.
In TallyPrime, you can manage the voucher types as mentioned below:
- Alter a pre-defined voucher type as per your business need.
- Create new voucher types as per your business need.
- Activate/Deactivate voucher type as per your business need.
- Use common narration or narration for each ledger selected in the voucher.
- Enable the option to print immediately after saving the vouchers.
- Delete unused voucher type created by you.
All these options around voucher types in TallyPrime make data entry a simple task that can be accomplished by anyone and not necessarily an accounting professional.
View and Alter the Voucher Types
Just like any other master in TallyPrime, you can also view and edit the pre-defined voucher types on the go. You can also activate the inactive voucher types with just a click.
![]()
- Press Alt+G (Go To) > type or select Chart of Accounts > Voucher Type.
Alternatively, Gateway of Tally > Chart of Accounts > type or select Voucher Type.
You can also press Alt+G (Go To) > type or select Alter Master > Voucher Type.
Alternatively, Gateway of Tally > Alter > Voucher Type.

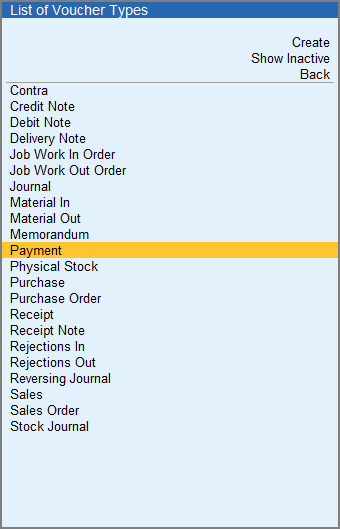
- Select the voucher type for alteration from the List of Voucher Types.
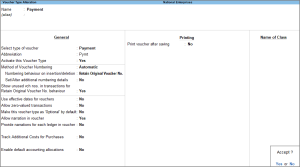
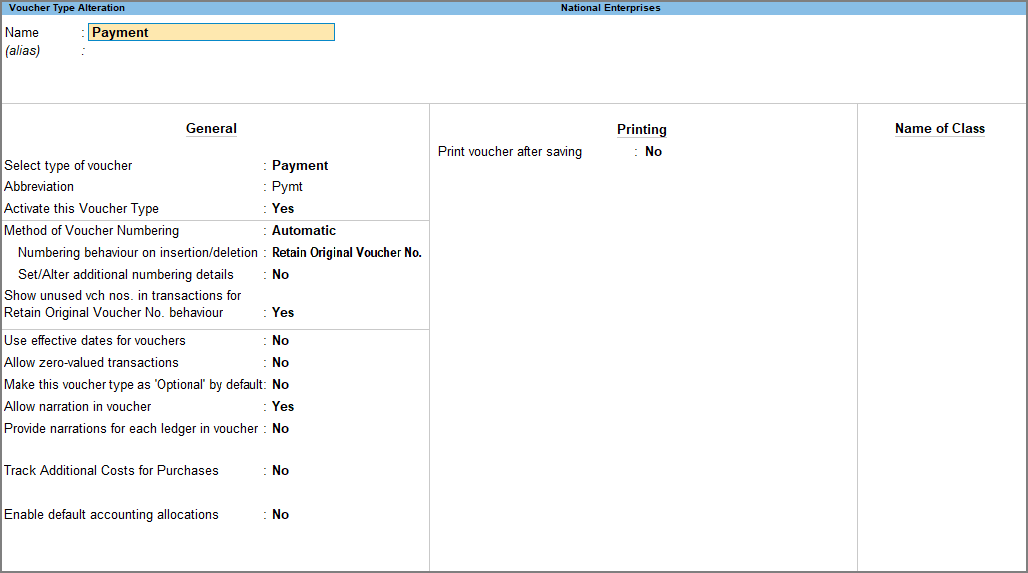
The Voucher Type Alteration screen appears.
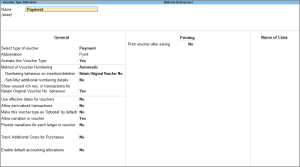
- Configure the voucher type with options and details as required.
- Enter the abbreviation in the Abbreviation field, if required.
- Select the Method of voucher numbering from the Methods of Numbering list, which appears as shown below:
To know more, refer to the Methods of voucher numbering. - Configure the voucher type with other details as required.
Refer to the Configure Voucher Types to Address Specific Requirements section on this page to understand how you can make use of the flexibility. - Set the Printing configurations of the voucher type as required.
- Enable Print voucher after saving to print every voucher immediately after saving it. To learn more, refer to the Print Invoice on Saving a Voucher section of the Print Sales Invoice with Company Logo and Additional Details topic.
Depending on the Type of Voucher selected to create or alter, different printing features appear in this field. For example, if you select Receipt as Type of Voucher, the option Print Formal Receipt after saving will be displayed. If you want to know how to disable printing after saving the voucher for a specific voucher type, then refer to Disable Print After Saving for Voucher Types.
- Set Use for POS invoicing to Yes to use the sales invoice as POS invoice. When you raise a bill for a POS transaction, to record such transactions in Tallyprime you can create a POS invoice voucher type and use it to record transactions. To learn more, refer to the Record a POS Invoice section of the Record Point of Sale (POS) Transaction in TallyPrime topic.
- Set Default title to print to Yes, to use the sales invoice default title name to print. You can also change the title if required. To learn more, refer to the Change Invoice Title section in the Print Sales Invoice with Company Logo and Additional Details topic.
Default title to print option will appear only in Sales Voucher Type.
- Select the bank in Default bank option to print the default bank ledger when the option Print Bank Details is enabled in a Sales voucher.
- Enter the Default jurisdiction to be printed on the sales invoice voucher type, if required.
- Enable Set/alter declaration on the sales invoice voucher type, if required. If your company is in the GCC countries, you can Set/alter declaration in Arabic and print the same. To know more, refer to Print Invoices with or Without Tax in Arabic or Bilingual.
- Enable Print voucher after saving to print every voucher immediately after saving it. To learn more, refer to the Print Invoice on Saving a Voucher section of the Print Sales Invoice with Company Logo and Additional Details topic.
- Create a voucher class in the Name of Class field, if required. It helps you to automate allocation during voucher entry. It is a table for pre-defining entries that you wish to automate during voucher creation. To know more, refer to the Voucher Class section.
- Accept the screen. As always, you can press Ctrl+A to save.
- Set the options as needed.
- As always, you can press Ctrl+A to save the voucher type.

In a similar way, you can configure any voucher type with options that make your data entry simple and quick.
Create Voucher Types | User-defined Voucher Types
Based on your business needs, you can create the required voucher types in TallyPrime by grouping them under the pre-defined voucher types. They serve as templates or pre-defined formats for entering transactions such as sales, purchases, payments, receipts, journal entries, and more. By creating voucher types in TallyPrime, you can streamline your accounting processes, enhance data accuracy, improve reporting capabilities, and so on.
Let’s say your company frequently incurs various types of expenses such as office supplies, utilities, travel, and entertainment. Each of these expense categories requires specific information to be recorded, such as the date of the expense, the payee or vendor, the amount, and the relevant expense account. By creating an “Expense Voucher Type” in TallyPrime with the required fields, you can establish a standardised template for entering expense transactions.
![]()
To create a voucher type in TallyPrime,
- Press Alt+G (Go To) > Create Master > Voucher Type.
Alternatively, Gateway of Tally > Create > Voucher Type. - Enter the Name of the voucher type.
- Select type of voucher from the list of pre-defined voucher types.
- Configure the voucher type with options and details as required. To learn more about the configurations, refer to the View and Alter the Pre-Defined Voucher Types section of this page.
Activate/Deactivate Voucher Types
TallyPrime comes with 24 pre-defined voucher types to meet all your accounting needs. Out of these 24 voucher types, several are active by default, whereas some need to be activated. Just like any other master in TallyPrime, you can either alter the voucher type and activate it or you can simply activate the voucher on the fly in the process of recording it.
![]()
To activate/deactivate voucher type.
- Press Alt+G(Go To)> Alter Master > Voucher Type.
Alternatively, Gateway of Tally > Alter > Voucher Type > type or select the voucher type.

- Set the option Activate this Voucher Type to Yes/No to activate/deactivate the voucher type.

When trying to record a voucher, if it is inactive, you will get a prompt to enable the voucher type for your company.

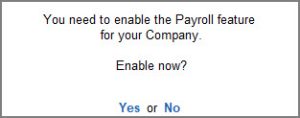
Once enabled, you can record the voucher as usual in TallyPrime.
You can activate or deactivate a voucher type as per its requirement in your business.
Configure Voucher Types to Address Specific Requirements
Apart from the usual facilities of setting up a voucher by defining it as per your business requirements, TallyPrime also provides some very unique features to enhance your voucher entry experience. Some of them are adding narration for each ledger, configuring the print option as required, and so on.
In this section
Create a future-dated transaction
Allow zero-valued transactions
Allow recording optional transactions
Include narrations in vouchers
Configure accounting allocation
WhatsApp invoices immediately after saving
Create a future-dated transaction
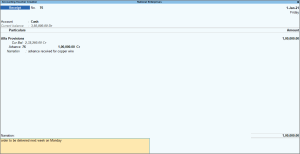
If you want to record a transaction on a particular date, but make the voucher come into effect only on a future date, you can do that with a simple configuration. If the effective date is entered, the overdue/ageing will be considered from the effective date and not from the voucher date.
![]()
In the Voucher Type Creation/Alteration screen,
- Enable Use effective dates for vouchers to enter the effective dates for vouchers.
- Complete the remaining configurations as needed.
- Accept the screen. As always, you can press Ctrl+A to save.
Similarly, you can use the effective date in other vouchers as well.
Allow zero-valued transactions
You may come across situations where you need to record a transaction for issue of free samples or returnable samples. In such cases, there is no money involved in the transaction but your inventory needs to be updated. You can configure the required voucher types to allow transactions without any value.
![]()
In the Voucher Type Creation/Alteration screen,
- Set the option Allow zero-valued transactions to Yes.
- Complete the remaining configurations as needed.
- Accept the screen. As always, you can press Ctrl+A to save.

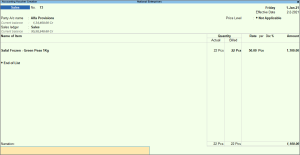
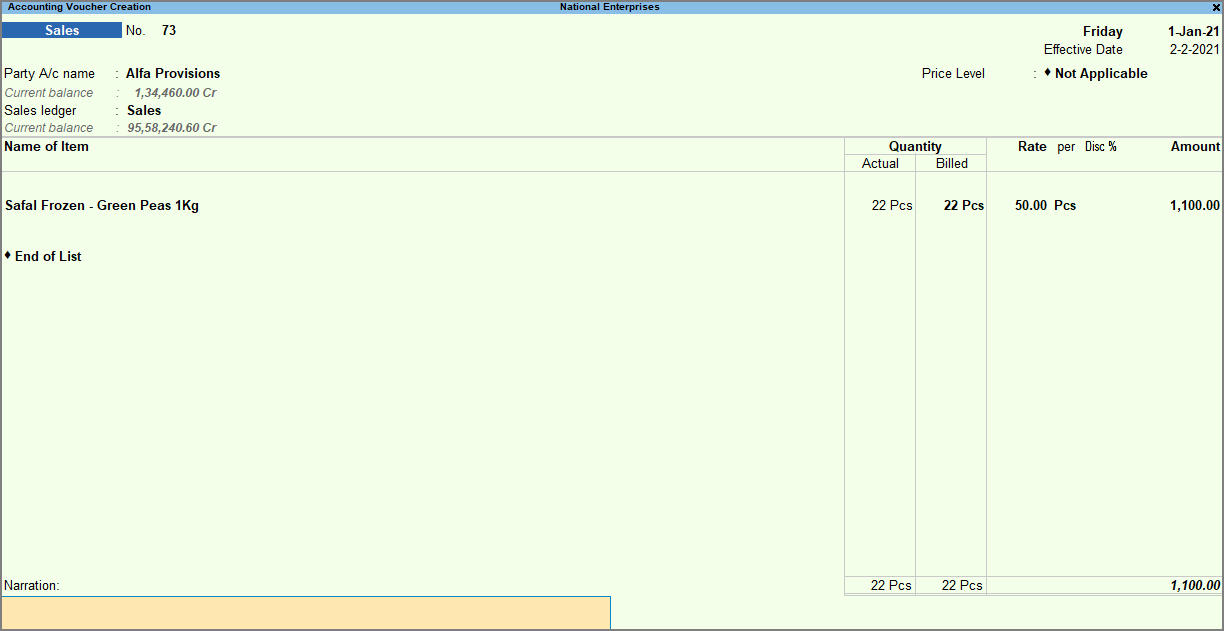
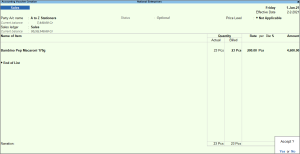
The invoice generated displays the billed items with the Amount details, along with the total quantity.
Allow recording optional transactions
You may have to record some transactions as optional because you will get to know the need for such transactions only if it happens. However, it is a better accounting practice to provision for such transactions. When the transaction actually happens, you can regularise the optional voucher.
Memorandum voucher and Reversing Journal voucher are optional by default.
![]()
In the Voucher Type Creation/Alteration screen,
- Set the option Make this voucher type as ‘Optional’ by default to Yes if you want the voucher to open as an optional voucher by default.
In Memorandum and Reversing Journal voucher, the option Make this voucher type as ‘Optional’ by default is not available.
- Complete the remaining configurations as needed.
- Accept the screen. As always, you can press Ctrl+A to save.

Include narrations in vouchers
TallyPrime allows you to enter a common narration for any voucher other than Delivery Note, Receipt Note, Sales Order, Purchase order, Physical Stock, Stock Journal, Rejection In and Rejection Out. Narration for each ledger is useful to provide a detailed description or explanation of the transaction recorded.
You can also add narration for each ledger used in a voucher, which will be useful when you want to provide specific details for each ledger.
![]()
In the Voucher Type Creation/Alteration screen,
- Enable Allow narration in voucher to give a common narration for the voucher.
- Enable Provide narration for each ledger in voucher, if you want to give a separate narration for each ledger selected in the voucher.
For Delivery Note, Receipt Note, Sales Order, Purchase order, Physical Stock, Stock Journal, Rejection In and Rejection Out, the option Provide narrations for each ledger in voucher is not available.
- Complete the remaining configurations as needed.
- Accept the screen. As always, you can press Ctrl+A to save.
This way you can simply highlight any specification in a voucher or a ledger used in a voucher.
While recording transactions,
-
If you are in Accounting Invoice or Item Invoice mode, select the ledger, press Ctrl+I (More Details) > Ledger Narration > enter the Narration.
-
If you are in As Voucher mode, select the required ledger, provide the amount, enter the narration in the Narration field appearing below the ledger name.
-
Ledger narration entered in any mode during voucher creation will be only visible in As Voucher mode.

Configure accounting allocation
You might have recurring expenses or income that need to be allocated to specific accounts each time they occur. Instead of manually entering the account details for each transaction, you can set up default accounting allocations so that TallyPrime automatically assigns the transactions to the appropriate accounts based on predefined rules.
![]()
In the Voucher Type Creation/Alteration screen,
- Set the option Enable default accounting allocations to Yes, for all item invoice (except for the items specified), if required.
- Set the option Set/Alter Default Accounting Entries to Yes.
Default Accounting Screen appears, as shown below:

- Complete the remaining configurations as needed.
- Accept the screen. As always, you can press Ctrl+A to save.

Once enabled, you can simply allocate the required ledgers to the specified accounts automatically.
WhatsApp invoices immediately after saving
Depending on your transactions or parties, there might come up a requirement where you will need to share your invoices immediately. You can configure the respective voucher type in TallyPrime and the next time you record the invoice and save it, TallyPrime will open the WhatsApp details screen instantly to help you send the invoice to the selected party.
Delete Voucher Types
You may want to delete Voucher Types in TallyPrime that you have created. Such a need occurs in the following scenarios:
- You had created a Voucher Type long ago, and you haven’t used it.
- You had created a Voucher Type, which is similar to an already existing Voucher Type.
- The Voucher Type was created by mistake.
- You have created a new Company, which is a copy of an existing Company.
However, some of the Voucher Types are not required in the new Company.
Although deleting a Voucher Type is very simple in TallyPrime, you can only delete it if the following pre-requisites are met.
- The Voucher Type is not a default one such as Sales, Purchase, and among the 24 pre-defined voucher types provided in TallyPrime.
- In the Company data, there is no voucher recorded using that Voucher Type.
You may want to delete a Voucher Type, even if you have recorded transactions using it. In such a case, you will need to delete all the transactions recorded using that specific Voucher Type. You can also move those transactions to a different voucher type to avoid loss of data and compliance issues, and delete the voucher type.
In this section
Delete transactions recorded using a Voucher Type
Before deleting transactions, you should take a Company data backup so that you can restore those transactions by restoring the Company data in the future, if needed.
You can delete the transactions by drilling down on the Statistics report in TallyPrime.
Follow the path given below.
![]()
- Press Alt+G (Go To) > type or select Statistics and press Enter.
Alternatively, Gateway of Tally > Display More Reports > Statements of Accounts > Statistics > Voucher Types. - Drilldown to the transactions.
- Drilldown on the required Voucher Type.
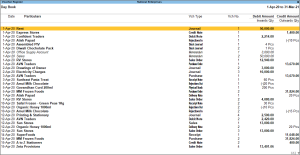
The Voucher Monthly Register screen appears. - Drilldown on the months in which the transactions were recorded.
The Voucher Register screen appears where all the transactions for the month are listed. - Select all the transactions using Spacebar and press Alt+D.
- Drilldown on the required Voucher Type.

Similarly, you can delete vouchers recorded using the Voucher Types in other months.
Delete a Voucher Type
Now that you have ensured that there are no transactions recorded using the Voucher Type, you can go ahead and delete the Voucher Type.
![]()
- Press Alt+G (Go To) > Voucher Type > type or select the Voucher Type and press Enter.
Alternatively, Gateway of Tally > Alter > Voucher Type > type or select the Voucher Type and press Enter. - Press Alt+D to delete and then press Y to accept.
Voucher Class
Voucher Class in TallyPrime helps you to automate entries during voucher creation. You can pre-define fields that you wish to include and automate in a voucher by using a voucher class. It helps apply specific rules or settings to different types of transactions. You might use a voucher class to handle different tax rates, a particular inventory, or a particular customer and tailor the voucher type accordingly by using a voucher class. For example, you can define a specific tax rate for a particular voucher class created. Let us say, you have created a ‘Sales BLR’ voucher type and in it, you have defined a voucher class ‘iPhone SalesBLR ‘with a fixed GST tax rate of 12%. Now, whenever you pass transactions using this voucher class, the tax rate entry will be automated.
Let us see another detailed example of a stock journal voucher class.
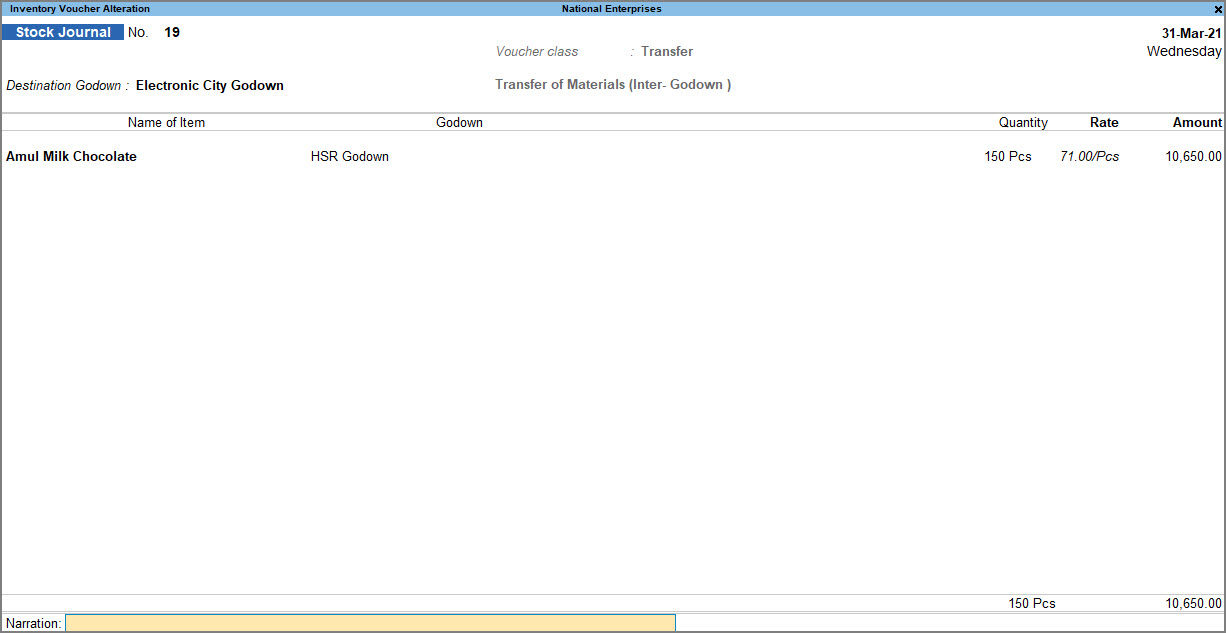
Stock Journal voucher classes allow you to handle transfers from one location to another, for companies having multi-location inventory and at least two locations. Once the class is selected, you will need to specify the destination and provide the list of items to be transferred. Through this class, all items/batches will be exactly mirrored as configured in the voucher class to the destination, including Batch Number, Rate, and Value. This will help in faster data entry of the regular type of Stock Journal entries.
![]()
- Press Alt+G (Go To) > Alter Master > type or select Voucher Types > type or select Stock Journal.
Alternatively, Gateway of Tally > Alter > type or select Voucher Types > type or select Stock Journal. - Name of Class: enter a suitable name, as per the purpose of the voucher class; for example, Transfer.
The Class: Transfer screen is displayed. - Use Class for Inter- Godown Transfers: Yes.

- As always, you can press Ctrl+A to save.
Once you have created a voucher class now with inter-godown transfer enabled, all you have to do is just enter the destination godown while recording the stock journal voucher and enter the item details.
Similarly, you can configure the voucher classes with values as required and simplify and automate your voucher entries.
Voucher Type Security
Voucher type security in TallyPrime helps you as a business owner to specify and control restrictions on both individual voucher types (Contra, Payment, etc.), and department and group levels (Sales Department, Procurement Department, Accounting Voucher, Inventory Voucher, and so on) for different users. The types of control that can be set include being able to create, alter, print, or have full access to any particular type of voucher. With the voucher type security feature, the administrator can:
- Create a department and role-based segregation of access for different users. For example, allow access based on sales, purchase, accounts, payroll, and so on for employees in those areas of work.
- Provide or deny access to the level of activity that can be performed on a voucher by different users. For example, allow Ramesh and Suresh to create and alter a payment voucher, and allow Rahul to only view the same.
- Provide access to an entire group of vouchers like accounting vouchers, or inventory vouchers as a whole.
In this section
- Security for pre-defined groups of vouchers
- Set up voucher type security for users
- Voucher type security add-ons and voucher type security
Security for pre-defined groups of vouchers
You can configure voucher security levels for four pre-defined groups of vouchers.
- Accounting Vouchers: Contra, Payment, and Receipt voucher types.
- Inventory Vouchers: Rejections In, Rejections Out, Stock Journal, Delivery Note, Receipt Note, Physical Stock, Material In, and Material Out voucher types.
- Order Vouchers: Sales Order, Purchase Order, Job Work Out Order, and Job Work In Order voucher types.
- Payroll Vouchers: Payroll and Attendance voucher types.
If users are allowed/disallowed access for any of the groups listed above, the voucher types listed under the respective group will also carry the same access configuration. Disallowing access to Voucher Types will not affect the user’s access to Create Voucher Types. To restrict a user from creating voucher types, you need to disallow access to Masters.
As per the example given in the previous section, as Arun has been disallowed access to Payment Voucher, he cannot record transactions in Payment Vouchers. But he can create a voucher type under the Payment voucher type. To restrict Arun’s access for creating voucher types under Payment voucher type, access to Accounting Masters has to be disallowed.
Set up voucher type security for users
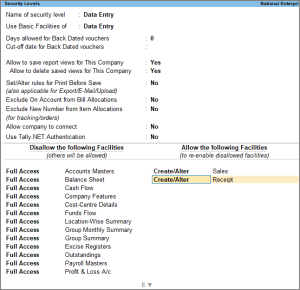
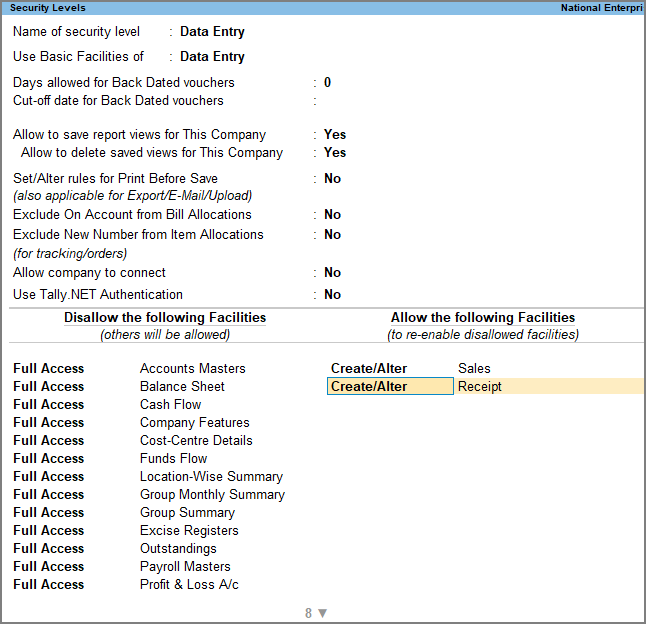
Consider the example of ABC Company having a user named Arun, who records sales and receipt transactions. You need to provide him with access to create and alter sales and receipt vouchers. On the Security Levels screen, you can allow access only to create and alter the sales and receipts vouchers and keep the remaining under the disallow columns.
![]()
- Gateway of Tally > Alt+K (Company) > select User Roles.
- In Security Levels screen, disallow the voucher types and group of vouchers to which you do not want to give access under Disllow the following Facilities.
Under Allow the following Facilities, you can give access to create/alter the sales and receipts vouchers, as required in this case.
The aliases provided for voucher types will not be displayed in the List of Reports while defining the Voucher Type Security.
- To provide access to Create/Alter sales and receipt voucher types, configure the Security Level as shown below:
Once you have set the voucher type security, you can log in using the user’s credentials.
You can verify the security assigned by logging in as a user with data entry-level security.
- Enter Arun’s login details to open the Company.
On navigating to voucher creation screen, you can observe that only receipt and sales vouchers will be enabled for recording transactions.
If the user Arun navigates to Day Book, all the vouchers recorded during the period specified will be displayed, but access to Alter/Print the vouchers will be restricted. If the user selects any voucher other than receipt or sales vouchers, an Error Message appears.
Voucher type security add-ons and voucher type security
If an Add-on for providing Voucher Type Security is already in use:
- Access configurations defined using TallyPrime and the Add-on will be combined. For example, if full access to Sales voucher is disallowed for Arun, and in the Add-on full access to Receipt voucher is disallowed, Arun will not be able to access both Sales and Receipt vouchers.
- The Voucher Type Security configuration will override the Add-on’s configuration. For example, if full access to the group Accounting Vouchers is disallowed for Arun, and in the Add-on full access to Sales voucher is allowed, Arun will not be able to access the Sales voucher.


