Record Sales Order and Delivery Note in TallyPrime
A Sales Order is a document generated and shared by the seller with the customer. Once you receive a Purchase Order from the customer with the details of the product required, you can confirm the sale and delivery of that product by issuing the Sales Order. Once the goods are delivered, you can record sales against the Sales Order. You can also Record Delivery note against the Sales Order and then record sales against the delivery note.
A Sales Order indicates the product details, quantity, and agreed price. Once the goods are sold you can track the sales order in the delivery note or in the sales invoice depending on your business practice. In Tallyprime, you can follow the process of creating a Sales Order followed by delivery note and then the sales flow. You can also follow the process of creating a Sales Order and then directly record the sales against the Sales Order.
Partial cancellation of goods can also be recorded in TallyPrime and you can also pre-close a Sales Order. After the delivery of goods, if there is any return, you can record the same in Rejections In voucher against the delivery note. The Sales Order outstanding report is available to view and track the Sales Order which is pending and take necessary action to complete or close the order.
Record Sales Order
When you receive an order from a customer, you may need to provide the details of items, quantities, delivery date, and so on, with a Sales Order Number and when these goods are delivered, this Sales Order Number is used to track the order details either in the delivery note or in the sales invoice.
- Press Alt+G (Go To) > Create Voucher > F10 (Other Vouchers) > type or select Sales Order.
Alternatively, Gateway of Tally > Vouchers > F10 (Other Vouchers) > type or select Sales Order.
You can activate the Sales Order voucher type if the voucher is inactive by selecting Yes or pressing Y when prompted. - Enter the Party Details.
- Party A/c Name: Select Cash or Bank for cash sales and the party name for credit sales and press Enter.
You can create the Party A/c on the fly by pressing Alt+C. - Dispatch Details: Enter the Dispatch Details, as needed and press Enter.
You can choose to enable the option for Order Details by pressing F12 (Configure). - Party Details: You can update the buyer details while recording the transaction and print the same in the invoice.
- Enter the Sales Order no. for the voucher.
If you want to enter an order number for each item, press F12 (Configure) > set Provide Order No. for each Stock Item to Yes. The Order no. field appears in the Items Allocation screen. It does not appear on the main screen of the invoice.
- Party A/c Name: Select Cash or Bank for cash sales and the party name for credit sales and press Enter.
- Select the Sales ledger to allocate the stock items.
- Provide the stock item details.
- Select the stock item or create a new item on the fly by pressing Alt+C.
- Enter the Due on date and Quantity. The Rate gets auto-filled if you have sold the same item earlier. However, you may choose to enter the Rate manually. The Amount appears automatically.
If you want orders with different due dates, specify the appropriate due date for each lot to be sold.

In F11 (Features), you can enable the feature of batches and provide the details in the Item Allocations screen. You can also enter these details if you have multiple godowns/locations.
- After entering the due dates for all the lots, press Enter on the Due on field to return to the Voucher Creation screen.
- Select additional ledgers, like transportation charges, insurance, or discount, if any.
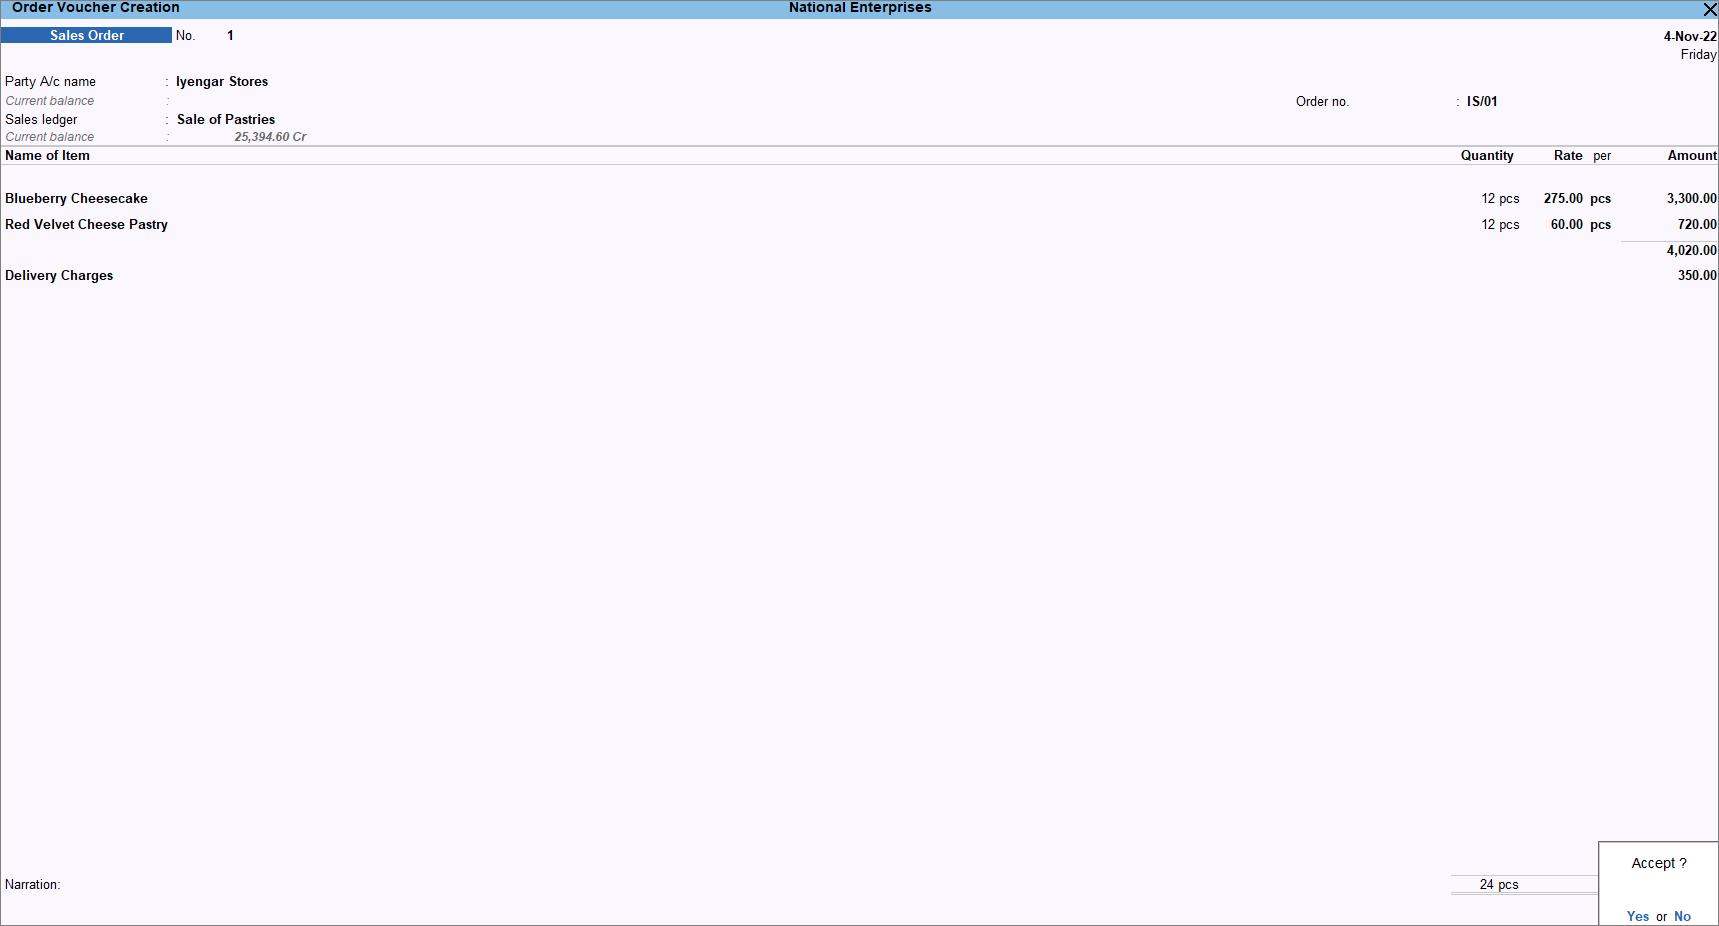
- Provide Narration, if needed. As always, press Ctrl+A to save and proceed.
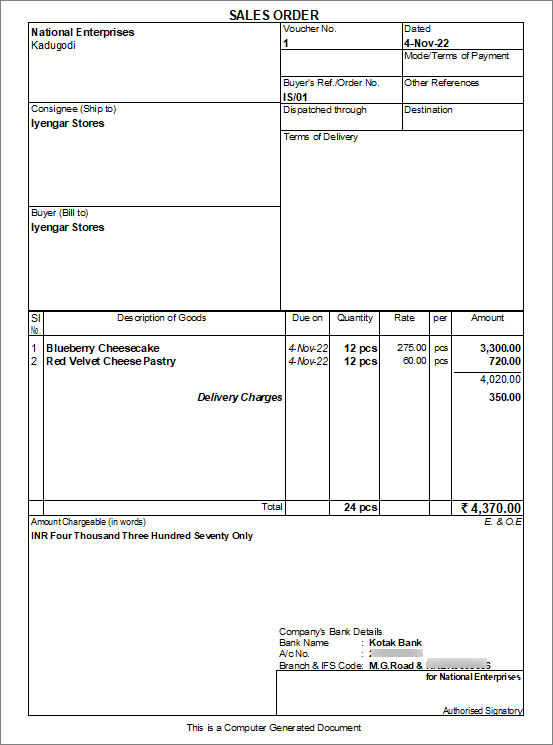
The following is a sample preview screen of the Sales Order.
The Sales Order details are printed on the invoice.
Click here to see the possible options of F12 (Configure) for Sales Order.
|
Configurations |
Descriptions |
|
Provide Buyer details |
Displays the Party Details screen, where you can enter the buyer’s name and mailing details. |
|
Provide Dispatch, Order, and Export details |
It involves the Party Details screen, where you can enter Dispatch, Order, and Export details. |
|
Select common Ledger Account for Item Allocation |
Enable this option to allocate all the items to a common accounting ledger. This option helps record transactions faster if enabled, as you do not have to select the sales ledger every time you select a stock item. You can disable this option if you want to allocate different sales ledgers for different items. |
|
Provide Additional Descriptions for Ledgers |
Specify any additional description for the ledger during voucher entry. |
|
Provide Additional Descriptions for Stock Items |
Specify any additional description for the item during voucher entry. |
|
Provide Order No. for each Stock Item |
Specify Order No. in the Stock Item Allocation screen for each stock item. |
|
Warn on Negative Stock Balance |
When there is insufficient stock during sales entry, a warning message of negative stock with quantity details appears. This check is important so that you don’t bill stock that is not available to you. Once you restore the stock, you can bill those. |
|
Warn on duplicate Order No. |
A warning message on a duplicate order number appears when the order number has already been used in earlier transactions. |
|
Modify all fields during voucher entry |
Modify all fields in the sales order. |
|
Provide details to preclose orders |
You can preclose orders partially or completely depending on your business requirement. If you have sold goods partly against a sales order, and later the remaining goods are not required by the customer, you can partially preclose the order. |
|
Select Cost Centre/Class |
Display the cost centre details for any additional ledger. Along with the stock item or service ledger, if any other additional ledger needs to be tracked separately, then you can use cost centres to track the expenses. |
|
Use Expired Batches for Stock items |
Display expired batches of stock items for selection while recording the invoice. |
|
Show Batches with Zero Quantity |
Display batches of stock items with zero balance. |
|
Provide Accounting Allocations in Order/Delivery Note |
Select the sales ledger for stock items. |
|
Skip the Date field during voucher creation |
The last voucher entry date appears, and the cursor will skip this field. |
|
Warn if Due Date of Order is earlier than Voucher Date |
A warning message appears when the sales order due date is before the voucher date. |
|
Show Turnover from selected Party A/c |
During voucher entry, along with the customer’s current balance, you can also see how much turnover that customer made. |
|
Show Current Balance of Ledgers |
Display the account balance of the party ledger. |
|
Show Balances as on Voucher date |
Display the account balance of the party as on the voucher date. If this option is enabled, the party ledger does not reflect the net account balance; instead, it shows the balance as of that particular voucher date. |
|
Show final Ledger Balance |
Display the account balance of the party ledger. |
|
Show Compound Unit of Items based on Rate |
While recording the voucher with the stock item having a compound unit, if you use the first set of units under quantity and the rate you have given for the second set of units, then with this option enabled, the unit for the quantity gets changed to the same unit for which the rate was given. |
|
Show details of Compound Unit |
Display full details of the compound unit in the Quantity field. |
|
Use Standard Selling/Last Sold Rate for Items with no Price List |
Shows the last sold rate or standard selling rate in case there is no item price list. |
|
Provide Marks or Container No. |
Specify container information for exported items. |
|
Provide No. of Packages |
Specify the number and package type for exported items. |
|
Calculate Tax on Current Subtotal (else calculations are on inventory total only) |
Calculate tax after including the additional income or expenses in the total item amount. If this field is not set as Yes, the tax is only calculated on the inventory total. |
|
Calculate MRP on Billed Quantity |
Display the MRP calculated on the billed quantity. |
Sales Against Sales Order
In your business, you may record sales invoices after raising Sales Orders without any delivery challan. In TallyPrime, you can record transactions in the same order.
- Open a sales voucher and enable supplementary details.
- Press Alt+G (Go To) > Create Voucher > press F8 (Sales).
Alternatively, Gateway of Tally > Vouchers > press F8 (Sales). - Press F12 (Configure) > set Provide Order Details to Yes.
- Press Alt+G (Go To) > Create Voucher > press F8 (Sales).
- Select the order number and record the invoice.
The Sales Order gets closed if completely billed. Otherwise, it is partially closed, and you can view the details in the Sales Order Outstandings report.
Record Delivery Note Against Sales Order
You may raise a Sales Order and once the goods are delivered you can record a Delivery Note against the Sales Order and track the same.
- Press Alt+G (Go To) > Create Voucher > F10 (Other Vouchers) > type or select Delivery Note.
Alternatively, Gateway of Tally > Vouchers > F10 (Other Vouchers) > type or select Delivery Note.
If the voucher is inactive, you can activate the Delivery Note Voucher Type by selecting Yes, or pressing Y when prompted. - Enter the Party details.
- Party A/c name: Select the party name and press Enter.
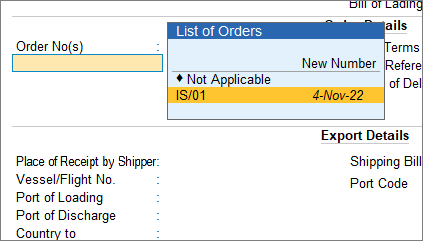
- Select the Sales Order number.
The details from the Sales Order appear in the Delivery Note. - Press Ctrl+A to save and proceed.
- Select the Sales Ledger.
- Enter the stock item details.
- Select the stock item.
- Specify the details in Stock Item Allocations screen.
- If you select a Purchase Order No(s) in the Party Details screen of the invoice:
- The stock items details in the Purchase Order appear in the receipt note.
- The Order No. is prefilled in the Stock Item Allocations screen.
- If Order No(s) is selected as Not Applicable, then specify the details in Stock Item Allocations screen.
- Enter a Tracking No. By default, the invoice number appears. You can change it if required by creating a New Number.
- Set the Order No. to Not Applicable.
- Enter the Quantity and Rate.
- Accept the screen.
- If you select a Purchase Order No(s) in the Party Details screen of the invoice:
- As always, press Ctrl+A to save.
A Delivery Note with Tracking No. marked as Not Applicable is an inventory document affecting only the inventory values. This will not affect the accounts.
The Sales Order gets closed if completely delivered. Otherwise, it is partially closed, and you can view the details in the Sales Order Outstandings report.
Record Partial Cancellation of Goods
After the sales are made, there can be partial cancellation of goods. Orders can be pre-closed if there is partial cancellation of goods and can be recorded through a Delivery Note.
- Open a Delivery Note voucher and select the party details.
- Press Alt+G (Go To) > Create Voucher > F10 (Other Vouchers) > type or select Delivery Note.
Alternatively, Gateway of Tally > Vouchers > F10 (Other Vouchers) > type or select Delivery Note. - Press F12 (Configure) > set the option Provide details to preclose orders to Yes.
Henceforth, you can enter the details of the pre-closure orders in the delivery note until you change the option in F12 (Configure). - Party A/c name: Select the party name and press Enter.
The Order Details screen appears. - Select the Sales Order number.
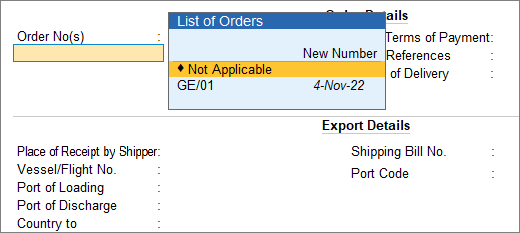
- Press Ctrl+A to save and proceed.
- Press Alt+G (Go To) > Create Voucher > F10 (Other Vouchers) > type or select Delivery Note.
- Record the Delivery Note with details of the partial cancellation of the order.
- Name of Item: Select the stock item.
The Stock Item Allocations screen appears. - Select the Tracking Number. The stock item, quantity, and rate appear automatically after selecting the sales order number.
- Select the Godown.
- Enter the Quantity delivered, the Pre-Close Quantity, and the Reason for Pre-Close.
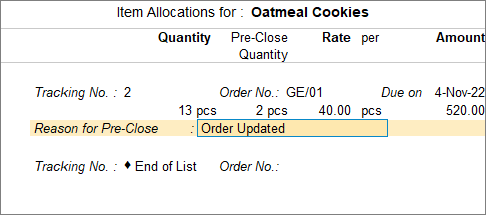
- Accept the Stock Item Allocations screen.
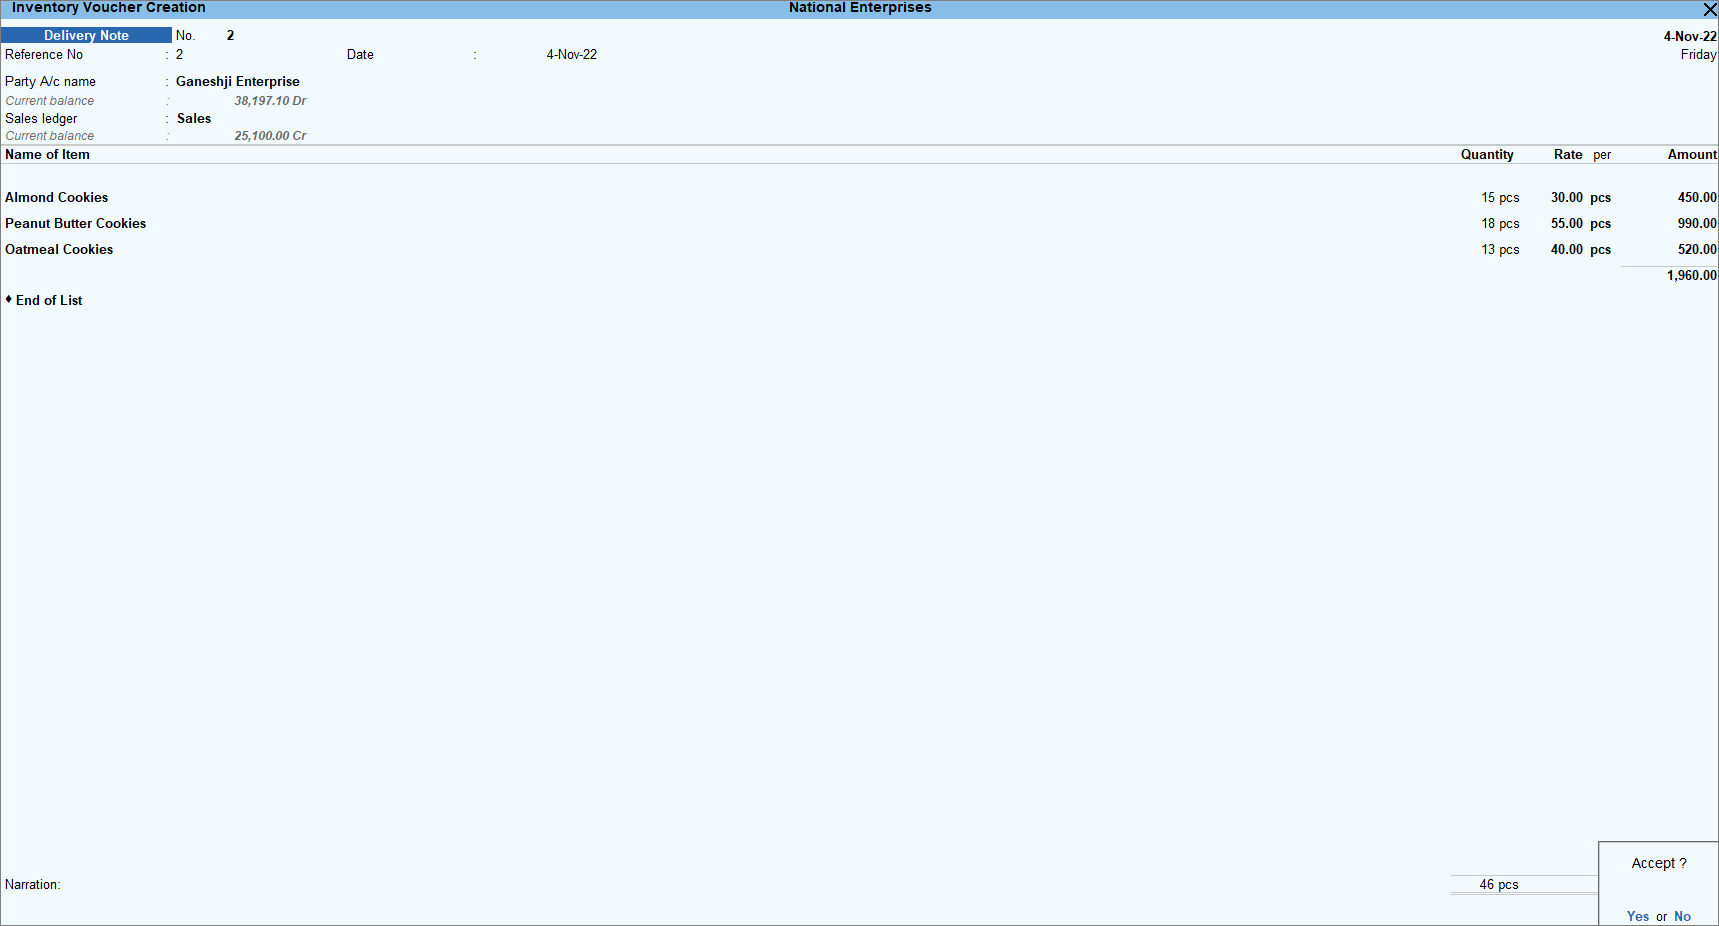
- As always, press Ctrl+A to save.
- Name of Item: Select the stock item.
The sales order gets closed as the required quantity of stock items is delivered after pre-closing the partially cancelled order.
Record Quotation
Quotation is a formal statement, setting the estimated cost for a particular good or services. If you want to generate a quotation in TallyPrime, mark the sales order as optional and print it.
- In the sales order, press Ctrl
- L (Optional) > record the invoice > save the transaction.
- Press Alt+P (Print) > press Enter on Current. The title appears as QUOTATION.
- Press I (Preview) to check the invoice before printing if needed, or press P (Print) to print.
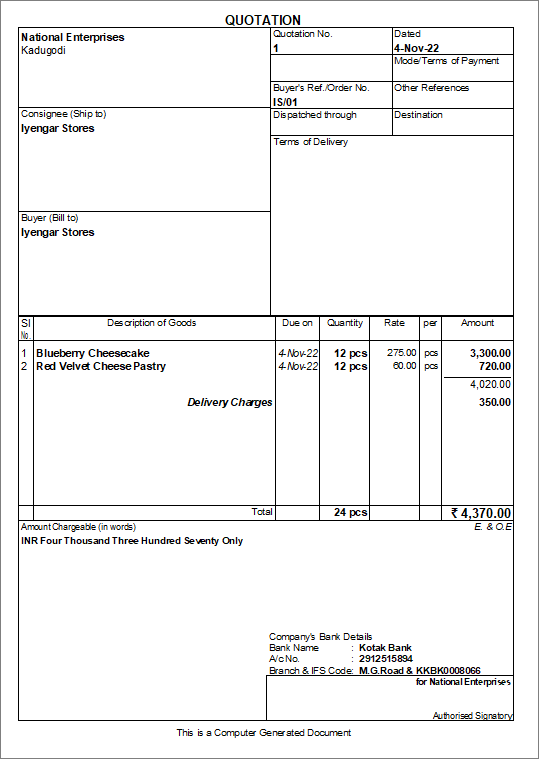
You can print the quotation for each Sales Order by marking it as an optional voucher.
Pre-Close Sales Order
After the delivery of goods is done against the sales order and there is a negligible quantity left in the order which you are not planning to supply to the customers then you can pre-close the sales order. Pending references for such orders continue to exist in TallyPrime until you close them. You can pre-close an order from Sales Order Outstanding reports or from the transactions, sales orders, delivery notes, or sales.
- Press Alt+G (Go To) > type or select Day Book > select the required Sales Order voucher > and press Enter.
Alternatively, Gateway of Tally > Display More Reports > Day Book > select the required Sales Order voucher > and press Enter. - To configure Sales Order Voucher for pre-closure of the order, press F12 (Configure) > set Provide details to preclose orders to Yes.
- In the Stock Item Allocations screen, enter the Pre-Close Quantity and the Reason for Pre-Close.
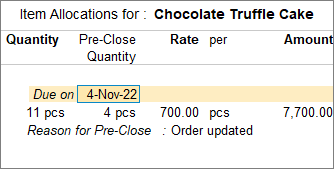
- If you want to, you can also pre-close the Sales Order completely.
- Open the sales order voucher screen in alteration mode.
- Press Alt+W (Pre-Close Quantity) > enter the Reason and the Closed on date > press Enter to accept.
- As always, press Ctrl+A to save.
Based on your convenience, you can pre-close the orders with the Sales Order voucher, Delivery Note, or Sales voucher.
Reports | Sales Orders & Sales Order Outstanding
You may want to know the sales orders outstanding and account for the partially or completely cancelled orders. You can use the reports of Sales Orders Outstanding and Pre-closure of orders report and pre-close the cancelled orders at any time. Different reports show outstanding Sales Orders. The outstanding orders can be viewed Stock Group-wise, Stock Category-wise, Stock Item-wise, account Group-wise, ledger-wise, or from All Orders.
- Press Alt+G (Go To) > type or select any of the Sales Order Outstandings reports.
Alternatively, Gateway of Tally > Display > Statement of Inventory > Sales Order Outstandings > choose the report to view.
In this section
- Sales Order – Stock Group
- Sales Order – Stock Item
- Sales Order – Group
- Sales Order – Ledger
- Sales Order – All Orders
- Ageing Analysis Report for Sales Orders
- Sales Orders Book
- Pre-close orders from reports
Sales Order – Stock Group
This report displays the Sales Order Outstanding summary of all or a selected Stock Group.
- Press Alt+G (Go To) > type or select Sales Order Stock Group Outstanding report under Sales Order Reports > Stock Group > select Primary or the required Stock Group.
Alternatively, Gateway of Tally > Display More Reports > Statements of Inventory > Sales Order Outstandings > Stock Group > select Primary or the required Stock Group.
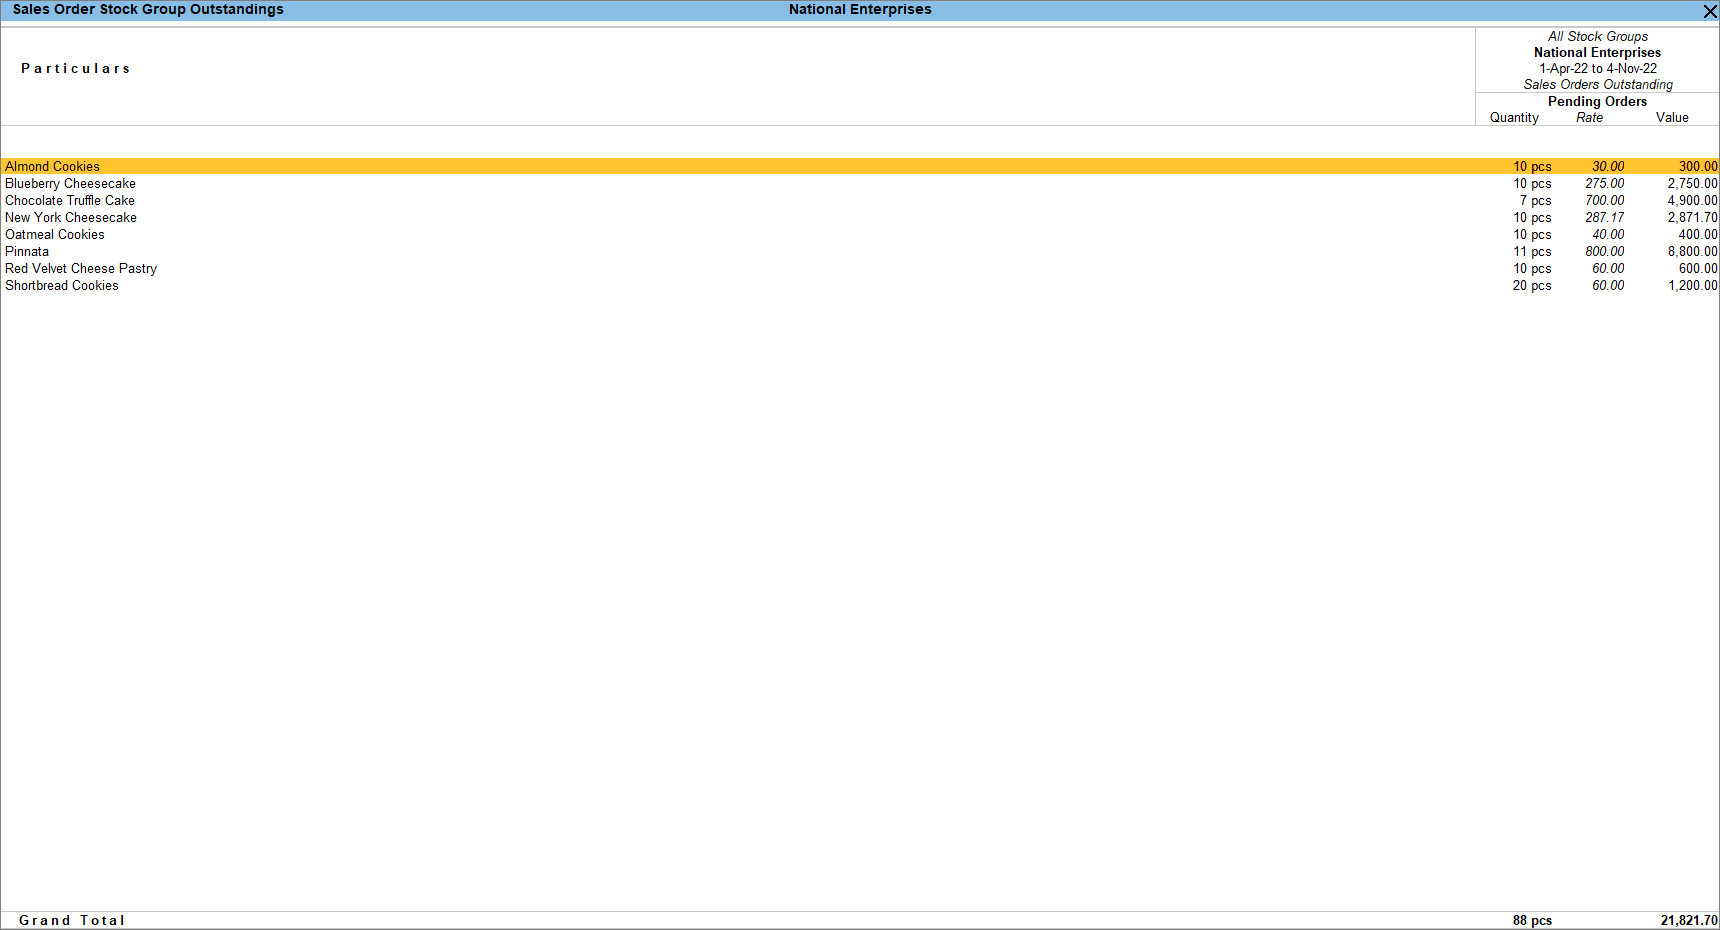
- Drill down from a Stock Group to view the Sales Order Outstandings of stock items.
You can change the display of the report and view other options as per your business need.
- F4 (Stock Group): This option helps you to select other stock groups to view the report.
- F5 (Stock Item-wise): This option helps you to view the report Stock Item-wise or Stock Group-wise. You can view the same from Ctrl+H (Change View).
- F9 (Orders): You can view the Sales Orders Outstanding, Purchase Orders Outstanding, Nett Stock, Saleable Stock and Stock in Hand. You can also view the same from Ctrl+B (Basis of Values)
You can further customise your report display in TallyPrime.
- Ctrl+B (Basis of Values): You can select the Scale Factor as required to view the report.
- Ctrl+H (Change View): You can view the Related Reports such as Summary, Monthly Summary, Movement Analysis and Ageing Analysis.
- Ctrl+J (Exception Reports): You can view the Negative Stock Items and Sales Order Outstanding.
To know more about reports and their features in TallyPrime, refer to the Working with Reports in TallyPrime topic.
Can we re-frame to:
Click here to see the possible options of F12 (Configure) for Stock Groups, Stock Items, Account Groups, and Ledgers.
|
Configurations |
Descriptions |
|
Show Quantity |
Display the Quantity column for stock items. |
|
Show Alternate Units |
Display the Alt. Units column for stock items. |
|
Show Rate |
Display the Rate column for stock items. |
|
Show Value |
Display the Value column for stock items. |
|
Show Opening Orders |
Display the Opening Orders section for stock items. |
|
Show Orders Booked |
Display the Orders Booked section for stock items. |
|
Show Cleared Orders |
Display the Orders Cleared section for stock items. |
|
Show Pending Orders |
Display the Pending Orders section for stock items. |
|
Show All Items (incl. zero balance) |
Display the stock items even when it has zero balance. |
|
Show Tail Units of Compound Units |
Display the quantity in the Second unit defined for the compound unit selected for the stock items. |
|
Display name for Stock items |
Display the stock items by selecting the required Display Name Style. |
|
Display name for Ledgers |
Display the ledgers by selecting the required Display Name Style. |
|
Scale factor for values |
Display the values by selecting from the List of Scale Factors. |
|
Show Base Currency |
Display the base currency symbol for the report. |
|
Sorting Method |
Display the stock items based on the required Sorting Methods. |
|
Expand all levels in detailed format |
Display the details associated with each stock item. |
You can view the details of the required orders for each stock group.
Sales Order – Stock Item
This report displays the Sales Order Outstandings summary of stock items.
- Press Alt+G (Go To) > type or select Sales Order Stock Item Outstanding report under Sales Order Reports > select a Stock Item.
Alternatively, Gateway of Tally > Display More Reports > Statements of Inventory > Sales Order Outstandings > Stock Item.
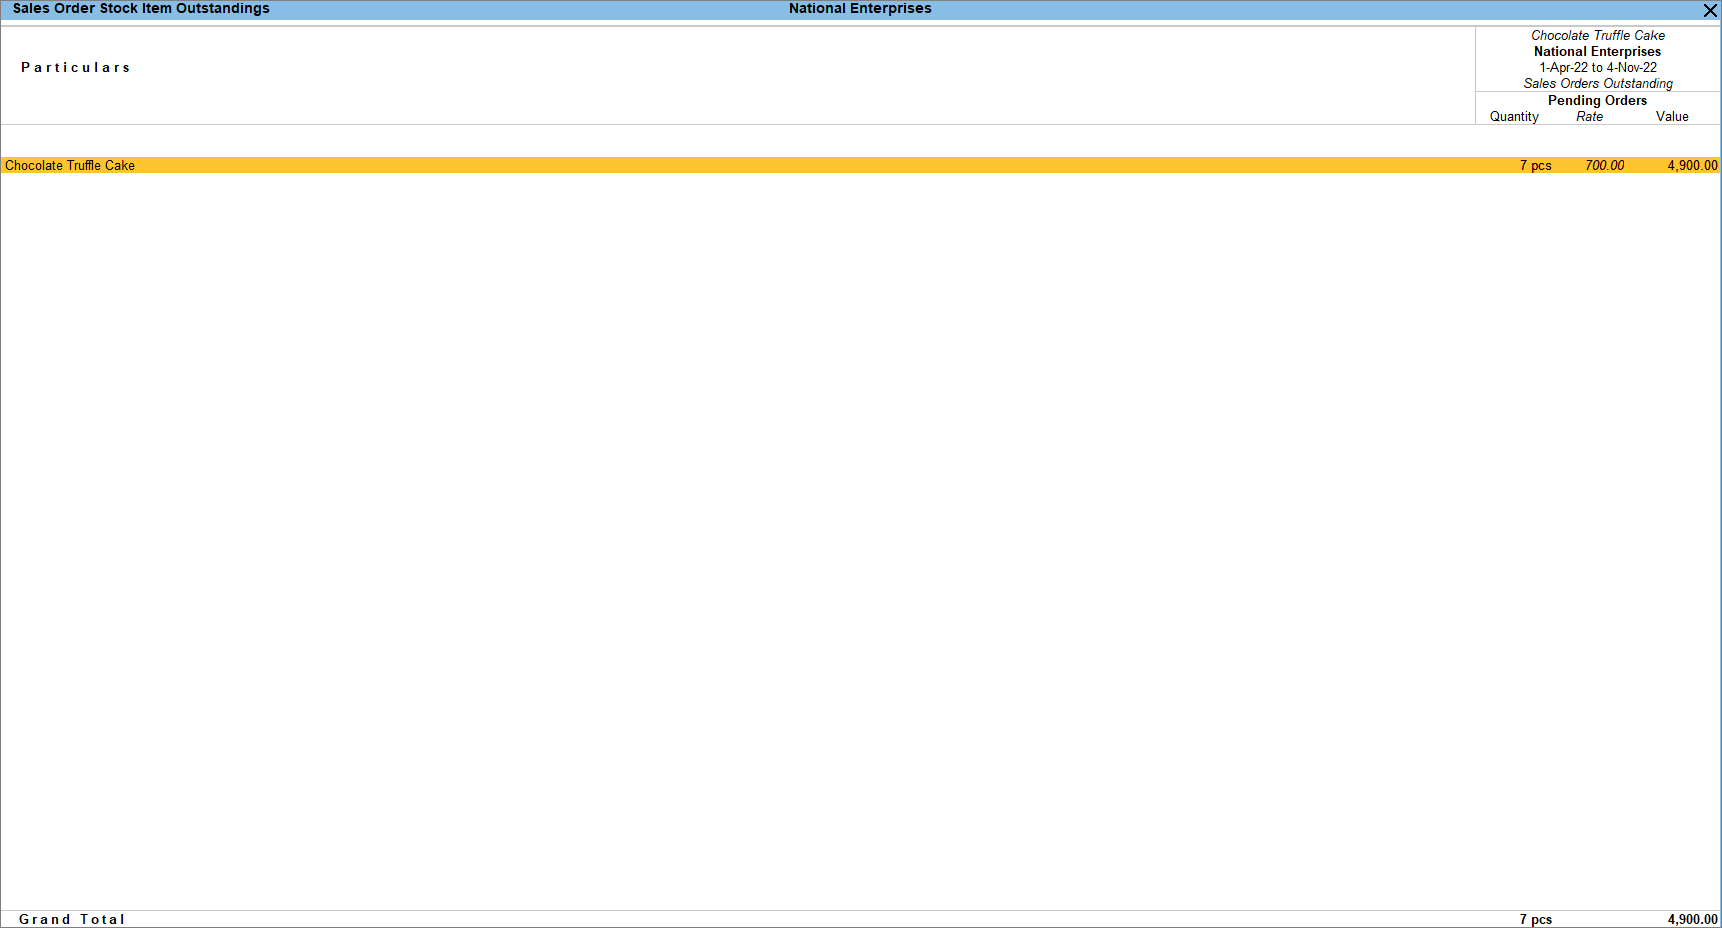
- Drill down from a stock item to view the Order Details screen. It displays the order number, date of order, party, quantity, undelivered order, rate, the value of the ordered stock, due date for delivering the goods, and the number of days overdue.

You can change the display of the report and view other options as per your business need.
- F4 (Stock Item): This option helps you to select other stock items to view the report.
- F9 (Orders): You can view the Sales Orders Outstanding, Purchase Orders Outstanding, Nett Stock, Saleable Stock and Stock in Hand. You can also view the same from Ctrl+B (Basis of Values).
You can further customise your report display in TallyPrime.
- Ctrl+B (Basis of Values): You can select the Scale Factor as required to view the report.
- Ctrl+H (Change View): You can view the Related Reports such as Stock Query, Monthly Summary, Movement Analysis and Ageing Analysis.
- Ctrl+J (Exception Reports): You can view the Sales Orders.
To know more about reports and their features in TallyPrime, refer to the Working with Reports in TallyPrime topic.
You can press F12 (Configure) and set the options as needed to view the details of the required orders for each stock item.
Sales Order – Group
You may have created subgroups for your sundry debtors based on region, type of party, city, location, or for each salesperson, as per your business need. This report is used to view the outstanding order for that group.
- Press Alt+G (Go To) > type or select Sales Order Group Outstanding report under Sales Order Reports > Select a Group.
Alternatively, Gateway of Tally > Display More Reports > Statements of Inventory > Sales Order Outstandings > Group.
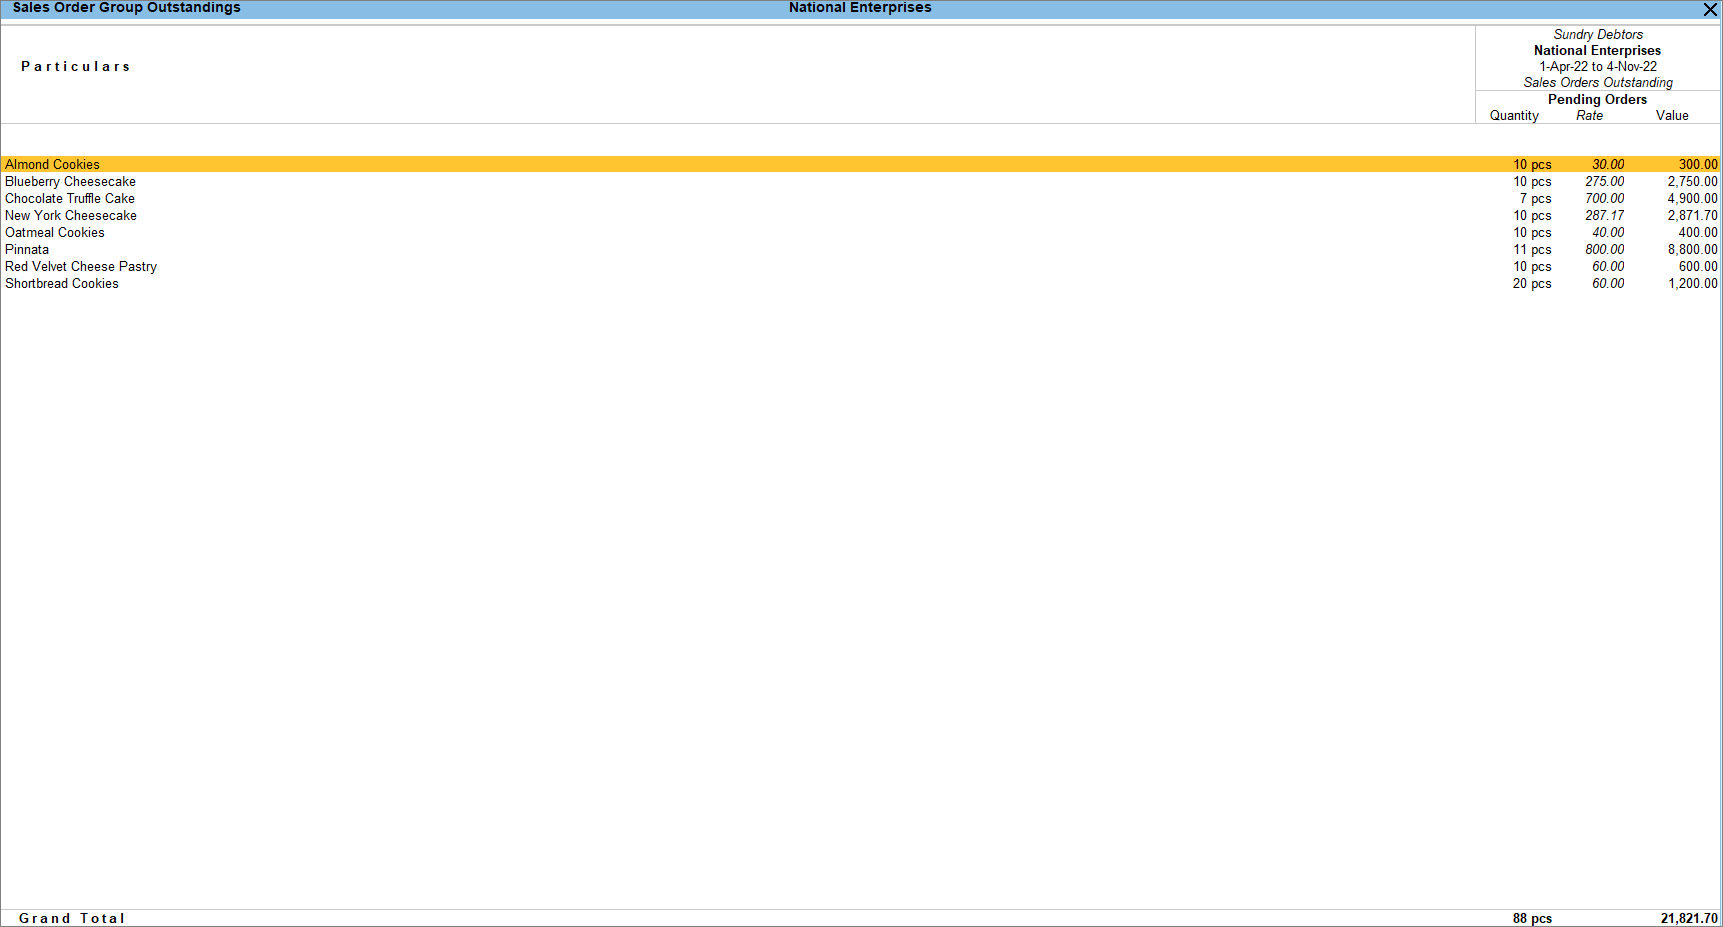
- Select the stock item and press Enter to view the Order Details.
You can press F12 (Configure) and set the options as needed to view the details of the required orders for each account group.
Sales Order – Ledger
This report displays the Sales Order Outstanding summary of ledgers.
- Press Alt+G (Go To) > type or select Sales Order Ledger Outstanding report under Sales Order Reports > Select a Ledger.
Alternatively, Gateway of Tally > Display More Reports > Statements of Inventory > Sales Order Outstandings > Ledger.
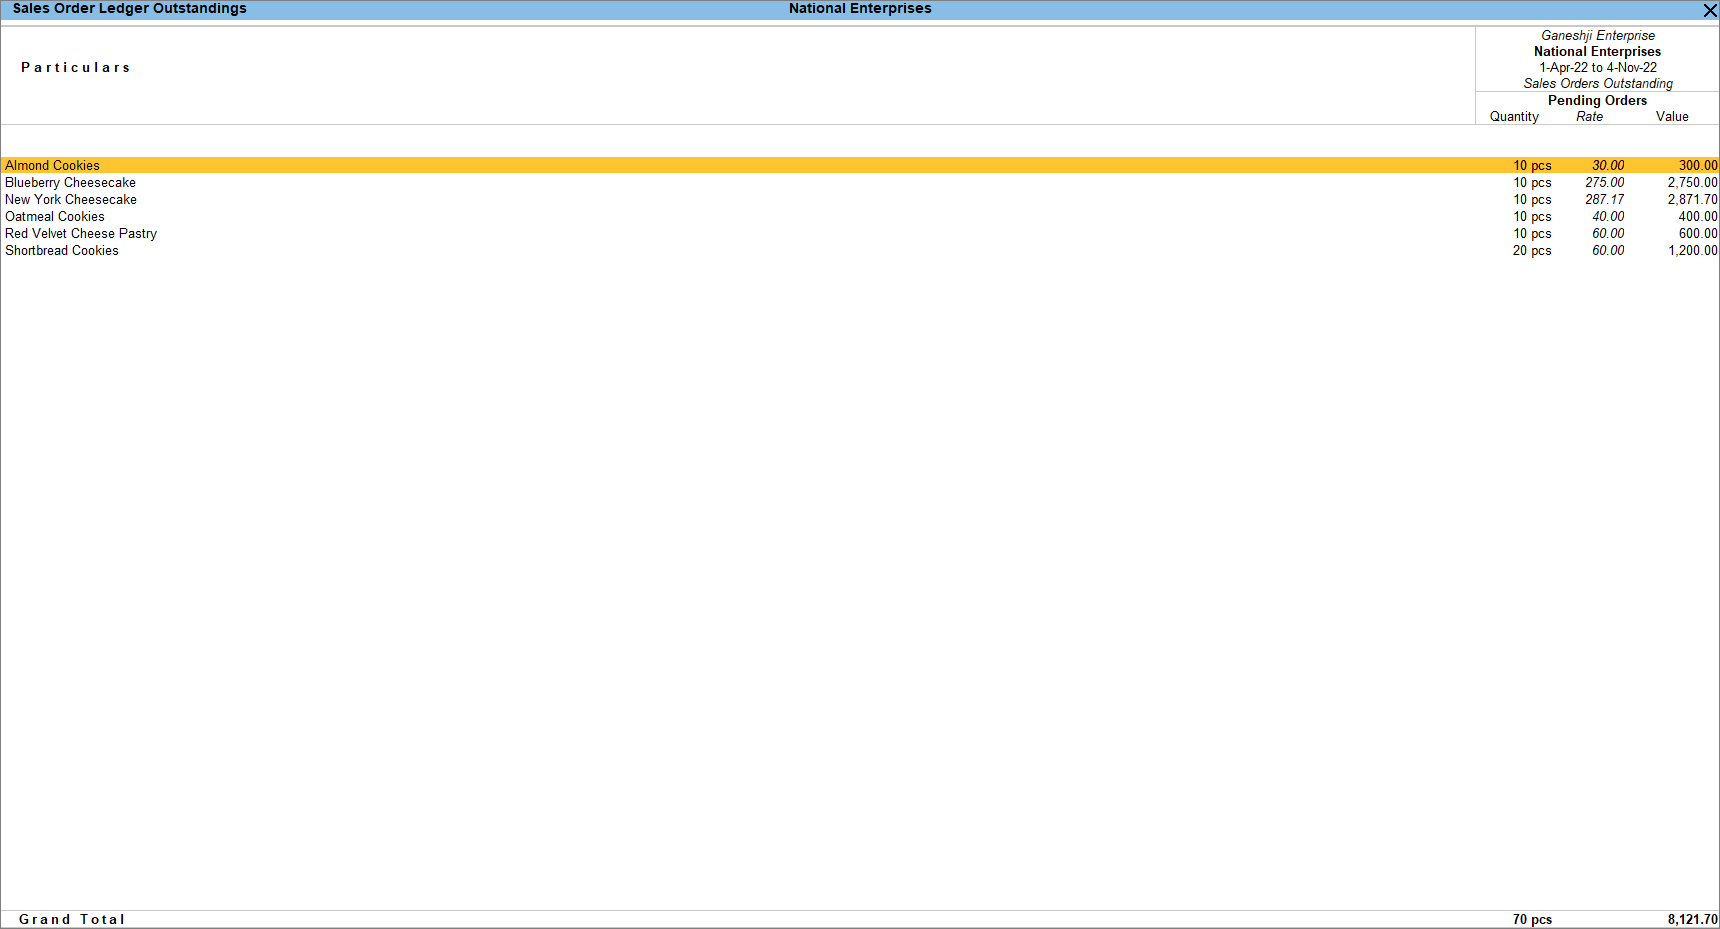
- Select the stock item and press Enter to view the Order Details.
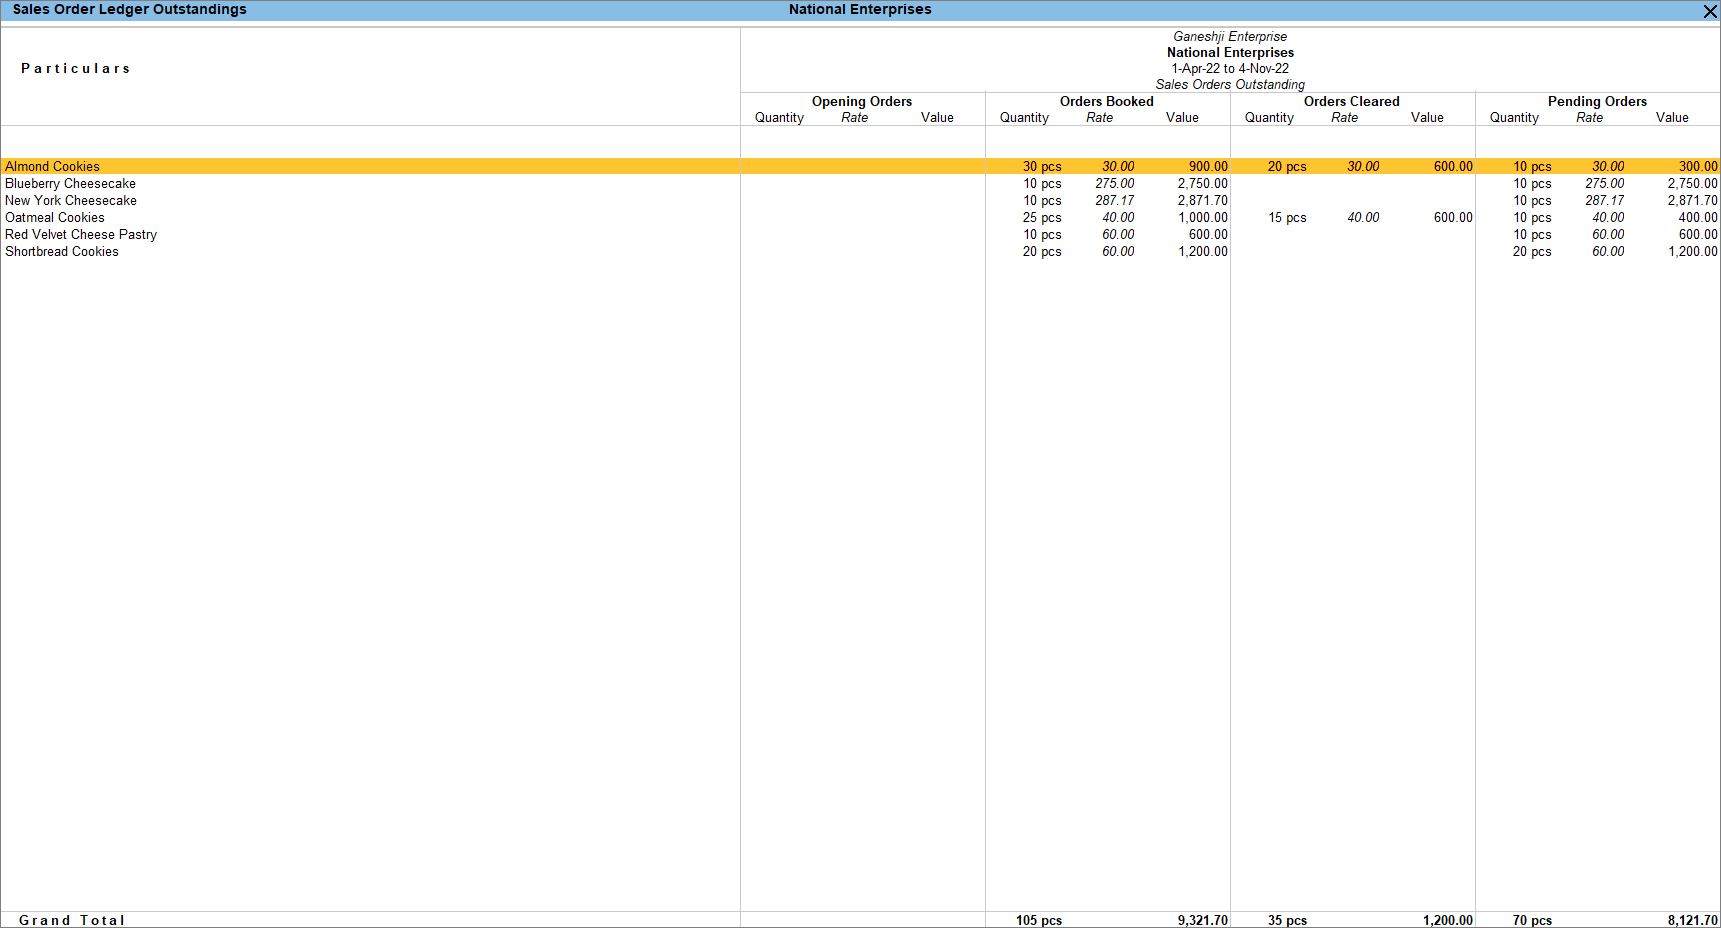
- Press F12 (Configure) and set the options to view the required order details.
Sales Order – All Orders
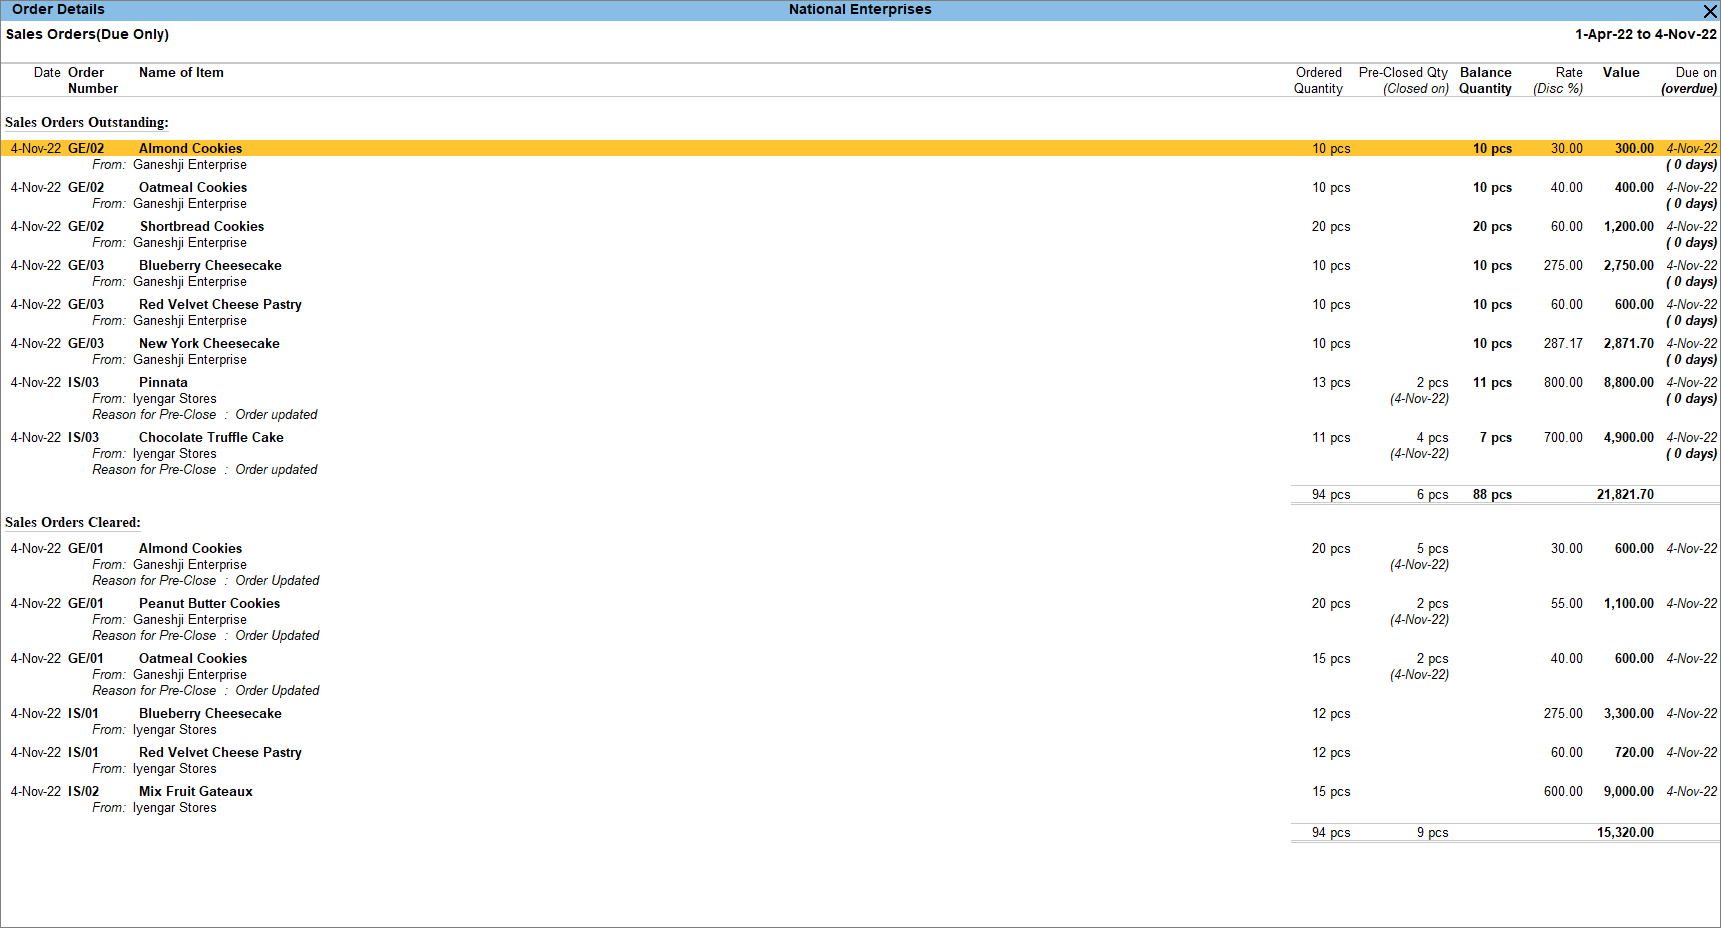
This report displays the Sales Order Outstanding of all the pending orders. It provides information on the order number, date of order, party, ordered Quantity, undelivered order, rate, the value of the ordered stock, the due date for delivering the goods, the number of days overdue, and information on goods delivered but orders not received.
- Press Alt+G (Go To) > type or select Sales Orders (Due Only) report under Sales Order Reports.
Alternatively, Gateway of Tally > Display More Reports > Statements of Inventory > Sales Order Outstandings > All Orders.

- Press Alt+F5 (Detailed) to view the details of sales orders.
- Press F8 (Due Orders) to view only the due orders. This button helps to view All Orders and Due Orders.
- Press F6 (Age-wise) to view the age-wise analysis report.
- Press Alt+W (Preclose Orders) to pre-close the sales order.
- Press F12 (Configure) and set the options as needed.
Click here to see the possible options of F12 (Configure) for the Sales Order – All Orders report.
|
Configurations |
Descriptions |
|
Show Outstanding Sales Orders |
Display the Sales Orders Outstanding section with transaction details. |
|
Show Cleared Sales Orders |
Display the Sales Orders Cleared section with transaction details. |
|
Show Goods delivered but Orders not received |
Display the Goods delivered without orders with transaction details. |
|
Show Outstanding Purchase Orders |
Display the Purchase Orders Outstanding section with transaction details. |
|
Show Cleared Purchase Orders |
Display the Purchase Orders Cleared section with transaction details. |
|
Show Goods received but Orders not sent |
Display the Goods received but Orders not Sent section with transaction details. |
|
Show Preclosure order details |
Display the column Pre-Closed Qty (Closed On) for each transaction. |
|
Show Reason |
Display the Reason for Pre-Close field for transactions in which the orders are pre-closed. |
|
Show Pre-Closed orders only |
Display only the transactions having pre-close details. |
|
Show Batch Details |
Display the stock items with Batches. |
|
Show Location Details |
Display the godown/location details for transactions. |
|
Show Alternate Units |
Display the Alt. Units column for stock items. |
|
Show Tail Units of Compound Units |
Display the quantity in the Second unit defined for the compound unit selected for the stock items. |
|
Show Actual and Billed Quantity details |
Display the Actual and Billed columns for the Ordered Quantity. |
|
Calculate Amount on Billed Quantity |
Display the transaction Value based on the billed quantity. |
|
Display name for Stock items |
Display the stock items by selecting the required Display Name Style. |
|
Display name for Ledgers |
Display the stock items by selecting the required Display Name Style. |
|
Sorting Method |
Display the stock items based on the required Sorting Methods. |
To know more about the the required information of All Orders of Sales Order Outstandings, refer to the Sales Orders Outstandings section.
Ageing Analysis Report for Sales Orders
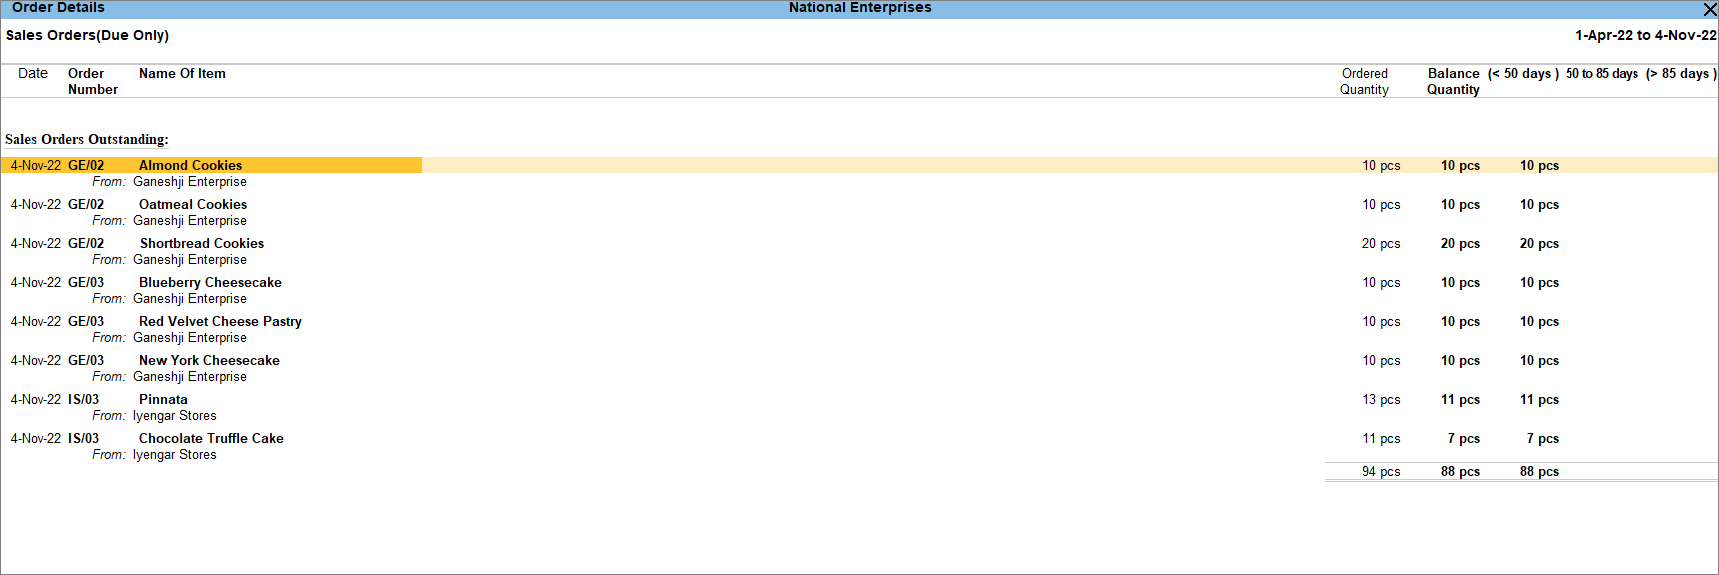
You can analyze the Order Details report based on the Bill date or Due date. This report helps you to track the ageing of the sales order so that you can take action on either delivering the goods or closing the order.
- Press Alt+G (Go To) > type or select Sales Orders (Due Only) under Sales Order Reports.
Alternatively, Gateway of Tally > Display More Reports > Statements of Inventory > Sales Order Outstandings > All Orders. - Press F6 (Age-wise) in the Order Details screen.
- Select the option Ageing by Bill Date or Ageing by Due Date for Methods of Ageing.

- Set the age periods required for the report. Age-wise Analysis report appears as shown below:
Click here to see the possible options of F12 (Configure) for the Ageing Analysis report.
|
Configurations |
Descriptions |
|
Show Outstanding Sales Orders |
Display the Sales Orders Outstanding section with transaction details. |
|
Show Cleared Sales Orders |
Display the Sales Orders Cleared section with transaction details. |
|
Show Goods delivered but Orders not received |
Display the Goods delivered but Orders not Recd. section with transaction details. |
|
Show Outstanding Purchase Orders |
Display the Purchase Orders Outstanding section with transaction details. |
|
Show Cleared Purchase Orders |
Display the Purchase Orders Cleared section with transaction details. |
|
Show Goods received but Orders not sent |
Display the Goods received but Orders not Sent section with transaction details. |
|
Show Opening/Prev cleared Order details |
Display the opening or previous orders that are cleared. |
|
Show Pre-Closure order details |
Display the column Pre-Closed Qty (Closed On) for each transaction. |
|
Show Reason |
Display the Reason for Pre-Close field for transactions in which the orders are pre-closed. |
|
Show Pre-Closed orders only |
Display only the transactions having pre-close details. |
|
Show Batch Details |
Display the Pending Orders section for stock items. |
|
Show Location Details |
Display the godown/location details for transactions. |
|
Show using Alternate Units |
Display the Alt. Units column for stock items. |
|
Show Tail Units of Compound Units |
Display the quantity in Second unit defined for the compound unit selected for the stock items. |
|
Show Actual and Billed Quantity details |
Display the Actual and Billed columns for the Ordered Quantity. |
|
Calculate Amount on Billed Quantity |
Display the transaction Value based on the billed quantity. |
|
Display name for Stock items |
Display the stock items by selecting the required Display Name Style. |
|
Display name for Ledgers |
Display the stock items by selecting the required Display Name Style. |
|
Sorting Method |
Display the stock items based on the required Sorting Methods. |
You can set the Ageing Analysis as needed based on your reporting requirements.
Sales Orders Book
Once you record a Sales Order in TallyPrime, you can view a summary of it in Sales Order Book. It displays the list of all sales orders till the date of the last order entered.
- Press Alt+G (Go To) > type or select Sales Orders Book under Sales Order Reports.
Alternatively, Gateway of Tally > Display More Reports > Inventory Books > Sales Orders Book.
You can compare the sales order created monthly, weekly, daily, and so on to track the pending and completed sales order.
- Press Alt+N (Auto Column) and select the options in the Auto Repeat Columns sub-screen to see the comparison

The Sales Orders Book appears as shown below:

- Select the required month and press Enter. Press Alt+F5 (Detailed) to view the transaction details.
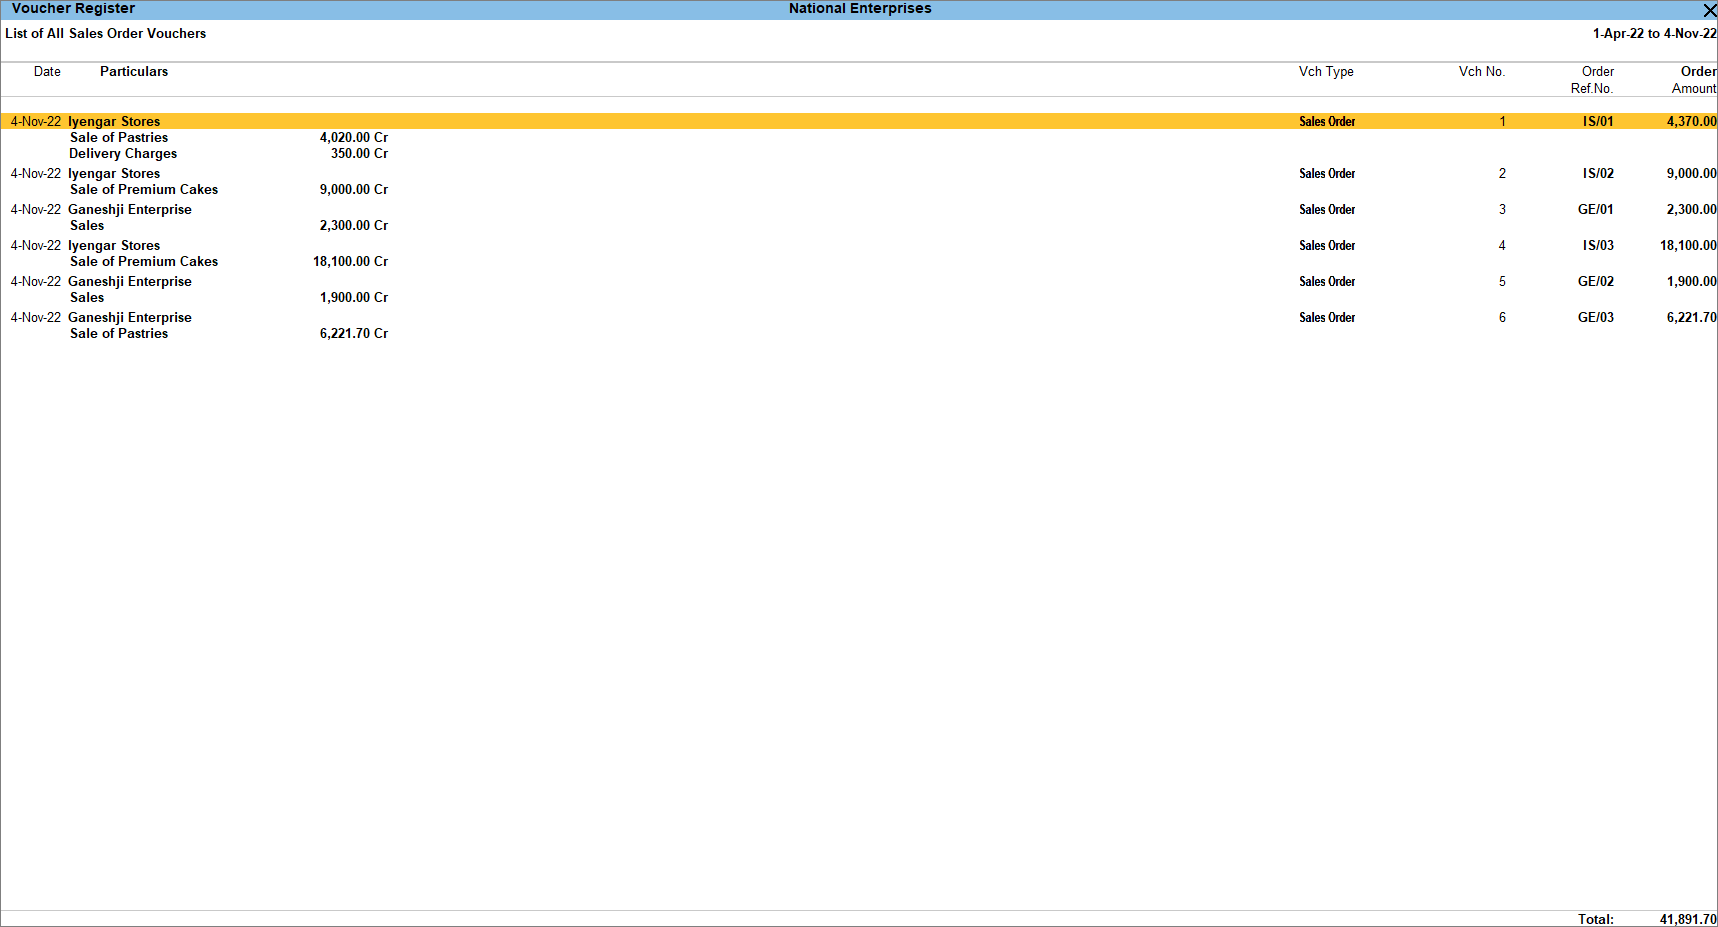
- You can view estimated profits/losses and monthly summary of the Sales Orders Book.
Press F7 (Show/Hide Profit) to view the estimated gross profit/loss report.
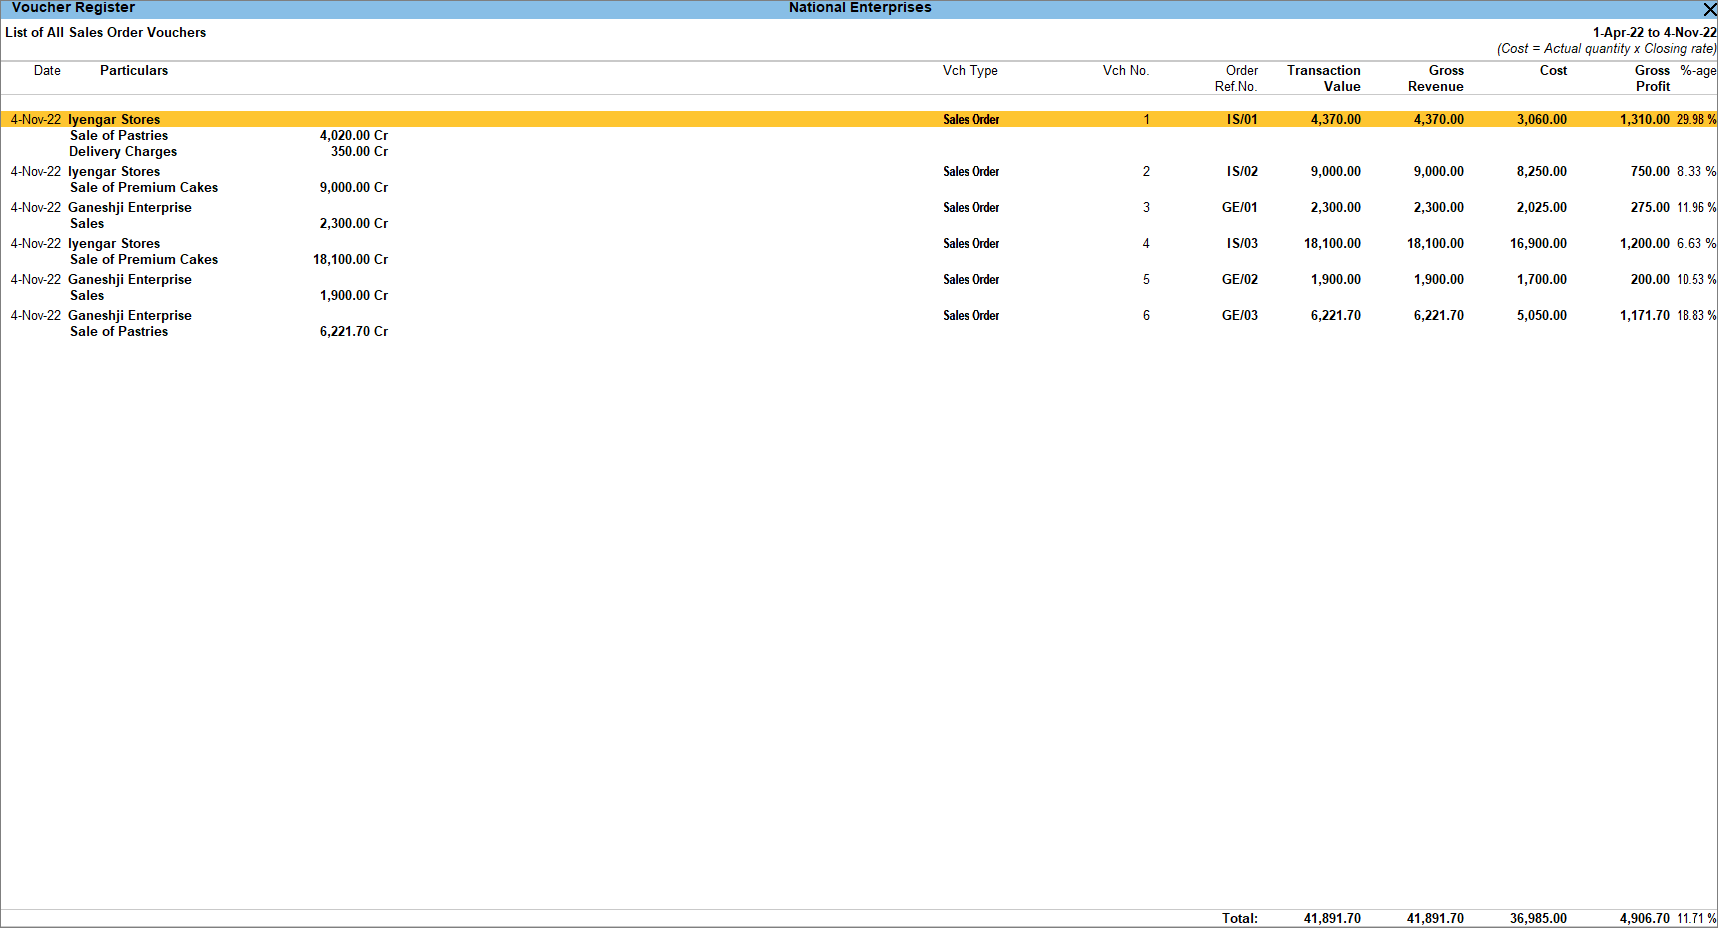
- You can press F8 (Columnar) to view the reports in Columnar format.
Click here to see the possible options of F12 (Configure) for the Sales Orders Book.
|
Configurations |
Descriptions of Monthly Configuration |
|
Show Optional Vouchers |
Display the optional voucher count in a separate column. |
|
Appearance of Names |
Display the party/bank ledger names by selecting the required Display Name Style. |
|
Periodicity |
You can select the Periodicity in which the Credit notes will be displayed in the Credit Note Register. |
|
Configurations |
Descriptions of Voucher Register Configuration |
|
Report Type |
Display the transaction details based on accounting groups and ledgers, with corresponding debit and credit values. |
|
Show Inventory-wise Extract |
Display only the transaction details based on stock groups and items, with corresponding Inward Qty, Rate, and Amount. |
|
Show Columnar Register |
Invokes the Columnar Register Alteration screen, where you can set the options as needed and view the report with the voucher details in separate columns. |
|
Show Gross Profit estimates |
Display the Gross Profit and Cost columns, with the percentage of profit and the calculation of the cost of stock item. |
|
Show Cost based on stock valuation |
Display the Cost based on the stock item’s selected valuation method. This option can be enabled only if Show Gross Profit estimates are set to Yes. |
|
Format of Report |
Display the report in a detailed or condensed view. |
|
Show Narrations |
Display the narration entered in the sales order. |
|
Show Bill-wise details |
Display the bill-wise details provided in the credit note. The bill-wise details help to track the credit note settlement. |
|
Show Cost Centre Details also |
Display the cost centres selected for the sales ledgers. |
|
Show Inventory details |
Display the stock item quantity, rate, and value. |
|
Show additional description for Stock Item |
Display the additional description entered for stock items in the sales order. |
|
Display name for Stock items |
Display the stock items by selecting the required Display Name Style. |
|
Show Optional Vouchers |
Display the word (Optional) against the optional vouchers. |
|
Appearance of Names |
Display the party/bank ledger names by selecting the required Display Name Style. |
|
Sorting Method |
Display the stock items based on the required Sorting Methods. |
You can view the required information related to sales orders from the Sales Orders Book.
Pre-close orders from reports
You can pre-close the orders from the Order Details report of Sales Order Outstandings.
- Press Alt+G (Go To) > type or select Sales Orders (All Orders) under Sales Order Reports.
Alternatively, Gateway of Tally > Display More Reports > Statement of Inventory > Sales Order Outstandings > All Orders. - Press F12 (Configure).
- Set the option Show Cleared Sales Orders to Yes.
- Set the option Show Preclosure Order details to Yes.
- Set the option Show Reason to Yes.
- The Order Details screen appears with the Pre-Closed Qty (Closed on) column and Reason for Pre-Close field.
Pre-close order – partial cancellation of orders
- Select the sales orders (press Spacebar to select more than one order), and press Alt+W (Preclose Orders).

- Enter the Pre-Close Quantity and the Reason for Pre-Close.

Pre-close order – complete cancellation of orders
- Select the sales orders (press Spacebar to select more than one order).
- Press Alt+W (Preclose Orders) > press Alt+W (Set Quantity).

- The balance quantity reflects under the Pre-Close Quantity column.

- Accept or modify the quantity and press Ctrl+A to accept.
Record a Delivery Note for Goods Dispatched
If you follow the business practice to record a Delivery Note for goods dispatched, you can record it in TallyPrime and track it to the sales invoice. You can record a Delivery Note even without recording a Sales Order. The procedure to record Delivery Notes without Sales Orders is explained below.
- Press Alt+G (Go To) > Create Voucher > F10 (Other Vouchers) > type or select Delivery Note.
Alternatively, Gateway of Tally > Vouchers > F10 (Other Vouchers) > type or select Delivery Note.
You can activate the Delivery Note voucher type if the voucher is inactive. Select Yes or press Y to proceed. - Enter the Party Details.
- Select the Party A/c name.
- Select the Sales ledger.
- Select the required stock item.
- Specify the details in Stock Item Allocations screen.
- Enter a Tracking No. By default, the invoice number appears. You can change it if required by creating a New Number.
- Set the Order No. to Not Applicable.
- Enter the Quantity and Rate.

If you select a sales Order No(s) in the Party Details screen of the invoice:- The stock items details in the sales order appear in the Delivery Note.
- The Order No.is prefilled in the Stock Item Allocations screen.
- Accept the screen.
- As always, press Ctrl+A to save.
A Delivery Note with Tracking No. marked as Not Applicable is an inventory document affecting only the inventory values. This will not affect the accounts.
You can select the tracking number of the delivery note to track the delivery of goods in the sales invoice.
Click here to see the possible options of F12 (Configure) for Delivery Note.
|
Configurations |
Descriptions |
|
Provide Buyer details |
Displays the Party Details screen, where you can enter the buyer’s name and mailing details. |
|
Provide Dispatch, Order, and Export Details |
Displays the Party Details screen, where you can enter the Dispatch, Order, and Export details. |
|
Select common Ledger Account for Item Allocation |
Enable this option to allocate all the items to a common accounting ledger. This option helps record transactions faster if enabled, as you do not have to select the sales ledger every time you select a stock item. You can disable this option if you want to allocate different sales ledgers for different items. |
|
Provide Additional Descriptions for Stock Items |
Specify any additional description for the item during voucher entry. |
|
Provide Additional Descriptions for Ledgers |
Specify any additional description for the ledger during voucher entry. |
|
Calculate Tax on Current Subtotal (else calculations are on inventory total only) |
Calculate tax after including the additional income or expenses in the total item amount. If this field is not set as Yes, the tax is only calculated on the inventory total. |
|
Warn on Negative Stock Balance |
When there is insufficient stock during sales entry, a warning message of negative stock with quantity details appears. This check is important so that you don’t bill stock that is not available to you. Once you restore the stock, you can bill those. |
|
Provide Accounting Allocations in Order/Delivery note |
Select the sales ledger for stock items. |
|
Show Turnover from selected Party A/c |
During voucher entry, along with the customer’s current balance, you can also see how much turnover that customer made. |
|
Modify all fields during voucher entry |
Modify all fields in the delivery note. |
|
Provide details to preclose orders |
You can preclose orders partially or completely depending on your business requirement. If you have sold goods partly against a sales order, and later the remaining goods are not required by the customer, you can partially preclose the order. |
|
Use Expired Batches for Stock items |
Allow the selection of stock items from expired batches. |
|
Show Batches with Zero Quantity |
Display the stock items batches with zero quantity. |
|
Consolidate quantity of Stock Items with same rate |
Consolidate the stock items having the same rates in the invoice. |
|
Show Compound Unit based on Rate |
Display the compound unit of the item based on the unit appearing in the Rate per column. |
|
Show details of Compound Unit |
Display full details of the compound unit in the Quantity field. |
|
Provide Marks or Container No. |
Specify container information for exported items. |
|
Provide No. of Packages |
Specify the number and package type for exported items. |
Record Sales Against Delivery Note
If you have a Delivery Note, which needs to be tracked against the sales invoice, you can select the order number and tracking number in TallyPrime to link it to the relevant invoices.
- Press Alt+G (Go To) > Create Voucher > press F8 (Sales).
Alternatively, Gateway of Tally > Vouchers > press F8 (Sales). - Press F12 (Configure) > set the option Provide Dispatch, Order, and Export details to Yes and enable Provide Order Details.
- Enter the party and order details.
- Select the Party A/c Name.
- Select the Delivery Note reference.
The details from the Delivery Note reflect in the Sales Voucher. If you have generated the Delivery Note against a Sales Order, that sales order details are also prefilled.
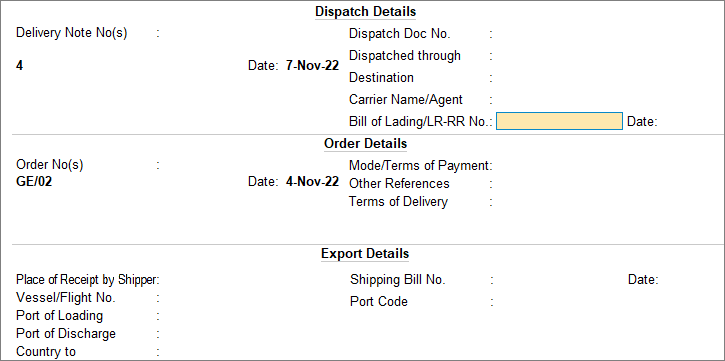
If you want to generate the bill against the Sales Order without selecting the delivery note tracking number, you can select End of List and press Ctrl+A to return to the sales invoice. Make changes in the items/quantities, if required.
- As always, press Ctrl+A to save.
A Delivery Note is closed if billed completely. The details appear in the Sales Bill Pending report if it is partially closed.
Record Sales with New Tracking Number
If you want to record a Sales Invoice before a Delivery Note, you can record the invoice with a Tracking Number and track it in the Delivery Note. The transaction is accounted against the party ledger without updating the stock value and appears as Bills made but goods not delivered in the Sales Bill Pending report.
- Ensure the tracking number feature is enabled.
- Record the sales invoice.
- Press Alt+G (Go To) > Create Voucher > press F8 (Sales).
Alternatively, Gateway of Tally > Vouchers > press F8 (Sales). - Select the party ledger and stock item.
- In the Stock Item Allocations screen:
- Select New Number for the Tracking No.
- Enter the Quantity and Rate. The Amount appears.
- Press Enter to return to the sales invoice.
- Press Alt+G (Go To) > Create Voucher > press F8 (Sales).
- As always, press Ctrl+A to save.
You can use the tracking number of the sales invoice in the Delivery Note.
Disable the Tracking Number
To prevent the Tracking Number from being displayed in the transaction, after all your Delivery Notes have been consumed by generating a Sales bill against them, or after generating a Delivery Note against a Sales bill, you can deactivate the Delivery Note voucher type altogether.
- Press Alt+G (Go To) > Alter Master > type or select Delivery Note > press Enter.
Alternatively, Gateway of Tally > Alter > type or select Delivery Note > press Enter.
The Voucher Type Alteration screen appears. - Set the option to Activate this Voucher Type to No.
- Press Y to accept the screen. As always, press Ctrl+A to save the Voucher Type Alteration.
As a result of this change, the Delivery Note voucher types are deactivated, and the Tracking Number no longer appears in the transaction unless you are specifically reactivating it.
Similarly, you can disable the Tracking Number in the Purchase ledger by deactivating the Receipt Note voucher type. As a result, the Tracking Number no longer appears in the transaction.
Record Rejections In against Delivery Note
Rejections In vouchers are used when the customer rejects or returns goods. The transaction is recorded after raising a Delivery Note but before raising a Sales Voucher.
- Press Alt+G (Go To) > Create Voucher > F10 (Other Vouchers) > type or select Rejections In.
Alternatively, Gateway of Tally > Vouchers > F10 (Other Vouchers) > type or select Rejections In.
You can activate the Rejections In voucher type if the voucher is inactive. Select Yes or press Y to proceed. - Provide the party details and stock item details.
- Under Ledger Account, select the party’s name who returned the goods.
The party’s name appears under Customer’s Name and Address with the address entered in the ledger master. - Select the stock item.
In the Item Allocations screen, the same appears if you had recorded a delivery note with a tracking number. You can select the relevant tracking number. - Enter the Quantity and Rate.
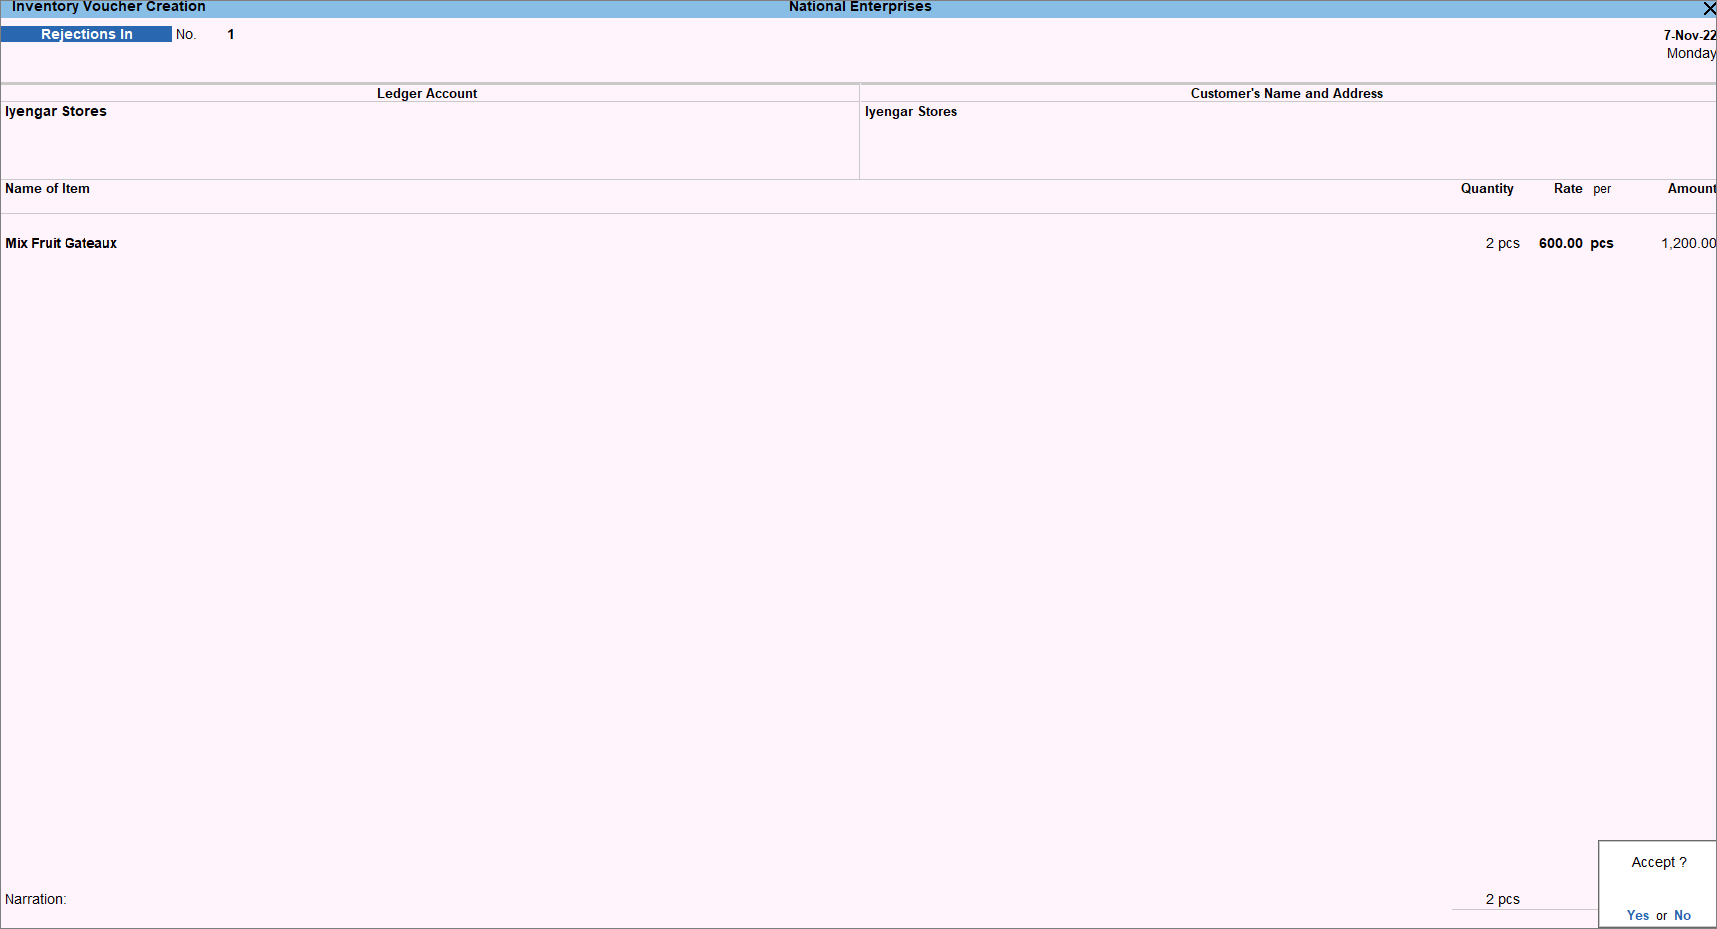
In F12 (Configure) configuration, enable the options Show Batch Wise Details and Show Godown–wise Details to view the batch and godown details in the invoice.
- Under Ledger Account, select the party’s name who returned the goods.
-
As always, press Ctrl+A to save.
The stock increased to the extent of the quantity entered in the Rejections In vouchers.
Know your Sales Bills Pending
Sales Bills Pending report lists all instances of incomplete sales, where goods may have been delivered but not invoiced. It also lists instances of invoices raised but against which goods have not been delivered.
When the Delivery notes or Rejections In voucher is recorded with a new tracking number, but the Sales invoice (or voucher) or Credit note is not linked to it, the inventory details are updated, but accounting entries are pending. Similarly, if you have entered a Sales invoice or Credit Note with a new tracking number, but the Delivery Note or Rejections In voucher is not linked to it, the accounting details are updated, but inventory entries are pending.
This report lists transactions of Goods Delivered but bills not Made and Sales bills to make.
- Press Alt+G (Go To) > type or select Sales Bills Pending.
Alternatively, Gateway of Tally > Display More Reports > Statements of Inventory > Sales Bills Pending.
A sample image of the Sales Bills Pending screen appears, as shown below:
You can view the pending and cleared bills in the Sales Bills Pending report.
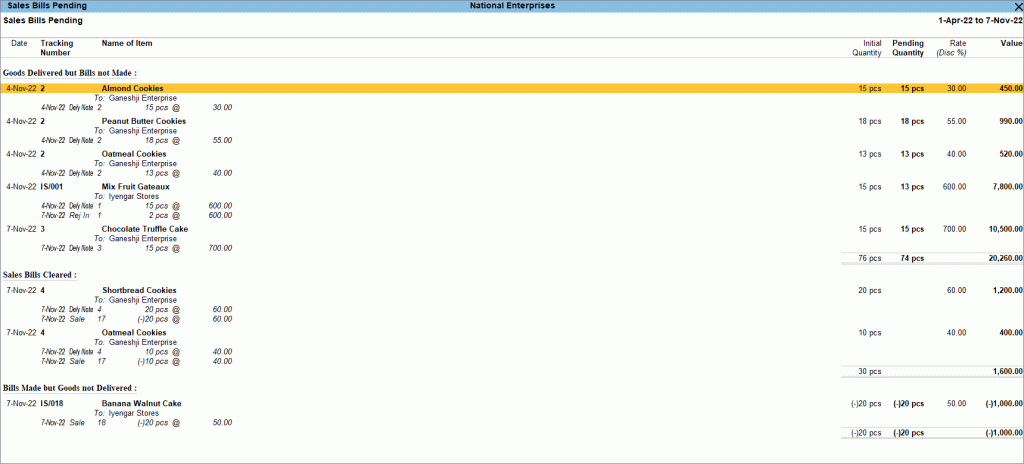
Press F12 (Configure) to enable or disable the options, as per your business needs.
Click here to see the possible options of F12 (Configure) for the Sales Bills Pending report.
|
Configurations |
Descriptions |
|
Show Outstanding Sales Bills |
Display the Goods Delivered but Bills not Made section with transaction details. |
|
Show Cleared Sales Bills |
Display the Sales Bills Cleared section with transaction details. |
|
Show Bills Made but Goods not delivered |
Display the Bills Made but Goods not Delivered section with transaction details. |
|
Show Outstanding Purchase Bills |
Display the Goods Recd. but Bills not Recd. section with transaction details. |
|
Show Cleared Purchase Bills |
Display the Purchase Bills Cleared section with transaction details. |
|
Show Bills received but Goods not received |
Display the Bills Recd. but Goods not Recd section with transaction details (when the purchase voucher is recorded with a new tracking number). |
|
Show Actual and Billed Quantity details |
Display the Actual and Billed columns for the Ordered Quantity. |
|
Show Alternate Units |
Display the Alt. Units column for stock items. |
|
Show tail unit of Compound Unit |
Display the quantity in Second unit defined for the compound unit selected for the stock items. |
|
Show Location Details |
Display the godown/location details for transactions. |
|
Show Batch Details |
Display the details of batches provided for stock items while recording transactions. |
|
Format of Report |
Display the report in Detailed or Condensed mode. |
|
Display name for Stock Item |
Display the stock items by selecting the required Display Name Style. |
|
Display name for Ledgers |
Display the ledgers by selecting the required Display Name Style. |
|
Sorting Method |
Display the stock items based on the required Sorting Methods. |
To drill down to the voucher level, place the cursor on the voucher detail line and press Enter.
The Sales Bills Pending report can be generated only when the option Tracking Numbers is set to Yes.
Starting from tracking Outstanding Sales Orders to print Sales Orders and pre-close the orders if needed, TallyPrime allows you to manage and record your Sales Order, as per your business needs. Similarly, you can also use TallyPrime to manage your Delivery Notes and keep track of your deliveries, with or without any reference to Sales Orders.

