Quick Setup for Excise for Manufacturer in Tally.ERP 9 helps you to configure statutory setup required to maintain the financial records of Excise Manufacturers.
To configure statutory setup for Excise for Manufacturer
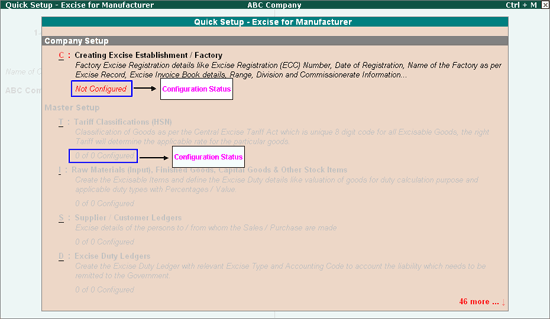
Go to Gateway of Tally > Quick Setup > Excise for Manufacturer. Quick Setup screen for Excise for Manufacturer will be displayed as shown

From this screen you can make required basic configurations like, creating excise manufacturer establishment, masters, voucher types, additional voucher types to account statutory transactions. It also allows making advance configurations wherever applicable.
Configuration details will be displayed below the setup options once the configuration is done other wise application will display the status as Not Configured for Company Setup and 0 of 0 Configured for other setups (Masters/Voucher Types setup etc.).
Company Setup guides you to create excise unit by providing relevant excise registration details . For more details on creating excise establishment click on the link, C : Creating Excise Establishment / Factory
C : Creating Excise Establishment / Factory
To create excise establishment /factory press Alt+C or select the option C: Creating Excise Establishment /Factory and press Enter to view Excise Establishment /Factory Setup sub-form.
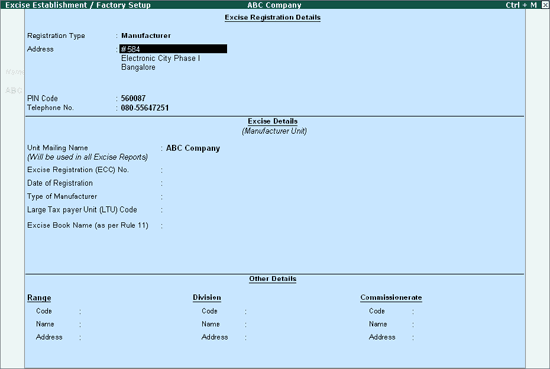
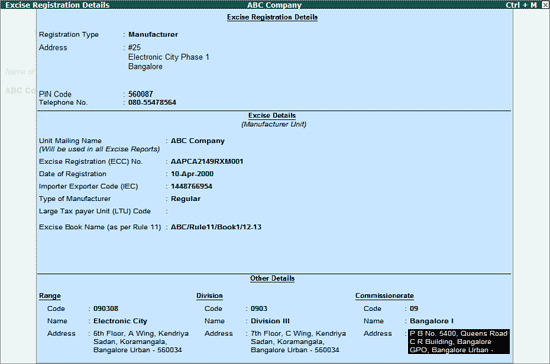
Registration Type: By default Manufacturer will be displayed as the Registration Type.
Address, Telephone No and PIN Code: Address, Telephone No. and PIN Code details are captured from the company creation screen. If required, it can be altered.
Excise Details: Under this section provide Excise Details of the unit. Excise Details will be specific to the Registration Type selected.
Note: Registration Type selected will be displayed below the heading – Excise Details to identify the unit as a manufacturer or a dealer.
Unit Mailing Name: The Mailing Name entered in the company creation will be displayed as the Unit Mailing Name. If required, it can be altered.
Note: Name entered in the Unit Mailing Name will be used in all Excise Reports.
Excise Registration (ECC) No.: It is a 15-Digit alphanumeric PAN based registration number mentioned in the Registration Certificate. The first part would be the 10-character (alphanumeric) Permanent Account Number [PAN] issued by the Income Tax Authorities to whom the registration number is allotted (includes a legal person).
The second part comprises a fixed 2-character alpha-code indicating the category of the Registrant (XD – For Dealers / XM – For Manufacturers). The third part is a 3-character numeric.
Enter 15 digits Excise Registration Number (ECC) of the Company/Unit, e.g. AAPCA2149RXM001
Date of Registration: Enter the date of Excise registration, e.g. 10-4-2000
Type of Manufacturer: select the appropriate Manufacturer Type from the list of Types of Manufacturer, e.g. Regular
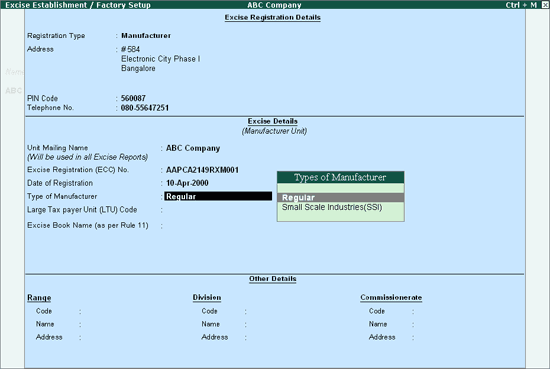
Large Tax Payer Unit (LTU) Code: Enter the LTU code, if your company/unit is a large tax payer and has opted for assessment in Large Tax Payer Unit. Skip the Large Tax Payer Unit (LTU) Code field.
Note: Large Tax Payers are those assessees who pay large amount of Tax. They are the eligible taxpayer for the purposes of being served by the LTU. For e.g.: Rs.5,00,00,000
Large Tax Unit is self-contained tax office under the Department of Revenue acting as a single window clearance point for all matters relating to Central Excise, Income Tax/ Corporate Tax and Service Tax. Eligible Tax Payers who opt for assessment in LTU shall be able to file their excise return, direct taxes returns and service tax return at such LTUs and for all practical purposes will be assessed to all these taxes there under. These units are being equipped with modern facilities and trained manpower to assist the tax payers in all matters relating direct and indirect tax/ duty payments, filing of documents and returns, claim of rebates/ refunds, settlement of disputes etc.
Large Tax Unit location Code for Bangalore is L–10000
More information on LTU is available on – http://www.cbec.gov.in/cae1-english.htm
Excise Book Name (as per Rule 11): Enter the Excise Book Name which is allowed by the Commissioner of Central Excise for the company/unit.
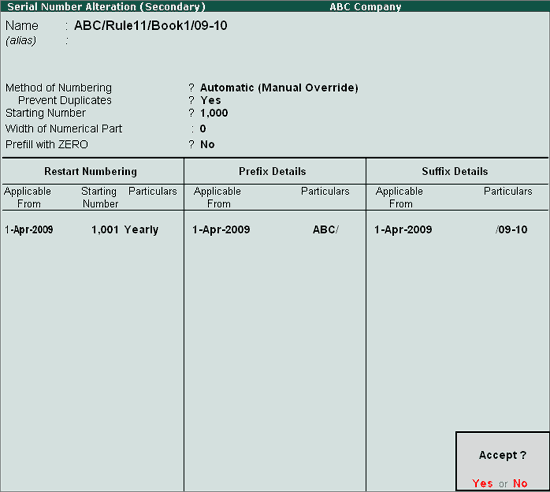
Select the option New Number from the List of Excise Books, to view Serial Number Alteration (Secondary) screen.
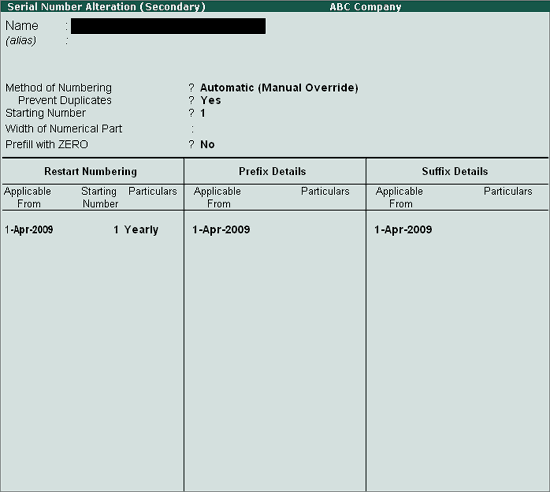
Name: Enter the excise invoice book name allowed by the Commissioner of Central Excise for the company/unit, e.g. ABC/Rule11/Book1/09-10
ABC - Denotes Company Name.
Rule 11: Denotes that invoice book is maintained as per Rule 11 of Central Excise Rules, 2002
Book1: Stands for Book Number, which is allowed for the current financial year
09-10: Denotes the financial year.
Method of Numbering: By default Automatic (Manual Override) is displayed as the method of numbering.
Note: Automatic (Manual Override) method of numbering assures the Rule 11 requirement of maintaining invoices serially numbered and sequence of numbering.
Prevent Duplicates: By default this field will be set to Yes.
Starting Number: Enter the Starting Voucher Number which is allowed by the Commissioner of Central Excise. E.g. 1001
Width of Numerical part: Mention the width of the numerical part.
Prefill with Zero: when this option is set to No the digits before the invoice number will be blank. If this field is set to Yes the invoice number will be prefilled with Zeros based on the width of numerical part e.g. 00001(where the width of numerical part is set to 5).
Restart Numbering: In this field enter the Starting Number as 1001 and ensure under Particulars the Type of Period is Yearly
This section user can set the dates to restart the voucher number by defining the types of period (Daily, Monthly, Never, weekly or Yearly).
Prefix Details: Here enter the information to be prefixed with voucher number
Applicable From: The date displayed in this field indicates the date from when the prefix should be displayed along with the voucher number.
Particulars: Enter the information to be prefixed to the voucher number E.g. ABC/
Suffix Details: Here enter the information to be suffixed with voucher number
Applicable From: The date displayed in this field indicates the date from when the suffix should be displayed along with the voucher number.
Particulars: Enter the information to be suffixed to the voucher number E.g. /08-09
In Tally.ERP 9 user can create more than one Excise Book Name for the same company or Unit. But, as per Rule 11 of Central Excise Rules, 2001 only one invoice book shall be in use at a time. A unit can maintain more than one invoice book if it is allowed by the Deputy/Assistant Commissioner of Central Excise.
To create more serial numbers, user can follow the above said procedure by selecting the option New Number or he can create serial numbers from the option Additional Excise Bill Book provided under Advanced Setup or he can create additional Excise Bill book from Gateway of Tally > Accounts Info. > Serial Number
Other Details: In this section enter Range, Division and Commissionerate details
Range: Enter the code Name and Address of the range under which your company is registered.
Code: Enter Range Code as 090308
Name: Enter Range Name as Electronic City
Address: Enter the Range Address
Division: Enter the code Name and Address of the division under which your company is registered.
Code: Enter Division Code as 0903
Name: Enter Division Name as Division III
Address: Enter the Division Address
Commissionerate: Enter the code Name and Address of the Commissionerate under which your company is registered.
Code: Enter Commissionerate Code as 09
Name: Enter Commissionerate Name as Bangalore I
Address: Enter the Commissionerate Address
Press Enter to accept and save Excise Registration Details.
Note: You can also create Excise establishment/factory by enable Excise feature in F11: Features screen. To Enable excise Go to Gateway of Tally > F11: Features > Statutory & Taxation
To know more on enabling excise from F11: Features refer the topic - Enabling Excise in Tally.ERP 9
Note: To move from one setup to another setup use Arrow (up and down) Keys.
Note: To move from one setup to another setup use Arrow (up and down) Keys.
Master Setup guides you to create masters like Tariff Classification, Stock Item and Supplier /Customer ledgers, Excise Duty Ledgers, CENVAT Ledgers and Additional charges or discount Ledgers by enabling relevant excise options in the masters. For more details on master creation Click on the below links.
T : Tariff Classifications (HSN)
Each and every goods manufactured or produced have to be classified for finding out the rate of duty applicable. Accordingly, Central Excise Tariff Act 1985 classifies all the goods under 91 chapters and specific code is assigned to each item. This code is called Tariff Classification code, which consists of 8 digits. First 4 digits represent Chapter and heading and next 2 digit represents sub-heading and the last 2 digit represents sub-sub heading.
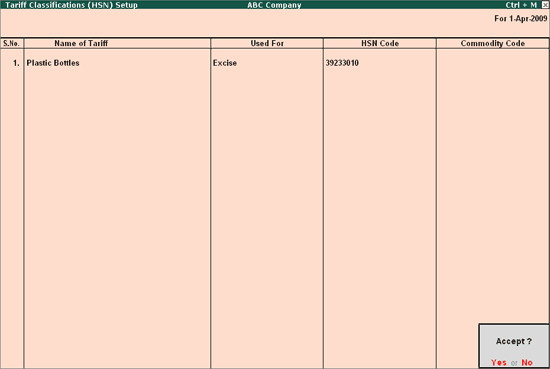
To create Tariff Classifications press Alt+T or select the option T: Tariff Classifications (HSN) and press Enter to view Tariff Classifications (HSN) Setup screen.
In Tariff Classifications (HSN) Setup screen
Enter the name of the Tariff Classification e.g. Plastic Bottles in the Name of Tariff field.
In Used For field - Excise will be displayed automatically.
Enter the Tariff Classification Code e.g. 39233010 in HSN Code field
Note: The Harmonized Commodity Description and Coding System (HS) of tariff nomenclature popularly known as Harmonised System of Nomenclature (HSN), is an internationally standardized system of names and numbers for classifying traded products developed and maintained by the World Customs Organization.
Note: From Multi Tariffs Classification Alteration screen you can create multiple Tariff classifications.
Press Enter to save.
Note: You can also create Tariff Classification from Gateway of Tally > Inventory Info. > Tariff/VAT Commodity
To know more on creating Tariff Classification from Tariff/VAT Commodity refer the topic - Creating Tariff Classification.
I : Raw Materials (Input), Finished Goods, Capital Goods and Other Stock Items
To create Stock Items (Raw material/ Finished goods/ Capital Goods/ Others) press Alt+I or select the option I: Raw Materials (Input), Finished Goods, Capital Goods and Other Stock Items and press Enter to view Stock Items Setup screen.
In Stock Items Setup screen
Enter the name of the Stock Item e.g. Pet Bottles - 1Ltr in the Name of Item field.
Select the Group Name e.g. Primary in the Under field.
In Tariff Classification field select the applicable tariff classification e.g. Plastic Bottles from the List of Tariff Classifications

Select the unit of measurement e.g. U (Numbers) of the stock item in the Units field (Use Alt +C to create Unit of Measurement).
In Opening Stock field specify opening stock of the stock item
In Rate field specify the rate of the opening stock, if any. Amount will be calculated and displayed automatically.
Enable the option Set/Alter Excise Details to Yes to view Excise Details screen.
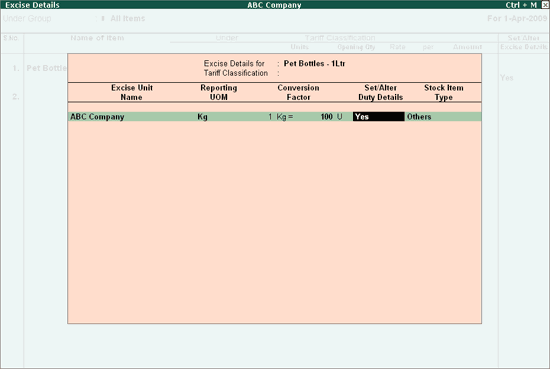
In Excise Details Screen
Excise Unit Name: By default Tally.ERP 9 displays ABC Company as Excise Unit Name.
Note: In Tally.ERP 9 excise units (Dealer/manufacturer) created are identified as godowns. When the option Maintain Multiple Godowns/Excise Units is not enabled in F11: Features > Inventory Features (F2) by default Tally.ERP 9 identifies the excise unit name with the Default Godown named - Main Location
Reporting UOM: Select Kg as Reporting UOM. All the reports will display the Stock item details based on the reporting UOM selected. (Use Alt +C to create Unit of Measurement)
Note: As Per Central Excise Act, in all the reports relating to stock items are required to be indicated with the relevant Unit of Quantity as specified under Central Excise Tariff Act. The Applicable Unit of Quantity for Bottles is ‘Kg (Kilograms)’, so it is must to select Kg (Kilograms) as the Reporting UOM.
In Conversion Factor field Set as 1 Kg = 100 U
Note: Tally.ERP 9 prompts the user to select the Conversion Factor only when the unit of Measurement selected in Units field and Reporting UOM is different.
Set/Alter Duty Details: Set this field to Yes to view the Duty Details screen
In the Duty Details screen
In Valuation Type select Ad Valorem from List of Valuation Type.
Select the Basic Excise Duty in the Type of Duty filed from the List of Excise Duty Classifications
In Applicable From field mention the Date from when the specified Rate of Duty is applicable
Specify the Rate of Duty as 10%
Select the Education Cess as the second duty in the Type of Duty filed from the List of Excise Duty classifications
In Applicable From field mention the Date from when the specified Rate of Duty is applicable
Specify the Rate of Duty as 2%
Select the Secondary and Education Cess as the third duty in the Type of Duty filed from the List of Excise Duty classifications.
In Applicable From field mention the Date from when the specified Rate of Duty is applicable
Specify the Rate of Duty as 1%
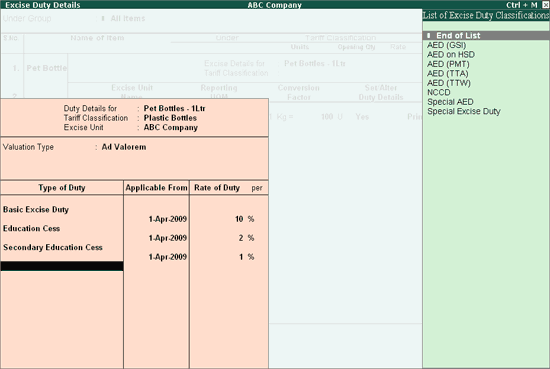
Accept to save Duty Details screen.
In Excise Details screen, under Stock Item Type field select as Principal Input from the List of Item Types.
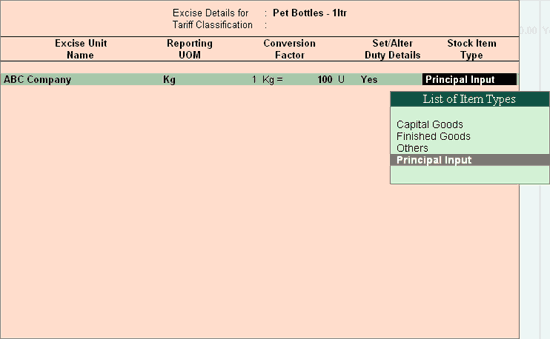
Note: You can create multiple stock items from Multi Stock Item Alteration screen. While creating Finished goods or Capital Goods etc. select the appropriate Stock Item Type.
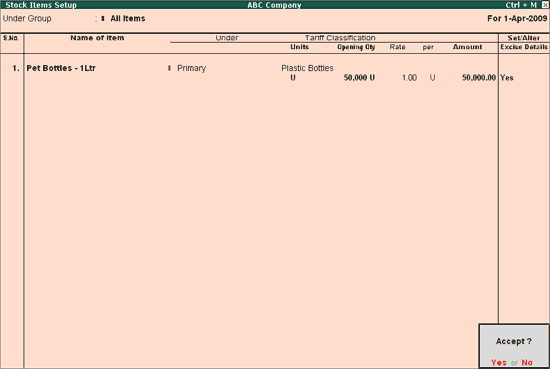
Press Enter to save.
Note: You can also create Stock Item from Gateway of Tally > Inventory Info. > Stock Items
To know more on creating items from Stock Items menu refer the topics -
2. Stock Item Finished Goods (Advalorem)
3. Stock Item Finished Goods (Quantum)
4. Stock Item Finished Goods (MRP)
5. CENVAT Credit on Capital Goods
S : Supplier / Customer Ledgers
To create Supplier/ Customer Ledgers press Alt+S or select the option S: Supplier /Customer Ledgers and press Enter to view Party Ledgers Setup screen.
In Party Ledgers Setup screen
In Name of Ledger field enter the name of the supplier e.g Swastik Water Suppliers.
Select Sundry Creditors as the group name in Under field.
Enable Set/Alter Excise Details to Yes to view Excise Details screen.
In the Excise Details screen,
Under Mailing Details enter party address
Under Excise Details enter party excise registration details
Enter the Excise Registration Number of the supplier.
Enter the Date of Excise Registration in Date of Registration field.
Enter the Range under which the supplier’s company is registered.
Enter the Division under which the supplier’s company is registered.
Enter the Commissionerate under which the premise of the Supplier’s company is registered.
Select the Default Nature of Purchase from the Nature of Purchase list. The table lists the Type of Purchase, which can be changed during transactions.
Note: The Default Type of Purchase depends upon the status of the supplier, whether he is a Manufacturer / First Stage Dealer / Importer / Second Stage Dealer. The default Type of Purchase set for the Ledger can be altered/changed during transaction.
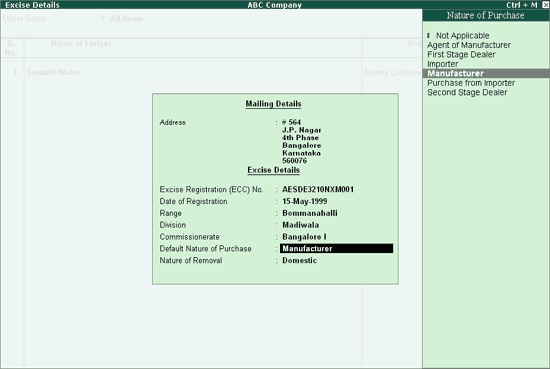
Press enter to save supplier's excise details.
In Name of Ledger field enter the name of the customer e.g. Universal Distributors.
Select Sundry Debtors as the group name in Under field.
Enable Set/Alter Excise Details to Yes to view Excise Details screen.
In the Excise Details screen,
Under Mailing Details enter party address
Under Excise Details enter party excise registration details
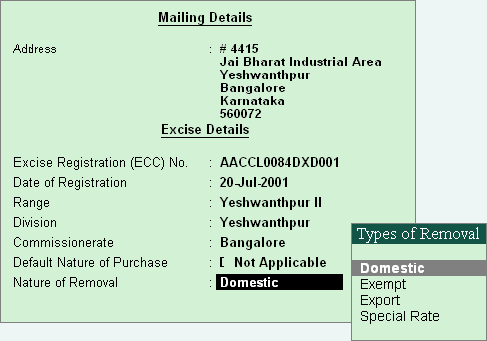
Press enter to save customer's excise details.
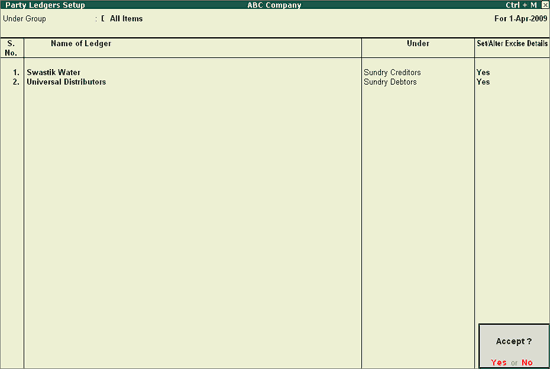
Press Enter to save.
Note: You can also create Party Ledgers from Gateway of Tally > Accounts Info. > Ledgers
To know more on creating party ledgers from Ledgers menu refer topics -
Excise Duty Ledgers are created to account the duty liability on the goods removed or to account the CENVAT Credit portion which is not availed during purchase of Inputs.
To create Excise Duty Ledger press Alt+D or select the option D: Excise Duty Ledgers and press Enter to view Excise Duty Ledgers Setup screen.
In Excise Duty Ledgers Setup screen
Enter the Name of the excise duty ledger you wish to create, for e.g., Basic Excise Duty @ 10% in Name of Ledger field
Select Duties & Taxes as the group name in the Under field.
In Excise Duty Type field select Basic Excise Duty from the List of Excise Duty Ledger

In Duty Head field based on the duty type selected in Excise Duty Types field duty head will be displayed automatically. e.g. Basic Excise Duty.
In Excise Accounting Code field enter the accounting code of Basic Excise Duty- 00380003.
Note: 8 digit Accounting Code and amount tendered against each type of duty should be mentioned in G.A.R.-7 Challan.
In Rate of Duty field mention the applicable rate of duty - 10%
Enter the Name of the education cess ledger you wish to create, for e.g., Education Cess @ 2%.
Select Duties & Taxes as the group name in the Under field.
In Excise Duty Type field select Education Cess from the List of Excise Duty Ledger
In Duty Head field based on the duty type selected in Excise Duty Types field duty head will be displayed automatically. e.g. Education Cess.
In Excise Accounting Code field enter the accounting code of Basic Excise Duty- 00380111.
In Rate of Duty field mention the applicable rate of duty - 2%
Enter the Name of the excise duty ledger you wish to create, for e.g., Secondary Education Cess @ 1%.
Select Duties & Taxes as the group name in the Under field.
In Excise Duty Type field select Secondary & Higher Education Cess from the List of Excise Duty Ledger
In Duty Head field based on the duty type selected in Excise Duty Types field duty head will be displayed automatically. e.g. Secondary Education Cess.
In Excise Accounting Code field enter the accounting code of Basic Excise Duty- 00380003.
In Rate of Duty field mention the applicable rate of duty - 1%
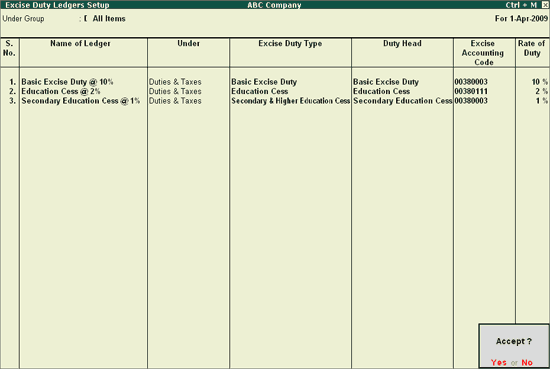
Press Enter to save.
Note: You can also create Excise Duty Ledgers from Gateway of Tally > Accounts Info. > Ledgers
To know more on creating excise duty ledgers from Ledgers menu refer topics -
1. Creating Basic Excise Duty Ledger
N : CENVAT Ledgers
CENVAT Ledgers are created to avail and account the CENVAT Credit on the Raw Materials (Inputs) purchased.
To create CENVAT Ledger press Alt+N or select the option N: CENVAT Ledgers and press Enter to view CENVAT Ledgers Setup screen.
In CENVAT Ledgers Setup screen
Enter the Name of the CENVAT ledger you wish to create, for e.g., Basic Excise Duty - CENVAT in Name of Ledger field
Select Current Assets as the group name in Under field.
Note: Tally.ERP 9 allows the user to create CENVAT Ledgers under Current Assets or Duties & Taxes. If the user
* Wants Net Group balance to be displayed then create CENVAT Ledger under Duties and Taxes
Example: Tax Liability (Rs. 10000) – credit (Rs. 3000) = Net (Group) Duty Liability
(Rs. 7000)
* Wants separate balance of Tax Liability and Credit to be displayed create CENVAT Ledger under Current Assets
Example: Tax Liability = Rs. 10000
Credit Account = Rs. 3000
In Excise Duty Type field select CENVAT Basic Excise Duty from the List of Excise Duty Ledger
In Duty Head field based on the duty type selected in Excise Duty Types field duty head will be displayed automatically. e.g. Basic Excise Duty.
Skip the Excise Accounting Code field. As the CENVAT Ledgers are not used to account duty payable it is not must to provide Excise Accounting Code. If required enter the accounting code.
In Rate of Duty field enter the duty rate as 10%
Enter the Name of the CENVAT ledger you wish to create, for e.g., Education Cess - CENVAT.
Select Current Assets as the group name in Under field.
In Excise Duty Type field select CENVAT Education Cess from the List of Excise Duty Ledger
In Duty Head field based on the duty type selected in Excise Duty Types field duty head will be displayed automatically. e.g. Education Cess.
Skip the Excise Accounting Code field. As the CENVAT Ledgers are not used to account duty payable it is not must to provide Excise Accounting Code. If required enter the accounting code.
In Rate of Duty field enter the duty rate as 2%
Enter the Name of the CENVAT ledger you wish to create, for e.g., Secondary Education Cess - CENVAT.
Select Current Assets as the group name in Under field.
In Excise Duty Type field select CENVAT Secondary & Higher Education Cess from the List of Excise Duty Ledger
In Duty Head field based on the duty type selected in Excise Duty Types field duty head will be displayed automatically. e.g. Secondary Education Cess.
Skip the Excise Accounting Code field. As the CENVAT Ledgers are not used to account duty payable it is not must to provide Excise Accounting Code. If required enter the accounting code.
In Rate of Duty field enter the duty rate as 1%
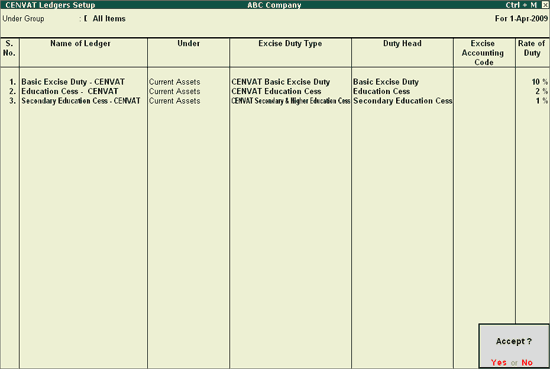
Press Enter to save.
Note: You can also create CENVAT Ledgers from Gateway of Tally > Accounts Info. > Ledgers
R : Additional Charges / Discount Ledgers
During Purchase or sale there is a possibility that some additional charges (or Discounts) might have been incurred (or given) during purchase (or sales) which will be included in purchase cost (or sales cost) to calculate the duty amount. Accounting duty on Assessable value inclusive of additional charges (or exclusive of discounts) is possible only when the expenses/discount ledger is created with appropriate configurations.
To create Additional Charges/ Discount Ledgers press Alt+R or select the option R: Additional Charges/Discount Ledgers and press Enter to view Additional Charges/Discount Ledgers Setup screen
In Additional Charges/Discount Ledgers Setup screen
Enter the Name of the expense ledger you wish to create, for e.g., Packing Charges in Name of Ledger field
Select Direct Expenses as the group name in Under field.
Set the option Use for Assessable Value Calculation to Yes
In Apportion for field select Excise & VAT form Duty/Tax Type.
Note: Based on the Duty/Tax Type selected (Excise & VAT) for the option Use for Assessable Value Calculation, the Value given against this ledger in the sales/Purchase voucher will be considered to calculate the assessable value of the stock item to compute the excise duty and VAT.
In Method of Apportion select Based on Value from Method of Apportion.
In case of Based on Value method of apportion, expenses will be apportioned based on the Value of the Stock item.
Packing charges is 5,000
Value of Item X is 50,000
Value of Item Y is 60,000
Apportionment of Packing Charges to Item X: 5,000*50,000/1,10,000 =2272.73
Apportionment of Packing Charges to Item Y: 5,000*60,000/1,10,000 = 2727.27
Assessable Value of Item X (52,272.73) = Value of Item X (50,000) +Packing Charges (2,272.73)
Assessable Value of Item Y (62,727.27) = Value of Item Y (60,000) +Packing Charges (2,727.27)
In case of Based on Quantity method of apportion, expenses will be apportioned based on the quantity of the Stock item.
Packing charges is 5,000
Quantity of Item X is 200 and Value is 20,000
Quantity of Item Y is 600 and Value is 60,000
Apportionment of Packing Charges to Item X: 5,000*200/800 =1,250
Apportionment of Packing Charges to Item Y: 5,000*600/800 = 3,750
Assessable Value of Item X (21,250) = Value of Item X (20,000) +Packing Charges (1,250)
Assessable Value of Item Y (63,750) = Value of Item Y (60000) +Packing Charges (3,750)
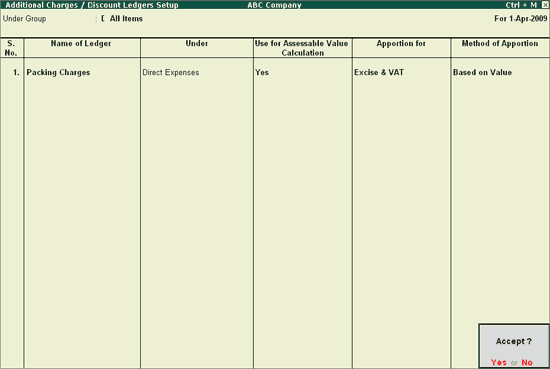
Press Enter to Save.
Note: You can also Additional Charges/ Discount Ledgers from Gateway of Tally > Accounts Info. > Ledgers
To know more on creating Additional Charges/ Discount Ledgers from Ledgers menu refer topics - Creating a Expense Ledger.
In Tally.ERP 9, all the Excise transactions needs to be recorded in Excise Voucher Types. You can create or alter the existing default voucher types to meet the requirement.
Voucher Types Setup guides you to create excise voucher types required to record excise transactions. For more details on voucher type creation Click on the below links.
F9 : Excise Purchase
To create Excise Purchase voucher type press F9 key or select the option F9 : Excise Purchase and press Enter to view Excise Purchase Voucher Type Setup screen.
Note: Here we are creating new voucher type by retaining the default voucher type available in Tally.ERP 9
In Excise Purchase Voucher Type Setup screen,
Enter the name of the Voucher type in Name Field e.g. Excise - Purchases
In Type of Voucher field application displays the voucher type as Purchase
Select the appropriate Method of Voucher Numbering e.g. Automatic
Set Use for Excise to Yes to enter Excise Purchase to capture Assessable Value and Excise Duty breakup.
In Default Excise Unit field select ABC Company from the List of Excise Units

Skip Name of Class field.
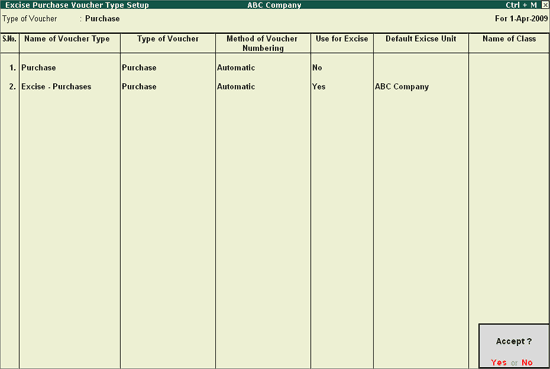
Press enter to save.
Note: You can also create Excise Voucher types from Gateway of Tally > Accounts Info. > Voucher Types
To know more on creating voucher Types refer topic - Creating Excise Voucher Types
F8 : Rule 11 Invoice (Excise Sales Invoice)
To create Sales voucher type press F8 key or select the option F8 : Rule 11 Invoice (Excise Sales Invoice) and press Enter to view Rule 11 Invoice (Excise Sales Invoice) Voucher Type Setup screen.
Note: Here we are creating new voucher type by retaining the default voucher type available in Tally.ERP 9
In Rule 11 Invoice (Excise Sales Invoice) Voucher Type Setup screen,
Enter the name of the Voucher type in Name Field e.g. Excise - Sales
In Type of Voucher field application displays the voucher type as Sales
Select the appropriate Method of Voucher Numbering e.g. Automatic
Set Use for Excise to Yes to enter Excise Purchase to capture Assessable Value and Excise Duty breakup.
In Default Excise Unit field select ABC Company from the List of Excise Units
Skip Name of Class field.
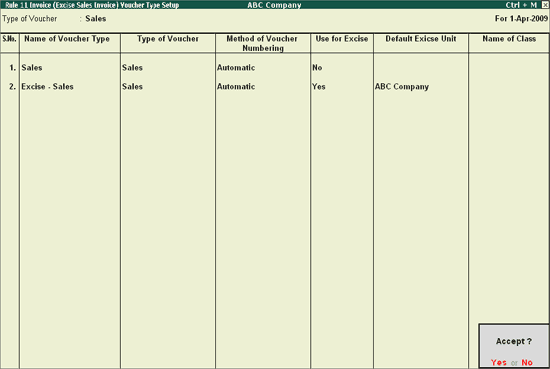
Press enter to save.
Note: You can also create Excise Voucher types from Gateway of Tally > Accounts Info. > Voucher Types
To know more on creating voucher Types refer topic - Creating Excise Voucher Types
Ctrl+ F9 : Rule 11 Invoice (Purchase Return)
In cases where you are not availing CENVAT credit on Inputs purchased while accounting purchases, same can be availed later. In Tally. ERP 9 CENVAT Availing entry can be recorded through a Debit Note (with Voucher Class).
To avail CENVAT credit you can alter Default Debit Note by creating CENVAT Availing Voucher Class or can create separate voucher type with Class under Debit note. It is suggested to alter the default Debit note by defining the CENVAT Availing Voucher Class.
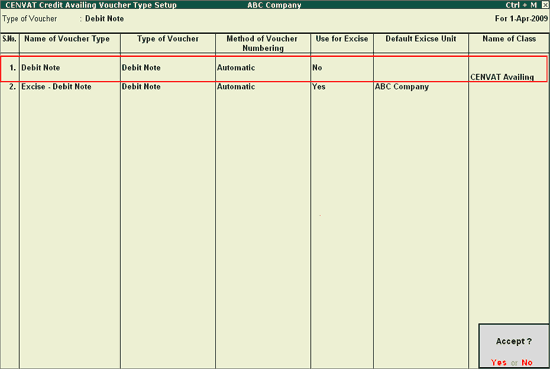
To create voucher class in Debit Note to account CENVAT Credit Availing press Alt+A or select A: CENVAT Credit Availing to view CENVAT Credit Availing Voucher Type Setup screen
In CENVAT Credit Availing Voucher Type Setup screen, Tally.ERP 9 displays default Debit Note voucher along with the Excise Debit Note voucher if any.
Select Debit Note Voucher Type. Retain the default settings in Name of Voucher Type, Method of Voucher Numbering
Set the option Use for Excise to NO
In Name of Class field mention the class name as - CENVAT Availing

Press Enter to view Voucher Type Class screen
In Voucher Type Class screen
Set the option Use Class for Excise /CENVAT Adjustment to Yes
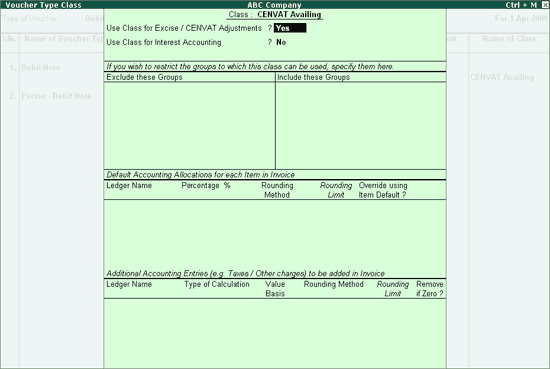
Press Enter to save voucher Type Class screen
Press enter to save.
Note: You can also create voucher class for Debit Note from Gateway of Tally > Accounts Info. > Voucher Types > Alter > Debit Note
To know more on creating Voucher Class for Debit Note refer the topic - CENVAT Credit on Purchases from Excise Dealers
F7 : Adjustment of CENVAT Credit /Advanced Adjustment
Under Central Excise Act Excise duty is payable monthly or quarterly depending on the Type of manufacturer. If you’re a Regular Manufacturer, Excise Duty is payable Monthly and if you are SSI Excise Duty is payable Monthly. Hence the CENVAT Credit Adjustment entry is recorded at the end of Every month or Quarter depending on the type of Manufacturer.
For the payment of Excise Duty, CENVAT Credit available to a Unit will be adjusted towards the Duty Payable to arrive at the Net Duty Payable to the Government.
In Tally.ERP 9 to record the adjustment entry is recorded in Journal Voucher with a CENVAT Adjustment Voucher Class by Crediting - CENVAT Ledgers and Debiting - Excise Duty Ledgers to nullify their balances and the net balance in the Excise Duty ledgers will be paid to the Government.
Note: This Voucher Type can also be used to adjust the Advance Excise duty paid to the Government towards Excise Duty payable for the current month.
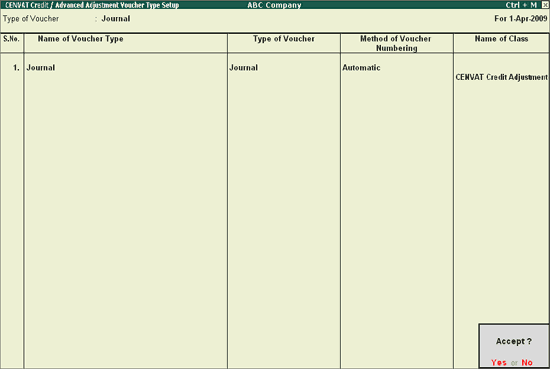
To create CENVAT Adjustment Class in Journal Voucher press F7 Key or select F7: Adjustment of CENVAT Credit / Advanced Adjustment and press enter to view CENVAT Credit /Advanced Adjustment Voucher Type Setup screen.
In CENVAT Credit /Advanced Adjustment Voucher Type Setup screen, Application displays default Journal Voucher
Select Journal Voucher Type. Retain the default settings in Name of Voucher Type, Method of Voucher Numbering
In Name of Class field mention the class name as - CENVAT Credit Adjustment

Press Enter to view Voucher Type Class screen
In Voucher Type Class screen
Set the option Use Class for Excise /CENVAT Adjustments to Yes

Press Enter to save Voucher Type Class screen.
Press enter to save.
Note: You can also create voucher class for Journal from Gateway of Tally > Accounts Info. > Voucher Types > Alter > Journal Voucher
To know more on creating Voucher Class for Debit Note refer the topic - Creating a Journal Voucher - CENVAT Credit Adjustment
F7 : Manufacturing/ Stock Journal
In Tally.ERP 9 you can record production (of finished goods) entry through Manufacturing Journal or Excise - Stock Journal.
Manufacturing Voucher type – Used to record the production of Single Finished Goods
Excise - Stock Journal – Used to record the production of Multiple Finished Goods
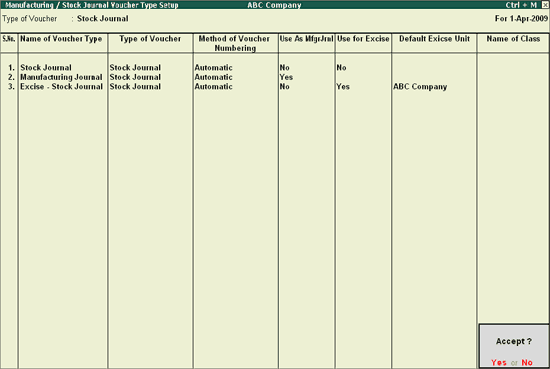
To create Manufacturing or Excise - Stock Journal press Alt +F7 or select F7 : Manufacturing /Stock Journal and press Enter to view Manufacturing / Stock Journal Voucher Type Setup screen
In Tally.ERP 9 user can create a Manufacturing Journal under Stock Journal or alter the exiting Stock Journal
Note: Here we are creating new voucher type by retaining the default voucher type available in Tally.ERP 9
In Manufacturing / Stock Journal Voucher Type Setup screen
Enter the name of the Voucher type in Name Field e.g. Manufacturing Journal
In Type of Voucher field application displays the voucher type as Stock Journal
Select the appropriate Method of Voucher Numbering e.g. Automatic
Set the option Use As Manf Jurl to Yes
There are industries which use common raw materials to manufacture multiple finished goods. In this case Raw materials will be issued from godown to production floor for the manufacture of multiple finished goods (with or without by-products).
In Tally.ERP 9, multiple finished goods manufacture (with or without by-products) can be recorded using Excise-Stock Journal.
Enter the name of the Voucher type in Name Field e.g. Excise - Stock Journal
In Type of Voucher field application displays the voucher type as Stock Journal
Select the appropriate Method of Voucher Numbering e.g. Automatic
Set Use for Excise to Yes
In Default Excise Unit field select ABC Company from the List of Excise Units
Press Enter to save.
Additional Voucher types are required to record the excise purchase /Sales Orders or Delivery/ Receipt of goods and to track these vouchers in excise Purchase or Sales vouchers.
F4 : Purchase Order
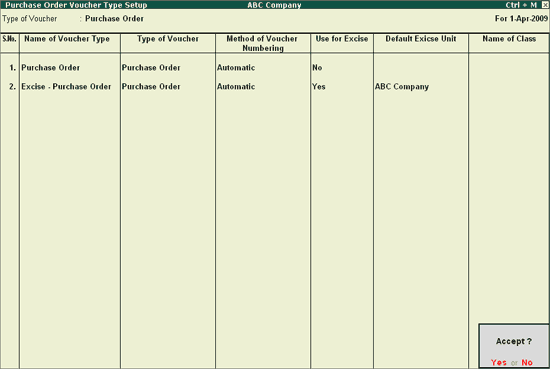
To create Excise Purchase Order voucher type press Alt+F4 or select the option F4: Purchase Order and press Enter to view Purchase Order Voucher Type Setup screen.
Note: Here we are creating new voucher type by retaining the default voucher type available in Tally.ERP 9
In Purchase Order Voucher Type Setup screen
Enter the name of the Voucher type in Name Field e.g. Excise - Purchase Order
In Type of Voucher field application displays the voucher type as Purchase Order
Select the appropriate Method of Voucher Numbering e.g. Automatic
Set Use for Excise to Yes.
In Default Excise Unit field select ABC Company from the List of Excise Units
Skip Name of Class field.
Press Enter to save.
F5 : Sales Order
To create Excise Sales Order voucher type press Alt+F5 or select the option F5: Sales Order and press Enter to view Sales Order Voucher Type Setup screen.
Note: Here we are creating new voucher type by retaining the default voucher type available in Tally.ERP 9
In Sales Order Voucher Type Setup screen
Enter the name of the Voucher type in Name Field e.g. Excise - Sales Order
In Type of Voucher field application displays the voucher type as Sales Order
Select the appropriate Method of Voucher Numbering e.g. Automatic
Set Use for Excise to Yes.
In Default Excise Unit field select ABC Company from the List of Excise Units
Skip Name of Class field.
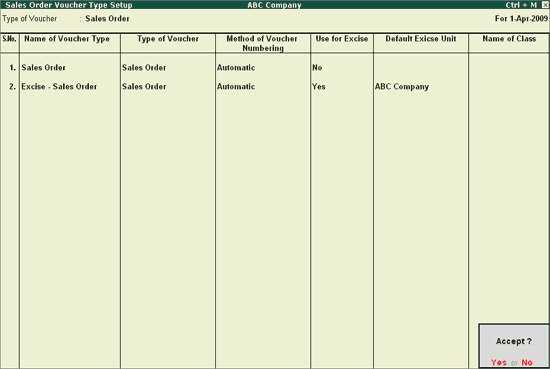
Press Enter to save.
F8 : Delivery Note
To create Excise Delivery Note voucher type press Alt+F8 or select the option F8: Delivery Note and press Enter to view Delivery Note Voucher Type Setup screen.
Note: Here we are creating new voucher type by retaining the default voucher type available in Tally.ERP 9
In Delivery Note Voucher Type Setup screen
Enter the name of the Voucher type in Name Field e.g. Excise - Delivery Note
In Type of Voucher field application displays the voucher type as Delivery Note
Select the appropriate Method of Voucher Numbering e.g. Automatic
Set Use for Excise to Yes.
In Default Excise Unit field select ABC Company from the List of Excise Units
Skip Name of Class field.
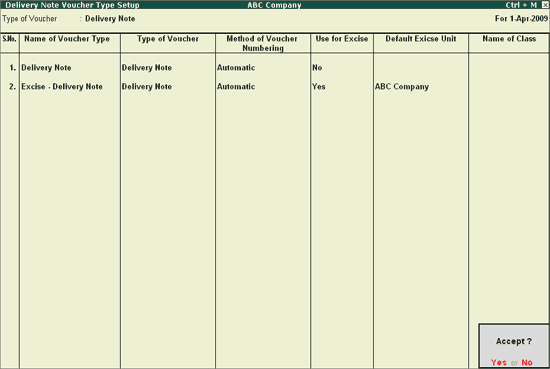
Press Enter to save.
F9 : Receipt Note
To create Excise Receipt Note voucher type press Alt+F9 or select the option F9: Receipt Note and press Enter to view Receipt Note Voucher Type Setup screen.
Note: Here we are creating new voucher type by retaining the default voucher type available in Tally.ERP 9
In Receipt Note Voucher Type Setup screen
Enter the name of the Voucher type in Name Field e.g. Excise - Receipt Note
In Type of Voucher field application displays the voucher type as Receipt Note
Select the appropriate Method of Voucher Numbering e.g. Automatic
Set Use for Excise to Yes.
In Default Excise Unit field select ABC Company from the List of Excise Units
Skip Name of Class field.
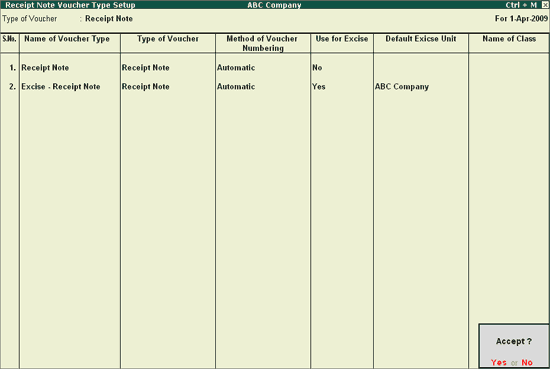
Press Enter to save.
Advanced Setup guides you to create additional excise establishments, additional excise bill book and to update excise duty of one stock item to multiple stock items at once. For more details on creating additional excise establishments additional excise bill book and to update excise duty to multiple stock items Click on the below links.
Note: To view the advance setup options press Enter from Advanced Setup or press F5 key or click on F5: Show Adv config button in the buttons bar.
X : Creating Additional Excise Establishment / Factory
In Tally.ERP 9 you can create multiple excise establishments in single company.
To create additional excise establishment press Alt+X or select X: Creating Additional Excise Establishment/Factory and press Enter to view Additional Excise Establishment /Factory Setup screen
In Additional Excise Establishment /Factory Setup screen
In Name field enter the additional Excise Factory name e.g. National Manufacturers
In Under field select Primary
In Excise Registration Type field select Manufacturer
To enter the excise registration details set the option Set/Alter Excise Details to Yes
In Excise Details screen
In Address field enter the address of the excise factory
Enter PIN Code and Telephone No. of the Excise Factory
Enter the Excise Details like
Excise Registration No. - ASSED4578SXM001
Date Of Registration - 10-Jun-2001
Type of Manufacturer - Regular
Excise Book Name (as Per Rule 11)- NM/Book 1/09-10 and enter the details in Serial Number alteration (Secondary) screen as shown below
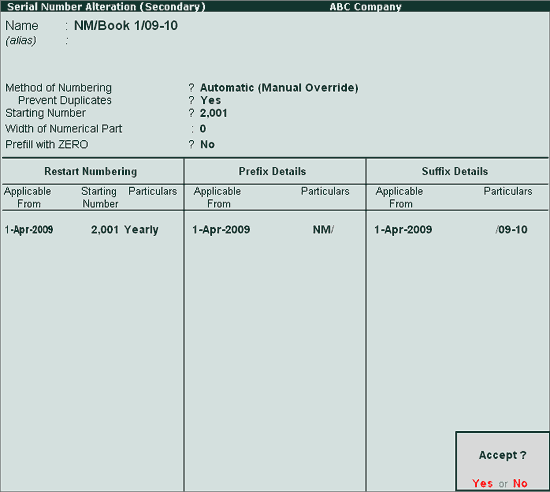
Press Enter to save Serial Number alteration (Secondary) screen
Enter Other Details like Range, Division and Commissionerate details.
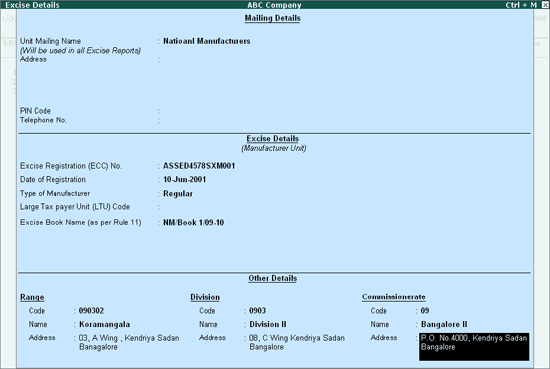
Press Enter to save Excise Details
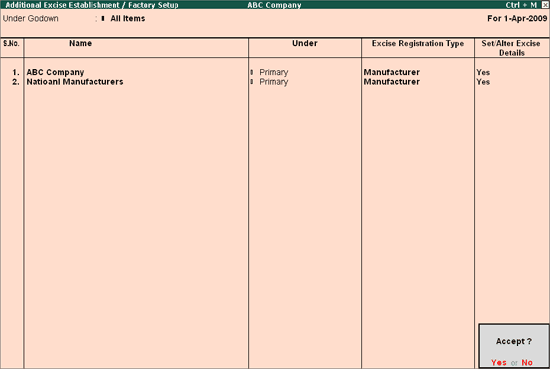
Press Enter to save.
Note: Additional Excise Establishment/Factory can also be created from Gateway of Tally > Inventory info. > Godowns / Excise Units > Create
U : Updating Excise Duty for Multiple Stock Items
In case of companies which have many stock items and doesn't want to define Duty to each item separately when ever there is change in duty (because of budget or any other reason), can use multi stock duty alteration option available in Tally.ERP 9 to copy the duty details of one stock item to multiple stock items.
Example: Update the excise duty details of Pet Bottles - 1Ltr to other stock Items like Pet Bottles - 2Ltr , Pet Bottles - 700ml etc.
To update excise duty details to multiple items press Alt+U or select the option U : Updating Excise Duty for Multiple Stock Items and press Enter to view Set Excise Duty Rates Setup screen.
In Set Excise Duty Rates Setup screen
Copy From: In this field select the stock item from which the duties to be copied i.e. Pet Bottles - 1Ltr
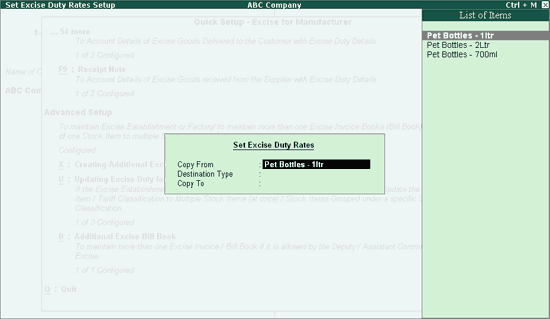
Destination Type: Here select the destination type to which you want to copy the duties. Tally.ERP 9 gives 3 Destination Types.
Stock Groups: If this destination type is selected, the duty details will get copied to all the stock items created under the selected Stock Group.
Stock Items: If this destination type is selected, the duty details will be copied to the Stock Item selected.
Tariff Classifications: If this destination type is selected, the duty details will get copied to all the stock items which fall under the selected Tariff Classification.
Here, Tariff Classifications is selected as the Destination Type
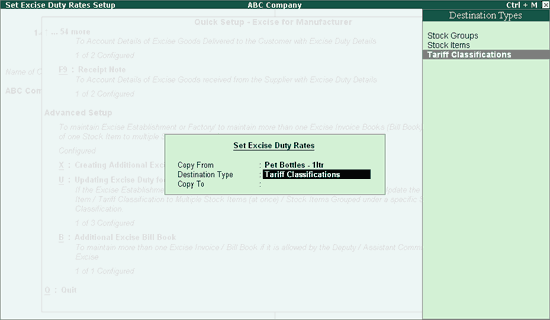
Copy To: In this filed depending on the destination type selected, identify the stock item/Stock Group /Tariff Classifications to copy the excise Duties
Select Plastic Bottles from the List of Tariff Classifications

Press Enter to view Excise Duty Details screen
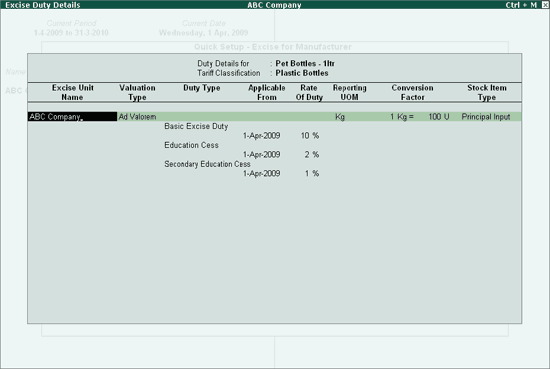
Note: The above screen displays the details (Excise Unit Name, valuation Type,Units, etc.) which will copied to the stock items.
Press Enter to view Proceed to Set Excise Duty screen
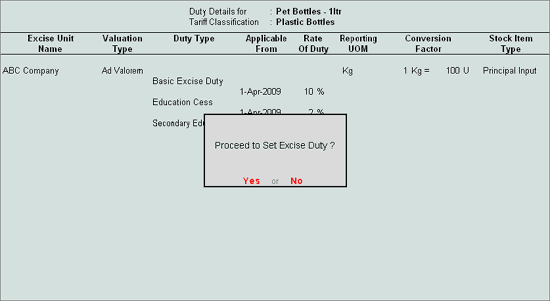
Press Enter to set excise Duty.
Now the stock items created under Tariff Classification Plastic Bottles would have been updated with the excise duties. Details like -
Stock Items to which the duty rates are updated
Number of stock items grouped under stock group/tariff classification (displayed when the Stock Group /Tariff Classifications is selected in Copy to field)
To how may Items update has been done.
will be displayed in the Calculator Pane.
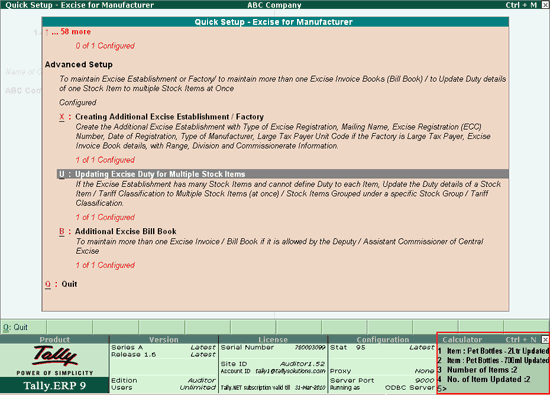
Note: You can also update excise duty for multiple stock items from Gateway of Tally > Inventory Info. > Stock Items > Update Excise Duties
To know more on updating excise duty for multiple stock items refer the topic - Multi Stock Duty Alteration
B : Additional Excise Bill Book
In Tally.ERP 9 user can create more than one Excise Bill Book for the same company or Unit. But, as per Rule 11 of Central Excise Rules, 2001 only one invoice book shall be in use at a time. A unit can maintain more than one invoice book if it is allowed by the Deputy/Assistant Commissioner of Central Excise.
To create Additional Excise Bill Book press Alt+B or select B: Additional Excise Bill Book and press enter to view Additional Excise Bill Books Setup screen.
Additional Excise Bill Books Setup screen displays the excise bill book which was created during excise establishment creation.
To create Additional Excise Bill Book
In Name of Excise Book enter the additional excise invoice book name allowed by the Commissioner of Central Excise for the company/unit, e.g. ABC/Rule11/Book2/09-10
By default Automatic (Manual Override) is displayed as the Method of Numbering.
Set Prevent Duplicates field to Yes.
In Starting Number field enter the Starting Voucher Number which is allowed by the Commissioner of Central Excise. E.g. 101
In Width of Numerical part field mention the width of the numerical part if required.
Set the field Prefill with Zero to No
Set the field Advanced Configuration to Yes and press enter to view serial number setup screen
In Serial Number Setup screen enter the details of Restart Numbering, Prefix and Suffix.

Press enter to save Serial Number setup
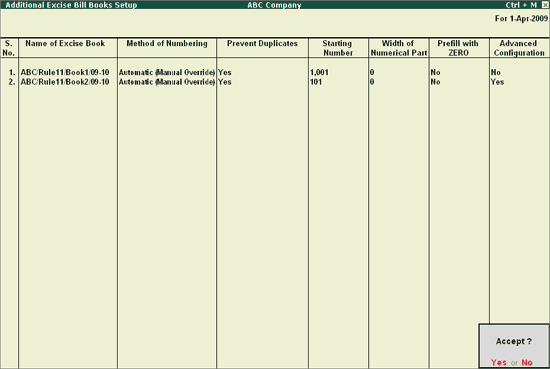
Press enter to save
Note: You can also create Additional Excise Bill Book from Gateway of Tally > Accounts Info. > Serial Number
To quit from Excise for Manufacturer Quick Setup screen press Alt+Q or select Q: Quit and press enter.