Apply Filters in TallyPrime Reports
For TallyPrime 3.0 & later
|For TallyPrime 2.1 & earlier|
You can filter reports in TallyPrime to view only the data that matches specific conditions. Depending on your requirement, you can apply a Basic Filter, Multi-Filter, or Advanced Filter.
Basic Filter lets you search using a single condition, Multi-Filter helps you combine multiple conditions, and Advanced Filter enables in-depth filtering based on detailed analysis of report data and underlying masters and vouchers.
After applying a filter, you can view Filter Details to see where the specified conditions match in vouchers and masters.
Apply Basic Filter

In the Basic Filter mode, you can filter a report using a single value or text.
For example, let’s consider filtering for the ledger AVN Traders in Day Book.
- In Day Book, press Ctrl+F (Apply Filter).
In the Basic Filter screen, Apply Filter on is set to Voucher, by default. - To Filter the vouchers based on a value/text used in any field, enter the text AVN Traders in the Look for field.
TallyPrime will look for vouchers where AVN Traders has been used. - Filter vouchers based on a value used in a specific field and set the parameters.
- Press F12 (Configure) and enable Select specific field to apply Filter.
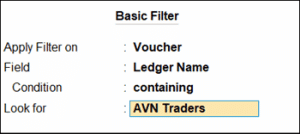
- Select the Field, for example Ledger Name.
- Select the Condition, based on your need for filtering.
For example:- Select containing if AVN Traders is only part of the party name.
- Select equal to if the party name is AVN Traders.
- Press F12 (Configure) and enable Select specific field to apply Filter.
- Press Enter to apply the filter.
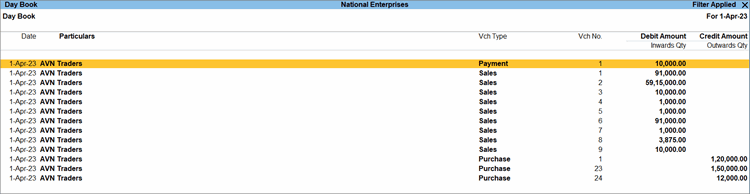
The Day Book with the Filter Applied status displays all the transactions with AVN Traders. - To view the filter details with the fields that matched the filter conditions, press Ctrl+Alt+F (Filter Details).
For TallyPrime 6.2 or earlier, press Alt+F (Filter Details).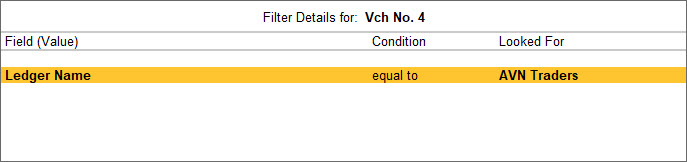
The filters available in each report depend on the report details and business requirements. Certain reports, such as Sales Register and Day Book, list only vouchers. Therefore, you can apply filters only to the vouchers displayed in these reports.
Apply Multi-Filter
Use Multi-Filter mode to filter a report using multiple conditions. You can combine conditions using and or or operators.
- and: Displays results that match all specified conditions.
- or: Displays results that match any one of the specified conditions.
- You can also combine and and or operators to define more complex filter criteria.
For example, let’s consider filtering for Cash transactions with ₹50,000 in Day Book.
- Open Day Book for the selected period > Ctrl+F (Apply Filter) > F6 (Multi-Filter).
In the Multi Filter screen, the Apply Filter on is set to Voucher, by default. - Set the parameters to filter vouchers based on the text or value you are looking for.
- Select the Field, for example Ledger Name.
- Select the Condition, for example containing.
- In the Look For field enter a text or value, for example Cash.
- To add another condition, press Enter and select and/or.
- Select and to display the transactions with ledger name containing Cash and amount greater than ₹50,000.
Only Cash transactions above ₹50,000 will be displayed. - Select or to display the transactions with ledger name containing Cash or amount greater than ₹50,000.
Transactions that contain Cash, transactions above ₹50,000, or both will be displayed. - Select and & or together to display transactions with ledger name containing Cash and Amount greater than ₹50,000 or Ledger Name containing Bank.
Cash transactions above ₹50,000 and all Bank transactions will be displayed.
- Select and to display the transactions with ledger name containing Cash and amount greater than ₹50,000.
- Set another set of parameters to filter the report further.
- Select the Field, for example Amount.
- Select the Condition, for example greater than.
- In the Look For field enter a text or value, for example 50000.
- Press Enter and select End of List.
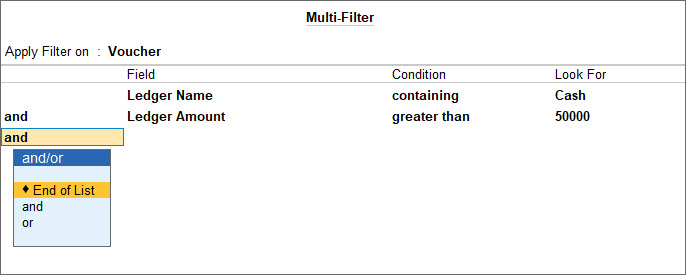
The Day Book with the Filter Applied status displays transactions with Cash and an amount greater than ₹50,000.
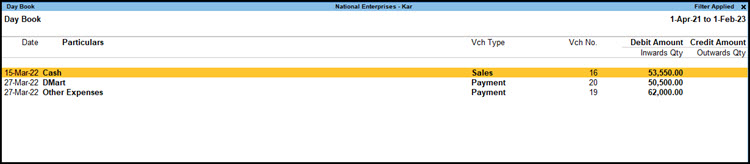
- To view the filter details with the fields that matched the filter conditions, press Ctrl+Alt+F (Filter Details).
For TallyPrime 6.2 or earlier, press Alt+F (Filter Details).
Apply Advanced Filter
Use Advanced Filter to filter report data using conditions from related masters or master hierarchies.
For example, you need to submit a report that displays the total quantity of Samsung products sold to Krishna Enterprises, out of the total sold items. In this case, you will need to filter for items with the name Samsung, and look for vouchers where the party is Krishna Enterprises..
- Open the Stock Group Summary report for the selected period > Ctrl+F (Apply Filter) > F7 (Advanced Filter).
- Under Filter Rows, provide the set of parameters to look for the ledger.
For example, stock items that have name as Samsung.- Select Name from List of Fields.
- Select containing from List of Conditions.
- Enter Samsung and select End of List.
You can use the and or or option and provide any additional parameters, as needed.
- Under Calculate Values, provide the set of conditions to look for transactions.
For example, transactions recorded for Krishna Enterprises for the sale of Samsung stock items.- Select Ledger Name from List of Fields.
- Select equal to from List of Conditions.
- Enter Krishna Enterprises and select End of List.
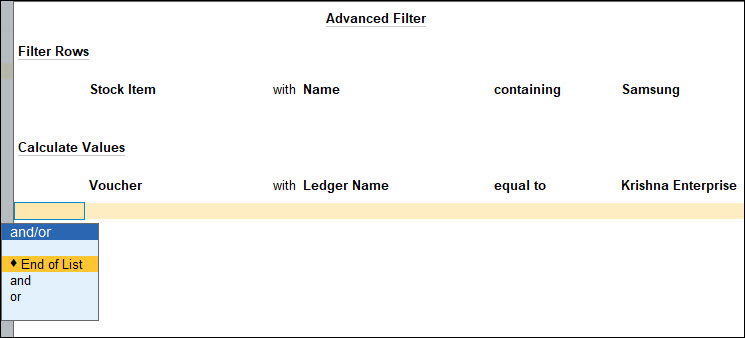
The filtered Stock Group Summary report with the Filter Applied status displays the stock items where the name contains Samsung and the values are based on transactions recorded for Krishna Enterprise.
- View filter details for Filter Rows and Calculate Values.
- To view the details matching the condition entered under Filter Rows, press Ctrl+Alt+F (Filter Details) directly from the filtered report.
For TallyPrime 6.2 or earlier, press Alt+F (Filter Details).

- To view the details matching the conditions entered under Calculate Values, drill down from the report to the voucher level, and press Ctrl+Alt+F (Filter Details).
For TallyPrime 6.2 or earlier, press Alt+F (Filter Details).

- To view the details matching the condition entered under Filter Rows, press Ctrl+Alt+F (Filter Details) directly from the filtered report.
Questions & Answers
- Why should I set a default filter mode for reports?
If you frequently use a specific filter type while analysing reports, you can set it as the default filter mode to save time and avoid selecting it repeatedly. For example, if you regularly apply multiple filtering conditions, you can set Multi-Filter as the default.- Press F1 (Help) > Settings > Display.
- Under Reports, select Default Filter mode for Reports, and select one of the Filter Modes.
The next time you press Ctrl+F (Apply Filter) in a report, the Multi-Filter screen will appear by default
- How do I remove a filter applied to a report?
If you no longer need the filtered view and want to see all records in the report again, you can remove the applied filter by pressing the Esc button. - How do I change an existing filter?
If the current filter does not give you the required results, you can modify the parameters for each filter and refine the report without applying a new filter. - How do I find out why a transaction appears in the filtered results?
If a transaction appears in the filtered report and you want to understand which filter condition matched it, you can view the details of the applied filter and verify the reason.- To view the filter details, press Ctrl+Alt+F (Filter Details).
For TallyPrime 6.2 or earlier, press Alt+F (Filter Details).
- To view the filter details, press Ctrl+Alt+F (Filter Details).
- Can I save a report after applying a filter?
Yes. If you want to preserve a filtered view for future reference, you can press Ctrl+L (Save View) to save the report with the required filters. - Why can’t I view Filter Details for some rows in reports such as Balance Sheet or Ratio Analysis?
Some reports contain default rows that are displayed regardless of the filter conditions applied. Since these rows are not part of the filtered results, Filter Details are not available for them.
For example:- In Balance Sheet, rows such as Difference in Opening Balances may appear even when they do not meet the filter criteria.
- In Ratio Analysis, rows such as Working Capital, Current Ratio, and Quick Ratio are displayed by default to support drill-down analysis.
When you select these default rows and view Filter Details, TallyPrime informs you that Filter Details are not applicable for the selected row.
- Why can’t I see Filter Details for some rows in a report displayed in Detailed format?
When a report is viewed in Detailed format, filters are applied only to the primary rows. Secondary rows are displayed based on the primary row but are not directly evaluated against the filter conditions.
For example, if a filter is applied in the Stock Summary:- Stock Groups are the primary rows and are filtered.
- Stock Items are secondary rows displayed under the matching Stock Groups.
If you select a secondary row, such as a Stock Item, and view Filter Details, TallyPrime indicates that Filter Details are not applicable because the filter was applied only to the primary row.