
Print Invoices and Reports in TallyPrime
In TallyPrime, easily print invoices, financial reports, and other business documents, as and when you need. You can also configure for printing at the application level to apply the settings to all printing jobs. Further, you can configure printing for each invoice/report separately to save paper, view invoice/report details, and more.
Set Up Print Configurations (Application)
![]()
Set print configurations at application level to apply for printing all documents.
Open Print Configuration: Press Alt+P (Print) > Configuration.
Set default printer, paper size, & print size
- Under Print Configuration, select Printer > press Enter.
- Under Printer Settings, select the required printer from the List of Printers.

If you want to add Digital Signature, select Microsoft Print to PDF and provide the Digital Signature details. - In the Printer Properties window, set the Paper Size.
Based on the printer you have selected, you can configure print size, print quality and others as needed.
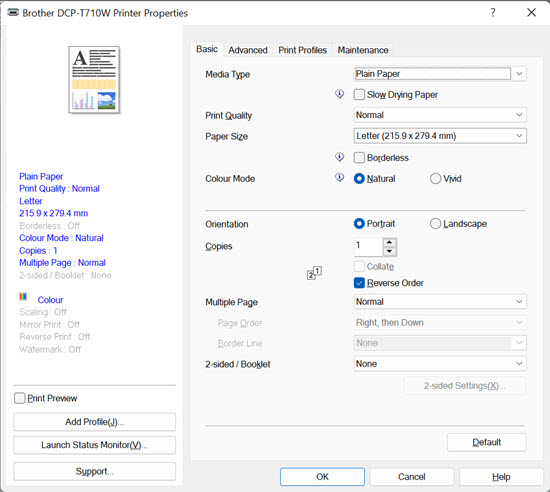
- Click OK to save.
Next time the documents you print will follow the print size and other settings.
Set number of copies for print
![]()
- Under Print Configuration, select Set no. of copies for printing vouchers > press Enter.
- Specify the number of copies that you want to print for each voucher type, and save.
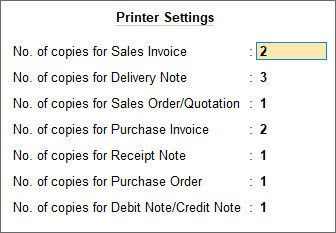
Next time you print an invoice, the printer will by default print the exact number of copies you have set in this screen.
Set Print Preview as default
- Under Print Configuration, set Set Preview as Default to Yes.
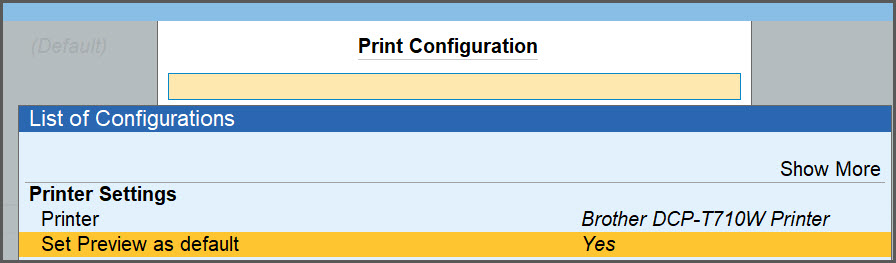
Next time you print a document, the Preview button on the Print screen is selected by default. On pressing Enter, you can preview the document for printing.
If you have Set Preview as default to No, then the Print button is selected by default. You can still preview by pressing I (Preview).
Print Company Name & Company Address
![]()
- Under Print Configuration, Set Show Company Name and Show Company Address to Yes.
- If you have multiple addresses for the company, select the Type of Address from the List of Address Types.
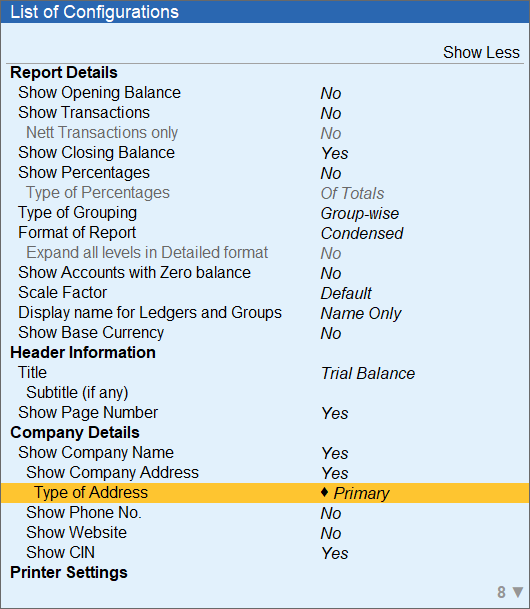
When you print a document, the company address will appear in the printed document.
Print Company Logo
![]()
- Under Print Configuration, set Include company logo as Yes.
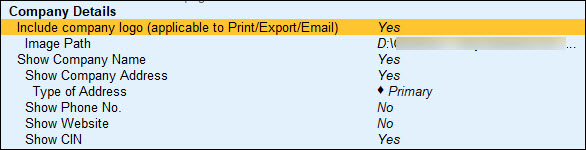
- In the Company Details screen, update the Image File Name.
The Image Path field will be updated by default after updating the Image File Name.
Next time you print an invoice or report, it gets printed with the company logo.
Some of these configurations can be overridden by setting up print configurations at the individual invoice and report level. The following sections are a few examples of the print configurations for invoices/reports. You can explore and set other configurations accordingly, as needed.
Set Up Print Configurations (Invoices/Reports)
You can configure printing of invoices and reports in TallyPrime. In case you have configured for printing at an application-level, you can override them for individual documents, when needed.
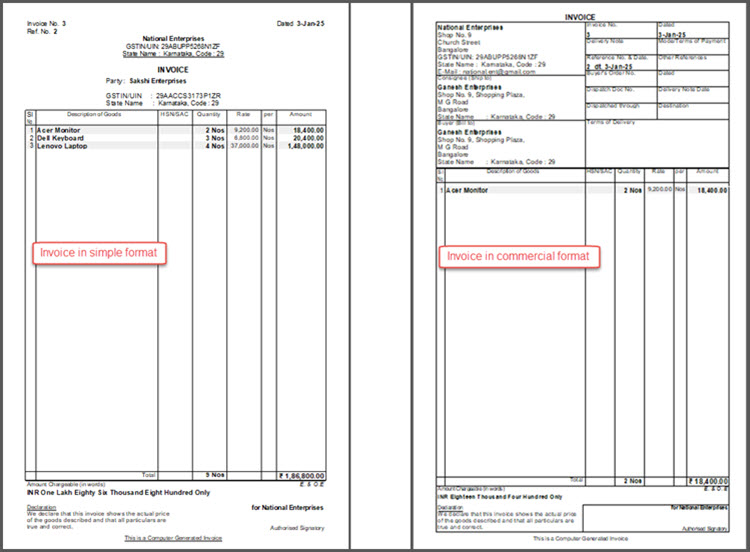
Print Invoices in Simple Format
![]()
This is applicable to outgoing documents like Sales Invoice, Receipt Voucher and so on and supported only on printers with Neat Mode print format.
- Ensure that the Print Format is set to Neat Mode in TallyPrime.
Open a sales invoice, Ctrl+P (Print) > C (Configure) > F8 (Print Format) > Neat Mode.
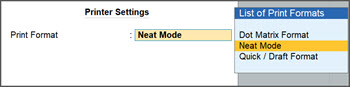
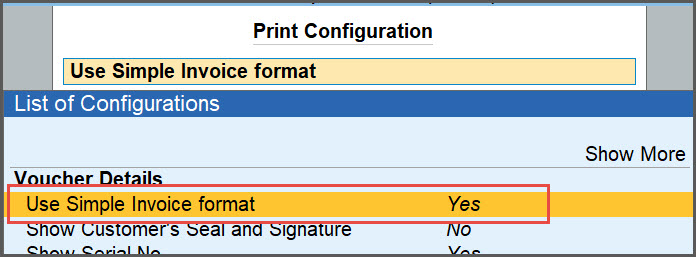
- Press C (Configure) > select Use Simple Invoice format > press Enter to set it as Yes.
Setting this option to No will print the document in Commercial format.

When you print an invoice, it gets printed in Simple format.
Set Number of Copies for invoices/reports
![]()
You can print one or more copies of your documents, and mark them as original, duplicate, triplicate, quadruplicate, and extra copies.
- Open an invoice, press Ctrl+P (Current) > F5 (No. of Copies).
- In the Printer Settings sub-screen, enter a number for Number of copies.
- Select the Type of Copy and save.
If you want to print only one type of copy – Original/Duplicate/Triplicate/Quadruplicate/Extra Copy, set the Number of copies to 1, and select the required Type of Copy.
Know more.|
Scenario |
Number of Copies |
Type of Copy |
Invoice Copies |
|
GST is enabled
|
2 | All< | The printed invoices will be marked as ORIGINAL FOR RECIPIENT and DUPLICATE FOR SUPPLIER. |
| 3 | All | The printed invoices will be marked as ORIGINAL FOR RECIPIENT, DUPLICATE FOR SUPPLIER and EXTRA COPY. | |
|
GST is not enabled
|
2 | All | The printed invoices will be marked as Original and Duplicate. |
| 3 | All | The printed invoices will be marked as Original, Duplicate and Triplicate. | |
| 4 | All | The printed invoices will be marked as Original, Duplicate, Triplicate, and Quadruplicate. | |
| 5 or more | All | The printed invoices will be marked as Original, Duplicate, Triplicate, Quadruplicate, and Extra Copy. |
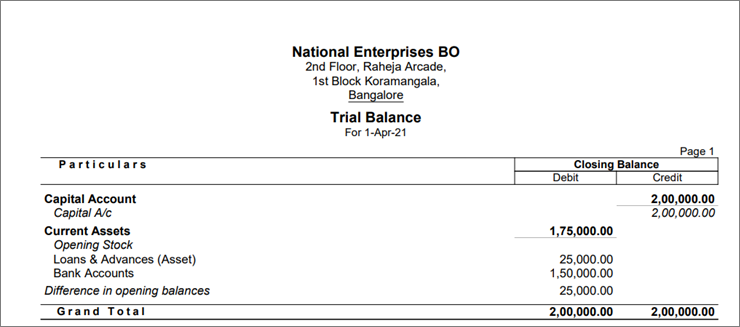
Print invoices/reports with Company Details
![]()
- From any invoice or report, press Ctrl+P (Current) > Alt+F7 (Company Details).
- In the Company Details screen, set Show Company Name and Show Company Address to Yes.
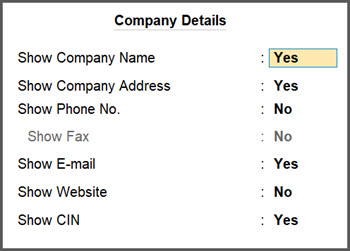
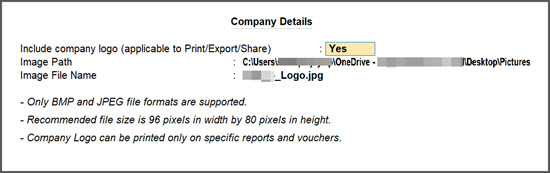
- Configure to print Company Logo.
- In the Print screen, press C (Configure).
- Under Print Configuration, set Show company logo to Yes.
- In the Company Details screen, update the Image File Name.
The Image Path field will be updated by default after updating the Image File Name.
- Press I (Preview) to verify, if needed, and press P (Print) to print the invoice.
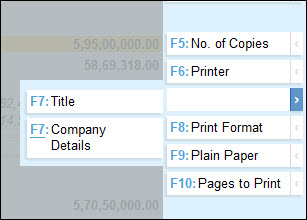
Print invoices/reports with Titles/Subtitles
![]()
You can update the title and subtitle of an invoice based on your party, business type, or type of invoice, such as GST or other taxations. Similarly, you can print your reports with a title and subtitle based on the period or purpose of the report.
- From any invoice or report, press Ctrl+P (Current) to open the Print sub-screen and press F7 (Title).
Alternatively, from the Print sub-screen, select C (Configure), type or select Title or Subtitle under Header Information - In the Header Information sub-screen, provide the required Title and Subtitle for the document and save.
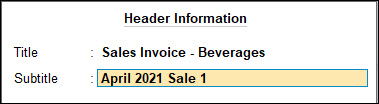
- Press I (Preview) to verify, if needed, and press P (Print) to print the invoice.
Print Invoices with Party Contact Details
![]()
- Ensure that the party ledger used in the invoice has the required contact details.
- Open the invoice, and press Ctrl+P (Current) > C (Configure).
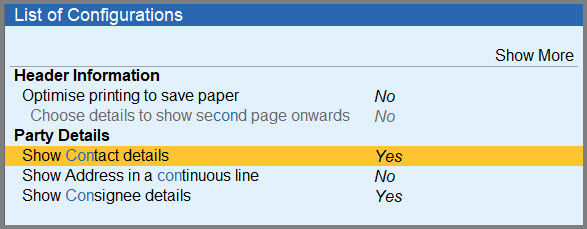
- Under Print Configurations, set Show Contact details to Yes.
- Press I (Preview) to verify, if needed, and press P (Print) to print the invoice.
When you print the invoice, the contact details of the party will appear in the printed invoice.
Print Invoices with Party Address
You can print invoices with your party address. If you have multiple addresses set for your party, you can select to print a particular address in the invoice as your Party Address.
Print party address from party ledger
![]()
- Ensure that you have the party address updated in the party ledger.
- Open the invoice and press Ctrl+P (Current) > C (Configure).
- Print the invoice with address as in the party ledger.
- Under Print Configuration, set Show Name and Address from Party Master to Yes.
- Press I (Preview) to verify, if needed, and press P (Print) to print the invoice.
Print party address from the invoice
![]()
- Ensure that you have entered the correct party address in the Party Details screen while recording the invoice.
- Open the invoice and press Ctrl+P (Current) > C (Configure).
- Print the invoice with address as entered during invoice entry.
- Under Print Configuration, set Show Name and Address from Party Master to No.
The party address from the invoice is automatically considered for printing. - Press I (Preview) to verify, if needed, and press P (Print) to print the invoice.
- Under Print Configuration, set Show Name and Address from Party Master to No.
Print the party and consignee address from the invoice
![]()
- Ensure that the Buyer (Bill to) and Consignee (Ship to) addresses are correct in the Party Details screen of the invoice.
- Open the invoice and press Ctrl+P (Current) > C (Configure).
- Print the invoice with the Buyer (Bill to) and Consignee (Ship to) addresses.
- Under Print Configuration, set Show Consignee details to Yes.
- Set Show Name and Address from Party Master to No.
The party and the consignee addresses from the invoice are automatically considered for printing. - Press I (Preview) to verify, if needed, and press P (Print) to print the invoice.

Print Previous & Current Balances in Invoices
![]()
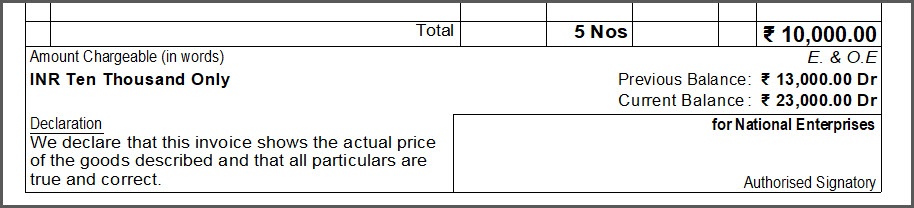
When you record multiple transactions with the same party on the same day, the latest balance (the Previous Balance and the Current Balance) will reflect the values as per the current date.
Say, you have a ledger with a balance of Rs 3000 Dr.
- Record a sales transaction, (say, Voucher No. 101) with an invoice amount of Rs 10,000.
- Print Voucher No. 101.
- Press Ctrl+P (Current) > C (Configure).
- Under Party Details, enable the Show Previous and Current Balances of Ledger option.
The Previous Balance will appear as Rs 3000 and the Current Balance will be Rs 13,000.

- Record another sales transaction, (say, Voucher No. 102) with the same ledger with an invoice amount of Rs 10,000.
- Print Voucher No. 101 again.
The Previous Balance will appear as Rs 13,000 and the Current Balance will be Rs 23,000, ensuring that the combined values are reflected from both the invoices.

Print HSN/SAC in the Invoice
Before you begin | Prerequisite
- Ensure that you have set up the HSN/SAC details.
When printing the sales invoice, you can configure it to print the HSN/SAC codes item-wise or consolidated.
- In the Print Configuration screen, set Show HSN/SAC details to Yes.
- Press P (Print) to print the invoice.
In the printed invoice, you can see the HSN defined for the stock items and the HSN/SAC along with the Taxable value and Total Tax Amount at the bottom of the invoice.
Print Invoices/Reports
In TallyPrime, you can print different documents, like your invoices, financial reports, payment reminder letters, dashboard tiles and more.
Print an Invoice
![]()
- Record an invoice, say a sales invoice, and press Ctrl+P (Current).
- Press C (Configure) to configure, as needed.
- Press I (Preview) to verify, if needed, and press P (Print) to print the invoice.
Print Reminder Letters
![]()
When you have outstanding amounts to be received from your parties, the Bills Receivable report in TallyPrime displays all such dues. To receive the due amounts on time, you can print reminder letters to send to your parties.
- Open the Bills Receivable report, and press Ctrl+P (Current) > C (Configure).
- Under Report Type, select Reminder Letter.

- Configure and print the Reminder Letter.

Print Dashboard tiles
![]()
Just like any other report in TallyPrime, you can print all tiles of the Dashboard or any specific tile, as needed.
- To print a specific tile in Dashboard, press Ctrl+P (Current).
To print all the tiles, press Alt+P (Print) > All Tiles and press Enter. - Configure, as needed, and print the tile.
Print Multi Account Reports
![]()
You can print the primary Books of Accounts, like the Cash and Bank Books, Account Ledgers, Sales and Purchase Registers and so on, without having to select the accounts one at a time and printing them. To know more, refer to the Printing Multi Account Reports topic.
- In TallyPrime, press Alt+P (Print) > Others.
- Select Show More > and press Enter to view all the reports supported for multi account printing.
- Select the required report and press Enter, and then print the required reports.
Cause:
The MAV error due to faulty driver occurs when you print an invoice with incompatible dimensions.
Resolution 1:
- Press Alt+G (Go To) > Alter Master > Voucher Type > type or select the name of the Voucher Type and press Enter.
Alternatively, Gateway of Tally > Alter > Voucher Type > type or select the name of the Voucher Type and press Enter. - Print voucher after saving: No.
Resolution 2:
Delete the .tsf file available in your TallyPrime folder.
This step will revert the impersistent settings implemented in TallyPrime to their default value.
Resolution 3:
Uninstall the printer driver and install again.
Cause:
The MAV error occurs when you use Rupakara font, generally used for the Indian currency (INR), in incompatible operating systems that include Windows Vista, Windows Server 2008, Windows 7, and Windows Server 2008 R2.
Resolution for the licensed Windows user:
Download the patch file from the Microsoft website.
For the users who do not have Windows license:
Resolution 1:
Rename the currency symbol
- Press Alt+K (Company) > Alter.
- Base Currency symbol: Rs.
Resolution 2:
Print the voucher without the currency symbol
- Press Ctrl+P (Print).
Alternatively, press Alt+P > Current.
The Print screen appears. - Press C (Configure).
List of Configurations appear. - Type or select Show Base Currency Symbol for Total and press Enter.
The option will be set to No.
Cause:
The error occurs whenever there is a mismatch between the size of the paper and printing dimensions while printing an invoice or a report.
Resolution:
Select the appropriate size of the paper while printing. To know how to do it, refer to the Select Page Size section in the Print Invoices and Report topic.
Cause:
The error occurs while printing sales vouchers using the multi voucher printing option, if the width configured under print configuration is greater than the width of the paper.
Resolution:
You will need to set the width of the invoice as per the width of the paper.
- In sales invoice, press Ctrl+P.
Alternatively, press Alt+P (Print) > Current and press Enter.
The Print screen appears. - Press C (Configure).
- Set appropriate width of the invoice as per the width of the paper.
- Type or select Width of normal invoice (in Inches) and press Enter.
- Type or select Width of simple invoice (in Inches) and press Enter, if you have set Use Simple Invoice Format as Yes.
The Printer Settings screen appears.
- Type or select Width of simple invoice (in Inches) and press Enter, if you have set Use Simple Invoice Format as Yes.
- Width of normal invoice (in Inches): number as per the width of the paper.
- Type or select Width of normal invoice (in Inches) and press Enter.


