
Manage Outstanding Receivables in TallyPrime
When you do sales on credit, you would certainly need to keep track of the due amounts that your parties owe you. All such dues from your parties will be your outstanding receivables. Managing the outstanding receivables can be critical to your business because it not only helps to understand how much your parties owe you, but also helps you to recover the dues on time and use it for your business, as needed. You can manage outstanding receivables in TallyPrime and keep record of all the dues.
Record and track dues in TallyPrime: If you have a good relationship with your parties and trust them, and have sold goods or services on credit, TallyPrime takes care of tracking all your outstanding receivables from the parties. By referring to the corresponding reports, you can simply follow up with your parties, when needed, for recovery of the due amounts.
For example, if you have made a credit sale with 100 pieces of item 1 worth Rs. 6,00,000 and 50 pieces of item 2 worth Rs. 4,00,000 to Customer A, you can view the total outstanding amount of Rs. 10,00,000 as On Account against Customer A.
Use credit period: To ensure that all the credits are tracked systematically, it is always advisable to maintain your accounts by specifying the credit period or due date for the party. You can specify a credit period of say 30 days in the party ledger for the party to make the payments. On recording a credit sale for such parties, TallyPrime reflects the pending amount and the due date based on the credit period specified for the party. This helps to avoid conflicts with your parties, systematically track your outstanding receivables, and recover the payments from your parties in a timely manner.
Bill-by-Bill: At times, when you have made a credit sale that your party may not be able to pay at a time, you can mutually agree with your party to make part payments and recover the total due within a specified time. In such a case, you can use the bill allocation capability in TallyPrime to create one or more bill references as per the breakup decided. Each bill reference can also be specified with a credit period or a due date.
For example, you can record the credit sale of Rs. 10,00,000 by creating bills references against each part payment – C1 for Rs. 5,00,000 in first 30 days, C2 for Rs. 2,00,000 in 60 days, and C3 for the remaining Rs. 3,00,000 in 90 days.
Whether you have recorded your credit sales to the party as On Account or Bill-wise, you can track the outstanding receivables using reports in TallyPrime and manage your accounts systematically on receipt of the payments. The benefit of tracking your outstandings receivables bill-by-bill is that you can easily settle the due amounts by linking
the bill reference in your transactions.
Based on your business process if you charge interest on the overdue payments, you can do so by defining the interest rates for the corresponding parties. For more information, see Interest Calculations.
Credit Sale Without Bill-wise
When you do a sale on credit, you will certainly need to track and manage the amount due against the party. Once you record a sale, TallyPrime reflects the sale amount as Debit against the party in the corresponding report. Anytime you receive the payment from your party, you can simply enter a receipt entry for that amount to clear the outstandings for that party.
In this section
- Record a credit sale
- Maintain Credit Sales Bill-by-Bill
- Change Bill Allocation
- Manage Credit Period
- Settle dues for credit sales made without bill-wise
- Ledger Vouchers
- Group Summary
Record a Credit Sale
A sale transaction without a corresponding receipt entry is a sale on credit – until the party has made the payment. Record a credit sale.
Maintain Credit Sales Bill-by-Bill
You may need to track bill-wise details for each party, to know the bill-by-bill details of payable or receivable amount. In TallyPrime, you can enable bill-wise details feature for the company, and enable the bill-wise tracking for the required party ledgers. You can then record transactions with bill-wise details and track the payable and receivable amounts.
- Enable bill-wise details in party ledger.
- Gateway of Tally > Alter > Ledger > select the party ledger > and press Enter.
Alternatively, press Alt+G (Go To) > Alter Master > Ledger > select the party ledger > and press Enter. - Set the option Maintain balances bill-by-bill to Yes.
If you do not see this option, press F12 (Configure) and set Maintain balances Bill-by-Bill to Yes.
All the bills generated earlier for this ledger, will reflect as On Account bills. You can link each bill to the respective sales and receipts. - Enter the Default credit period which you want to allow for this party.
- Set the option Check for credit days during voucher entry to Yes to manage the credit limit while recording an invoice.
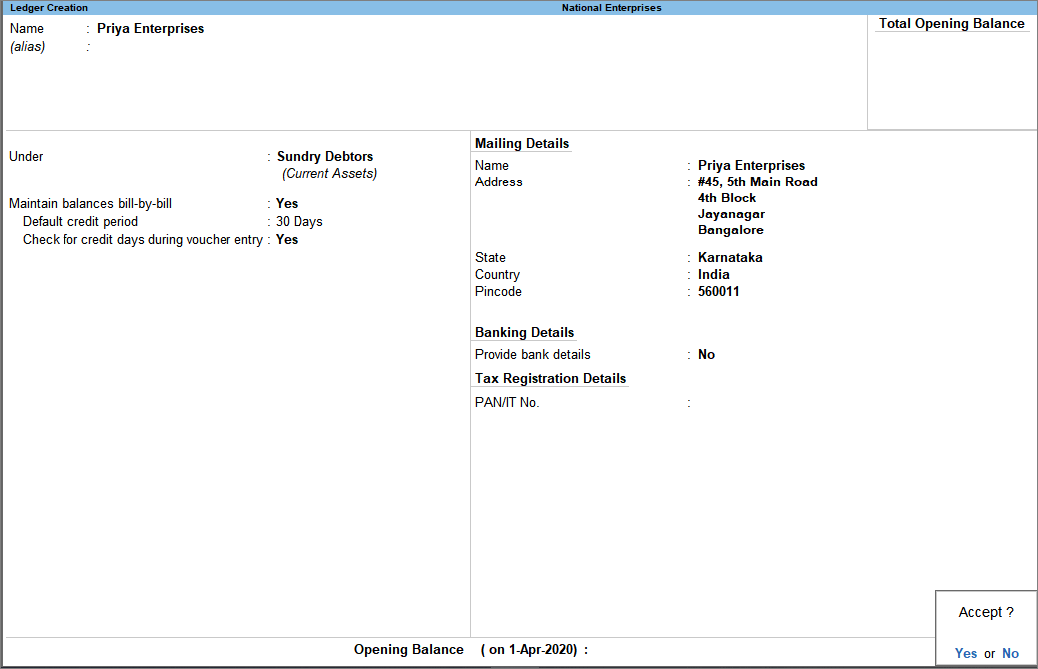
- Accept the screen. As always, you can press Ctrl+A to save.
In the party ledger, the cursor will skip the field Maintain balances bill-by-bill when the option Inventory Values are affected is enabled. Also, if you select a foreign currency in the Currency of ledger field, the option Maintain balances bill-by-bill will not be displayed.
We recommend that you maintain the currency of party ledger in the base currency selected for the company. In case of bank ledgers used to maintain foreign currencies, you can select the required foreign currency. Only when you maintain a ledger account in base currency, you can configure bill-wise details, record transactions by selecting any other currency to track outstanding and also generate your MIS or Final Reports. Hence, if you select a foreign currency for party ledger, the option Maintain balances bill-by-bill will not be displayed.
- Gateway of Tally > Alter > Ledger > select the party ledger > and press Enter.
- Record the sales transaction.
When default bill allocation is enabled (Use default Bill-wise details for Bill Allocation set to Yes in the F12 configuration options) of sales invoice, you will not see any difference in the voucher. On saving the sales transaction, the bill gets linked to the party as default bill allocation. The voucher number appears as the bill reference. This bill starts appearing in the outstanding reports of the party.
Change Bill Allocation
If you receive advance payments from your customers and have accounted as receipts, you will need to settle these advance receipts when you record the sales transaction. In TallyPrime, you can allocate your sales bills against your receipt entries. You can also configure your sales invoice to decide the bill allocations (including method of adjustment, bill no., etc.)
- Configure the invoice to change the bill allocation.
- Ensure the option Maintain balances bill-by-bill is set to Yes.
- In the sales voucher, press F12 (Configure) > set Use default Bill-wise details for Bill Allocation to No.
Henceforth, you can select the bill references in the Bill-wise Details screen, until you change the option in F12 (Configure) of the invoice. - In the invoice total field, place the cursor and press Enter to view the Bill-wise Details screen.
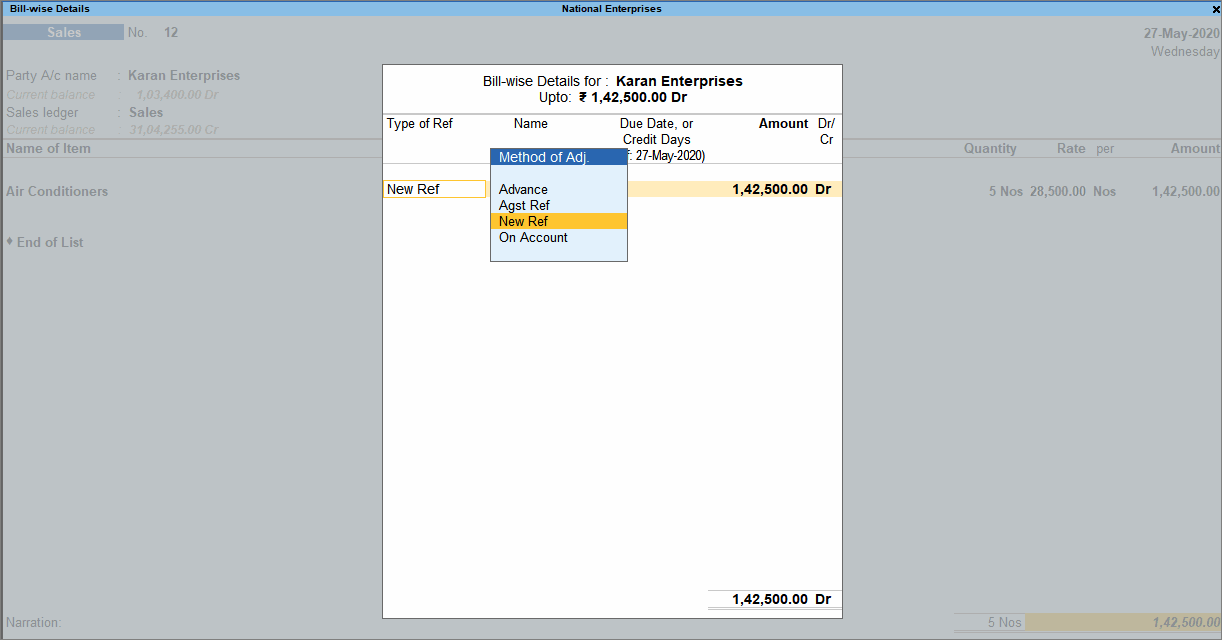
- Specify the bill-wise details.
Bill-wise Details allows users to track details of payments or receipts/advanced received which have already been made, or that are due, and also generate payables or receivables reports. It allocates bill numbers as defined in the voucher type master, in ascending order.
- In Type of Ref, select the method of adjustment.
This field enables you to make adjustments against any other transaction with the party, which you can do by providing the corresponding bill number against which the transaction is recorded.
- Advance – This is not applicable for sales.
- Agst Ref – Select when you need to adjust the transaction against a bill (advance received, credit note, etc.).
- New Ref – Select when you are recording a fresh transaction, to generate a new bill for the party.
- On Account – Select when you want to save the sales invoice without any bill reference.
In Name, the sales voucher number appears. You can change this to any value and use the name to track the bill. If you configure appropriate voucher numbering, you can use the voucher number itself.
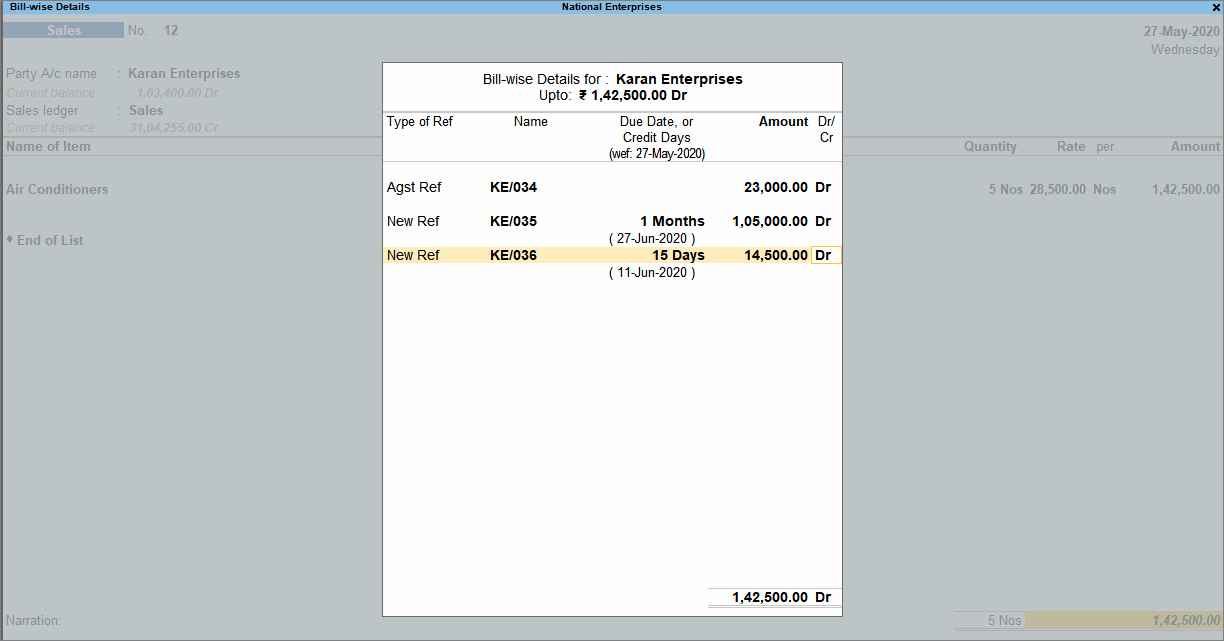
If you want to adjust some amount against an advance, and split the remaining bill value by providing different credit days, you can do it in TallyPrime. You can break the amount of a single sales invoice into multiple bills by entering different bill references and due date/credit days.
- Press Enter to accept.
- Accept the invoice. As always, you can press Ctrl+A to save.
- In Type of Ref, select the method of adjustment.
While recording transactions with party ledgers, the bill-wise details will appear for selection. You can select the required bills to set-off/clear the bill references.
Manage Credit Period
Based on your business requirements and customer relationship, you may need to provide different credit period to different parties. In TallyPrime you can enter the required credit period for each customer in the party ledger, and change it, if needed, while recording the transaction.
When the party master is enabled to Maintain balances bill-by-bill, the following options appear in the party master:
- Default credit period – Set the credit days. The credit period may be given for Sundry Debtors and Sundry Creditors. The number of credit days or period can be defined in various ways:
|
|
Suffix |
Example |
|
Days |
None |
5 is considered as 5 days. |
|
Weeks |
W |
5 W is considered as 5 weeks. |
|
Months |
M |
5 M is considered as 5 months. |
|
Year |
Y |
5 Y is considered as 5 years. |
While recording transactions, the credit period will appear in the Bill-wise Details screen as Due Date or Credit Days. You can change the details as needed.
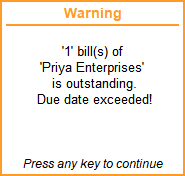
- Check for credit days during voucher entry – Set it to Yes to get warned about exceeding credit period or pending outstanding bills for a party during transactions. The warning message appears as shown below:
Once you set the terms of credit in party ledger, the same gets applied in transactions.
Settle dues for credit sales made without bill-wise
When your party makes a payment against a sale that you have recorded earlier, you can pass a receipt entry to settle the due amount. It is important to ensure that you receive the payments from your parties and settle your accounts time to time.
Scenario 1: Sale made for say Rs 50,000. Customer pays only Rs. 30,000 first and the remaining Rs. 20,000 later. This is the simplest case.
Scenario 2: Sale made for say Rs. 50,000. Customer pays Rs. 30,000 first, pays another Rs. 50,000. At a later date asks for goods worth Rs. 30,000. This is the complex case (without Bill-wise).
For example, Customer A owes you a total of Rs. 1,00,000 from the sales made on credit, and later has made a payment of Rs. 40,000. You can now make a receipt entry against that party on the day you receive the payment. As an when Customer A makes a payment of the remaining Rs. 60,000, you can pass another receipt entry to settle to entire outstanding receivables from that party. If you often transact with a customer, say Customer B, and you received an advance payment of Rs. 1,20,000. As and when you make a sale to the party, the corresponding amount gets knocked off from the total outstanding from the credit balance against Customer A.
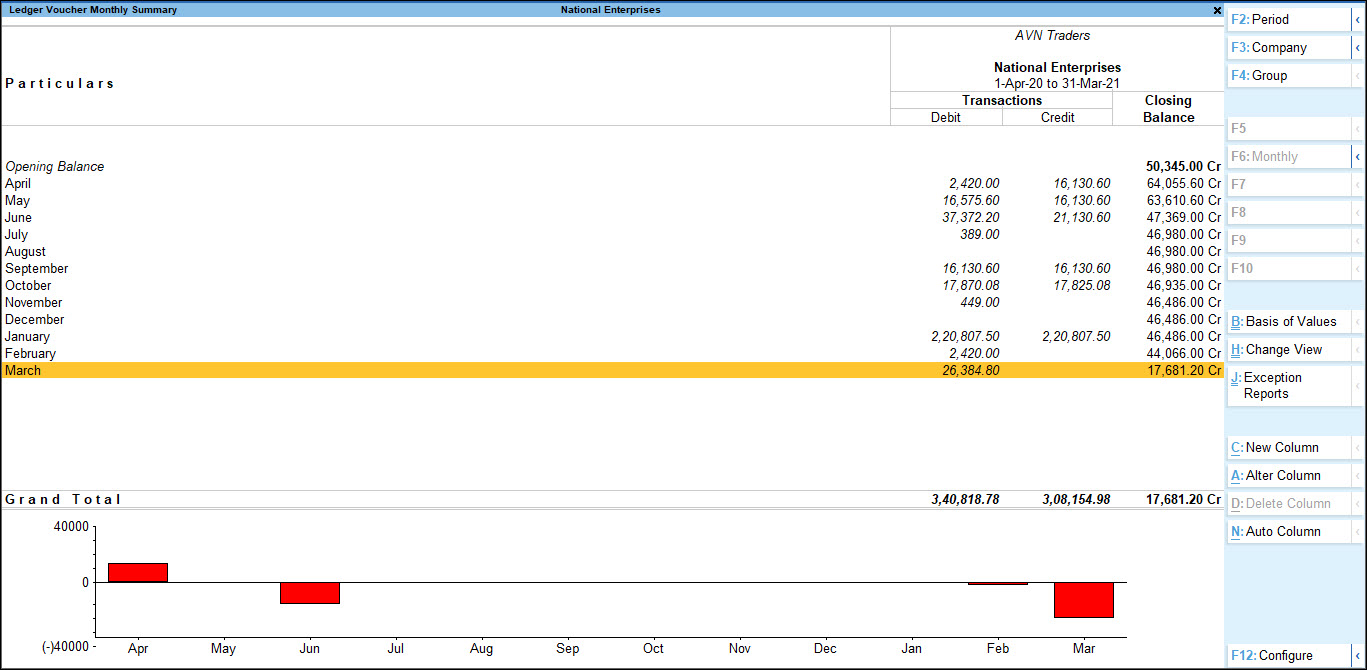
Ledger Vouchers
In this report, you can see the details of sales you have made to your party along with the receipts recorded on receiving the payments.
- Alt+G (Go To) > type Ledger Vouchers > select the party.
Alternatively, Gateway of Tally > Display More Reports > Account Books > Ledger > select the party. A sample image is as shown.

Ledger Voucher Monthly Summary
- Press F6 (Monthly) to view the monthly receivables and payments received from the party.
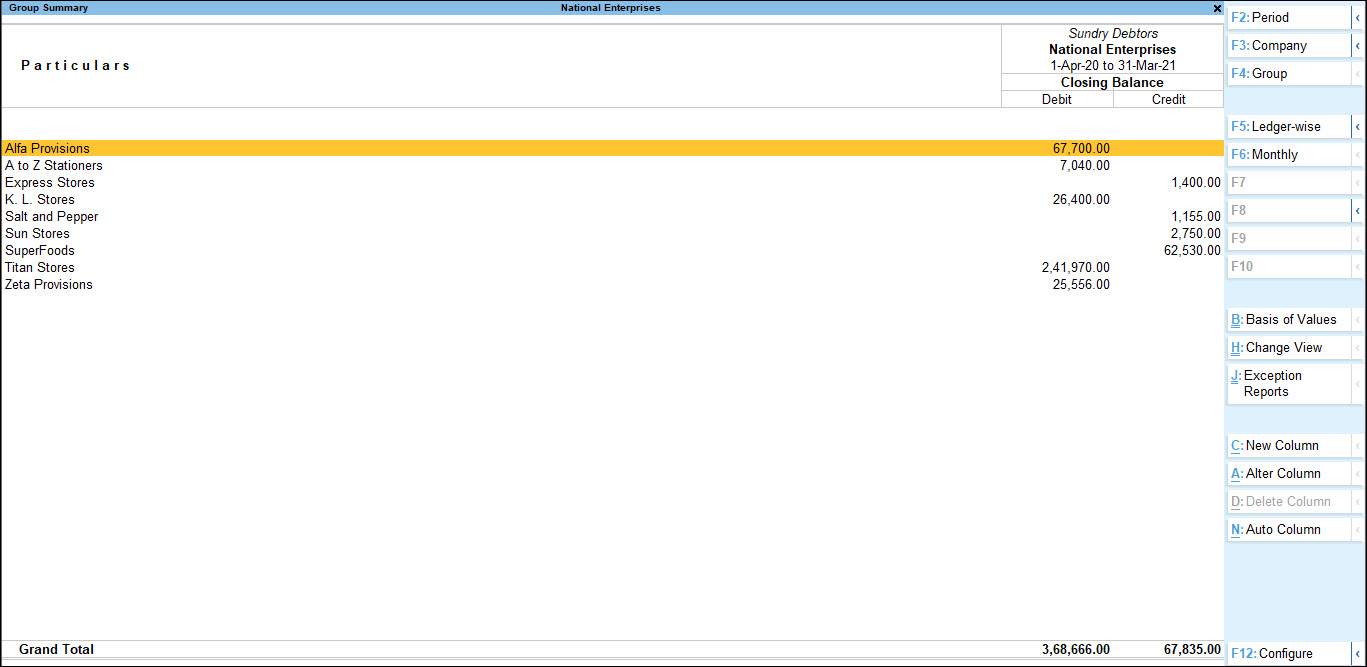
Group Summary
If you have recorded sales for more than one party, you can view the Closing Balance for the parties under the selected group, using the Group Summary report. This report by default displays the Closing Balances of parties with uncleared dues.
- Alt+G (Go To) > type Group Summary > select the party group (For example, Sundry Debtor).
Alternatively, Gateway of Tally > Display More Reports > Account Books > Group Summary > select the party group.
A sample image is as shown.
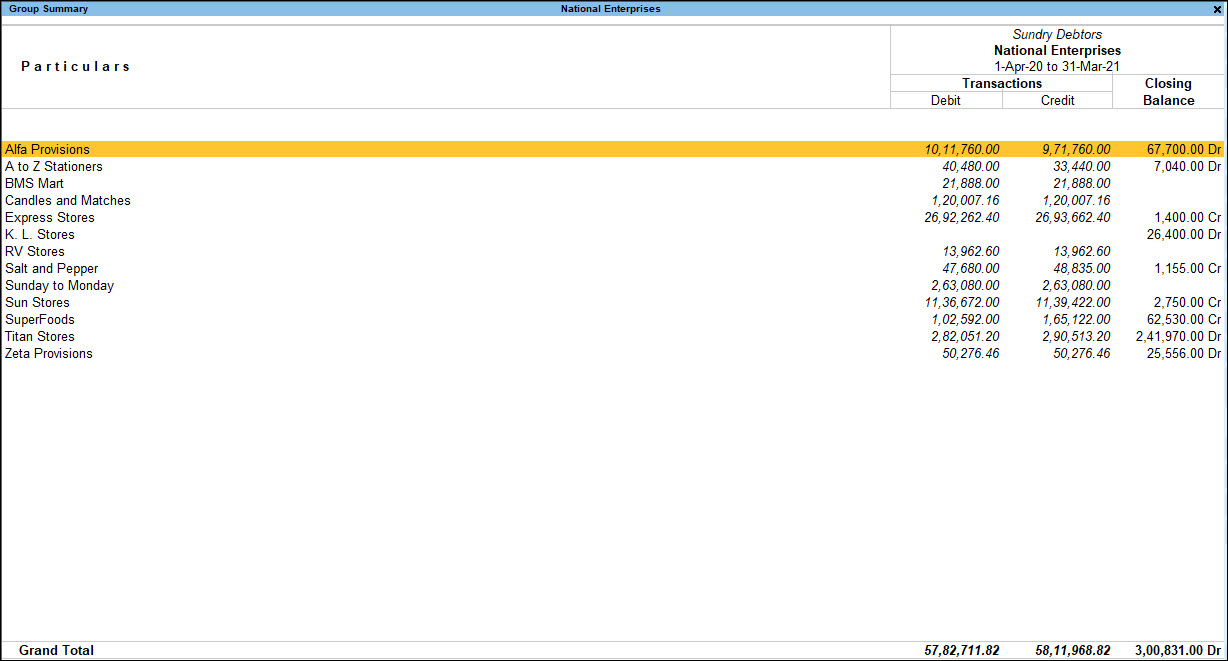
- To view transaction details – along with the Closing Balances – for all parties that you have transacted with, under a group, press F12 (Configure) > set Nett transactions only to No.
A sample image is as shown below.
Track Outstandings for party
If you maintain your sales report separately for parties belonging to different branches, regions, etc., you can track the outstandings for all parties together or view the consolidated receivables for each set (branch, region, etc.) of parties.
For example, Customer A, Customer B, and Customer C belong to the NorthZone and Customer D and Customer E belong to SouthZone. If you recorded credit sales for all of these customers, you can view the receivables party-wise or view the total receivables from NorthZone and SouthZone separately.
Press F5 (Ledger-wise) to view receivables party-wise. When you are seeing the party-wise receivable details, press F5 (Group-wise) to view the consolidated receivables from each group.
As in all other reports, press Alt+F5 to expand the groups to view receivables party-wise under each group.
Credit Sale with Bill-wise
For systematic management of receivables and a cordial relationship with your buyers, it is always advisable to maintain accounts bill-by-bill. If you maintain bills with specific reference numbers for easy tracking in the future, you can use the bill-wise option in the party master. Next time you record a transaction for that party, TallyPrime will internally track the bill by using the voucher number as the reference number. All earlier transactions recorded for that party without the bill-wise option will be tracked as On Account. Whether there is a reference number or not, such dues can be settled by passing the corresponding receipt entries.
In this section
- Enable bill-wise in party master
- Record a credit sale
- Settle dues for credit sales made using bill-wise
Enable bill-wise in party master
In the Party Master screen:
- To maintain vouchers bill-wise for a particular party, enable the option Maintain balances bill-by-bill. When you make a credit sale to this party, by default the voucher date is considered as the due date for the payment.
Note: On maintaining balances bill-by-bill, all bills generated earlier are reflected as On Account. - To get the option in party master:
- In F11, ensure that Maintain Accounts is set to Yes and set Enable Bill-wise entry to Yes.
- Ensure that in F12 of party master, the option Provide bill-wise details is set to Yes.
- Credit Period: If you want to provide any lead time to your party to clear their dues, specify the Credit Period – for example, 30 or 60 Days. When you make a credit sale to this party, TallyPrime internally calculates the due date against the voucher entry date, based on the credit period you have specified. You may override this during transaction, if you wish to. Refer to the Sales of Goods and Services topic.
If you have specified a credit period for the party, next time you make a sale to the party, you can keep a check on the credit days given to that party. To do so, enable the option Check for credit days during voucher entry. When you record a sales invoice after the specified number of credit days for the party, TallyPrime will inform you of the same.
Refer to Record a credit sale for details.
Record a credit sale
A sale transaction without a corresponding receipt entry is a sale on credit – until the party has made the payment. Record a credit sale. If you have enabled the bill-wise option in the party master, TallyPrime tracks the bill by using the voucher number as the bill reference number.
Settle dues for credit sales made using Bill-wise
If you have made sales on credit, it is important that you receive the payments from your parties and settle your accounts time to time. When your party makes the payment, you can pass a receipt against the corresponding sales bill reference and settle your dues.
For example, Customer B owes you a total of Rs. 85,000 from the sales made on credit, and later has made a payment of Rs. 25,000. You can now make a receipt entry against that party on the day you receive the payment. When Customer B makes a payment of the remaining Rs. 60,000, you can pass another receipt entry to settle to entire outstanding receivables from that party.
When recording a receipt entry
- In the Bill-wise Details screen, you can choose the bill reference number, against which you want to record the receipt.
Alternatively, you can settle the sales bill from the Ledger Outstanding report.
Split a Credit Sale into Multiple Bills
When you have to make a credit sale of large amount that your party is unable to pay at a time, and has agreed to make partial payments in regular intervals, you can split the sales into multiple bills. This helps you to track the payment breakup against the bills created and manage your outstanding receivables systematically.
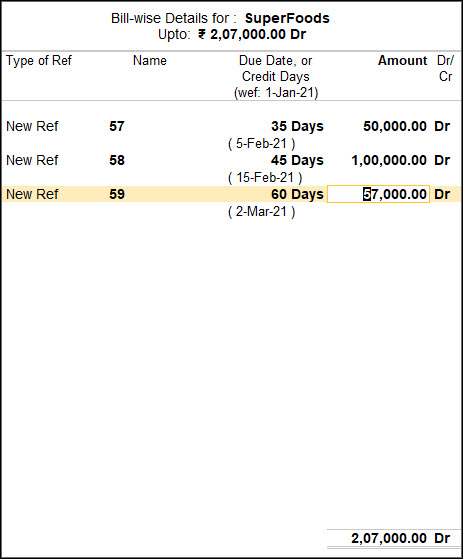
For example, you have made a credit sale of Rs. 10,00,000 to Super Foods. You can split this amount into Rs. 2,00,000 payable in 30 days, Rs. 5,00,000 in 60 days, and the remaining Rs. 3,00,000 in 90 days. Each part payment will be associated with a bill reference number. The corresponding reports will show the breakup of your receivables in the next 90 days. At the same time, when you receive the payment from the party, you can record the receipt entry against the bill references created and settle such bills.
In this section
- Enable Bill-wise in party master
- Record a credit sale – split bill
- Settle dues for credit sales made using bill-wise
Enable bill-wise in party master
For more information, click here.
Record a credit sale – split bill
You can record a sale and split the amount into multiple bills using the Bill Allocation feature.
Alt+G (Go To) > Create Voucher, press F8 (Sales).
Alternatively, Gateway of Tally > Vouchers > press F8 (Sales).
To split the sales bill into multiple bills, when recording a credit sale:
- Press F12 (Configure) > set Use default bill-wise details for bill allocation to No.
- In the voucher screen, press Enter on the total amount field to open the Bill-wise Details screen.
- In this screen, select New Ref and provide a Name for the bill. For example, if your voucher number is V1, your bill names can be V1a, V1b, and so on.
The bill name that you specify here can be used as the bill reference when you record a receipt transaction to settle your dues. - If you had specified any Credit Period in the Party Master, the Due Date is set to the same value by default. To override the Credit Period, press F12 (Configure) > set Modify all fields to Yes. Now, specify the due date.
- Fill in the Amount based on how you want the total amount to be split.
Settle dues for credit sales made using Bill-wise
For more information, click here.
Ledger Outstanding
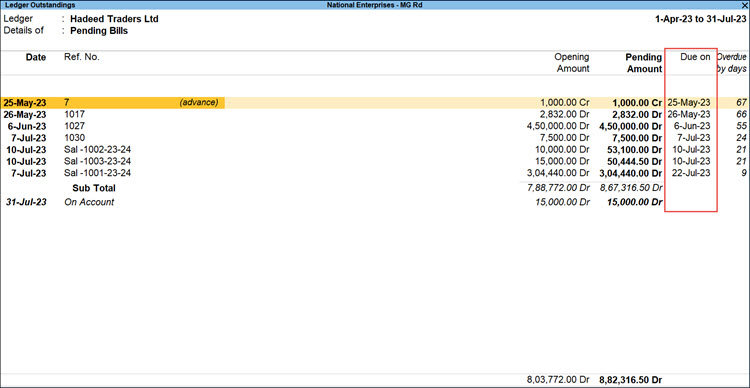
The Ledger Outstandings report displays the details of the outstanding receivables – Opening Amount, Pending Amount, Due Date and Overdue days for the selected party. All the sales entries recorded bill-wise or without any bill references and the corresponding receipt entries recorded are displayed in this report. You can settle the outstanding
amount from your party using the report.
In this section
- View Ledger Outstanding report
- View age-wise outstanding receivables
- Settle bills from Ledger Outstanding reports
View Ledger Outstanding report
Gateway of Tally> Display More Reports > Statement of Accounts > Outstandings > Ledger > select the party.
Alternatively, Alt+G (Go To) > type Ledger Outstanding > select the party.
- On Account: When the sales and receipt entries are not recorded bill-wise then such entries are tracked as On Account and are displayed in the Ledger Outstandings report.
- Bill-wise entries: All the credit sales that are recorded bill-wise for a party are displayed in this report.
Press Alt+F5 to see all the bills with the corresponding receipt entries. - Pending Amount: The pending amount that you have to receive from the party and if any advance payments that have already been received from the party are displayed here.
- Due on: By default, the sales voucher date is considered as the due date. However, if you have specified a credit period or due days in the party master, the due date is updated accordingly once you record a sales
transaction. - Overdue by days: Based on the date of the report, TallyPrime displays the overdue days from the due date, if specified earlier, or the voucher entry date.
A sample image of the Ledger Outstandings report is shown below.

View age-wise outstanding receivables
If you want to know about your outstanding receivables from a party in a periodic manner, you can configure your report to analyse the age of the pending amount. This will help in tracking the amount you will receive in the coming days and therefore plan accordingly.
- Press F6 (Age-wise) and select the Method of ageing.
- Ageing by Bill Date: Considers the voucher entry date for displaying the details.
- Ageing by Due Date: Considers the due date for displaying the details.
- Specify the From and To values.
For example, if you can set the values to 0 to 15, 15 to 30, 30 to 45 and so on, the report will display the pending amount to be received in every 15 days for the next 45 days.
View outstanding receivables based on Due Dates | Sort Bills
TallyPrime Release 5.0 provides the flexibility to sort bills and view your receivables based on the payment due dates set for the sales made to your parties. For parties that you maintain balances bill-wise while recording the transactions, you can settle their bills based on the order of their due dates. In case you have set any credit period for the party, while recording a transaction against a reference bill, the due dates is considered including the Credit Period. This flexibility was not available in TallyPrime Release 4.1 and earlier.
You can clear the pending bills in order of their due dates, including the credit days if any for the party, with the oldest bill being settled first.
- Open the Ledger Outstanding report: press Alt+G (Go To) > type or select Ledger Outstandings.
- Select the Party for which you want to view the outstanding receivables. For example, Hadeed Traders Ltd.
- In the default report, sort the transactions to view then as per the due date.
- Press F12 (Configure) > Sorting Method.
- Select Due Date (Decreasing) or Due Date (Increasing) based on the order of dates that you want to check.
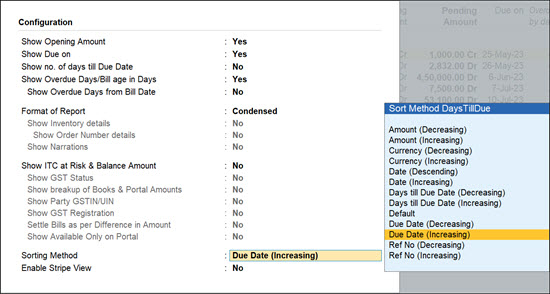
You can also sort the report based on the Pending Amount, Ref No. and other columns available in the report, as per your convenience.
You can view that the bills for Hadeed Traders Ltd. are sorted based on the Due Dates.
- In case you want to use the same report for future reference, press Ctrl+L (Save View) to save the report with a report name of your choice.
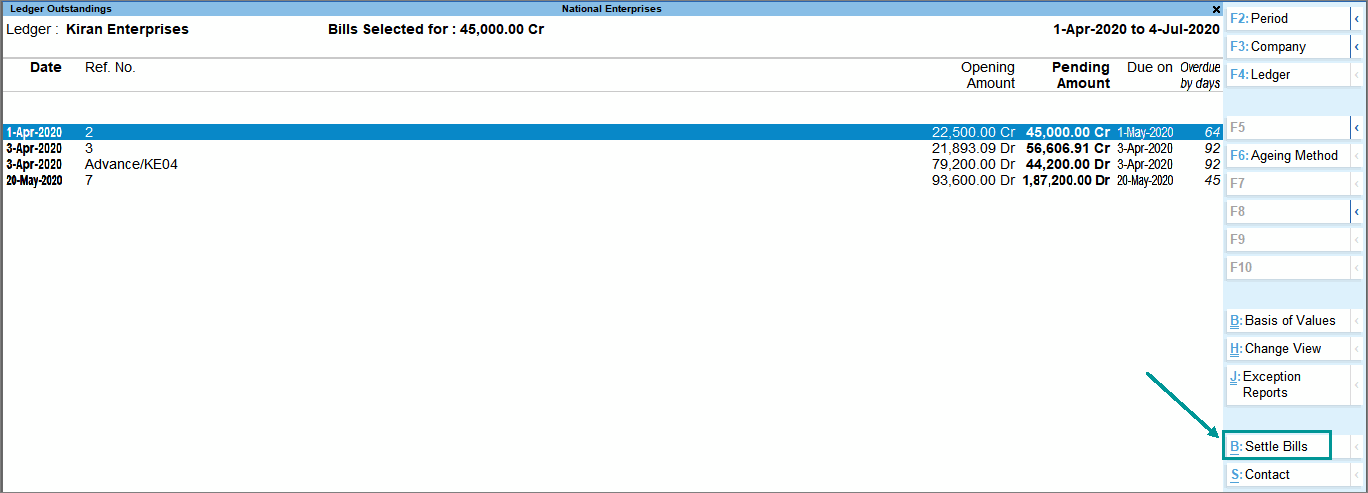
Settle bills from Ledger Outstanding reports
If you have maintained your sales using bill-wise and your party has made the complete due payment, settling the bill from the outstandings report becomes simpler.
- Press space bar to select the bill for which you have received the payment.
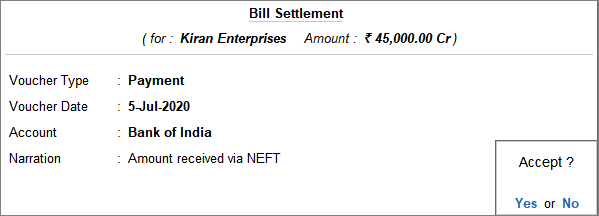
- Press Alt+B (Settle Bill) to open the Bill Settlement screen.
- Provide the receipt entry date.
- Specify the Account type. For example, Cash or Bank.
- Enter Narration, if any.
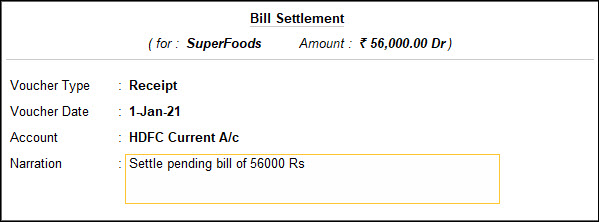
- Save the screen.
TallyPrime creates a receipt entry based on the details you provide and settles the due bill amount.
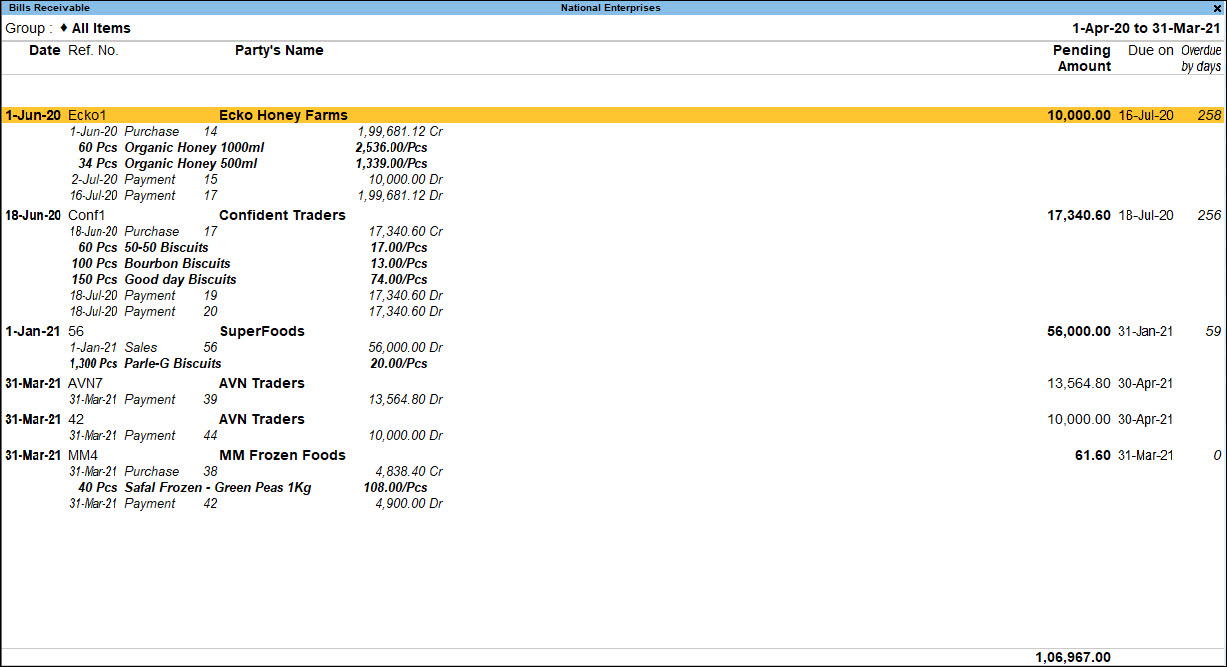
Bills Outstanding
The Bills Outstanding report displays the Pending Amount, Due Date and Overdue days for all accounts maintained using the bill-wise option for the parties. If you have made a receipt entry against any of the parties, the Pending Amount will be updated accordingly until the total due is settled. If you have specified a credit period for your parties or defined the due dates in the transactions, TallyPrime calculates the overdue details based on the date when you recorded the sales transaction.
Gateway of Tally > Display More Reports > Statement of Accounts > Outstandings > Receivables.
Alternatively, Alt+G (Go To) > type Bills Outstanding or Bills Receivable.
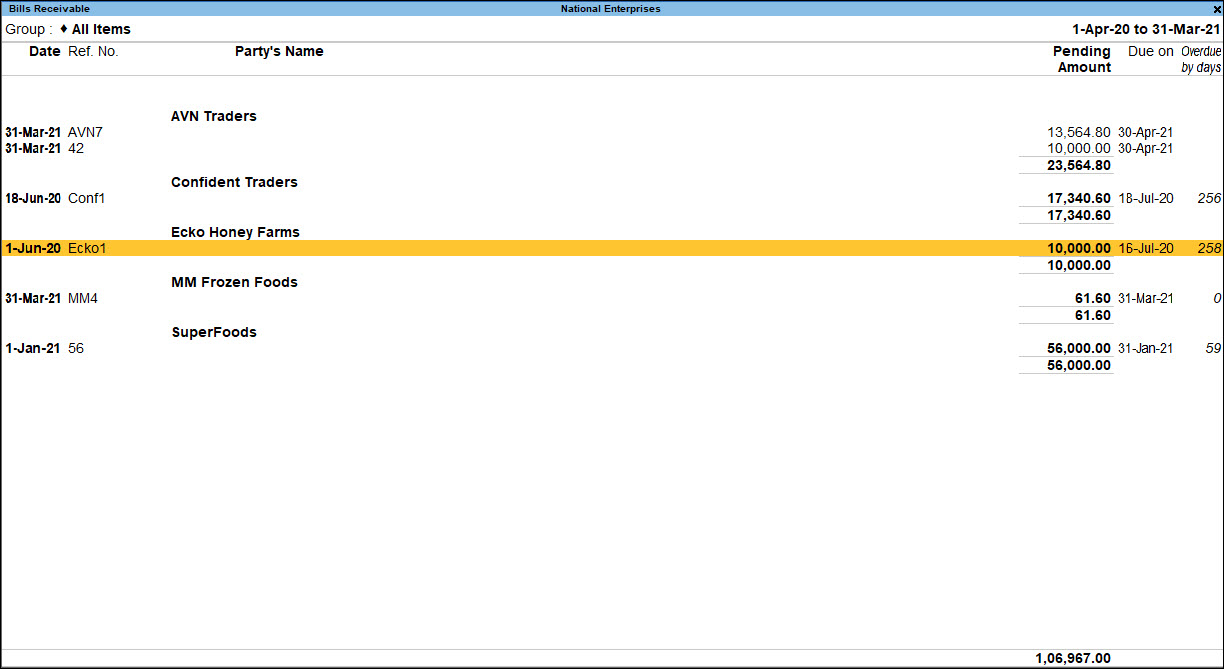
A sample image of the Bills Outstanding report is shown below.
- Pending Amount: This the amount pending from your party.
- Due on: By default, with bill-wise option enabled, the sales voucher date is considered as the due date. However, if you have specified a credit period or due days in the party master, the due date is updated accordingly once you record a sales transaction.
- Overdue by days: Based on the date of the report, TallyPrime displays the overdue days from due date, if specified earlier, or the voucher entry date.
Ledger-wise Bills:
Press F7 (Ledger-wise Bills) to view the receivables bill-by-bill for each party in the selected group.
Check and Settle bills from Bills Outstanding report
Select the outstanding bills which you want to settle.
- Press Alt+G (Go To) > type or select Ledger Outstandings.
Alternatively, Gateway of Tally > Display More Reports > Statements of Accounts > Outstandings > Ledger. - Press Spacebar and select the bills to be settled.
- Press Alt+B (Settle Bills).
- Enter the details in the Bill Settlement screen.
- Press Enter to accept the Bill Settlement sub screen. The Receipt/Payment Voucher gets prefilled as shown below:
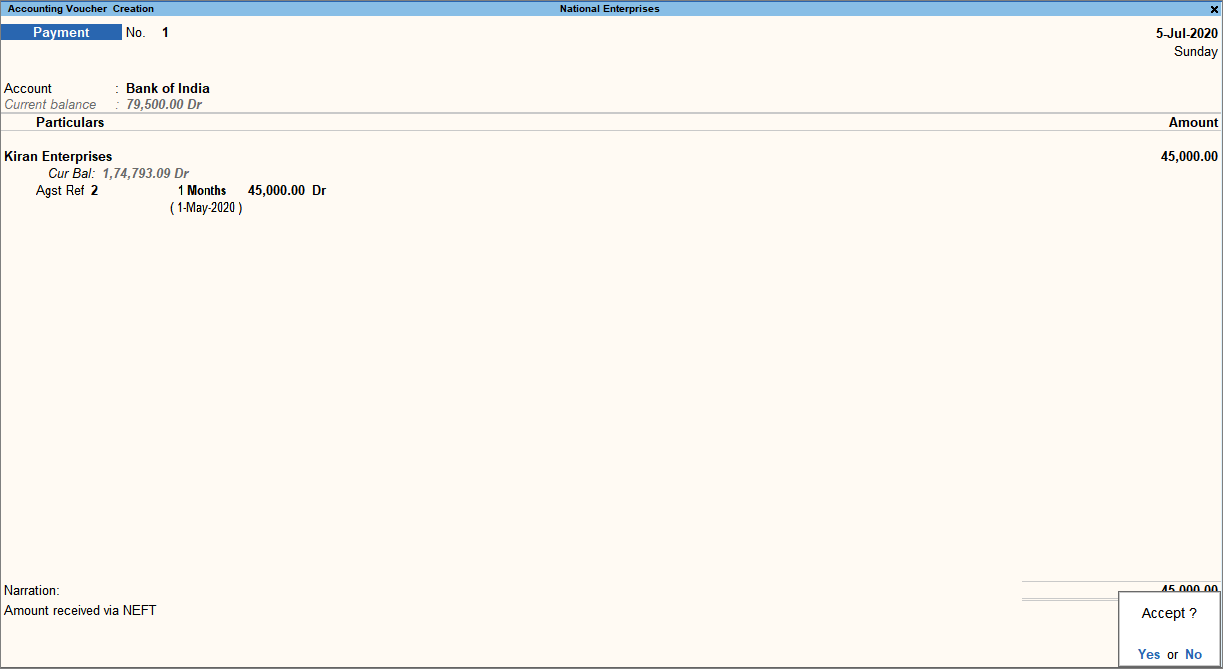
- Accept the voucher.
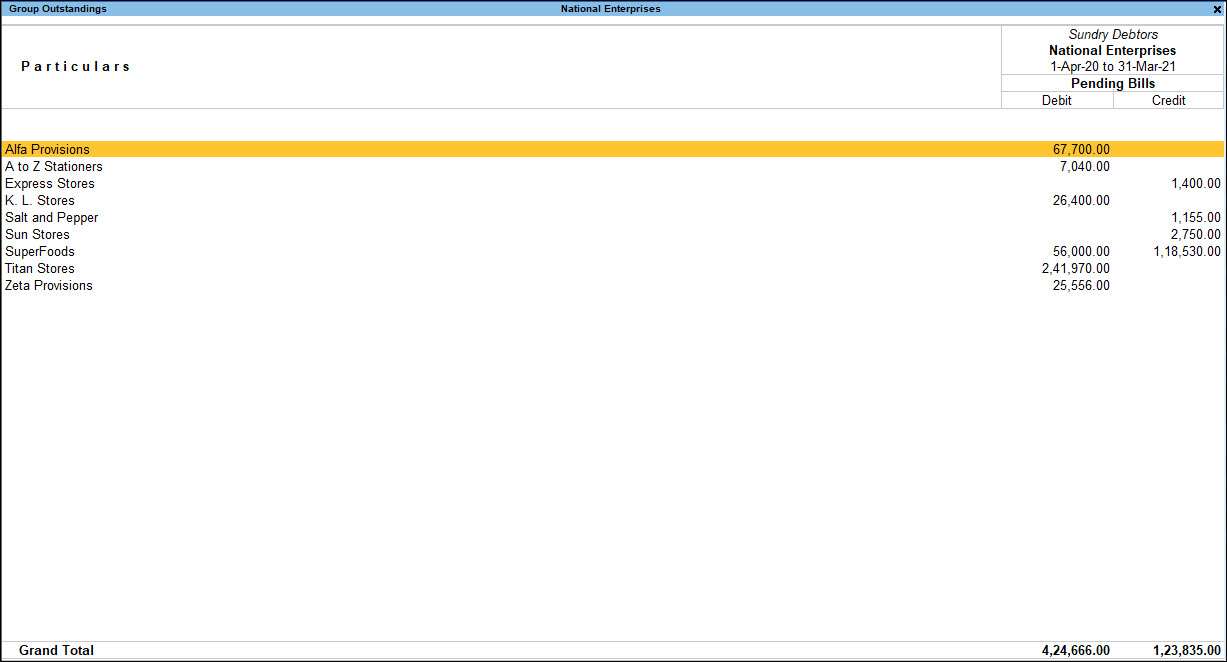
Group Outstandings
This report helps to view the group-wise outstanding details, including the debit and credit balances. You can configure the report to see only the overdue balances and take necessary steps to recover the due amount from your parties.
Gateway of Tally > Display More Reports > Statement of Accounts > Outstandings > Group Outstandings > select the group.
Alternatively, Alt+G (Go To) > type Group Outstandings > select the group.
Ledger-wise
Press F5 (Ledger-wise) to get a consolidated view of all the receivables party-wise in the selected group. A sample image is shown below.
Age-wise
Press F6 (Age-wise) to view the outstanding receivables from a party in a periodic manner, you can configure your report to analyse the age (in days) of the pending amount. This will help in tracking the amount you will receive in the coming days and therefore plan accordingly.
- Press F6 (Age-wise) and select the Method of ageing.
- Ageing by Bill Date: Considers the voucher entry date for displaying the details.
- Ageing by Due Date: Considers the due date for displaying the details
- Specify the From and To values.
For example, if you can set the values to 0 to 15, 15 to 30, 30 to 45 and so on, the report will display the pending amount to be received in every 15 days for the next 45 days.
Ledger-wise Bills
Press F7 (Ledger-wise Bills) to view the receivables bill-by-bill for each party in the selected group.
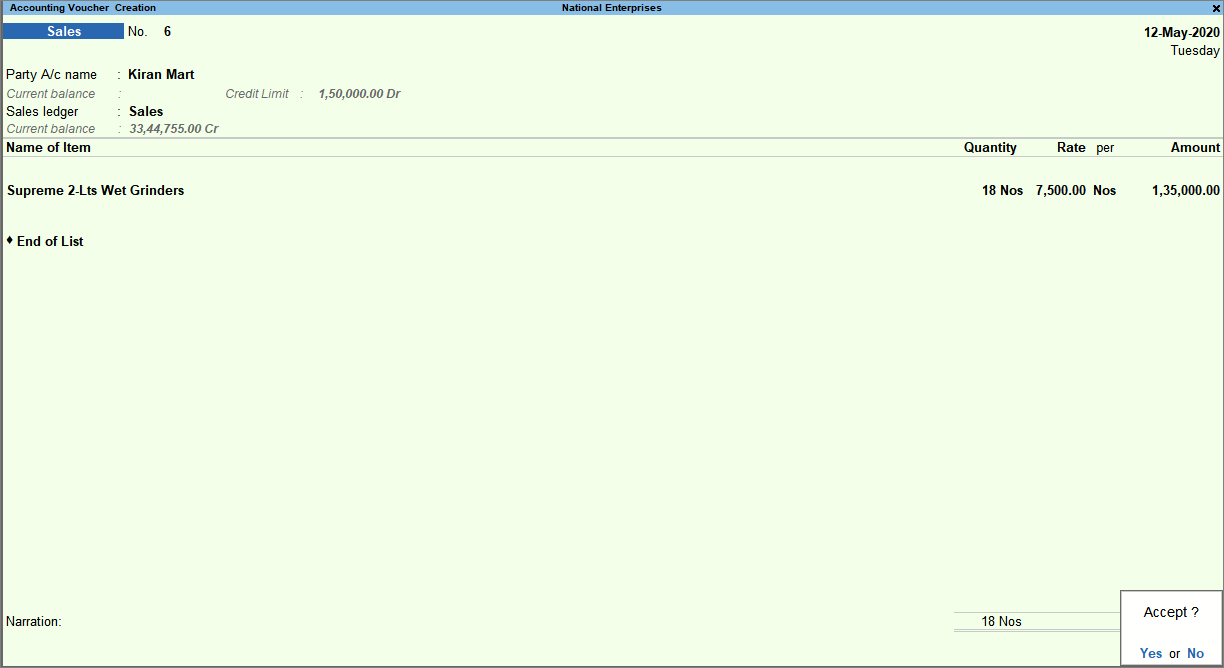
Manage Credit Limit for Parties
You can specify the credit limit allowed as per your business for each debtor in the respective ledger. You can record transactions within the specified credit limit for the party. However, transactions like sales order, which do not affect your book of accounts can be passed. TallyPrime also gives you the option to consider posted-dated sales and receipts transactions to arrive at the credit limit utilization by setting the option Override credit limit using post-dated transactions to Yes.
In this section
- Enable and set credit limit
- Check on exceeding credit limit
- Override credit limit using post-dated transactions
Enable and set credit limit
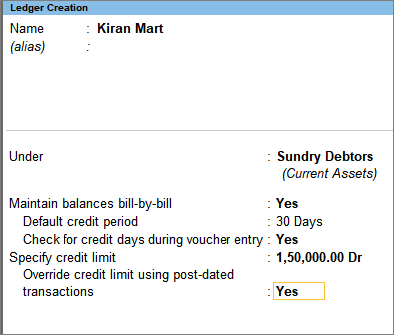
You may want to set credit limit for party ledgers. In TallyPrime, you can set credit limits for ledgers grouped under Sundry Debtors and Sundry Creditors.
Set credit limit for each ledger one-by-one
- Gateway of Tally > Alter > Ledger > select the party ledger > and press Enter.
Alternatively, press Alt+G (Go To) > Alter Master > Ledger > select the party ledger > and press Enter. - Press F12 (Configure) > set Provide Credit Limits to Yes.
- Enter the amount in the Specify credit limit field.
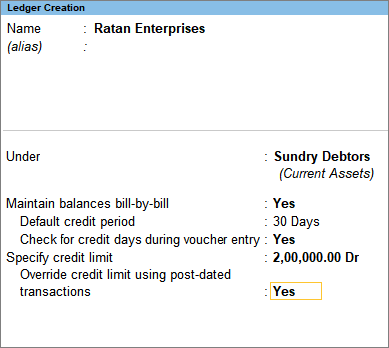
- Enable the option Override credit limit using post-dated transactions, if required.
Set credit limits for multiple parties in one-go
- Gateway of Tally > Alter > Credit Limits > select the account group > and press Enter.
Alternatively, press Alt+G (Go To) > Alter Master > Credit Limits > select the account group > and press Enter. - Select the required group of ledgers to set the credit terms.

- In the Multi Ledger Limit Alteration screen, set:
- Credit Limit – Specify the amount of credit limit against the ledger account in this field. You can set the amount in foreign currency, if required, for ledgers involving forex transactions.
- Credit Period – Specify credit period in number of days or the due date.
- Check for Credit Days during Voucher Entry – Enable this to get a warning message when the party ledger selected in a transaction has exceeded the credit period, and the outstanding bills are not cleared.
To view this report for a different group, press F4 > select the group > and press Enter.
The credit limits defined in the party ledgers will be applied in the transactions.
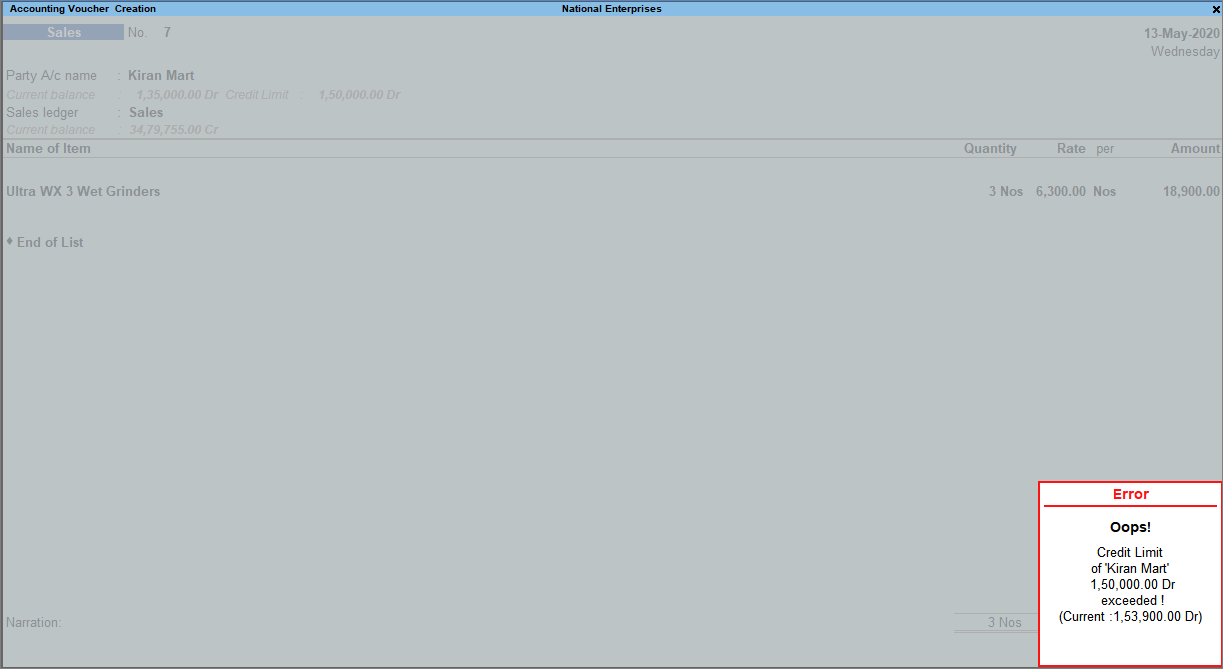
Check on exceeding credit limit
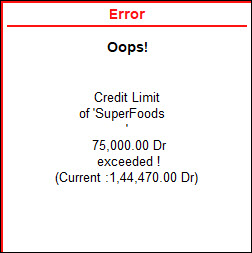
While recording transactions, you may want to know if the credit limit has been exceeded. In such cases, in TallyPrime, an error message appears with the credit limit defined for the party while saving the transaction. It also shows the amount that has been exceeded.
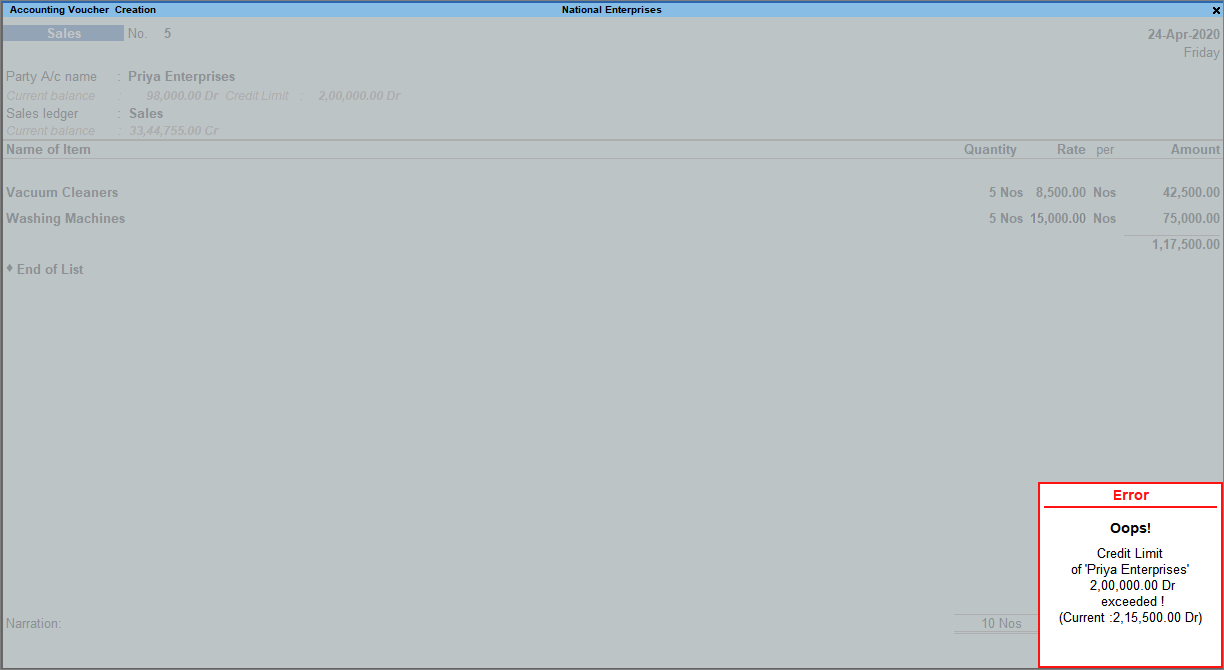
You can:
- Enter a lower value (within the prescribed credit limit) to complete the entry, or
- Enable the option Override credit limit using post-dated transactions in the party ledger.
You can use this information to have better control over the outstandings while recording sales transactions.
Override credit limit using post-dated transactions
Post-dated transactions are non-accounting transactions. They get converted to accounting transactions on the voucher date. The credit limit will not be considered until the transaction is converted from post-dated to regular voucher. However, you may want the post-dated receipt transaction to be considered when the customer has exceeded the credit limit. You can do this in TallyPrime by enabling the option Override credit limit using post-dated transactions in the party ledger.
- Enable party ledger to override credit limit in post-dated vouchers.
- Enter the required amount to Specify credit limit.
- Set the option Override credit limit using post-dated transactions to Yes.
- Record sales invoice before a post-dated receipt voucher.
- Record an invoice for an amount within the credit limit.
- Record another sales invoice, with amount that exceeds the credit limit. An error message appears.
- Record an invoice for an amount within the credit limit.
- Record a sales invoice after post-dated receipt voucher.
- Record a post-dated receipt voucher.
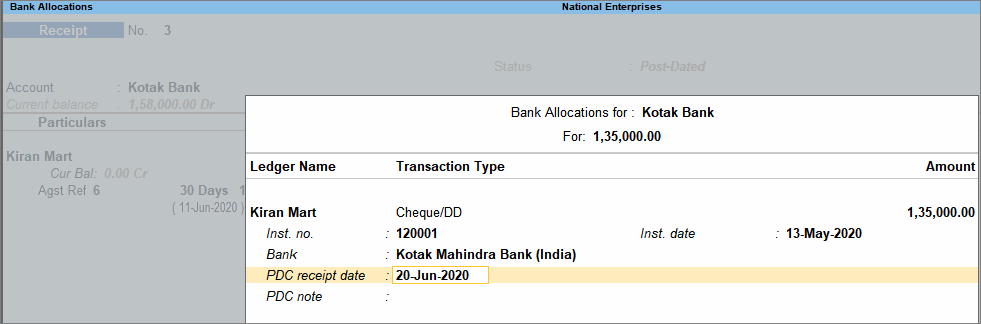
Note: Press Ctrl+T (Post Dated) to mark a voucher as Post-Dated in the voucher creation mode.
- Record a sales transaction for the excess amount. The message about exceeding credit limit will not appear.
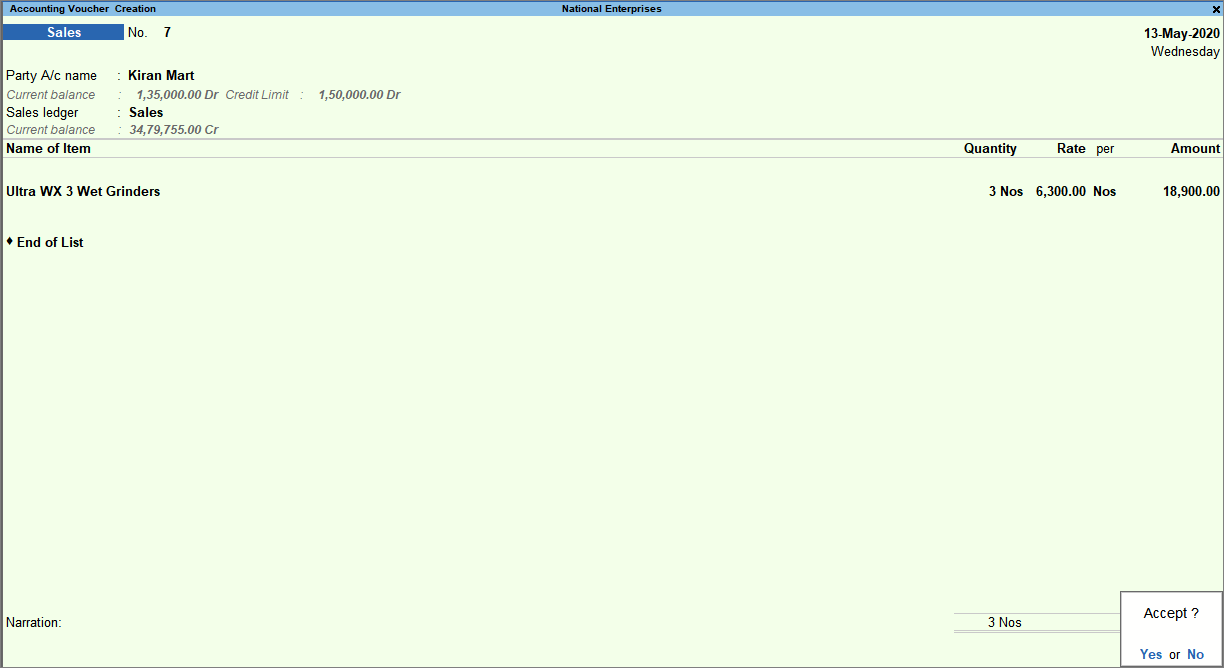
- Accept the invoice. As always, you can press Ctrl+A to save.
- Record a post-dated receipt voucher.
Using the procedure explained above, you can consider the value of post-dated receipt voucher when the party has exceeded the credit limit.
Send E-mails to Parties for Outstanding Bills | Reminder Letters
To manage the bills or ledgers outstanding with your parties, you can send reminder letters or the report details to the parties, as needed. Sending reminder letters helps in clearing due payments from parties so that you can update your books on time.
You can send reminder letters or the reports by using the E-mail feature in TallyPrime.
In this section
Reminder letters for current report
Let’s consider the Bills Receivable report for e-mailing reminder letters for overdue payments.
- From the Bills Receivable report, press Ctrl+M (E-mail).
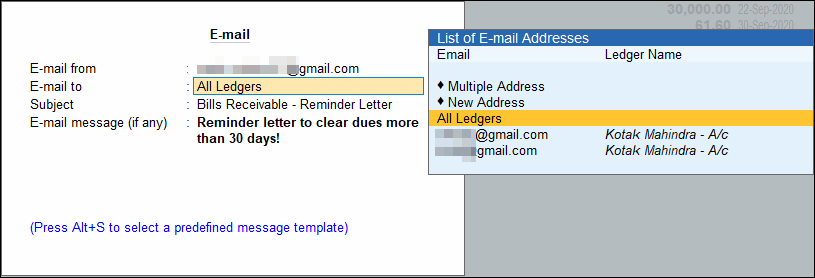
Alternatively, press Alt+M (Share) > Current under E-MAIL. - Set up your E-mail details.
- E-mail from: Select an e-mail profile.
To create an e-mail profile, select Create under List of Profiles. - E-mail to: Select New Address, Multiple Addresses, or All Ledgers, as needed.
- Select All Ledgers to send mass e-mail to all parties in the report.
- Enter the Subject of the e-mail and E-mail message (if any) and press Enter.
You can select a predefined message template by pressing Alt+S.
- E-mail from: Select an e-mail profile.
- Configure E-mail for Reminder Letters.
- Press C (Configure) > set Report Type as Reminder Letter.
Note: The Report Type is Bills Outstanding by default.
- In the Company Ageing Alteration screen, select the age of the outstanding amount for which you want to send the reminder letter.
- Configure other options as needed for the Reminder Letters.
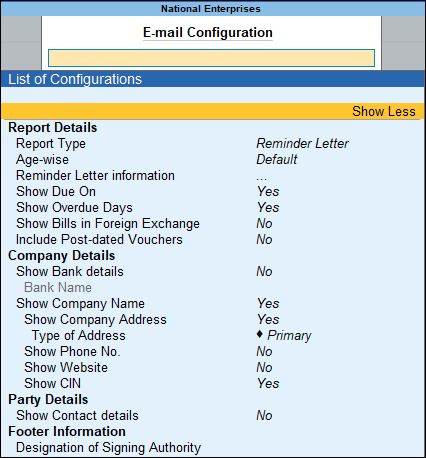
- Press C (Configure) > set Report Type as Reminder Letter.
- Save the configurations and press M (E-mail).
Based on the configurations you have set, the reminder letter for the dues will be sent to the parties.
Scenario 1: If you have selected one or more bills in the report for multiple parties, the reminder letters will be sent for all the bills:
- E-mail to is set to All Ledgers – Reminder letters will be sent to all parties for all their corresponding bills details.
- E-mail to is set to New Address or Multiple Address – Reminder letters of all parties with their respective bills will be sent to e-mail IDs entered in E-mail to. In this case, for each party, the bills appears in a new page.
Scenario 2: If you have not selected any bills in the report, the reminder letter will be sent for all the bills:
- E-mail to is set to All Ledgers – Reminder letters will be sent for all the bills to the respective parties.
- E-mail to is set to New Address or Multiple Address – Reminder letters for the specified period in the report will be sent to the e-mails provided. In this case, for each party the bill details will be displayed on a new page.
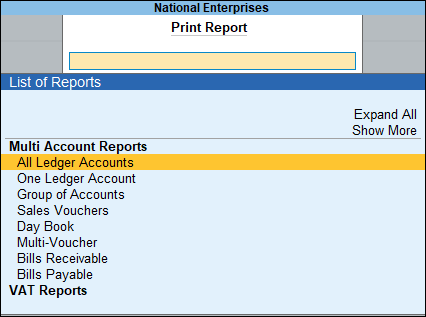
Reminder Letters using multi-account printing
You can also send reminder letters to one or more parties by selecting from the Multi Account Reports. For Multi Account Reports, Reminder Letters can be sent for the following reports:
- All Ledger Accounts
- Group of Accounts
- Bills Receivable
- Group Outstanding
- Group of Account Outstandings
Steps to send reminder letters in case of Multi-account printing are the same as explained above for current report.
Send Outstanding report details
To ensure timely payments from your parties against the outstandings, you can send the outstanding report details to parties.
For example, from the Bills Receivables report:
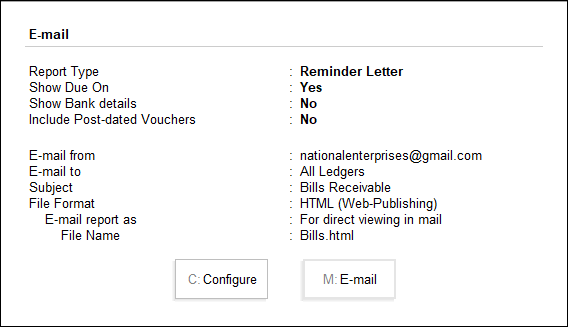
- Press Ctrl+M (E-mail) > C (Configure).
- Specify other details as needed.
- Provide the E-mail from ID.
- Under E-mail to, select one or more e-mail IDs. Select All Ledgers if you need to send the report details to all parties displayed in the report.
- Press M (E-mail) from the E-mail screen to send the report details, as per the E-mail to details provided.
E-mail Confirmation of Accounts
Similar to sending reminder letters, you can also send the Confirmation of Accounts to one or multiple parties for multi-account reports.
- Press Alt+M (Share) > select Others under E-MAIL.
- Select the report name under Multi-Account Reports.
You can send the Confirmation of Accounts for the following:- All Ledger Accounts
- Group of Accounts
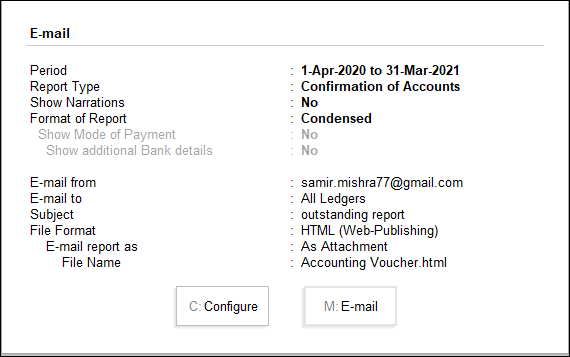
- Set up e-mail details.
- E-mail from: Select a e-mail profile from the List of Profiles.
If you have not created a profile yet, select Create under List of Profiles and create a profile. - In the E-mail to field
- Select New Address to enter a new e-mail ID.
- Select Multiple Address to select more than one address.
- Select All Ledgers to send mass e-mail to all parties in the report.
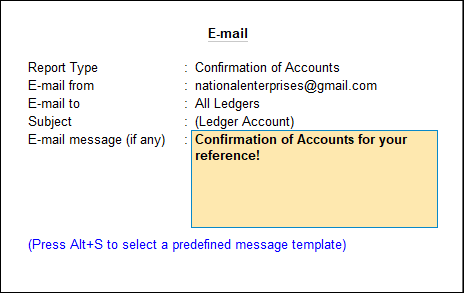
- Enter the Subject of the e-mail and E-mail message (if any).
You can select a predefined message template by pressing Alt+S.
Note: You can also send the Ledger Accounts or default reports to parties using this mass e-mail feature in TallyPrime.
- E-mail from: Select a e-mail profile from the List of Profiles.
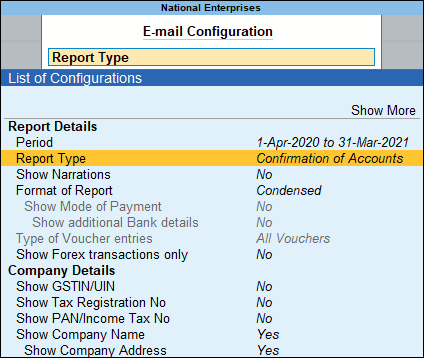
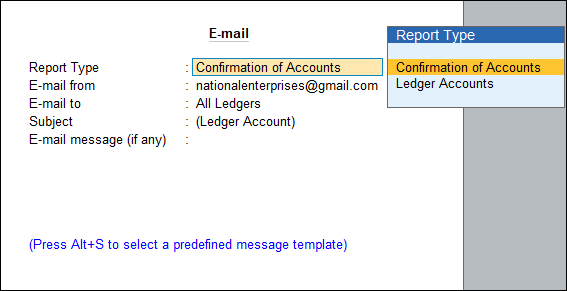
- Press C (Configure) to configure for Confirmation of Accounts.
- Under Report Type, select Confirmation of Accounts.
- Configure other options as needed.
- Save the configurations and press M (E-mail).
Based on the configurations you have set, the Confirmation of Accounts will be sent to the parties.
For Release 1.0: Click here.
Reminder letters for current reports
-
-
- From the Bills Receivable report, press Ctrl+M (E-mail).
Alternatively, press Alt+M (Share) > Current under E-MAIL. - Set Report Type as Reminder Letter.

Note: The Report Type is Bills Outstanding by default.
- In the Company Ageing Alteration screen, select the age of the outstanding amount for which you want to send the reminder letter.
- Set up other E-mail details.
- E-mail from: Select an e-mail profile from the List of Profiles.
If you have not created a profile yet, select Create under List of Profiles and create a profile. - E-mail to: You can enter a New Address, or select more than one address using Multiple Addresses.
- Select All Ledgers to send mass e-mail to all parties in the report.

Note: You can send the reminder letter to a single party or multiple selected parties. You can choose to mass e-mail to all the parties ledgers displayed in the report for the selected period.
- Select All Ledgers to send mass e-mail to all parties in the report.
- Enter the Subject of the e-mail and E-mail message (if any) and press Enter.
You can select a predefined message template by pressing Alt+S.
- E-mail from: Select an e-mail profile from the List of Profiles.
- Press C (Configure) to configure other options as needed and save.
- Press M (E-mail) to send the reminder letters based on your selection.
Based on the configurations you have set, the reminder letter for the dues will be sent to the parties.
- From the Bills Receivable report, press Ctrl+M (E-mail).
-
E-mail Confirmation of Accounts
Similar to sending reminder letters, you can also send the Confirmation of Accounts to one or multiple parties for multi-account reports.
-
-
- Press Alt+M (Share) > select Others under E-MAIL.
- Select the report name under Multi-Account Reports.
You can send the Confirmation of Accounts for the following:- All Ledger Accounts
- Group of Accounts
- Under Report Type, select Confirmation of Accounts.
- E-mail from: Select a e-mail profile from the List of Profiles.
If you have not created a profile yet, select Create under List of Profiles and create a profile.
Note: You can send the reminder letter to a single party or multiple selected parties. You can choose to mass e-mail to all the parties ledgers displayed in the report for the selected period.
- In the E-mail to field
- Select New Address to enter a new e-mail ID.
- Select Multiple Address to select more than one address.
- Select All Ledgers to send mass e-mail to all parties in the report.
- Enter the Subject of the e-mail and E-mail message (if any).
You can select a predefined message template by pressing Alt+S. - Press Enter to E-mail screen, displaying the configurations.
- Press C (Configure) to set other e-mail configurations, if needed.
- Save the configurations and press M (E-mail).
Based on the configurations you have set, the Confirmation of Accounts will be sent to the parties.
-
Print Reminder Letters | Bills Outstanding
- From the Bills Receivable report, press Ctrl+P (Print). Alternatively, press Alt+P (Print) > Current.
- Press C (Configure) to view the List of Configurations.
- Under Report Type, select Reminder Letter.

Note: By default, Bills Outstanding is selected. You can also print the entire Outstanding Report.
- In the Company Ageing Alteration screen, select the age of the outstanding amount for which you want to send the reminder letter.
- Configure the reminder letter as per your needs.
- Reminder Letter information – You can enter the bill or amount details for reference.
- Enable Show Due on and Show Over Due Days, as needed.
- You can also include Post-dated Vouchers to be printed in the reminder letter.
- Set the Number of Copies that you want to print.
- Save the configurations and press P (Print).

Based on the configurations you have set, the reminder letter for the dues will be printed.
Similarly, you can print the Bills Outstanding report. Under Report Type, retain Bills Outstandings, configure other necessary details from printing and print the report.
Print Confirmation of Accounts – Similar to e-mailing, you can also print confirmation of accounts as follows:
- Press Alt+M (Share) > select Others under E-MAIL.
- Select the report name under Multi-Account Reports.
You can send the Confirmation of Accounts for the following:- All Ledger Accounts
- Group of Accounts
- Press C (Configure) to view the List of Configurations.
- Under Report Type, select Confirmation of Accounts.
- Set up other configurations as needed for printing.
- Save the configurations and press P (Print).
Based on the configurations you have set, the confirmation of accounts will be printed.
To know more about the Printing feature and flexibilities in TallyPrime, refer to the Printing Invoices and Reports topic.
Data Representation in Reports
Date behaviour in Reports | Bills Outstandings for selected period
The Bills Outstanding report displays the pending amount as on date. For example, if you are viewing the report for 1-Jul-2020 to 30-Sep-2020, any pending amount from the previous period is also displayed as the outstanding amount gets carried forward.
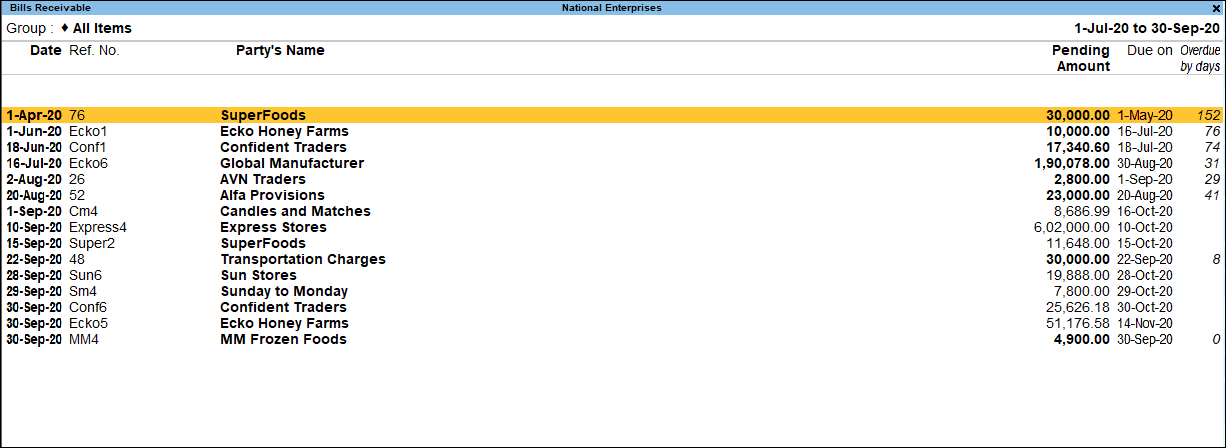
Therefore, to view the outstanding bills only for the selected period – 1-Jul-2020 to 30-Sep-2020, for example:
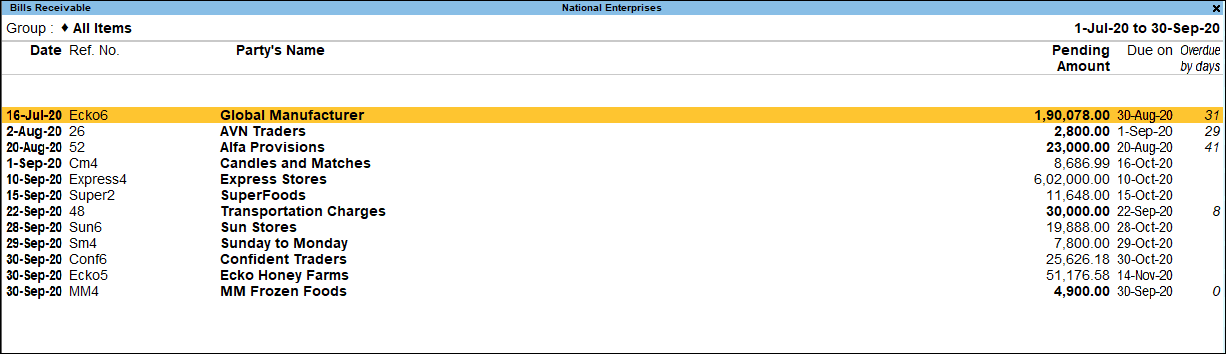
- Press Alt+F12 (Range).
- Select the Type of Information, Particulars, and Range of information as in the sample below:
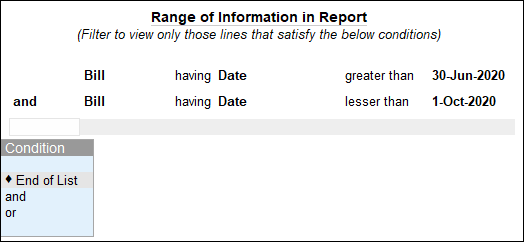
- Select End of List to view the outstanding bills only for the range selected.
Explode/Collapse
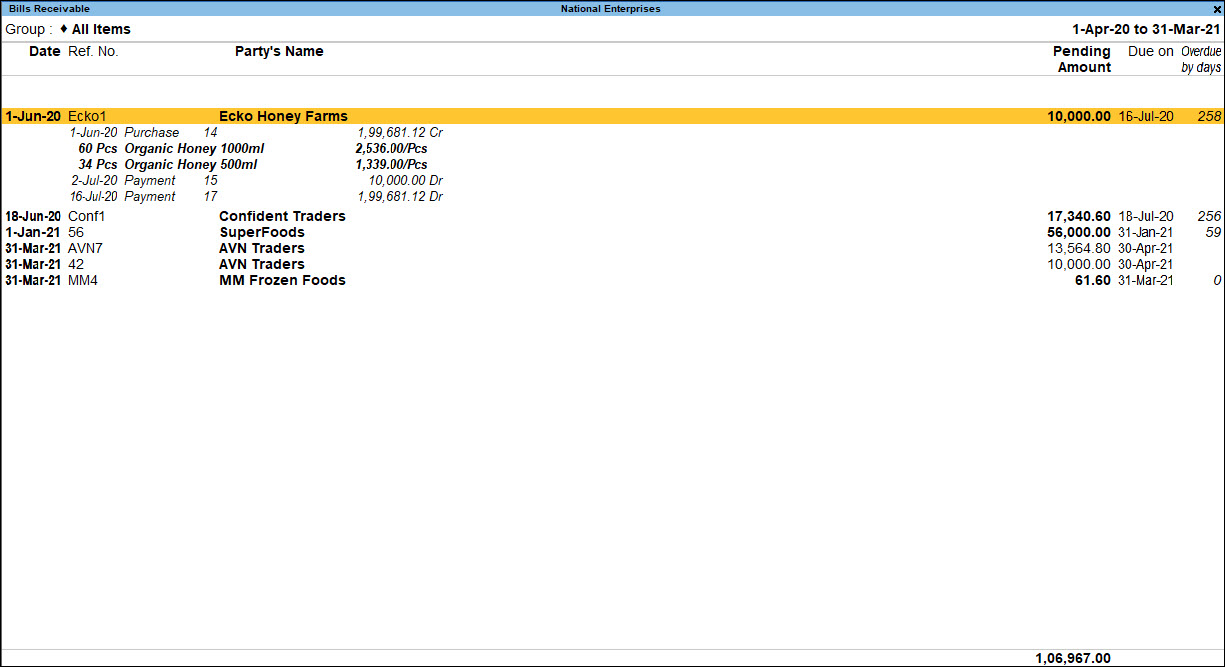
- Press Shift+Enter to see the next level of data for the selected line on the same screen. You can move to any of the lines in the next level and further explode/collapse the selected line using Shift+Enter.
When you press Shift+Enter on any of the transaction recorded bill-wise or on account, the details related to the transaction are further expanded and displayed as shown below:
What you see on the screen can vary based on your choices. Press F12 (Configure) to change the options, and F11 (Company Features) to enable or disable features.
- Press Alt+F5 to expand the data shown in the report in the detailed format. All the transactions recorded against a particular bill or On Account, and the partial settlement made against these transactions are displayed here.
You can toggle between the Detailed and Condensed formats of the reports using Alt + F5. A sample image is shown below.
What you see on the screen can vary based on your choices. Press F12 (Configure) to change the options, and F11 (Company Features) to enable or disable features.
- Press Ctrl+Enter on any of the transactions displayed in the report to alter the transaction. If there are any opening balances recorded for a party you can also alter all such details from the same report.
Change Report Context
- Press F4 and select a party to view the outstanding receivables details for that party.
Settle Bill
- Press Alt+B to settle an outstanding bill for a particular party. You can also select more than one bill and settle the total pending amount for the party. A sample image is shown below.
- Press F6 (Age-wise) to see what is the expected payment from the party in the coming days.
- Press F12 (Configure) to add or remove details from the report.
Ctrl+B (Basis of Values)
You can configure the values in your report for that instance, based on different business needs.
In Outstanding Receivables, you can display the values based on the pending or overdue bills.
- Press Ctrl+B (Basis of Values) > Type of Bills > select Pending Bills.
- Press Esc to view the default values.
Similarly, you can view the total values related to bills recorded with foreign exchange only. Press Ctrl+B (Basis of Values) > Show Bills in Foreign Exchange > and press Enter.

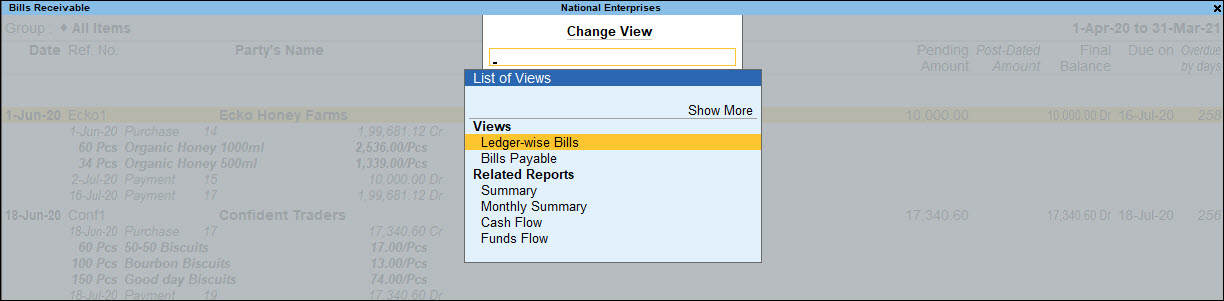
Ctrl+H (Change View)
You can display the details of a report in different views with additional details or for a specific period. You can also view other reports related to the current report.
- To view the Bills Receivables ledger-wise, press Ctrl+H (Change View) > type or select Ledger-wise Bills > and press Enter.
- Press Esc to view the default report.
Similarly, you can view the Bills Payable from through Change View. In addition, you can also view other related reports, such as Summary, Monthly Summary, and so on.
Ctrl+J (Exception Reports)
You can view the exceptions related to the data displayed in the current report by pressing Ctrl+J (Exception Reports), without closing the report.
- To view the Negative Ledgers for Outstanding Receivables, press Ctrl+E (Exception Reports) > type or select Negative Ledgers > and press Enter.
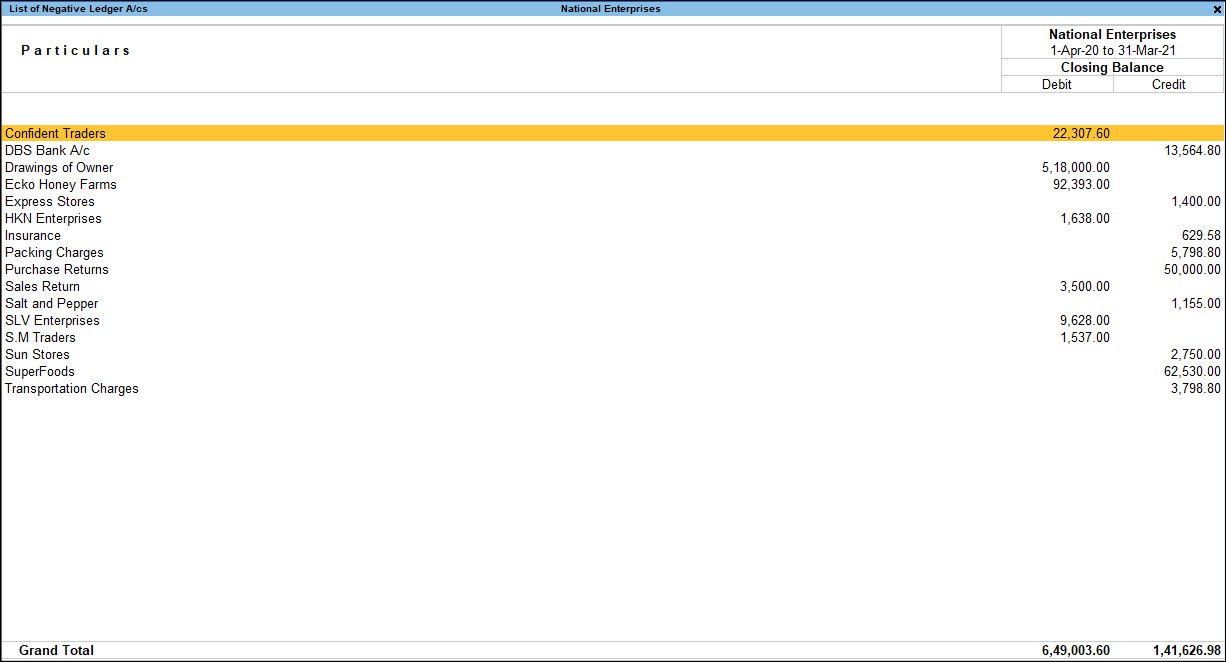
- Press Esc to view the default report.


