
Enable VAT in TallyPrime
You can enable VAT in TallyPrime for a state by using the F11 (Features) of the company. In the Company VAT Details screen, you can provide all the required details, such as TIN, tax details and information related to filing return as applicable for a particular state.
To enable VAT in TallyPrime, follow the steps given below.
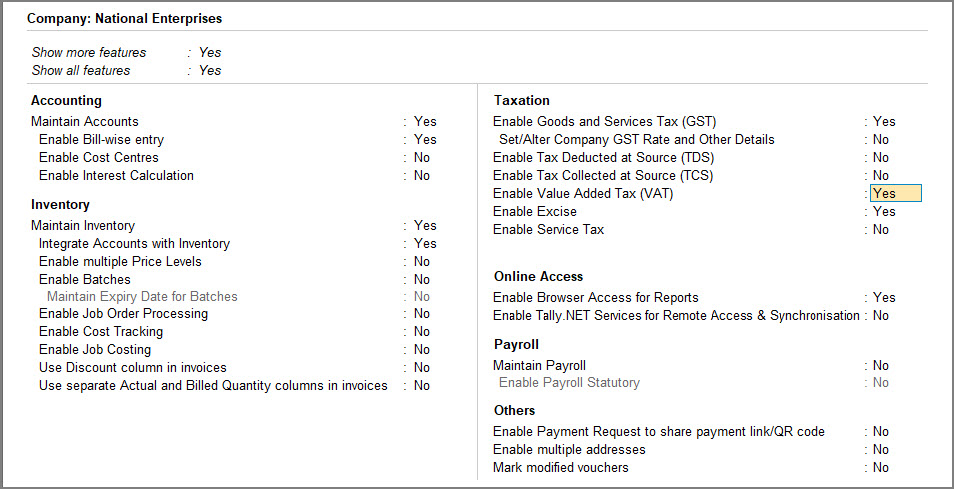
- Press F11 (Features) > set the option Enable Value Added Tax (VAT) to Yes, to open the Company VAT Details screen.
In case you do not see this option,- Set the option Show more features to Yes.
- Then, set the option Show all features to Yes.
- Enter the company TIN and Interstate sales tax number.
- Press F12 (Configure) to view the configurations screen and set the options as shown below:
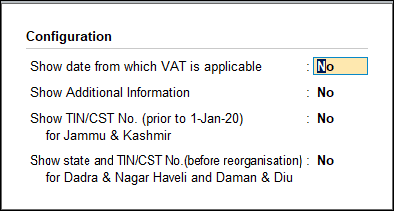
Note:
♦ When you select the State name as Jharkhand in the party ledger, the District Name screen appears, which allows you to select the district. This is applicable only when Jharkhand is selected as State in company master.
♦ In case of Ladakh TIN (prior to 1-Jan-2020) and Interstate sales tax number (prior to 1-Jan-2020) will also appear under VAT Details. For Jammu & Kashmir, you can enable the option Show TIN/CST No. (prior to 1-Jan-2020) for Jammu & Kashmir option under F12 (Configure) to specify the TIN (prior to 1-Jan-2020) and Interstate sales tax number (prior to 1-Jan-2020).
♦ The name of new union territory Dadra & Nagar Haveli and Daman & Diu in TallyPrime. All masters with Daman & Diu and Dadra & Nagar Haveli are automatically updated with the name of new union territory. You have to manually specify the new TIN and Interstate sales tax number, if changed. In case you want to view state/union territory, TIN, and Interstate sales tax number of the company before the merger, you can enable the option Show state and TIN/CST No. (before reorganisation) for Dadra & Nagar Haveli and Daman & Diu under F12 (Configure). The fields State (before reorganisation), TIN (before reorganisation) and Interstate sales tax number (before reorganisation) are displayed with the details specified before reorganisation.
- Enable the option Set/alter tax/rate details to view the Tax/Rate Details screen. A single VAT rate for all stock items in a company can be defined in this screen.
To provide tax/rate details:- Press F12 (Configure) to view the Configuration screen.
- Set the options to Yes to provide all tax details at the company level. These details are picked in the relevant VAT/CST forms and annexures.
- Enter the applicable CST Rate, VAT Rate, and Other Info. Press Alt+W (Details) to view the VAT Rate Details screen, and to specify different VAT rates with separate Applicable From dates.
- Accept the screen. As always, you can press Ctrl+A to save.
- Enable the option Define VAT commodity and tax details as masters if separate VAT classifications have to be created for each tax rate. You can apply these classifications to ledgers, stock items or stock groups.
When the state is selected as Uttarakhand, in the Company Features Alteration screen:
Enable Sales Tax Cess to Yes.
Set/alter sales tax cess to Yes. Enter the Cess Rate in the Sales Tax Cess screen, and press Enter to accept.
Cess calculation based on quantity is not supported.
General Details on Enabling VAT in TallyPrime
Press Ctrl+I (More Details) to provide PAN and CIN number for your company data.
- Enter the PAN/Income tax no.
- Enter the Corporate Identity No. (CIN).
- Accept the screen. As always, you can press Ctrl+A to save.
Click here for details on options provided as per state specific requirements of VAT/CST returns and annexures.


