Stock Item in TallyPrime (VAT)
Stock items are tradeable goods. You can create a stock item in TallyPrime, and select the same in transactions. Stock items can be created with MRP applicable globally or for specific state.
To create a stock item in TallyPrime, follow the steps given below.
- Gateway of Tally > Create > type or select Stock Item > and press Enter.
Alternatively, press Alt+G (Go To) > Create Master > type or select Stock Item > and press Enter. - Enter the Name of the stock item.
- Select the required group in the Under field. If the stock group is predefined with tax details, the same gets applied to the stock item. If it is set to Primary, tax and commodity details specific to the stock item can be defined.
As in other transactions, you can create the stock group on the fly by pressing Alt+C. Alternatively, press Alt+G (Go To) > Create Master > type or select Stock Group > and press Enter. - Select the required unit of measurement in Units field.
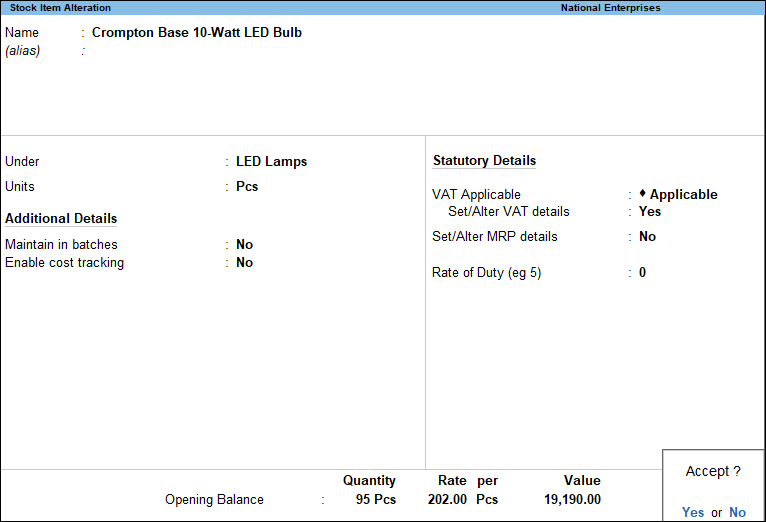
- Set the option VAT Applicable to Applicable.
- Enable the option Set/Alter VAT details if the item is not grouped under stock group predefined with tax details. To specify the VAT rate for the stock item in the VAT Details screen,
- Press F12 (Configure) > set the option Set VAT details to Yes.
If you do not see this option:- Set Show more configurations to Yes.
- Set Show all configurations to Yes.
- Set the Classification option in the VAT Details screen to:
- Undefined if unique tax rate and commodity details have to be defined.
Or - Any of the user-defined classification.
Note: Once the VAT Classification is applied, the other options disappear and the cursor returns to the Stock Item Creation screen.
- Undefined if unique tax rate and commodity details have to be defined.
- Enter the Tax rate.
- Press Ctrl+A to accept the VAT Details screen.
The Stock Item Creation screen appears as shown below:

- Press F12 (Configure) > set the option Set VAT details to Yes.
- Accept the screen. As always, you can press Ctrl+A to save.
Click here for options provided in the stock item master as per state specific requirements of VAT/CST returns and annexures.
Stock Item Creation for Uttarakhand VAT
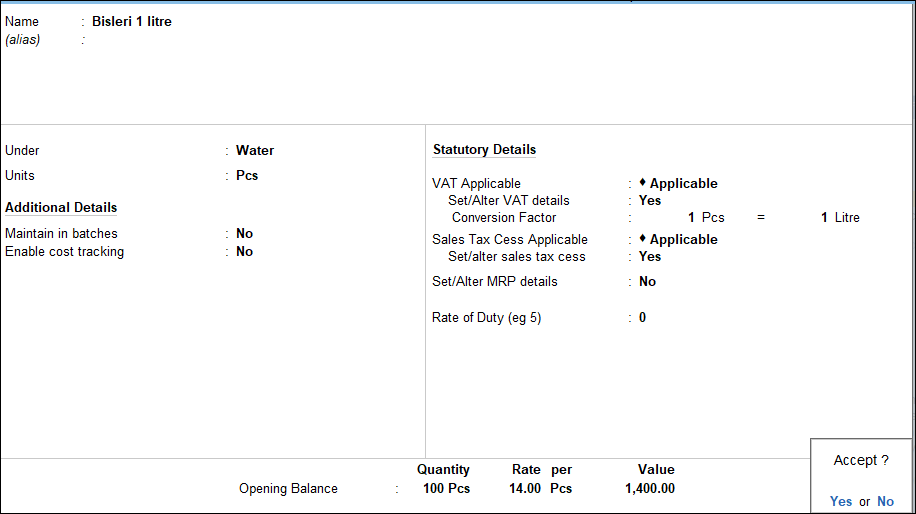
In Stock Item Creation screen of company enabled for Uttarakhand VAT, additional option of Sales Tax Cess Applicable and Set/alter sales tax cess appear as shown below, if sales tax cess feature is enabled in the Company Features Alteration screen:
Set the rate of cess in the Sales Tax Cess screen and accept the screen. As always, you can press Ctrl+A to save.
Set MRP Details
To enable MRP feature in stock item master
- Press F12 (Configure) in the Stock Item Creation screen. In the configuration screen,
- Enable the option Provide MRP details.
- If you do not see this option, set Show more Configurations to Yes.
- Press Ctrl+A to accept the Configuration screen.
- Enable Set/alter MRP details in the Stock Item Creation screen.
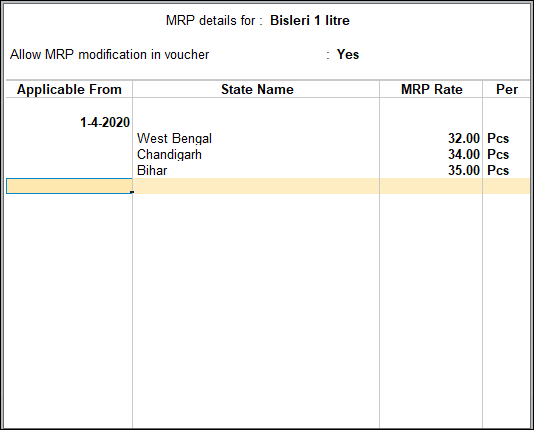
- Set the option Allow MRP modification in voucher to Yes, to enable altering the MRP rate while recording the voucher.
- Enter the MRP Rate. The MRP Details screen appears as shown below:

- Press Ctrl+A to accept the MRP Details screen.
- Accept the screen. As always, you can press Ctrl+A to save
To enter MRP applicable on the stock item in different states
- Press F12 (Configure) > set the option Allow state-wise MRP as Yes > and press Enter, in the MRP Details screen of the stock item master.
- In the MRP Details screen
- Accept the screen. As always, you can press Ctrl+A to save.


