
Party Ledger in TallyPrime (VAT)
You need to create party ledgers in TallyPrime to use party details in the process of business transactions. Party ledger in TallyPrime can be created for interstate or intrastate parties, and VAT/CST details can be configured, as required.
Party Ledger in TallyPrime | Supplier Ledger
- Gateway of Tally > Create > type or select Ledger.
Alternatively, press Alt+G (Go To) > Create Master > type or select Ledger. - Enter the Name of the supplier.
- Select Sundry Creditors from the List of Groups, in the Under field.
- Set Maintain balances bill-by-bill to Yes.
- Enter the Default credit period, if any.
- Set Check for credit days during voucher entry to Yes, if required.
- Set Inventory values are affected to Yes, if required.
- Enter the Mailing Details.
- Select the required State.
- Select the required Country.
Note:
? When you select the State name as Jharkhand in the party ledger, the District Name screen appears, which allows you to select the district. This is applicable only when Jharkhand is selected as the State in the company master.
? In case of Ladakh TIN (prior to 1-Jan-2020) and Interstate sales tax number (prior to 1-Jan-2020) will also appear under VAT Details. For Jammu & Kashmir, you can enable the option Show TIN/CST No. (prior to 1-Jan-2020) for Jammu & Kashmir option under F12 (Configure) to record the TIN (prior to 1-Jan-2020) and Interstate sales tax number (prior to 1-Jan-2020).
- Enter the Pincode.
- Set the option Provide bank details to Yes to select the Transaction Type, if required.
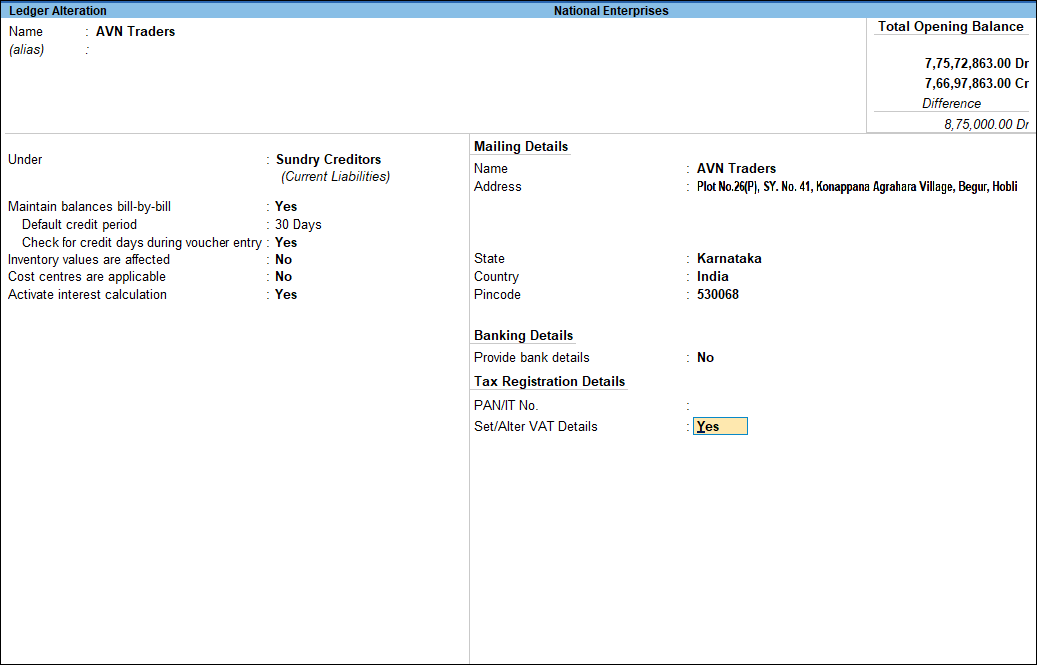
- Enter the PAN/IT No..
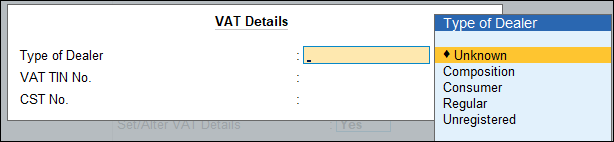
- Enable the option Set/Alter VAT Details. In the VAT Details screen,
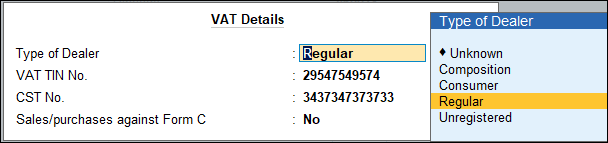
- Select the Type of Dealer from the Type of Dealer list as shown below:
Note:
? In case the Type of Dealer is selected as Regular and VAT TIN No. field is left blank, the warning message TIN is blank appears.
? When you select the State name as Jharkhand in the party ledger, the District Name screen appears, which allows you to select the district. This is applicable only when Jharkhand is selected as State in company master.
? When you select Ladakh or Jammu & Kashmir as the State for the party, the fields VAT TIN No. (prior to Jan-2020) and CST No. (prior to 1-Jan-2020) also appear in the VAT Details screen. The TIN and CST numbers assigned to the party when Ladakh was part of Jammy and Kashmir are captured in these fields.
? The name of new union territory Dadra & Nagar Haveli and Daman & Diu is also provided. All masters with Daman & Diu and Dadra & Nagar Haveli are automatically updated with the name of new union territory. You have to manually specify the new TIN and Interstate sales tax number, if changed.
- Enter the VAT TIN No. and CST No.
- Select the Type of Dealer from the Type of Dealer list as shown below:
- Accept the screen. As always, you can press Ctrl+A to save. The Ledger Creation screen appears as shown below:
- Accept the screen. As always, you can press Ctrl+A to save.
Party Ledger in TallyPrime | Customer Ledger
- Gateway of Tally > Create > type or select Ledgers.
Alternatively, press Alt+G (Go To) > Create Master > type or select Ledger. - Enter the Name of the customer ledger.
- Select Sundry Debtors as the group name in the Under field.
- Set Maintain balances bill-by-bill to Yes.
- Enter the Default credit period, if any.
- Set Check for credit days during voucher entry to Yes, if required.
- Set Inventory values are affected to Yes, if required.
- Enter the Mailing Details.
- Select the required State.
- Select the required Country.
- Enter the Pincode.
- Set the option Provide bank details to Yes to select the Transaction Type, if required.
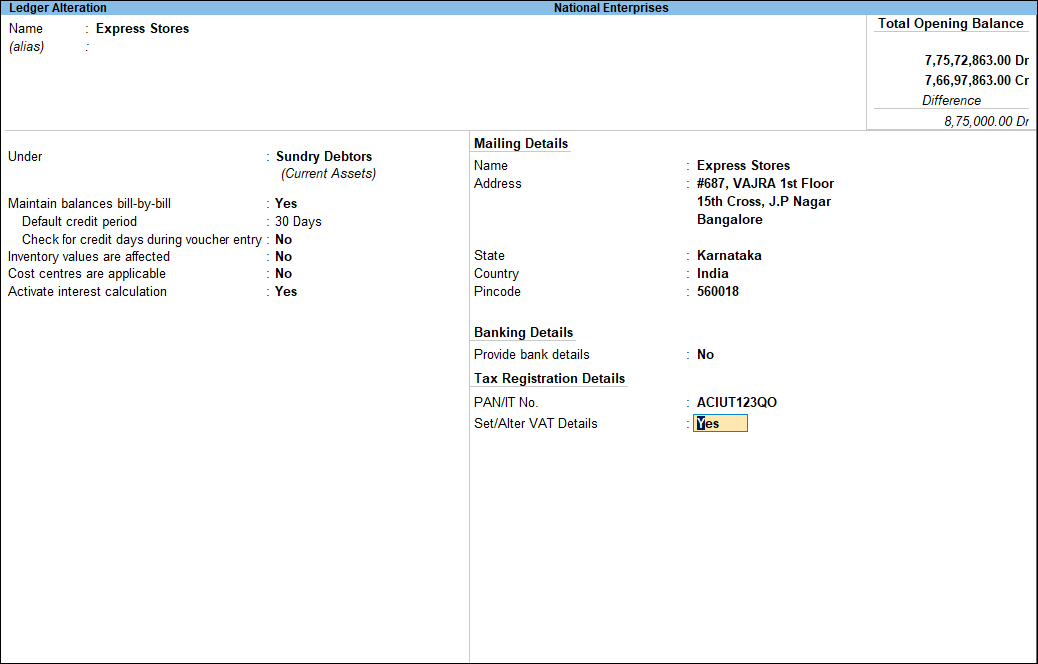
- Enter the PAN/IT No..
- Enable the option Set/Alter VAT Details. In the VAT Details screen,
- Select the Type of Dealer from the Type of Dealer list as shown below:
Note: If the Type of Dealer is selected as Regular and VAT TIN No. field is left blank, the warning message TIN is blank. appears.
- Enter the VAT TIN No. and CST No.
- Accept the screen. As always, you can press Ctrl+A to save. The Ledger Creation screen appears as shown below:
- Select the Type of Dealer from the Type of Dealer list as shown below:
- Accept the screen. As always, you can press Ctrl+A to save.
For interstate transactions, you can create ledgers for suppliers and customers belonging to other states.
VAT Details – Configuration Options
- Press F12 (Configure) in the VAT Details screen. In the configuration screen,
- Set Allow CST number to Yes.
- Set Allow exemption details to Yes, to classify the party as SEZ, Diplomatic Missions & U.N or Notification.
Note: Exemption types are provided as per the requirements of state specific return forms and annexures. Hence, based on the State selected in the Company VAT Details screen, the exemption types will vary.
- Set Allow Import Export Code to Yes if the party has import or export code details.
Note: If the Type of Dealer is selected as Regular and VAT TIN No. field is left blank, the warning message TIN is blank. appears.
- Press Ctrl+A to accept, and return to the VAT Details screen.
- Enter the CST No..
- Enter the Export/Import Code.
- Select the Type of Exemption.
- Enter the notification or the SEZ registration number and date.
Note: The option Dealer Category appears when the company is enabled for Jharkhand VAT to select the category as Dealer or Oil Company.
- Accept the screen. As always, you can press Ctrl+A to save.
The option Sales/purchases against Form C appears in the VAT Details screen if the State selected in the Ledger Creation screen is other than the State selected in the Company Creation screen. This selection is retained for the option Is against C Form in the Party Details screen, while recording transactions.
Is this information useful?
YesNo


