Record Sales with Salesperson Details for Collection and Commission in TallyPrime
Salespersons are those who help you to sell your goods or services by maintaining a good relationship with the customer and by helping them with their requirements. You can pay the Salespersons in terms of Commission, or you can pay them salary along with the commission. To pay the Salesperson commission you need to calculate how much sales were made by the Salesperson and how much was he able to collect from the customer. Based on the sale amount and collection made by the Salesperson the commission is calculated and paid.
You can maintain the Salesperson details in TallyPrime in the form of Cost Centres. Create the Cost Centres with the Salesperson’s name and allocate the sales and collection to the respective salesperson. The Cost Centres help you to track the sales and collection for individual Salesperson.
To calculate the commission based on the Sales amount, you need to enable the Sales ledger with the Cost Centre feature in TallyPrime. You also need to enable the Party ledger with the Cost Centre feature if you want to calculate commission based on the collections made by the Salespersons.
Salesperson Details to Calculate Commission on Sales Amount
In your business, when you are selling goods, you can sell the goods through a salesperson. When the salesperson sells the goods on your behalf, you must pay a commission to the salesperson for the sales made. To do so you need to track the sales made by the salesperson. You need to enable the Sales ledger for Cost Centre applicability and select the Cost Centre created for the salesperson to arrive at the value for the calculation of commission. TallyPrime, allows you to track the sales made through Cost Centres and view the commission calculated.
- Enable the Sales ledger for Cost Centre applicability.
- Press Alt+G (Go To) > Alter Master > Ledger > press Enter.
Alternatively, Gateway of Tally > Alter > Ledger. - Select the Sales ledger.
- Set the option Cost Centres are applicable to Yes.
If you do not see this option, press Ctrl+I (More Details) > type or select Cost Centre applicability > press Enter to set it to Yes. If the feature is inactive, you can activate the Cost Centre feature. Select Yes or press Y to proceed. - Press Ctrl+A to save the ledger.
- Press Alt+G (Go To) > Alter Master > Ledger > press Enter.
- Open a sales voucher and select the Party ledger.
- Press Alt+G (Go To) > Create Voucher > press F8 (Sales).
Alternatively, Gateway of Tally > Vouchers > press F8 (Sales). - Press F12 (Configure) and set the option Select common Ledger Account for Item Allocation to No.
As always, press Ctrl+A to save and proceed. - Party A/c Name: Select the Party ledger. Ensure the option Cost centers are applicable is set to No in the Party ledger.
- Press Alt+G (Go To) > Create Voucher > press F8 (Sales).
- Provide the stock item details.
- Name of Item: Select the stock item.
- Enter the Quantity and Rate. The amount appears automatically.
- Select the Sales ledger and provide the Cost Center details.
- Fill in other details, if any.
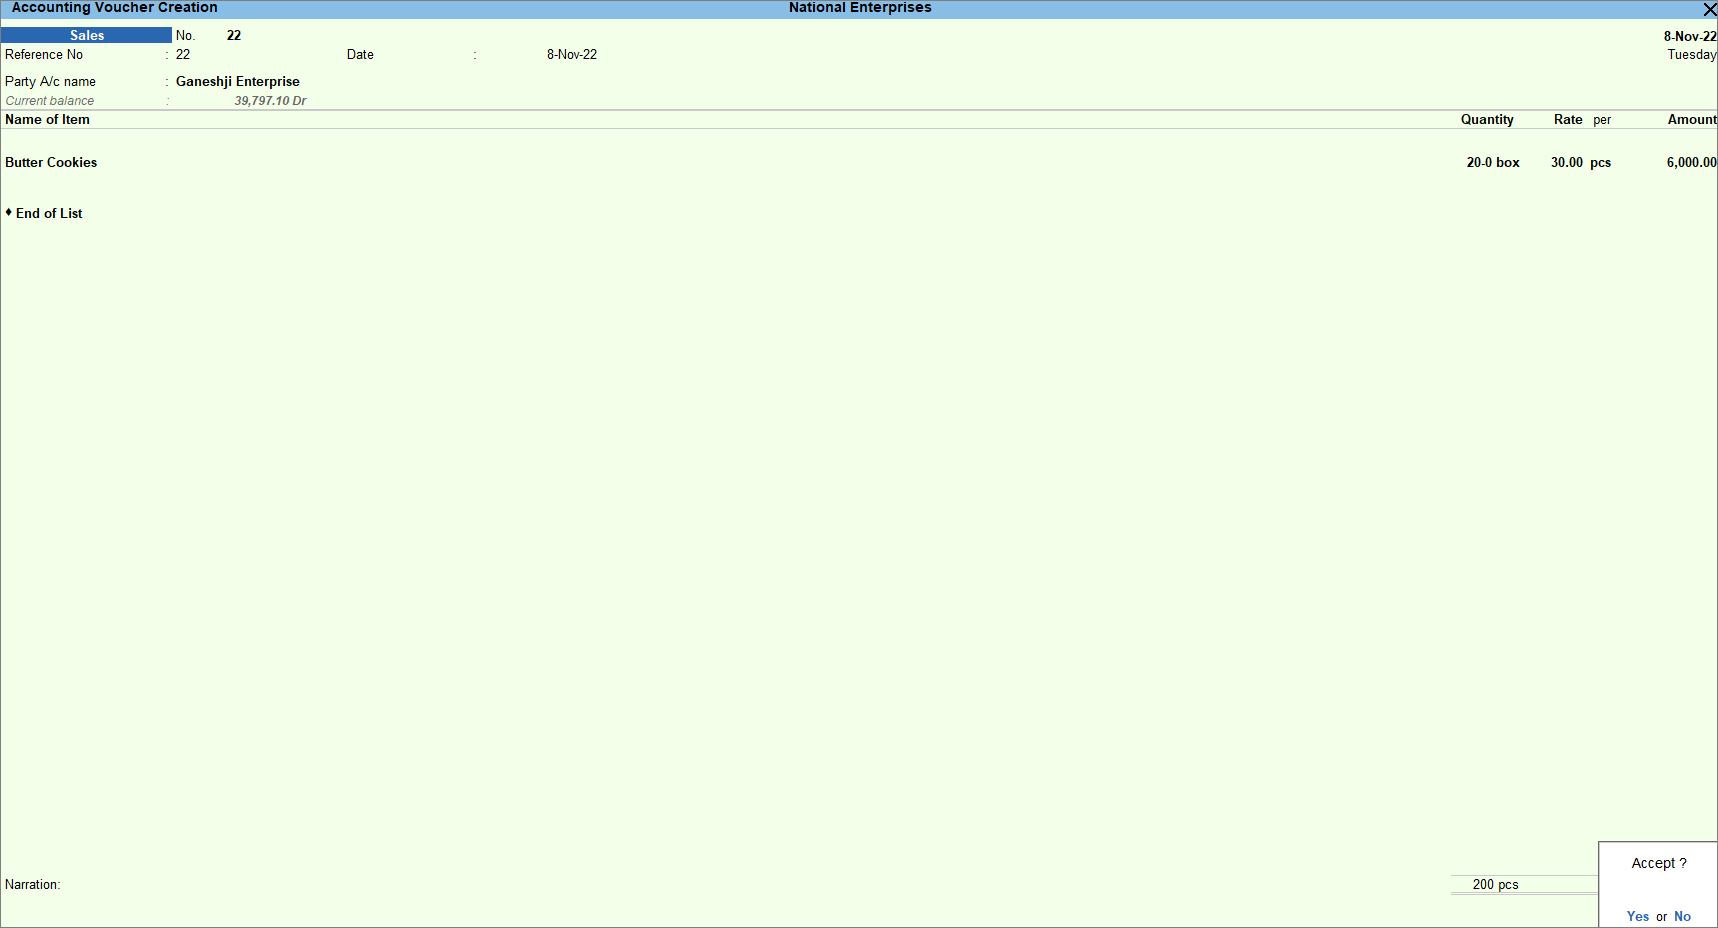
- Provide Narration, if needed. As always, press Ctrl+A to save.
You can view the total amount for commission calculation.
Similarly, you can check the Cost Centre details for other ledgers.
Salesperson Details for Collection of Sales Amount
Once the sales are made, you may want to assign salespersons to collect the sales amounts from parties. You can track the amount collected by the salespersons through Cost Centres for which you need to enable the Party Ledger for Cost Centres applicability and allocate the collections made by the salespersons. In TallyPrime you can track sales collection amounts through Cost Centres and record the receipt from the parties allocating such an amount to the salesperson.
In this section
Sales with Cost Centre allocation for collection
In TallyPrime, you can record the amount collected from the parties by the salespersons. You need to enable the Party ledger for Cost Centre applicability and select the Cost Centre created for the salesperson to allocate the collected sales amount.
- Enable the Party ledger for Cost Centre applicability.
- Press Alt+G (Go To) > Alter Master > Ledger > press Enter.
Alternatively, Gateway of Tally > Alter > type or select Ledger. - Select the Party ledger.
- Set the option Cost Centres are applicable to Yes.
If you do not see this option, press Ctrl+I (More Details) > type or select Cost Centre applicability > press Enter to set it to Yes. If the feature is inactive, you can activate the Cost Centre feature. Select Yes or press Y to proceed. - Press Ctrl+A to save the ledger.
- Press Alt+G (Go To) > Alter Master > Ledger > press Enter.
- Open a Sales voucher and select the Party ledger.
- Press Alt+G (Go To) > Create Voucher > press F8 (Sales).
Alternatively, Gateway of Tally > Vouchers > press F8 (Sales). - Party A/c Name: Select the Party ledger.
- Press Alt+G (Go To) > Create Voucher > press F8 (Sales).
- Provide the stock item details.
- Select the Sales ledger. Ensure the option Cost centres are applicable is set to No.
- Provide the Cost Allocation details for the total voucher value for the party selected in the voucher.
- Select the Cost Centre created for the salesperson, collecting the amount from the party.
- Enter the amount.
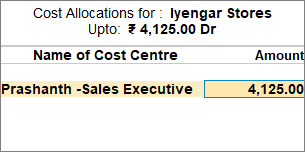
- Press Ctrl+A to save and proceed.
- Provide Narration, if needed. As always, press Ctrl+A to save.
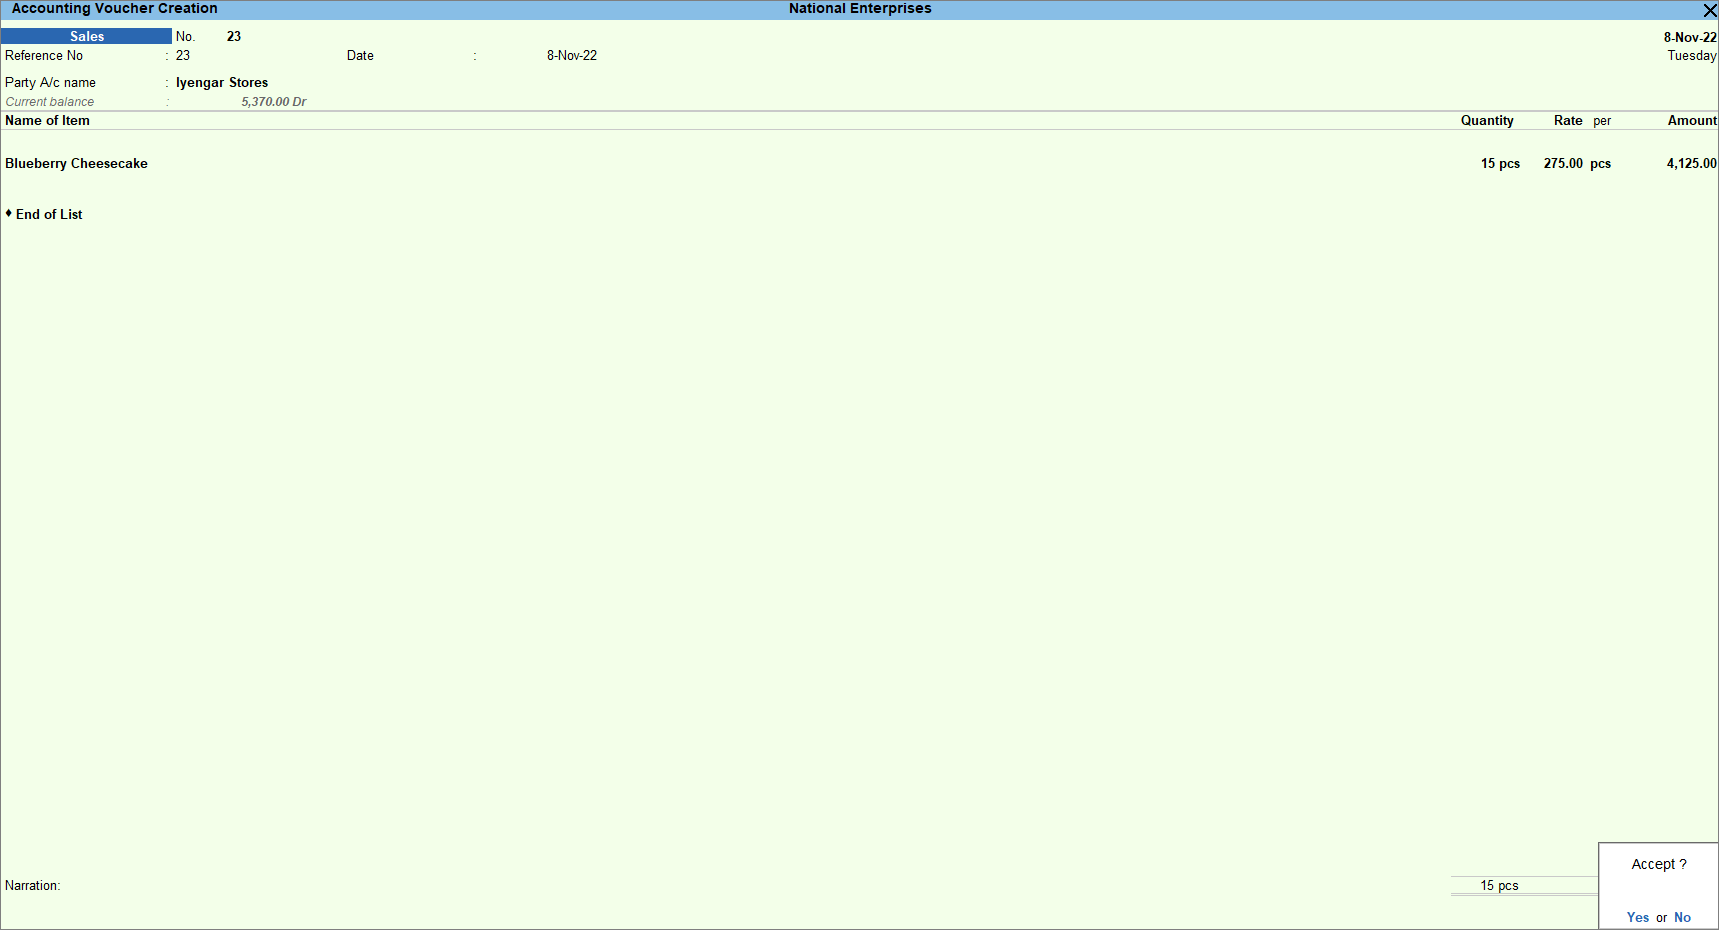
Similarly, record sales by selecting the required Cost Centre for collecting the amount from the party.
Receipt voucher for collection
Record the receipt from the customer and allocate it to the required salesperson in the receipt voucher. The amount is allocated to the salespersons through Cost Centres. While recording the receipt entry, you need to select the Cost Centres created for the salesperson and record the amount received by that salesperson. You can view the total amount to be collected along with the Cost Centre breakup.
- Press Alt+G (Go To) > Create Voucher > press F6 (Receipt).
Alternatively, Gateway of Tally > Vouchers > press F6 (Receipt). - Enter the details related to Account, Particulars, and Amount.
- Account: Select Cash or Bank ledger.
- Particulars: Select the Party ledger from whom the amount is received.
- Amount: Enter the amount received.
- Select the Cost Centre created for the salesperson and enter the amount.
- Enter the bank details if you have received the amount via bank transfers.
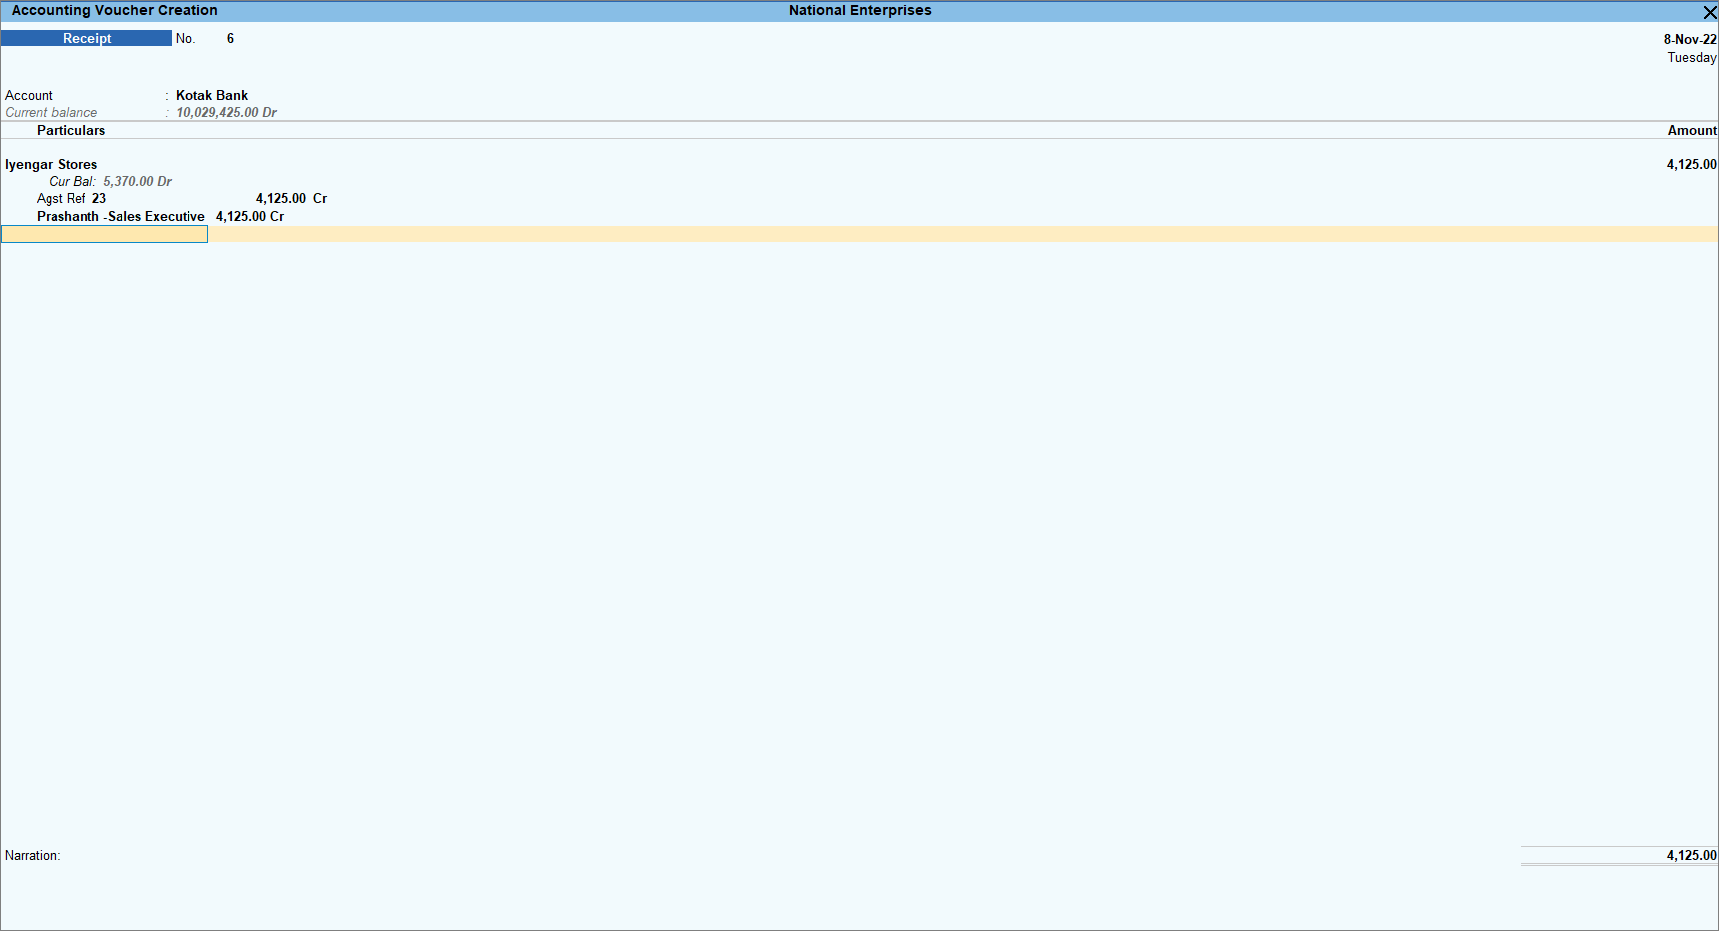
- As always, press Ctrl+A to save.
Similarly, you can record receipts for the amount collected by other salespersons.
You can view the total amount to be collected from the party, with Cost Centre details.
Similarly, you can check the Cost Centre details for other ledgers.
Salesperson Details for Collection and Commission
In your business, you may want to assign salespersons to collect sales amounts from parties and provide commission on the same. You can calculate the amount of commission depending on the amount collected by the salespersons. TallyPrime, allows you to track such collection of amounts through Cost Centres. You need to enable the Cost Centre applicability for both Sales and Party ledger and create the Cost Centres with the salesperson’s name. Select the same Cost Centres to track the amount collected and allocate the amount collected to the salespersons to whom you will pay the commission.
In this section
Sales with cost centre allocation for collection and commission
You need to enable the Sales and Party ledgers for Cost Centre applicability. You can then select the Cost Centre created for the salesperson to collect the sales amount and calculate the commission.
- Enable the sales ledger for cost centre applicability.
- Enable the party ledger for cost centre applicability.
- Open a Sales voucher and select the Party ledger.
- Press Alt+G (Go To) > Create Voucher > press F8 (Sales).
Alternatively, Gateway of Tally > Vouchers > press F8 (Sales). - Press F12 (Configure) and set the option Select common Ledger Account for Item Allocation to No.
As always, press Ctrl+A to save and proceed. - Party A/c Name: Select the Party ledger.
- Press Alt+G (Go To) > Create Voucher > press F8 (Sales).
- Provide the stock item details.
- Select the Sales ledger and provide Cost Centre details.
- Select the Sales ledger enabled for Cost Centre applicability.
- Select the salesperson under Name of Cost Center.
- Enter the amount.
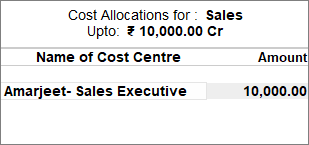
- Press Ctrl+A to save and proceed.
- Provide the Cost Allocation details for the party selected in the voucher.
- Provide the Cost Centre allocation details.
- Select the Cost Centre created for the salesperson, who receives the commission for this transaction value.
- Enter the amount.
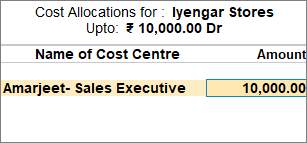
- Press Ctrl+A to save and proceed.
- Fill in other details, if any.

- Provide Narration, if needed. As always, press Ctrl+A to save.
Similarly, record sales by selecting the required Cost Centre for collecting the amount from the party.
You can view the total sales done by the salespersons to calculate the commission.
Similarly, you can check the Cost Centre details for other ledgers.
Receipt voucher for collection
Record the receipt from the customer and allocate it to the required salesperson in the receipt voucher for commission calculation. You can allocate the amount to the salesperson using Cost Centres. In TallyPrime, you can record the receipt and allocate the amount to the salesperson.
- Press Alt+G (Go To) > Create Voucher > press F6 (Receipt).
Alternatively, Gateway of Tally > Vouchers > press F6 (Receipt). - Enter the details related to Account, Particulars, and Amount.
- Account: Select cash or bank ledger.
- Particulars: Select the party ledger from whom the amount is received.
- Amount: Enter the amount received.
- Select the Cost Centre created for the salesperson and enter the amount.
- Enter the bank details if you have received the amount via bank transfers.
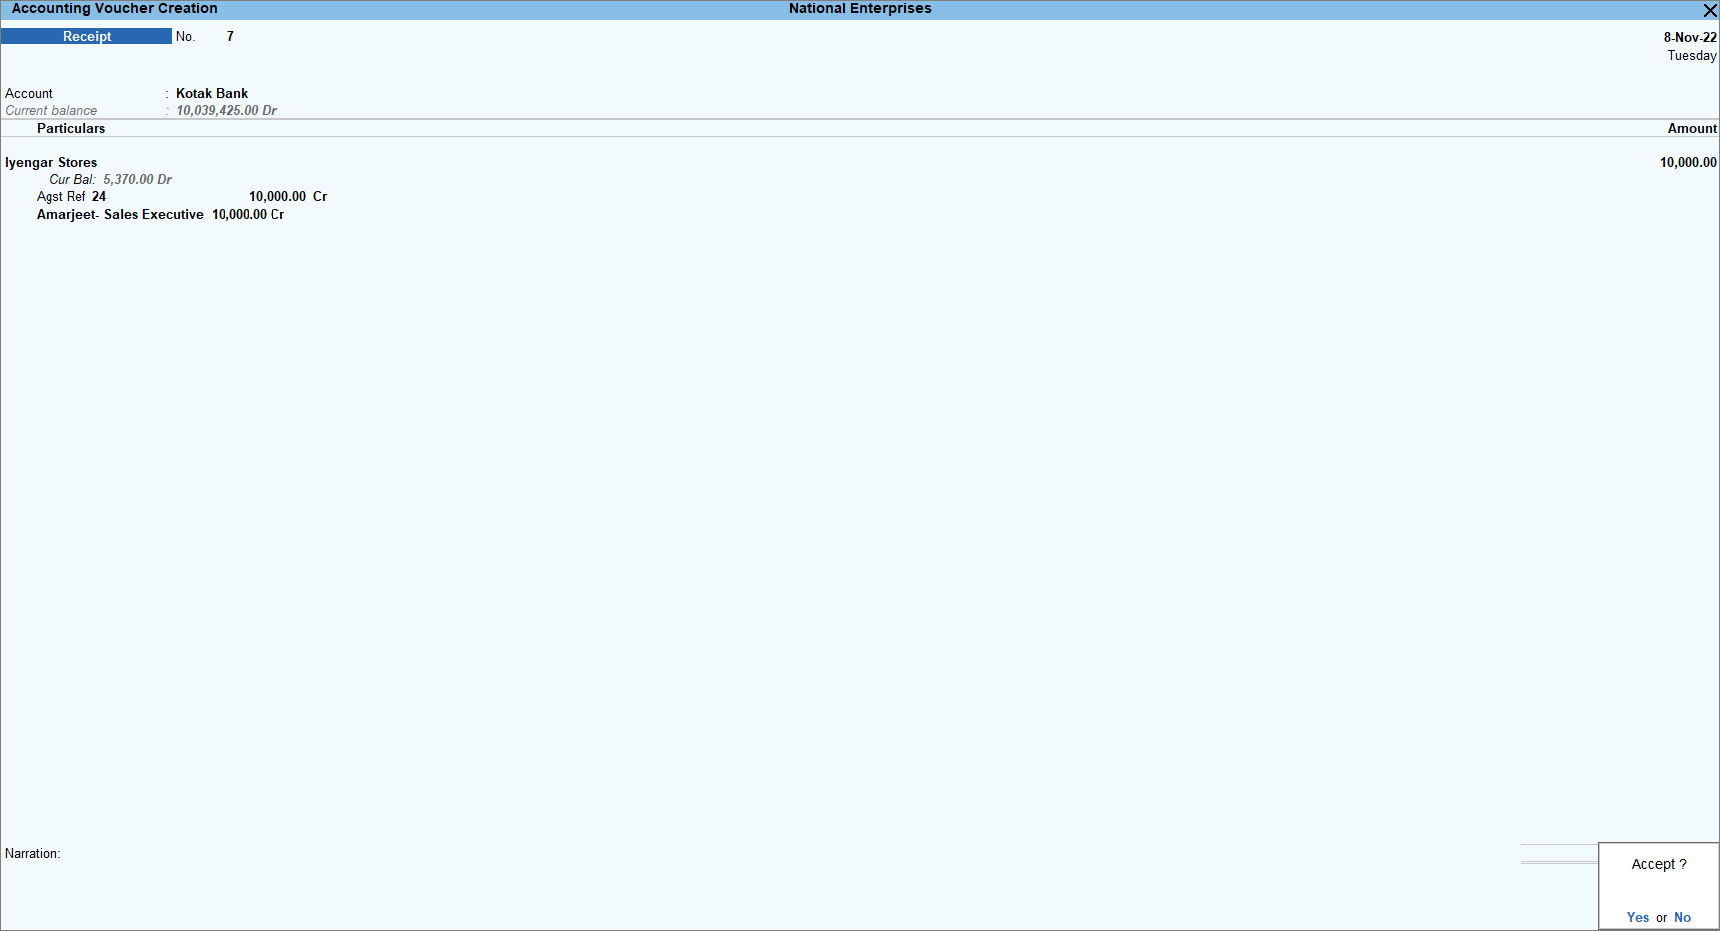
- As always, press Ctrl+A to save.
Similarly, record sales by selecting the required cost centre to collect the amount from the party and calculate the commission.
You can view the total amount to be collected from the party, with cost centre details.
Similarly, you can check the cost centre details for other ledgers.
In case you have only one salesperson in an invoice, you can create a cost centre class for each salesperson and use the cost centre class for invoicing. This helps avoid the manual allocation of a cost centre for each ledger. You can also maintain a department-wise grouping of cost centres. Click here for more details on cost centres.

