Print Sales Invoice with Company Logo and Additional Details
In your business, when you make a sale to a buyer, you would certainly need to handover the sales invoice to the buyer. While printing the invoice for the buyer, you might want to include specific details of sales, depending on your company policies or the buyer’s requirements. Using TallyPrime, you can print an invoice with the Company Logo, item details, delivery address, party details and many more, including the GSTIN details, as needed. Moreover, considering the increasing printing expenses in businesses, TallyPrime makes it printing invoices more convenient and cost-effective, by providing options to optimise printing that can save space and paper.
Say, you sell electronic equipment and have maintained the configuration of each equipment along with the other inventory details. If there comes a requirement of adding the configuration of the equipment in the sales invoice from one of the buyers, you can do so while printing the sales invoice. Similarly, you can add the motor capacity of an appliance, the warranty offered on the item, and so on in the sales invoice while printing. It can also happen that your party might want the details of the delivery destination mentioned in the sales invoice, which you can include in the sales invoice before printing. If your buyer and shipping address are different, you can print both addresses in the invoice. TallyPrime handles all such invoicing needs and more.
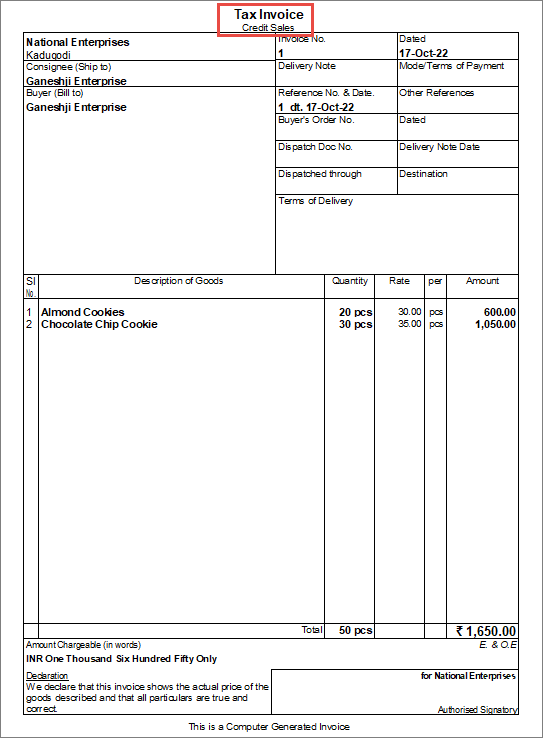
Update invoice title: TallyPrime provides you with the option to update the title and subtitle of your invoice, based on your business requirement. Once you configure the invoice title, it remains the same for the rest of the invoices, until edited by you.
Print with Company details: You can print the details of your company in your sales invoice including the name of your company, company logo, and so on to enhance the familiarity of your business amongst your customers.
Optimise printing to save paper: Say, you have multiple items to be printed in the invoice. You can set your Invoice Print size to accommodate all the information in a single paper. This can help you save paper.
Print invoice with goods/services details: If you are dealing with multiple items, you can add the descriptions for these items or service details in the printed invoices for the buyer’s reference. You can also add descriptions for your ledgers and stock items.
Print with export details: While exporting goods, you can mention the goods/service details in your invoice for the convenience of your parties. You can include details such as marks or container numbers, the number of packages sold, and so on, for reference purposes.
Additional printing preferences: In TallyPrime, you can also explore the additional printing preferences, as mentioned below:
- Along with a regular invoice, you can also print Proforma Invoice in TallyPrime.
- You can also enable the option to print invoices immediately after the voucher is saved.
- You can mention the Declaration/Terms & Conditions in the invoice to keep your parties updated about your business ethics and practices.
To know more about the Printing features in TallyPrime, refer to the Printing Invoices and Reports topic.
Change Invoice Title
TallyPrime provides you with the option to change the title and subtitle of your invoice. You can decide on the Invoice title based on your business requirement. Once you change the title on the configuration page, it remains the same for the rest of the invoices, until changed.
- Change the title and subtitle of the invoices once and it continues for the rest of the invoices.
- In the sales voucher, press Ctrl+P.
Alternatively, press Alt+P (Print) > Current. - Press F7 (Title) to enter the required title and subtitle.
- Press Enter to accept the screen.
- In the sales voucher, press Ctrl+P.
- Print the voucher with the changed title and subtitle.
The title you have specified appears on the top of the printed invoice. If you have used a subtitle, it appears below the title. This remains the same until you change it again.
Print Company Logo
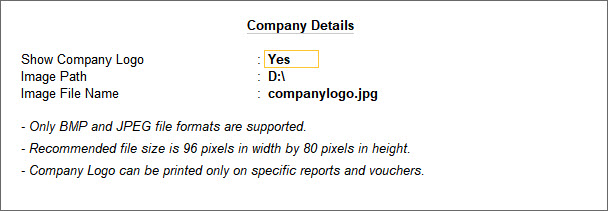
You can print the company logo and the company name on your invoices which helps customers remember your business easily.
- Enable the use of the company logo in TallyPrime.
- Print the voucher with the company logo.
- In the Print screen, press I (Preview) to check the invoice before printing, if needed.
- Press P (Print) to print.
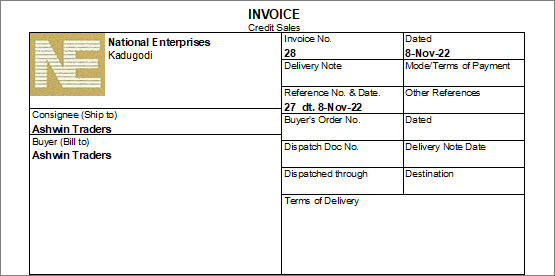
The company logo appears on the top left side along with the company name on the printed invoice.
Print Company Bank Details
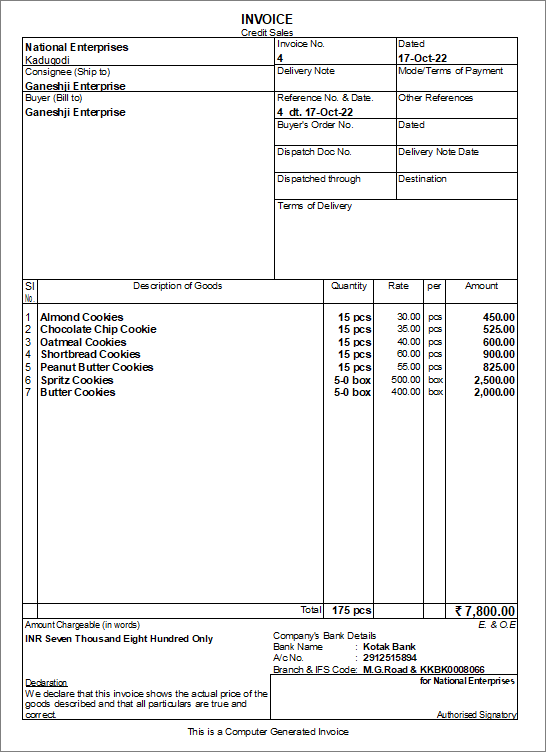
In the sales invoice, you can print your bank details for the customers to make payments directly to your bank account. If you need to provide the bank details in some invoices, then you can select the bank name while printing the invoice. However, you can specify the bank details as default in the sales voucher type if you need to print the bank details in all the invoices.
In this section
Print bank details in sales invoice
You can print the bank details created in the bank ledger in your sales invoice. This helps the customer in making payments. You can also mention your mobile number along with the account details if you are willing to receive money through UPI.
- Select the bank name to print in the invoice.
- In the sales voucher, press Ctrl+P.
Alternatively, press Alt+P (Print) > Current > press C (Configure). - Type or select Show Bank Details > press Enter to set it to Yes.
If it is already enabled, then you can select the bank ledger. - Type or select Show Bank Name > press Enter to select the bank ledger.
The bank ledger is created with the account number and other relevant details.
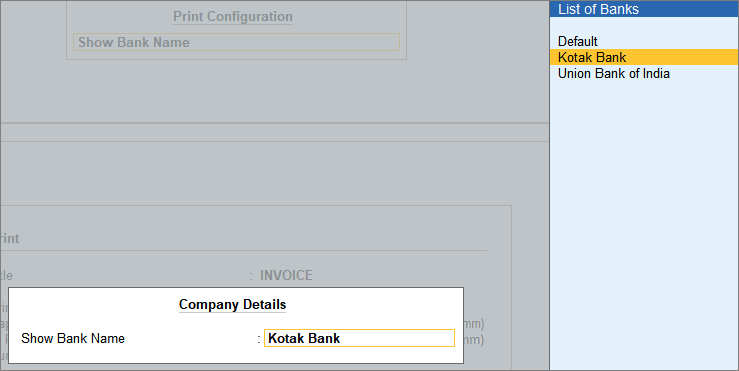
- Press Ctrl+A to save the changes.
- In the sales voucher, press Ctrl+P.
- Press P (Print) on the Print screen.

If you need to change the bank details, you can select either a different bank from the bank list or you can change the account number in the same bank.
Print default bank details from sales voucher type
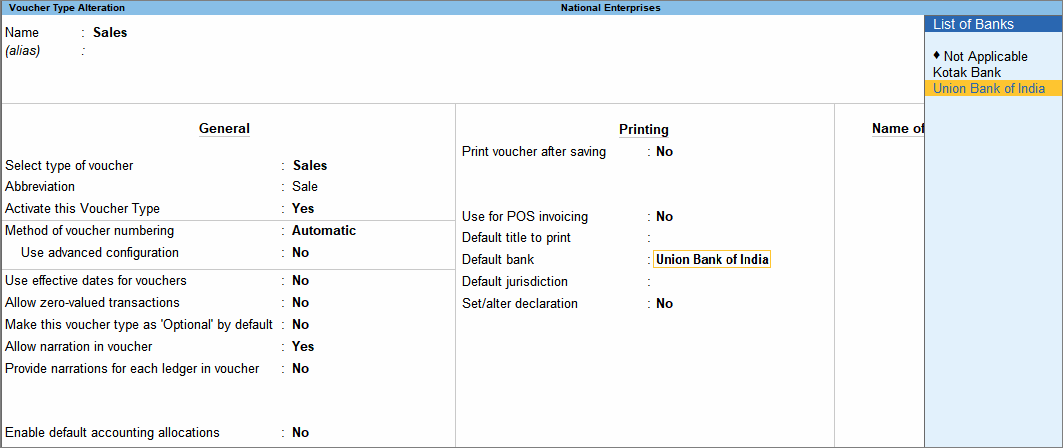
You can create multiple sales voucher types for different types of sales or alter an existing sales voucher type. Suppose you sell domestic items as well as international items, then you can create two separate sales voucher types. In each voucher type, you can set the default bank that you want your customer to know. You can use one account for domestic sale receipts and another account for international sale receipts.
- Provide the bank name in the sales voucher type.
- Print the default bank details in the sales invoice.
- In the sales voucher, press Ctrl+P.
Alternatively, press Alt+P (Print) > Current > press C (Configure). - Type or select Show Bank Details > press Enter to set it to Yes.
- Type or select Show Bank Name > press Enter to select the Default bank ledger.
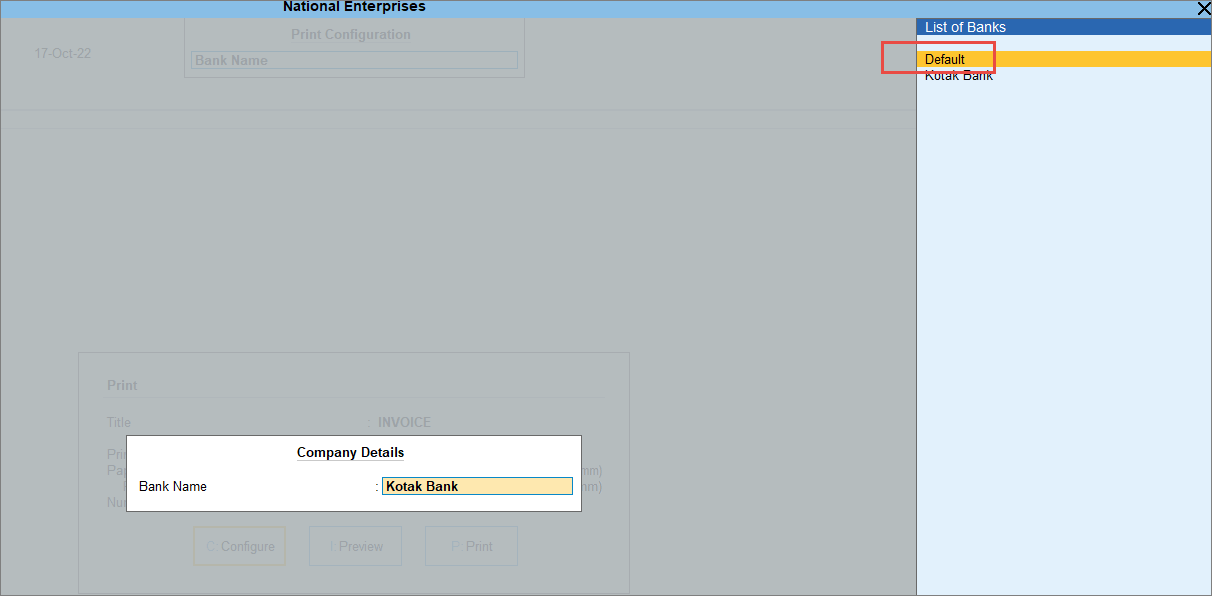
- Press Ctrl+A to save the changes.
- In the sales voucher, press Ctrl+P.
- Press P (Print) on the Print screen.
As you update the default bank details, going forward all your invoices shows the same bank details until changed.
Print PAN and CIN in the Invoice
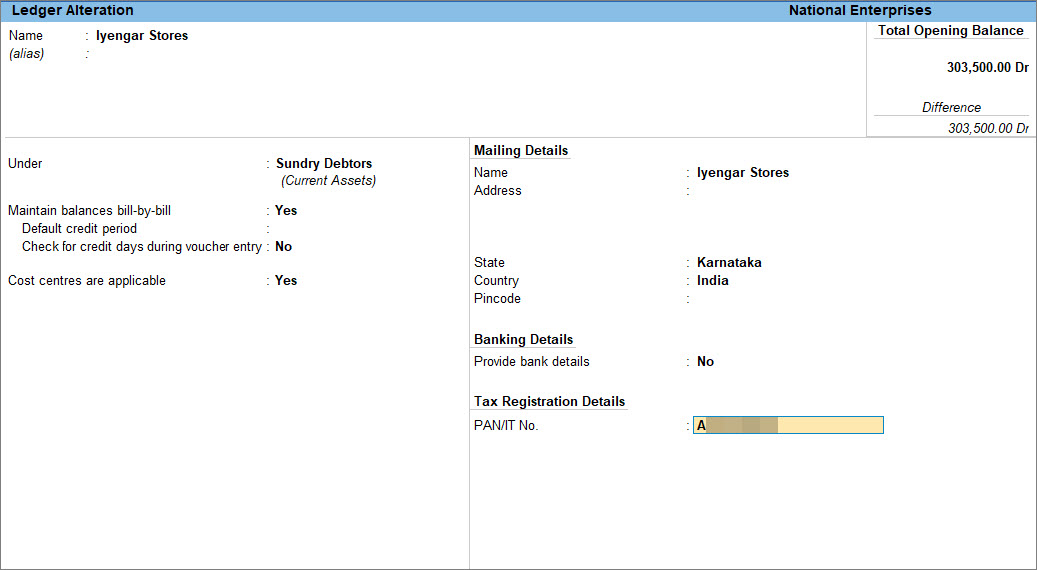
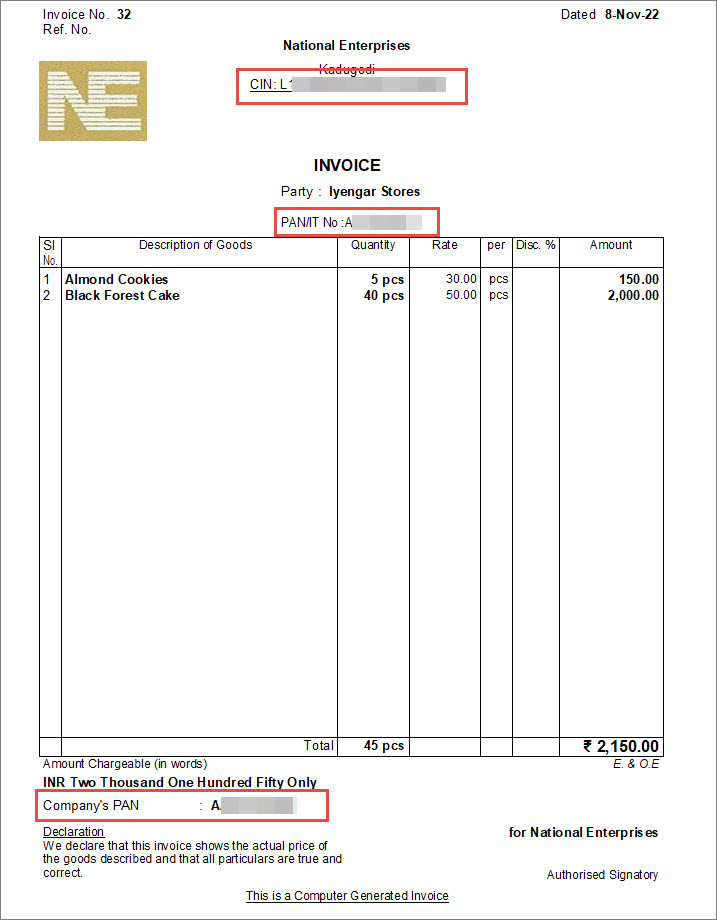
As per Section 139A(5)(c) of the Income Tax Act, it is mandatory to print the PAN number in the invoice for both buyer and seller if the invoice value is Rs. 2,00,000 or more. Additionally, as per Section 12(3)(c) of the Companies Act, it is mandatory to print the Corporate Identity Number (CIN) along with other details in all business documents, including invoices. To print the PAN and CIN in the invoice, you need to first add the PAN and CIN of your company in company features (F11). Once added, you can configure your invoice and print the PAN and CIN.
- Add PAN and CIN of your company.
- Add PAN details of your buyer.
- Record the sales voucher.
- Print the invoice.
You can now share the invoice with the buyer along with the PAN and CIN of your company.
Change Declaration/Terms & Conditions in Sales Invoice
If your business policy has any declarations related to the sales of goods and services, and you want to print them in your invoice, you can do so in TallyPrime. In TallyPrime there is a default declaration which appears in all the invoices. You can alter the declaration and print it accordingly. The altered declaration appears in all future invoices until you change it.
- Enable the sales voucher type to print the declaration.
- Press Alt+G (Go To) > Alter Master > Voucher Type > type or select Sales > and press Enter.
Alternatively, Gateway of Tally > Alter > Voucher Type > type or select Sales > and press Enter. - b. Go to Set/alter declaration under Printing > set it as Yes.
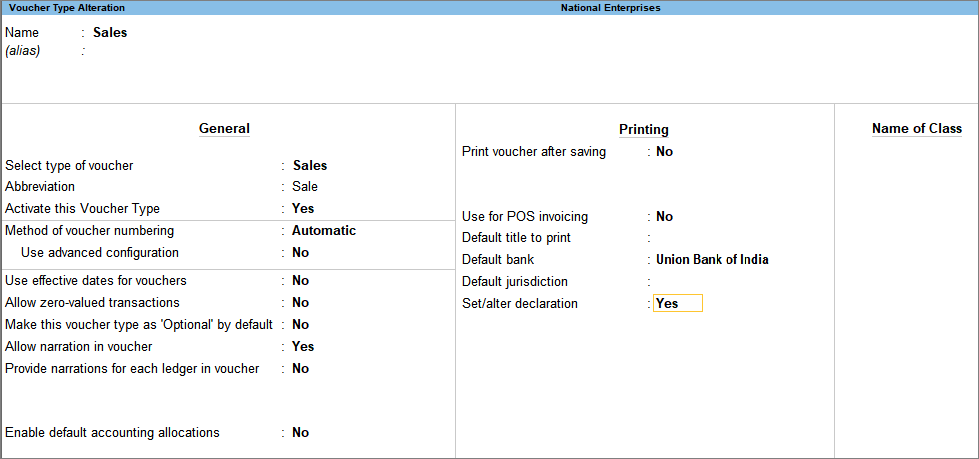
- Change the declaration, as needed.
Use Ctrl+Enter to break lines for multi-line entry.
- Press Alt+G (Go To) > Alter Master > Voucher Type > type or select Sales > and press Enter.
- Print the declaration in the sales invoice.
- In the sales voucher, press Ctrl+P.
Alternatively, press Alt+P (Print) > Current > press C (Configure). - Type or select Show Declaration and press Enter to set it to Yes.
- Press Ctrl+A to save the changes.
- Press P (Print) to print.

- In the sales voucher, press Ctrl+P.
In the printed invoice, the declaration appears as provided and this declaration appears in all the invoices hereafter.
Set Invoice Print Size to Use Less Paper for Printing
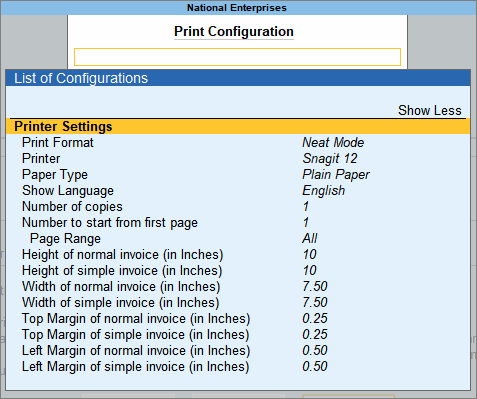
By default, TallyPrime prints invoices on A4-size papers. In certain cases, your transaction may involve multiple line items and it may take more than a single page to print. You can set the print size for your invoice and use less papers for printing. Printing invoices as per the print and paper sizes depends on your printer. The default height is set to 10 for an A4 paper. If your invoice requires only half the size, change the height to 5 inches and replace the printing paper with A5.
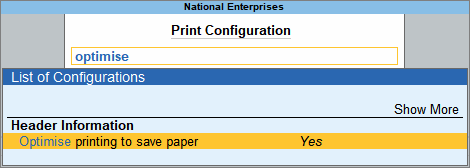
You can also enable the option for Optimise printing to save paper.
This option appears only when:
The Country selected for the company in India.
The taxation feature for GST/VAT/TDS/TCS is enabled.
The service tax and excise features are disabled.
- Set the Invoice Print Size.
- In the sales voucher, press Ctrl+P.
Alternatively, press Alt+P (Print) > Current. - Press C (Configure) > press Enter on Show More > type or select Printer Settings and press Enter twice.
- Height of normal invoice (in Inches): By default, the standard height is set to 10 inches for an A4 paper. If your invoice requires only half the size, change the height to 5 inches. If your printer’s tray contains A4 size papers, replace them with papers appropriate for printing. For example, to print an invoice of a height of 5 inches, use A5 size papers.
- In the sales voucher, press Ctrl+P.
- Enable Optimise printing to save paper.
As you print the invoice after enabling the option Optimise printing to save paper, the list of stock items appears on a single page. Similarly, if you set this option to No, the same information gets printed on two pages. Using appropriate print and paper sizes for printing your invoices helps you save paper.
Print Marks or Container Number & Number of Packages
When you export goods, shipping details such as Marks or Container No. and the Number of Packages sold becomes critical information for the business. Hence, when printing your sales voucher, you can add the details and print them for verification and shipment, and other reference purposes.
- Configure your sales invoice for Marks or Container No. and No. of packages.
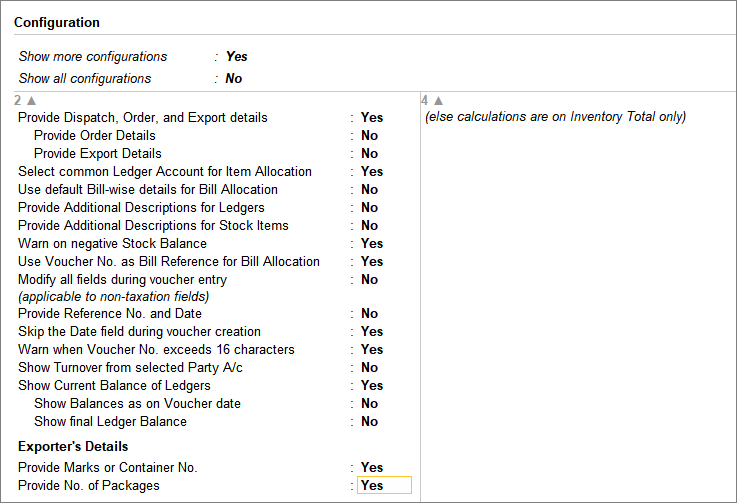
- In the sales voucher, press F12 (Configure).
- Under Exporter’s Details, set the option Provide Marks or Container No. and Provide No. of Packages to Yes.
If you do not see the above options, set Show more configurations to Yes.
- In the sales voucher, provide the code for Marks and No. of packages.
- As always, press Ctrl+A to save.
- Print the Marks and No. of packages in the invoice.
- In the sales voucher, press Ctrl+P.
Alternatively, press Alt+P (Print) > Current. - Press I (Preview) to check the invoice before printing, if needed.
- Press P (Print) to print.
- In the sales voucher, press Ctrl+P.
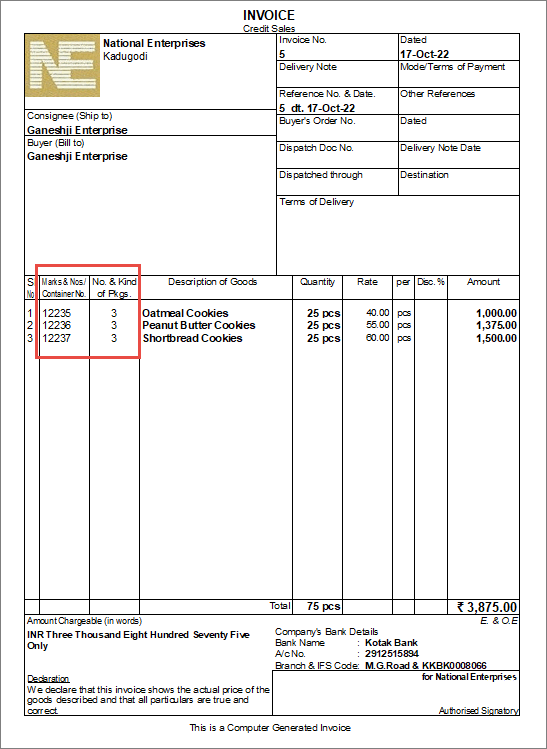
In the printed invoice, the code for Marks and No. of packages appears for each stock item as entered during voucher entry.
Add Description for Items & Ledgers to Print in Invoice
You may deal with multiple variants of an item, say appliances of different motor capacities or services in different packages. You can add descriptions for these items or service details in the printed invoices for the buyer’s reference.
In this section
Additional description for stock items to print
You can add descriptions for stock items and print the same. If you are selling food items, you can mention the main ingredients or if you are selling a mobile phone then you can mention the storage capacity or any other feature
- Enable the option to add description for stock items.
- In the sales voucher, Press F12 (Configure) > set Provide Additional Descriptions for Stock Items to Yes.
Henceforth, you can add descriptions for each item you select in every sales invoice until you disable the option. - After selecting the item, enter the additional description in the sub-screen Description(s) for Item.
You can add more than one line of description by pressing Enter.
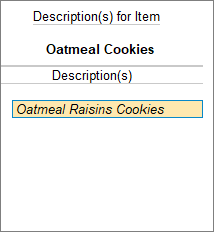
If you had included any description in the stock item master, the same description is prefilled in the Description(s) for the Item screen. You can update or add more descriptions for the item here.
- As always, press Ctrl+A to save.
- In the sales voucher, Press F12 (Configure) > set Provide Additional Descriptions for Stock Items to Yes.
- Print the description in the invoice.
- In the sales voucher, press Ctrl+P.
Alternatively, press Alt+P (Print) > Current > press C (Configure). - Type or select Show Additional Descriptions for Stock Items and press Enter to set it to Yes.
- Press Ctrl+A to save the changes.
- Press P (Print) to print.
- In the sales voucher, press Ctrl+P.
The description appears below each stock item entered during the voucher entry in the printed invoice.
Additional description for ledgers to print
Similar to adding descriptions to stock items, you can also add descriptions for ledgers and print the same. If you are selling services, you can mention details related to that service.
- Enable the option to add descriptions for ledgers.
- In the sales voucher, press F12 (Configure) > set Provide Additional Descriptions for Ledgers to Yes.
Henceforth, you can add descriptions for each ledger you select in every sales invoice until you disable the option. - After selecting the ledger, enter the additional description for the ledgers in the sub-screen Description(s) for Ledger.
You can add more than one line of description by pressing Enter.
If you had included any description in the ledger master itself, the same description is prefilled in the Description(s) for the Ledger screen. You can update or add more descriptions for the ledger here.
- As always, press Ctrl+A to save.
- In the sales voucher, press F12 (Configure) > set Provide Additional Descriptions for Ledgers to Yes.
- Print the description in the invoice.
- In the sales voucher, press Ctrl+P.
Alternatively, press Alt+P (Print) > Current > press C (Configure). - Type or select Show Additional Descriptions for Ledgers and press Enter to set it to Yes.
- Press Ctrl+A to save the changes.
- Press P (Print) to print.
- In the sales voucher, press Ctrl+P.
The description appears below each ledger entered during the voucher entry in the printed invoice.
Print Proforma Invoice
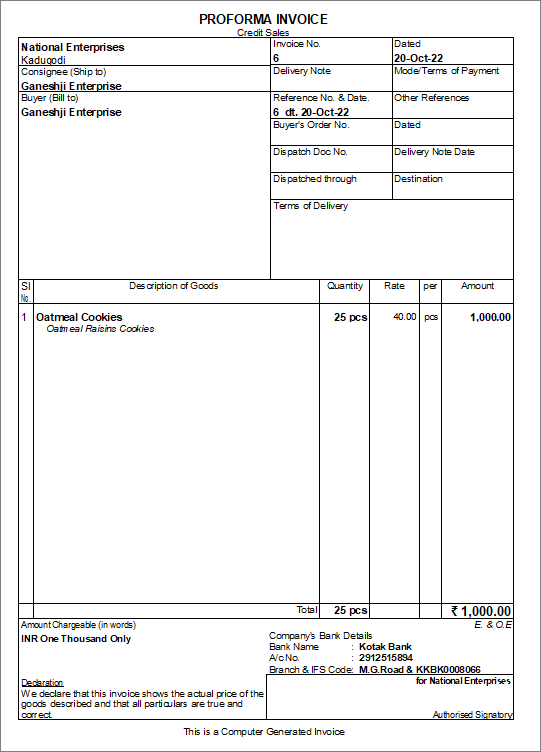
In a business, it is a common practice to share a Proforma Invoice before the sales invoice is issued. A proforma invoice helps a buyer to understand better the sale deal. It contains all the details related to the sale including the item, quantity, rate, payment terms, date of delivery and so on. Based on the proforma invoice the buyer can decide on any changes or propose a price negotiation, or early delivery date. The buyer needs to confirm and agree to all the details mentioned in the Proforma invoice. Once you receive the confirmation you can work towards the sale of goods or services and issue a final tax invoice.
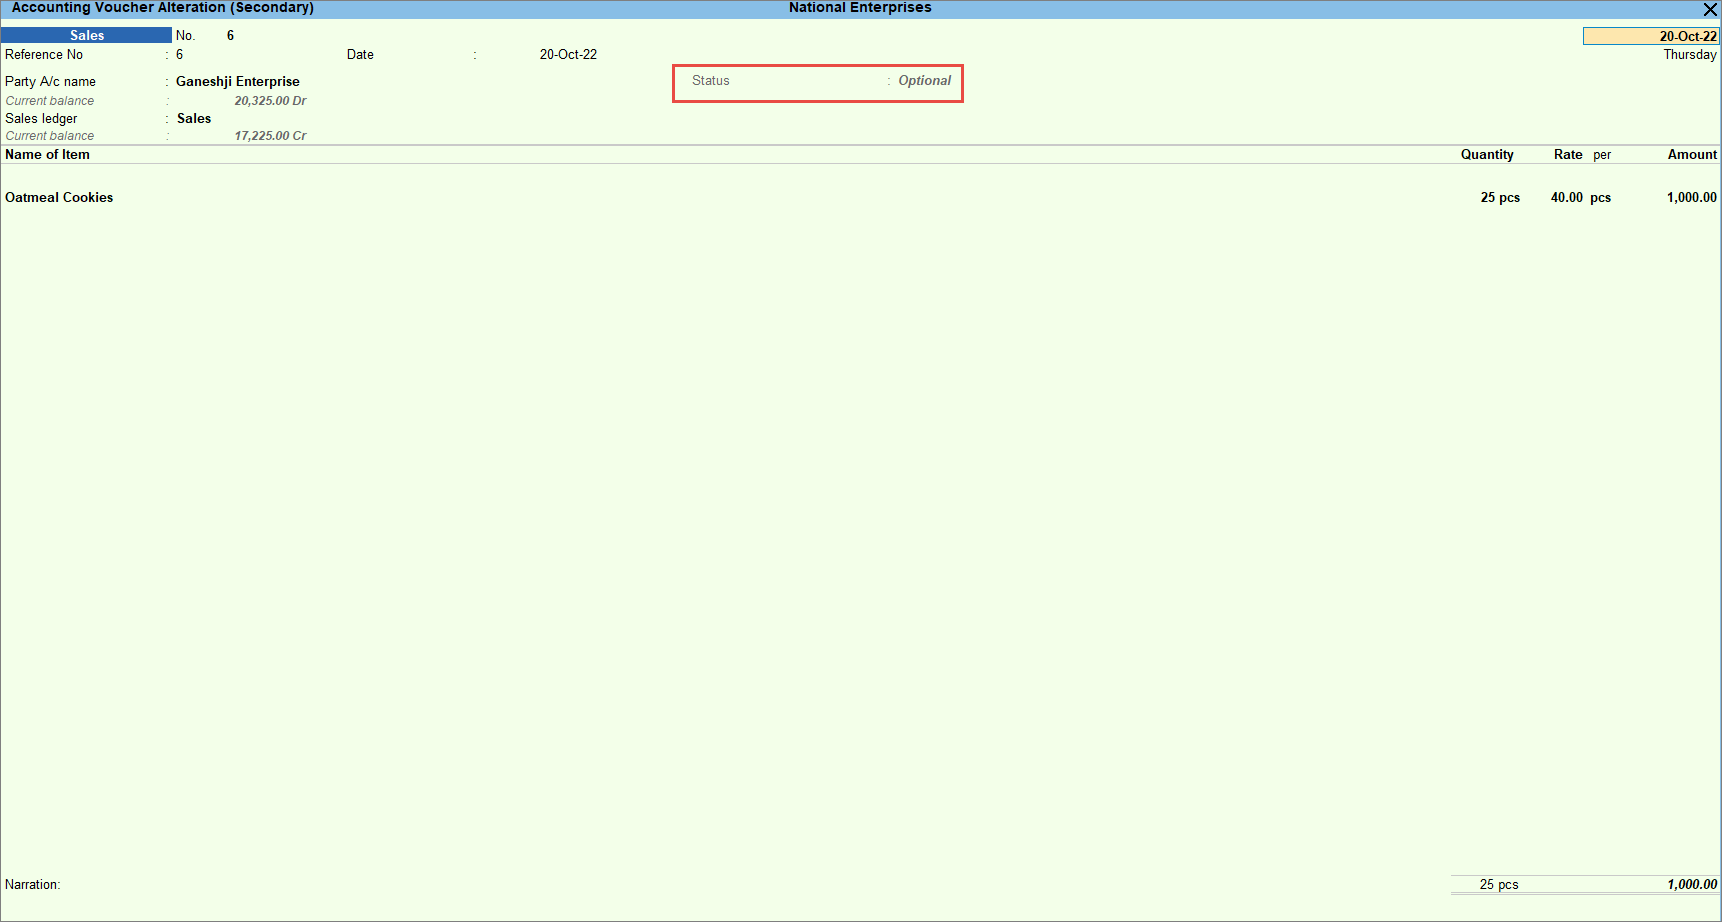
A proforma invoice in TallyPrime is a printout of an optional sales voucher. Once you mark a voucher as Optional, it does not impact your books of accounts. The seller also issues a proforma invoice to get an advance payment.
- Record optional sales vouchers.
- Press Alt+G (Go To) > Create Voucher > press F8 (Sales).
Alternatively, Gateway of Tally > Vouchers > press F8 (Sales). - Press Ctrl+L (Optional) to mark the voucher as an optional voucher. This button allows you to mark the voucher as optional or regular.
- Record the sales transaction with all the details
- Provide Narration, if needed, and press Ctrl+A to save.
- Press Alt+G (Go To) > Create Voucher > press F8 (Sales).
- Print proforma invoice.
The optional voucher gets printed as a Proforma Invoice.
Print Invoice on Saving a Voucher
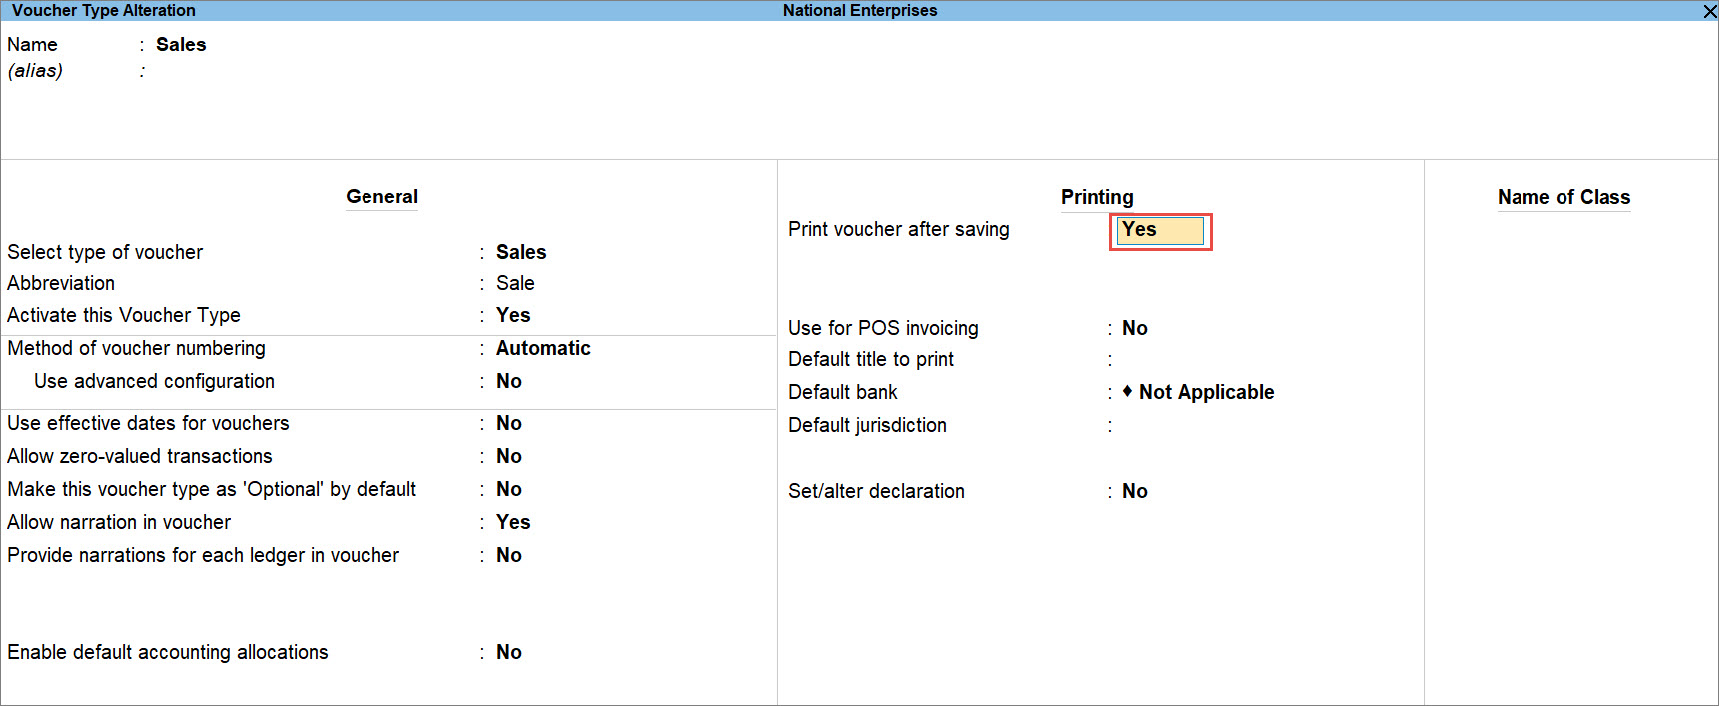
In TallyPrime, you can print vouchers immediately after saving or later. If you want to print the vouchers immediately, then enable the option Print voucher after saving in the Sales voucher type.
However, it may be possible that you print all the vouchers at the end of the day, or the invoices need to be approved before printing them. In such cases, you can disable the Print voucher after saving option in the voucher type.
- Enable the Print voucher after saving option.
- Press Alt+G (Go To) > Alter Master > Voucher Type > type or select the name of Voucher Type and press Enter.
Alternatively, Gateway of Tally > Alter > Voucher Type > type or select the name of Voucher Type and press Enter. - In the Voucher Type Alteration screen, Set Print voucher after saving to Yes.
- Press Ctrl+A to save the voucher type.
- Press Alt+G (Go To) > Alter Master > Voucher Type > type or select the name of Voucher Type and press Enter.
- Record the sales voucher and save the voucher.
The Print screen appears. - In the Print screen.
- Press I (Preview) to check the invoice before printing, if needed.
- Press P (Print) to print.
You can print the invoices immediately after saving the voucher.

