
Sales Register in TallyPrime
Sales Register in TallyPrime provides a comprehensive view of the month-wise sales done in your business. You can drill down from the selected month to view the voucher-wise listing of sales. The period and details of the report can be modified as per your business needs. You can also configure the report to view the data for different voucher types. TallyPrime enables you to generate columnar periodic reports, view monthly sales summaries, compare sales data of different periods, check profitability on sales, and more from the Sales Register.
View Sales Register report
- Press Alt+G (Go To) > type or select Sales Register.
Alternatively, go to Gateway of Tally > Display More Reports > Account Books > Sales Register.
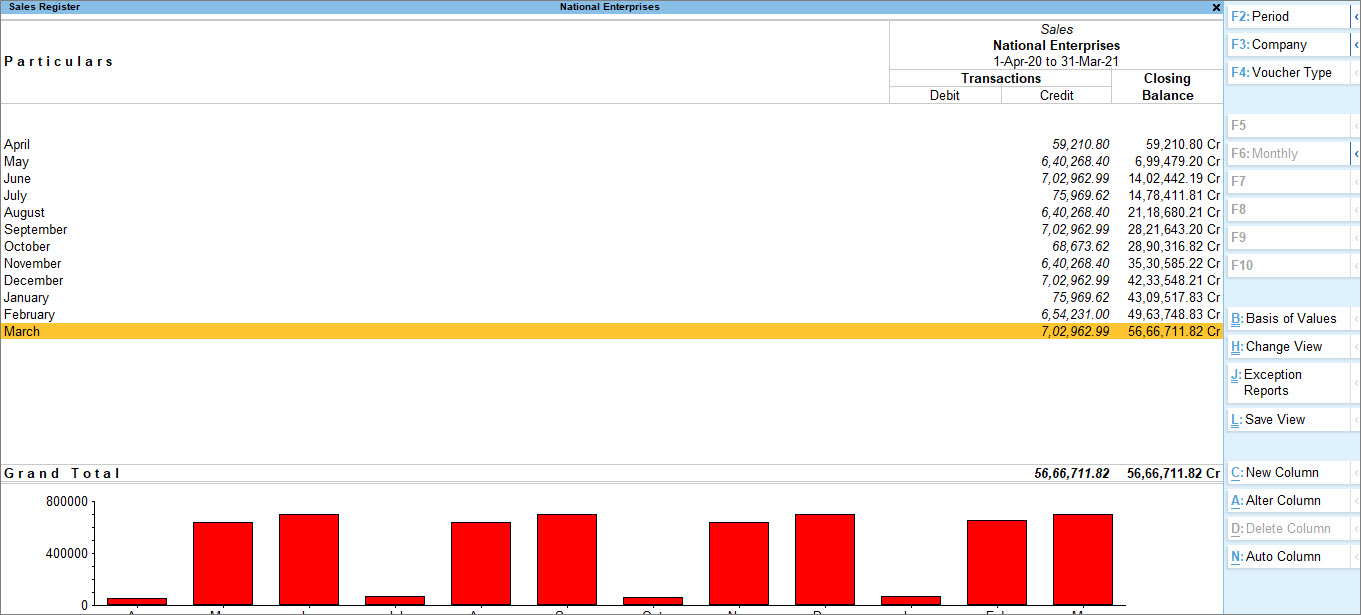
- Press F2 (Period) to set the reporting period as required to analyse periodic sales.
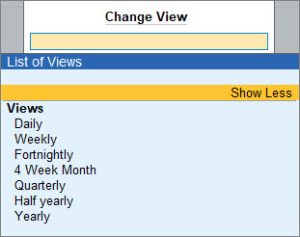
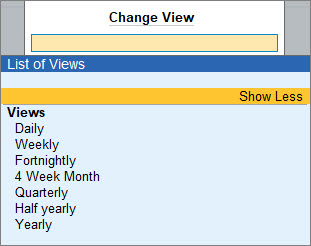
- Press Ctrl+H (Change View) to select the periodic view as required to daily, weekly, fortnightly, monthly, and so on.
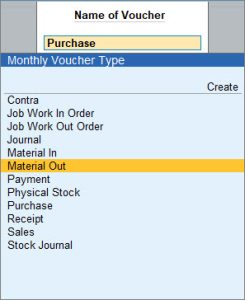
- Press F4 (Voucher Type) to view a different register from within an existing register. For example, if you are in Sales Register and want to view the Material Out register, press F4 (Voucher Type) and select Material Out.
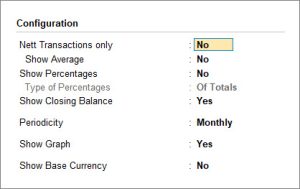
- Press F12 (Configuration) on the Sales Register screen and configure the report with the details of percentages, averages, closing balances, periodicity, and so on as required.
- To view the sales vouchers recorded for a specific month, scroll up or down to select the month and press Enter.


Columnar Sales Register
TallyPrime enables you to generate columnar reports from the Sales Register. You can select the month for which you want to view the columnar report and configure it with buyer details like party’s address, party’s GSTIN, PAN, port code, and so on.
In Sales Register > Voucher Register for any selected month:
- Press F8 (Columnar). The Columnar Register Alteration screen appears as shown below:
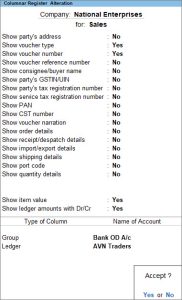
- Configure the Columnar Register Alteration screen as needed. For example,
- Show party’s address: Yes
- Show voucher type: Yes
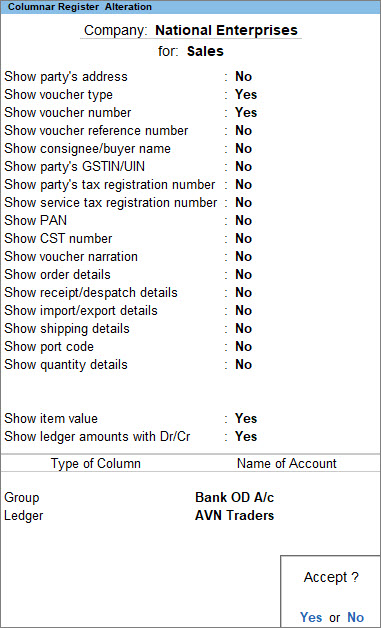
Select the Type of Column and Name of Account.
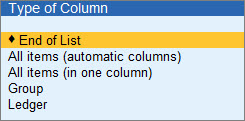
All items (automatic columns): If this option is selected, every ledger account will be displayed in a separate column.
All items (in one column): If this option is selected, all the ledger accounts are displayed in one single column.
Group: You can also select a group of ledger accounts to be displayed together in one column, for example, Sales accounts. For other columns, you can use the additional options, namely Related accounts (automatic columns) or Related Items (in one column).
Related Items (automatic columns or in one column): Related items indicate all the ledger accounts used in a voucher. Hence, the report will be similar to All items (automatic columns). This option is helpful when used in combination with a Group or a specific ledger account in the first column.
Ledger: Select a specific ledger account, for example, VAT/Sales Tax. All other accounts can be put in one or more columns.
For example, in the register shown, Show party’s address has been enabled to add the Address column. Also, Group is selected as Sales Account and Ledger as Transportation Charges to add the respective columns in the report.

Display Extract of Sales Register
TallyPrime enables you to view an extract of all the sales vouchers for a particular month. The extract gives a breakdown of the sales vouchers and ledger used to record all sales vouchers for the period. The extract also groups them to show the totals for each group. You can also view an inventory-wise extract of the sales register.
In Sales Register > Voucher Register for any selected month:
- Press Alt+F8 (Extract). The sales voucher register with extract is displayed as shown below:

Press Alt+F5 (Detailed ) for an expanded view of the report.

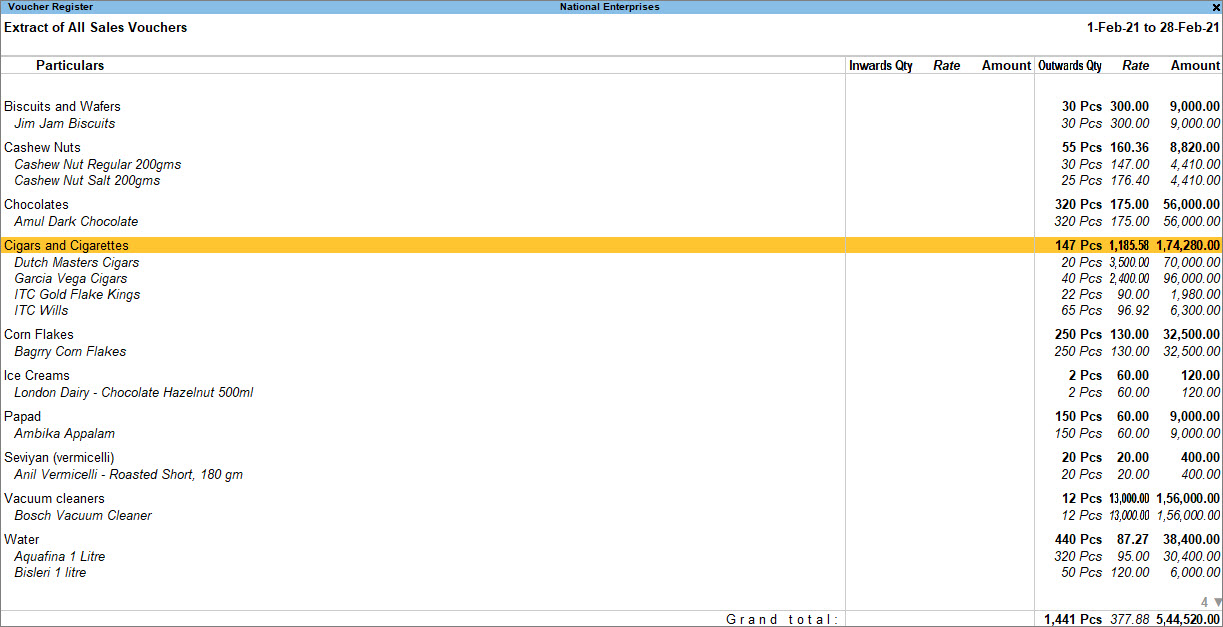
You can also view an inventory-wise extract of the sales register. Press F12 (Configure) and set Show Inventory-Wise Extract to Yes. You can also configure other details if required.
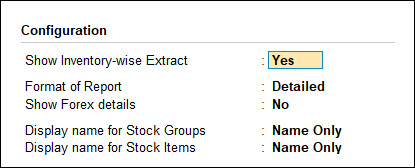
The sales voucher register with inventory details is displayed as shown below.
Display Sales Register with Profitability
TallyPrime enables you to view profitability from the Sales Register. It calculates gross profits for each invoice based on the Transaction Value and Cost. Gross profit is calculated as the difference between sales value and Cost.
In Sales Register > Voucher Register for any selected month:
- Press F7 (Show Profit) to view the profitability or activate the option Show Gross Profit Estimates to Yes in F12 (Configuration).

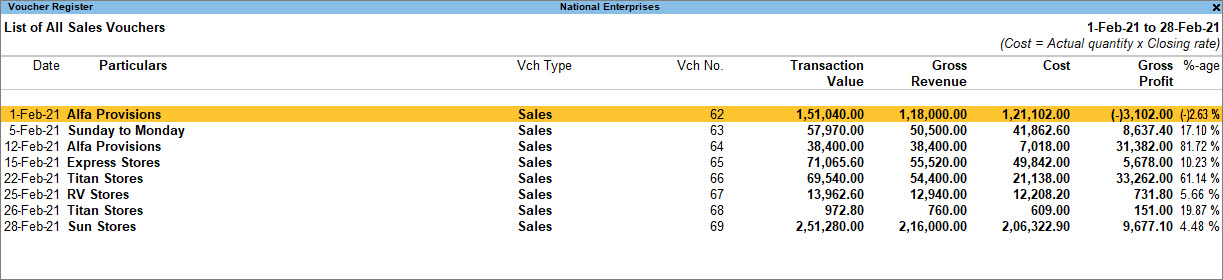
The report now displays each invoice with:
- Transaction Value: Invoice value including taxes
- Gross Revenue: Actual sale value minus taxes
- Cost: Book cost of the product
- Gross Profit: Amount of profit or loss on the sale
Matching the Gross Profit in the Sales Register and Stock Summary and Profit & Loss A/c
The transaction level Gross Profit of Sales Register can be matched with Profit & Loss A/c and Stock Summary reports by enabling the option Show Cost based on Stock Valuation in the Sales Register F12 (Configure) screen.
Consider that your business deals with the two stock items – Books and Dictionaries. In TallyPrime, you have created the stock item master with the following settings:
Books:
- Opening Balance = Quantity 100, at the Rate of Rs. 150 each.
- Costing Method = FIFO
Dictionaries:
- Opening Balance = Quantity 70, at the Rate of Rs. 200 each.
- Costing Method = Avg Cost (the default setting for stock items).
Say you have made the following transactions with your parties:
Purchase:
- 50 books at the rate of Rs. 170 each
- 25 Dictionaries at the rate of Rs. 210 each.
Sales:
- 50 books at the rate of 190 each.
- 25 Dictionaries at the rate of 225 each.
Now, open the Stock Summary and Sales Register reports.
- Press Alt+G (Go To) > Stock Summary.
Alternatively, Gateway of Tally > Stock Summary.
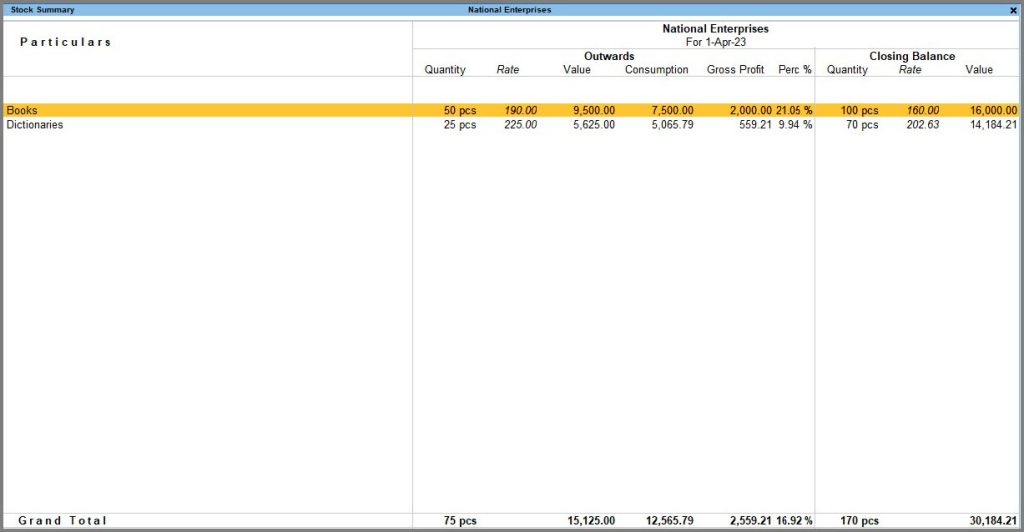
The Stock Summary report appears, as shown below:
- Press Alt+G (Go To) > Sales Register.
Alternatively, Gateway of Tally > Display More Reports > Account Books > Sales Register.
The Sales Register report appears, as shown below:
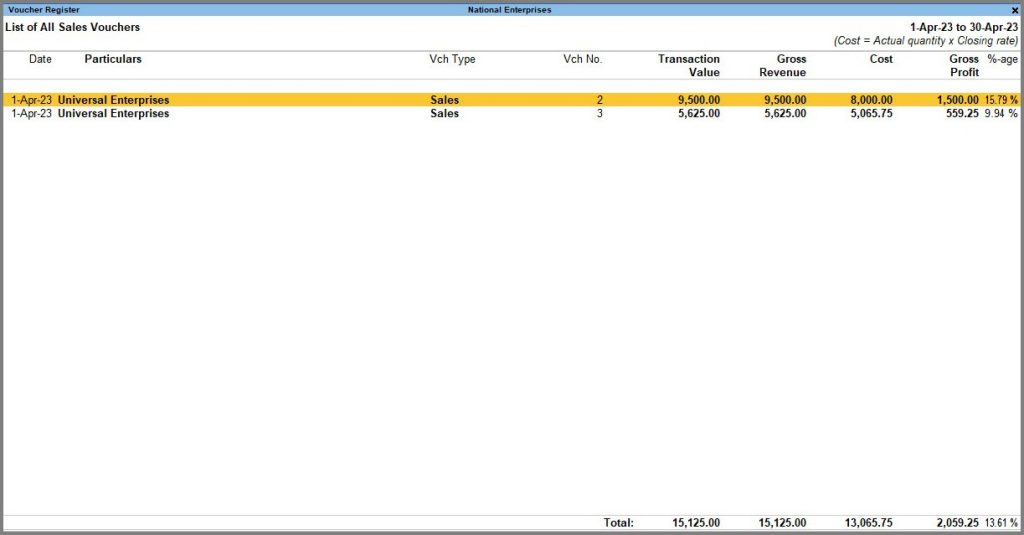
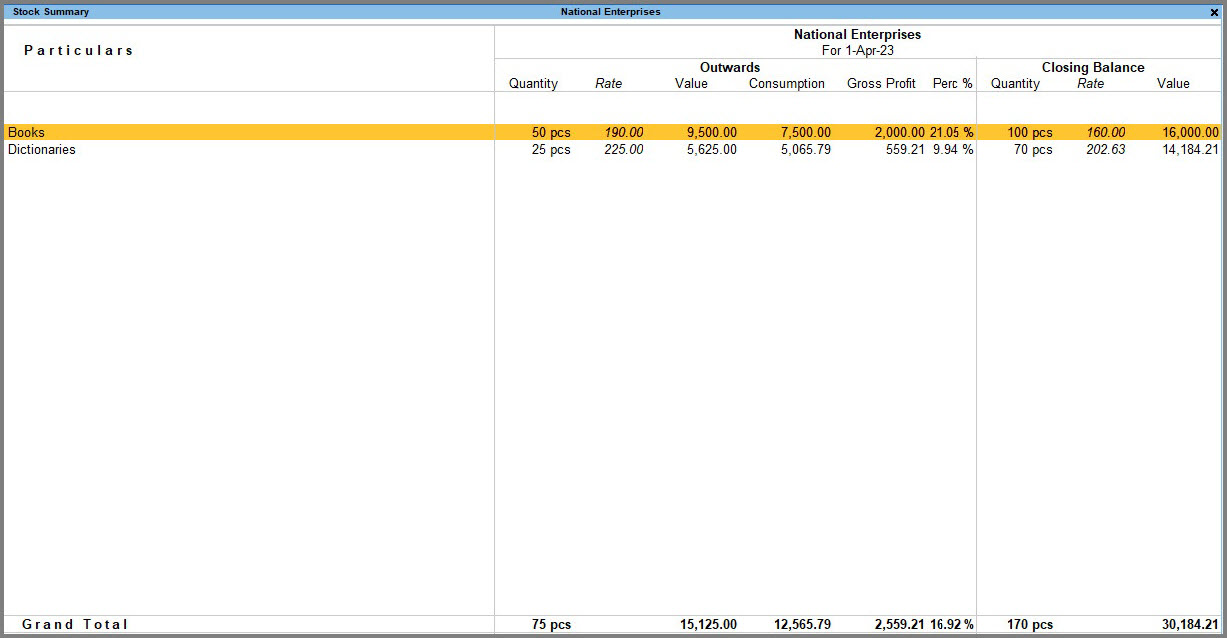
The Gross Profit shown in your Sales Register will be different from the Gross Profit shown in Stock Summary.
This is because the Stock Summary report by default considers the gross profit based on the Opening Balance for Books. It does not calculate the profit based on the purchase cost for the stock item Books, which is set as FIFO.
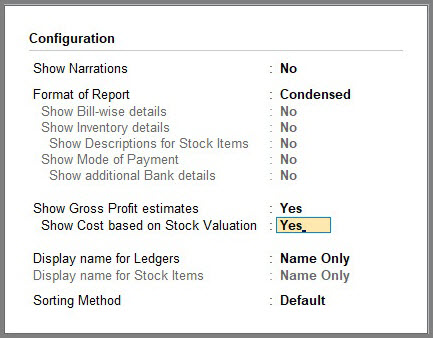
Configure the Sales Register report to display the gross profit based on the Stock Valuation method of stock items. In this case:
- Press F12 (Configure) > Show Cost based on Stock Valuation > Yes.
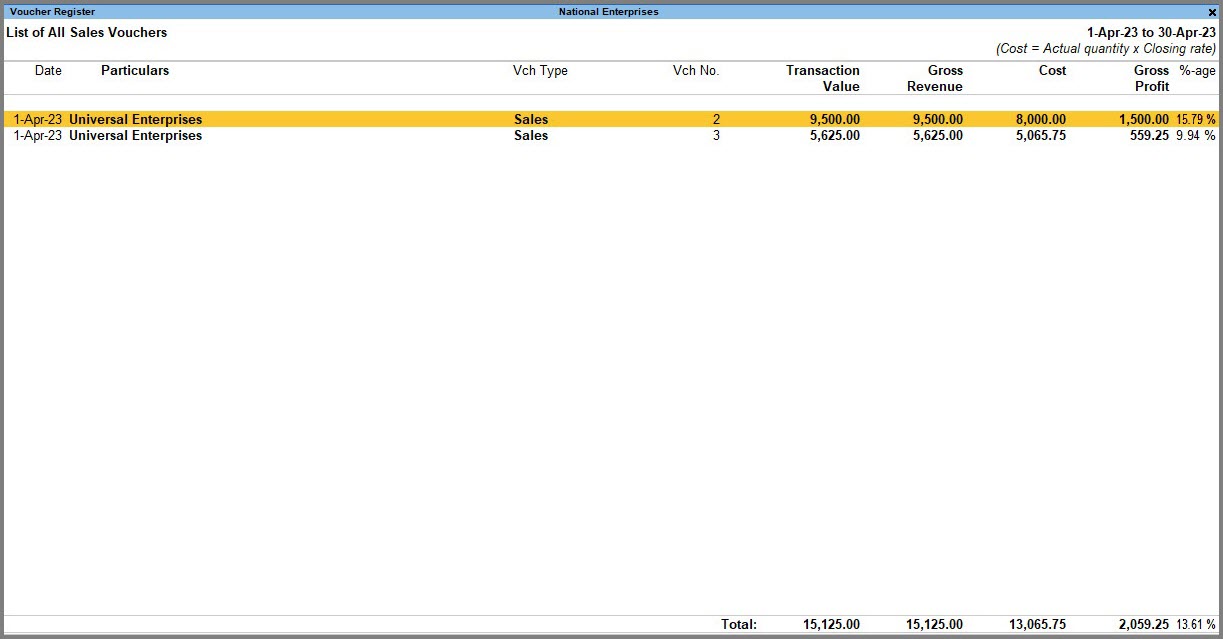
Notice that the Gross Profit in the Sales Register matches with the Stock Summary report after enabling the option. The Sales Register appears, as shown below: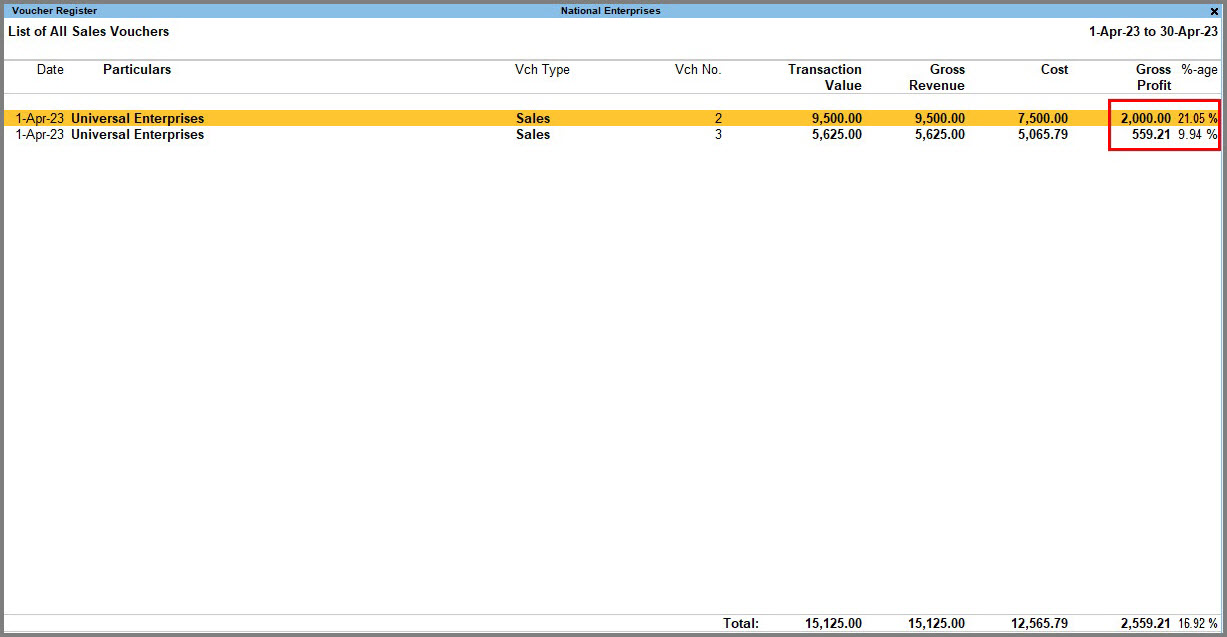
The total Gross Profit of Sales Register will not match with Stock Summary and Profit and Loss account reports in
the following scenarios:
- If batches and godowns are enabled for the stock items.
- If there are discounts and additional costs involved in the sales transactions. For example, lighting charges
(for factory) will not be included in the cost of the stock item. Since this is a direct expense, it will be included in the Profit and Loss A/c. - If the actual and billed quantities of a sales voucher are different.
- Inventory Vouchers are not considered to calculate the Gross Profit in Profit and Loss A/c.
- In the financial year 2022-23, an accounts-only company was maintained, and the stock values were updated in the ledger. In financial year 2023-24, if you want to maintain accounts with inventory, there will be differences in Gross Profit of Sales Register with Stock Summary and Profit & Loss A/c.
Reasons for Difference in Values of Sales Register and Profit & Loss Account
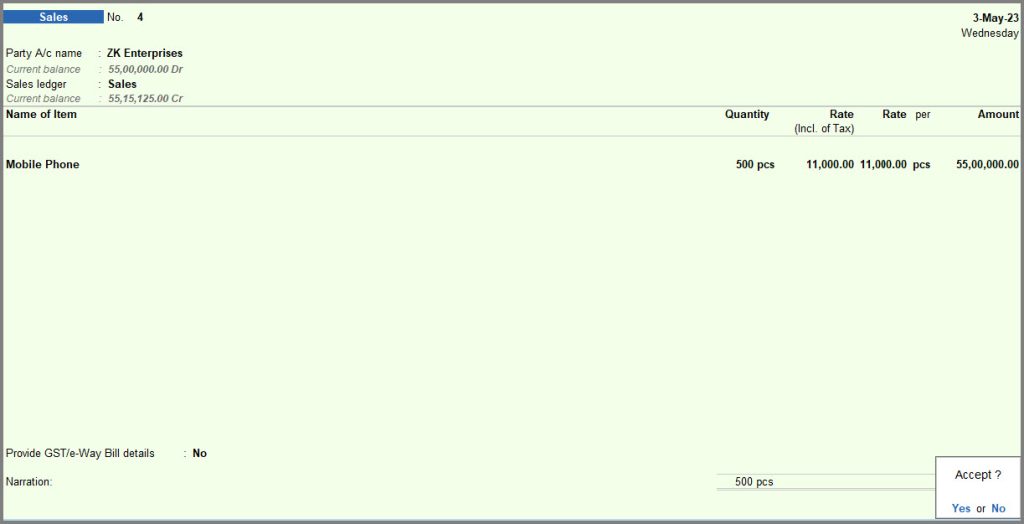
The Sales Register displays complete Sales value including the Tax Amount, whereas the Profit & Loss A/c displays only the Sales value. This results in a difference in the values of Sales Register and Profit & Loss A/c reports.
Consider the following example of Sales invoices recorded with and without Tax to view the impact on Sales Register and Profit & Loss A/c.
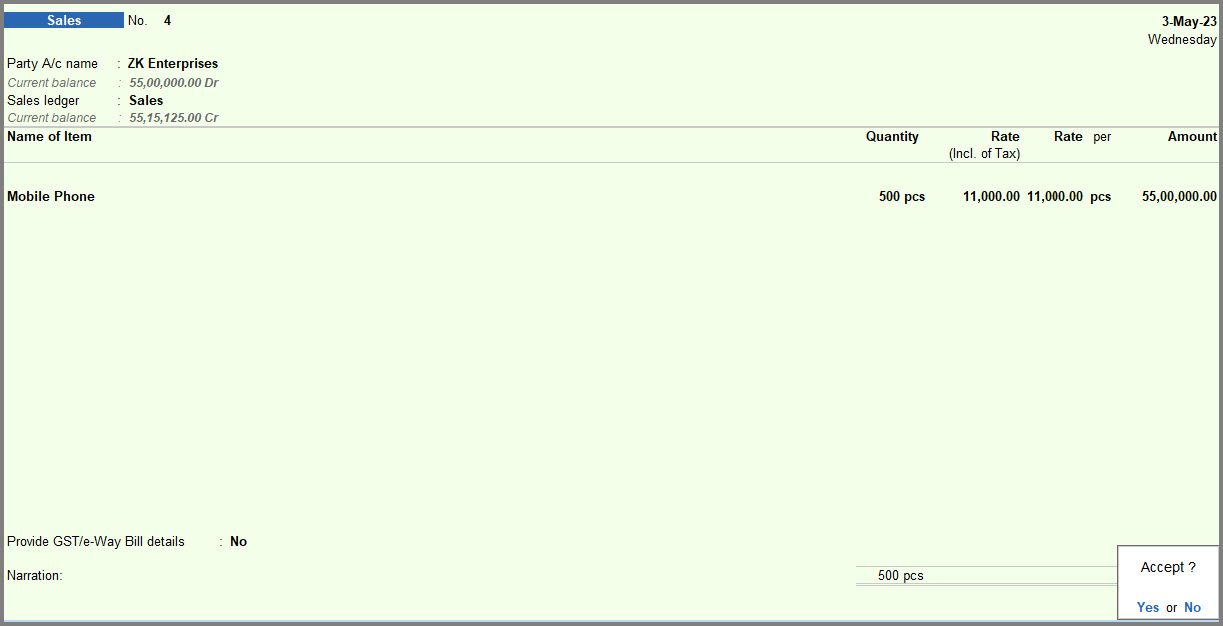
- Record a Sales invoice without tax as shown below:
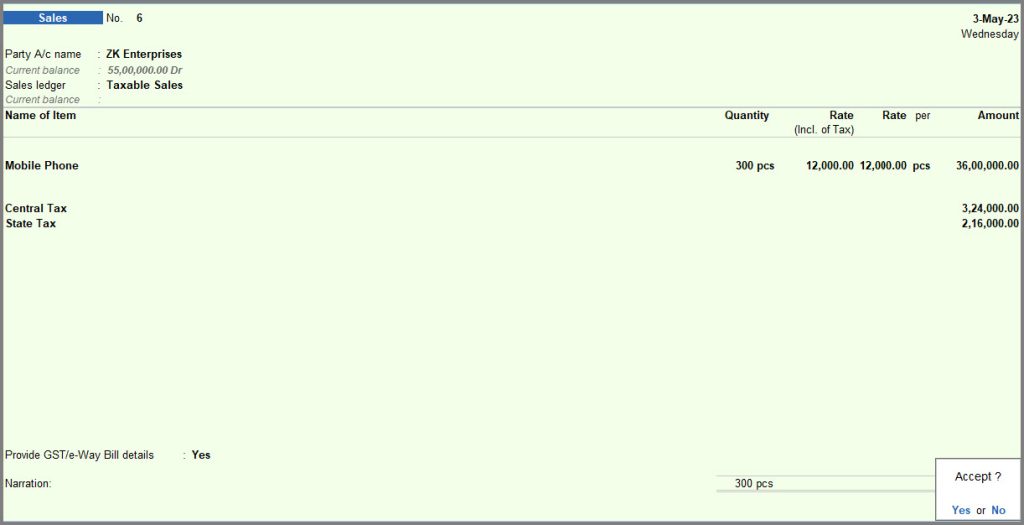
- Record a Sales invoice with GST as shown below:
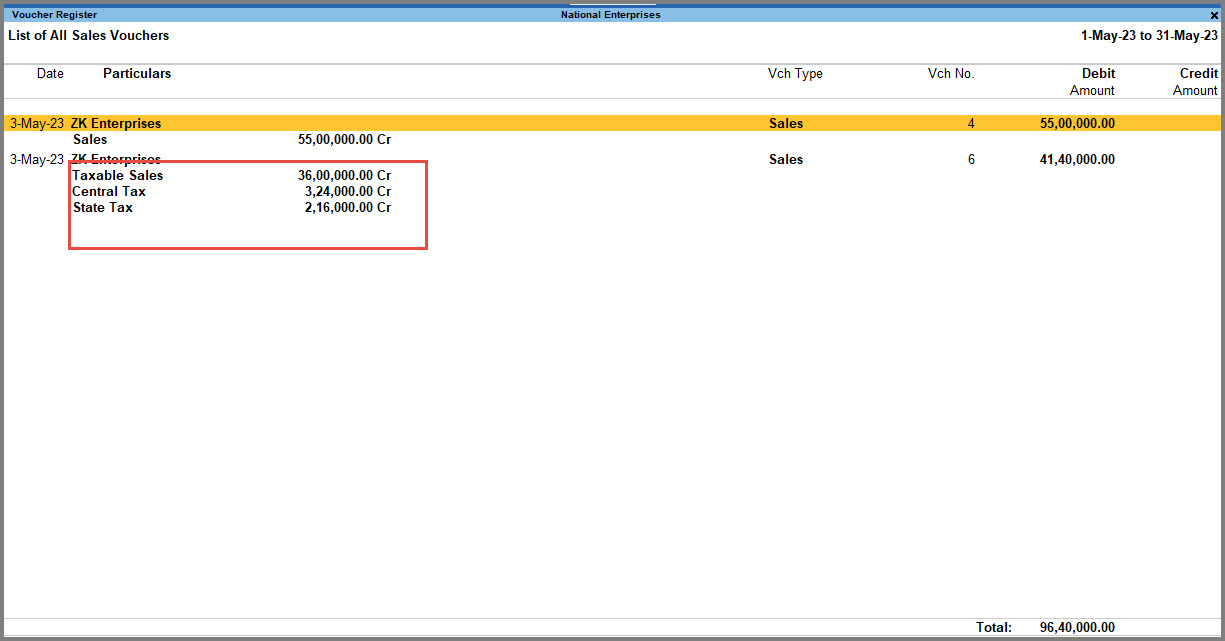
- Compare the values in Sales Register and Profit & Loss A/c.
- Press Alt+G (Go To) > Sales Register.
Alternatively, Gateway of Tally > Display More Reports > Account Books > Sales Register.
The total value includes GST.

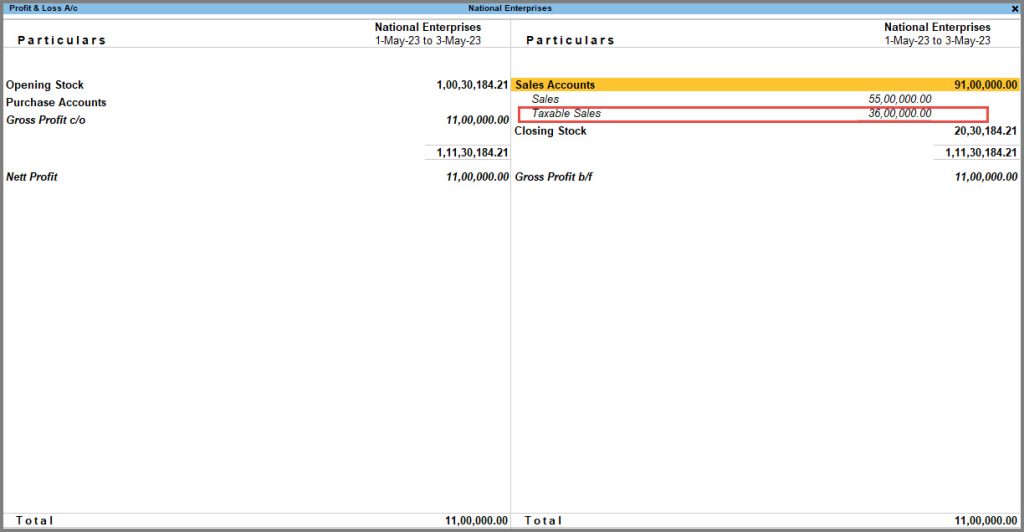
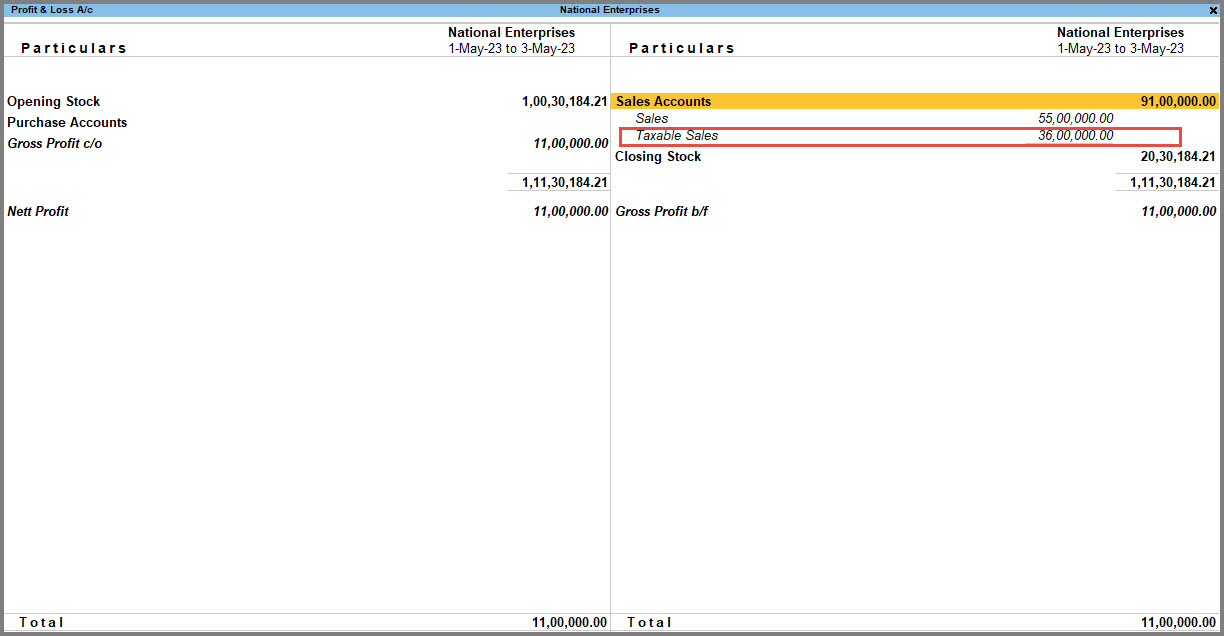
- Press Alt+G (Go To) > Profit & Loss A/c.
Alternatively, Gateway of Tally > Profit & Loss A/c.
The Sales Accounts displays the values without GST.
- Press Alt+G (Go To) > Sales Register.

Such discrepancies may arise in reports like Sales Register, Stock Summary and Profit & Loss A/c and you can resolve them by following the procedures given above. This will ensure accuracy and consistency of maintaining your company data.
Display Comparative Sales Register
TallyPrime enables you to compare details of a report with another by displaying details in a new column as per your selected parameters. For example, you can compare sales of two different months or sales of a month with the purchases, and even alter the parameters in the column as required. You can also compare similar data of two or more companies stored in the same data directory. Once you have compared the details as per your requirement, you can delete unnecessary columns.
New Column
As a business owner, in some scenarios, you will want to compare your current quarter’s sales with that of the last quarter or the current month’s sales with that of the previous month or any month. Also, you will be doing a comparison of sales with other business transactions like purchases to know whether your purchases are in order with that of sales transactions.
In TallyPrime, you can compare an existing report with another by adding a new columnar report and configuring it with the period, currency, and voucher details as required.
- On the Sales Register screen, press Alt+C (New Column) and press Enter.
- Fill in the Column Details as required and press Enter.
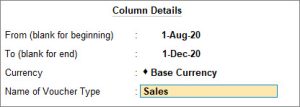
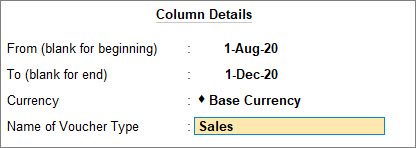
In the comparative sales report shown below, sales from 1-April- 2020 to 31-March-2021 are compared with sales from 1-August-2020 to 1-December-2020.

If you want to add another column, press Alt+C (New Column) and enter the Column Details as required and press Enter. Similarly, if you want to alter any Column Details, select the column and press Alt+A (Alter Column). You can also delete a column by selecting it and pressing Alt+D (Delete Column).
Auto Column
In your business, you will often want to compare sales of various periods, and every time creating a New Column can be a tedious task. TallyPrime enables you to create Auto Column to create columns automatically based on selected periods like Yearly, Half Yearly, Quarterly, Monthly, and so on.
Auto column feature in TallyPrime enables you to repeat multiple columns in a sales register. You can select the period as Daily, Monthly, Quarterly, and so on, as required.
- On the Sales Register screen, press Alt+N (Auto Column) and press Enter.
- On the Auto Repeat Columns Screen, select options in Auto Column and Show Total column filed as required and press Enter.
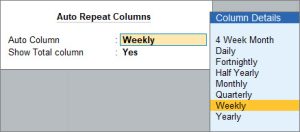
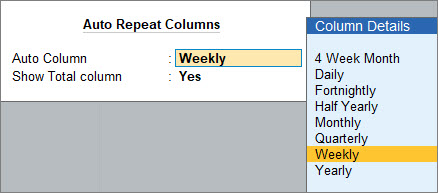
Shown below is an example of Auto Column feature with Auto Repeat Columns set to Weekly and Show Total column set to Yes. Similarly, you can select Auto Column to Daily, Monthly, Quarterly, and so on, as required. You can also set the Show Total column to Yes or No.


