
Job Costing in TallyPrime
Job costing is a systematic method of analyzing your expenses and incomes when you take up certain projects or jobs as per a client’s specifications and requirements. TallyPrime enables you to effectively manage the costs incurred for a project, thereby ensuring better tracking of the revenues associated with one or more jobs. Starting from acquiring raw materials to producing and delivering the materials to a client, TallyPrime helps you deal with Job costing efficiently, even if you are handling more than one job at a single point in time.
During the completion of a job, any direct or indirect expenses will be termed as the cost of completing the project or job. Meanwhile, any direct or indirect income generated will be recorded as the Revenue of your company. As a part of your job requirement, your expenses might include:
- Procurement and transfer of the raw materials to the factory or warehouse.
- Consumption and transfer of the finished products to godowns.
- Additional charges, such as packaging, wear and tear, and so on.
Knowing the expenses incurred against each of the deliverables can help you visualize your incomes more effectively.
Allocate and Track project costs and revenues: Using the job costing feature in TallyPrime, you can now allocate and track all the expenses as well as the revenues made towards completing a project. You might have used cost centres to allocate different expenses and godowns to manage the raw materials and finished goods. TallyPrime handles tracking of stock consumption godown-wise or location-wise and allocated costs seamlessly. It also tracks the costs involving procurement, movement, and consumption of raw materials. What’s more? If you are managing multiple projects at the same time, TallyPrime facilitates use of Stock Journal Voucher Classes to simplify your data entry while effectively reflecting your overall cost and revenue from each project.
View project costs in reports: When you handle multiple projects at a time, it is necessary that you track the expenses and income of individual projects or jobs. Since, one project or job might fetch higher profit margins than the other, a job-level costing is necessary to prevent one job’s profit from overlapping the loss incurred in another job. You can view the Job Work Analysis report in TallyPrime to get a crux of all your expenses incurred and incomes generated by individual projects/jobs and determine the Nett profit or loss. TallyPrime provides different reports to analyse the project costs and expenses, thereby enabling you to make informed business decisions.
Compare inward and outward revenue flow: In TallyPrime, you can also compare your inward and outward flow of revenues, in addition to giving you an insight of the profitable and unprofitable projects. Such an insight will help you analyze and ascertain the cost of similar jobs to be undertaken in the future.
Setup TallyPrime for Job Costing

In TallyPrime, enabling Job Costing and Cost Centres are prerequisites for using the Job Costing feature. Since your project or job is spread across multiple sites, creating godowns is mandatory to track the location-wise material movement and finances associated with each project or job. Stock Journal Voucher Classes can be created to define the type of material movement in your project or job sites. You can select whether the material movement involves only transfer, or if the material is being consumed at the source location to produce finished goods at the destination location, by selecting either Transfer or Consumption as the class respectively.
Let’s say you have undertaken two projects namely, Project Amara and Project Prestige, where you need to deliver finely cut and polished 2×2 and 3×3 sizes of granite tiles. You strike a deal with Universal Enterprises, a granite supplier in Rajasthan who sells fine quality granite slabs at lesser prices. Both the projects will require 5,000 sq.ft of raw granite each. Since the truck can accommodate 12,000 sq.ft. of slabs, you decide to purchase an extra 2,000 sq.ft. of granite and store it in the Main Location Godown. Then you transfer the raw materials from HSR layout Godown to Electronic City Godown for Project Amara and from Koramangala Godown to Whitefield Godown for Project Prestige. The granite is consumed in these destination godowns and the required sizes of granite tiles are produced. Post this, the granite tiles are sent to Electronic City Godown for Project Amara and Whitefield Godown for Project Prestige from where they’ll finally be sold off to the clients.
- Enable Job Costing.
- Press F11 > set Enable Job Costing to Yes.
In case you do not see this option, set Show more features to Yes.

- Accept the screen. As always, you can press Ctrl+A to save.
- Press F11 > set Enable Job Costing to Yes.
- Enable and create Cost Centres.
- Press F11 > set Enable Cost Centres to Yes.

- Create Cost Centres.
- Press F12 (Configure) > enable the option Set Job Costing for Cost Centres.
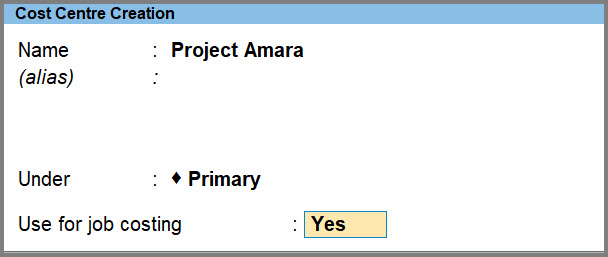
- Set the option Use for job costing to Yes.
The Cost Centre Creation screen appears, as shown below:
- Accept the screen. As always, you can press Ctrl+A to save.
To know more about creating Cost Centres, refer to the Cost Centre Allocation topic.
- Press F11 > set Enable Cost Centres to Yes.
- Create Godowns.
When you create a Godown/Location in TallyPrime for the first time, you are prompted to alter the existing internal godown (Main Location), where all your inventory is stored by default.- Press C (Create New) and start creating the Godowns.
- Fill in the details in the Godown Creation screen.
- Select a cost centre under Set job/project for job costing.
If you do not see this option, press F12 (Configure) > Allow storage of materials as Yes > Set Job Costing details as Yes.
The Godown Creation screen appears, as shown below:
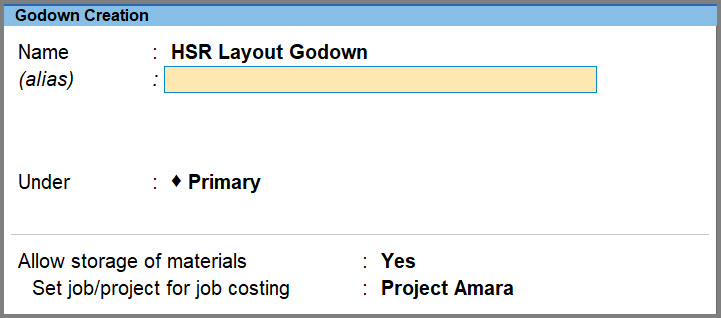
- Select a cost centre under Set job/project for job costing.
- Accept the screen. As always, you can press Ctrl+A to save.
To know more about creating godowns, refer to the Create Godown topic.
-
Define Stock Journal Voucher Class for Transfer or Consumption.
- If you want to transfer the materials from one godown to the other, follow the steps below,
- Press Alt+G (Go To) > Alter Master > Voucher Types > type or select Stock Journal and press Enter.
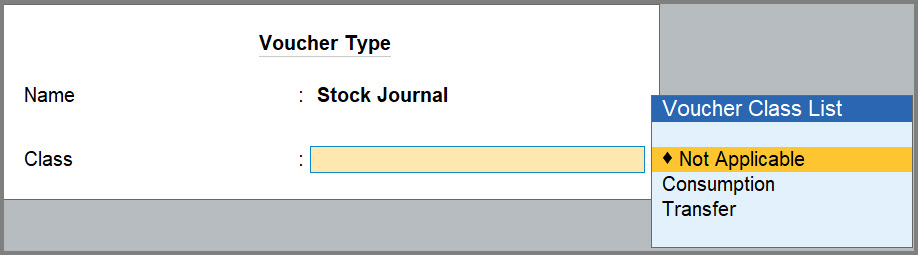
- Enter the Name of Class, for example, Transfer, and press Enter to view the Voucher Type Class screen.
- Set the option Use Class for Inter-Godown Transfers to Yes and press Enter.
Enable this option if the Material Movement involves only transfer of materials.

-
If the materials are getting consumed in the godowns, follow the steps below,
- Press Alt+G (Go To) > Alter Master > Voucher Types > type or select Stock Journal and press Enter.
- Enter the Name of Class, for example, Consumption, and press Enter to view the Voucher Type Class screen.
- Set the option Use Class for Job Costing Consumption to Yes and press Enter.
Enable this option if the Material Movement involves only consumption of materials.

- If you want to transfer the materials from one godown to the other, follow the steps below,
To know more about working with voucher classes, refer to the Voucher Class section in the Voucher Types topic.
Now that you have enabled the features, created godowns as well as voucher classes, you can progress with the jobs or projects as per your client’s requirements.
Procurement of Materials
To begin any project or job, you must understand the requirements and specifications of your clients. Then you can plan on obtaining the required raw materials from different sources and start the production process. The price of raw materials will have a direct impact on the project or job; therefore, you must deal with suppliers who will supply you the materials at reasonable rates without compromising on the quality of the materials. Since your business requires bulk purchasing of materials, you can negotiate with suppliers for providing better rates. Once the materials are procured, you can get ahead with the production process.
The two projects you have undertaken as mentioned in the example, will require you to purchase 10,000 sq.ft. of uncut raw granite slab.
You can record the purchase transaction in the following manner:
- Open Purchase voucher in As Voucher mode.
- Press Alt+G (Go To) > Create Voucher > press F9 (Purchase).
Alternatively, Gateway of Tally > Vouchers > press F9 (Purchase). - Press Ctrl+H (Change Mode) and select As Voucher.
- Press Alt+G (Go To) > Create Voucher > press F9 (Purchase).
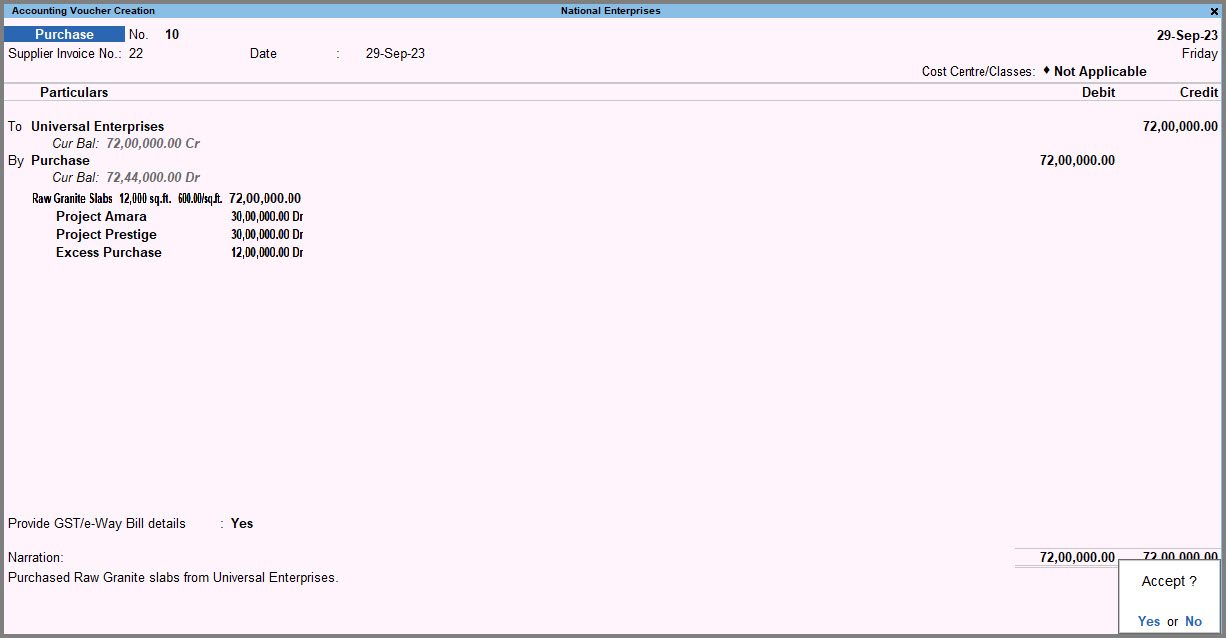
- Record the purchase transaction and allocate to different projects.
- Credit the Party Ledger.
- Select the Purchase ledger.
The Inventory Allocations screen appears, as shown below:

- Enter the Name of Item that you wish to purchase.
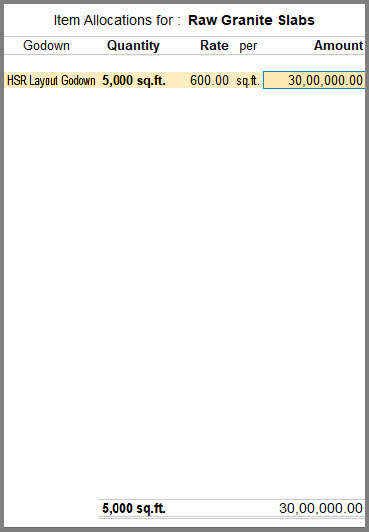
The Item Allocations screen appears. - Select the Godown, Quantity and Rate of the stock item.
The Item Allocations screen appears, as shown below:
The Inventory Allocations screen appears. - Select the stock item.
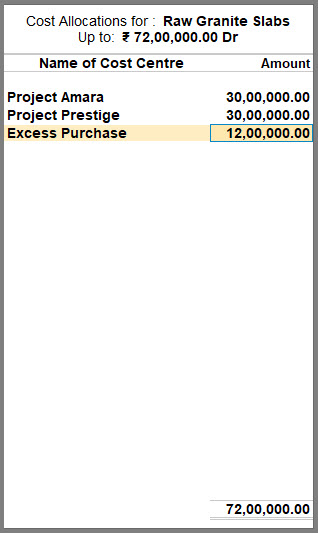
The Cost Centre Allocations screen for the purchase of the stock item appears. - Select the project name under Name of Cost Centre.
If you are purchasing for multiple projects at one go, select the stock item multiple times and allocate it to the specific projects.
The Cost Centre Allocations screen appears, as shown below:
Note: If you are purchasing for a single project, continue in Item Invoice mode and specify the Project Name under Cost Centre/Classes.
The Accounting Voucher Creation screen appears, as shown below:
- Accept the screen. As always, you can press Ctrl+A to save.
To know more about how to record purchase entries, refer to the Record Purchase Order topic.
Movement and Consumption of Materials
Transferring raw materials from one site to another is a common aspect when the project is spread across different locations. There might be an immediate requirement for some goods which might not be readily available at your disposal. Or you may have unused stock for the required item at some other Godown which you can utilise here. In this case, the material will have to be transferred from the main location to the desired one. Similarly, the raw materials may be consumed at one site leading to the production of finished goods.
When the same material is being transferred from the source location to the destination location, it is termed as inter-godown transfer of materials. In contrary, when the material utilised in the location leads to the production of finished goods, it is referred to as Consumption of the materials in the given location. You can create voucher classes based on whether the material movement involves only transfer or consumption of the materials. The materials in the Source (Consumption) and Destination (Production) sides cannot be the same when you select Consumption as the Class. With TallyPrime, you will be able to record the inter-location transfer of materials and track its consumption as well.
In this section
- Record Inter-Godown Transfer of Materials
- Record Consumption of Materials
Record Inter-Godown Transfer of Materials
For Project Amara, when you are shipping the huge uncut raw granite slabs from HSR Godown to Electronic City Godown, there is transfer of material taking place. Therefore, you select Transfer as the voucher class and Electronic City Godown as the destination location to record the Inter-Godown Transfer of the uncut granite slabs.
To record the transfer of material,
- Press Alt+G (Go To) > Create Voucher > Vouchers > press F10 (Other Vouchers) > type or select Stock Journal and press Enter.
Alternatively, Gateway of Tally > Vouchers > press F10 (Other Vouchers) > type or select Stock Journal and press Enter. - Select a Voucher Class, for example, Transfer.

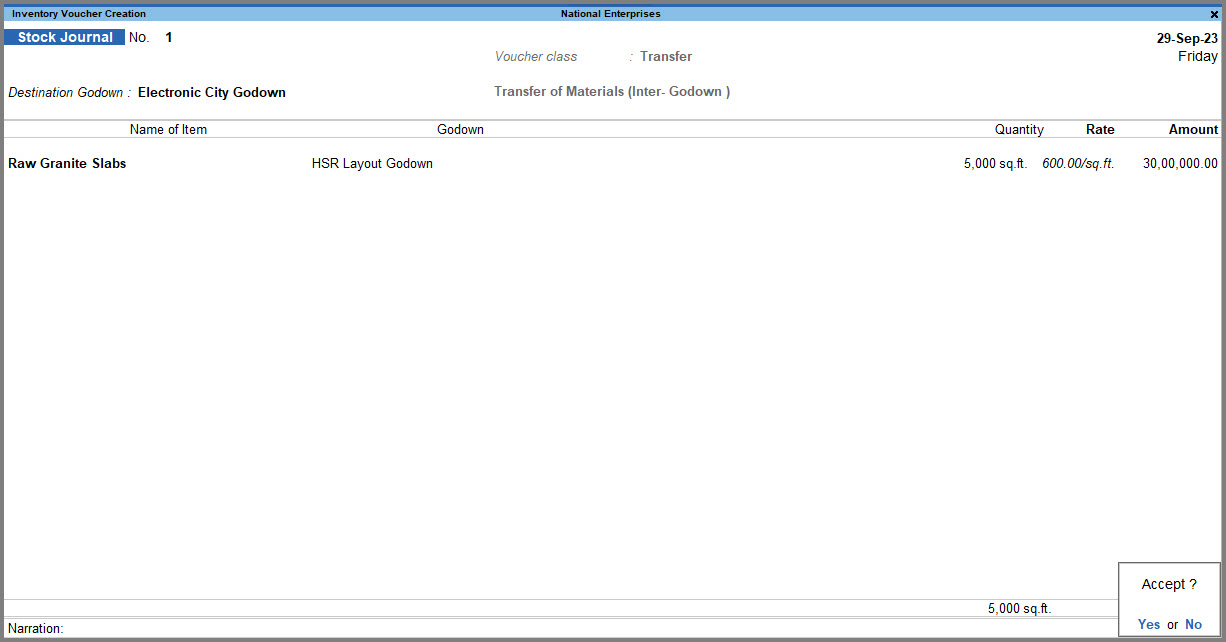
- Record the Stock Journal Voucher for the transfer of material.
- Enter the Destination Godown, where the material will be shipped, in this case, Electronic City Godown.
- Enter the Name of Item being transferred.
- Select the Godown from where the material is being shipped, in this case, HSR Godown.
- Enter the Quantity, Rate and Amount of the item that is to be transferred.
The Inventory Voucher Creation screen appears, as shown below:
- Accept the screen. As always, you can press Ctrl+A to save.
You can easily record the inter-location transfer of materials after specifying the Voucher class as Transfer and track the material movement.
Record Consumption of Materials
After transferring the slabs to the Electronic City Godown, the huge granite slabs are consumed. Here the uncut granite slabs are consumed to produce finely cut and polished 2×2 and 3×3 tiles which will be finally sold off to the clients. On selecting Consumption as the voucher class, you will derive the entire overview of the consumption of raw materials and the production of finished goods in the Electronic City Godown including the specific quantities, rates and amount of the materials consumed and produced at both ends.
To record the consumption of materials,
- Press Alt+G (Go To) > Create Voucher > Vouchers > press F10 (Other Vouchers) > type or select Stock Journal and press Enter.
Alternatively, Gateway of Tally > Vouchers > press F10 (Other Vouchers) > type or select Stock Journal and press Enter.
- Select a Voucher Class, for example, Consumption.
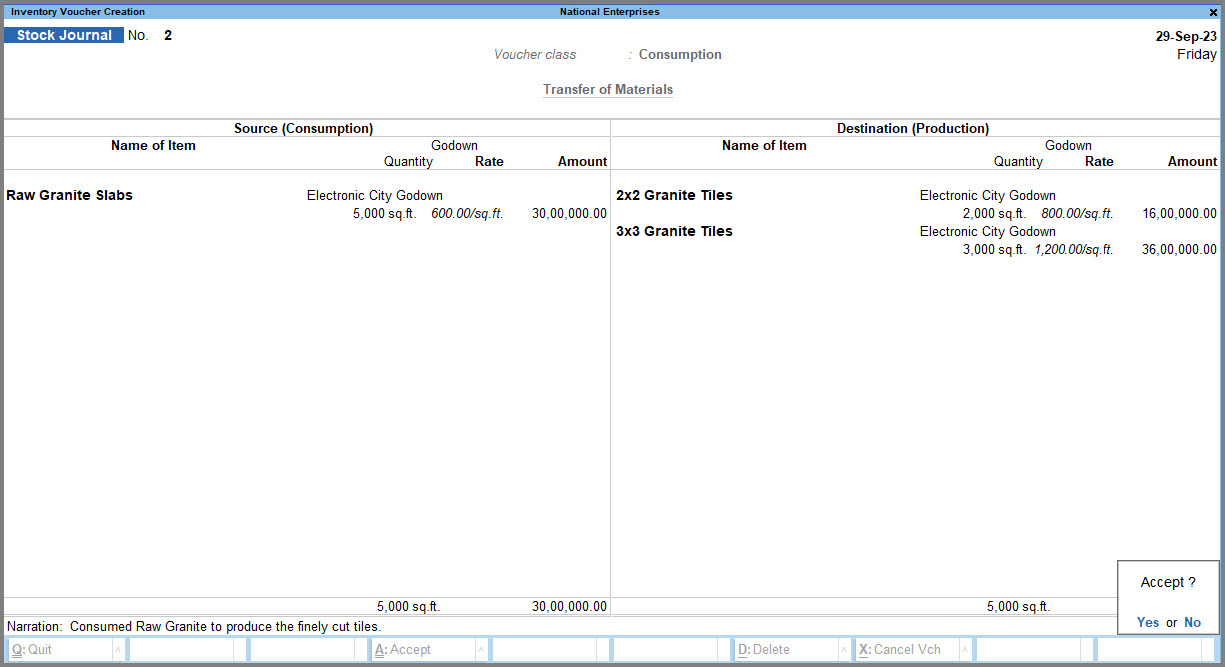
- Record the Stock Journal for the consumption of material.
- Under Source (Consumption), enter the Name of Item, Godown (Electronic City Godown), Quantity, Rate, Amount of the goods that is consumed in the production process.
- Similarly, under Destination (Production), enter the Name of Item, Godown (Electronic City Godown), Quantity, Rate, Amount of the produced goods.
The Inventory Voucher Creation screen appears, as shown below:
- Accept the screen. As always, you can press Ctrl+A to save.
You can easily record the consumption of materials after specifying the Voucher class as Consumption and track the material usage.
Allocate Costs to Projects
Budget Allocation is a significant aspect while planning a project or assigning a job. Since every job or project undergoes varied stages before completion, there are different direct and indirect costs associated with it. You can allocate the costs to individual jobs or projects and track them. Any kind of payment that you make for the project will be termed as Expense. It is possible that you do not pay the creditors immediately and adjust the payment later. In such a case, record a journal voucher to accrue your expense made for the project or job. An overview of these finances will help you in planning your resources and managing your budget.
Accrue your Expenses
When you are shipping the materials from one godown to another, you will incur certain costs like loading or unloading charges for the materials, transportation costs and so on, which is payable later. In such cases, you can book your expenses by recording a Journal Voucher.
- Press Alt+G (Go To) > Create Voucher > press F7 (Journal).
Alternatively, Gateway of Tally > Vouchers > press F7 (Journal). - Record the Journal Voucher.
- Select the Cost Centre/Classes, for example Project Amara and enter the respective amounts.
- Debit the expense or income ledger.
- Credit the payable account.
The Accounting Voucher Creation screen appears, as shown below:
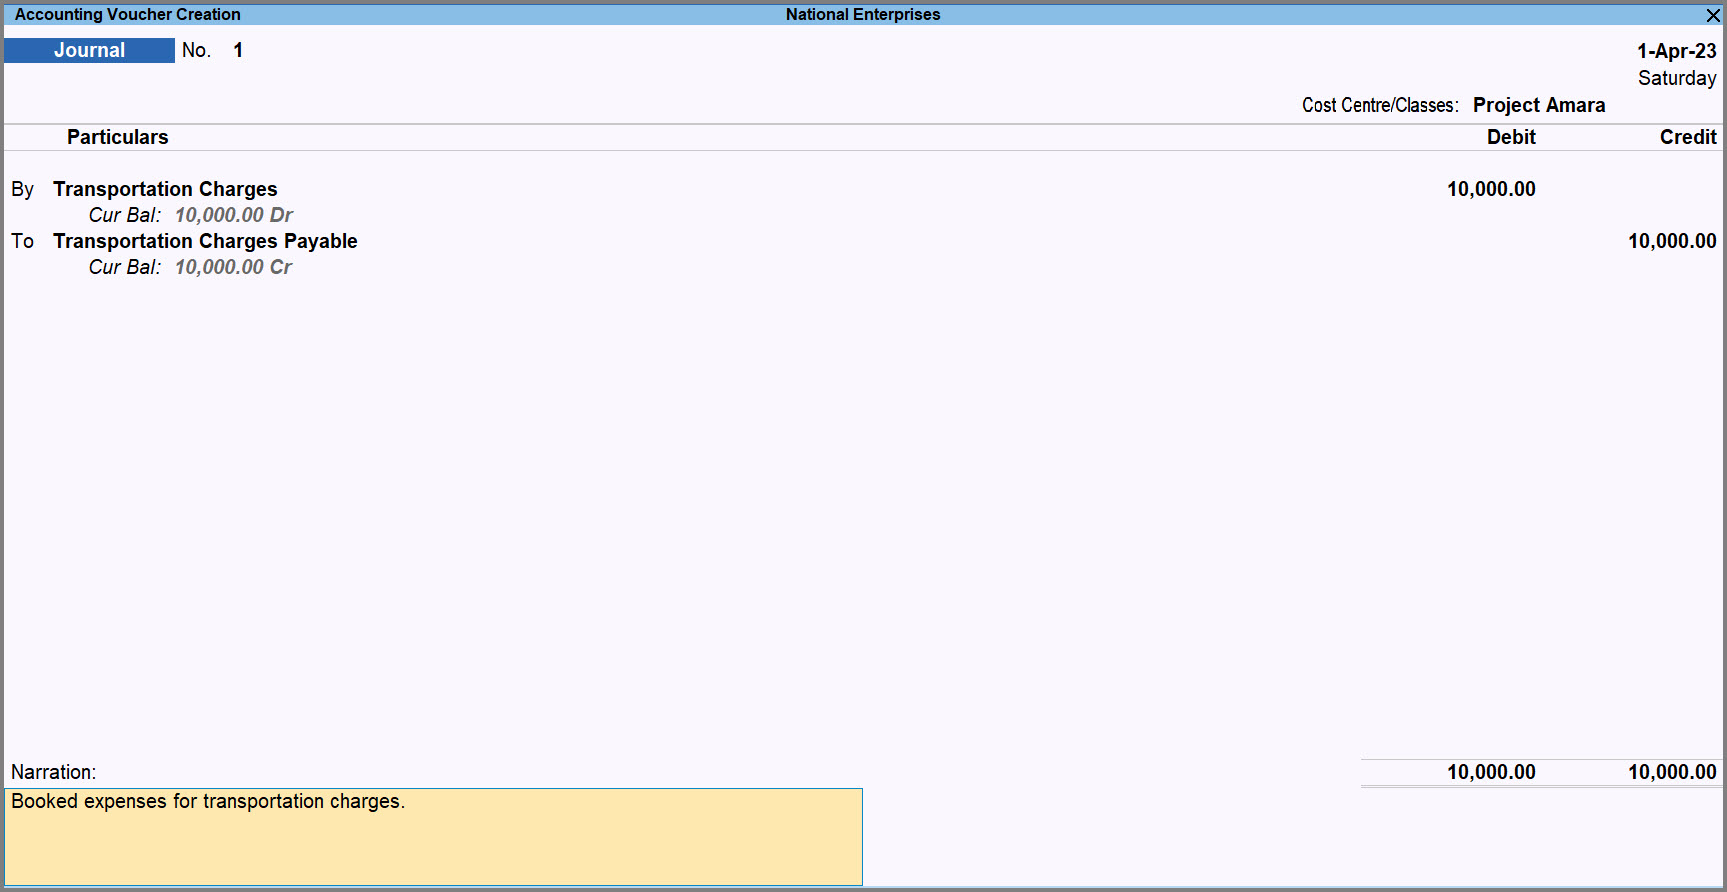
- Accept the screen. As always, you can press Ctrl+A to save the voucher.
This is how you record the journal voucher for payable expenses and allocate the payment for the project or job.
Record Payments for Expenses
Any expenses made immediately after purchasing the materials during a project, or a job can be allotted to it by recording Payment Vouchers. You pay the workers for cutting the edges of the marbles, polishing and loading/unloading materials. The labour payments you make count as direct expenses in your project, and you can record the payment voucher in the following manner:
- Press Alt+G (Go To) > Create Voucher > press F5 (Payment).
Alternatively, Gateway of Tally > Vouchers > press F5 (Payment). - Record the payment voucher.
- Select the Cost Centre/Classes and enter the respective amounts.
- Select the bank/cash ledger and the expense ledger.
- Enter the Amount.
The Accounting Voucher Creation screen appears, as shown below:
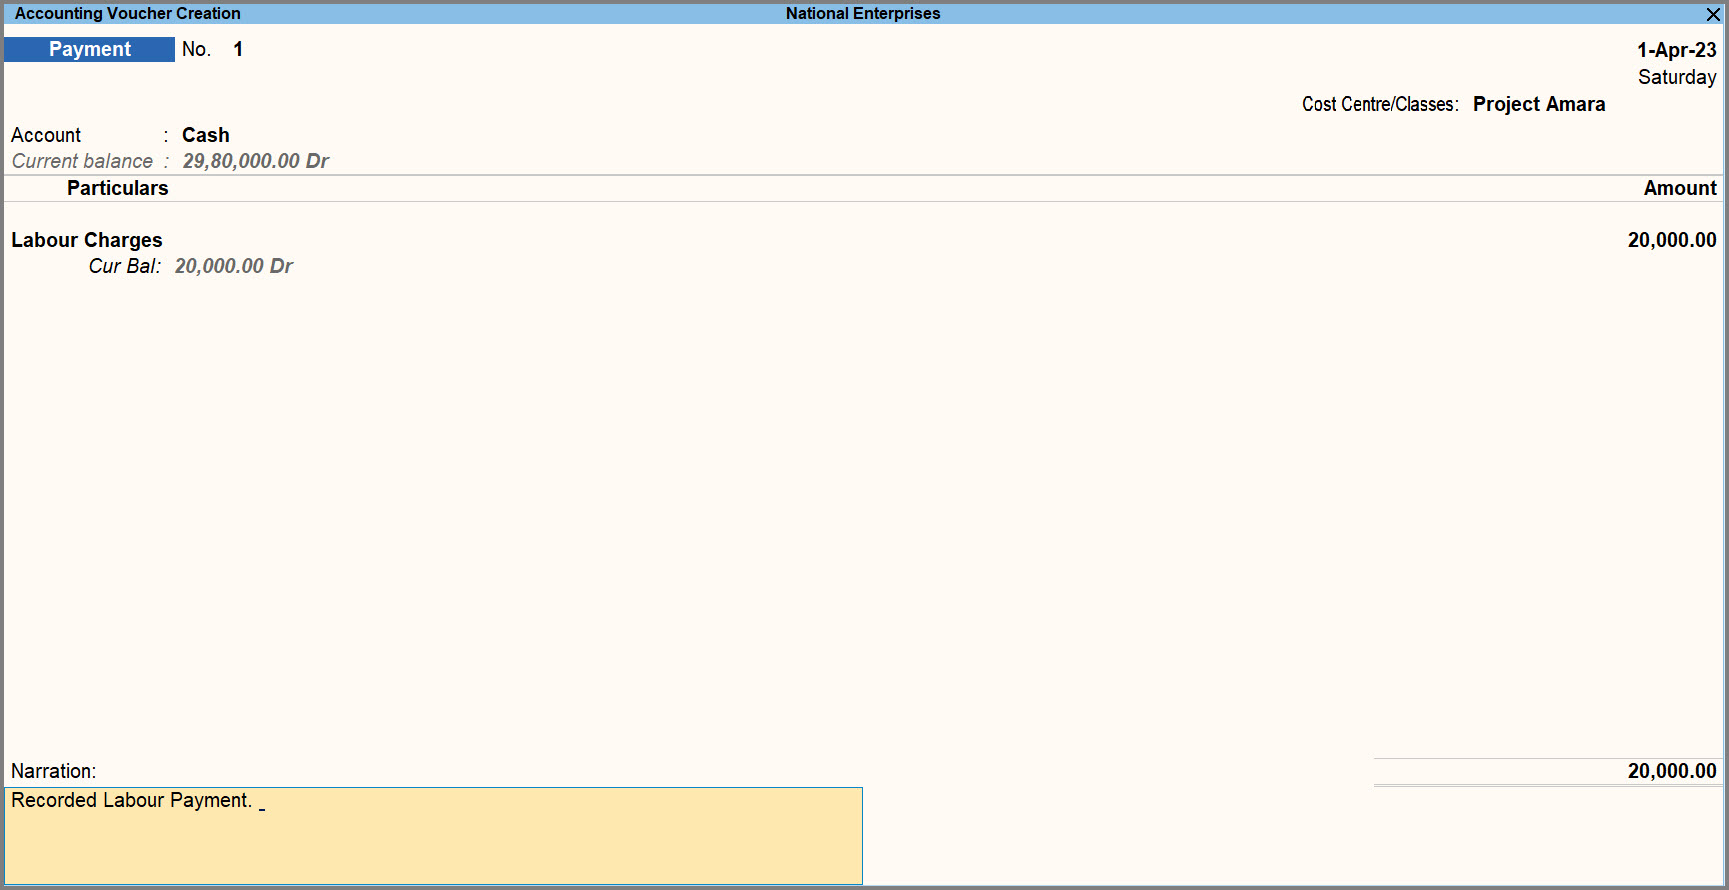
- Accept the screen. As always, you can press Ctrl+A to save the voucher.
This is how you record the payment and allocate it to the undertaken project or job.
Allocate Revenue to Projects
Any income that is generated via the projects can be allocated as their Revenue. You can allocate revenue to individual jobs or projects and track them. As the project progresses in phases, you are left with finely cut and polished 2×2 and 3×3 granite tiles. Income is earned by selling off the tiles to the clients. You may also have left-over granite from each bulk purchase intended to address specific projects. You can even sell these off in scrapyards and earn revenue.
Record Sales for Revenue
You can record the sales transaction of the tiles and allocate the revenue to the project.
- Open Sales Voucher in As Voucher mode.
- Press Alt+G (Go To) > Create Voucher > press F8 (Sales).
Alternatively, Gateway of Tally > Vouchers > press F8 (Sales). - Press Ctrl+H (Change Mode) and select As Voucher.
- Press Alt+G (Go To) > Create Voucher > press F8 (Sales).
- Record the sales transaction.
- Debit the Party ledger, for example Galaxy Builders.
The Cost Allocation screen appears. - Select the project name under Cost Centre.

- Credit the Sales ledger.
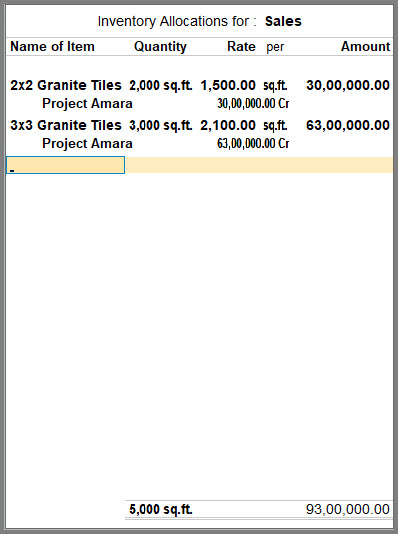
The Inventory Allocation screen appears. - Enter the Name of Item that you are selling.
The Item Allocation screen appears. - Enter the Godown name, Quantity and Rate at which you are selling the items.
The Cost Allocation screen appears. - Select the project name under Cost Centre.
The Inventory Allocation screen appears, as shown below:
The Accounting Voucher Creation screen appears, as shown below:
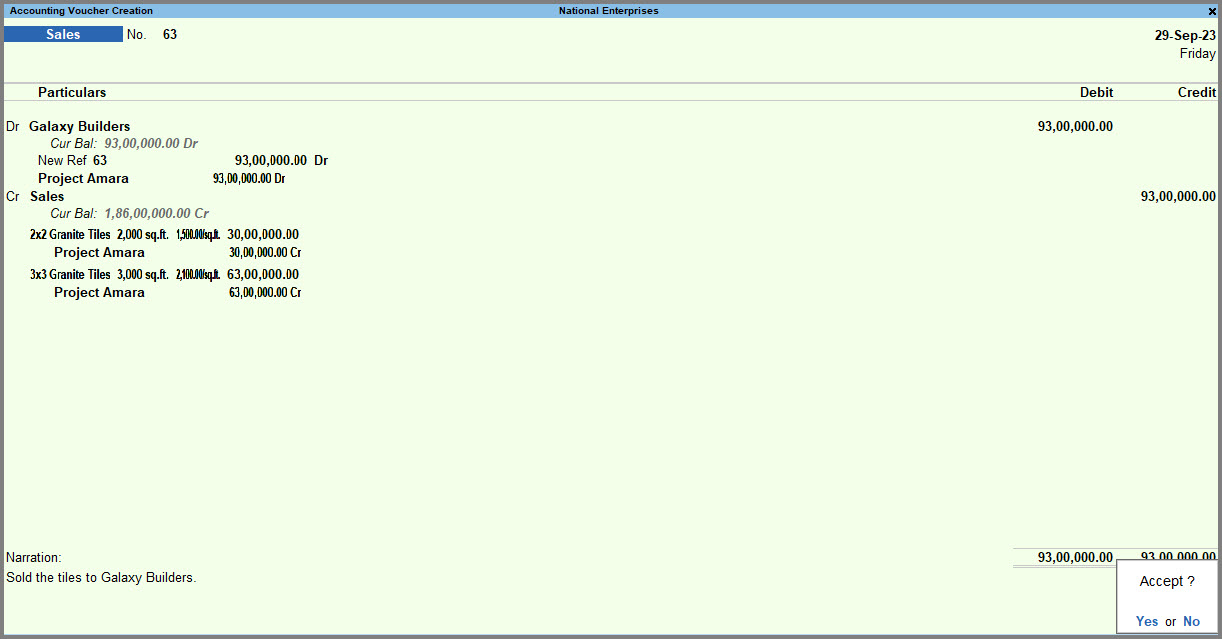
- Debit the Party ledger, for example Galaxy Builders.
- Accept the screen. As always, you can press Ctrl+A to save.
To know more about recording sales transactions, refer to Sales with Cost Centre Allocation topic.
This is how you can allocate your receipts to a job or project you have undertaken. Similarly, you can make entries for direct and indirect revenue and allocate them to individual jobs and projects.
Job Work Analysis Report
Job Work Analysis is a detailed report of the finances involved in the completion of a project which will help you in determining the Nett profit or loss of your business. With this report, you will be able to maintain a proper track of the cash flow and ensure profitability of your business. It will provide you with a detailed breakdown of the costs and revenue associated with the different phases of the job or project. This will ensure that you make informed decisions about allocating your resources and finances in a project.
- Press Alt+G (Go To) > Job Work Analysis > press Enter.
Alternatively, Gateway of Tally > Job Work Analysis > press Enter. - From the List of Jobs/Projects, select the job or project that you wish to analyse, for example Project Amara.
The Job Work Analysis report appears, as shown below:
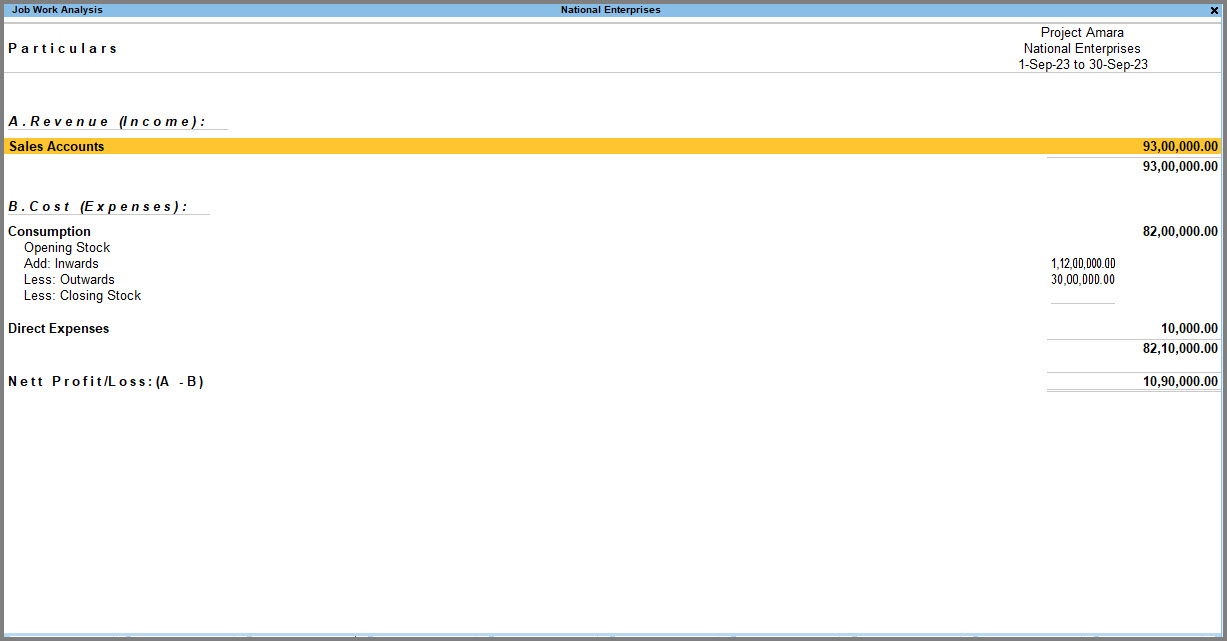
Any form of direct or indirect source of income is listed under Revenue (Income). Similarly, any direct or indirect expenses incurred while completing the project is listed under Cost (Expenses). The Nett Profit/Loss section indicates that this project has generated profit for your business. You can now plan things around each financial aspect and control expenses while the project is still in progress.
Note: Cost centres enabled for job costing will be available for selection in the Job Work Analysis report.
Ctrl+B (Basis of Values): The report is set to appear in the Default Scale Factor. However, you can alter the view of the Amount section by selecting from the List of Scale Factors.
Ctrl+H (Change View): You can view related reports such as Monthly Summary, Breakup of Job/Project and Job/Project Summary in this section.
- Monthly Summary: The report will display a month-wise summary of the cost and revenue involved in the selected job/project.
- Breakup of Job/Project: The breakup of the costs and revenue will be displayed according to the Accounting Groups involved in the job/project.
- Job/Project Summary: An overall summary of costs and income of the job/project will be displayed.
Ctrl+J (Exceptions Report): All the Negative Ledgers can be viewed under this section.
Alt+C (New Column): You can track and compare the Revenue, Expenses and Nett Profit/Loss by defining the columns as per your business requirements. You can press Alt+A (Alter), Alt+D (Delete) and Alt+N (Auto Column) to set columns on a weekly, monthly and so on, basis as well.
To know which project has garnered more profitability than the other, you can compare the Nett Profit/Loss of both the projects side-by-side. While you are viewing the Job Work Analysis report,
- Press Alt+C (New Column), enter the From and To dates and select the project or job with which you want to make the comparison, for example Project Prestige.
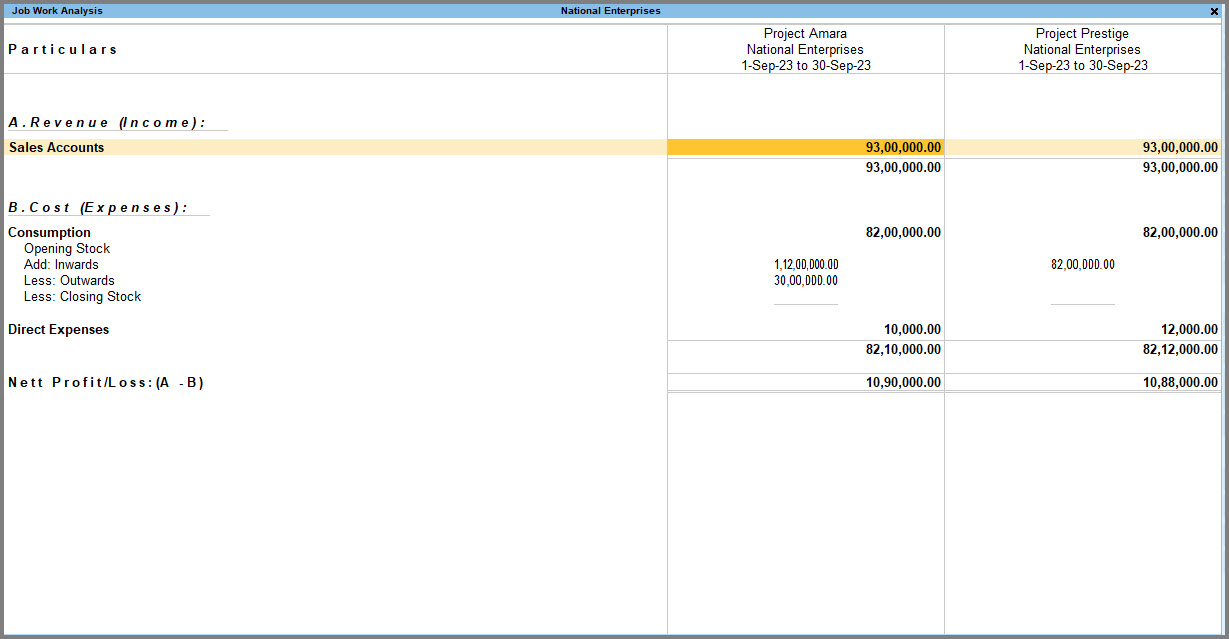
The report displays both your projects side-by-side in a columnar format. The comparison indicates that despite selling the same quality of granite tiles to both the clients, at the same rate, Project Amara is a more profitable project than Project Prestige. This can be accounted to the overhead charges levied in the latter. With this information, you will be able to decide that investing in which project turned out to be more profitable to your business and how you can cut costs for upcoming projects.
To know more about reports in TallyPrime, refer to Working with Reports.


