Stock Items – FAQ
Some of the commonly asked questions about stock items are answered here.
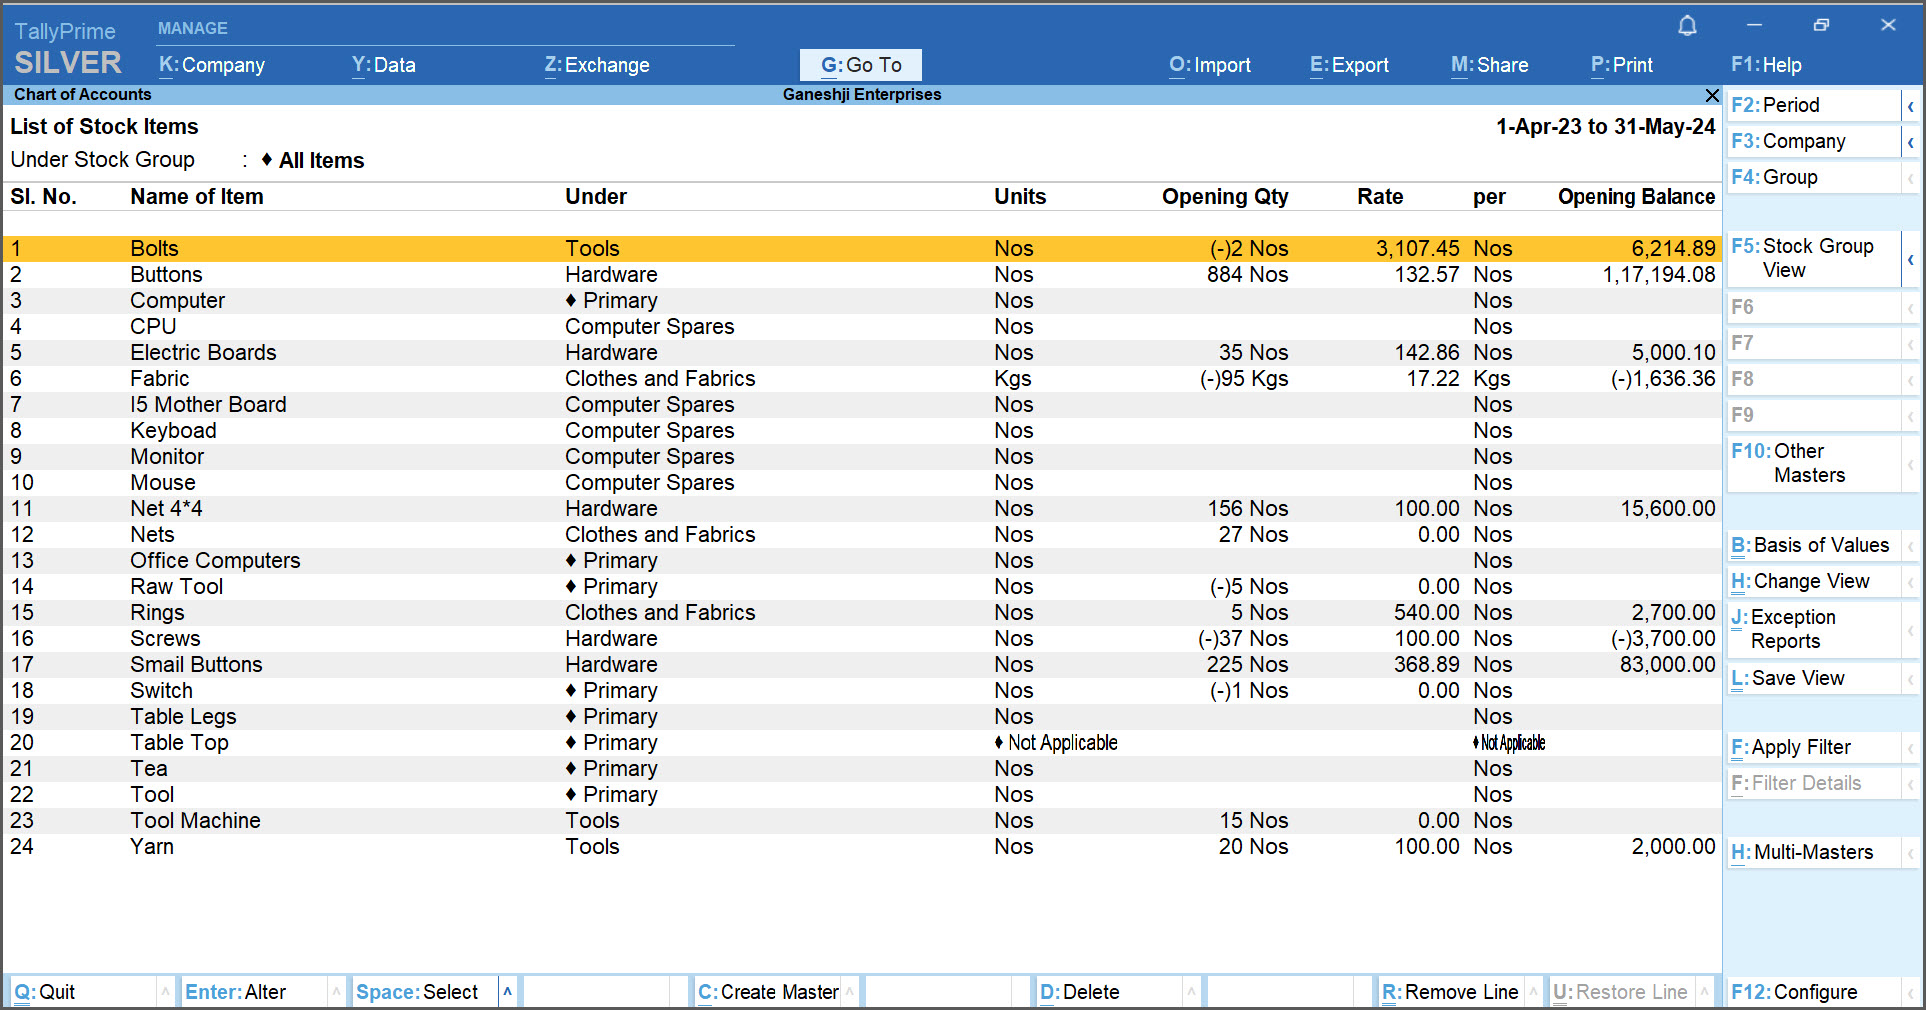
In TallyPrime, you can create, alter, and view the details related to your stock items through the Multi Stock Item Creation or Multi Stock Item Alteration screens.
- Open Gateway of Tally and select Chart of Accounts.
- Select Stock Items under Inventory Masters.
- Press F5 (Stock Item View) to view the additional details about the stock items such as group, units, opening quantity, rate, opening balance, and so on.
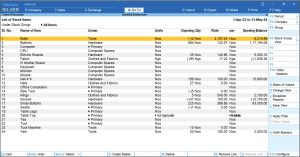
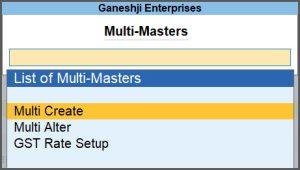
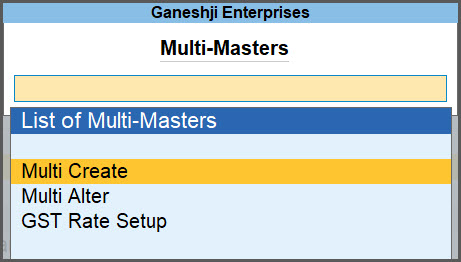
- Press Alt+H (Multi-Masters) to open the Multi Stock Item Creation or Multi Stock Item Alteration screens.
- You can view, create, and edit the details about the stock items in the Multi Stock Item Creation or Multi Stock Item Alteration screens.
Currently, TallyPrime does not support viewing and editing all the details related to stock items in the Multi Stock Item Alteration screen.
However, you can go for the following workaround:
- Export the stock items from TallyPrime into an Excel sheet.
- In the Excel sheet, manually add or edit the details and save it.
- Import the Excel sheet into another company in TallyPrime.
You can also enable ODBC in TallyPrime and view/alter all details of master in Excel.
You can follow the same process to create, alter, and view other masters as well.
Currently, TallyPrime does not support the change of stock valuation method for all the stock items at once.
However, you can go for the following workaround to change the stock valuation methods.
- Export the stock items from TallyPrime into an Excel sheet.
- In the Excel sheet, create a Stock Valuation Method column and manually enter the stock valuation methods for each stock items.
You can map the valuation methods, as per the labels for market valuation methods used in the TallyPrime. - Save the Excel sheet.
- Import the Excel sheet into TallyPrime.
While recording a sales voucher with BoM, you can update the quantity of the stock items that have zero or negative values, on the fly.
- Open a sales voucher and enter the stock item with zero or negative value.
- In the Item Allocations for: screen, put cursor under Quantity and press Alt+V to open a manufacturing journal.
- In the Inventory Voucher Creation screen, enter quantity for the items.
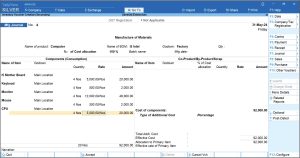
- Press Ctrl+A to save the manufacturing journal and come back to sales voucher.
From the Stock Summary, you can view your stock details including the quantity and value of your company’s stock. In TallyPrime, you can easily increase or decrease the value and quantity of the closing stock.
Increasing the Value and Quantity of the Closing Stock
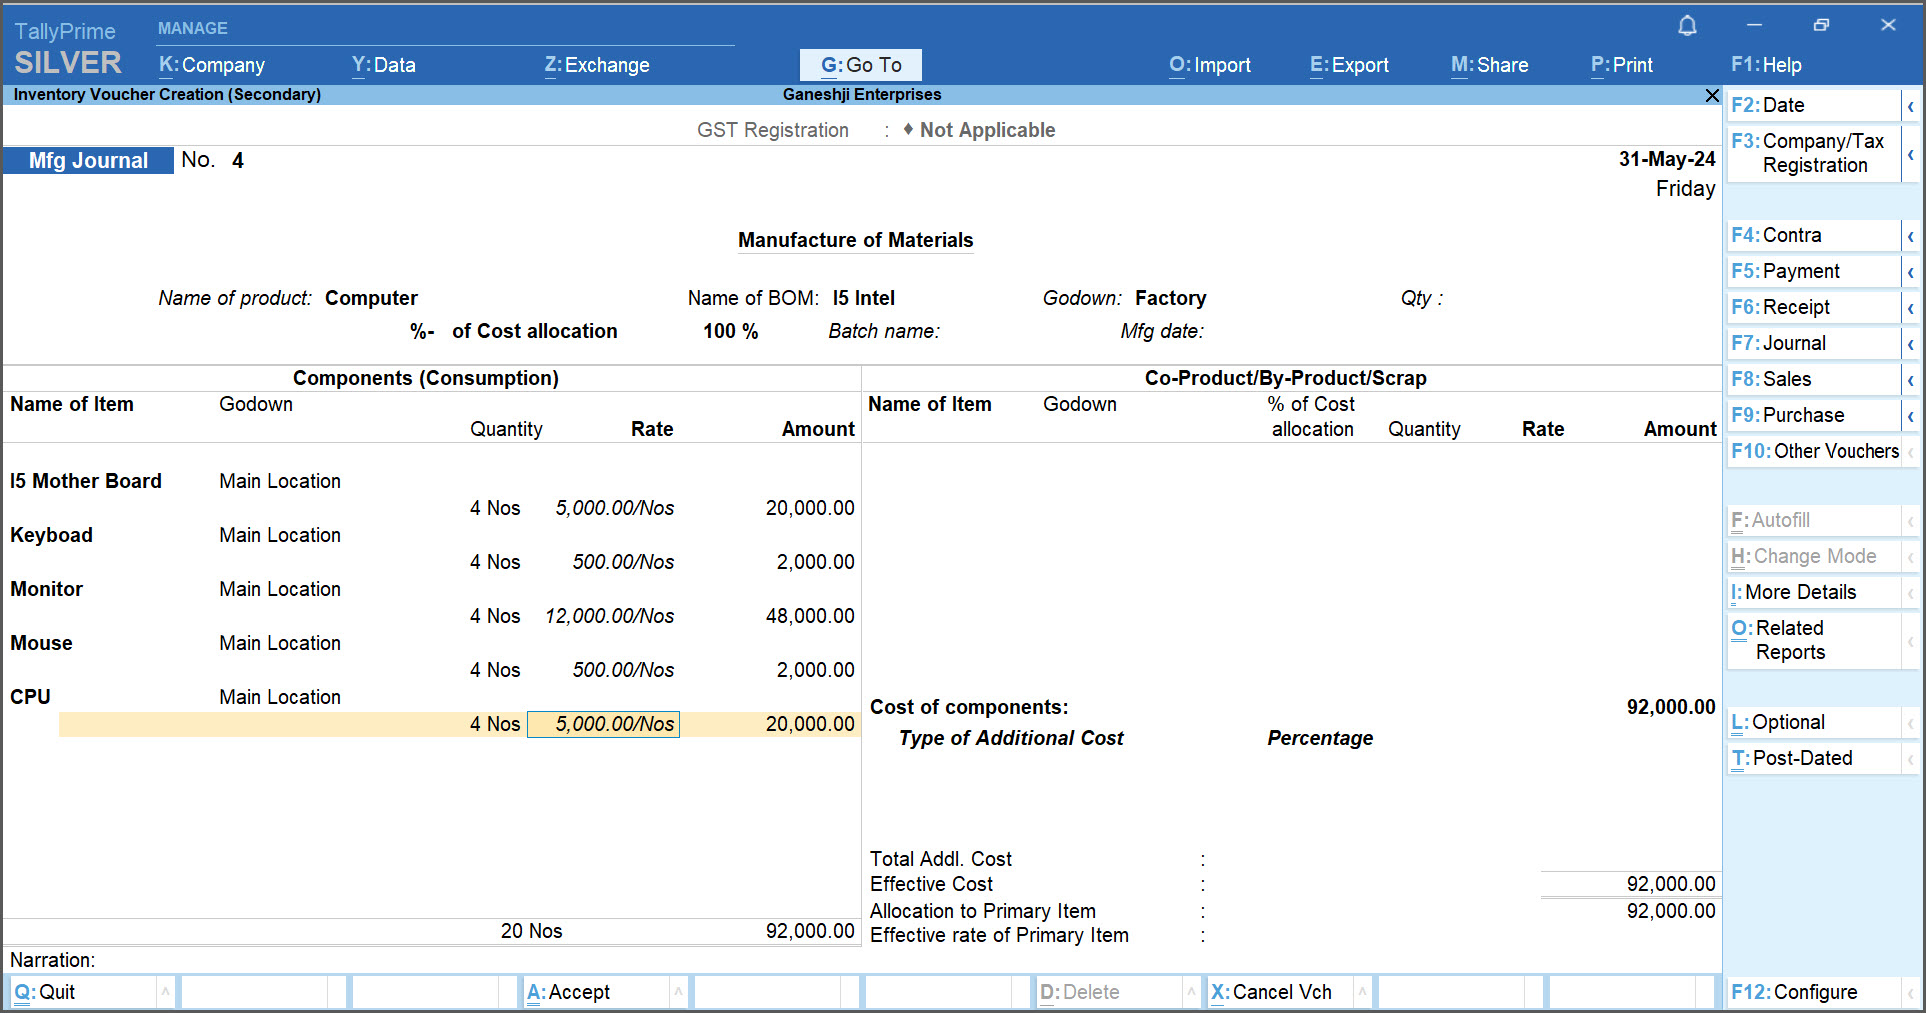
On 3-May-2020, National Enterprises made a physical verification of its stock and found that the closing balance of rice was 30 kgs, but as per the books, it was 20 kgs. National Enterprises wants to increase the closing quantity and value of rice accordingly.
The Stock Summary appears as shown below:

- Gateway of Tally > Vouchers > press F10 (Other Vouchers) > type or select Physical Stock > and press Enter.
Alternatively, press Alt+G (Go To) > Create Voucher > F10 (Other Vouchers) > type or select Physical Stock. - Select the stock item for which the closing quantity needs to be increased.
- Enter the actual quantity in the Quantity field.
- Accept the screen. As always, you can press Ctrl+A to save.
- Press Alt+G (Go To) > type or select Stock Summary > and press Enter.
The closing balance quantity of the selected stock item appears increased, as shown below:

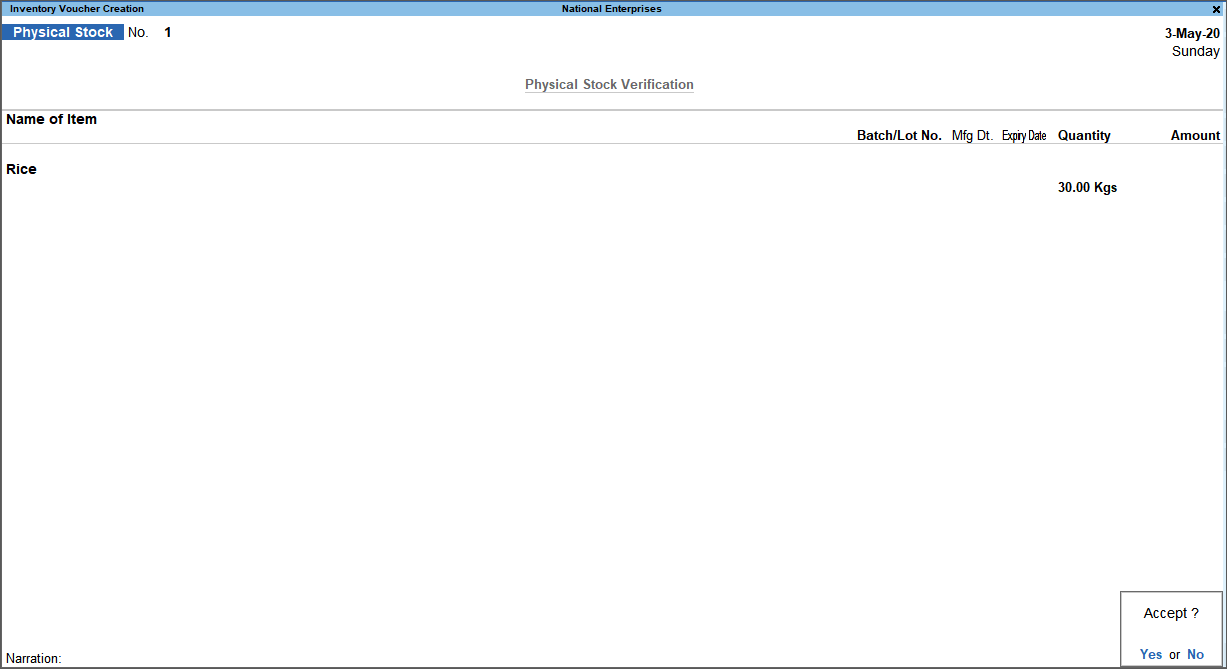
Increase the value of the closing balance
Consider the scenario where the rate per unit has to be increased, but the quantity of stock as per the books, and the quantity as per physical verification is the same. You can apply the following formula, and enter the same value in the stock journal voucher.
Increase in rate per unit * Total Closing Quantity = XXX
Or
Total estimated value (after increase in rate per unit) – value as per books = YYY
Let us apply the formula for the above example, assuming the estimated closing value of Rs. 1,440 (instead of Rs. 1,300) for a total closing quantity of 20 kgs.
7 (Increase in rate per unit) * 20 (Total Closing Quantity) = 140
Or
1,440 (Total estimated value) – 1,300 (value as per books) = 140
Record a stock journal to increase the Closing Stock Value
- Gateway of Tally > Vouchers > press F10 (Other Vouchers) > type or select Stock Journal > and press Enter.
Alternatively, press Alt+G (Go To) > Create Voucher > F10 (Other Vouchers) > type or select Stock Journal.
You can also press Alt+F7 to view the Stock Journal voucher. - Select the stock item for which the closing value needs to be increased under Destination (Production) and enter the above value.
- Press Alt+G (Go To) > type or select Stock Summary > and press Enter. The increased value of closing balance for rice appears as shown below:

Note: Before recording the Stock Journal, ensure the option Allow zero-valued transactions is set to Yes, in the Stock Journal Voucher Type Alteration screen.
Decreasing the Value and Quantity of the Closing Stock
On 6-Aug-2020, National Enterprises made a physical verification of its stock. It found that the closing balance of Cooking Oil was 290 litres, but as per the books, there were 300 litres. National Enterprises wants to reduce the closing balance of cooking oil accordingly. The Stock Summary appears as shown below:

- Gateway of Tally > Vouchers > press F10 (Other Vouchers) > type or select Physical Stock > and press Enter.
Alternatively, press Alt+G (Go To) > Create Voucher > F10 (Other Vouchers) > type or select Physical Stock. - Select the stock item for which the closing balance needs to be reduced.
- Enter the actual quantity in the Quantity field.

- Accept the screen. As always, you can press Ctrl+A to save.
- Press Alt+G (Go To) > type or select Stock Summary > and press Enter.
The closing balance quantity of the selected stock item appears reduced, as shown below:

Decrease the value of the closing balance
Consider the scenario where the rate per unit has to be decreased, but the quantity of stock as per the books, and the quantity as per physical verification is the same. You can apply the following formula, and enter the same value in the rejections out voucher.
Decrease in rate per unit * Total Closing Quantity = XXX
Or
Value as per books – Total estimated value (after decrease in rate per unit) = YYY
Let us apply the formula for the above example, assuming the estimated closing value of Rs. 28,000 (instead of Rs. 29,000) for a total closing quantity of 200 pcs.
5 (Increase in rate per unit) * 200 (Total Closing Quantity) = 1000
Or
29,000 (Value as per books) – 28,000 (Total estimated value) = 1000
In case National Enterprises finds that the quantity of stock as per the books and the quantity as per physical verification is the same, but the value of the stock has to be decreased, the following has to be done:
- Gateway of Tally > Vouchers > press F10 (Other Vouchers) > type or select Rejections Out > and press Enter.
Alternatively, press Alt+G (Go To) > Create Voucher > F10 (Other Vouchers) > type or select Rejections Out.
In case the voucher is inactive, you will be prompted to activate the Rejections Out voucher type. Select Yes or press Y to proceed. - Select the party ledger or Cash ledger and select the stock item.
- In the Stock Item Allocations screen, enter only the Amount to be reduced.
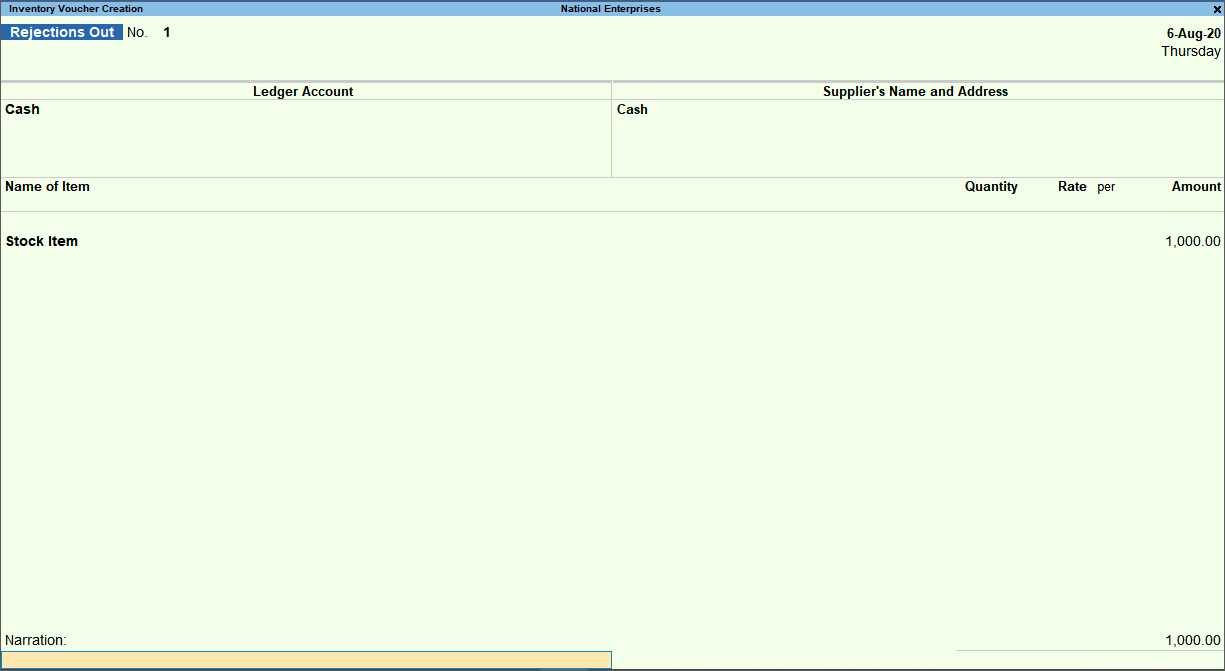
Note: Before recording the Rejections Out voucher, ensure the option Allow zero-valued transactions is set to Yes, in the Rejections Out Voucher Type Alteration screen.
- Accept the screen. As always, you can press Ctrl+A to save.
- Press Alt+G (Go To) > type or select Stock Summary > and press Enter.
The value of closing balance of the selected stock item appears as shown below:

Increase or decrease closing stock value without unit of measure
This applies only to stock items created without unit of measure. These stock items are used to maintain the values and not the units.
Record a physical stock voucher and enter the revised amount in the Amount column.
If the closing stock value is Rs. 10,000, you can increase it to 15,000 using a physical stock voucher. Closing stock value appears as shown below:

Record a physical stock voucher
- Gateway of Tally > Vouchers > press F10 (Other Vouchers) > type or select Physical Stock > and press Enter.
Alternatively, press Alt+G (Go To) > Create Voucher > F10 (Other Vouchers) > type or select Physical Stock. - Select the stock item and enter the revised value.

When a company wants to maintain inventory separately or when the stock reports in the system and godown are different, the opening and closing of stock are usually entered manually.
To do this in TallyPrime:
- Disable the accounts and inventory integration option.
- Press F11 (Features) > set the option Integrate Accounts with Inventory to No.
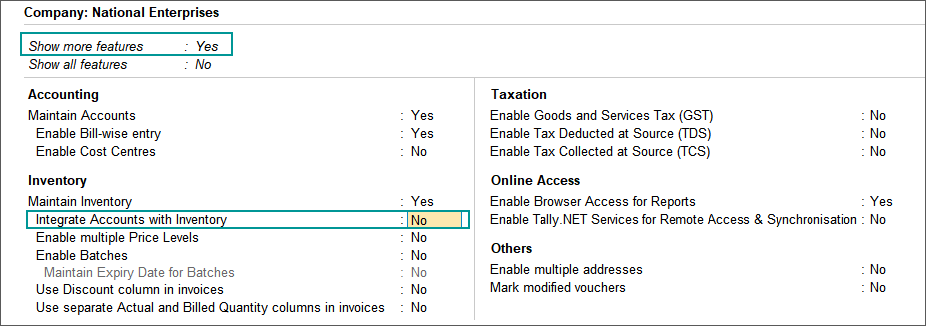
- Accept the screen.
- Press F11 (Features) > set the option Integrate Accounts with Inventory to No.
- Create a Stock-in-Hand ledger and enter the opening stock amount.
- Press Alt+G (Go To) > Create Master > Ledger > and press Enter.
Alternatively, Gateway of Tally > Create > Ledger. - Enter the Name and select Stock-in-Hand in the Under field.
- Enter the amount of stock in Opening Balance field as shown below:
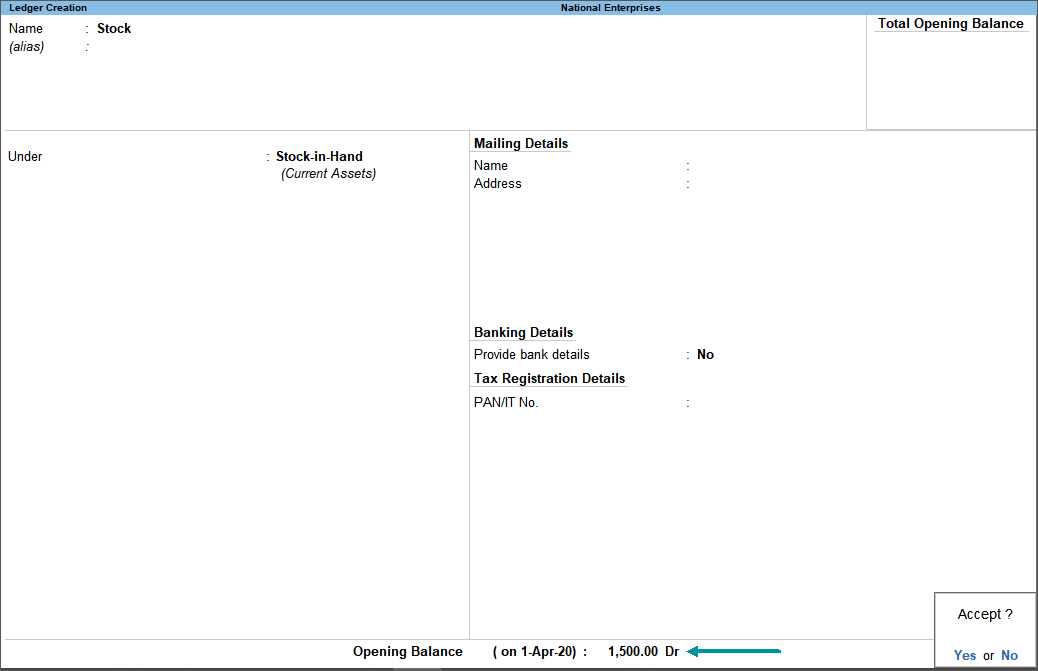
- Accept the screen. As always, you can press Ctrl+A to save.
- Press Alt+G (Go To) > Create Master > Ledger > and press Enter.
- For closing stock, open the Stock-in-Hand ledger in alteration mode, and specify the closing date and amount.
- Press Alt+G (Go To) > Alter Master > Ledger > select the Stock ledger > and press Enter.
Alternatively, Gateway of Tally > Alter > Ledger > select the Stock ledger > and press Enter. - Enter the closing date and the amount of closing stock balance as shown below:

- Accept the screen.
- Press Alt+G (Go To) > Alter Master > Ledger > select the Stock ledger > and press Enter.
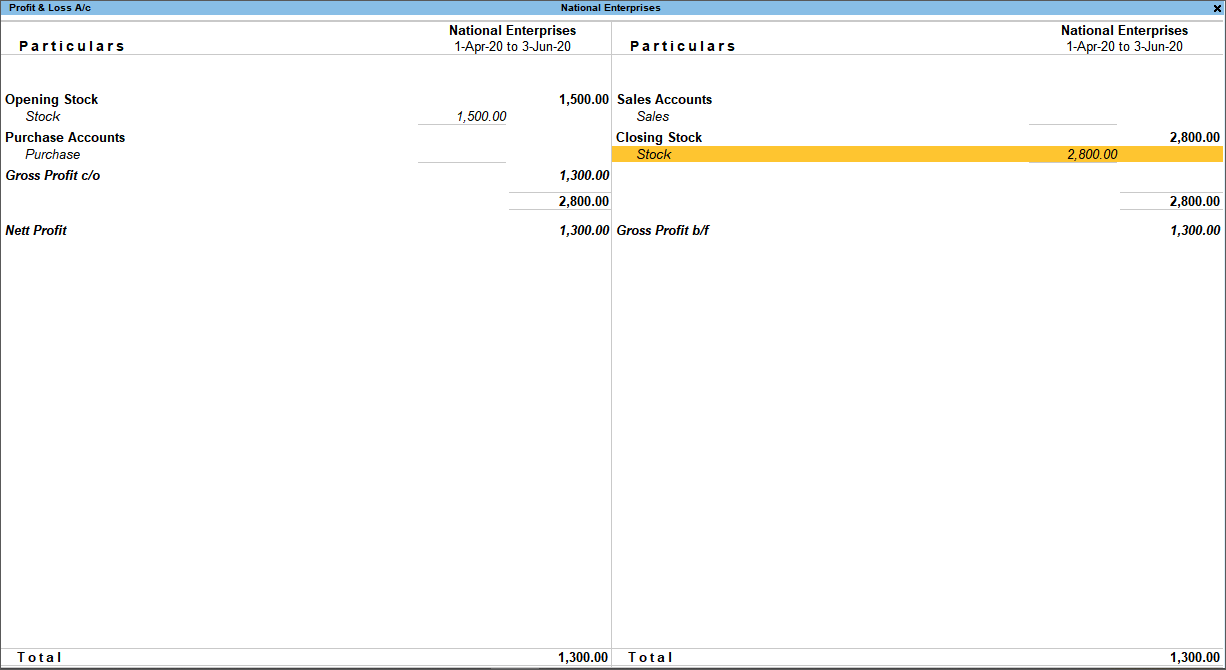
Now, you can view the opening and closing stock balance in Balance Sheet and Profit & Loss Account.
To view the Balance Sheet, press Alt+G (Go To) > type or select Balance Sheet > and press Enter. Alternatively, Gateway of Tally > Balance Sheet.
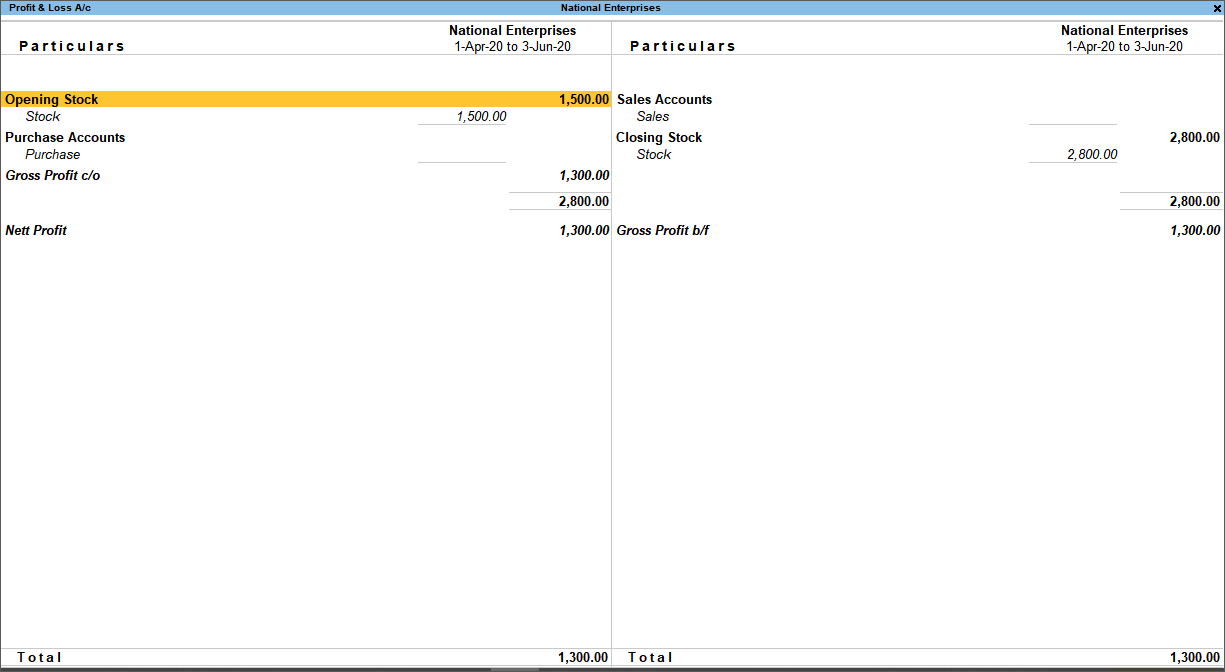
Notice that the opening balances and closing stock displayed are the exact amount entered manually at the Ledger Creation and Alteration screens respectively.
Similarly, the manually entered opening and closing stock balances will be displayed in the Profit & Loss Account. To view the same, go to Gateway of Tally > Profit & Loss A/c.
You need to record a rejections out voucher by entering only the amount, to reduce the closing stock value.
- Gateway of Tally > Vouchers > press F10 (Other Vouchers) > type or select Rejections Out > and press Enter.
Alternatively, press Alt+G (Go To) > Create Voucher > F10 (Other Vouchers) > type or select Rejections Out.
In case the voucher is inactive, you will be prompted to activate the Rejections Out voucher type. Select Yes or press Y to proceed. - Select the party ledger or Cash ledger and select the stock item.
- In the Stock Item Allocations screen, enter only the Amount to be reduced.
Note: Before recording the Rejections Out voucher, ensure the option Allow zero-valued transactions is set to Yes, in the Rejections Out Voucher Type Alteration screen.
- Accept the screen. As always, you can press Ctrl+A to save.
- Press Alt+G (Go To) > type or select Stock Summary > and press Enter.
The value of closing balance of the selected stock item appears as shown below:
Additional description is an easy and convenient mode to further classify goods by providing additional information.
In TallyPrime you can record additional description for goods in the stock item master. Further, the additional description can also be provided while recording a transaction by enabling the option provided under F12: Configure. The additional descriptions provided in the stock item master or while recording the transaction, can be printed on the invoice.
Additional description in stock item master
To provide the description in stock item master:
- Gateway of Tally > Create/Alter > Stock Item.
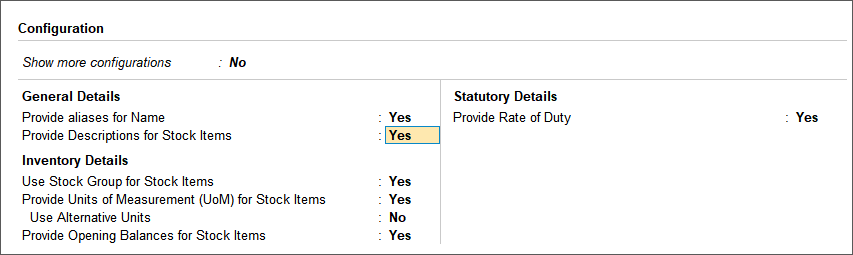
Alternatively, press Alt+G (Go To) > Create Master/Alter Master > type or select Stock Item > and press Enter. - Press F12 (Configure) > set the option Provide description for stock items to Yes.
- In the stock item master, enter the Name of the item.
- Enter the Description for the stock item.
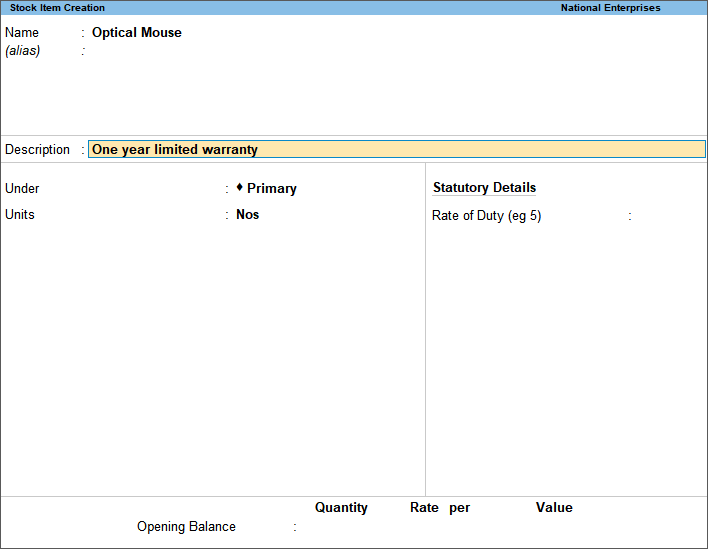
You can also modify the description provided earlier, if needed. - Provide the required details in the other fields.
- Accept the screen. As always, you can press Ctrl+A to save.
Additional description for stock items in invoice
While recording the invoice, you can add/modify the required description for the stock item.
- Gateway of Tally > Vouchers > F8 (Sales).
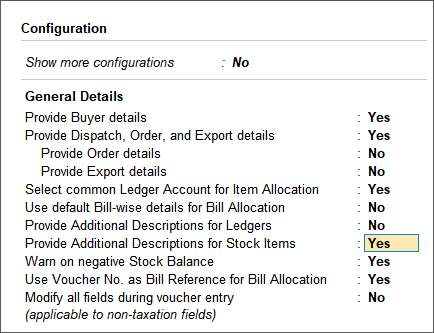
Alternatively, press Alt+G (Go To) > Create Voucher > press F8 (Sales). - Press F12 (Configure) > set Provide Additional Descriptions for Stock Items to Yes.
- In the sales invoice, select the party ledger and the sales ledger.
- Select the stock item and press Enter. The Description of Item screen appears.
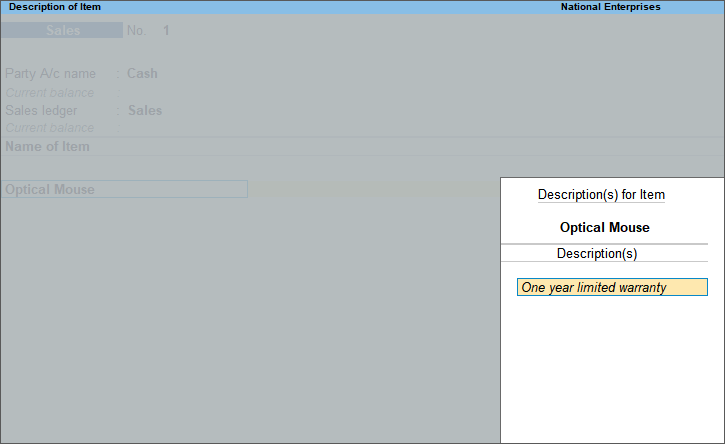
- Enter the Description(s) and press Enter to return to the voucher.
- Provide the required details in the voucher.
- Accept the screen. As always, you can press Ctrl+A to save.
Print additional description of stock item
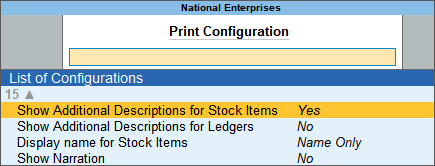
The additional description specified in stock item master or in the transaction, can be printed by enabling the options provided under print configuration.
- After recording the transaction with stock item description, press Ctrl+P to print.
- In the Voucher Printing screen, press C (Configure).
- Type or select Show Additional Descriptions for Stock Items and press Enter to set it to Yes.
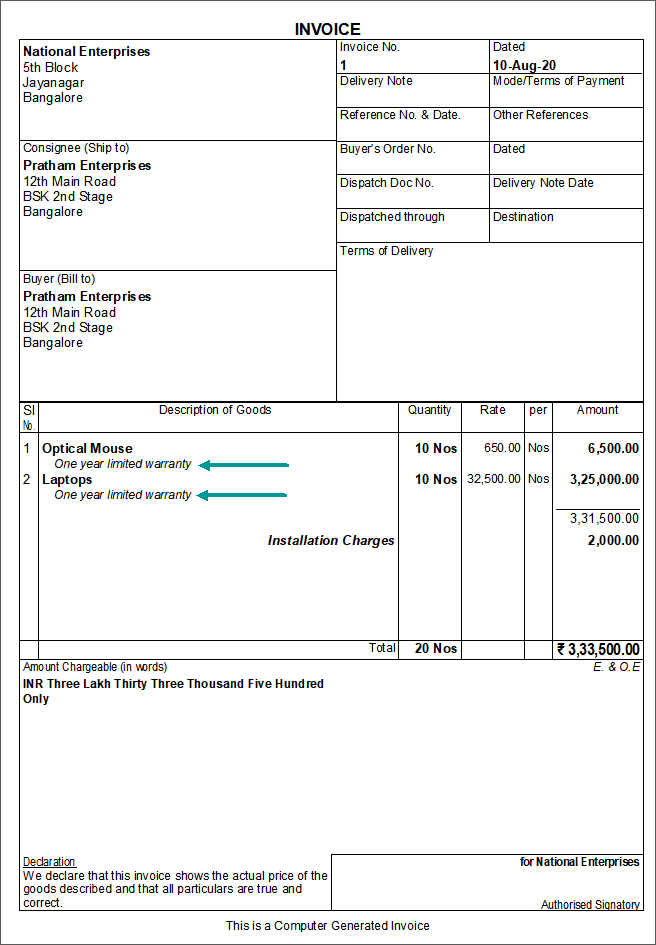
Henceforth, you can print the item description in all the sales invoices, until you change the option in F12 (Configure) for invoice printing.
- Press Esc to return to the Voucher Printing screen.
- Press P (Print) to print.
The description recorded for stock item gets printed in the invoice.
You can delete a master only when it is not used in another master or transactions.
Stock Item
A stock item cannot be deleted due to the following reasons:
- Stock items are used in transactions.
- The stock item has been configured as component in BOM (bill of material creation) or BOM transaction is recorded.
- The stock item has been configured in voucher class by enabling default accounting allocation for stock item.
Stock Group
A stock group or unit of measure (UoM) cannot be deleted due to the following reasons:
- The stock item which is grouped under a stock group having the unit of measure, has been used in transactions.
- The stock group is used as a sub-group or main group for any set of groups.
Unit of Measure
The unit of measure (UoM) cannot be deleted due to the following reasons:
- The stock item in which the UoM is defined, has been used in transactions.
- The stock item which is grouped under a stock group having the unit of measure, has been used in transactions.
- The stock item in which the UoM is used, has been configured as component in BOM (bill of material creation) or BOM transaction is recorded.
- The stock item in which the UoM is used, has been selected in the voucher class by under default accounting allocation for stock item.
Godowns
You cannot delete godowns if:
- They are linked to excise unit.
- The data has been continued from excise regime.
- It is the parent godown for other godowns.
- Godown is selected in transactions or in the Opening balance allocation of stock item master.
- Godown is selected in the Bill of Material screen.
To view the stock group and stock item-wise details for all stock transfers:
- Press Alt+G (Go To) > type or select Stock Journal Register > and press Enter.
Alternatively, Gateway of Tally > Display More Reports > Inventory Books > Stock Transfer Journal Register. - Drill down to Voucher Register.
- Press Alt+F8 (Extract).
This report displays stock group and stock item-wise all Inwards and Outwards.
To view the batch information of an item in summary statements:
- Press Alt+G (Go To) > type or select Stock Summary > and press Enter.
Alternatively, Gateway of Tally > Stock Summary. - Press Alt+F5 (Detailed) to expand the stock group, or press Shift+Enter on the required stock group, to view the stock items.
You can view the Batches and their stock position. - To view the batch details of opening balance, and inward and outward movement of goods in separate columns, press F12 (Configure) > enable the options Show Opening Balance, Show Goods Inwards and Show Goods Outwards.
A Compound Unit is a relation between two Simple Units. Hence, before you create a Compound Unit, ensure that you have already created two Simple Units. Alternate Units are individual units similar to independent units which are used instead of the primary unit.
Alternate units are capable of defining a relationship between two simple units, one simple and one compound unit or 2 Compound Units. One of the scenarios wherein Alternate Unit is used is when the Item is bought in one UOM and sold in another UOM, for example, Pencils could be bought in Boxes and sold in pieces.
Compound units are usually used when the definition is predefined, for example, 1 kg = 1000 g. However, you can define it as needed.
| Compound Unit | Alternative Unit |
| Once you define the units of measure for compound units, it cannot be separated. For example, 1 Kgs = 1000 gms. We cannot define as 1 kg = 900 gms. Here UOMs are joined together. | Here UOMs are separated. You may define and change as required, that is, the conversion factor can be different for different items and vouchers. |
| Compound unit is not parallel | Alternate units are parallel to each other |
| Conversion is defined at the compound unit level. For example, while creating the compound unit if it is defined that 1 box = 10 nos, then this remains constant throughout, whether used in different stock items or in vouchers and so on. | But alternative units are flexible where it can be converted at any point of time. For example, for Item A, 1 box = 10 nos and for Item B, 1 box = 12 nos. It can also be defined in the voucher level irrespective of the conversion specified in the Item Master. That is, for Item A 1 box = 10 nos is specified in the item master, however, at the voucher level it can be defined as “1 box = 5 nos”. |
This occurs when incorrect godowns or batches are selected in the Stock Item Allocations screen while recording sales or a purchase invoice.
For example, National Enterprises records a sales invoice for a stock item by selecting Chennai godown, with batch – B2, where no stock items exist. The Stock Summary displays negative balance in the Chennai godown, as shown below:

Therefore, when you select an incorrect godown where no stock items exist, the Stock Summary displays negative balance in the godown.
You cannot record a journal voucher for ledgers created under the group Stock-in-Hand. However, you can specify the closing stock values as on date under the stock-in-hand ledger by following the steps given below:
- Gateway of Tally > Create > Ledger.
Alternatively, press Alt+G (Go To) > Create Master > Ledger. - Provide the name of the ledger, for example, Stock.
- Group it under Stock-in-Hand.
- Enter the opening balance while creating the ledger.
- Accept the screen.
- Open the ledger in alteration mode, to enter the Opening or Closing balances.
- Enter the opening balance as on the Books beginning date.
- Enter the date for the closing balance and the closing stock value.
Similarly you can enter different dates and their closing stock values.
Note: Ensure the option Integrate Accounts with Inventory in F11 (Features) is set to No. This is required when you want to enter the stock values manually and not based on Tally’s Inventory (in case of Accounts with Inventory Company).
In case the desired UOM is not available in the books, then the existing UOM should be renamed. This will have an effect on all the entries. For example, assume you have selected the UOM as Nos. and want to change it to PCS. Now, if PCS is not available, you can rename the UOM.
Note: The above changes can be done if that UOM is not used for any other stock item. Else the changes will be applicable for all the stock items.
No. Once the stock item is used in any transaction or if the Compound Unit containing this UOM is used in any of the transactions then the UOM of that stock item cannot be altered.
Note: Please ensure to take the data backup before deleting the transactions. The deleted transactions cannot be retrieved.
Watch the video How to Alter UOM & Number of Decimal Places in TallyPrime
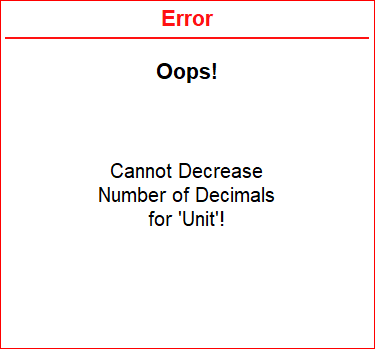
In the alteration mode of a Unit of Measurement (UoM), you can increase Number of decimal places in TallyPrime at any point in time.
However, you can decrease Number of decimal places for a UoM only if you have not used it in a transaction.
If you decrease Number of decimal places for a UoM after using it in a transaction, you will see an error message.
To view the values of closing stock as per different valuation methods:
- Gateway of Tally > Balance Sheet.
Alternatively, press Alt+G (Go To) > type or select Balance Sheet > and press Enter. - Press Alt+C (New Column) > Method of Stock Valuation.
- Select the required valuation method.
To view these details:
- Gateway of Tally > Stock Summary.
Alternatively, press Alt+G (Go To) > type or select Stock Summary > and press Enter. - Press Alt+N (Auto Column). The Auto Repeat Columns screen appears as shown below:
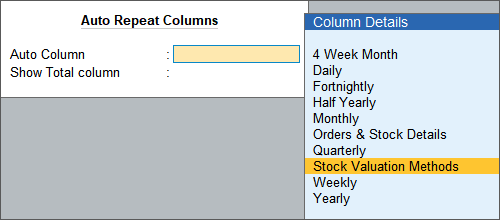
- Select Stock Valuation Methods and press Enter.
The Stock Summary displays the value of stock as per different costing methods, along with the default method, as shown below:

Suppose a few items are damaged and considered as Scrap, reducing the closing stock value as well as profit and loss account becomes a critical step.
- Record a physical stock voucher (Vouchers > press F10 (Physical Stock)), to reduce the value in Closing stock, for profit and loss account.
- Create the ledger Scrap under Indirect Expense group.
- Pass the journal voucher by debiting the profit and loss account and crediting the Scrap ledger.
The group Stock-in-hand is available only in the ledger creation mode and not in the alteration modes of ledgers due to the following reasons:
- Any ledger created under the group Stock-in-Hand is used only for entering the opening and closing values which should have impact on the financial reports (If the option Integrate Accounts and Inventory is set to No in F11 (Features), and this ledger will not appear in any voucher).
- In a ledger created under Stock-in-Hand, you can specify opening and closing balances. In ledgers grouped under other groups, you can specify only the opening balance. If the group Stock-in-Hand is selected in the alteration mode of other ledgers, you can specify the closing balance as well (which would be the wrong behaviour). Since the ledger created under Stock-in-Hand does not appear in transactions, if this option is provided in the ledger alteration, then transactions passed using those ledgers will be lost, which in turn will impact the financial accounts.
To view item-wise cost centre allocation:
- Gateway of Tally > Stock Summary.
Alternatively, press Alt+G (Go To) > type or select Stock Summary > and press Enter. - Select the stock item.
- Drill down to Stock Vouchers screen.
- Press F12 (Configure).
- Set Show Cost Centre details to Yes.
You can enable this option after setting the format of the report as Detailed.
The Stock Voucher report displays cost centre details for the stock items.
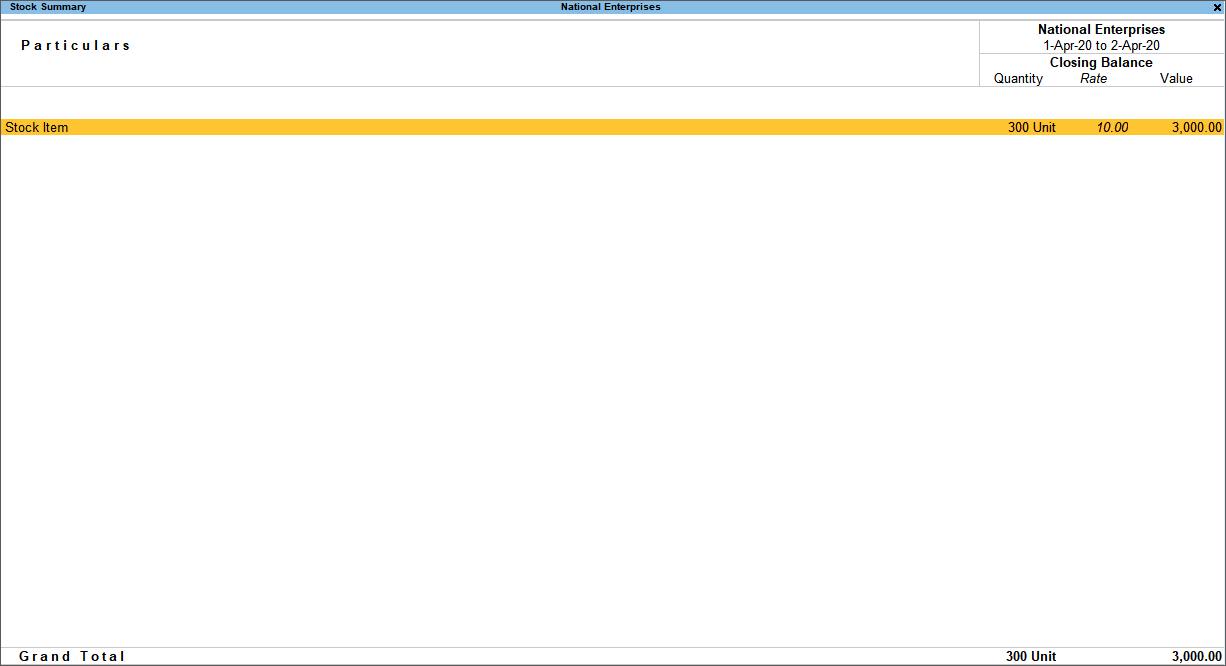
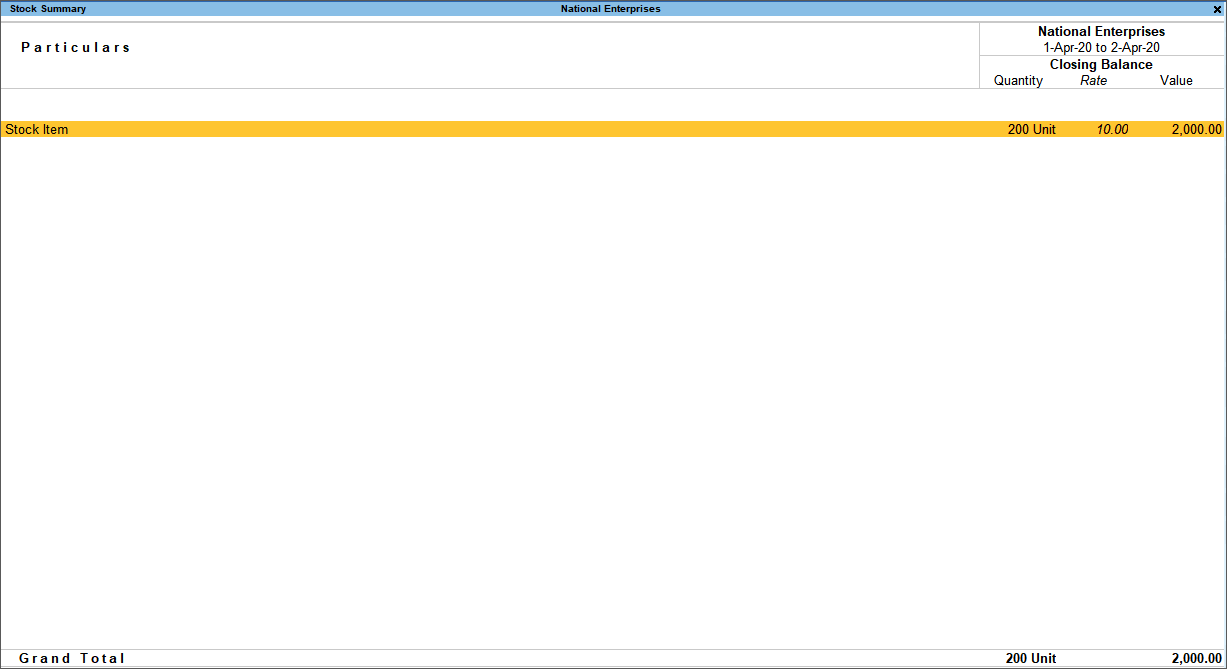
Consider the scenario given below:
- Opening balance as on 1-4-2020:100 units @10\u=1000
- Purchase made in current year: 200 units @ 10\u=2000
- Closing balance of only current year: 200 units @ 10\u=2000
Stock Summary report can be configured to display only current year closing balance by using Value filters.
- Gateway of Tally > Stock Summary.
Alternatively, press Alt+G (Go To) > type or select Stock Summary > and press Enter.
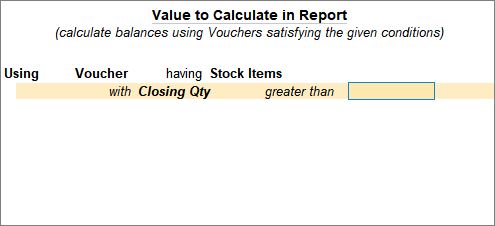
- Press Ctrl+F12 (Value) to open the Value Filters.
- Specify the condition as Using > Voucher > having > Stock Items > with > Closing Qty > greater than > 0 or leave it blank and accept.
The report arrived based on the conditions shows only the current year closing balance excluding carried balance from last year (opening balance).
The option Maintain in batches appears in stock item master, on setting the feature Enable Batches in the company features screen. It is an option is for maintaining batch information pertaining to stock Items like, medicine, food, perishables, etc. Batch details are used to identify the movement of the inventory in batches or lots, and to monitor the date of manufacture, date of receipt or the expiry date.
A batch does not delete itself after it is disposed, but remains on record. The behaviour is similar to that of a ledger.
For example,
- Stock Item: Asprin
- Batches: ASP-1026 (Mfg. Date – Sept 2020, Expiry Date – Oct 2023), ASP-1174 ( Mfg. Date – Jan 2021, Expiry Date – Feb 2023)
You can extract sales details of Asprin belonging to batch ASP-1026.
Click here for detailed information on batch-wise details.
Yes, you can activate the stock categories at any point of time. If you have already created the stock items, then you need to alter each stock item to assign it to the required category. Ensure you take a backup of the data before altering the stock item master.
To remove the opening balances of all stock items:
- Gateway of Tally > Chart of Accounts > Stock Items > press Alt+H (Multi-Masters) > Multi Alter.
Note: Backup your data before removing the opening balances of all the stock items.
- Select All Items and press Enter.
- Press Alt+B (Zero Opening Balance). The opening balances of all Stock Items will get removed.
- Accept the screen. As always, you can press Ctrl+A to save.
The Stock Vouchers report will display the quantity of a specific stock item purchased and sold. To view this:
- Press Alt+G (Go To) > type or select Stock Vouchers > and press Enter.
- Select the required stock item > and press Enter. The quantity purchased (Inwards) and sold (Outwards) will appear only when, the options Treat all sales as new manufacture and Treat all purchases as consumed are set to Yes in the item master. To check these options in stock item master:
- Press Alt+G (Go To) > Alter Master > Stock Item > select the stock item for which you are viewing the Stock Vouchers report, and press Enter.
- Press F12 > enable Set options for Stock Behaviour to Yes > and press Ctrl+A to save the settings.
- In the stock item master, set Provide Behaviour options to Yes.
- Set the options Treat all sales as new manufacture and Treat all purchases as consumed to No, and reaccept the vouchers.
To delete multiple stock items in one-go:
- Press Alt+G (Go To) > type or select List of Accounts > Stock Items.
- Press F5 (Stock Item View) to view the list of stock items.
- Press Alt+G (Go To) > type or select List of Accounts > Stock Items.
- Select the required stock items using Spacebar > press Alt+D to delete the selected stock items.
Note: There should not be any transactions pertaining to that stock item. If the stock items are used as BOM then first delete the main item then try to delete its components. Ensure data is backed up before proceeding.
In TallyPrime, total consumption is obtained by subtracting the Total Closing Value from the Total Inward Value.
Opening balances for stock item master can be entered only from the Books Beginning Date. A Physical Stock voucher or Stock Journal has to be recorded to enter the opening balance for stock items on a date (middle of the month or a year), which is different from the books beginning date.
- If only Quantity has to be updated in the books, record Physical Stock voucher.
- If Quantity and Rate has to be updated to the books, record Stock Journal by specifying the stock item details with Quantity and Rate on the Destination (Production) side.
For example: You have purchased TallyPrime on 1st of June, but the books are beginning from 1st of April. In this case you can record a Physical Stock voucher or Stock Journal on 1st of June.
Note: Closing stock valuation considers the opening balance of stock item as on date, and the transactions recorded with that stock item.
When costing method of the item is selected as Average cost, there might be a mismatch between the opening balance and the closing balance.
Consider an example where the Costing Method of the item is selected as Average cost. The Closing balance of the stock item in this example, appears as Rs. 4,25,719.98 as on 31.3.2020, as shown below:
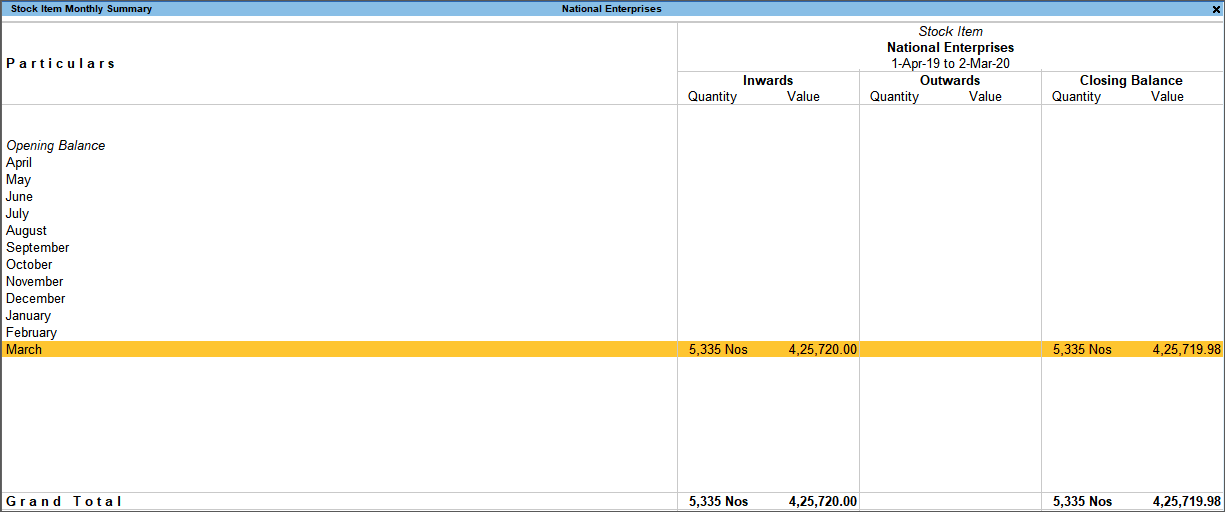
The closing balance calculated as on 31.3.2020, is as per the following method:
Item Cost = (Item Value / Item Quantity) * Item Quantity
= (425720.00 / 5335) * 5335
= (79.79756326) * 5335
Round off = 79.79756 * 5335
Closing value = 425719.98
The Closing balance of the stock item is Rs. 4,25,719.93 as on 1.4.2020:
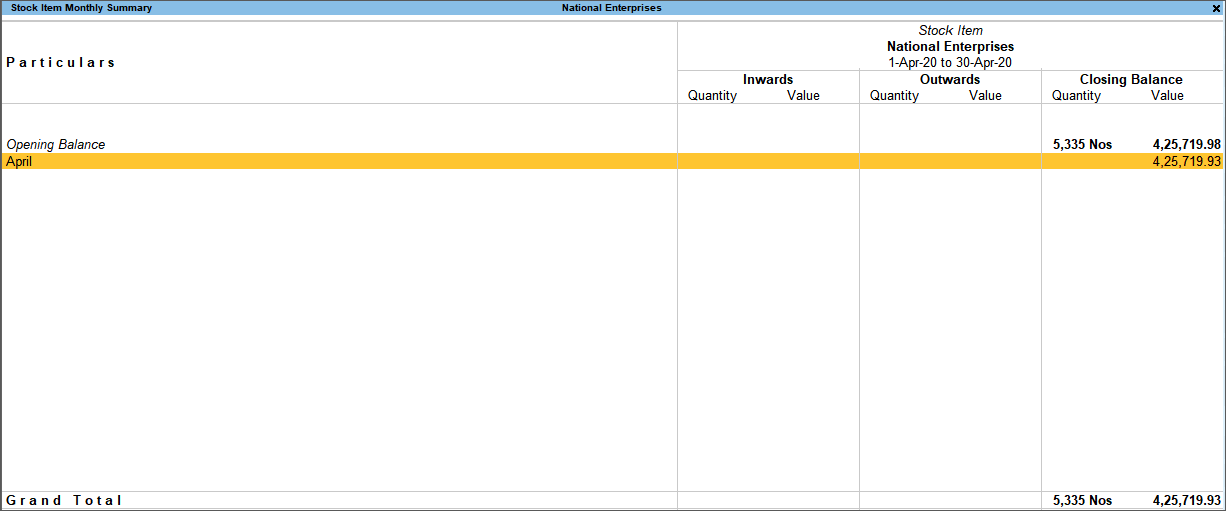
The closing balance calculated as on 1.4.2020, is as per the following method:
Item Cost = (Item Value / Item Quantity) * Item Quantity
= (425719.98/5335) * 5335
= (79.79755951) * 5335
Round off/ Truncates = 79.79755 * 5335
Closing value = 425719.93
If debit note is recorded only with value, then the value will be treated as additional expenses, and adjusted with the value of first purchase. The debit note will not be tracked to the purchase.
Scenario: Consider the stock item SI262AA having a closing value of 10,325, and the date of first purchase as 1-12-2020.
When quantity is blank in debit note, then the value will get adjusted with first purchase, which is 1-12-2020
The stock report for the period 1-12-20 to 31-12-20, appears as shown below:

In the above screen purchase is made for 16 Pcs at Rs. 1,095 = Rs. 17,520 and debit note of Rs. 1,000 (No inventory included). Now the value is getting reduced from total purchase value (i.e 17,520 – 1,000 =16,520).
For 16 Pcs = Rs 16,520, for 10 Pcs is (10 pcs x 16,520) / 16 = 10,325.
Note: Calculation is based on the inward value.
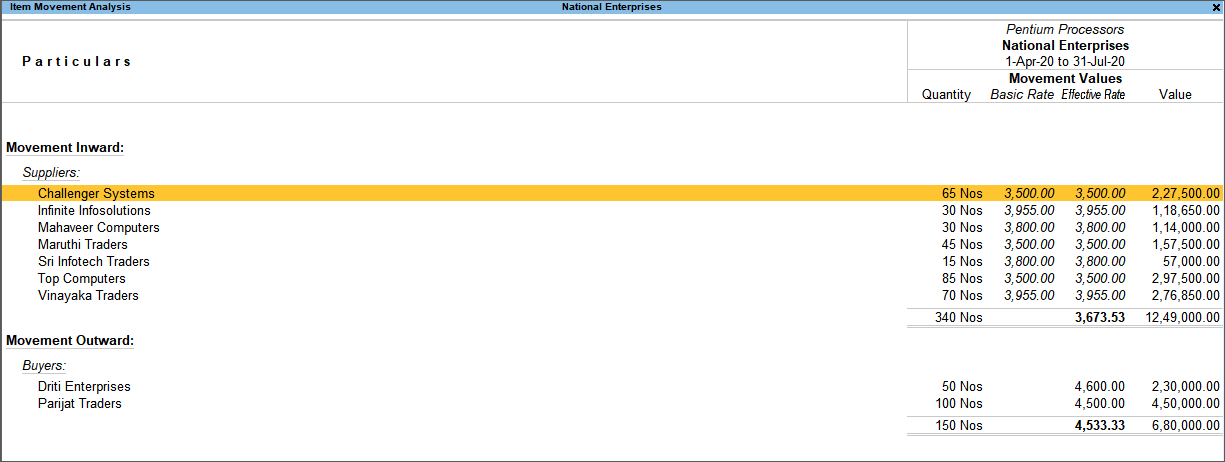
To view the inward and outward entries of a stock item by excluding transfers:
- Gateway of Tally > Display More Reports > Inventory Books > Movement Analysis > Stock Item Analysis.
Alternatively, press Alt+G (Go To) > type or select Stock Item Analysis > and press Enter. - Select the required stock item.
- In the Item Movement Analysis, press F12 (Configure). The configuration sub-screen appears as shown below:
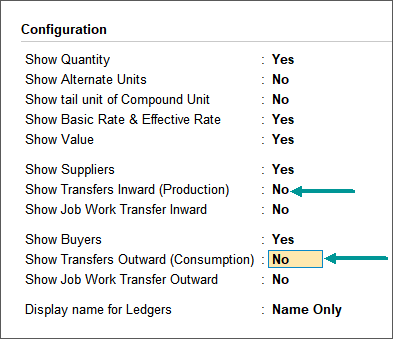
- Set Show Transfers Inward (Production) to No.
- Set Show Transfers Outward (Consumption) to No. The Item Movement Analysis report appears as shown below:
In the Stock Summary, when the stock group consists of multiple stock items with various UoM (units of measurement), the quantity of closing balance is not displayed.
To illustrate the above case, let us take an example of a stock group – Finished Goods. This consists of stock items created with different units of measurement. Some of the stock items are measured in bundles and some in kilograms.

In the above screen, the Closing Balance quantity for the Finished Goods are not displayed even though the stock items grouped under Finished Goods have stock balance.
- In the Stock Summary, press F12 (Configure) and set the following options to Yes.
- Show Opening Balance
- Show Goods Inwards
- Show Goods Outwards
- Show Stock Items with zero Quantity or Balance
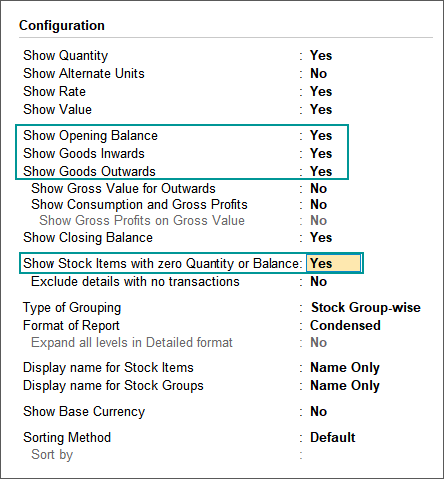
- Accept the changes in the configuration screen.
The Stock Summary displays the opening, inward, outward and closing balance.

Select the stock group Finished Goods and press Enter. The stock items appear as shown below:

The report displays the quantity, rate and value for each stock item grouped under Finished Goods.
While recording a back-dated sales transaction, the current closing balance of the stock item appears in the List of Stock Items sub-screen instead of the actual quantity as on that date. To view the actual quantity of stock item as on that day:
- Open the voucher.
- Press F12 (Configure) > set the option Show Balances as on Voucher Date to Yes.
If you do not see this option, set Show more configurations to Yes.
Why does sales ledger display lower value when compared to stock outward value in the Stock Summary?
This may happen when the Outwards value includes inter-location transfer of goods.
- Gateway of Tally > Stock Summary.
Alternatively, press Alt+G (Go To) > type or select Stock Summary > and press Enter. - Press F12 (Configure) > set Show Goods Outwards to Yes.
The Stock Summary displays the Outwards column.

- Press Ctrl+F12 (Range) to filter the report only for sales, and provide the details as shown below:
The actual sale value appears in the Stock Summary.

When the proprietor of a firm withdraws stock for personal use, the same needs to be recorded in the company’s books.
Scenario
The proprietor withdraws stock for personal use, and he is withdrawing from the opening stock. There are no purchases or sales of that particular item in the current year, and accounts are maintained with inventory. Opening stock is converted to investment in the current year, and there are no purchases or sales for that item in the current year.
Solution
Record the entries shown below to transfer the stock drawn for personal use:
Method 1:
Record a journal voucher by debiting the capital account ledger, and crediting the purchase ledger. Since the item is transferred as part of drawings for personal use, purchases need to be reduced accordingly.

Method 2:
Record a journal voucher by debiting capital account ledger, and crediting the stock drawn for personal use ledger (grouped under Direct Incomes). Since the item is transferred as part of drawings for personal use, the stock of the withdrawn item needs to be reduced accordingly.
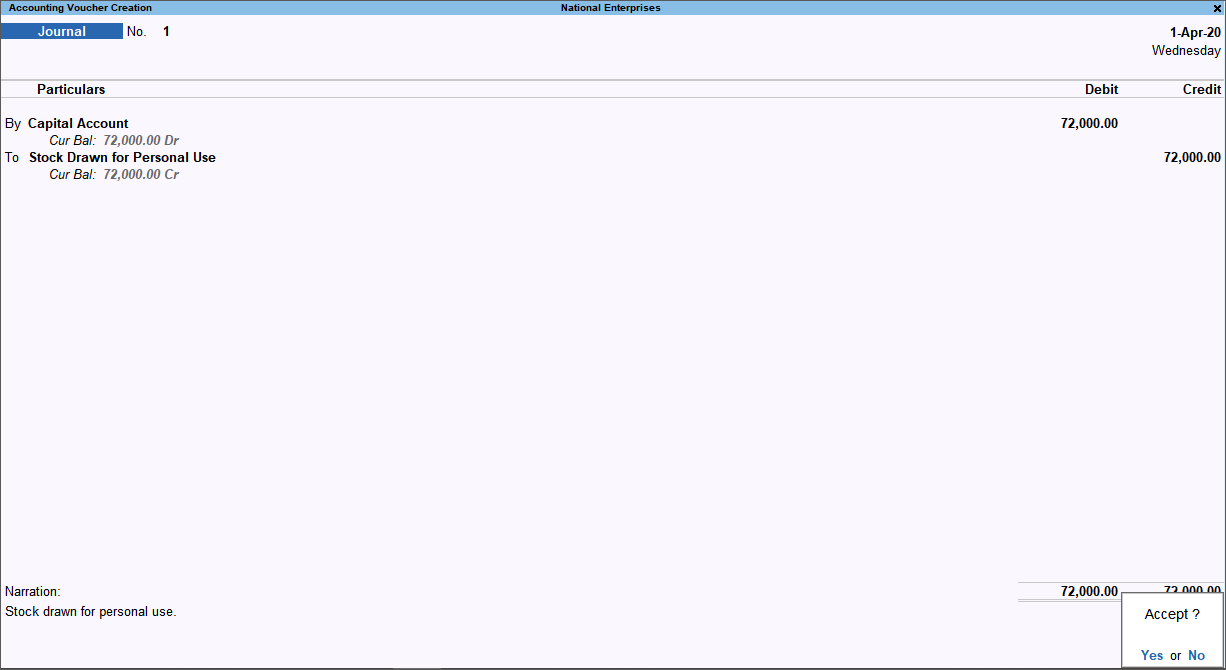
Method 3:
Record a journal voucher by debiting capital account ledger, and crediting Profit & Loss account. Since the item is transferred as part of drawings for personal use, the Profit & Loss account value needs to be reduced accordingly.
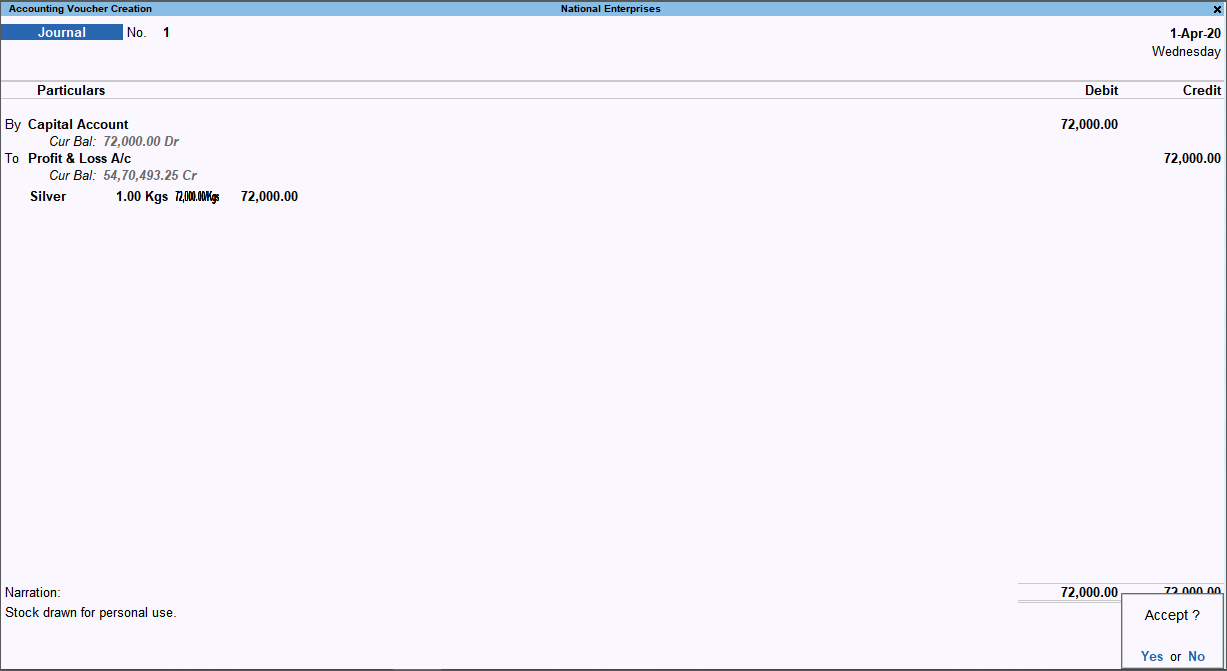
You can follow the above procedure for transferring stock items into investments.
The Stock Summary displays the closing value of stock based on the costing method selected for the stock item.
The value in the Stock Ageing Analysis is calculated based on the actual purchase value of the remaining stock.
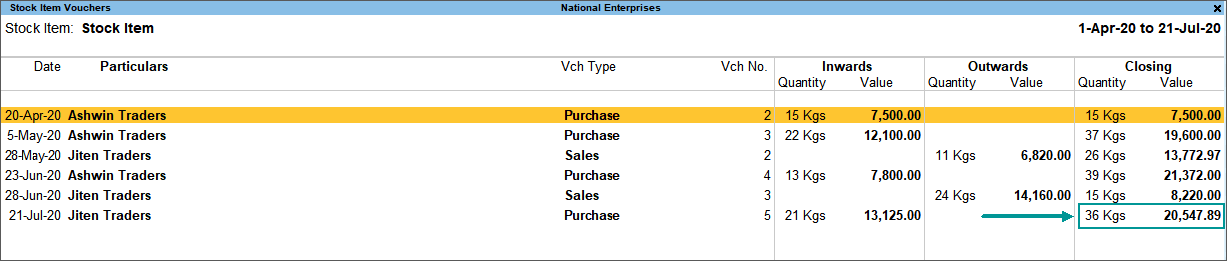
In this scenario there are four purchases with total quantity of 71 kgs, and two sales with total quantity of 35 kgs. The closing stock in the godown would be 36 kgs (which is 71 kgs – 35 kgs).
| Date | Purchase | Sales | ||
| Quantity | Value | Quantity | Value | |
| 20-4-2020 | 15 | 7500 | ||
| 5-5-2020 | 22 | 12100 | ||
| 28-5-2020 | 11 | 6820 | ||
| 23-6-2020 | 13 | 7800 | ||
| 28-6-2020 | 24 | 14160 | ||
| 21-7-2020 | 21 | 13125 | ||
| Closing Stock | 36 | |||
To display the stock ageing analysis, first the sales quantity will be deducted from the purchases, then the remaining quantity will be considered for ageing.
In this scenario, TallyPrime considers the sale of 35 kgs as utilized from the goods purchased under first two bills (15+22= 37), then the remaining stock will be considered for ageing analysis.
In the Stock Aging Analysis report, depending on the ageing period defined, the ageing of the stock starting from the latest (last) purchase and the actual purchase value will be displayed.
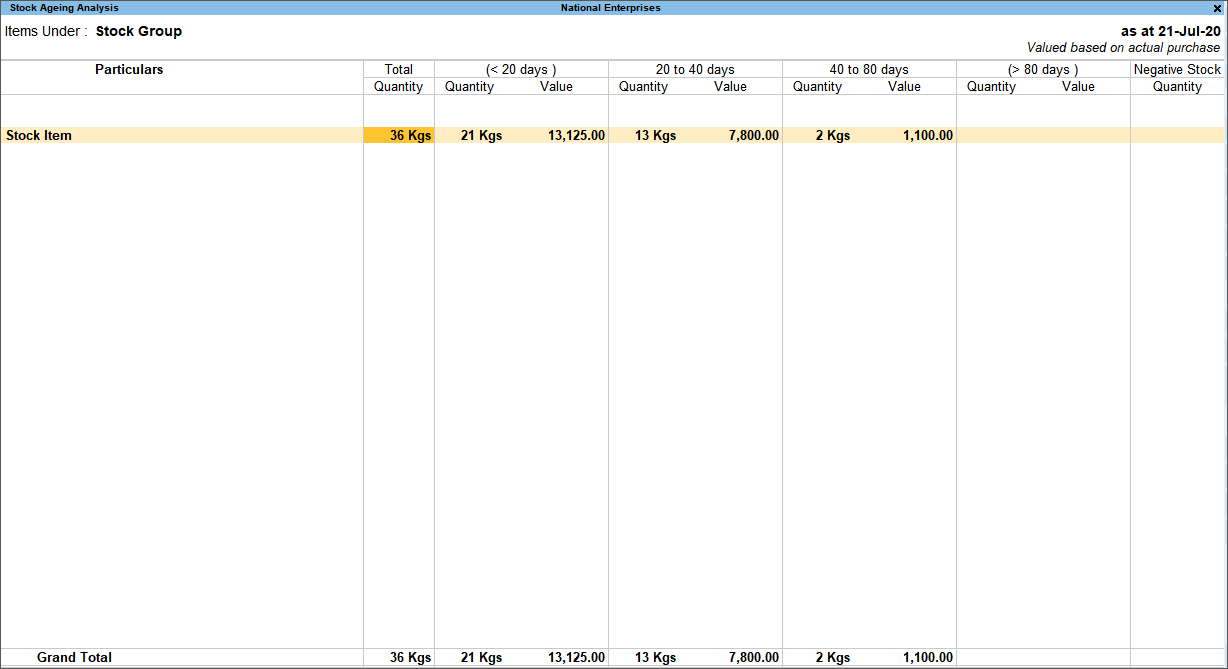
Here we have taken the Ageing Period as 0-20, 20-40, 40-80, 80 and more.
- 20 to 40 days – Displays the purchase quantity of 13 kgs and value as 7800 on 23-Jun-2020.
- 40 to 80 days – Displays the reaming purchase quantity of 2 kgs and value of 1100 (12100/22 = 550 X 2) on 5-May-2020.
In the Name field, press Shift+F3, and then type the first letter. This letter will appear in lower case.
Reason
While recording a Receipt Note/Delivery Note/Sales invoice/Purchase invoice by selecting stock item which does not have unit of measure, if tracking number is given in the Stock Item Allocations screen, an error message appears as shown below:

Solution
Define the unit of measure for the stock item. To save the voucher by defining the unit of measure for the stock item,
- In the voucher, press Alt+G (Go To) > Alter Master > type or select Stock Item > and press Enter.
- Select the stock item.
- In the Unit field, select (or create by pressing Alt+C) the unit of measurement.
- Accept the stock item.
- Press Esc to return to the voucher, and continue to record the transaction by providing the quantity and rate for the stock item.
To view the Alias field while creating stock groups:
- Press F12 (Configure) in the stock group > set the option Provide aliases for Name to Yes.
- Accept the screen. As always, you can press Ctrl+A to save.
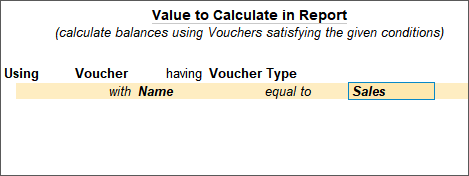
Yes, a particular batch can be filtered from the Stock Summary.
- Press Ctrl+F12 (Range).
- Apply the condition at Value to Calculate in Report as Using > Voucher > having > Batch Name > containing > give the name of a particular batch name.
To print the amount column in the stock journal, follow the steps given below:
- Press Ctrl+P in the stock journal voucher.
- In the Voucher Printing screen, press C (Configure) > type or select Show Amount and press Enter to set it to Yes.
- Press Esc to save and return to the Voucher Printing screen.
- Press P (Print) to print the voucher.
In TallyPrime, you can use a separate report to view batches with negative stock items as on date.
Press Alt+G (Go To) > type or select Negative Batches > and press Enter.

Gateway of Tally > Create > type or select Stock Category > and press Enter.
Alternatively, press Alt+G (Go To) > Create Master > type or select Stock Category > and press Enter.
By default, TallyPrime displays quantity information as shown below:
To view stock quantity in millions:
- Press F1 (Help) > Settings > Country > select Date and Number Format and press Enter.
- Set the option Show Quantity and Number in millions to Yes.
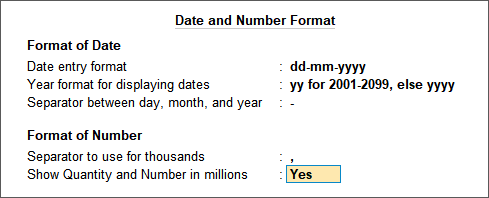
- Press Esc to return to the Country Settings screen.
- Return to Gateway of Tally > Vouchers.
- Record the voucher or view the reports. The quantity will appear in millions, as shown below:
Yes. The net available stock in the business depends on sale order and purchase order, rejections in/out, sale/purchase, and credit/debit Note. Considering these transactions, shortfall in the stock is calculated.
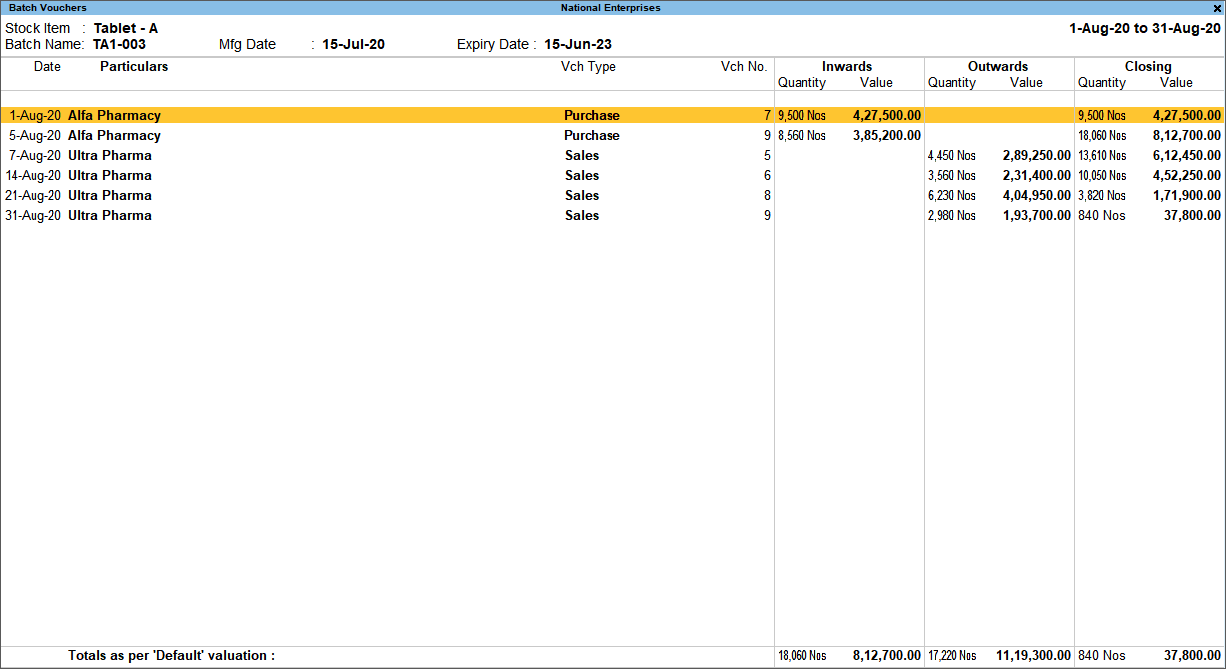
Batch Vouchers is a list of all vouchers for a particular stock item of the same batch, for the given period. The report displays transactions of both inward and outward movement of stock, along with quantity, rate and closing value for the selected batch.
The Batch Vouchers report will be available when the option Enable Batches is set to Yes in the Company Features Alteration screen.
To view Batch Vouchers report:
- Gateway of Tally > Display More Reports > Inventory Books > Batch.
Alternatively, press Alt+G (Go To) > type or select Batch Vouchers > and press Enter.Note: At least one stock item should be enabled for batches, for this menu to appear.
- Select the required stock item, and select the Batch from the List of Batches as shown below:

The Batch Vouchers report appears as shown below:
Alternatively, you can also view Batch Vouchers report from the Stock Item Vouchers screen.
- Gateway of Tally > Stock Summary.
Alternatively, press Alt+G (Go To) > type or select Stock Summary > and press Enter. - Select the stock item and press Enter, to view the Stock Item Voucher screen as shown below:

- Press Ctrl+F4 (Batch) and select the required Batch.
The Batch Vouchers report appears as shown below:
- Press F7 (Show Profit) to view the profit and consumption details. The report displays quantity and value of the opening, inward goods, outward, and closing stock, and the value of consumption (using the cost method).
The configuration options of this report appear as shown below:
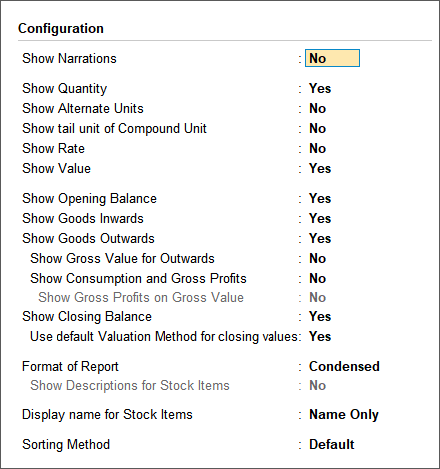
- By default, the option Show Narrations is set to No. Set it to Yes to view the report with narration for all transactions.
- By default, the option Show Quantity is set to Yes. It displays inward, outward and closing quantities.
- By default, the option Show Alternate Units is set to No. Set it to Yes, to view the Alternate Units defined for the stock item.
- By default, the option Show tail units of Compound Unit is set to No. Set it to Yes, to view the Compound Units defined for the stock item.
- By default, the option Show Opening Balance is set to Yes. It displays the opening balance of stock and the corresponding value.
- By default, the option Show Goods Inwards is set to Yes. It displays the details of inward movement of stock.
- By default, the option Show Goods Outwards is set to Yes. It displays the details of outward movement of stock.
- By default, the option Show Consumption and Gross Profits will be set to No. You can enable this option, or press F7 (Show Profit) in the report to view the gross profit/loss for the selected batch.
- By default, the option Show Closing Balance is set to Yes. It displays the details of closing stock.
- Closing Quantity = Opening quantity + Inward Quantity – Outward Quantity
- Closing Rate = Closing Value / Closing Quantity
- Closing Value = The Closing Stock Value will be based on the Costing Method selected for each item.
- By default, the option Use default Valuation Method for closing values will be set to Yes. If you set it to No, it will display the Closing value = Opening value + Inward Value – Outward Value. Transaction value is only for reporting purpose to compare with default valuation. It will not show it in Profit and Loss account.
- Select the required Sorting Method.
- Press F8 (Batch-wise) to view the Batch Summary report.
The report with consumption and gross profit details appears as shown below:
You can alter the details of the stock item by pressing F4 (Stock Item).
No. By default, primary stock group is the topmost stock group available in Tally.
Ensure there are no stock categories created under this. Also check if it has been used in any transaction. If it has been used, you will not be allowed to delete it until the transaction is deleted.
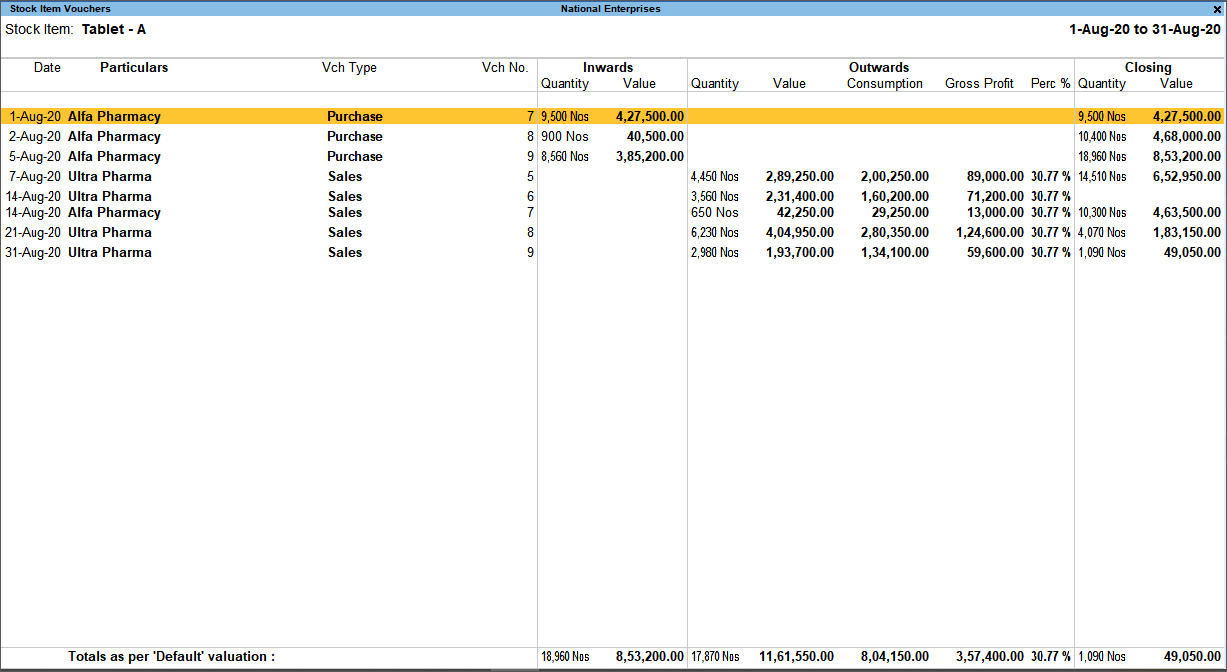
The Stock Item Vouchers report appears as shown below:
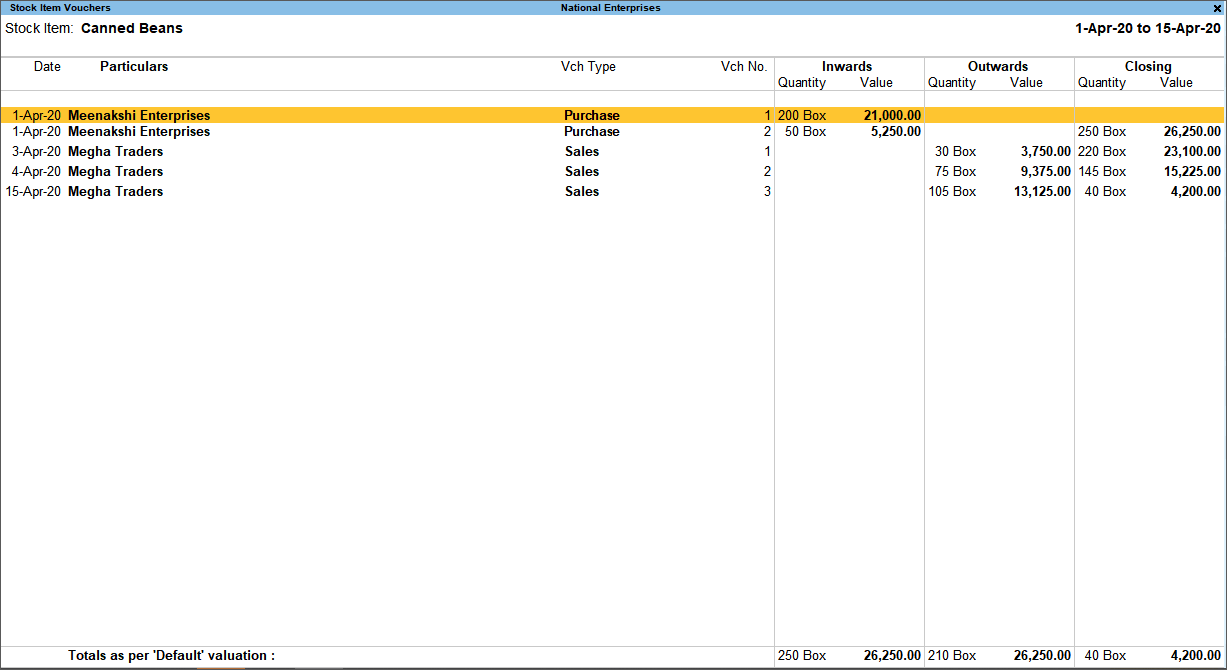
An explanation of this report is given below:
- Inwards: Displays the inward movement of the selected stock item.
- Outwards: Displays the outward movement of the selected stock item.
- Consumption: Displays the cost of goods sold of respective outward entry, based on the valuation method selected in the item master.
- Gross Profit: Calculated as ‘Outward Value – Cost of Goods Sold’.
- Perc %: Calculated as ‘Gross Profit / Outward Value x 100’.
- Closing Quantity: Calculated as ‘Outward Quantity – Inward Quantity’.
- Closing Rate: Calculated as ‘Closing Value / Closing Rate’.
- Closing Value: Displays the closing value derived as per the valuation method selected in the item master. If the transaction value is enabled in F12 configuration, then the value gets calculated as ‘Closing value = Opening value + Inward Value – Outward Value’. This transaction value is only for reporting purpose to compare with default valuation. It will not appear in the Profit and Loss account.
- Totals as per ‘Default’ valuation: The values in this field will not change when you press Alt+F12 (Range) to apply the filter the report as per your requirement.

- Totals as per ‘Transaction’ values: This field appears when the option Use default Valuation Method for closing values is set to No in the F12 configuration screen. The values displayed in this row are derived from the transaction available for the selected stock items in the report. The values will be updated when you press Alt+F12 (Range) to apply the filters to remove few line items from the report.
- Total Inward: Calculated as ‘Opening + Total Inward’ values.
- Total Outward: Displays the total of outward entries.
- Total Consumption: Calculated as ‘Total Inward Value – Total Closing Value’.
- Total Gross profit: Calculated as ‘Total consumption – Total Outward Value’.
- Total Closing: Displays the closing value derived as per valuation method selected in the item master. If the transaction value is enabled in F12 configuration, then the value gets calculated as ‘Closing value = Opening value + Inward Value – Outward Value’.
You can view the stock item analysis with graphical representation of the movement of stock.
- Gateway of Tally > Display More Reports > Inventory Books > Stock Item. You can navigate from the Stock Summary as well.
Alternatively, press Alt+G (Go To) > type or select Stock Item Summary > and press Enter. - Select the stock item > press F12 (Configure) and set the option Show Graph to Yes.
- The details appear with a graph for goods inwards and outwards (red for inwards and blue for outwards).

The existing stock items will continue to be grouped under the primary stock group. You can alter the stock items to group them under the new stock group.
The primary stock group cannot be altered/deleted.
No, it is not compulsory to create stock groups, unless you need to classify them into different sets. This classification helps in extracting the stock of items pertaining to that group.
To ascertain the current stock by considering the pending orders:
- Press F9 (Orders) from Stock Summary or Group Summary.
- Select Nett Stock in the Type of Values field as shown below.

- The Nett Stock appears.
Standard rates mentioned in the stock item are for the ease of recording invoices. They will automatically appear during invoice entry. However, when standard costing method is selected, it takes into consideration these standard rates for stock valuation. The closing stock will be valued according to the standard method of costing.
It is not compulsory to assign Tracking No. for all Receipt Notes or for all Purchase transactions. Tally provides the flexibility to mark the Tracking No. as Not Applicable and complete/accept the transaction. Tally updates either the Inventory or Accounting parts depending upon the nature of entry.
Note:
If the Receipt Note with Tracking No. is marked as Not Applicable, it becomes a complete inventory document, affecting only the inventory value but not the Accounts. In this case, the Purchase Bills Pending list will not be generated.
If the Purchase entry with Tracking No. is marked as Not Applicable, the Accounts are updated without increasing the Stock. In this case, the Purchase Bills Pending list is generated as Bills recd. but Goods not recd.
The Stock Item Allocations screen gets enabled when you enable any of the following features/voucher types. You can then allocate the stock items to the respective godowns/locations, batches, or provide the tracking details.
- Godowns/Locations
- Batches
- Item Cost tracking
- Sales Order or Purchase Order vouchers
- Delivery Note or Receipt Note vouchers.
- Rejection In or Rejection Out vouchers
If you do not want the Stock Item Allocations screen to appear, check if any of the above features/voucher types are enabled in the company data. Take the data backup, and then disable the features/voucher types.
- Open Chart of Accounts > Stock Items.
- Press Ctrl+J (Exceptions Report), and select Show Unused.
- Press F2 (Period) to set the period for which you want to view the unused stock items.
You can either create a compound unit or an alternate unit for the stock items and added the conversion from KG to Grams.