
Record Purchase Order and Receipt Note
In some business scenarios, you may want to raise a demand to the supplier for a supply mentioning the required stock details. You can record a Purchase Order in TallyPrime to raise such demand indicating the types, quantities, and agreed prices for products or services. It controls the purchasing of products and services from external suppliers. Similarly, once you have received the goods, you can record a Receipt Note in TallyPrime to account for the goods received and against the existing Purchase Order as well. You can view your purchase bills that are pending and also pre-close orders via partial cancellation or complete cancellation as well.
When the order is placed with the suppliers for the supply of goods, the items, quantities, order due date, and so on, details are given with the Purchase Order Number. Later, when these goods are received, the Purchase Order is tracked for the Order Details in the Receipt Note or in the Purchase invoice based on your preferred business practices. If you follow the Order>Receipt Note>Purchase flow or Order>Purchase flow, TallyPrime gives you the flexibility to follow your preferred practices as they are.
The Outstanding Purchase Order reports are available in TallyPrime. Also, knowing the order position of any item in the Stock Summary is possible. Separate Purchase Order Outstanding report and Purchase Order Summary report are also available.
Record Purchase Order
To record a Purchase Order in TallyPrime, you can create a voucher with various details like the order number, receipt details, and more that can later be tracked in various reports.
![]()
- Open the purchase order voucher screen.
- Press Alt+G (Go To) > Create Voucher > F10 (Other Vouchers) > type or select Purchase Order.
Alternatively, Gateway of Tally > Vouchers > F10 (Other Vouchers) > type or select Purchase Order.
In case the voucher is inactive, you will be prompted to activate the Purchase Order voucher type. Select Yes or press Y to proceed.
- Press Alt+G (Go To) > Create Voucher > F10 (Other Vouchers) > type or select Purchase Order.
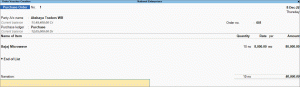
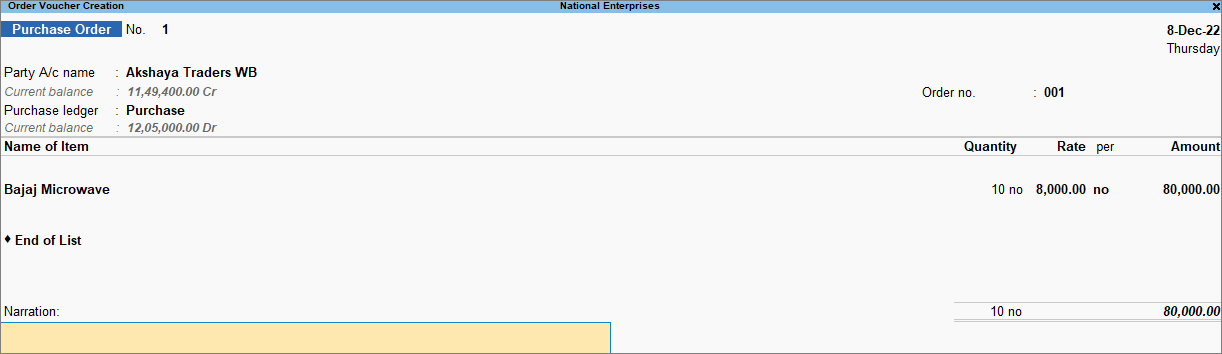
- Specify the supplier details.
- Party A/c Name: Select the party name and press Enter.
- Enter the required details.
If you do not see the Order Details, Receipt Details, and Import Details screen, press F12 (Configure), and set Provide Receipt, Order, and Import details to Yes.
As always, you can press Ctrl+A to save and proceed. - Enter Party Details.
- Enter the purchase Order no. for the voucher.
If you want to enter an order number for each item, press F12 (Configure) > set Provide Order No. for each Stock Item to Yes. The Order no. field will appear in the Stock Items Allocation screen. It will not appear on the main screen of the invoice. - Select the Purchase to allocate stock items.
- Provide stock item details.
- Select stock item.
- Enter the Due on date and Quantity. The Rate will be auto-filled, if available for the stock item. However, you may choose to enter the Rate. The Amount appears automatically.
If orders are split with different due dates, specify the appropriate due date for each lot to be sold. - After entering the due dates for all the lots, press Enter on the Due on field to return to the Voucher Creation screen.
- Provide Narration, if needed, and accept the screen. As always, you can press Ctrl+A to save.
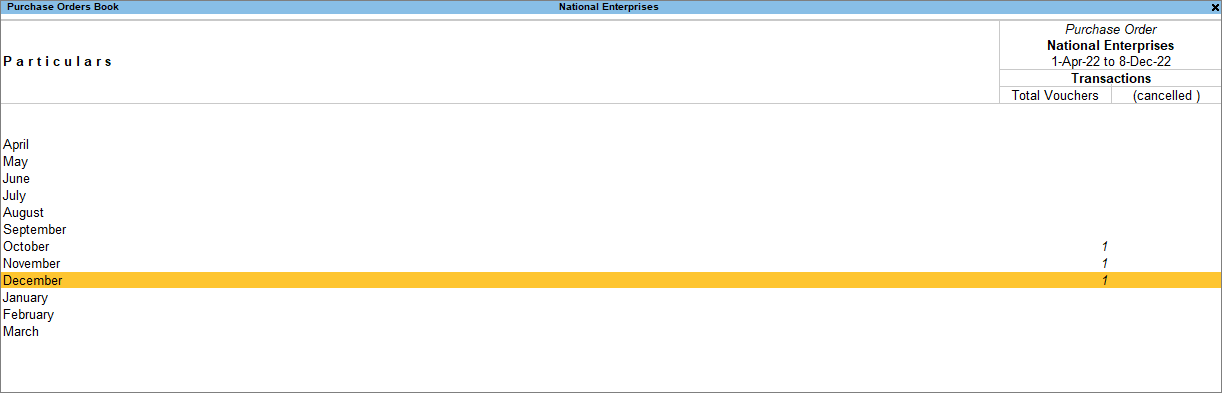
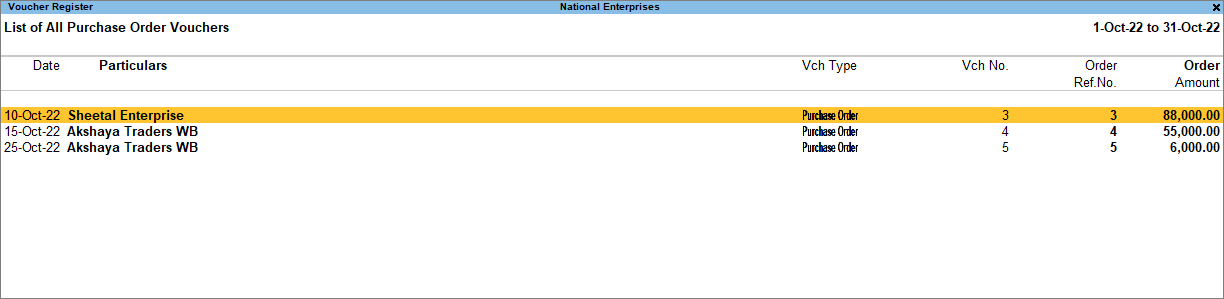
Purchase Order Book
Once you record a Purchase Order in TallyPrime, you can view a summary of it in Purchase Order Book. It displays the list of all purchase orders till the date of the last order entered.
![]()
- Press Alt+G (Go To) > type or select Purchase Order Book.
Alternatively, Gateway of Tally > Display More Reports > Inventory Books> Purchase Orders Book.
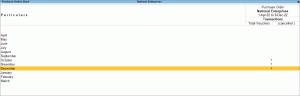
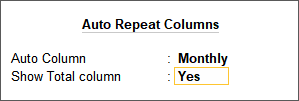
- Press Alt+N (Auto Column) and select the options in the Auto Repeat Columns sub-screen.
The Purchase Orders Book appears as shown below:
- Select the required month and press Enter to view the purchase orders recorded in that month.
Press F12 (Configure), and set the options as needed. The report appears with the relevant details.

Pre-Close Purchase Order
You may have to close orders with negligible quantities yet to be received, or you are no longer planning to receive those pending items from the supplier. Pending references for such orders continue to exist in TallyPrime until you close them. You can pre-close an order from Purchase Order Outstanding reports or from the purchase order transaction and reports.
In this section
Pre-close from transaction
You can pre-close the orders directly from the voucher.
![]()
- Open the purchase order voucher in alteration mode and configure it for pre-closure of the order.
- Press Alt+G (Go To) > type or select Day Book > select the required Purchase Order voucher > and press Enter.
Alternatively, go to Gateway of Tally > Display More Reports > Day Book > select the required Purchase Order voucher > and press Enter. - Press F12 (Configure) > set Provide details to preclose orders to Yes.
- Press Alt+G (Go To) > type or select Day Book > select the required Purchase Order voucher > and press Enter.
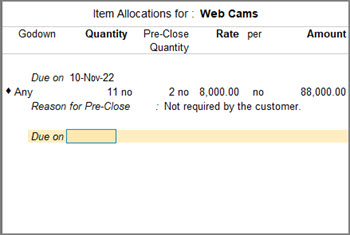
- In the Stock Item Allocations screen, enter the Pre-Close Quantity and the Reason for Pre-Close.

This will pre-close the order partially based on the entered details. - You can also pre-close the purchase order completely.
- Open the sales order voucher screen in alteration mode.
- Press Alt+W (Pre-Close Quantity) > enter the Reason and the Closed on date > press Enter to accept.
- As always, press Ctrl+A to save.
Based on your convenience, you can pre-close the orders with the purchase order voucher, receipt note, or purchase voucher.
Pre-close from reports
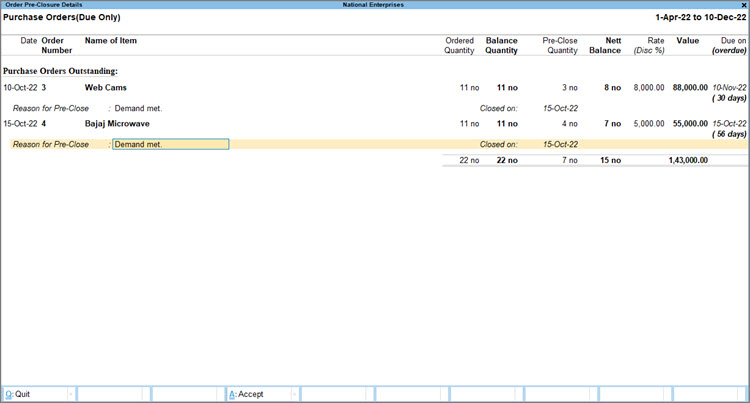
You can pre-close the orders from the Order Details report of Purchase Order Outstandings.
![]()
- Press Alt+G (Go To) > Purchase Order Reports > type or select Purchase Orders (Due Only).
Alternatively, go to Gateway of Tally > Display More Reports > Statements of Inventory > Purchase Order Outstandings > All Orders. - Press F12 (Configure).
- Set the option Show Cleared Purchase Orders to Yes.
- Set the option Show Pre-closure Order details to Yes.
- Set the option Show Reason to Yes.
The Order Details screen appears with the Pre-Closed Qty (Closed on) column and Reason for Pre-Close field. Now, you can partially or even completely pre-close orders directly from Purchase Order (Due Only) report.
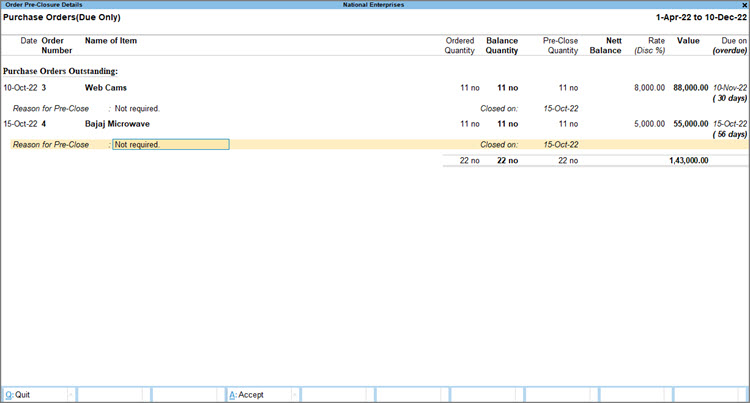
Pre-close order – partial cancellation of orders
- Select the purchase orders (press Spacebar to select more than one order), and press Alt+W (Pre-close Orders).
- Enter the Pre-Close Quantity and the Reason for Pre-Close.

- As always, press Ctrl+A to save.
Pre-close order – complete cancellation of orders
- Select the purchase orders (press Spacebar to select more than one order)
- Press Alt+W (Pre- close Orders) > Alt+W (Set Quantity).
- The balance quantity reflects under the pre-close quantity column.
- As always, press Ctrl+A to save.
Purchase Order Outstanding
In some business cases, after you record a purchase order, the supply might get partially or completely canceled. Also, you may want to keep a track of the purchase orders outstanding and account for the partially or completely canceled orders. TallyPrime provides you with the Purchase Order Outstandings report to view all such outstanding orders. You can also pre-close the outstanding orders and canceled orders at any point in time.
There are different reports under Purchase Order Outstandings. The outstanding orders can be viewed Stock Group-wise, Stock Item-wise, Group-wise, Ledger-wise, or from All Orders.
- Press Alt+G (Go To) > type or select any of the Purchase Order Reports.
Alternatively, Gateway of Tally > Display More Reports > Statements of Inventory > Purchase Order Outstandings > choose the report to view.

In this section
- Purchase Order – Stock Group
- Purchase Order – Stock Item
- Purchase Order – Group
- Purchase Order – Ledger
- Purchase Order – All Orders
Purchase Order – Stock Group
This report displays the Purchase Order Outstanding summary of all or a selected Stock Group.
- Press Alt+G (Go To) > type or select Stock Group Purchase Order Outstanding.
Alternatively, Gateway of Tally > Display More Reports > Statements of Inventory > Purchase Order Outstandings > Stock Group > select Primary or the required Stock Group.
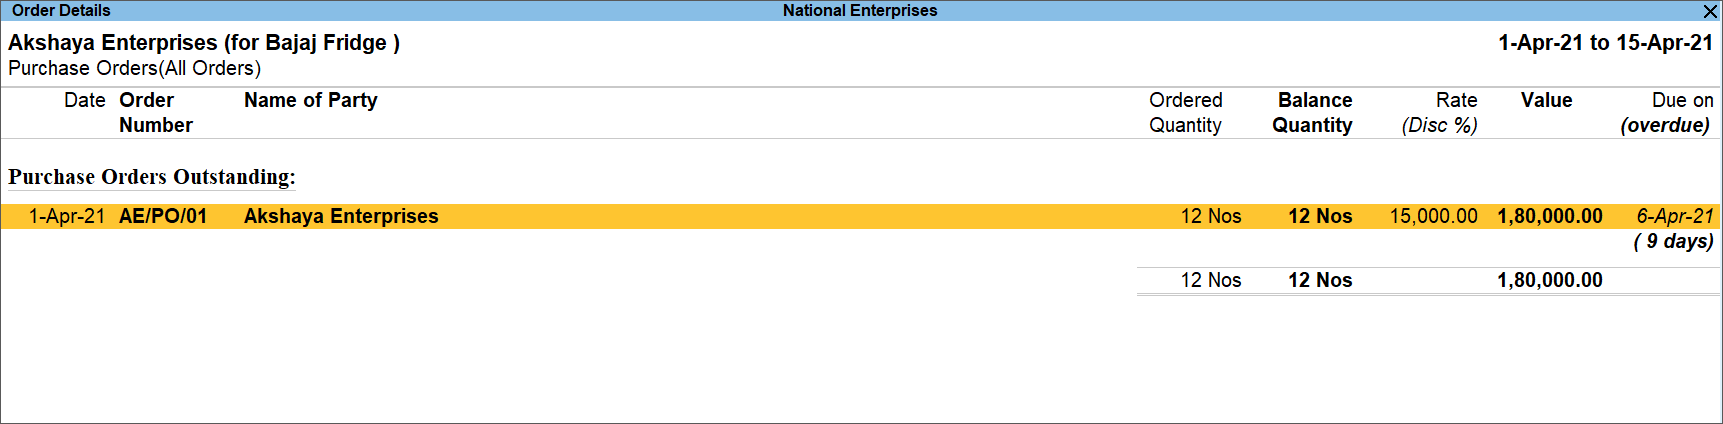
If you want to know how to record a Purchase Order, then click here. - Drill down from any stock item to view the Purchase Orders Outstanding of the stock item in the Order Details screen.
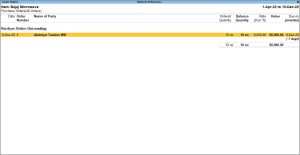
It displays the Date of the order, Order Number, Name of Party, Ordered Quantity, Balance Quantity, Rate, Value of the ordered stock, Due on date for delivering the goods, and the number of days overdue.

You can press F12 (Configure) and set the options as needed, to view the details of the required orders for each account group.
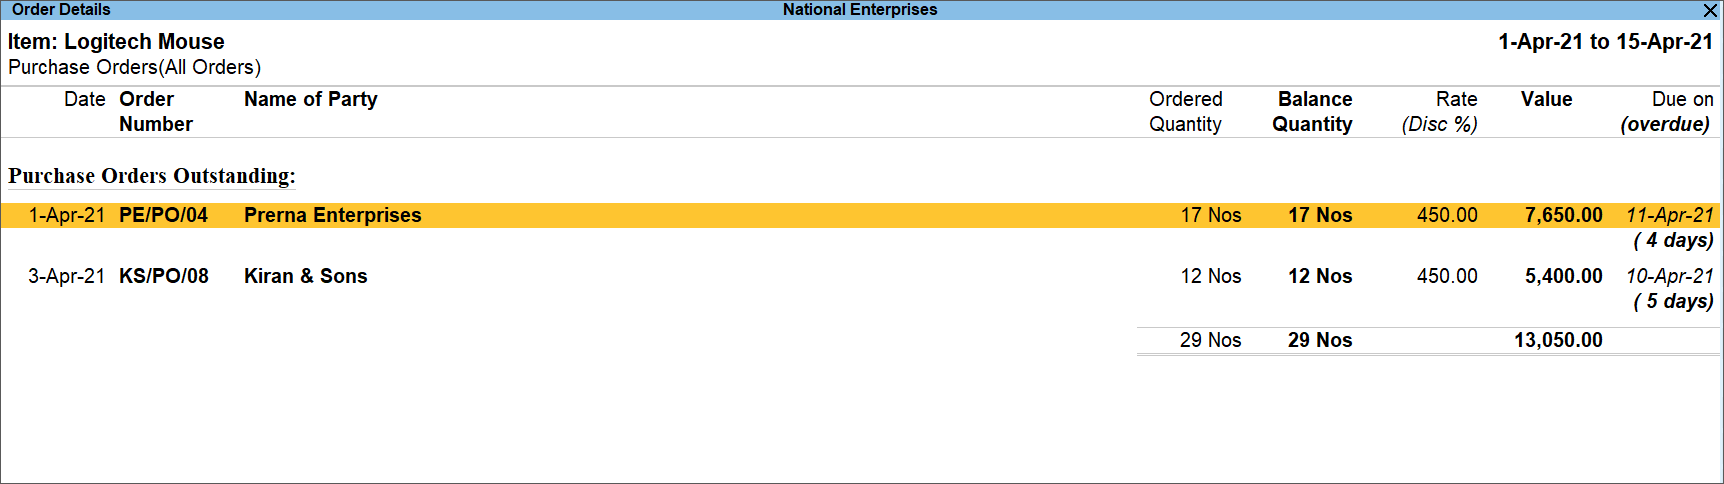
Purchase Order – Stock Item
This report displays the Purchase Order Outstanding summary of Stock Items.
- Press Alt+G (Go To) > type or select Stock Item Purchase Order Outstanding.
Alternatively, Gateway of Tally > Display More Reports > Statements of Inventory > Purchase Order Outstandings > Stock Item.
If you want to know how to record a Purchase Order, then click here. - Select the stock item from the List of Stock Items and press Enter.
- Drill down from the stock item to view the Purchase Orders Outstanding of the stock item in the Order Details screen.

It displays the Date of the order, Order Number, Name of Party, Ordered Quantity, Balance Quantity, Rate, Value of the ordered stock, Due on date for delivering the goods, and the number of days overdue.
You can press F12 (Configure) and set the options as needed, to view the details of the required orders for each stock item.
Purchase Order – Group
You may have created subgroups for your Sundry Creditors based on the region, type of party, city, location, or for each salesman, as per your business need. You can use this report to view the Purchase Order Outstanding for such groups.
- Press Alt+G (Go To) > type or select Group Purchase Order Outstanding.
Alternatively, Gateway of Tally > Display More Reports > Statements of Inventory > Purchase Order Outstandings > Group.
If you want to know how to record a Purchase Order, then click here. - Select Sundry Creditors and press Enter.
- Drill down from the stock item to view the Purchase Orders Outstanding of the stock item in the Order Details screen.
It displays the Date of the order, Order Number, Name of Party, Ordered Quantity, Balance Quantity, Rate, Value of the ordered stock, Due on date for delivering the goods, and the number of days overdue.
You can press F12 (Configure) and set the options as needed, to view the details of the required orders for each account group.
Purchase Order – Ledger
This report displays the Purchase Order Outstanding summary of ledgers.
- Press Alt+G (Go To) > type or select Ledger Purchase Order Outstanding.
Alternatively, Gateway of Tally > Display More Reports > Statements of Inventory > Purchase Order Outstandings > Ledger.
If you want to know how to record a Purchase Order, then click here. - Select the Ledger and press Enter.
- Press F12 (Configure) and set the below options to get a comparison of the number of Orders Booked, Orders Cleared, Pending Orders, and also Opening Orders, if any.
- Show Opening Orders to Yes.
- Show Orders Booked to Yes.
- Show Cleared Orders to Yes.
- Show Pending Orders to Yes.
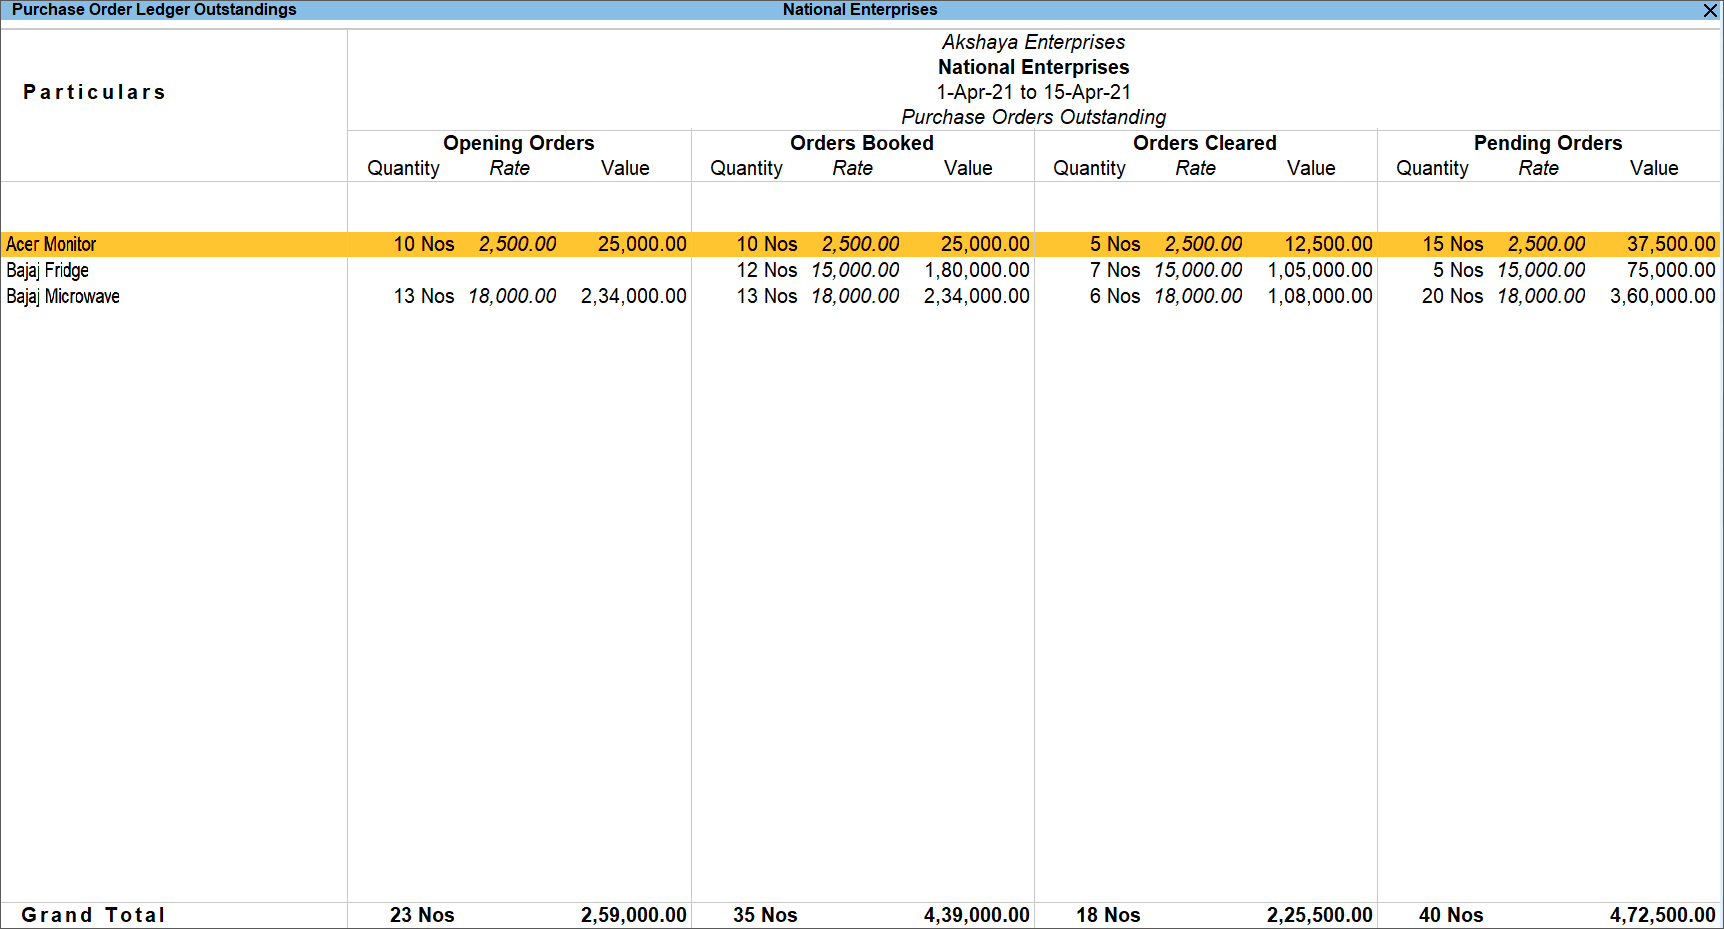
If you have any pending orders which are yet to be cleared, you can get those orders displayed in the Opening Orders column by setting the date that is one day after the due date set for that order.
You can also set other options as needed from F12 (Configure), to view the required order details for each ledger.
Drill down from the stock item to view the Purchase Orders Outstanding of the stock item in the Order Details screen.
It displays the Date of the order, Order Number, Name of Party, Ordered Quantity, Balance Quantity, Rate, Value of the ordered stock, Due on date for delivering the goods, and the number of days overdue.
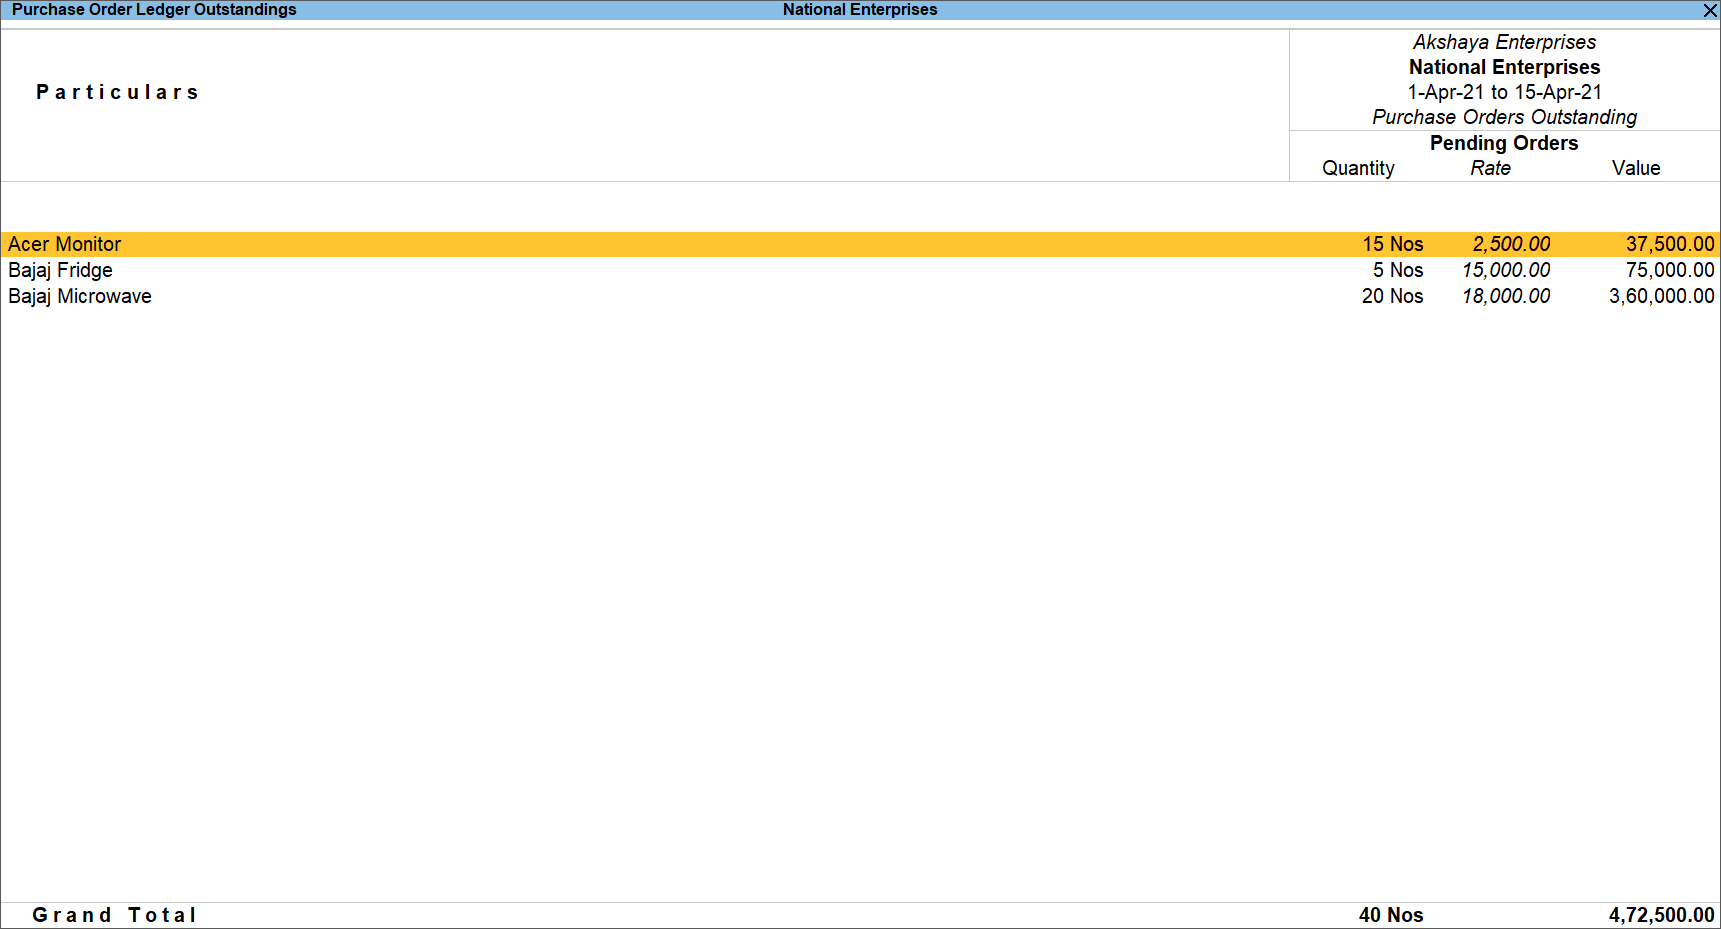
Purchase Order – All Orders
This report displays the Purchase Order Outstanding summary of all the pending orders. It displays the list of stock items with pending purchase orders along with the order details, party details, and due date for delivering the goods. It also provides information on Goods received but Orders not Sent, if any.
- Press Alt+G (Go To) > type or select Purchase Orders (All Orders).
Alternatively, Gateway of Tally > Display More Reports > Statements of Inventory > Purchase Order Outstandings > All Orders.
If you want to know how to record a Purchase Order, then click here.
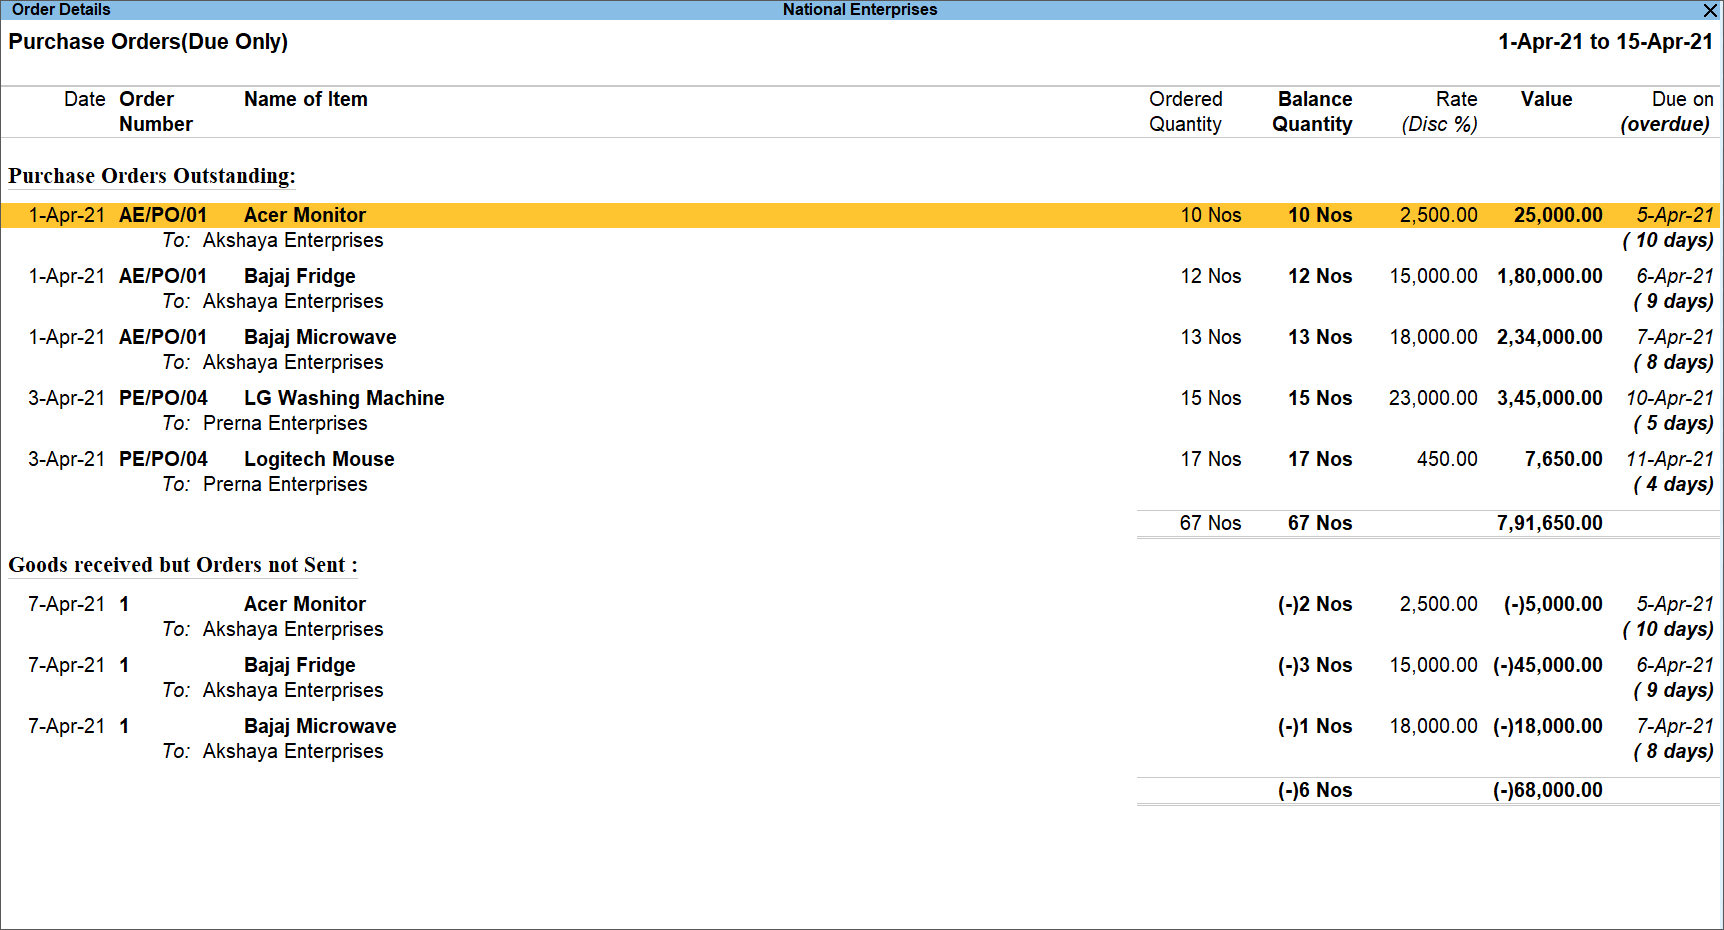
It displays the Date of the order, Order Number, Name of Item with party information, Ordered Quantity, Balance Quantity, Rate, Value of the ordered stock, Due on date for delivering the goods, the number of days overdue, and Goods received but Orders not Sent, if any.
Some of the additional features are mentioned below, which you can consider when viewing Purchase Orders Outstanding summary of all the pending orders.
- Press Alt+F5 (Detailed) to view the purchase orders in detailed format.
- Press F6 (Age wise) to view the age-wise analysis report.
- Press F8 (All Orders) to view all the orders that are due. This button can be used to view All Orders and Due Orders alternatively.
- Press Alt+W (Preclose Orders) to pre-close the purchase orders.
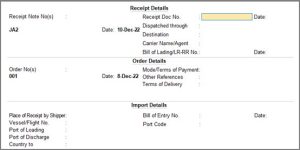
Record a Receipt Note for Goods Received
In TallyPrime you can record a Receipt Note for goods received and track it with its reference number in the Purchase invoice and also against the Purchase Order. However, you can record a Receipt Note even without recording a Purchase Order.
![]()
The procedure to record Receipt Notes with or without Purchase Orders is explained below.
- Open the Receipt Note voucher screen.
- Press Alt+G (Go To) > Create Voucher > F10 (Other Vouchers) > type or select Receipt Note.
Alternatively, go to Gateway of Tally > Vouchers > F10 (Other Vouchers) > type or select Receipt Note.
You can activate the Receipt Note voucher type if the voucher is inactive. Select Yes or press Y to proceed.
- Press Alt+G (Go To) > Create Voucher > F10 (Other Vouchers) > type or select Receipt Note.
- Enter the Reference No if required and Date.
- In Party A/c name, select the party ledger against which you are recording the receipt note.
- On the Party Details screen, enter the Order Details and Receipt Details as required.
- Select Order No(s) from the List of Orders, if a purchase order exists for that supplier. If not, select Not Applicable.
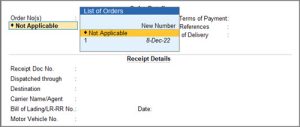
- Select Order No(s) from the List of Orders, if a purchase order exists for that supplier. If not, select Not Applicable.
- Select the Purchase Ledger.
- Specify the details in Stock Item Allocations screen.
- If you select a purchase Order No(s) in the Party Details screen of the invoice:
- The stock items details in the purchase order appear in the receipt note.
- The Order No.is prefilled in the Stock Item Allocations screen.
- If Order No(s) is selected as Not Applicable then specify the details in Stock Item Allocations screen.
- Enter a Tracking No. By default, the invoice number appears. You can change it if required by creating a New Number.
- Set the Order No. to Not Applicable.
- Enter the Quantity and Rate.
- Accept the screen
- If you select a purchase Order No(s) in the Party Details screen of the invoice:
- Enter the Narration if required. As always, press Ctrl+A to save the voucher.
A Receipt Note with Tracking No. marked as Not Applicable is an inventory document affecting only the inventory values. This will not affect the accounts.
You can select the tracking number of the receipt note to track the received goods in the purchase invoice.
Record Purchase Against Receipt Note
If you have a receipt note, which needs to be tracked against the purchase invoice, you can select the order number and tracking number in TallyPrime to link it to the relevant invoices.
![]()
- Open the purchase invoice and enter the invoice number and date.
- Press Alt+G (Go To) > Create Voucher > press F9 (Purchase).
Alternatively, go to Gateway of Tally > Vouchers > press F9 (Purchase). - Enter the Supplier Invoice No.: and Date.
- Press Alt+G (Go To) > Create Voucher > press F9 (Purchase).
- Press F12 (Configure) > set the option Provide Receipt, Order, and Import details to Yes.
Henceforth, you can enter the additional details in the purchase voucher until you change the option in F12 (Configure). - Select the party ledger in the Party A/c name.
- Select the receipt note reference in the purchase invoice.
- After selecting the party, a sub-screen opens. Select the receipt note reference. The details from the receipt note reflect will reflect in the purchase voucher.
If you have generated the receipt note against a purchase order, the purchase order details also get prefilled. Press Ctrl+A to save.
- After selecting the party, a sub-screen opens. Select the receipt note reference. The details from the receipt note reflect will reflect in the purchase voucher.
- Select the Purchase Ledger.
- Change the stock item’s Quantity and Rate on the Stock Item Allocations screen, if required.
Tracking No.: and Order No.: will be auto-filled by default based on the receipt note and order number reference. - As always, press Ctrl+A to save the voucher.
A receipt note is closed if billed completely. The details appear in the Purchase Bill Pending report if it is partially closed.
Record Purchase with New Tracking Number
If you want to record a purchase invoice before a receipt note, you can record the invoice with a tracking number and track it in the receipt note. The transaction is accounted against the party ledger without updating the stock value and appears as Bills made but goods not received in the Purchase Bill Pending report.
![]()
- Ensure the tracking number feature is enabled.
- Record the purchase voucher.
- Press Alt+G (Go To) > Create Voucher > press F9 (Purchase).
Alternatively, go to Gateway of Tally > Vouchers > press F9 (Purchase). - Select the party ledger and stock item.
- In the Stock Item Allocations screen:
- Select New Number for the Tracking No.
- Enter the New Number.
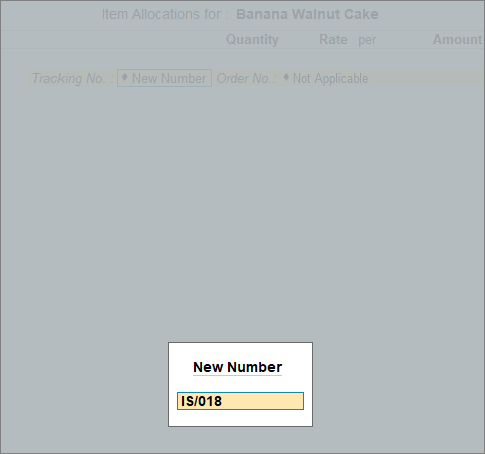
- Enter the stock item’s Quantity and Rate. The Amount appears.
- Press Enter to return to the purchase voucher.
- Press Alt+G (Go To) > Create Voucher > press F9 (Purchase).
- As always, press Ctrl+A to save the voucher.
You can use the tracking number of the purchase voucher in the receipt note.
Disable the Tracking Number
To prevent the Tracking Number from being displayed in the transaction, after all your Receipt Notes have been consumed by generating a Purchase bill against them, or after generating a Receipt Note against a Purchase voucher, you can deactivate the Receipt Note voucher type altogether.
![]()
- Press Alt+G (Go To) > Alter Master > Voucher Type > type or select Receipt Note > press Enter.
Alternatively, go to Gateway of Tally > Alter > Voucher Type > type or select Receipt Note > press Enter.
The Voucher Type Alteration screen appears. - Set the option to Activate this Voucher Type to No.
- Press Y to accept the screen. As always, press Ctrl+A to save the Voucher Type Alteration.
As a result of this change, the Receipt Note voucher types are deactivated, and the Tracking Number no longer appears in the transaction unless you are specifically reactivating it.
Similarly, you can disable the Tracking Number in the Sales process by deactivating the Delivery Note voucher type. As a result, the Tracking Number no longer appears in the transaction.
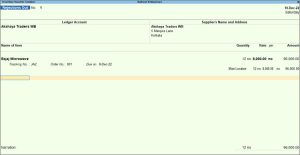
Record Rejections Out against Receipt Note
Rejections Out vouchers are used when you reject or return goods to your supplier. The transaction is recorded after raising a receipt note but before raising a purchase voucher.
![]()
- Open the Rejections Out voucher.
- Press Alt+G (Go To) > Create Voucher > F10 (Other Vouchers) > type or select Rejections Out.
Alternatively, go to Gateway of Tally > Vouchers > F10 (Other Vouchers) > type or select Rejections Out. - You can activate the Rejections Out voucher type if the voucher is inactive. Select Yes or press Y to proceed.
- Press Alt+G (Go To) > Create Voucher > F10 (Other Vouchers) > type or select Rejections Out.
- Provide the party details.
- Under Ledger Account, select the party ledger to which you are returning the goods.
- The party’s name appears under Supplier’s Name and Address with the address entered in the ledger master.
- Provide the stock item details.
- Select the stock item. In the Item Allocations screen, the same details appear if you had recorded a receipt note with a tracking number. You can select the relevant tracking number.
- Enter the Quantity and Rate.
In the F12 configuration, enable the option Show Godown–wise Details to view the batch and godown details in the invoice.
-
As always, press Ctrl+A to save.
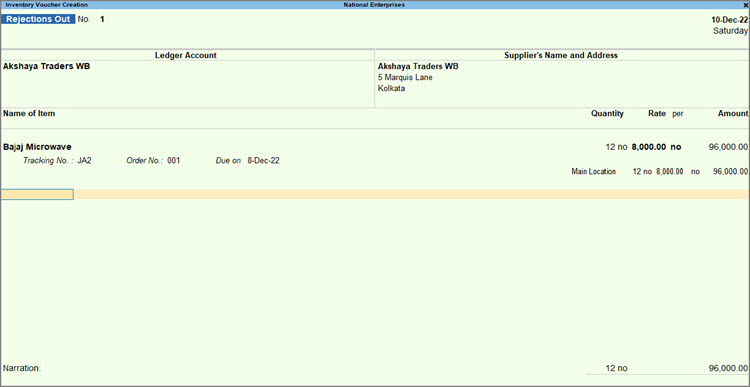
The stock will decrease to the extent of the quantity entered in the rejections out voucher.
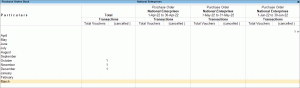
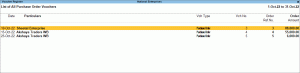
Know your Purchase Bills Pending
Purchase Bills Pending report lists all instances of incomplete purchases where goods may have been received but not invoiced. It also lists instances of invoices raised but against which goods have not been received.
When the Receipt Note or Rejections Out voucher is recorded with a new tracking number, but the purchase invoice (or voucher) or debit note is not linked to it, the inventory details are updated, but accounting entries are pending. Similarly, if you have entered a purchase invoice or debit note with a new tracking number, but the Receipt Note or Rejections Out voucher is not linked to it, the accounting details are updated, but inventory entries are pending.
![]()
This report lists transactions of Goods Recd. but Bills not Recd.: and Bills Recd. but Goods not Recd.:.
Press Alt+G (Go To) > type or select Purchase Bills Pending.
Alternatively, go to Gateway of Tally > Display More Reports > Statements of Inventory > Purchase Bills Pending.
The default report appears as shown:

You can view the pending and cleared bills in the Purchase Bills Pending report.
You can configure the Purchase Bills Pending report by selecting the appropriate option.
Press F12 (Configure) and set the options as needed.
To drill down to the voucher level, place the cursor on the voucher detail line and press Enter.
The Purchase Bills Pending report can be generated only when the option Tracking Numbers is set to Yes.


