
Record Point of Sale (POS) Transaction in TallyPrime
In the retail business, Point of Sale or POS plays an important role. When customers check out online, walk up to your checkout counter, or pick out an item from your stand or booth, they are at the point of sale. In TallyPrime, you can record a POS Invoice by creating a separate Voucher type under Sales. You can also record POS Invoices with multiple modes of payments and later view those transactions in the POS register. TallyPrime also allows you to scan the barcode given in the product while recording the invoice. You can also create a Voucher Class for easy and quick recording of POS invoices.
If you are making Point of Sale transactions, you need POS Software as well as POS Hardware. If you have an online store, all your sales happen on your website, so you don’t need POS hardware to help you accept payments. But if you have a cafe, you may need a register and a credit card reader. If you operate a food truck, a phone or tablet could be all you need to process orders. The various POS equipment used in retail outlets is cash registers, card readers, and barcode scanners.
Record a POS Invoice
When you raise a bill for a POS transaction, to record such transactions in Tallyprime you must create a POS invoice voucher type and use it to record transactions.
- Create POS Voucher type.
- Press Alt+G (Go To) > Create Master > Voucher Type > press Enter.
Alternatively, go to Gateway of Tally > Create > Voucher Type > press Enter. - Enter the Name for the voucher type, for example, POS Invoice.
- Set Sales as the Type of Voucher.
- Provide the voucher numbering details, as needed.
- Press Alt+G (Go To) > Create Master > Voucher Type > press Enter.
- Enable the voucher type for POS transactions.
- Set the option Use for POS invoicing to Yes.
- Enter Message to print (1) and Message to print (2), as required, to be printed at the bottom of the POS invoice.
- Enter the Default title to print, as required.
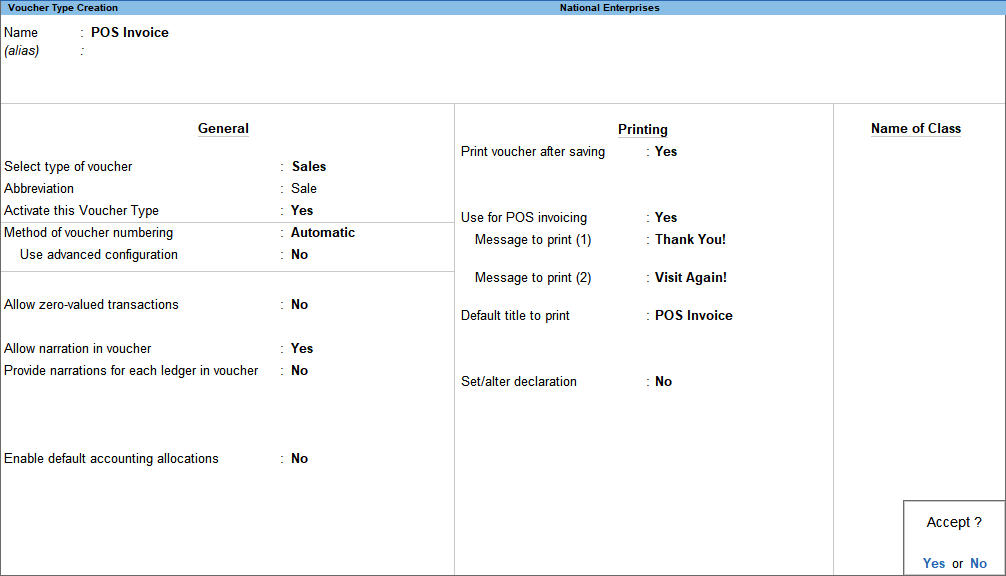
- Press Ctrl+A to save the Voucher Type Creation screen.
- Record the POS transaction.
- Press Alt+G (Go To) > Create Voucher > press F8 (Sales) > select POS Invoice.
Alternatively, go to Gateway of Tally > Vouchers > press F8 (Sales) > select POS Invoice. - Set the Party A/c Name to Not Applicable if the buyer details are unknown.
If you know the buyer’s details, you can select the same. - Select the Sales ledger.
- Select the stock item and specify Quantity and Rate. By default, the Quantity appears as 1. You can press Backspace and change it if needed.
To update the item rate, press F12 (Configure) > set Modify the Rate field during voucher entry to Yes. You can then change the rate of the item.
- Press Alt+G (Go To) > Create Voucher > press F8 (Sales) > select POS Invoice.
- Specify the payment details.
By default, Cash appears as the mode of payment. When you receive cash, enter the Cash tendered. The Balance amount, if any, appears.
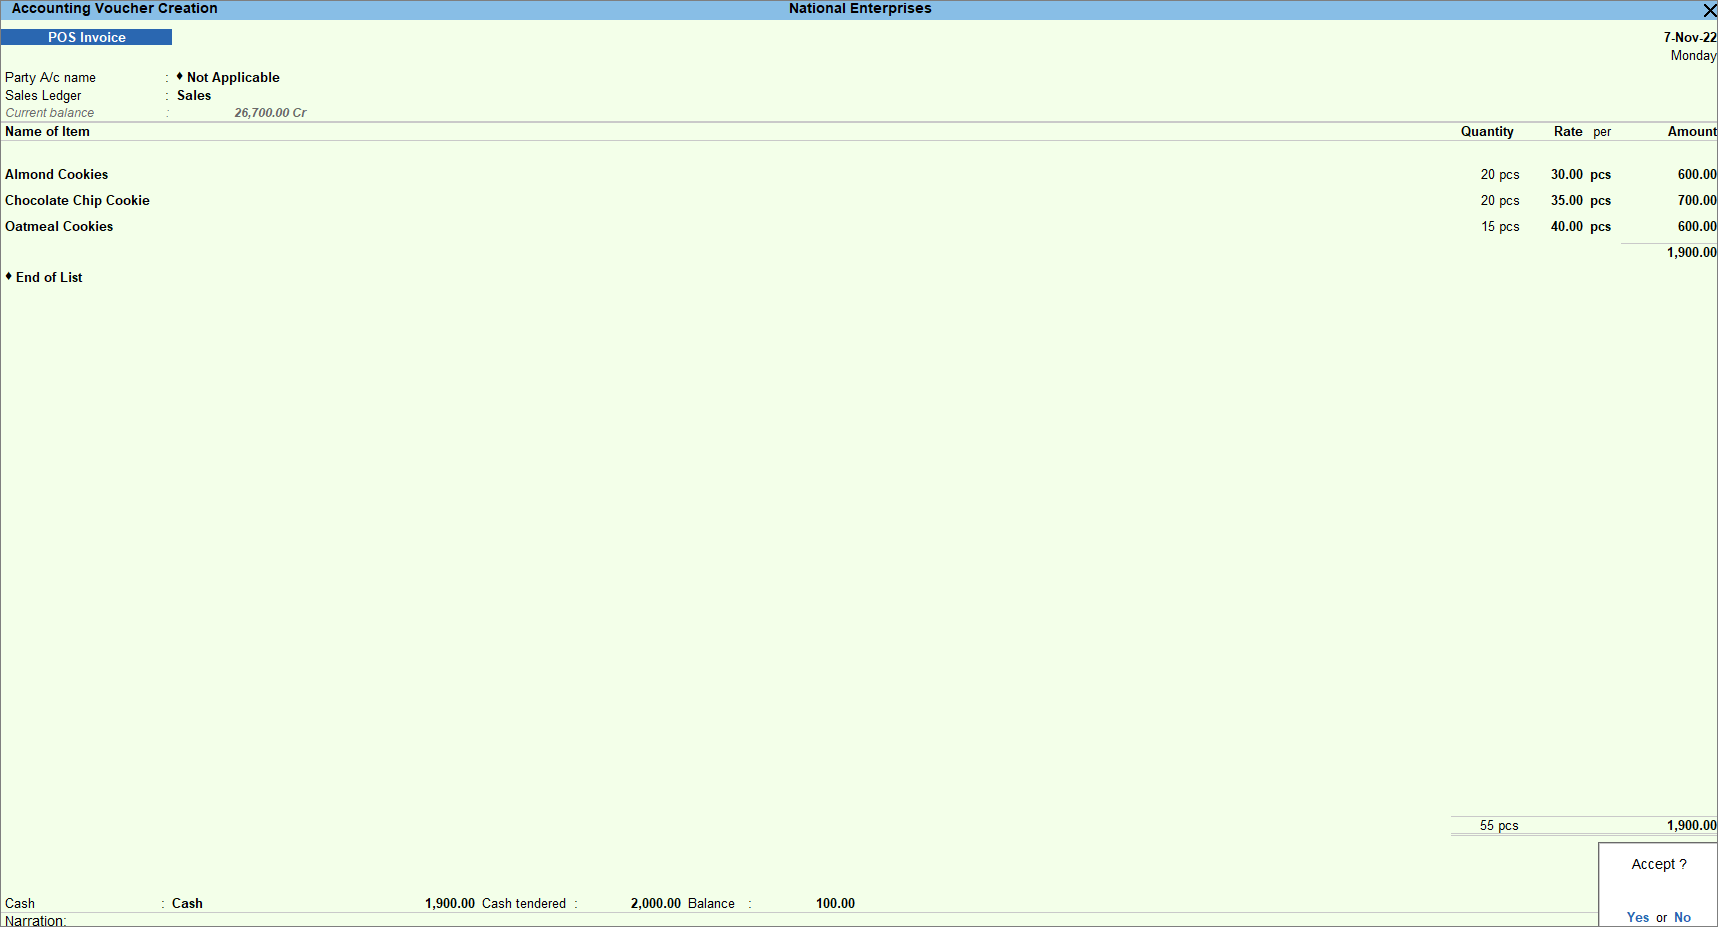
- As always, press Ctrl+A to save the POS Voucher.
- Print the invoice.
- Press Alt+P (Print) > press Enter on Current.
- Press F12 (Configure) > press Enter on Printer > select the POS printer.
- Press Enter on Show More > press Enter on Print Format and select the required format.
- Press Esc twice to return to the Print screen.
- Press I (Preview) to check the invoice before printing, if needed.
- Press P (Print) to print.
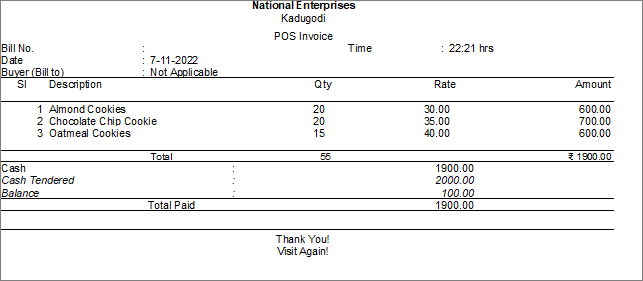
You can print the POS invoice with the relevant information using the required paper size.
Click here to see the possible F12 (Configure) configurations for POS Invoice.
|
Configurations |
Descriptions |
|
Provide Buyer details |
It invokes the Party Details screen, where you can enter the Buyer details. |
|
Provide Additional Descriptions |
Specify any additional description for the item during voucher entry. |
|
Skip the Quantity field during voucher entry |
The Quantity field is prefilled with 1, and the cursor skips this field. |
|
Modify the Rate field during voucher entry |
Change the Rate per unit while recording the POS invoice. |
|
Provide Party details in POS Invoice |
Display the Party A/c Name field to select the party ledger in the POS invoice. |
|
Warn when Voucher No. exceeds 16 characters |
Display a message when the voucher number is more than 16 characters. Any voucher number that exceeds 16 characters is not exported to the e-return formats. |
|
Modify all fields during voucher entry |
Modify all fields in the POS invoice. |
|
Use Expired Batches for Stock items |
Display expired batches of stock items for selection while recording the invoice. |
|
Show Batches with Zero Quantity |
Display batches of stock items with zero balance. |
|
Calculate Tax on Current Subtotal (else calculations are on inventory total only) |
Calculate tax after including the additional income or expenses in the total item amount. |
Using Barcode Scanner in TallyPrime
A Barcode scanner is an input device that you can use to capture and read the information given in the barcode of a product. The purpose of barcode scanners is to read, translate, and transmit information contained in barcodes. In TallyPrime, you can scan the barcode mentioned in the product using a barcode scanner while creating the Stock item master. If the item is huge and cannot be brought near the scanner, then the barcode number can be mentioned manually as well.
In this section
Create Stock Items with Barcode
While creating the stock item master, you can record the number given in the barcode of the product. You need to scan the barcode using a barcode scanner and update the details in the Alias field while creating the stock item.
- Add barcode details while creating a stock item.
- In the Stock Item Creation screen, enter the name of the item under the Name field.
- In the Alias, scan the barcode and a 16-digit number gets recorded.
- Fill in the remaining details and as always, press Ctrl+A to save the Stock Item Creation screen.
Once the stock item is created with the barcode number, you can insert that number while recording the transaction in the Name of Item field and it will automatically display the product name along with its rate and amount.
Record Transactions using Barcode
After the stock item master is created along with the Barcode number, you can record the transactions and scan the barcode from the product while recording the transaction.
For example, you want to record the sale of 50-50 biscuits which was already created with the barcode number.
- In the Sales Voucher, select the party and sales account.
- In the Name of Item field, scan the barcode from the product. It captures the number and displays the item name which is created with that number.
- It automatically displays the Quantity, Rate and Amount.
- Fill in the remaining details and as always, press Ctrl+A to save the Sales Voucher.
You cannot print the barcode as a label in TallyPrime, however, if you want to print the barcode number in your invoice, you can print the same. Configure the printing details by enabling Name (Alias) under Display name for Stock Items.
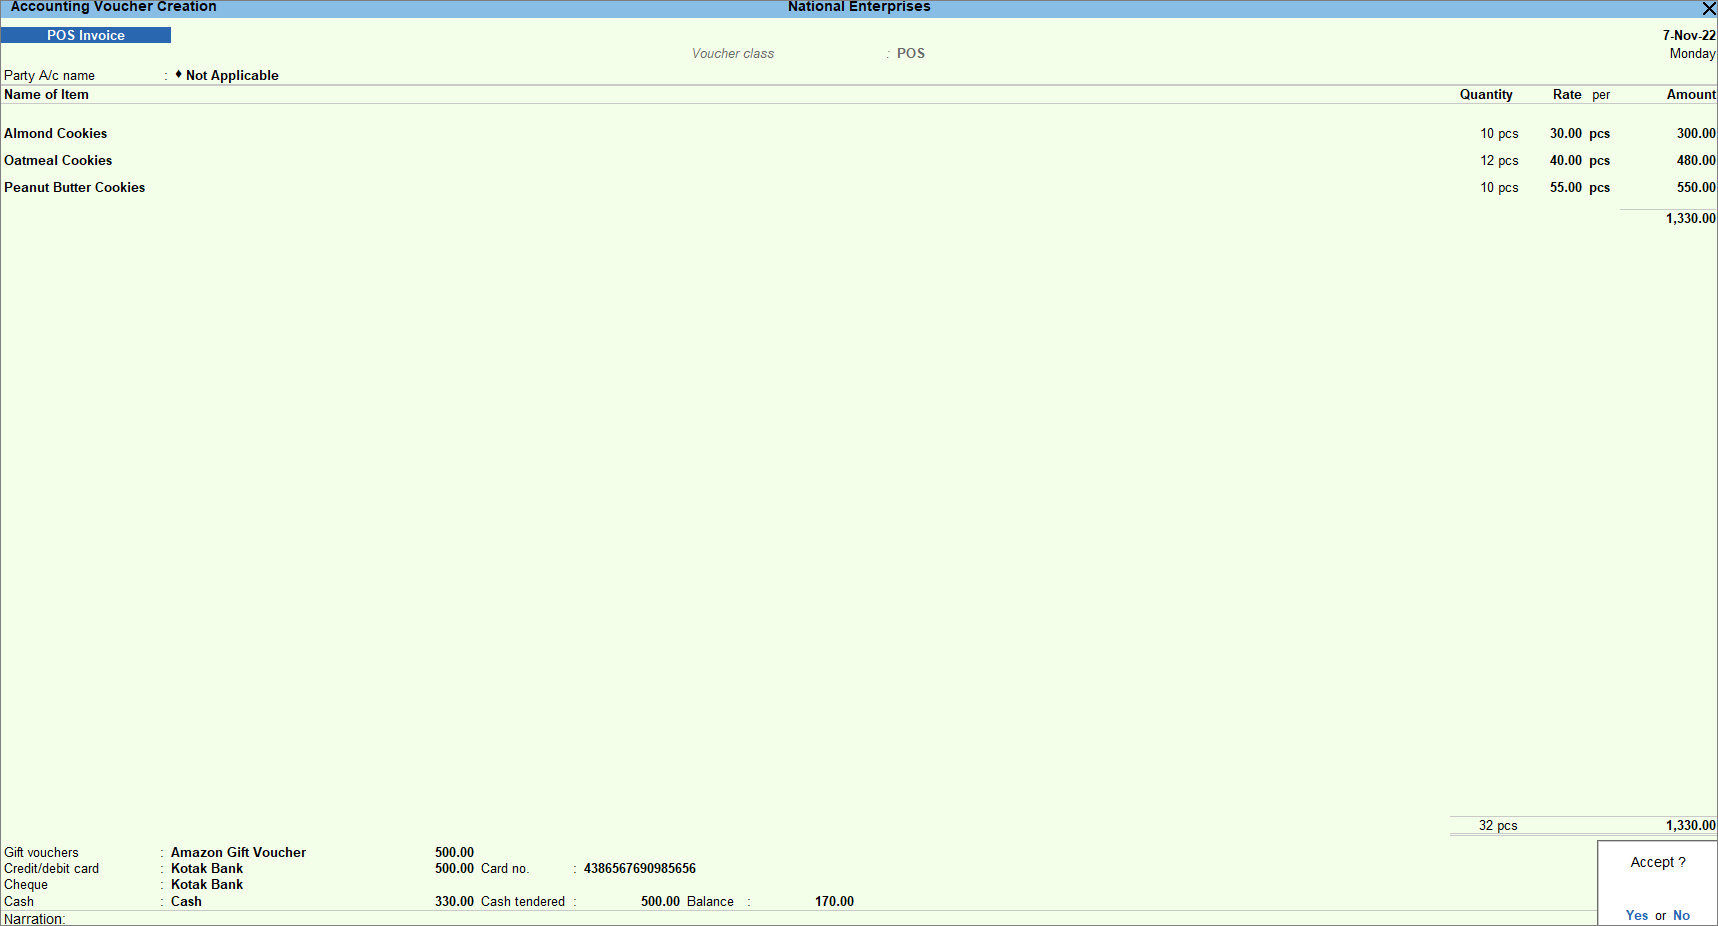
Record POS Invoice with Multiple Modes of Payment
When you make a POS sale, you may receive payment in modes other than cash, such as gift vouchers, debit or credit cards, or even cheques. You may want to select different payment modes while recording a POS invoice. In TallyPrime, you can choose multiple modes of payment.
- Record the POS invoice.
- Select the modes of payment and enter the amount.
- Press Alt+I (Multi-Mode Pymt). The multi-mode payment options appear.
- Gift Voucher: You can select only the ledgers created under Sundry Debtors/Sundry Creditors. Select the gift voucher ledger created under these groups.
- Credit/Debit card and Cheque: Select the bank ledgers.
- Cash: Enter the Cash tendered, if applicable. The Balance amount, if any, appears.
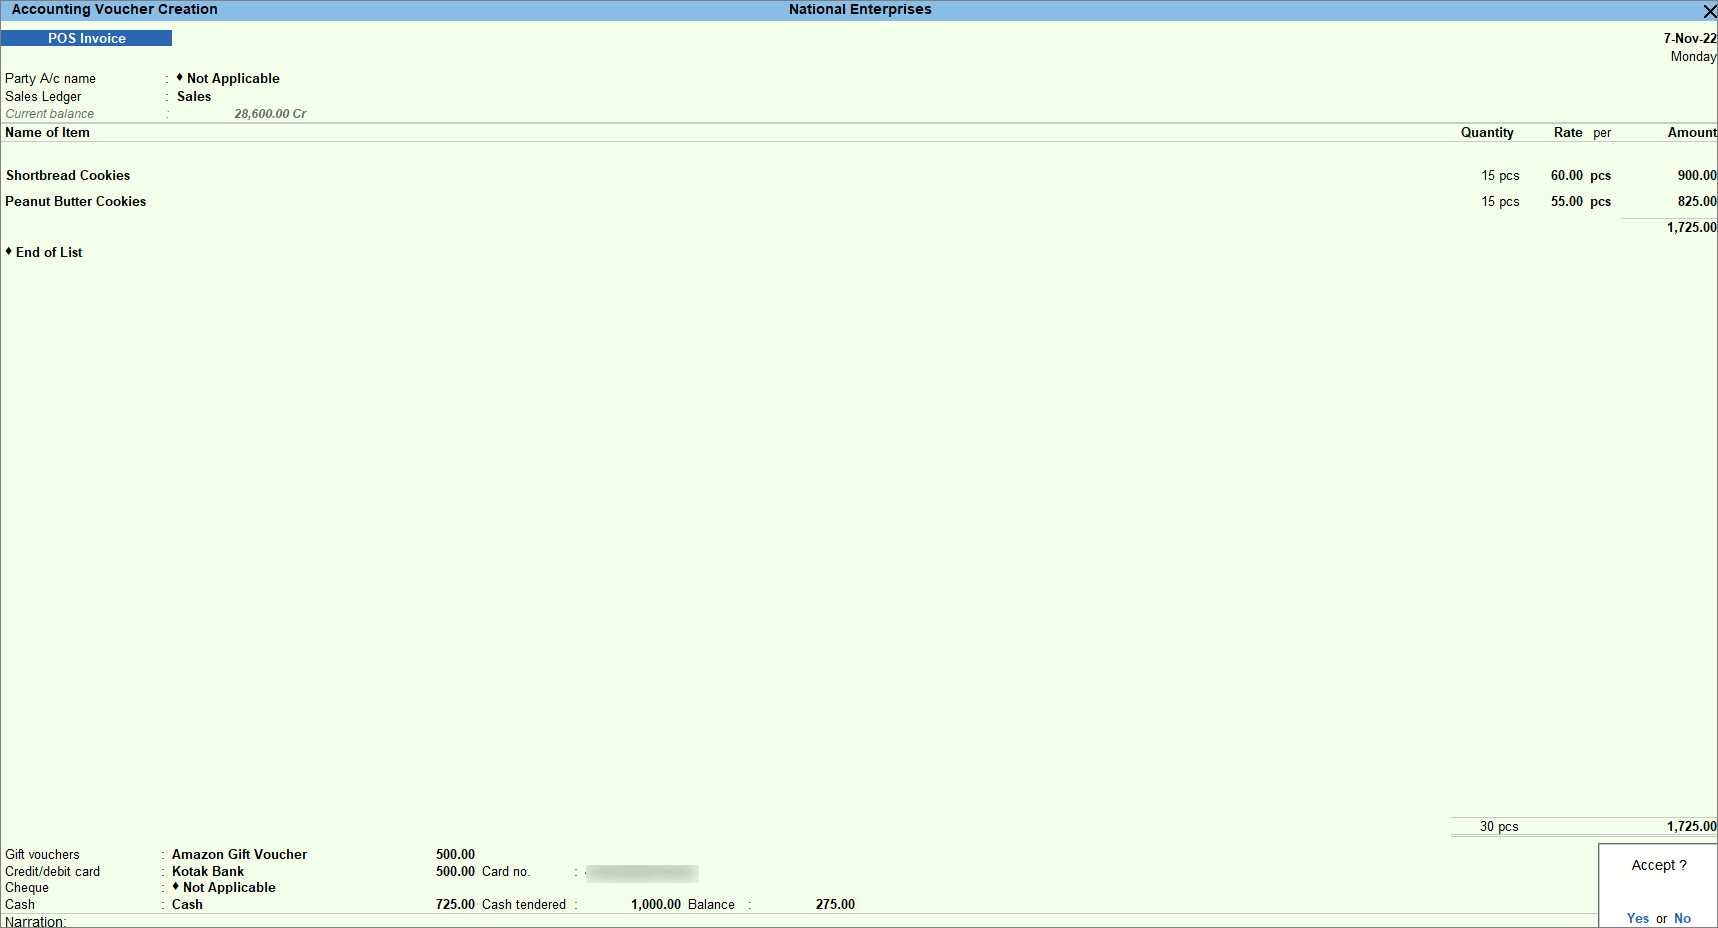
- As always, press Ctrl+A to save.
- Print the invoice.
- To print the invoice, press Alt+P (Print) > press Enter on Current.
- Press F12 (Configure) > press Enter on Printer > select the POS printer.
- Press Enter on Show More > press Enter on Print Format and select the required format.
- Press Esc twice to return to the Print screen.
- Press I (Preview) to check the invoice before printing, if needed.
- Press P (Print) to print.

You can print the POS invoice with the required details.
Discount in POS Invoice
At the time of the POS sale, you can sell the products at a discounted price along with giving items free or in an offer. For example, there can be an offer to buy 1 and get one free, or even buy a product worth Rs. 5,000 and get a trolley free and so on. You can record all such transactions in TallyPrime. If the offer is for the same item, then you can enable Use separate Actual and Billed Quantity columns in invoices record the transaction. If the items are different, then enable Allow zero-valued transactions from the POS Voucher type.
POS Register | POS Report
POS Register lists all the POS invoices. You can drill down from each POS invoice to view the invoice details.
- Press Alt+G (Go To) > type or select Monthly POS Register.
Alternatively, Gateway of Tally > Display More Reports > Accounts Books > POS Register.
The POS Register is available only if the option Use for POS Invoicing is enabled in the POS Voucher Type and at least one transaction has been recorded.
- Press Alt+F5 (Detailed) to view the report in detailed mode.
- Press F12 (Configure) and set the options, as needed.
You can view all the POS transactions in the POS Register.
Click here to see the possible F12 (Configure) configurations for POS Register.
|
Configurations |
Descriptions |
|
Report Type |
Display the transaction details based on accounting groups and ledgers, with corresponding debit and credit values. |
|
Show Inventory-wise Extract |
Display only the transaction details based on stock groups and items, with corresponding Inward Qty, Rate, and Amount. |
|
Show Columnar Register |
Invokes the Columnar Register Alteration screen, where you can set the options as needed and view the report with the voucher details in separate columns. |
|
Show Gross Profit estimates. |
Display the Gross Profit and Cost columns, with the percentage of profit and the calculation of the cost of the stock item. |
|
Show Cost based on stock valuation. |
Display the Cost based on the stock item’s selected valuation method. This option can be enabled only if Show Gross Profit estimates are set to Yes. |
|
Format of Report |
Display the report in a detailed or condensed view. |
|
Show inventory details |
Display the stock item quantity, rate, and value. |
|
Show additional descriptions for Stock Items. |
Display the additional description entered for stock items in the POS invoice. |
|
Display name for Stock items |
Display the stock items by selecting the required Display Name Style. |
|
Show Optional Vouchers |
Display the POS invoices marked as optional vouchers. |
|
Appearance of Names |
Display the party/bank ledger names by selecting the required Display Name Style. |
|
Sorting Method |
Display the stock items based on the required Sorting Methods. |
Voucher Class for Faster Data Entry
A voucher class is created, predefining the entries that make the invoice entry a simple task. The payments for POS invoices are generally made by cash, gift vouchers, cheques/drafts, or credit/debit cards. In TallyPrime, you can create a voucher class for POS invoices with the required modes of payment. These payment modes are prefilled in the invoice upon selecting the voucher class. This helps you quickly record a POS invoice with the required modes of payment.
To learn how to create a voucher class for a POS invoice, click here.
Using the voucher class, you can record a POS invoice with the required modes of payment.
- Open the POS invoice voucher type with voucher class
- Press Alt+G (Go To) > Create Voucher > press F8 (Sales) > select POS Invoice.
Alternatively, go to Gateway of Tally > Vouchers > press F8 (Sales) > select POS Invoice. - Select the POS invoice voucher type > select the POS voucher class.
The modes of payment with the corresponding ledgers appear.
- Press Alt+G (Go To) > Create Voucher > press F8 (Sales) > select POS Invoice.
- Enter the transaction details.
- You can set the Party A/c Name to Not Applicable when the buyer details are unknown. If you know the buyer’s details, you can select the same.
- Select the stock item. By default, the Quantity appears as 1. You can press Backspace and change it, if needed. The sales ledger selected in the voucher class gets allocated to the stock items.
- The Rate gets auto-filled if you have sold the same item earlier. However, you may choose to enter the Rate.
- Enter the values against the applicable modes of payment.
- As always, press Ctrl+A to save.
You can record POS invoices with different actual and billed quantities by enabling the option Use separate Actual and Billed Quantity columns in invoices in F11 (Features).
Apart from managing inventory and handling barcode operations, POS Invoice feature in TallyPrime helps in tracking down and recording the date and time of every sale made at the point of sale. Keeping an eye on the product movement across your inventory, POS Invoice feature in TallyPrime offers you a flexible and simpler way to conduct business.


