
Inventory Movements and Physical Stock Take
Inventory Management in TallyPrime allows you to keep track of your inventory during the entire business process. You can keep track of the movement of your goods from one location to another in case of transfer and also verify the physical quantity of your stock items using inventory vouchers in TallyPrime. In case of sales or purchases, you can send a receipt note or a delivery note to your supplier or customer. Also, you have features that will help you place an order for goods with your supplier when the stock is below the limit that is defined by you.
In your business, you can be dealing with inventories and it becomes pivotal to keep track of your stock for the smooth running of your business. If you have an updated account of inventory at your fingertips, you can easily make decisions to place orders, accept orders, transfer items to the required locations, and so on. No matter if you are a dealer, a manufacturer, or dealing with job work, you can manage your inventories for all such cases in TallyPrime.
When the order is placed with the supplier for the supply of goods, details like item name, quantity, order due date, and so on are recorded with the Purchase Order voucher. Later, when these goods are received the respective order number is tracked for the Order Details in the Receipt Note. If you follow the Purchase Order>Receipt Note>Purchase flow or Purchase Order>Purchase flow, TallyPrime with its vouchers supports the flexibility to follow your preferred practices as they are. Similarly, when you reject the goods from your supplier you can record a Rejection Out voucher. For your sales cycle as well, you can follow a similar process of Sales Order > Delivery Note > Sales Invoice or Sales Order > Sales Invoice, and a Rejection in case any goods are rejected by the customer.
Once you have the inventory in place, you can further track the movement of your stocks across your different godowns using the Stock Journal voucher in TallyPrime. Not just the movement, but additional costs involved during the transfer like transportation and wastage or shortage of stocks can also be recorded using the Stock Journal voucher. TallyPrime also provides you with the facility to record the stock take process, also known as inventory or the physical count using the Physical Stock voucher. It involves physically counting and verifying the quantities of all items in stock to ensure accuracy and reconcile them with the recorded inventory data.
Stock Transfers using Stock Journal
To keep track of all your stock adjustments, you can use the Stock Journal voucher in Tallyrpime. In case of any additional costs/expenses incurred during the transfer and any kind of wastage as well, you can use Stock Journal to monitor all such stock adjustments. When you record a Stock Journal voucher for transfers mentioning the respective locations, the quantity at each location undergoes a change as per the quantity mentioned in the voucher. For example, if you transfer 100 pieces of Cricket Bat from Godown A to Godown B, then the quantity will decrease in Godown A and increase in Godown B respectively.
The need for recording inventory vouchers for stock adjustment may be due to the following reasons:
- Inter-location transfer: This is useful for transferring goods from one location to another. The quantity of stock remains the same in the company, but changes at the two locations involved in the transfer.
- Additional cost/expenses involved in the transfer of goods: In the case of transfer, you can also account for the additional cost incurred due to the transfer of materials from one location to another.
- Accounting for wastage of stock or shortage of stock: There may be a shortage or wastage of stock items, and the quantity may have changed. In such cases, you have to enter a stock journal to account for the increase or decrease in the stock item.
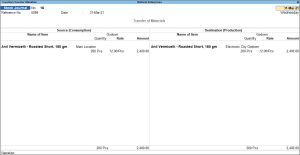
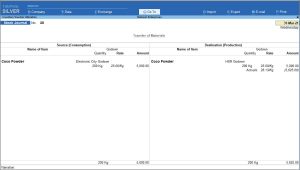
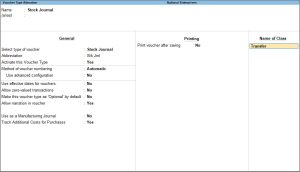
Transfer of materials from one location to another
In your business, you may be transferring materials from one location to another for which you can record a Stock Journal voucher at the origin location to keep your books updated.
![]()
- Press Alt+G (Go To) > Create Voucher > press Alt+F7 (Stock Journal).
Alternatively, Gateway of Tally > Vouchers > press Alt+F7 (Stock Journal).
In case the voucher is inactive, you will be prompted to activate the voucher type.
Select Yes or press Y to proceed. - Press F2 (Date) and change the date, if needed.
- Enter the reference number in Reference No. field, if any.
- If you do not see this option, press F12 (Configure) > set the option Provide Reference No. and Date as Yes.
- If you need to use this option only for the current voucher, press Ctrl+I (More Details) > type or select Provide Reference No. and Date > and press Enter.
- Provide the details of the goods at the source.
- Source (Consumption): select the items and the location from where you are transferring the goods.
- Specify Quantity.
The Rate and Amount field gets prefilled if you have specified it for the goods selected.
- Provide the details of the goods at the destination.
- Destination (Production): select the items and the location to where the goods should be sent.
- Provide Narration, if needed.
- As always, press Ctrl+A to save.
In case the transfer is interstate and you need to follow GST, it becomes a sales.
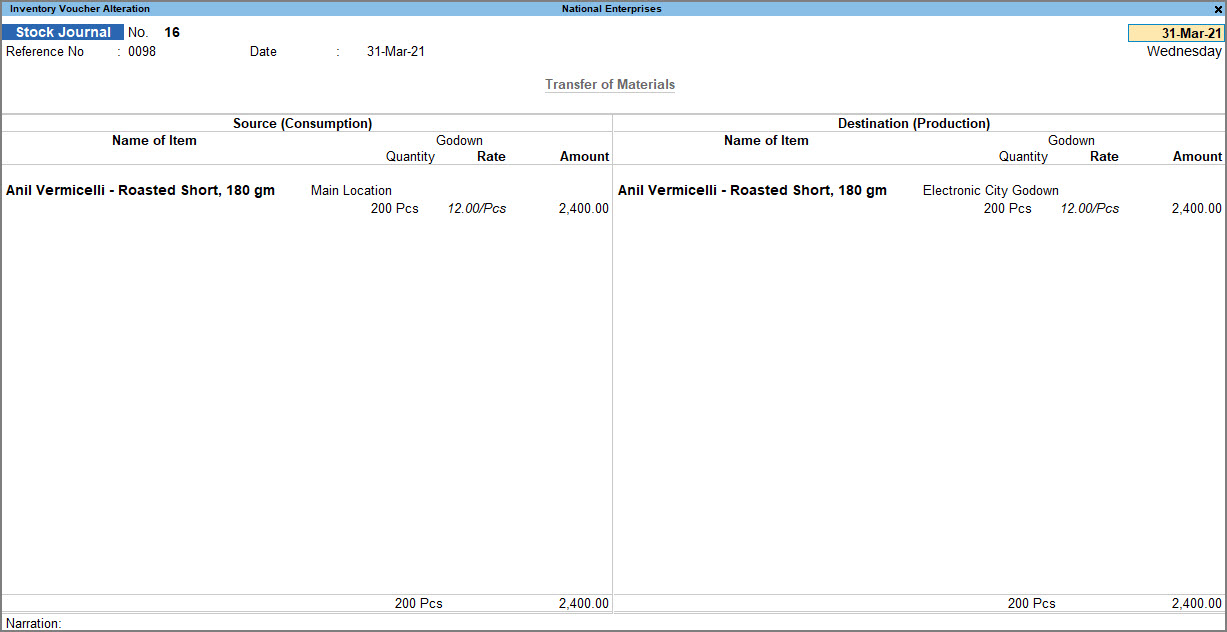
Similarly, in case of damage to items, you can simply record the difference in the Destination column after receiving the goods at the destination location by entering the remaining items left after damage or spillage.
You can refer to the image shown below:
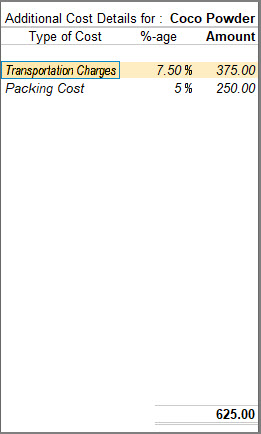
Additional cost/expenses in the transfer of goods
When you transfer goods from one place to another, it can incur some transportation charges. In TallyPrime, you can record such expenses incurred during the transfer in the Stock Journal itself.
![]()
- Press Alt+G (Go To) > Create Voucher > press Alt+F7 (Stock Journal).
Alternatively, Gateway of Tally > Vouchers > press Alt+F7 (Stock Journal).
In case the voucher is inactive, you will be prompted to activate the voucher type.
Select Yes or press Y to proceed. - Press F2 (Date) and change the date, if needed.
- Enter the reference number in Reference No. field, if any.
- If you do not see this option, press F12 (Configure) > set the option Provide Reference No. and Date as Yes.
- If you need to use this option only for the current voucher, press Ctrl+I (More Details) > type or select Provide Reference No. and Date > and press Enter.
- Provide the details of the goods at the source.
- Source (Consumption): select the items and the location from where you are transferring the goods.
- Specify Quantity.
The Rate and Amount field gets prefilled if you have specified it for the goods selected.
- Provide the details of the goods at the destination.
- Destination (Production): select the items and the location to where the goods should be sent.
- Specify Quantity.
The Rate and Amount field gets prefilled if you have specified it for the goods selected.You can have a different Rate for Source (Consumption) and for Destination (Production) column for the same stock item.
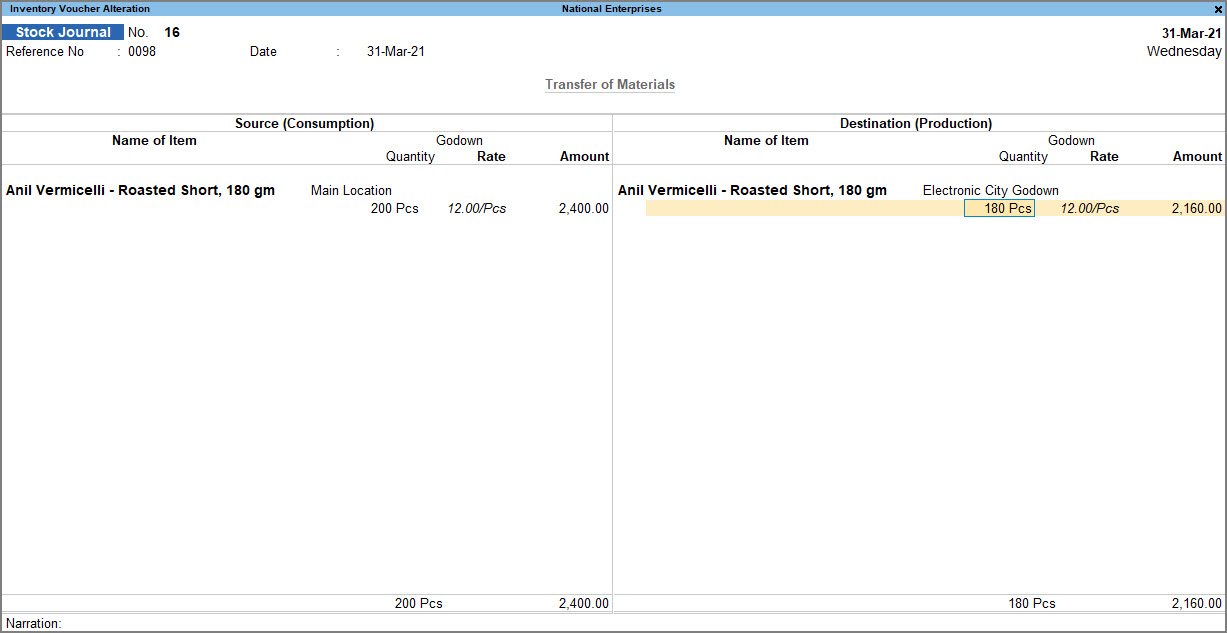
The Additional Cost Details screen appears in which you can add Additional Cost/Expenses incurred.
If you do not see the Additional Cost Details screen:- Press Alt+G (Go To) > Alter Master > select Voucher Type > Stock Journal.
- Set Track Additional Costs for Purchases to Yes.
- Provide the details of additional cost.
- Type of Cost: select the additional cost ledger.
- %-age: enter the additional cost percentage.
- Amount: it gets automatically calculated based on the stock items amount.
What you see on the screen can vary based on your choices. Press F12 (Configure) to change the options.
- Provide Narration, if needed.
- As always, press Ctrl+A to save the voucher.
To know more, press F12 Configurations of Stock Journal voucher, click here.
|
Options |
Description |
|
Skip the Date field during voucher creation |
By default, the cursor skips the Date field during Voucher creation. If you do not want to skip the Date field, then set this option as No for faster voucher entry. |
|
Provide Reference No. and Date |
Enable this option to add the voucher reference field in Stock Journal. |
|
Provide Additional Descriptions for Stock Items |
You can Provide the additional description for the stock Item in the transactions |
|
Show message on negative Stock Balance |
By default, a warning message is displayed for negative stock balance. If you set it to No, the error message will not be displayed. |
|
Use Expired Batches for Stock items |
By default, the expiry batches in the list of active batches during voucher entry are displayed. If you set it to No, expiry batches will not be displayed in the List of Active batches. |
|
Show Batches with Zero Quantity |
It will display the zero quantity batches for the stock item |
|
Show Balance as on Voucher Date |
By default, the ledger current balance up to last voucher entry date are displayed. If you set it to Yes, then it will display the ledger balance up to current voucher entry date |
|
Options |
Description |
|
Skip Co-product/By-Product/Scrap details |
When the option Skip Co-Product/By-Product/Scrap Stock Item is set to Yes, and while recording a manufacturing journal for a stock item for which the BoM is created by capturing the details of Co-Products/By-Products/Scrap; then the configuration is ignored and the details of Co-Products/By-Products/Scrap are captured. You can also modify the details in the Co-Products/By-Products/Scrap section. (For Manufacturing Journals only) |
|
Show Compound Unit based on Rate |
Enable this option to show the compound unit of item based on the unit provided in the Rate Per column |
|
Show details of Compound Unit |
Enable this option to display details of compound unit in the Quantity field. If Kgs is typed in the Rate Per field, then the Quantity field will display as 12 Kgs.250 gms. |
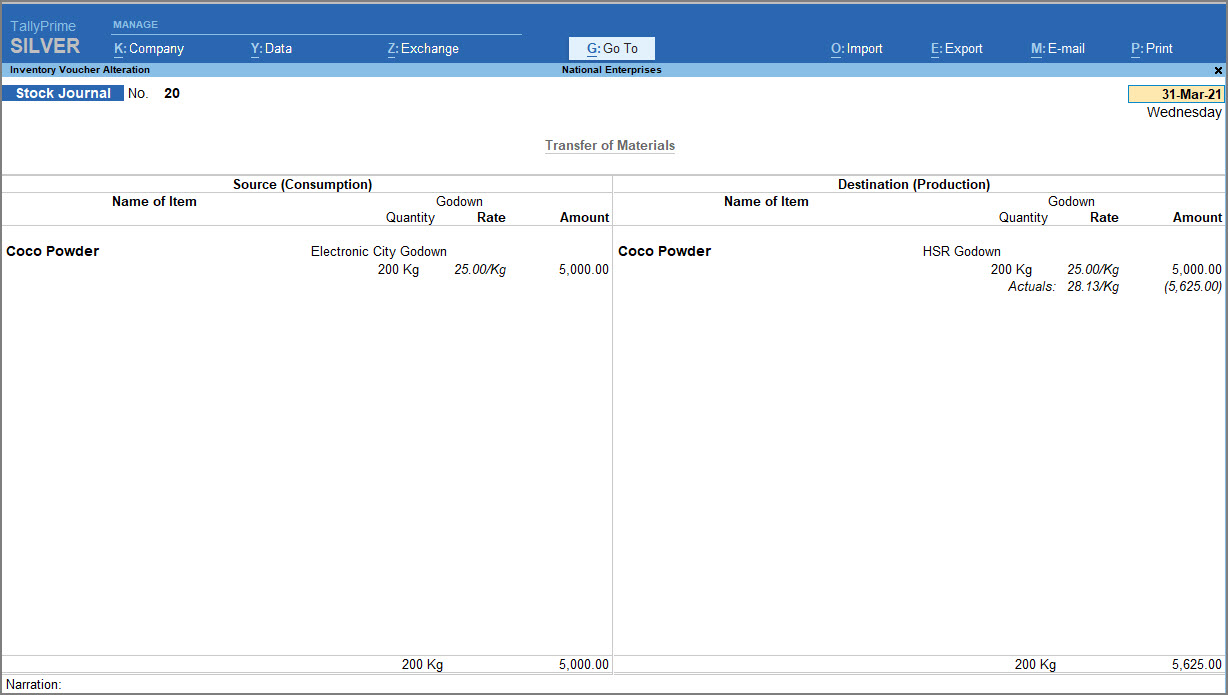
Stock Journal Voucher Class
Stock Journal voucher classes allow you to handle transfers from one location to another, for companies having multi-location inventory and at least two locations. Once the class is selected, you will need to specify the destination and provide the list of items to be transferred. Through this class, all items/batches will be exactly mirrored as configured in the voucher class to the destination, including Batch Number, Rate, and Value. This will help in faster data entry of the regular type of Stock Journal entries.
The facility to create voucher classes is provided for all the accounting and inventory vouchers in TallyPrime.
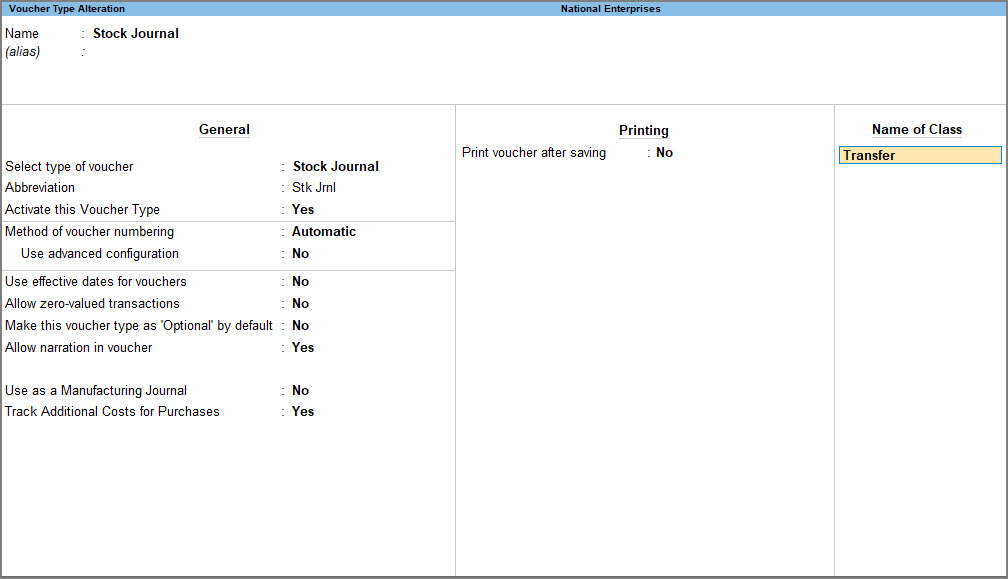
You can either alter the existing Stock Journal or create a new voucher type based on the requirements.
![]()
- Press Alt+G (Go To) > Alter Master > type or select Voucher Types > type or select Stock Journal.
Alternatively, Gateway of Tally > Alter > type or select Voucher Types > type or select Stock Journal. - Name of Class: enter a suitable name, as per the purpose of the voucher class; for example, Transfer.
What you see on the screen can vary based on your choices. Press F12 (Configure) to change the options.
The Class: Transfer screen is displayed. - Set Use Class for Inter- Godown Transfers: Yes.

- As always, you can press Ctrl+A to save.
Once you have created a voucher class now with inter-godown transfer enabled, all you have to do is just enter the destination godown while recording the stock journal voucher and enter the item details.

Similarly, you can configure the voucher classes with values as required and simplify your Stock Journal entries.
Record Delivery of Goods | Delivery Note
It is important to keep track of the goods and their delivery that you have sent to your customers. In TallyPrime, you can record a Delivery Note as a document of proof between you and your customer that goods are delivered as per order and accepted in good condition to avoid discrepancies during payment. You can record the order information like item details, quantity, delivery address, the location from where the item is being sent, and so on. To know more, refer to Record Delivery Note Against Sales Order section in Record Sales Order and Delivery Note in TallyPrime topic.
Record Rejection of Goods Delivered | Rejection In
When you sell goods to your customer, there can be scenarios when some of the goods are rejected or returned by. Rejection In is one of the inventory vouchers in TallyPrime used when goods are rejected or returned by the customer. The transaction is recorded after raising a delivery note, but before raising a sales voucher.
If the customer rejects the goods after you have recorded the sales voucher, then you will have to record a credit note against that rejection.
To know more, refer to the Record Rejections In against Delivery Note section in the Record Sales of Goods Dispatched topic.
Record Receival of Goods | Receipt Note
When you receive the purchased goods from your supplier, you may want to acknowledge that you have received the goods that you requested. You can record a Receipt Note voucher in TallyPrime, to account for this. The receipt note includes your supplier information, goods that you have received, amount, and so on. Receipt Note voucher keeps track of the receipt of goods at your location.
To know more, refer to the Record a Receipt Note for Goods Received section in the Record Purchase Order and Receipt Note topic.
Once a receipt note is passed, the inventory is updated to reflect the increase in stock due to the goods being received.
Record Rejection of Goods Delivered | Rejection Out
When you buy goods from your supplier, there can be scenarios where you reject or return some goods due to varied reasons like poor quality or surplus inventory. Rejections Out vouchers are used when you reject or return goods to your supplier. The transaction is recorded after raising a receipt note but before raising a purchase voucher.
If you reject the goods after you have recorded the Purchase voucher, then you will have to record a debit note against that rejection.
To know more, refer to the Record Rejections Out against Receipt Note section in the Record Purchase Order and Receipt Note topic.
Once a rejection out voucher is passed, the inventory is updated to reflect the reduction in stock due to the rejected goods being removed from the inventory.
Physical Stock Verification
In your business, you can be practicing the stock take process, also known as inventory or the physical count. It involves physically counting and verifying the quantities of all items in stock to ensure accuracy and reconcile them with the recorded inventory data. It helps identify any discrepancies and provides a clear picture of the actual inventory levels. In TallyPrime, you can record a Physical Stock voucher in such cases and keep a clear log of your items.
Similarly, when there are differences between the actual stock available at your location and the stock that is displayed in your company books, you can record a Physical Stock voucher to address the discrepancies. For example, the physical stock voucher can be recorded in case of damages, losses, or pilferages in the stock that needs to be adjusted in the system to reflect the quantity that is actually available for use or sale for your business.
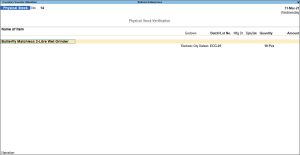
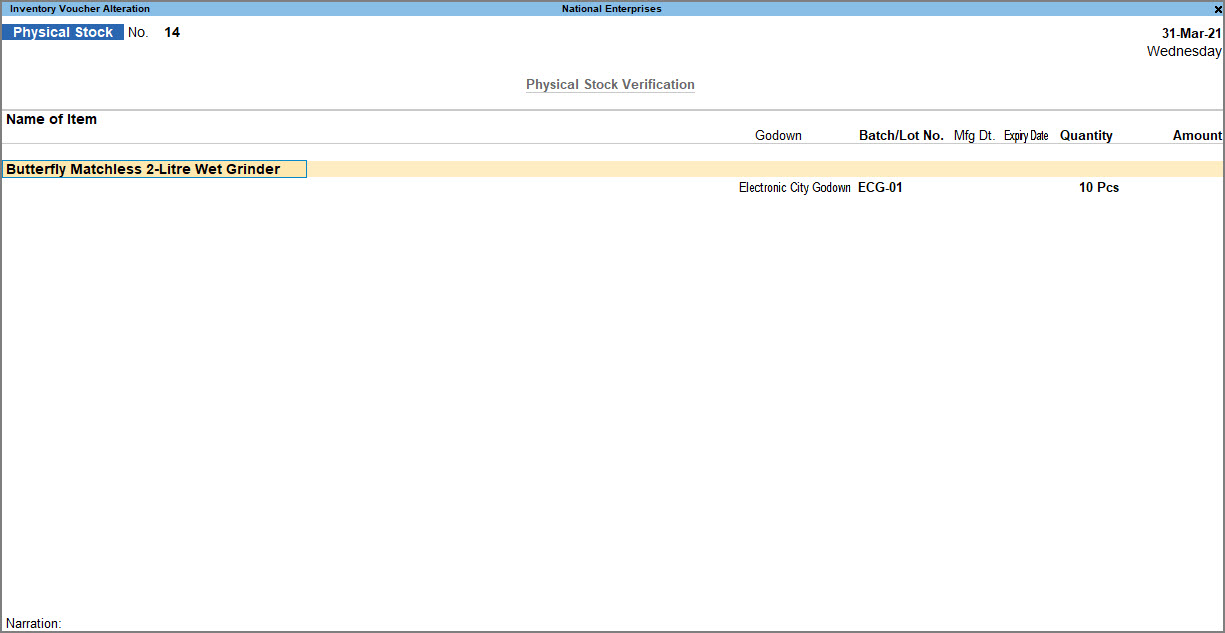
![]()
- Press Alt+G (Go To) > Create Voucher > press Ctrl+F7 (Physical Stock).
Alternatively, Gateway of Tally > Vouchers > press Ctrl+F7 (Physical Stock). - Press F2 to change the stock taking date.
- Provide the details of stock items.
- Select the stock items and location, if applicable.
As in other transactions, you can create the item or location on the fly by pressing Alt+C. Alternatively, press Alt+G (Go To) > Create Master > type or select Stock Item > and press Enter. - Batch number: select the appropriate batch number for which the Physical Stock quantity is to be recorded.
Batch details will appear only if, batch wise details are activated in the Stock Item master screen. - Physical Stock: enter the actual quantity.
The item quantity will be updated in your company books with the details that you record in this voucher.
- Select the stock items and location, if applicable.
- Provide Narration, if needed.
- As always, press Ctrl+A to save.
Once a physical stock voucher is passed, the inventory is adjusted to match the physical count of items, ensuring that the recorded inventory aligns with the actual quantities on hand.
To know more about F12 configurations of Physical Stock voucher, click here.
|
Options |
Description |
|
Skip the Date field during voucher creation |
By default, the cursor skips the Date field during Voucher creation. If you do not want to skip the date field then set this option to No for faster voucher entry. |
|
Provide Additional Descriptions for Stock Items |
Provide the additional description for the stock Item in the transactions. |
Receipt of Material for Job Work | Material In
In your business, you can be dealing with job work from your customer in which you receive unfinished products from the principal manufacturer and you are to deliver the finished products. When you receive raw materials from your customers for job works, you can use a Material In voucher in TallyPrime to keep track of the goods received. The Material In voucher helps document and record the details of the received materials, such as the quantity, description, and any relevant information pertaining to the materials.
To know more, refer to the Receipt of Material Towards a Job Order section in the Record Job Work In Order Transactions in TallyPrime topic.
Delivering Finished Goods towards Job Work | Material Out
In the case of Job Work In order, on completing the production of the agreed goods, the finished goods are delivered to the Principal manufacturer. In TallyPrime the Material Delivery (Finished Goods/ scrap etc.) to the Principal Manufacturer can be recorded using Material Out vouchers.
To know more, refer to the Delivering Finished Goods Towards a Job Order section in the Record Job Work In Order Transactions in TallyPrime topic.
Manufacturing Journal
You can keep track of all the goods used to produce the finished goods, co-products, by-products, and scraps during the manufacturing process. It provides a clear view of the items that are consumed or damaged during the process. To learn more, refer to the Manage Inventory in Manufacturing topic.
View Edit Log for Inventory Transactions
If you have opted for Edit Log in TallyPrime and want to know how to view Edit Log for transactions, then refer to the Edit Log in TallyPrime topic.
Keeping track of your inventory and stocks across multiple godowns is necessary to ensure that your business is streamlined. Enabling you to manage and handle your stocks and inventory effectively, TallyPrime assists you in accessing information about the same in the blink of an eye, so that you can run your business smoothly.


