
Establish Connection with State Bank of India (SBI) Accounts from TallyPrime
With Connected Banking, you can connect your State Bank of India (SBI) accounts to TallyPrime. This allows you to avoid all manual activities and perform the following right from TallyPrime:
- Send payments online from TallyPrime.
- View Bank Balance in a click.
- Get Bank Statement right in TallyPrime to reconcile your bank transactions.
Prerequisites to Using Connected Banking
-
Valid TallyPrime license and TSS
-
A current account with SBI on YONO Business
-
Tally.NET ID and password
All you need to do is log in to Connected Banking with your Tally.NET ID and password. Once a Connected Banking session is established, you can start connecting your bank accounts to TallyPrime. -
The mobile number linked with the Tally.NET ID should be the same as that registered with the bank.
If you change your mobile number, then you will need to update the number at the bank and then update it for your Tally.NET ID. -
Connection with SBI account by completing the onboarding steps on the bank portal
-
Consent form and board resolution document, if you have a multi-user current account with SBI
Account Types Supported
If you have an SBI account, then you can use Connected Banking.
Here’s the table with the account types supported:
|
Sl No. |
Account Type |
Number of Users/Admin in Bank Account |
Supported/Not Supported |
|---|---|---|---|
|
1 |
Current Account |
Single User |
Supported |
|
2 |
Current Account |
Multi-User and Single Admin |
Supported |
|
3 |
Current Account |
Multi-User and Multi-Admin |
Supported |
|
4 |
Savings Account |
NA |
Not Supported |
Connect Your SBI Accounts | Single-user Bank Account

- In TallyPrime, press Alt+Z (Exchange) > All Banking Options > Bank Connections.
If you have not logged in to Connected Banking already, then you will need to log in. - Press F6 (New Connection).
- Select State Bank of India (India).
A connection ID gets generated that you will need to enter on the bank portal. - Press C (Connect) in the Connect to Bank screen.
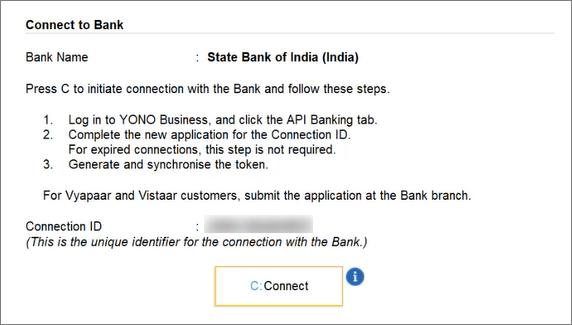
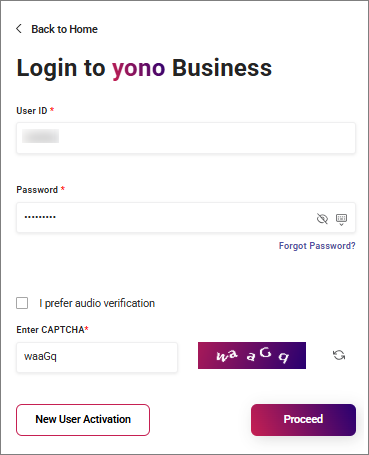
Consequently, you get redirected to the bank portal. - Log in to YONO Business SBI portal.
- Enter your User ID, Password, and Captcha.
- Click PROCEED.
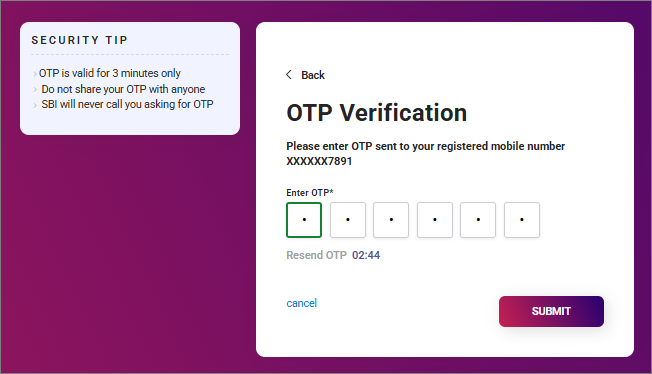
- Enter the OTP sent to your registered mobile number and click SUBMIT.
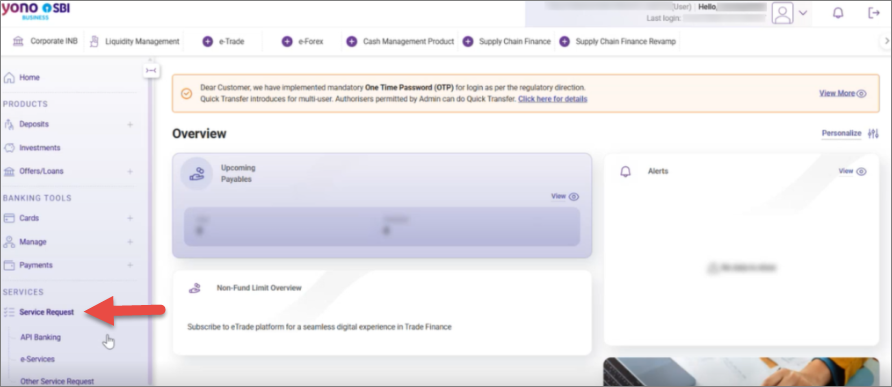
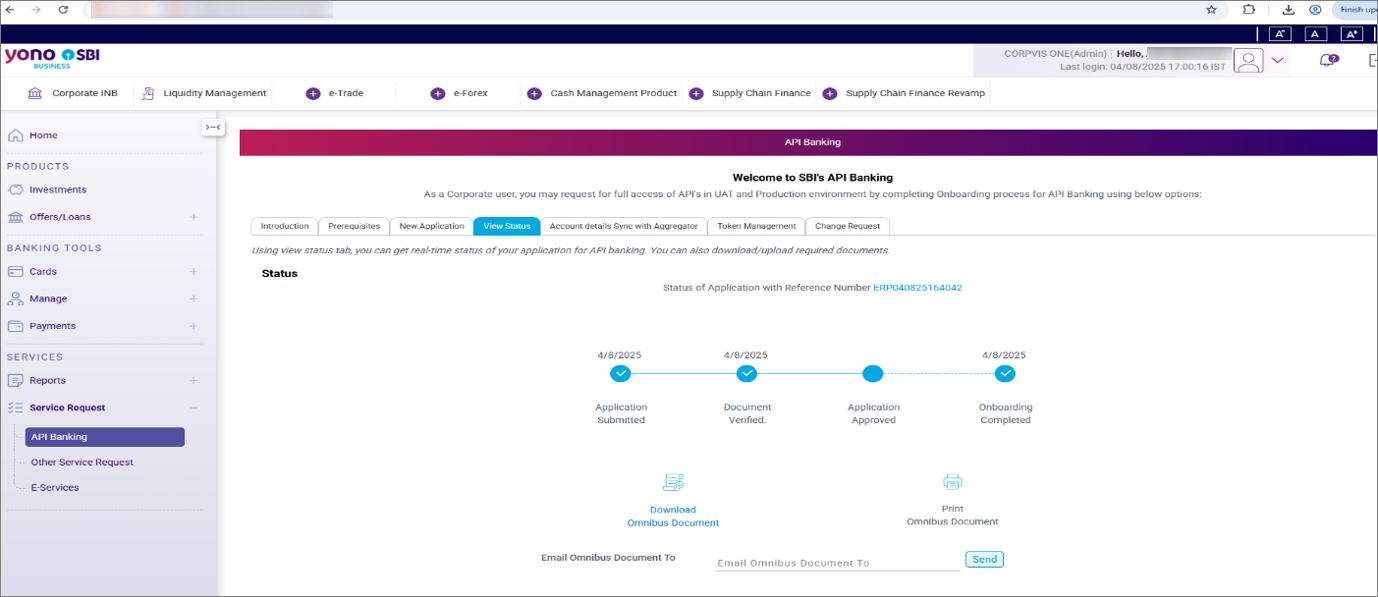
- Under Service Request located on the left-hand side menu, click API Banking.
- Click New Application.
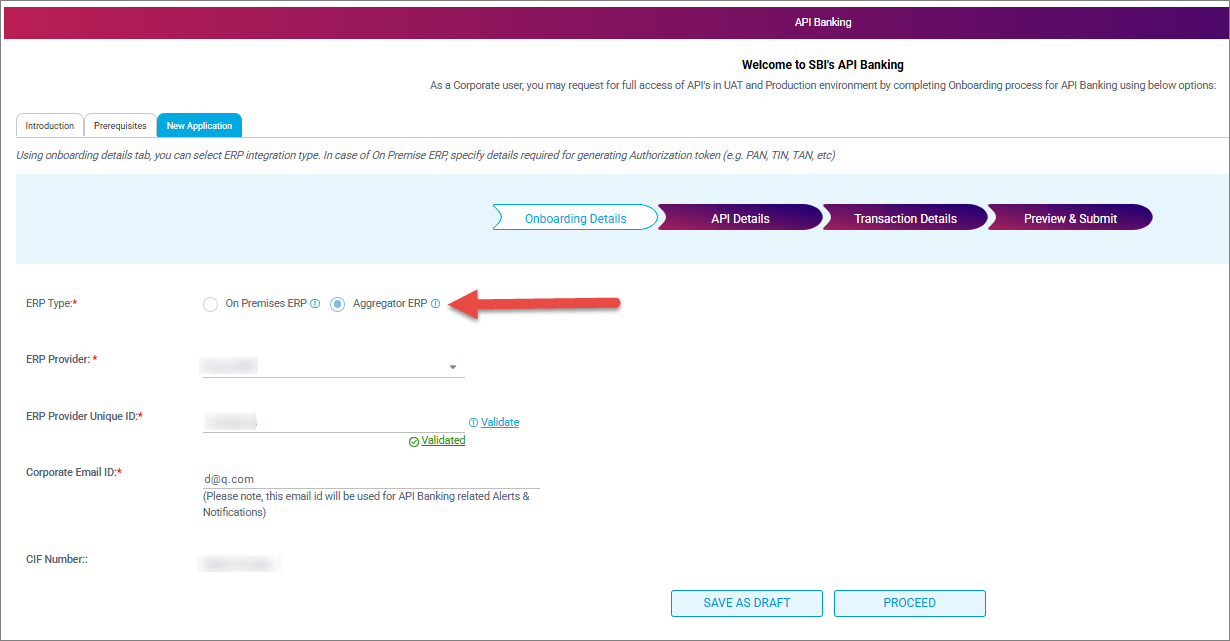
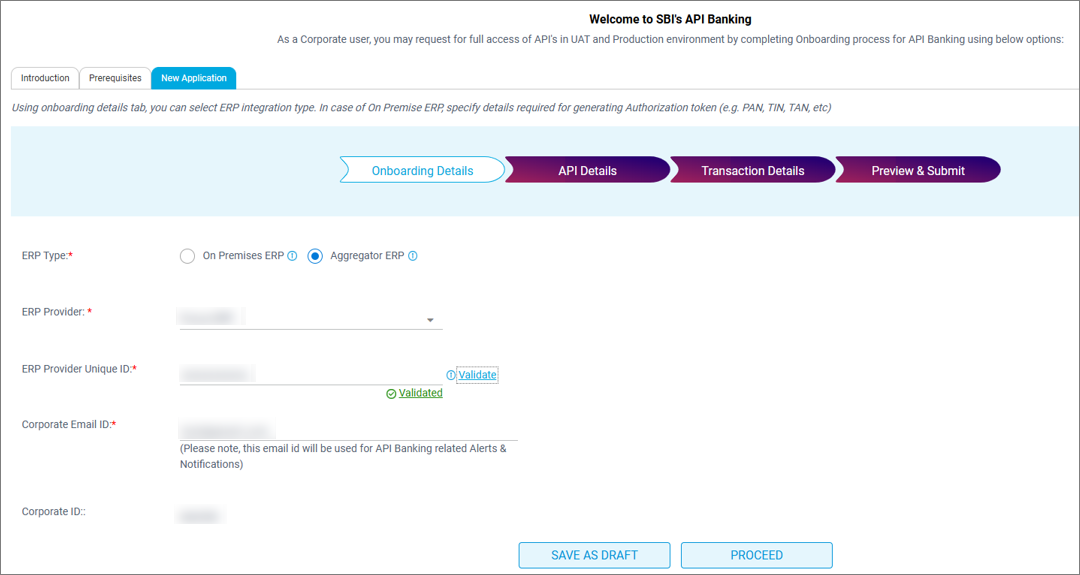
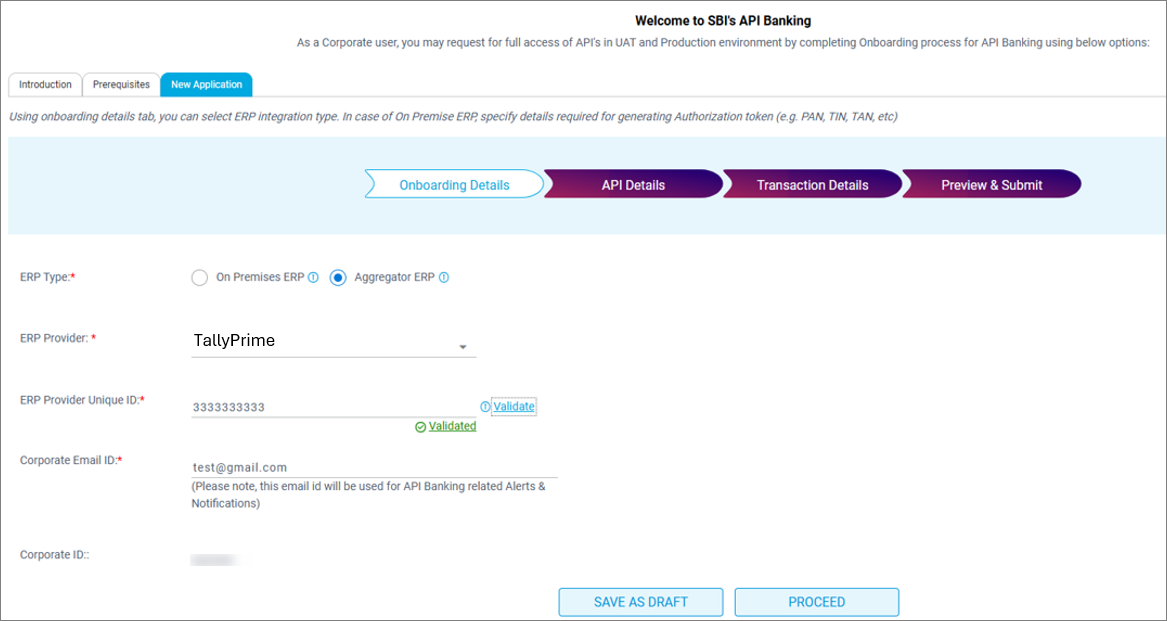
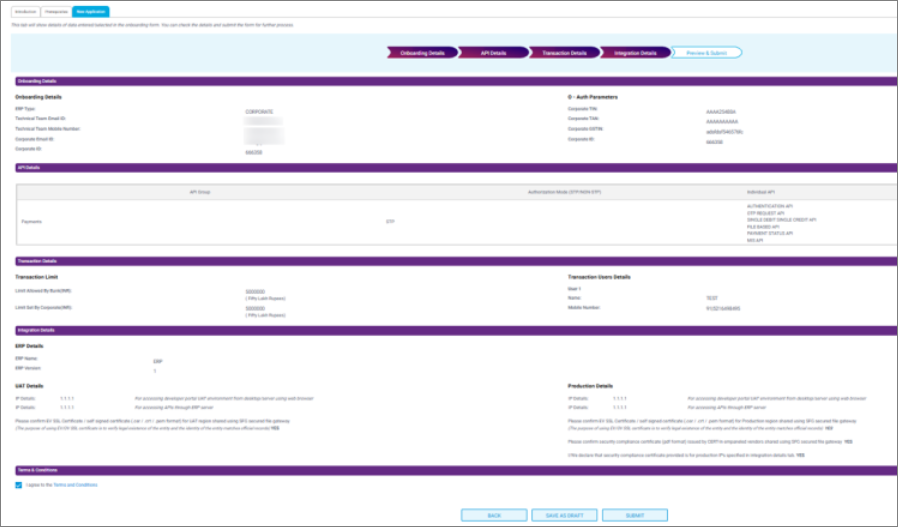
- Provide the necessary details in the Onboarding Details page.
- ERP Type: Aggregator ERP.
- ERP Provider: TallyPrime.
- Validate the ERP Provider Unique ID.
- Enter the Connection ID displayed in the Bank Connections report.
- Paste the Connection ID under ERP Provider Unique ID on the YONO portal.
- Click Validate.
The Connection ID gets validated.
- Corporate Email ID: E-mail ID registered with the bank.
- Click PROCEED.
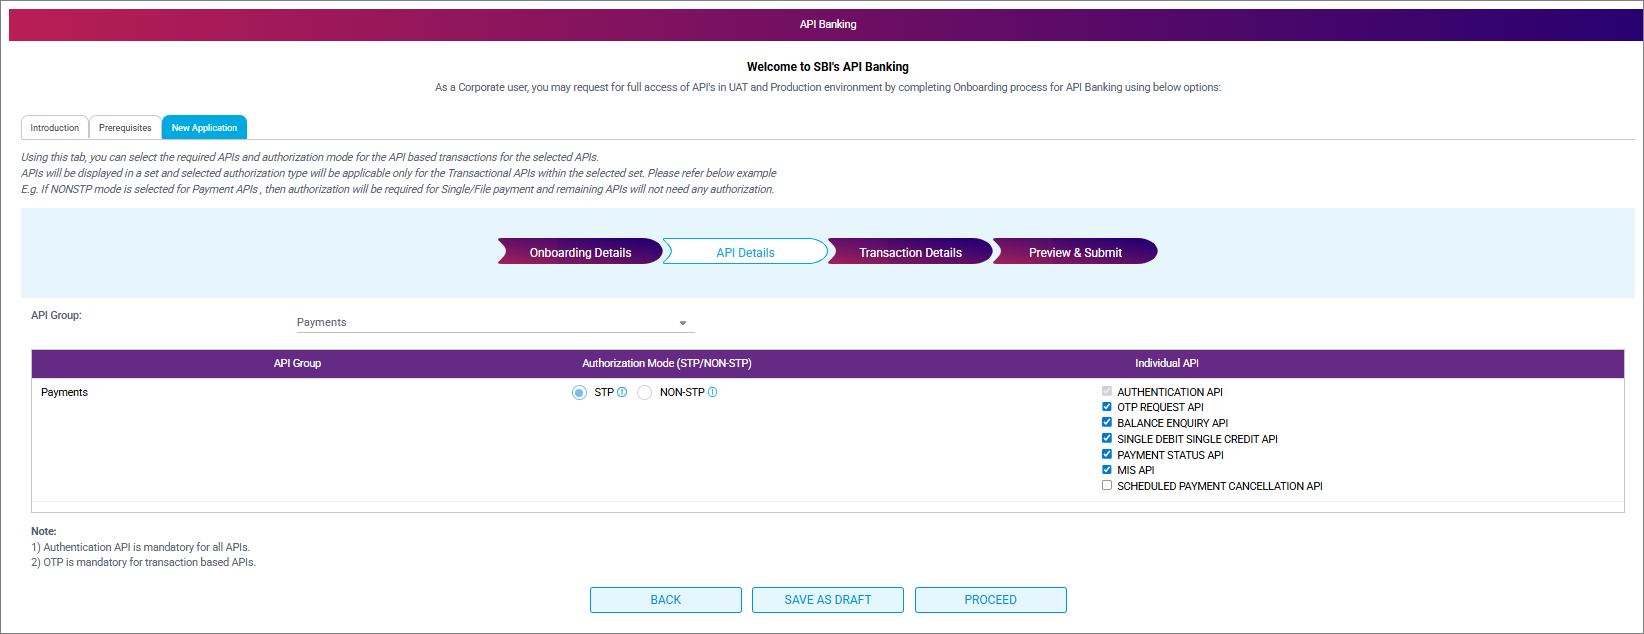
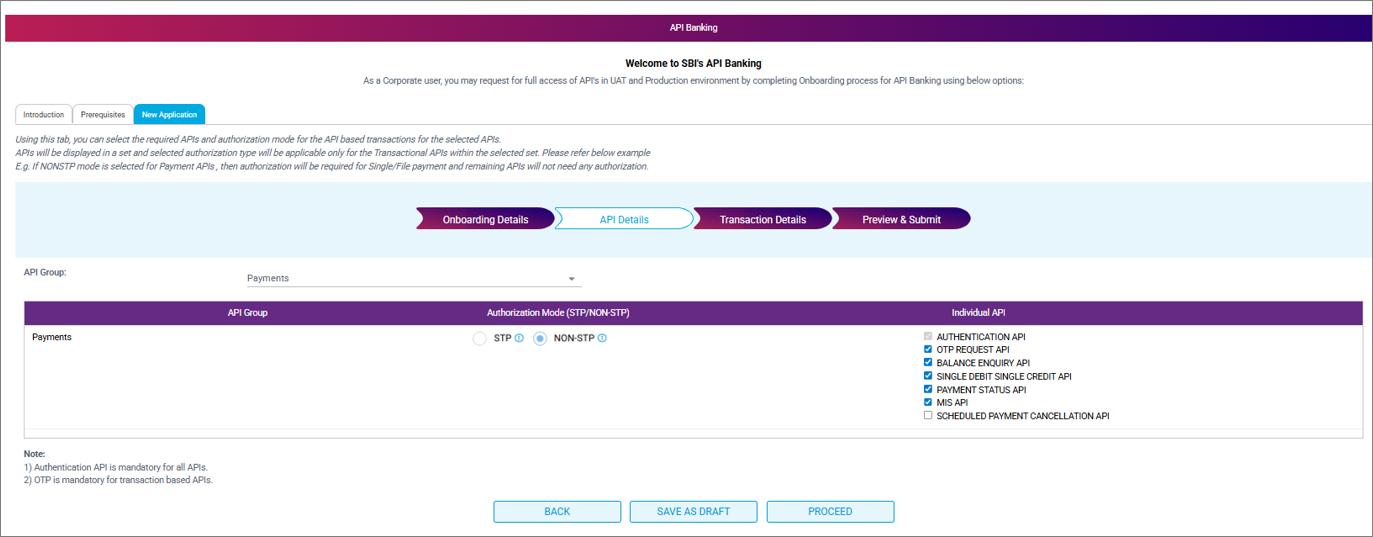
- On the API Details page, provide the necessary details.
- Select the API Group as Payments.
- Under Individual API, select all the checkboxes.
- Click PROCEED.
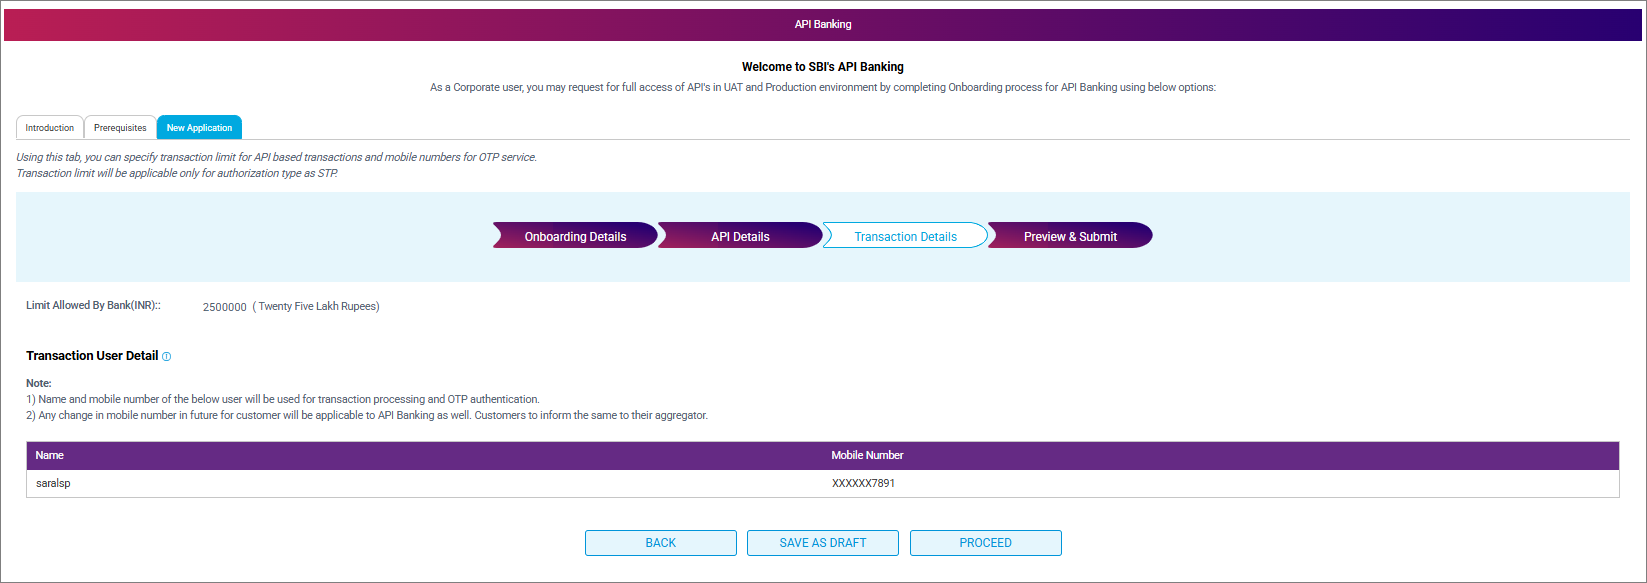
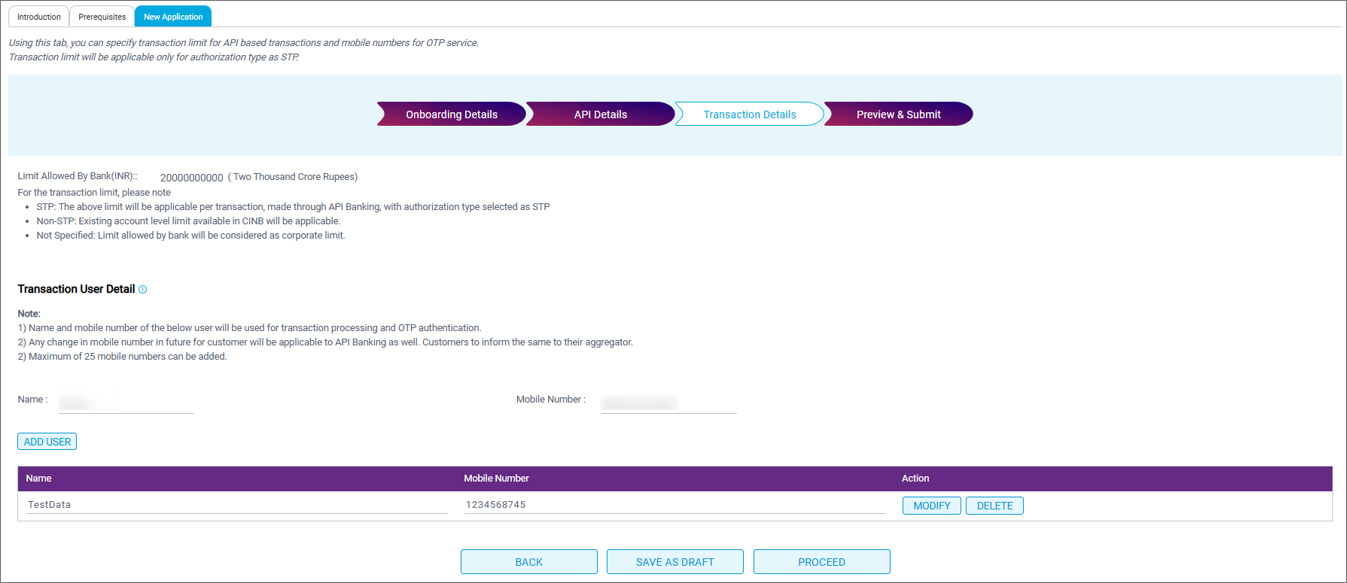
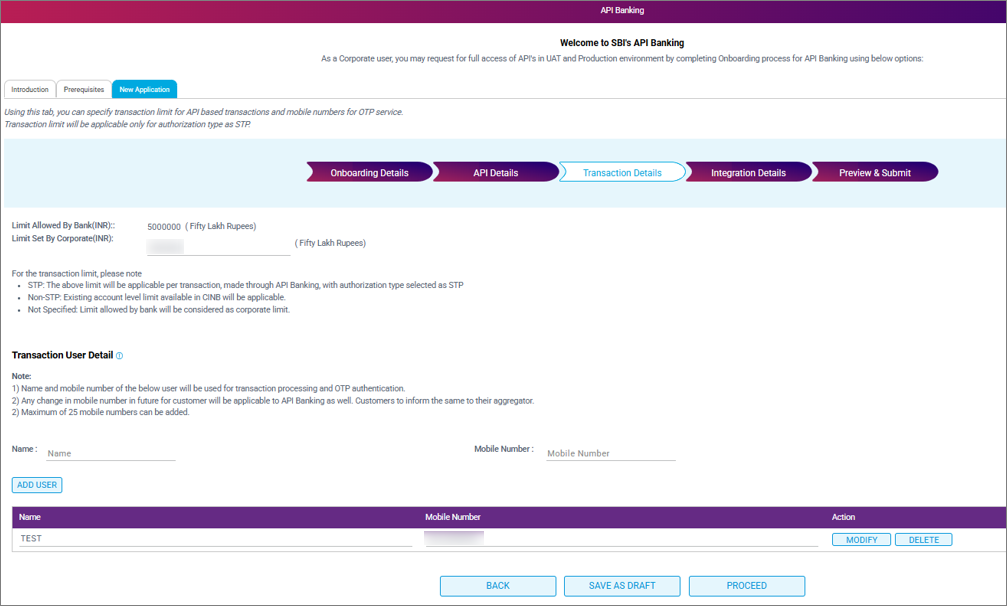
- On the Transaction Details page, review the Limit Allowed by Bank (INR) and your mobile number and click PROCEED.
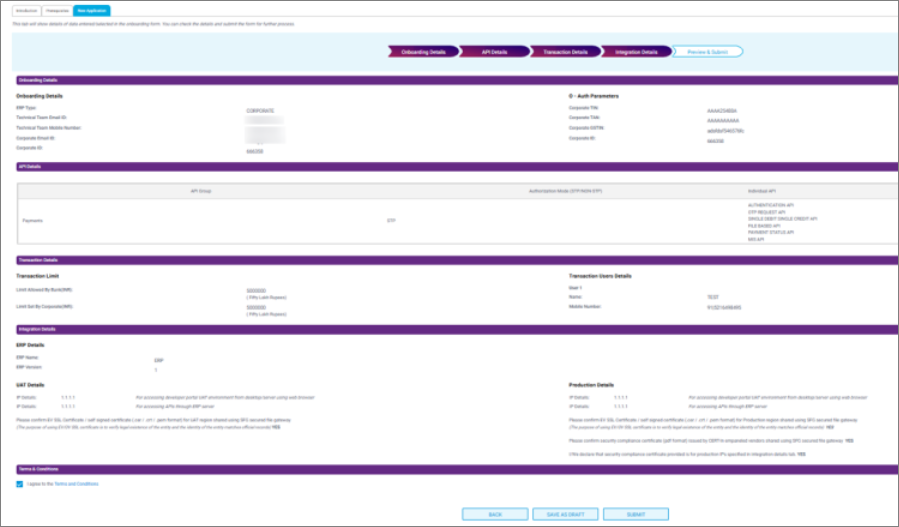
- On the Preview & Submit page, submit the application.
- Review all the details provided by you.
- Select I agree to the Terms and Conditions.
- Click SUBMIT.

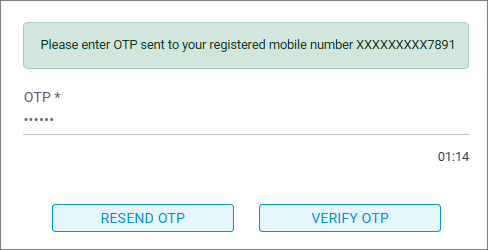
- Verify with the OTP.
- Enter the OTP received on your registered mobile number and click Verify OTP.
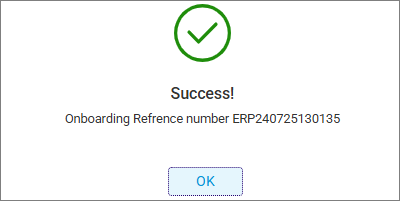
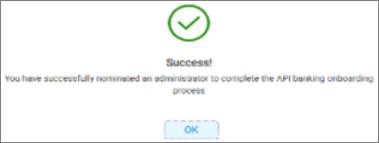
- Click OK.
- Enter the OTP received on your registered mobile number and click Verify OTP.
- On the Account details Sync with Aggregator page, click SYNC DATA WITH AGGREGATOR.

The data gets synchronised with TallyPrime. - Click PROCEED.
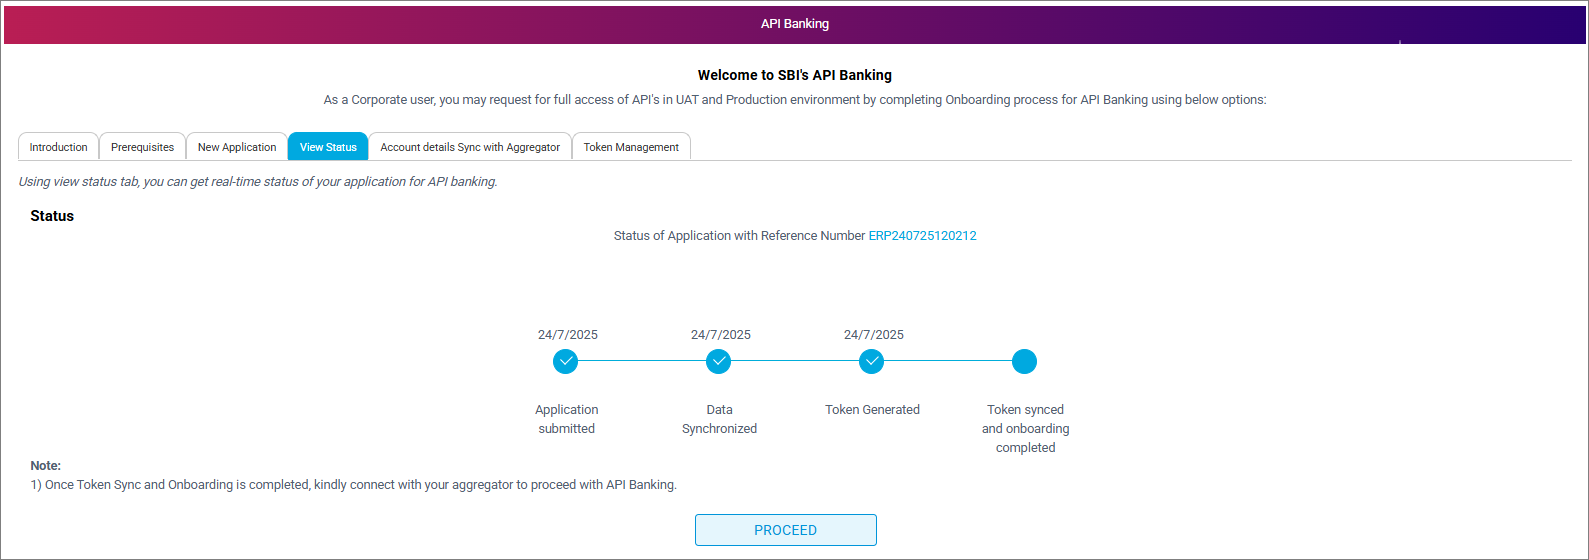
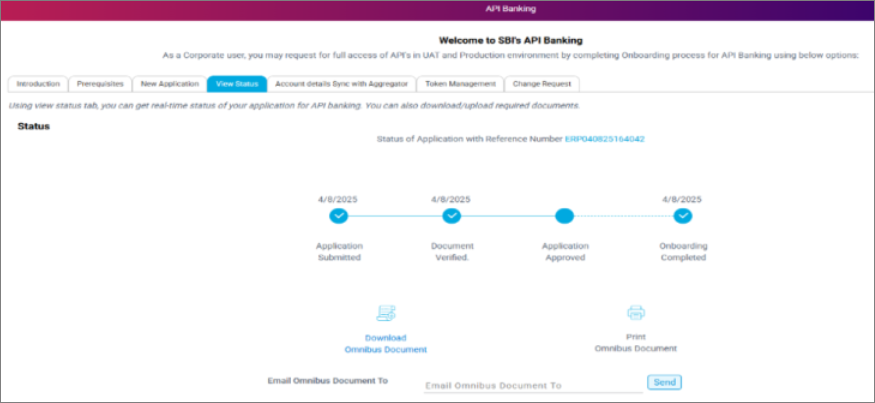
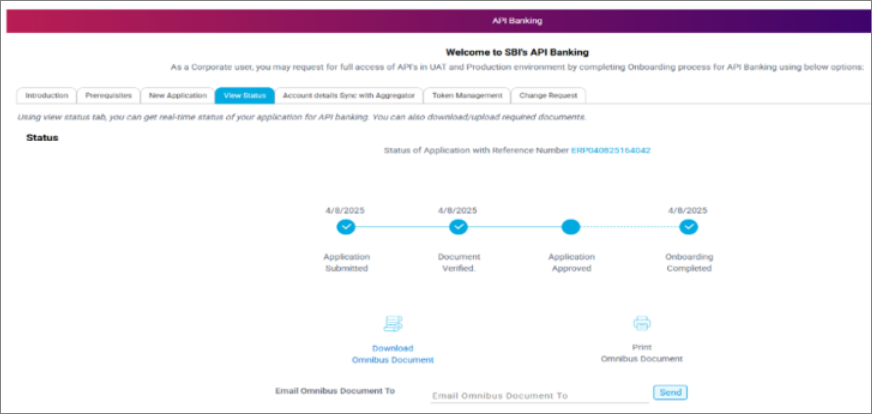
- On the View Status page, click PROCEED.
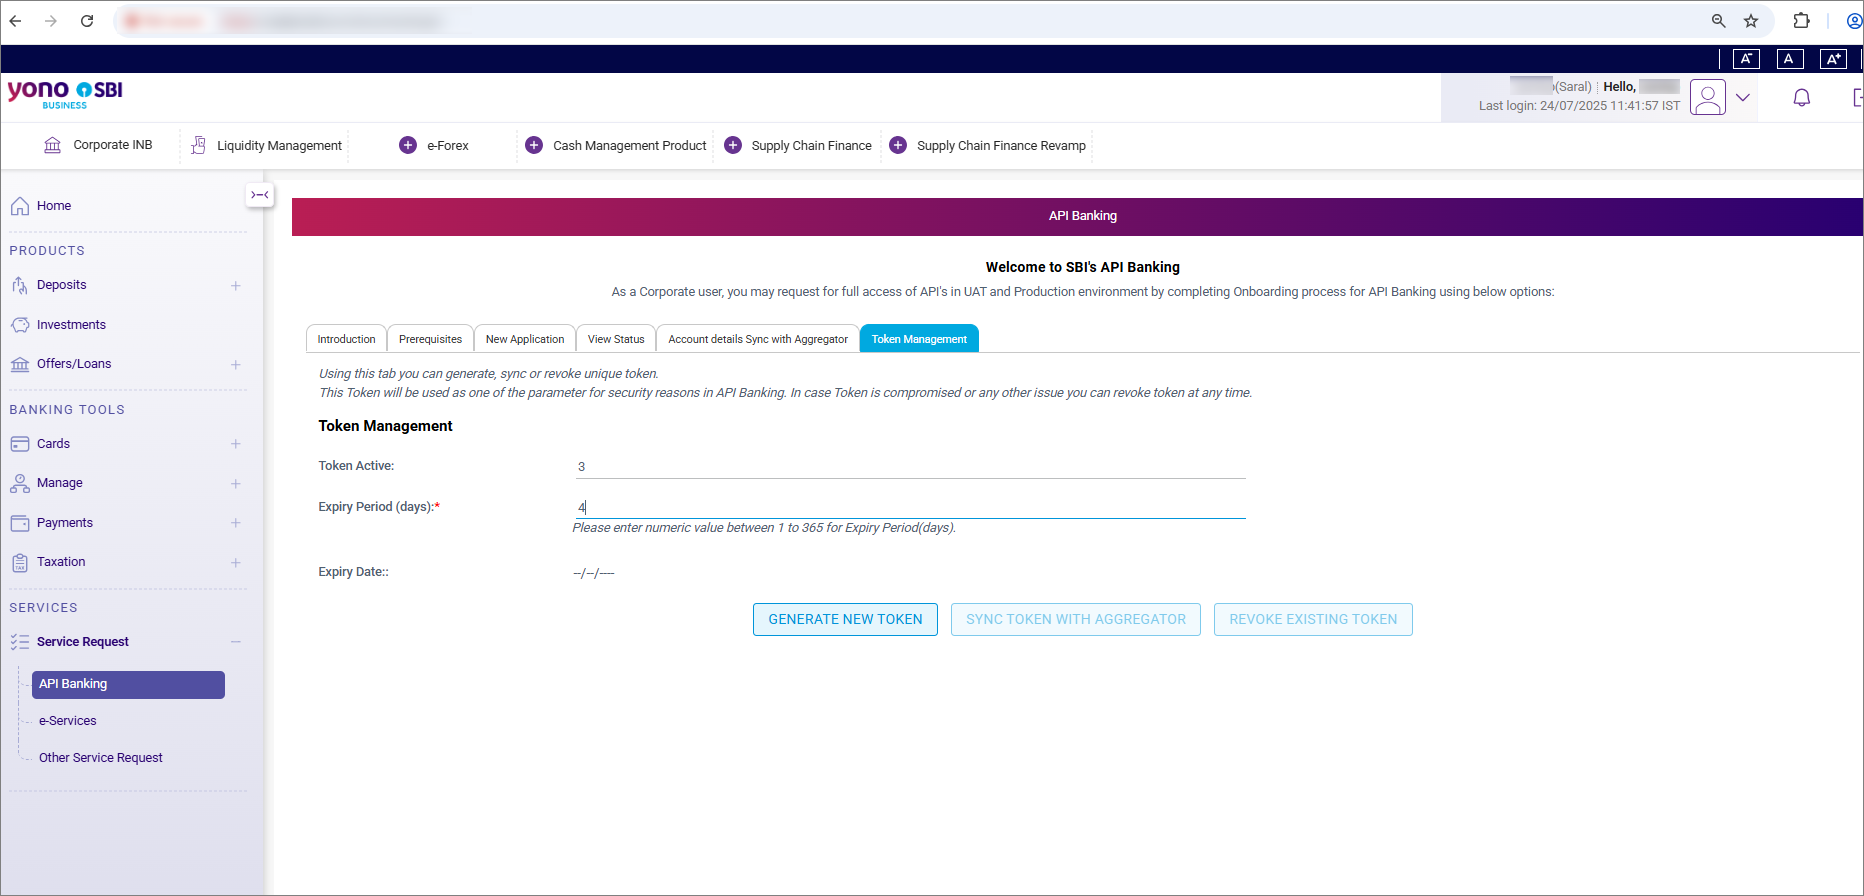
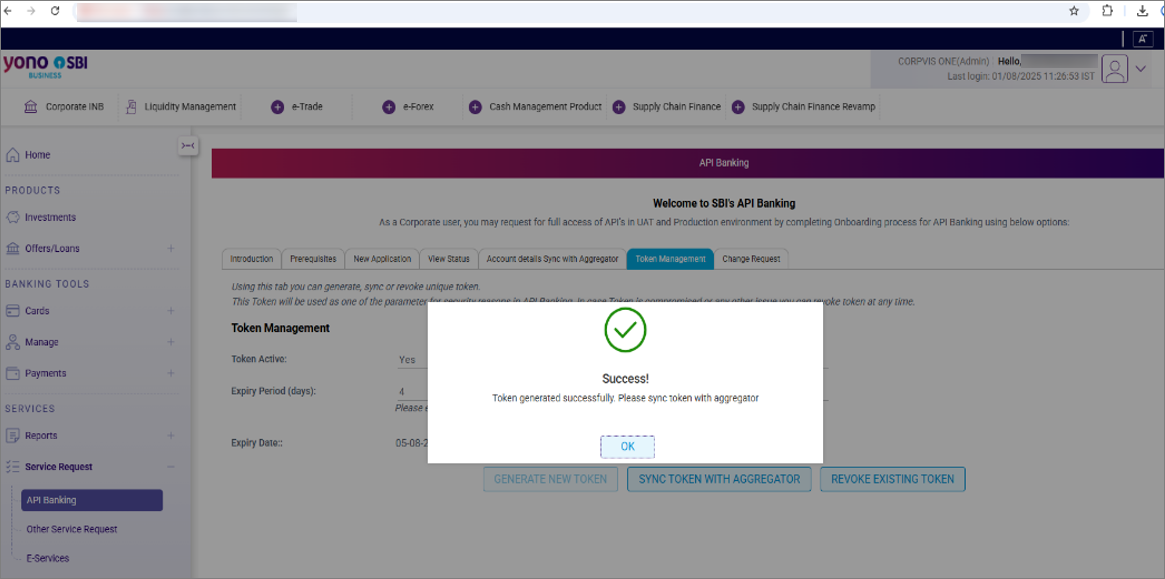
- On the Token Management page, generate a new token.
- Expiry Period (days): Enter the number of days as 365.
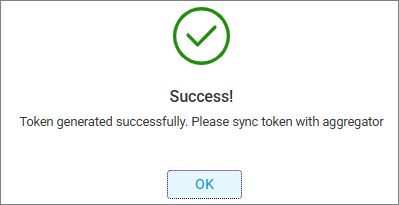
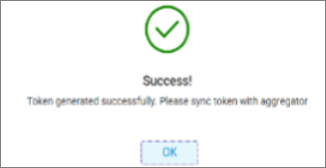
- Click Generate New Token.
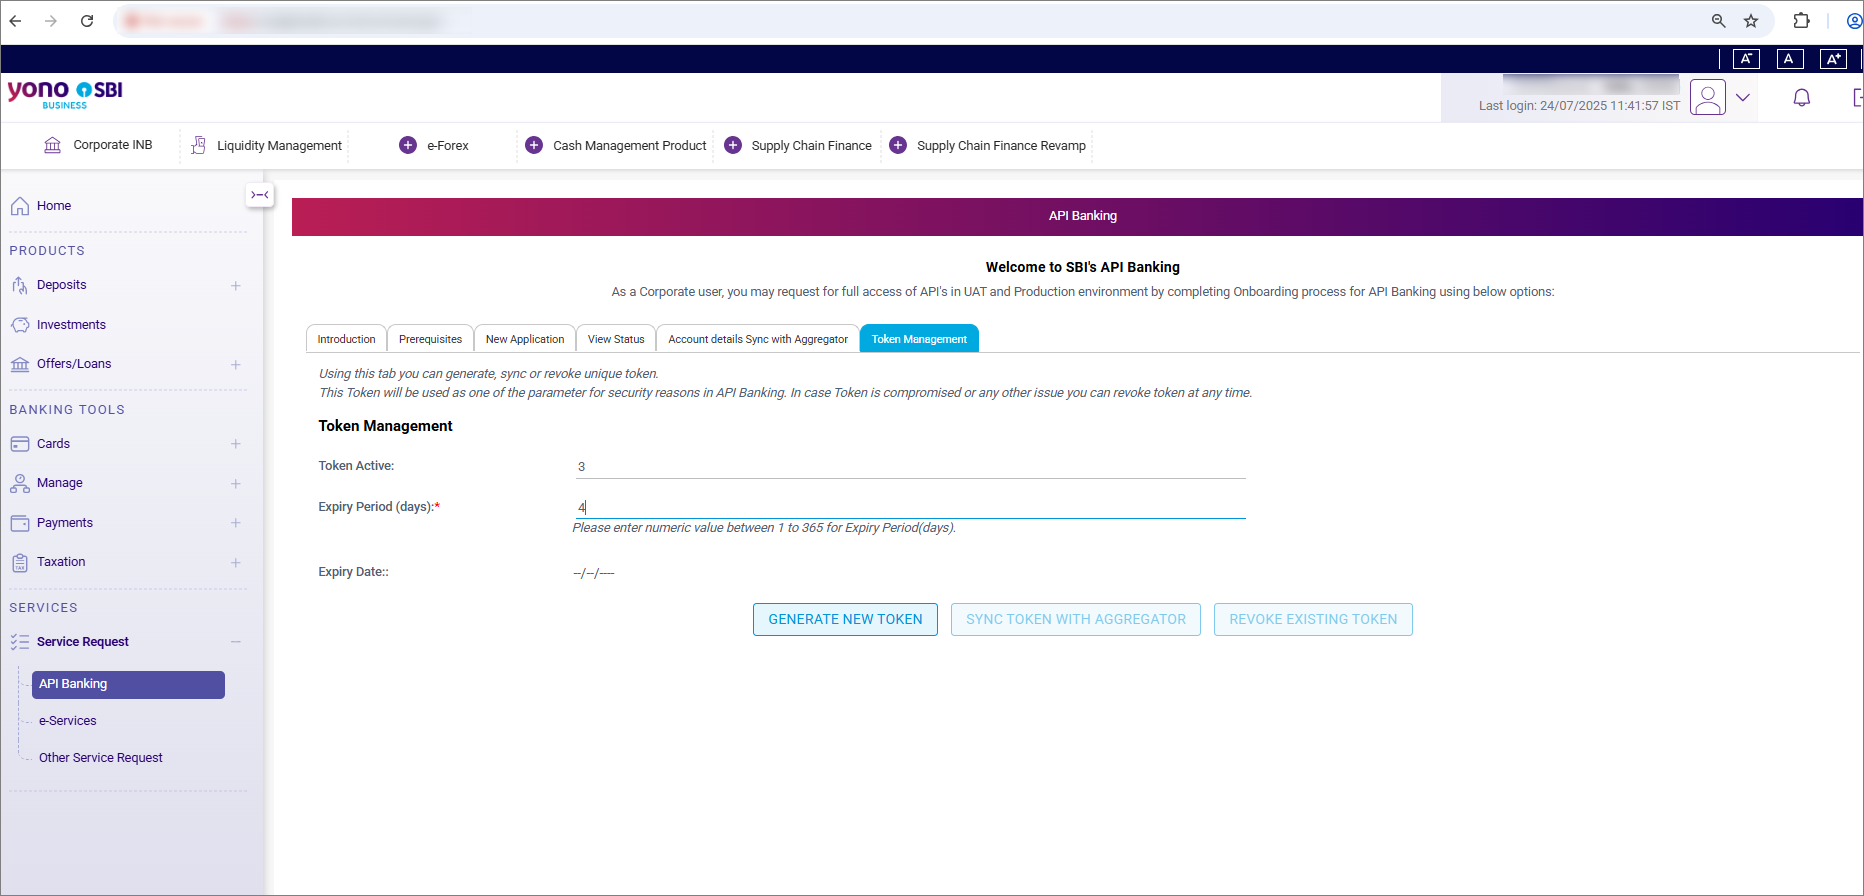
- Click OK.

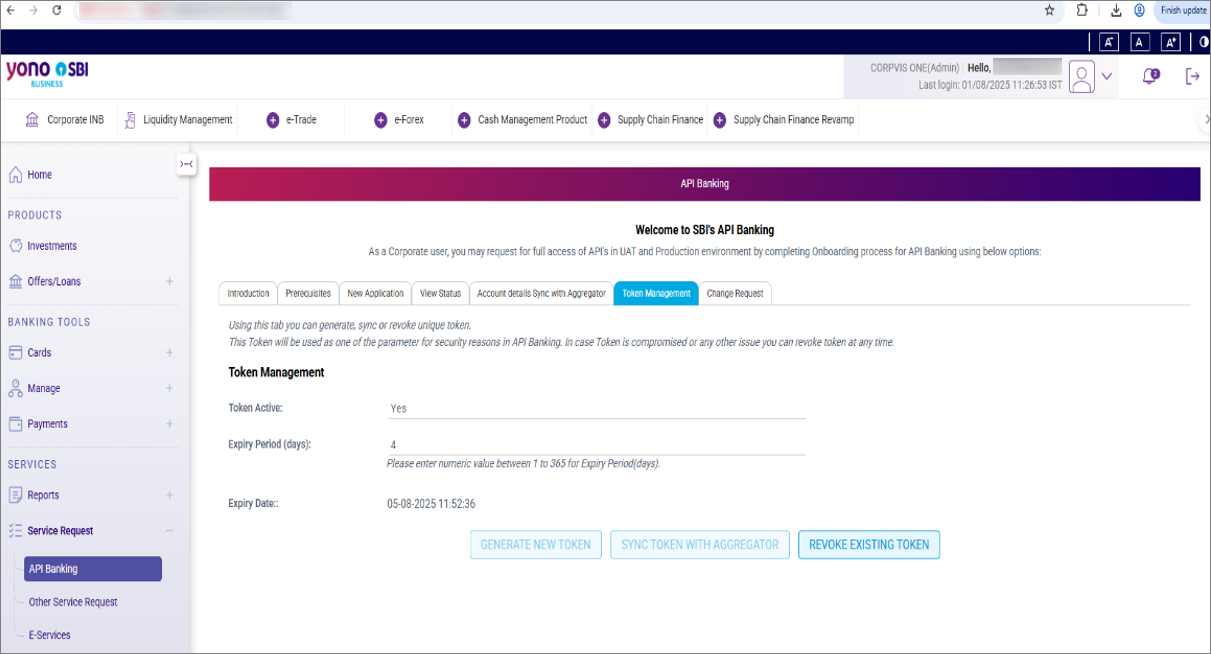
- On the View Status page, click PROCEED.
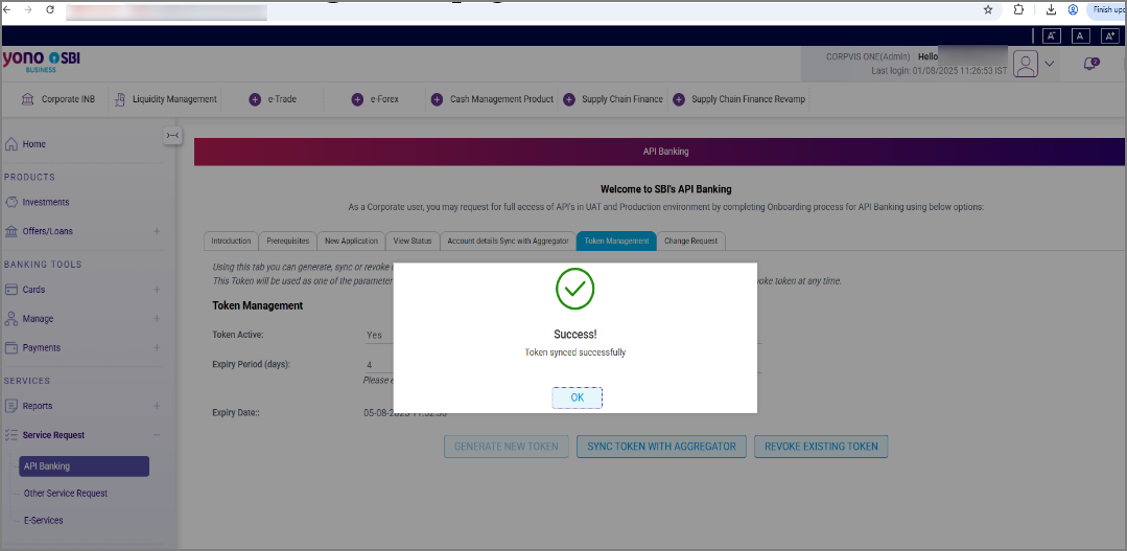
- On the Token Management page, synchronise the token with the aggregator.
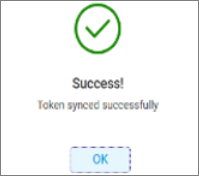
- Click SYNC TOKEN WITH AGGREGATOR.
- Click OK.
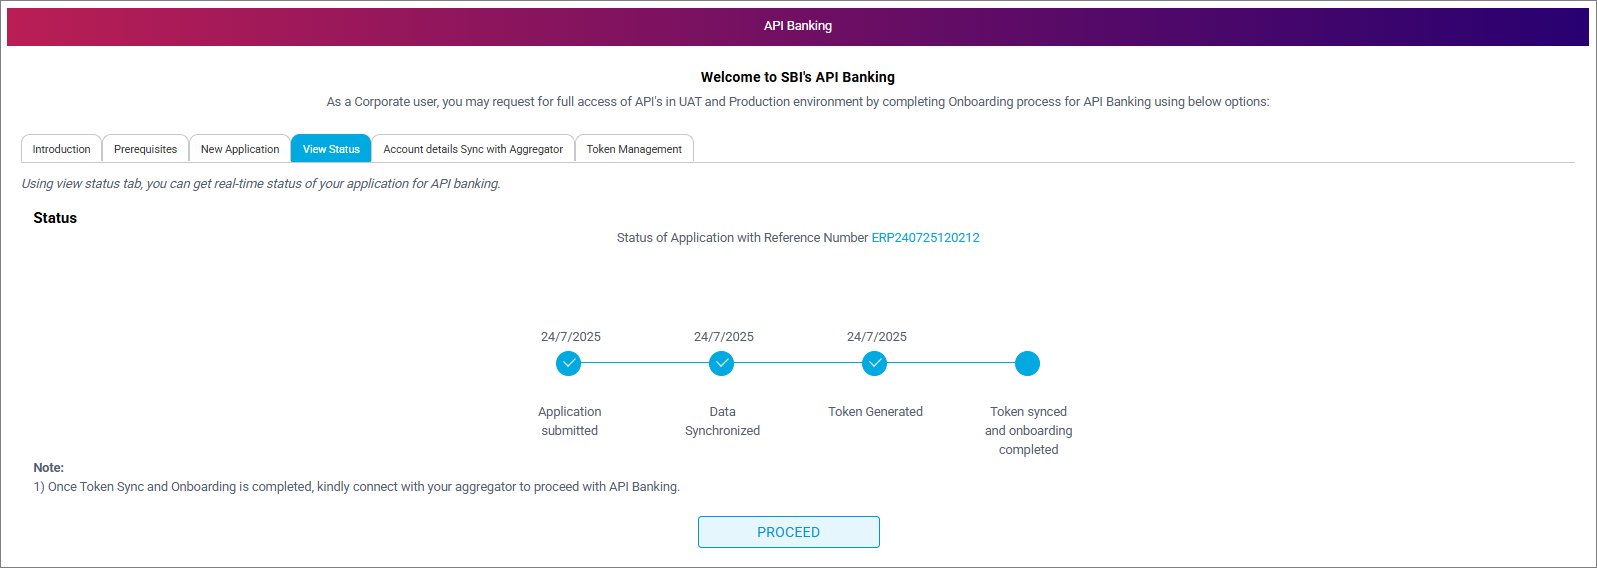
The onboarding on the portal gets completed.
- Switch to TallyPrime and in the in the Connect to Bank screen, press S (Refresh Status).
The status of the connection with the bank is Connected.
The screen also displays the validity and the linked account numbers.
If the status is not updated, then in the Bank Connections report:
- Select the connection press F10 (Refresh Status).
Connect Your SBI Accounts | Multi-user (Single Admin) Bank Account
The process to connect your SBI multi-user (single admin) account is similar to that applicable to the accounts with multiple users (single admin). In the case of multi-user (single admin) account, you need to add users who can access the bank accounts in TallyPrime.
Only the admin of the bank account can initiate the connection and complete the steps on the bank portal to establish the connection.

- In TallyPrime, press Alt+Z (Exchange) > All Banking Options > Bank Connections.
If you have not logged in to Connected Banking already, then you will need to log in. - Press F6 (New Connection).
- Select State Bank of India (India).
A connection ID gets generated that you will need to enter on the bank portal. - Press C (Connect) in the Connect to Bank screen.
Consequently, you get redirected to the bank portal. - Log in to YONO Business SBI portal.
- Enter your User ID, Password, and Captcha.
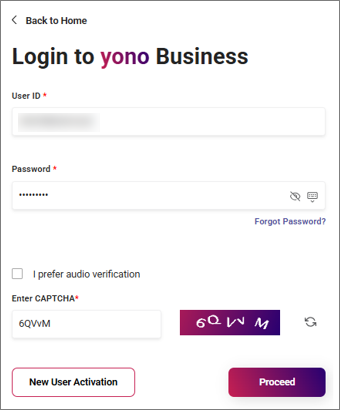
- Click PROCEED.
- Enter the OPT sent to your mobile number and click SUBMIT.
- Enter your User ID, Password, and Captcha.
- Under Service Request located on the left-hand side menu, click API Banking.
- Click New Application.
- Provide the necessary details in the Onboarding Details page.
- ERP Type: Aggregator ERP.
- ERP Provider: TallyPrime.
- Validate the ERP Provider Unique ID.
- Enter the Connection ID displayed in the Bank Connections report.
- Paste the Connection ID under ERP Provider Unique ID on the YONO portal.
- Click Validate.
The Connection ID gets validated.
- Corporate Email ID: E-mail ID registered with the bank.
- Click PROCEED.
- In the API Details page, select API Group as Payments, and click PROCEED.

- On the Transaction Details page that contains Limit Allowed by Bank (INR), enter the Limit Set by Corporate (INR).
- Add users on the Transaction Details page.
- Click ADD USER.
- Enter the mobile number of the user and click PROCEED.
You can add multiple users and their mobile numbers. The users can log in to Connected Banking with their own mobile numbers.
- Agree with the Terms and Conditions to submit the application.
- On the Preview & Submit page, check I agree with the Terms & Conditions.
- Click SUBMIT.
- Submit the necessary document to the bank.
- Click Download Omnibus Document.
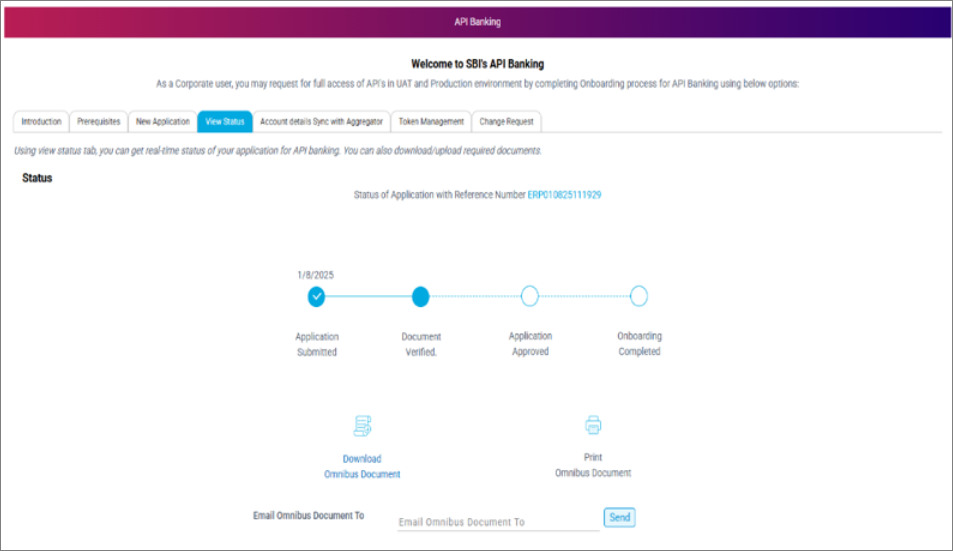
-
Submit the downloaded omnibus document to the branch with Terms and Conditions, signed & stamped on each page, along with the Board Resolution and KYC document. The omnibus document can be submitted to the bank by anyone from your organisation.
Once the document is submitted, the branch maker user reviews the application with the physical document and approves, followed by the review and approval by the branch checker and finally, the GITC user. You can always contact your bank relationship manager to know the status of the application.
- Click Download Omnibus Document.
-
Generate a token on the bank portal.
- On the Account details Sync with Aggregator page, click SYNC DATA WITH AGGREGATOR.
The data gets synchronised with TallyPrime.
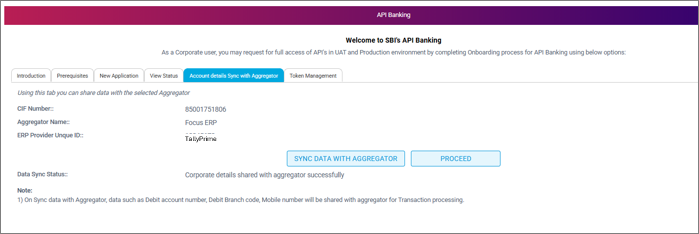
- Click PROCEED.
- On the Token Management page, generate a new token.
- Expiry Period (days): Select the number of days.
- Click Generate New Token.
- Click OK.
- On the Account details Sync with Aggregator page, click SYNC DATA WITH AGGREGATOR.
- Synchronise the token with the aggregator.
- On the Token Management page, click SYNC TOKEN WITH AGGREGATOR.
- Click OK.
The onboarding on the portal gets completed.
- Switch to TallyPrime and in the in the Connect to Bank screen, press S (Refresh Status).
The status of the connection with the bank is Connected.
The screen also displays the validity and the linked account numbers.
If the status is not updated, then in the Bank Connections report:
- Select the connection press F10 (Refresh Status).
Connect Your SBI Accounts | Multi-user (Multiple Admins) Bank Account
If you have a multi-user account with multiple admins, then you need to select a Primary Administrator. Moreover, you can also select a Secondary Administrator, if needed.
Only the admin of the bank account can initiate the connection and complete the steps on the bank portal to establish the connection.
- In TallyPrime, press Alt+Z (Exchange) > All Banking Options > Bank Connections.
If you have not logged in to Connected Banking already, then you will need to log in. - Press F6 (New Connection).
- Select State Bank of India (India).
A connection ID gets generated that you will need to enter on the bank portal. - Press C (Connect) in the Connect to Bank screen.
Consequently, you get redirected to the bank portal. - Log in to YONO Business SBI portal.
- Enter your User ID, Password, and Captcha.
- Click PROCEED.
- Enter the OPT sent to your mobile number and click SUBMIT.

- Enter your User ID, Password, and Captcha.
- Select administrators, as needed.
- Select Primary Administrator and click OK.
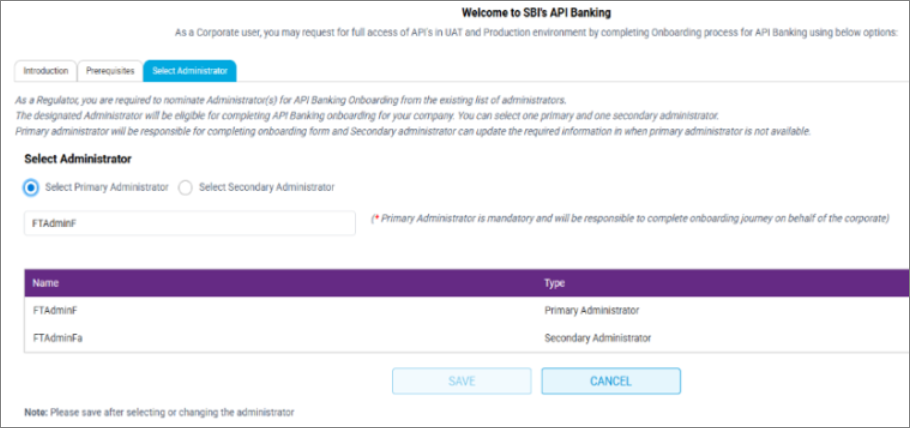
Select Secondary Administrator and click OK, if applicable. - Click SAVE.
- Click OK.
- Select Primary Administrator and click OK.
- Under Service Request located on the left-hand side menu, click API Banking.
- Click New Application.
- Provide the necessary details in the Onboarding Details page.
- ERP Type: Aggregator ERP.
- ERP Provider: TallyPrime.
- Validate the ERP Provider Unique ID.
- Enter the Connection ID displayed in the Bank Connections report.
- Paste the Connection ID under ERP Provider Unique ID on the YONO portal.
- Click Validate.
The Connection ID gets validated.
- Corporate Email ID: E-mail ID registered with the bank.
- Click PROCEED.
- In the API Details page, select API Group as Payments and click PROCEED.
- Verify the API Details and click PROCEED.
- On the Transaction Details page that contains Limit Allowed by Bank (INR), enter the Limit Set by Corporate (INR).
- Add users on the Transaction Details page.
- Click ADD USER.
- Enter the mobile number of the user and click PROCEED.

- Agree with the Terms and Conditions to submit the application.
- On the Preview & Submit page, check I agree with the Terms & Conditions.
- Click SUBMIT.
- Submit the necessary document to the bank.
- Click Download Omnibus Document.

- Submit the downloaded omnibus document to the branch with Terms and Conditions, signed & stamped on each page, along with the Board Resolution and KYC document. The omnibus document can be submitted to the bank by anyone from your organisation.
Once the document is submitted, the branch maker user reviews the application with the physical document and approves, followed by the review and approval by the branch checker and finally, the GITC user. You can always contact your bank relationship manager to know the status of the application.
- Click Download Omnibus Document.
- Generate a token on the bank portal.
- On the Account details Sync with Aggregator page, click SYNC DATA WITH AGGREGATOR.
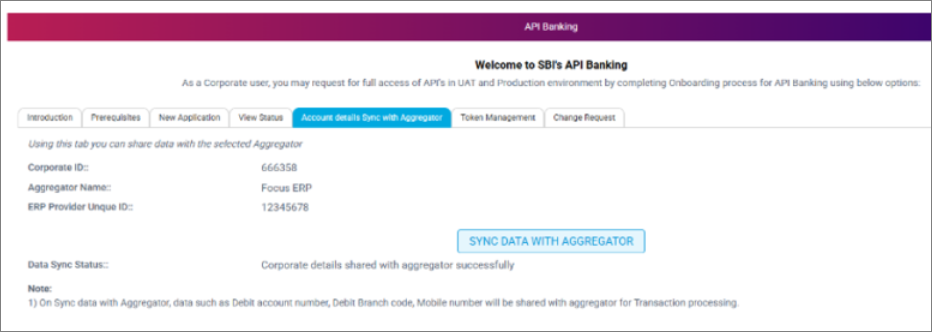
The data gets synchronised with TallyPrime. - Click PROCEED.
- On the Token Management page, generate a new token.
- Expiry Period (days): Select the number of days.
- Click Generate New Token.
- Click OK.

- On the Account details Sync with Aggregator page, click SYNC DATA WITH AGGREGATOR.
- Synchronise the token with the aggregator.
- On the View Status page, click PROCEED.
- On the Token Management page, click SYNC TOKEN WITH AGGREGATOR.
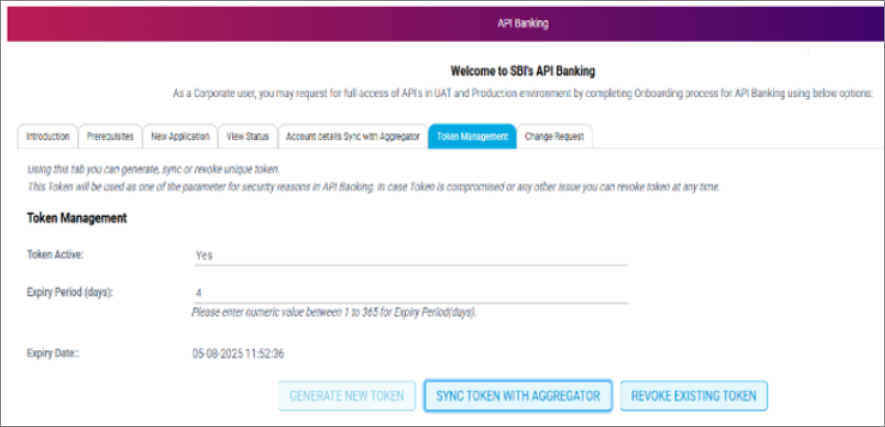
- Click OK.

The onboarding on the portal gets completed.
- Switch to TallyPrime and in the in the Connect to Bank screen, press S (Refresh Status).
The status of the connection with the bank is Connected.
The screen also displays the validity and the linked account numbers.
If the status is not updated, then in the Bank Connections report:
- Select the connection press F10 (Refresh Status).
Reconnect Your SBI Accounts
You can reconnect to the bank using an existing Connection ID in the following scenarios:
- The connection is still in progress.
- The connection has expired in the following scenarios:
- The connection has crossed its validity.
- Mobile number has been changed.
- The token is revoked on the bank portal.
The process of reconnect your SBI accounts to TallyPrime is the same for the single user, multi-user (single admin), and multi-user (multiple admins) account.
- Select the connection, and press Enter or press F7 (Manage Connection).
- In the Manage Connection screen, press F6 (Reconnect to Bank).
- Press C (Connect) in the Reconnect to Bank screen.
Consequently, you get redirected to the bank portal. - After logging in to the SBI YONO Business portal, click API Banking.
- On the Token Management page, generate a new token.
- Expiry Period (days): Select the number of days.
- Click Generate New Token.
- Click OK.
- Synchronise the token with the aggregator.
- On the View Status page, click PROCEED.
- On the Token Management page, click SYNC TOKEN WITH AGGREGATOR.
- Click OK.
The onboarding on the portal gets completed.
- Switch to TallyPrime and in the in the Connect to Bank screen, press S (Refresh Status).
The status of the connection with the bank is Connected.
The screen also displays the validity and the linked bank accounts.
If the status is not updated, then in the Bank Connections report:
- Select the connection press F10 (Refresh Status).
Disconnect Your SBI Accounts
When you do not want to use your SBI accounts through Connected Banking in TallyPrime, you can choose to disconnect them.
The process for disconnecting your SBI accounts on the YONO portal is the same for the single user, multi-user (single admin), and multi-user (multiple admins) accounts. However, in case of multi-user accounts, you need to be the administrator on the YONO portal.
- Select the connection, and press Enter or press F7 (Manage Connection).
- In the Manage Connection screen, press Alt+F6 (Disconnect).
- In the Disconnect from Bank screen, press D (Disconnect).
- Press Y to confirm.
You will be redirected to the portal. - After logging in on the YONO portal, revoke the token.
- On the Token Management page, click REVOKE EXISTING TOKEN.
- Click YES to confirm.
- Click OK.
- On the Token Management page, click REVOKE EXISTING TOKEN.
- Switch to TallyPrime and in the in the Disconnect from Bank screen, press S (Refresh Status).
The status of the connection with the bank is Disconnected.
Approve/Disable User Access to Connected Banking | Multi-user Accounts
In case of multi-user accounts, if you have generated the Connection ID, then you are the admin. As an admin, you can approve or disable user access to Connected Banking.
Approve User
Some users might be pending for approval. You can approve access for those users.
- In the Bank Connections report, press F7 (Manage Connection).
- Select the user and press F8 (Approve Access).
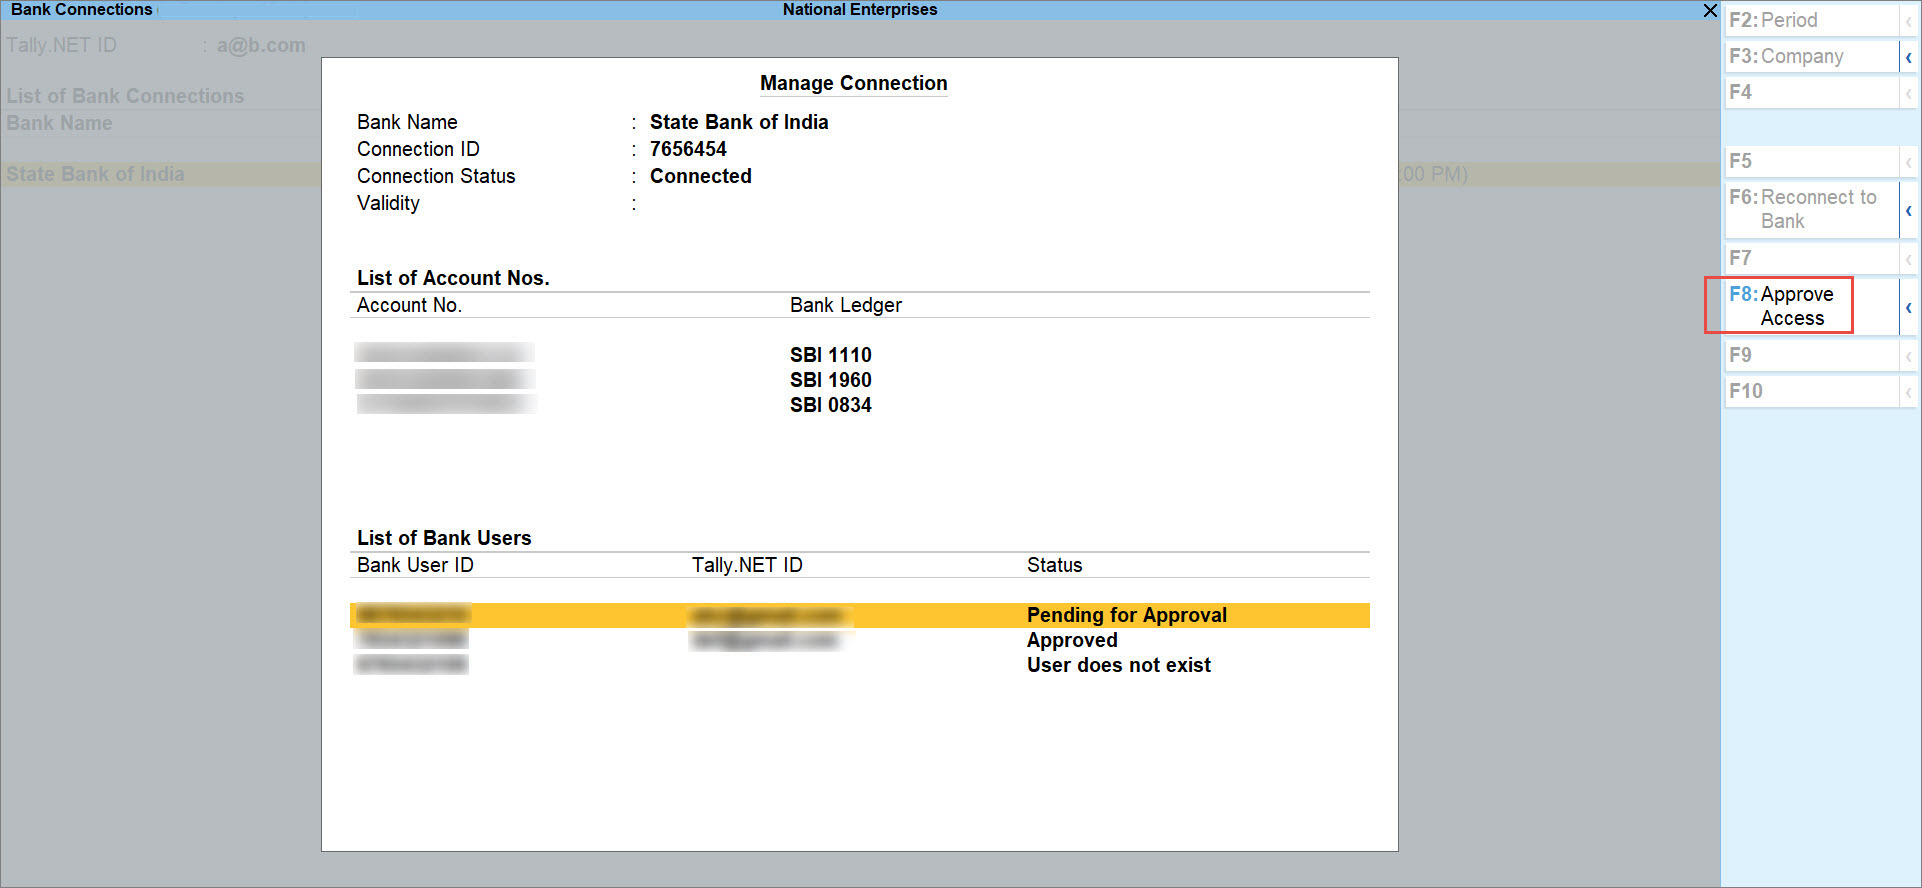
- Press Y to confirm.
The user will be able to access the bank accounts through Connected Banking services.
It is important to note that if the mobile number of a user is changed, then you will need to ensure that the number is updated at the bank and also for the Tally.NET ID of the user.
You will need to approve the users with the updated mobile numbers.
Disable User Access
You might want to disable access to bank accounts for a few users. You can disable access for those users.
Moreover, if the mobile number of a user is removed, then you will need to remove the number at the bank and disable user access to Connected Banking.
- In the Bank Connections report, press F7 (Manage Connection).
- Select the user and press Alt+F8 (Disable Access).
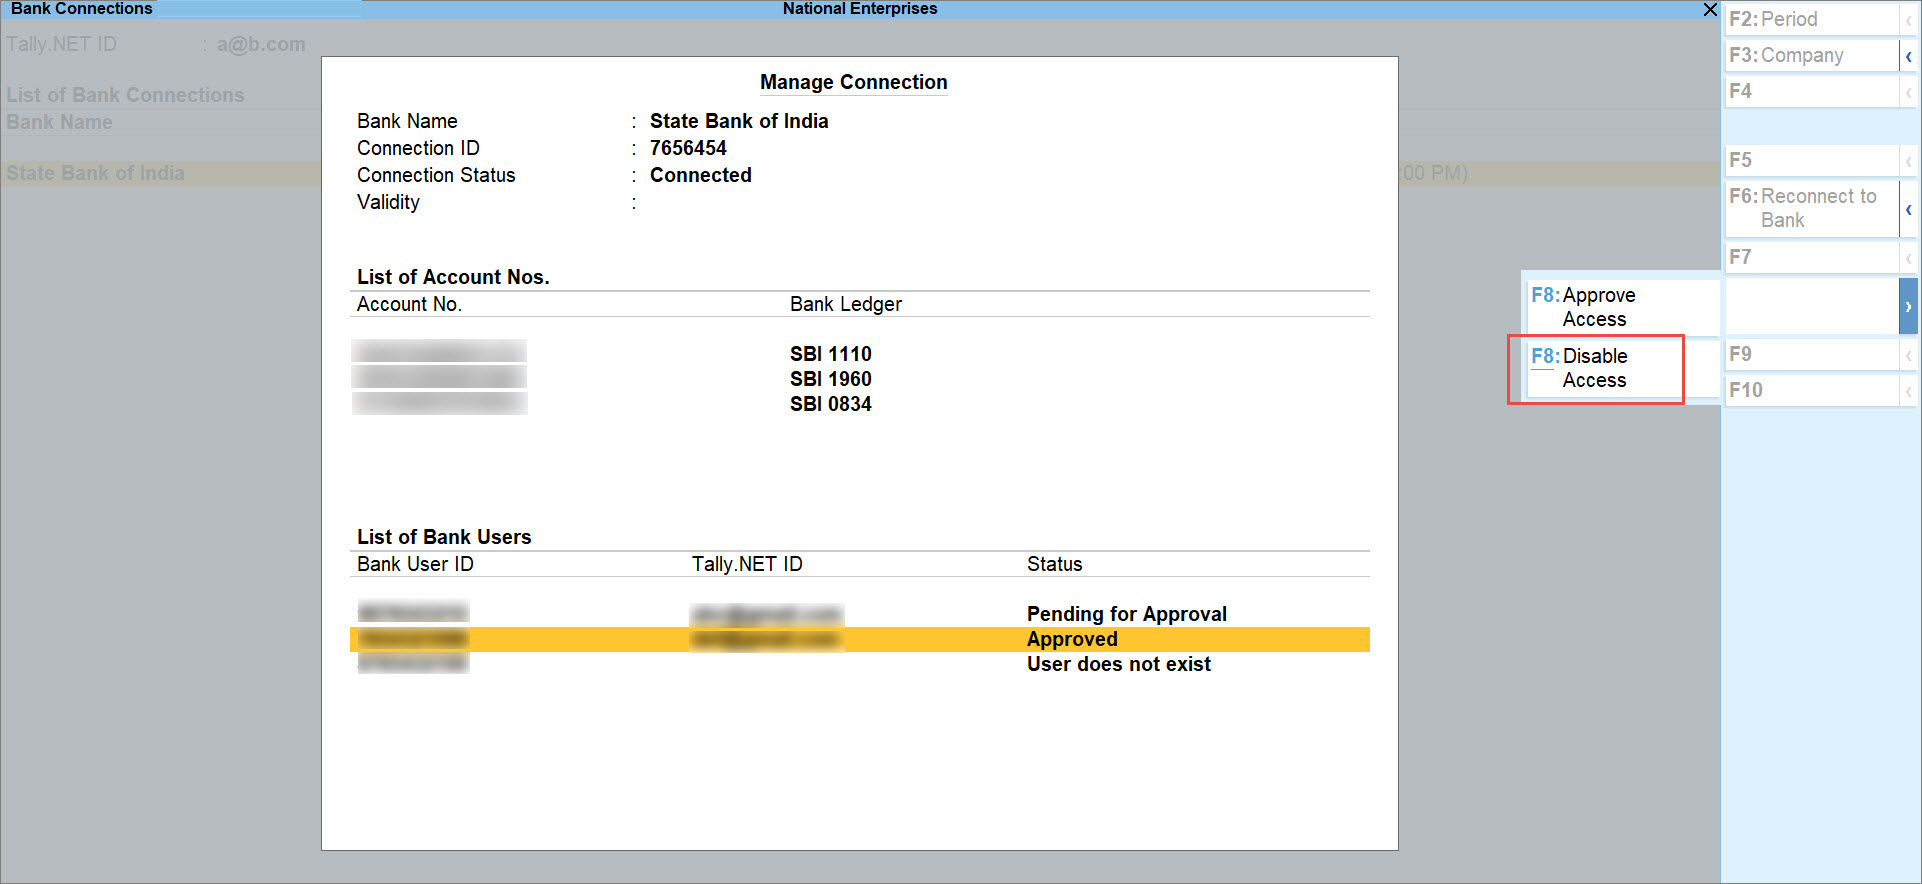
- Press Y to confirm.
The user will no longer be able to access the bank accounts through Connected Banking services.


