
TallyPrime – FAQ
This topic lists the different TallyPrime FAQs or frequently asked questions on TallyPrime. It covers different areas in TallyPrime and the responses to each of the TallyPrime questions.
Tally.ERP 9 Support
Yes, support for Tally.ERP 9 will continue.
You need to have a backup of Tally.ERP 9 data before you migrate to TallyPrime. Data once migrated to TallyPrime cannot be loaded on Tally.ERP 9. If you want to work on Tally.ERP 9, you need to work on the backup data which is not migrated.
Yes, we have stopped updates for Tally.ERP 9 and any enhancement in the future will be considered only for TallyPrime.
When your data has any exceptions due to processes like Migration, Import, Repair and so on, the text (e) appears on the Gateway of Tally screen.
You can resolve the exceptions from Alt+Y (Data) > All Exceptions.
From TallyPrime Release 1.0 till Release 2.0, we had not provided the bottom toolbar to ensure consistency with other universal key that were hidden in Tally.ERP 9.
However, Release 2.0.1 onwards, TallyPrime has introduced a much user-friendly bottom bar that will allow you to perform the most frequent actions with the click of a button, or by using the shortcut keys. When you are viewing the reports, if you need to use the shortcuts, you can easily refer to the bottom bar and apply the same.
Note that the bottom bar in Release 2.0.1 and later is enabled by default. If at any point you need to disable the bottom bar to increase the viewing space on your screen:
- Press F1 (Help) > Display > set Show bottom bar to No.
With a single interface, you can toggle to different modes of recording/altering a transaction without worrying about the pre-configuration or settings.
For example, in TallyPrime, you can record transactions in the following modes as per your business requirement:
- Item Invoice
- Accounting invoice
- Single entry
- Double entry
- Forex gain or loss
- Interest calculation
- Use as Manufacturing Journal
For Income and Expense Account to appear in TallyPrime, you need to go to the Profit & Loss A/c ledger and then enable the option Use as Income & Expense A/c.
Like Tally.ERP 9, TallyPrime will continue to support both keyboard and mouse operations.
Like Tally.ERP 9, TallyPrime will continue to support Arabic by default.
The new look and colour of Tally is designed in a way to provide comfort to the eyes while working. It also makes the data more readable without causing strain in your eyes.
As per new product experience, we have minimised the number of options appearing on Gateway of Tally menu and all masters are made available under the Create option.
Switch To is same as Go To that will also allow user to navigate to any report while being in the product. However, user will not be able to go back to the previous place from where he triggered Switch To whereas in Go To, it is possible to return to where you had left and resume the action.
Facility has been provided to search for reports that you need. Secondly, commonly used reports have been included under a group named Common Reports. This would help you to identify the reports immediately.
We believe the new look will be welcomed by you and provide you with an even more delightful experience. So, unfortunately, the UI cannot be customised to look like the earlier Tally product.
In TallyPrime, you can navigate to a given report in multiple ways. You can access the same report via Gateway of Tally menu, Go To, Change View, Basis of Values, and drill down. Further to this, you can open the reports on top of each other using Go To. Since the navigation in TallyPrime is not linear, the concept of Show Open Reports has come into existence. It will allow you to view all open reports and navigate to any of them by clicking it. Show Open Reports is available under Go To.
TallyPrime comes with a whole new experience designed to give simplified and consistent experience across the product. We feel you will learn the product very fast. In any case, TallyPrime supports co-existence with releases of Tally.ERP 9, which means both products will continue to run independently. You can choose to install TallyPrime in a different folder, experience it, and move to TallyPrime whenever you feel comfortable.
All company features are available at F11: Features screen. During the creation of company, if any of the features are not activated – maybe during that time it was not necessary for the company or it was missed out, without worrying about the fact that features were activated or not, even while creating the masters, users will be allowed to activate/enable the feature.
This is to maintain consistency across the entire product and to help build memory of the buttons on the right-side as the placement is uniform across the product.
At present, TallyPrime doesn’t support selection of multiple companies for loading. However, if you want to open multiple companies every time you start TallyPrime, you can do so from F1 (Help) > Settings > Startup. To know more, refer to Load Companies on Startup section in the Set Up TallyPrime topic.
TallyPrime Release A comes with a new product experience. With this change, various options and configurations available in the product are rationalised to provide consistency and usability (specifically from the perspective of discoverability). So now, license information will be available as part of Top Menu in Tally Application.
Go To will help you to access all default reports and view any report for quick reference. However, the flexibility of creating voucher and creating/altering master has been provided.
We have added quite a few alias to existing report names so that you can find the report using different names as you are convenient with.
Currently, you are not warned on the transactions that are on hold. However, Go To helps you to go back to the original voucher type/report from where you had navigated.
In Go To, there is a section named Show Opened Reports that will highlight all the reports viewed by you. You can click any of the reports and directly navigate there.
At present, we do not have the capability to mark reports as favorites and to show under Go To. However, we have taken a note and will pass to our product development team for further analysis.
Go To will remain primarily for reports only.
We are checking with further feasibility to extend the support for searching voucher number in our future major releases.
In TallyPrime, the report will be available as a part of Change View of the Cash Flow report or can be directly viewed from Go To. As Cash Flow Projection is meant to be seen along with Cash Flow report, the product is designed to provide all related reports together and it is one-time learning for you to get used to the necessary behaviour changes/discovery of accessing reports.
In TallyPrime, the report will be available as part of Change View of the Cash Flow report or can be directly viewed from Go To. As Receipts and Payments depicts the movement of cash either inward or outward, the product is designed to provide all related reports together, and it is one-time learning for you to get used to the necessary behaviour changes/discovery of accessing reports.
Receipts and Payments is now available under Change View of the Cash Flow report or can be also searched in Go To.
The list of accounts/masters is now available under Chart of Accounts and can also be searched under Go To.
In Go To, search for Reversing Journals or Memorandum Vouchers. Then, select the respective reports.
From Trial Balance, press Alt+G (Go To) (available on the top bar) and select Day Book from the list of reports.
In TallyPrime Release 1.0, tax analysis for each taxation modules are separately available. This has been done to improve the readability and provide information for a specific taxation only. Providing shortcuts for all taxation modules is not suggested and even you will find it difficult to remember. Hence, we have brought all of these together under More Details.
However, in the next GST offline release, we are working completely on GST taxation module (we are introducing stat data voucher concept). We will consider tax analysis with stat data voucher holistically and redesign based on inputs from the market also.
Scenario: Some cases the options differ based on the format, in this the user after selecting the format has to again go back or come front and then choose the option. For e.g., When we export Sales register we get pivot table option only when format is Excel, We get dependent masters only when format is XML. Here the user has to go back and choose these options after he selects the format.
Since print configurations are seldom changed, it was decided to put functional configurations on the top and print configurations in the bottom. However these configurations can be searched and enabled.
Exclude Order Voucher is dependent on Type of Voucher Entries. When the values for Types of Voucher Entries is selected other than All Vouchers, Exclude Order Voucher becomes active.
This is a new table behavior, where Enter will change the value of the configuration and save. Whereas Esc and Ctrl+A will take you out of the table. We believe that this is a one-time learning for you and you would love it when you start using the new search mechanism.
These report will not be available in the table by default. Neither it will be available on selecting Show All. However, to make the inactive reports discoverable to the users, provision is given in the Go To table to click Show Inactive. Alternatively, type the desired report in the field available. This will highlight the reports for which the feature was not enabled in F11.
Similar to TallyPrime, TallyPrime Server has also been designed for Simplicity, Flexibility and New look and Feel. If you upgrade your Tally.ERP 9 to TallyPrime, you will need to also upgrade your existing Tally.Server 9 to TallyPrime Server.
Viewing multiple reports in a single window is not possible currently. However, you can switch between the reports easily with the new Go To and Switch To features.
No, you won’t be able to change the colours of the stripes. Stripe View is supported even if you have disabled colour in TallyPrime. You will be able to view your reports and vouchers in alternate stripes of lighter and darker shades of grey. To know more, refer to the Enable Stripe View section in the Get Familiar with TallyPrime and TallyPrime Edit Log Features topic.
Yes, you can enable Stripe View for a few selected reports and vouchers.
To view a report or voucher with stripes:
- Open any report or voucher in TallyPrime > press F12 (Configure) > set Enable Stripe View to Yes.
To know more, refer to the Enable Stripe View for specific report/voucher section in the Get Familiar with TallyPrime and TallyPrime EditLog Features topic.
Do not use the existing add-ons along with the Stripe View feature in TallyPrime as it might give you an inconsistent experience. However, if you prefer the add-ons for Stripes or Gridlines, you may continue using them instead of the Stripe View feature.
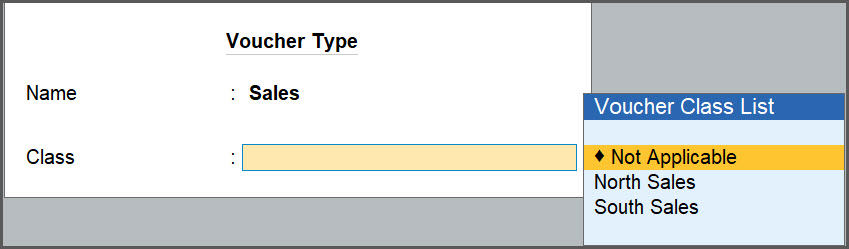
Yes, you can create more than one voucher class for a voucher type that already has one existing voucher class.
Let’s assume that you have already created a voucher class, South Sales for 12%., under the Sales Voucher Type.
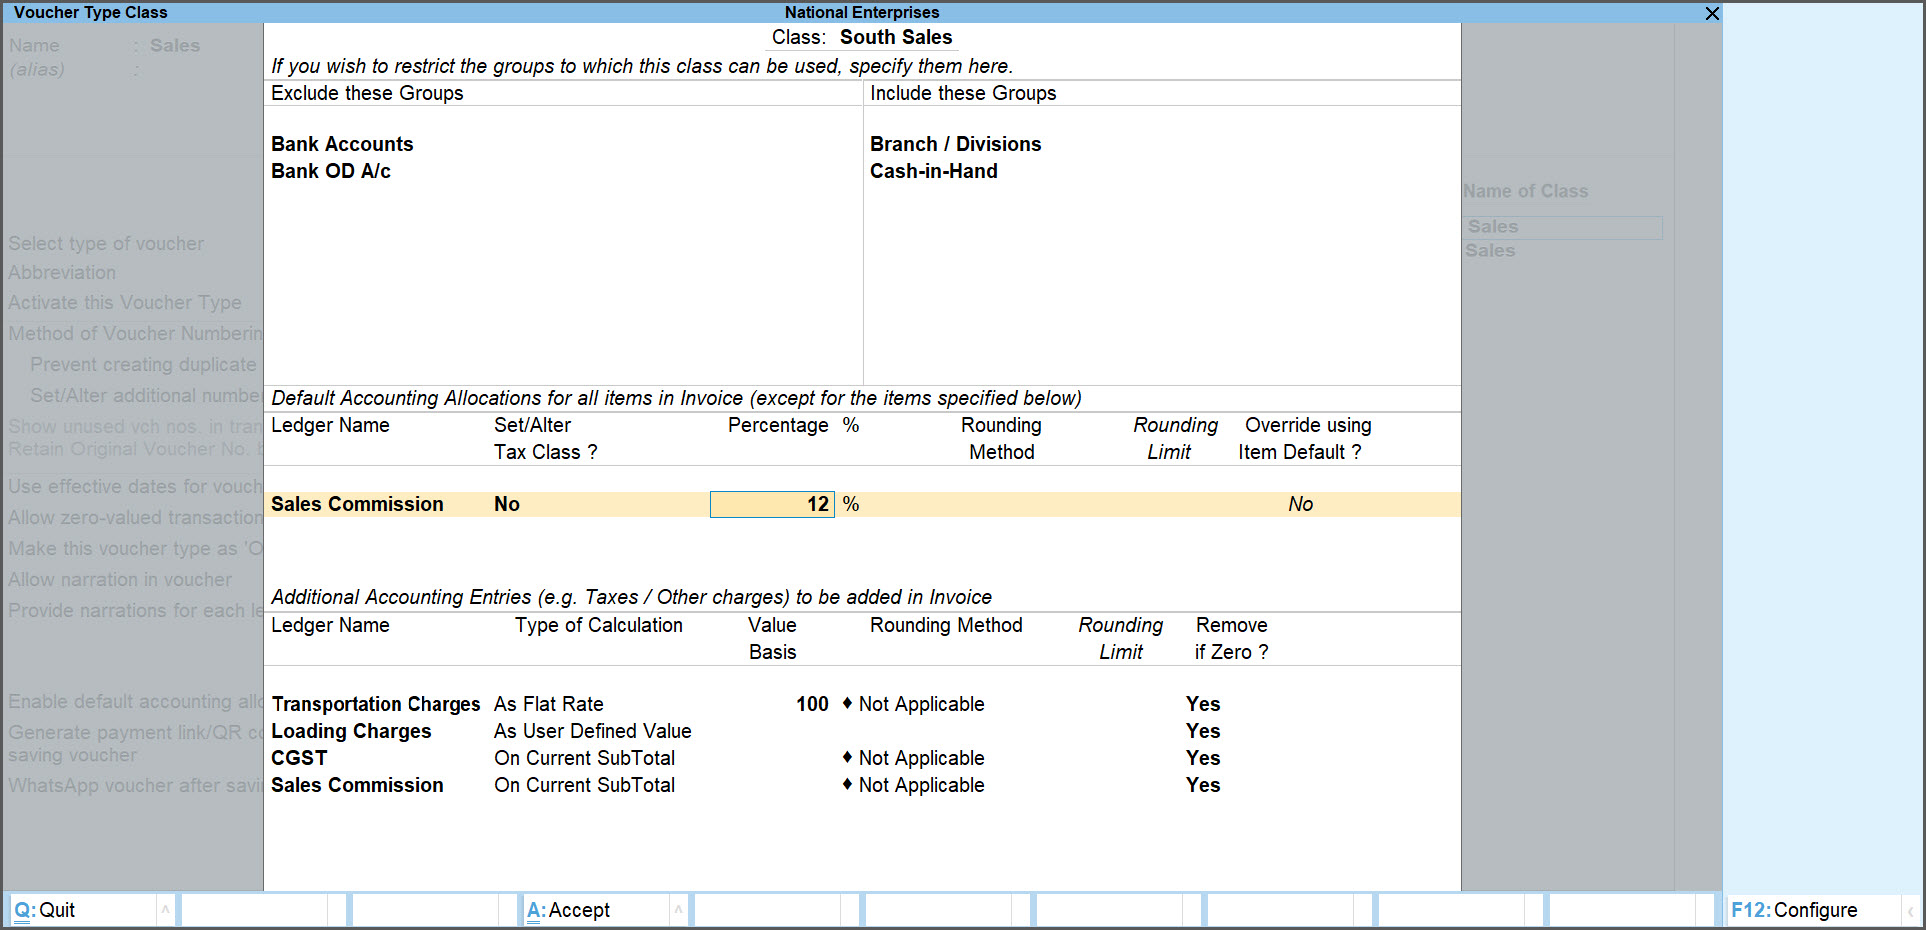
Now, to create another voucher class for the same voucher type:
- Open the voucher type in alteration mode and add another voucher class, say, North Sales for 18%.
- Define the default allocations as needed and save the voucher type.
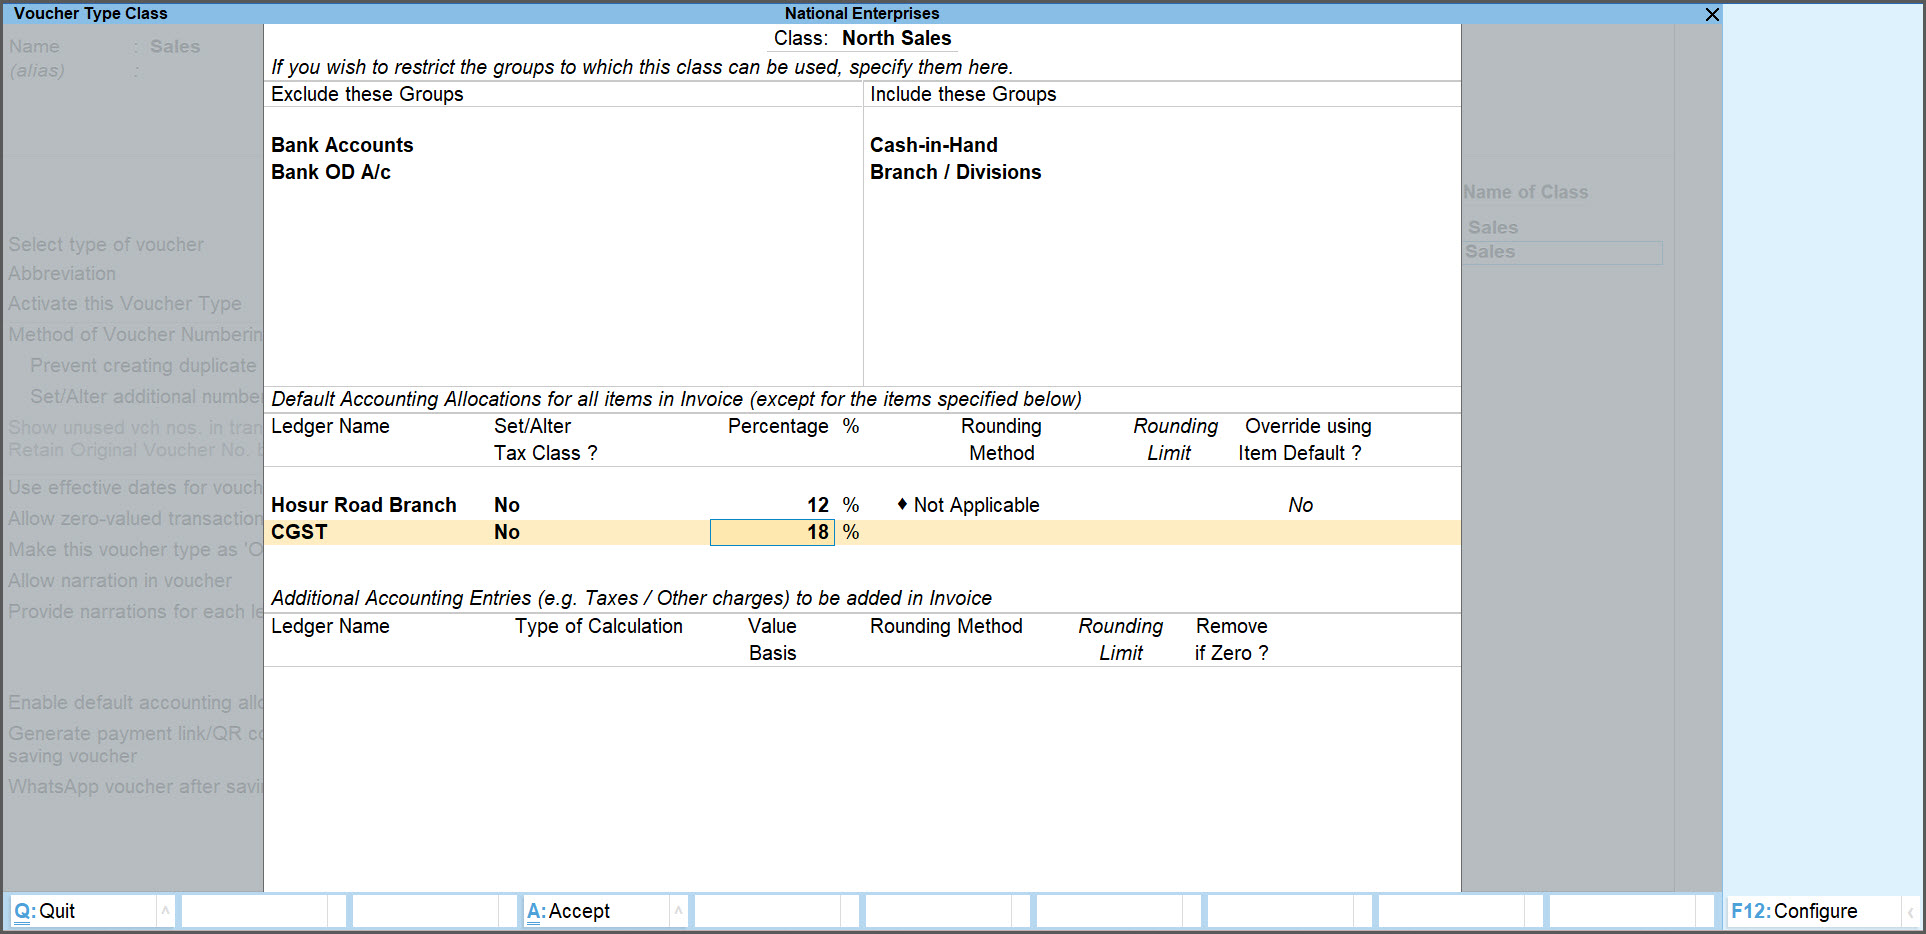
Now, while recording a sales voucher, you can select the class from the Voucher Class List and record the transaction.
- Open Gateway of Tally and select Chart of Accounts.
- Select Ledgers under Accounting Masters.
- Press Ctrl+J (Exception Reports) and select Show Unused.
The list of unused ledgers will appear.
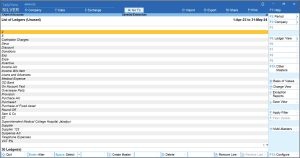
- Press F5 (Ledger View) to view the respective Groups beside the name of the ledgers in an additional column.
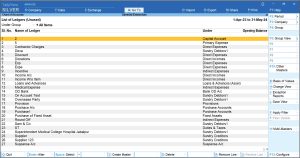
- Select one or more ledgers by pressing Spacebar and press Alt+D (Delete) to delete the ledgers.

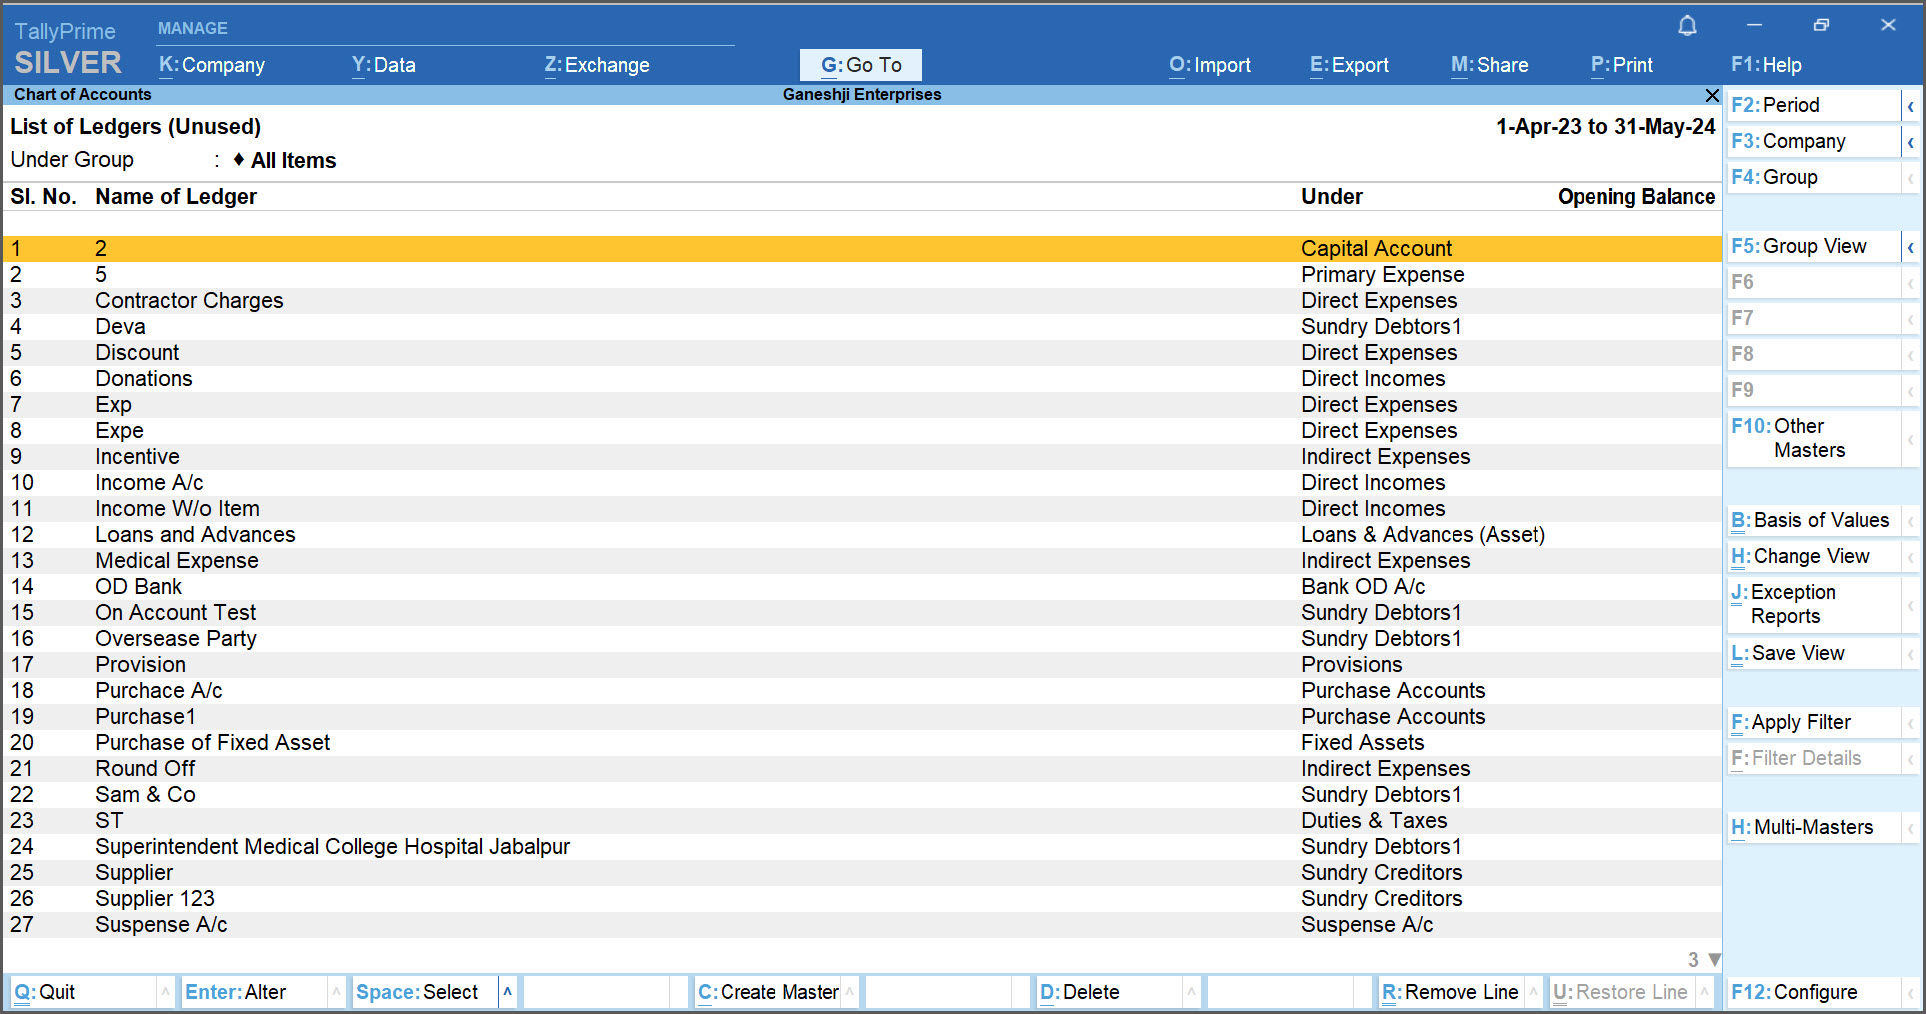
You can follow the same process to view and delete the other unused Stock Items, Stock Groups, and so on.
When you delete the transactions or mark the vouchers as optional, their voucher numbers remain unused. In case, you have set the Method of Voucher Numbering to Automatic and Numbering behaviour on insertion/deletion to Retain Original Voucher No., on deleting a voucher or setting a voucher as optional, the corresponding voucher numbers can be reused while creating a new voucher.
To use the deleted/unused voucher numbers,
- While creating or altering a voucher, press Ctrl+I (More Details) > Voucher No. Details > Select Unused Voucher Nos.
- Select an unused voucher number from the List of Unused Voucher Nos.

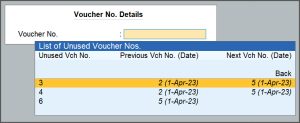
You will be redirected to the voucher creation or alteration screen and you can see the changed/updated Voucher No. - Specify other necessary details and save the voucher.
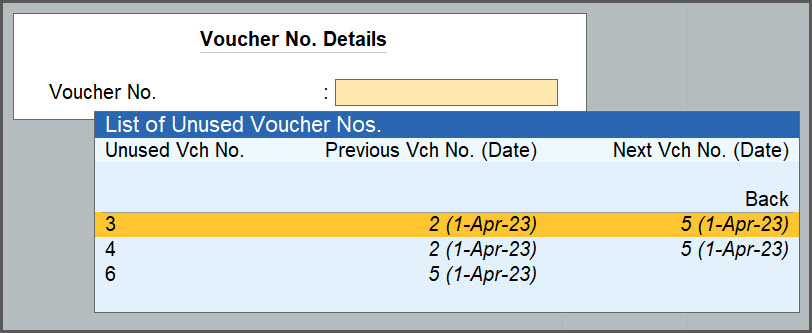
So, you can easily reuse these unused voucher numbers while creating/altering the vouchers. This helps eliminate the gaps in voucher numbering caused by the deleted vouchers.
To print the Rate (Incl. of Tax) column from Display mode of a voucher,
- Go to the print configuration from the Display mode of the voucher.
- Set Show Rate Inclusive of Tax to Yes.
To print on all transactions, including Multi Account Printing, press F12 (Configure) and enable the option Provide Rate Inclusive of Tax for Stock Item.
To remove the Rate (Incl. of Tax) column in the print from the Display mode of a voucher,
- Go to the print configuration from the Display mode of the voucher.
- Set Show Rate Inclusive of Tax to No.
We continuously update online help to ensure that more business scenarios are addressed based on input from our customers. This helps in meeting your requirements better and providing an enhanced experience.
For quick access, you can open the site help.tallysolutions.com on your mobile. For offline reference, you can also download any topic as a PDF when you are connected to the Internet. However, we recommend you to access online help in order to ensure use of the latest content.
The shortcut keys are changed to bring consistency in the product. Unlike the old way of working, a key will now perform the same functionality across the product. Universal keys are brought into the product so that the users are able to perform similar activities which they used to perform in other applications. Hence, they do not have to learn new things. With these new changes, things have become easy to remember.
The whole list and the reason for it is available here – Buttons removed from Tally.ERP 9
Event Log will show the logs of the running instance only. At present in TallyPrime, we are not supporting the log management. However, this is a good feedback and we will take this up in the future release.
TallyPrime application loads all the required files such that you will not find delay in opening reports as compared to Tally.ERP 9 releases. Therefore, you may feel a marginal increase in application loading.
We understand that this feature exists in Release 6.x. We have taken a conscious call to remove password strength from the product as overall security including password strength will be taken up in future releases and solved with completeness.
Yes. Refer to Quick Start Guide for detailed information.
No, currently TallyPrime is not supported on MAC. However, you can install TallyPrime using crossover applications like winebottler.
You can cancel an existing invoice using the shortcut Alt+X.
Refer to the Keyboard Shortcuts in TallyPrime topic for more details.
Refer to the Keyboard Shortcuts in TallyPrime topic for details.
Yes, the migration of your Tally.ERP 9 data into TallyPrime is seamless with just a click. There will not be any impact on the data due to migration. However, it is recommended that you take a data backup of your data before migration so that if something goes wrong due to some uncertain reasons, you can restore your backup and continue data entry.
Migrating data from Tally.ERP 9 to TallyPrime is seamless. However, if there are any errors in the older data, it will display the errors during migration. The migration process will be complete only if there are no errors in the data.
Yes. Refer to the Remote Access topic for details.
Yes, you can get a Trial license for 7 days to evaluate the product.
Refer to the Quick Start Guide for detailed information.
Refer to the TallyPrime Release Notes page to know details of what is new in TallyPrime.
TallyPrime is a 64-bit application that runs on Windows 7 or later. With rapid changes in technology, most of the hardware device manufacturers moved to 64-bit architecture that is more responsive when running several programs simultaneously, and switching between them frequently. To benefit from the real advantages of the combination of 64-bit architecture and 64-bit operating systems for the best performance, TallyPrime is designed as a 64-bit application.
Refer to the Tally Solutions website for more information.
Yes, we have retained all the Tally.ERP 9 functionalities except the following few which have been deprecated:
- 32-bit OS support
- e-Sugam, LBT, Schedule VI Balance sheet
- Tax Audit & Stat Audit
- SMS
- Status bar
- Password strength
- Offline help
The prices remain same as of now and any changes in prices have not been thought through.
No, it is not compulsory to upgrade to TallyPrime. You can continue to use Tally.ERP 9. However, any enhancement in the future will be updated only for TallyPrime. We have stopped any feature updates for Tally.ERP 9.
No. TallyPrime can be installed only on 64-bit OS.
You may contact your preferred partner for training on TallyPrime or else you can join our live webinars which have organized on a daily basis.
After updating to TallyPrime, while extracting data in Excel, the following error appears:
The specified DSN contains an architecture mismatch between the Driver and Application.
This error message appears when you extract data from a 64-bit version of Tally.ERP 9 into 32-bit version of Microsoft Excel through ODBC. This also appears when you extract the data from a 32-bit version of Tally.ERP 9 into 64-bit version of MS Excel.
TallyPrime is a 64-bit supported application. If you are using 32-bit Excel, you will need to install MS query of 64 bit and try.
- Press F1 (Help) > Settings > Country > type or select Date and Number Format.
- Set the options under Format of Date, as per your business needs, and save.
TallyPrime currently does not support connecting to two printers automatically. When you need to print any document, you can select the printer of your choice from the List of Printers, and print the document.
Next time you print a document, the last chosen Printer will be prefilled under Printer Name.
In TallyPrime, switching a voucher to double-entry mode will save the same setting for all the future vouchers. However, to keep your changes permanent, you need full access to the configuration file in the Tally installation folder. Without this access, your changes won’t be saved. With complete access, you can permanently retain any adjustments you make in TallyPrime.
Scenario: At the time of company creation, the tax ledgers and various statutory configurations should be in auto mode. We often see that the user requires going through the one-time setup of configurations. This will make Tally more difficult for the new users. There must be some pre-list of options for the user’s requirements and the user should have an option that will enable the auto-creation of tax ledgers and other statutory adjustments.
While we understand your requirement, considering each business is diverse in nature and keeping in mind our power of flexibility, we will not be able to provide pre-defined ledgers and configurations without understanding the business. Hence, we have not provided it.
Noted. Not only for terms like voucher, we are looking at the overall product for each country that would impart a feeling, “fit for me” and lead to better usability across countries. We have planned to fulfill this requirement in our future releases.
COA is one place to manage the complete masters of the company and in TallyPrime, this is available in Gateway of Tally itself. Users can also manage or create/alter single or multi masters from COA. Moreover, this should be one-time discoverability and once known to the users, they can discover to navigate to COA for multi creation/alteration of masters thereafter.
While saving the voucher, the warning message is shown for all the incomplete/missing details related to e-Way Bill details for successful e-Way Bill generation.
The Alt+S key and functionality for Stock Query do exist in transactions but the button has been removed. Over a period of time, the ask had increased to provide more reports that can be accessed while being in a transaction. To solve this problem we have provided the Go To feature so that user can access any of the report while being in a transaction. However, keeping a single button for Stock Query was not consistent with rest of the right buttons and hence it has been removed to avoid clutter.
With the introduction of top menu, now users can open transaction(s), master(s), or report(s). While shutting the company, you are reminded to ensure that all opened transactions or masters or edit reports are saved so that you do not loose any changes made.
You can cancel an invoice in TallyPrime by using the shortcut key Alt+X.
Refer to Keyboard Shortcuts topic for more information.
Delivery Note and Receipt Note are part of the Tracking No. feature in TallyPrime. By enabling the Delivery Note, the Tracking No. feature gets enabled and that is the reason Receipt Note tracking is displayed during Purchase entry.
Yes. Gateway of Tally > Chart of Accounts > Ctrl+H (Multi-Masters) > Alter.
In TallyPrime, you do not need to create a new voucher type or alter the existing voucher type for creating a manufacturing journal.
- Alt+G (Go To) > Create Voucher > Alt+F7 (Stock Journal).
- Press Ctrl+H (Change Mode) > and select Use for Manufacturing Journal.
You can enable Payroll features during Company Creation. The F11 Features screen appears in the flow of Company Creation in TallyPrime.
However, if you have not enabled Payroll during Company Creation, you can perform one of the following:
- Press F11 (Features) > set Maintain Payroll to Yes.
You can now start using all the payroll features – create masters and transaction – similar to other accounting features. - Alt+G (Go To) > Show More > type of select any payroll master (for example, Pay Head) > and press Enter.
- TallyPrime prompts you to enable Payroll feature on the fly. Press Enter.
To enable Payroll in TallyPrime, you can enable it during the company creation itself as it pops-up the F11 feature and you can enable from there. If it is not enabled during the company creation or if it requires to enable in the company already created, you can go to Alt+K:Company>>F11:Features and enable the Payroll feature. Else in simple, you can go to creation of Master>>Show more>>Show inactive>>and start creating the payroll masters it will allow you to enable the payroll feature and create the payroll masters on the fly
Scenario: In Tally.ERP 9 there is an option to enter Opening Balance for all Ledgers in Multi Ledger option. Where can the same be found in TallyPrime?
- Alt+G (Go To) > Chart of Accounts > and press Enter.
- Select the required master > press Alt+H (Multi-Masters) > Multi Alter.
- Select All Items or any particular group and enter or update the Opening Balance details, as needed.
TallyPrime has facility to export transactions only in XML format by pressing Alt+O (Import) > Transactions. However, if you need to export transactions in PDF/Excel format, you can do so from Day Book.
- Press Alt+G (Go To) > select Day Book > press Enter.
Alternatively, Gateway of Tally > select Day Book > press Enter. - Select the transaction > press Enter.
- Press Ctrl+E (Current) > click Configure.
- Select the desired output format under File Format (for example, PDF or Excel) > Send.
You can use the option, Configure, to customize the information you want in the transaction.
- Press Alt+G (Go To) > Create Voucher > press Alt+F6 (Credit Note).
Alternatively, Gateway of Tally > Vouchers > press Alt+F6 (Credit Note). - Press F12 (Configure) > set Provide Original Invoice details to Yes.
- Specify the original invoice details.
- Select Party A/c name and press Enter.
- Enter details in Original Invoice No. and Date.
In the Voucher Creation screen for Sales
- Press Ctrl+I (More Details) > type or select Reference No. & Date.
- Enter the Reference Details and save.
The Item Allocation screen appears if you are using tracking numbers for your transactions. To disable the screen, you need to disable the related voucher types – Sales Order, Purchase Order, Rejection In/Out, Delivery Note and Receipt Note.
However, the Item Allocation screen will also appear if you are using more than one godowns or batches. In this case, you will not be able to disable the screen.
- Press Alt+G (Go To) > Alter Master > Expense Ledger.
- Set the option Inventory values are affected to Yes.
You will now be able to select the expense ledger while recording your purchases.
In the Purchase voucher, click Show More to view the Expense ledger.
- If there is any mismatch in Buyer (Bill To) and Consignee (Ship To) details, both the details will be shown irrespective of the configuration.
- Country field is introduced in Consignee details to maintain consistency except type of registration as it is required only for the buyer. In such cases, both Buyer and Consignee details will be shown.
- In few circumstances, few of the details like State, GSTIN, etc. was not being saved. Hence, post migration it will be shown blank and the same will be printed. To get the details, user can re-select the party in the Buyer/Consignee so that it would reflect correctly. For example, if these details were blank in the party master it was getting pre-filled from Company, but the info was not being saved. This is been resolved so that on selecting the party again, it gets updated with appropriate Party details.
Pin Code is a new field introduced in the Supplementary details. There could be possibilities that Buyer or Consignee details have been altered in the supplementary details (by selecting other party master/manually). Hence, it is not wise to show the pin code from the party master for the existing transactions. However, it will be shown in the supplementary details for the new transactions. On selecting the party again, it gets updated with appropriate details from the master.
- The mailing name can be seen by enabling the configuration ‘Provide Mailing name’ in the Party details sub-form of supplementary details.
- For the existing transactions, the mailing name will be shown against the Mailing Name field and the Party name fields.
- In few circumstances, the details like State, Country, GSTIN, etc. was not being saved. Hence, post migration it will be shown Not Applicable or blank. To get the details, user can re-select the party in the Buyer/Consignee field so that it would reflect correctly. For example, if these details were blank in the party master, it was getting pre-filled from Company but the info was not being saved. This is been resolved so that on selecting the party, it gets updated with appropriate Party details.
- The fields State and Country was not supported in the supplementary details (some voucher types did not have these State & Country for Consignee and some for Buyer as well). We have introduced these as default fields to maintain consistency and hence post migration, it will be shown Not Applicable.
In TallyPrime, the State & Country will be available as default fields and the Pin Code information can be provided by enabling the configuration. Post migration, the details will be retained in the address for all existing transactions and the same will be printed.
In TallyPrime, it is made much simpler that you need not click a button to provide the Party details manually. Using New Party from the table or by just typing the party name, you will be able to provide the Party name.
In Release 6.x, though registration types were shown as Unregistered, it used to allow to capture the Tax registration details. Post migration, on changing the registration type to Regular or Composition, you can see the details.
In these circumstances, though the details were shown under Buyer in Release 6.x, it was ideally getting saved under Consignee details and the same will be printed. This is resolved in TallyPrime. As the details are different, it is always good to keep the customer informed about the difference by showing Buyer and Consignee details rather than going with a wrong assumption thinking it is same. In order to get the details, user can re-select the party in the Buyer/Consignee so that it would reflect correctly or disable consignee details if not required.
In these circumstances, though the transaction is Cash Sales and the details were shown under Buyer in Release 6.x, it was ideally getting saved under Consignee details and the same was printed. This is resolved in TallyPrime. As the details are different, it is always good to keep the users informed about the difference by showing Buyer and Consignee details rather than going with an assumption that it is same details. In order to get the details, user can re-select the party in the Buyer/Consignee so that it would reflect correctly or disable consignee details if not required.
Post migration, there is no impact in the GST Returns though the Place of Supply is not visible in the transaction for the existing transactions. This will be taken up in our upcoming releases.
Post migration, there is no impact in the CT-1 / CT-3 Outstanding reports though the Certificate No. & Date fields are not visible in the transaction for the existing transactions. As a workaround the details can be entered in narration until we support in our future release. This will be taken up in our upcoming releases.
On changing the party, a message is shown as ‘You are changing the Party ledger. Do you want to update the Party’s address and Tax Registration details for the transaction? Yes/No”.
- On selecting Yes:
- The newly selected party details will be updated in both the Bill To & Ship To (same/different) details.
- In case of Purchase cycle, only the Supplier details will be changed with the newly selected party details and the Consignee details will get refreshed with the Company’s details (same/different).
- On selecting No:
- The newly selected party details will not be updated rather it will retain the information of the previous party.
The current design of Emirate (POS) is a hard-coded list. However, it will be enhanced in our future release.
Ideally, businesses having branch(es) will have some differentiation in the party/ledger names for easy identification in the book of accounts. As the Name and Mailing names are available separately in the supplementary details, the party is given the priority and hence it gets pre-filled from the party master. However, user can provide the Company’s address details manually.
The above configuration is changed to ‘Show name and address from party master’. This is now moved to print as it is related to printing. Also, the option ‘Show Contact details’ in the print will appear only if Provide Buyer Details or Show name and address from party master is enabled. The functionality is retained as per Release 6.x except the placeholder.
Yes, you can choose not to print the consignee details in invoice by disabling the printing configuration Show Consignee details.
If the e-Way Bill details are filled for an invoice which is lower than threshold limit, it means that the threshold is incorrectly configured in F11. This will help you export e-Way Bill directly from transactions. As these are exceptional scenarios where you want to export the e-Way Bill for invoice, which has value lower than the threshold limit it is wise to verify the details from e-Way Bill report and for all such invoices you can export e-Way Bill from report provided, after verification.
For the bill reference to be generated, enable the configuration ‘Use default Bill-wise details for Bill Allocation’ in the Sales voucher.
With the new registers added in TallyPrime, users do not have to go to Contra or Payment and then user filter to view Contra or Payment Registers. New registers are included for all voucher types for easy identification and navigation.
Currently, team is in the process of understanding the business benefits of providing this capability in the product and in parallel, trying to come up with a simplified design that would make this feature more robust and usable.
If the Purchase Order Pending report is opened from Stock Summary, then it will show all pending order details for the period and stock items shown in Stock Summary.
However, if the Purchase Order Pending report is opened from the report showing only the negative stocks, then it will show pending orders for these stock items only.
With an objective to bring consistency in the right buttons across reports, the daily button was removed from reports listing vouchers.
The observations in voucher listing reports included:
- Ledger Vouchers
- Stock Item Vouchers
- Batch Vouchers
- Godown Vouchers
- Cost Centre Vouchers
- Group Vouchers
In these reports, Group Vouchers has only Monthly, Ledger Vouchers has both Monthly and Daily and the rest of them have only Daily. Now, all of these have Monthly button only.
After navigating to periodic report (default is monthly view), you will have the facility to change the view to daily, fortnightly, half-yearly, yearly, etc. And this can be achieved using Ctrl+F6 (Monthly), Ctrl+H (Change View) or F12 (Configure).
- Press Alt+G (Go To) > Ledger Vouchers > select a party.
- Press F5 (Bill-wise) to view the pending bills for the selected party ledger.
- To view all the bills (pending and cleared), press Ctrl+B (Basis of Values) > Type of Bills > All Bills > and press Enter.
e-Sugam has been replaced by e-Way Bill systems and therefore, e-Sugam reports will not be required any longer. However, in case you feel that you may need access to earlier period e-Sugam reports in the future, please take a backup of your data before moving to TallyPrime. You may install earlier version of Tally, which you were using, restore the backup of your data in that version, and continue to access earlier period reports from that. Alternatively, you may take hard copy or export a copy of those on your system and store them for future reference.
To be very frank, MCA reports have undergone a lot of changes in the past. In fact, Schedule VI has been replaced by Schedule III reports. We have supported those old formats and have not been able to keep pace with the evolution in requirements of MCA reports. Even though there are users who look at Schedule VI report from Tally to fill their Schedule III reports and complete MCA formalities, on many occasions these are found to be unusable as per the latest needs of the MCA reports. Therefore, we have taken this call to remove these reports from the current version of the product. We will bring them back when we are in a position to take custody of it and provide up to date and most enriching experience of using MCA Reports.
LBT has been abolished in Maharashtra since 1st August 2015, and users are not required to file LBT returns anymore. Therefore, call has been taken to remove this feature from the product. However, in case you feel that you may need access to earlier period returns in the future, please take a backup of your data before moving to TallyPrime. You may install earlier version of Tally that you were using, restore the backup of your data in that version, and continue to access LBT Reports of the earlier period. Alternatively, you may take hard copy or export a copy of those on your system and store them for future reference.
Though E-Faktur is not supported directly from the product, users can export Sales Register in Excel with Pivot details. The information available in the exported Excel file can be copy pasted in the E-Faktur template.
We have taken this as a conscious decision in relation to the legacy tax features. These legacy indirect taxes are already subsumed in to GST. Most of our users are already migrated to the new tax regime and will not require to use old stat features anymore. However, keeping those users in mind, who are still impacted by old stat regime, the masters and transactions will continue as is in the product. However, if you require return forms from the product, we request you to download the extension available on our website.
Tally.ERP 9 version 4.x and TallyPrime will continue to work subject to installed in different folders. You need to download the Extension for Tax installer to view reports of VAT, Service Tax, and Excise.
Refer to the GST Rate Setup topic for more information.
Scenario: Digitisation has proved to take a revolution in India. Online Book Keeping system like Quickbooks, Zoho Books, etc. is already providing a facility to collect payments online through Net Banking, Credit Cards, etc. However, none of the offline accounting software are providing this feature as of now. Tally can take the chance of it. Collecting payment online is very easy and easy to configure as well. Tally can easily tie-up with Payumoney, CC Avenue, etc. in order to set-up users account for free of cost. For every transaction, it will charge the TDR and nothing else.
Tally has considered to provided the facility to collect payment online. Our team is in touch with different payment aggregators like GPay, PayU, Ingenico, Billdesk, PayTM, etc. We have noted this requirement and planning to provide it in the near future.
Any cheque printing configuration that has been configured/set will continue to exist and remain the same. There will be no change in the same.
(The user must be enabled to set the default view of screens. Tally is providing various options to enable a user for data accessibility, like Columnar, Auto Column, etc. However, the user is required to set these options each time as per the need. The option for setting the default view of screens at various levels can help the users to set the software as per their requirement so that it doesn’t require multiple steps to perform each time.)
The requirement is partially solved in TallyPrime with Change View. However, other elements are considered as part of our future releases, and facility would be provided in each of the report for user to set default value/views which would persist thereafter. This facility will allow users to view report in similar way each time they enter.
All F12 configurations are meant to assist users by personalising the view and to handle various business diversities, as they feel comfortable with.
On the contrary, if we have this at the company level, it will be common across all users, which will defeat the flexibility we want to give to each user. Also, some of these will then be required to change in each company which will make it a tedious experience for our customers.
In TallyPrime, we have enhanced the experience to help you to find almost all the information about the deployment at a single location and also about the environment in which it is running from F1 (Help) > About.
You would require to navigate to update report and then start the update process. Or from the About report, you can check whether the new release is available and navigate to update report to start update.
All these info along with host of other info about your Tally installation and environment can be accessed from About Page.
It will continue to be easy for our users to understand weather his application is in license mode or not, by viewing the product identity at the title bar.
With this approach, you will not need to read through the content/description as was the case earlier, but the visual clue will indicate it much faster manner. Unlike the previous case where the panel could have got hidden due to user choice, in the new approach, the title bar it is discoverable always. Additionally, if you want to get complete information you can always go to the About page for the same.
About report contains information of application, license, data, TDLs, and the deployment information.
When an activity fails, user must be prompted a message to notify the failure. In case of the sequence of failure messages, the user will be prompted to check the Event Log report where the Calculator Panel messages will be redirected to. This report is capable of being filtered as per the functionality.
These facilities have always been available from the web too. However, the experience on the web was different from the experience provided in the product/application, which was confusing to the users.
To provide a uniform, seamless, and convenient experience, we have moved it to the web. The link of the web is also available from within the product.
Since this was to help in getting information when the user was on the move, we have substituted this with reports on browser which has much more information across many reports for those who want to access it on the move.
In order to support a specific use case of users who require to work in both Tally.ERP 9 and TallyPrime Release A using same license instance, support for co-existence is provided in the TallyPrime Release A Gateway server. This allows individual products to be used in licensed mode with the same deployment.
The number of days it can support co-existence is a business decision considering various aspects including customer needs (due to statutory and non-statutory reasons).
TVU is a license entitlement, and it will work as long as the license supports a specific release. For the specific scenario mentioned in this question, as the license is valid for both Tally.ERP 9 as well as TallyPrime Release A, the customers migrating from Tally.ERP 9 to TallyPrime Release A can avail all the entitlements of the underlying license including TVU.
In order to support a specific use case of users who require to work in both Tally.ERP 9 and TallyPrime Releases A using the same license instance, support for co-existence is provided in the TallyPrime Release A Gateway server. This allows individual products to be used in licensed mode with the same deployment.
Thus, a Tally.ERP 9 client and TallyPrime Release A client can point to TallyPrime Gateway for the purpose of getting a license.
Yes, all Tally applications need to be updated to TallyPrime in order to use data sync and remote access.
Backward and forward release compatibility is not there for data sync or remote access.
The data model used in Tally.ERP 9 is different from the one used in TallyPrime. If synchronisation and remote access are allowed between Tally.ERP 9 and TallyPrime, this may render the data inaccessible. Hence, for user’s benefit, we do not allow remote & sync to work with older versions.
Yes, you can use the same license for both Tally.ERP 9 as well as TallyPrime. In Tally.ERP 9, you will continue to work in the same manner as it has been today. Kindly refer the help link for the same. For TallyPrime, you can activate and reactivate from the license management screen. Kindly refer to help for a step by step guide.
For Release 4.x or earlier, moving to TallyPrime is a manual process. The user needs to download TallyPrime setup from download page of the Tally Solutions portal, run the setup, and follow steps.
In the past, the option to buy Tally License was available from within the application as well as from the website. However, the experience of the website was different from the experience provided in the product/application, which was confusing to the users.
To provide a uniform, seamless and convenient experience, we have moved it to the website.
Your TSS renewal date will not get affected by any product update including TallyPrime. Current renewal date remains the same.
Yes. Refer to the Remote Access topic for details.
No, currently TallyPrime is a system-based application that works on Windows operating systems. If you would need to view the reports, you can view it on any browser.
TallyPrime is a system-based application and has Remote Access capability to access and work on the data anywhere by installing the application. TallyPrime also supports accessing reports on browsers to view the reports anywhere; however, currently, it does not allow editing of data through browsers.
Refer to the Synchronisation topic for more details.
Refer to the Tally Software Services page for more details.
There is no change in the synchronisation process. The discoverability and navigation have been enhanced.
To get the license information, do any of the following:
- Click the text TallyPrime Gold or Silver available on the top-left corner of the application.
- Press F1 (Help) > About.
Yes, you can activate the new license for Tally.ERP 9. However, any enhancement in the future will be done only for TallyPrime. We have stopped feature updates for Tally.ERP 9.
If you update TallyPrime on your existing Tally.ERP 9 setup, then all your existing configurations will get carry forwarded to TallyPrime. If you install as a new installation, then you have to newly setup sync as it is part of the config file.
Data can be loaded in MS Excel using ODBC bridge. Enable ODBC in application settings of the Tally client. Then in MS Excel, go to Data > Get Data > From other sources > ODBC. The company name will be listed in the DSN. Once you select the company, you can select the values that needs to be loaded.
No enhancements are executed with respect to ODBC in TallyPrime Release A.
Please reach out to your Tally Partner for assistance on the same.
In TallyPrime Release A, in the top menu under Import, you will be able to import masters and transactions and set other configuration information too.
Yes, system will support the export and import data from Tally Prime to the older releases and vice versa. Import will be supported only in XML format.
Moving from Tally.ERP 9 to TallyPrime is a seamless process. All new enhanced migration experience is designed to assist moving to TallyPrime seamlessly.
Split will be available from Top Menu. This change is for providing you with ease of access.
The intention is to bring consistency across Print/Export/E-mail modules. Users need to select configure to change the location and/or path, and also configure functional configuration as required from a single place. Also, every time changing the file format or folder path or export or E-mail to is non-frequent since the configurations do not change frequently. This is done in order to support one-click send for faster task completion, keeping the fields in landing page of export/print as read-only. However, there would be few circumstances that users will need to change. In such scenarios, users can navigate to configuration and change.
The data model used in Tally.ERP 9 is different from the one used in TallyPrime. If a user tries to carry out synchronisation between TallyPrime and Tally.ERP 9, this may render the data inaccessible. Hence, it is not recommended to carry out synchronisation between Tally.ERP 9 and TallyPrime or vice versa. In case of remote access, user will not be allowed to access TallyPrime companies on Tally.ERP 9 and vice versa as this may render the data inaccessible.
Yes, all Tally applications need to be updated to TallyPrime in order to use data sync and remote access.
As a part of Release A, a consistent user experience is provided across the product for single-company selection. We totally understand the need for choosing multiple companies together. We will be definitely including it across the product for a seamless experience. In addition, there are more use-cases for multiple companies, which we will also be solving to enhance your experience.
In TallyPrime, the right bar buttons have been made context-specific rather than having all items like in Tally.ERP 9. This leads to decluttering of the overall visual interface.
While we understand that the one-step activity in Release 6.x is now in two-steps in TallyPrime, the benefit in TallyPrime is that using the same key (Alt+K and then O), the user has the flexibility to connect company from anywhere in the product without losing the current context, and not only from Gateway of Tally.
The calculator panel is hidden from TallyPrime onwards. This is done to provide a clutter-free environment on Gateway of Tally. The Event Log is provided with the intent to remove junk messages (technical errors) which the user does not understand. Also, the user has better flexibility to filter the messages in the Event Log based on Event Type and Event Category.
For TallyPrime, it is recommended that the user should check the Event Log, which is accessible across the product from Top Menu> F1 Help > Troubleshooting > Event Log post synchronisation to check the status of the activity.
While we understand that a prompt would help, we are working on it, and you can expect this in our future releases.
Migration process remains the same for Tally.ERP 9 Company data to TallyPrime Company data.
TallyPrime will detect companies from Tally.ERP 9 and show the status as migration required in the company selection table. Selecting the company will ask for the migration of the company.
Once the user chooses to migrate, the company data will be migrated and made compatible with TallyPrime.
Lower versions will not be able to use the same company data once migrated.
Lower versions would require to rewrite the data again in the respective release to use the TallyPrime compatible data.
TallyPrime will not be compatible with Tally.ERP 9 (or even the lower versions).
Lower versions will not be able to use the same company data once migrated. Lower versions would require to rewrite the data again in the respective release to use the TallyPrime compatible data.
Yes, the system will support the export and import data from TallyPrime to older releases and vice versa.
Moving from Tally.ERP 9 to TallyPrime is a seamless process. All new enhanced migration experience is designed to assist moving to TallyPrime seamlessly.
In Tally, we always try to design our product to give the best performance in given situations. Hence, similar to our OS decision where TallyPrime will be supported only on 64-bit OS and Windows 7 onwards, we have taken a decision to not support 32-bit ODBC application, and users should upgrade to 64-bit ODBC.
This behavior is retained as it exists in Release 6.x. When user upgrades in Release 6.x folder, the current cfg file will retain and the existing configuration will remain as is.
If users install TallyPrime in a new folder, the default configurations will not get set and they will need to manually configure this behavior.
Tally.ERP 9 had a different architecture compared to TallyPrime. In Tally.ERP 9, restarting the application has a capsule-based approach whereas from TallyPrime, that approach is not followed and application restarts. As you will generally not need to change client/server setup multiple times, this should have a minimal impact.
During migration, you need to take the backup of your data at a destination folder path. This message occurs when the specified destination path does not have the required rights. Change the backup destination path to the one with rights and proceed to migrate.
No, this is not feasible.
No. TallyPrime does not facilitate migrating data in one go for multiple companies.
Can I view reports in the browser?
Can I do data entry using browser?
Can I share data over WhatsApp?
Does this also mean that Tally will keep a copy of my business data?
Edit on Browser – At present, Edit in Browser is not available. We are working to offer this feature in our upcoming releases.
Share the information through WhatsApp – When viewing reports in browser, you can download reports or invoices in PDF and Excel format. This can be printed or shared as is through any medium.
How secure is my business data when accessed via web browsers?
Your business data is secure as the data remains with you, and is not stored anywhere else. Further, you can decide who can access different reports.
- Can I store my data in cloud?
- Is my data secured? Or should I worry?
- If tally is still an installable software, what did he mean by cloud?
Tally has been an on-premise software and will continue to provide a seamless experience being an on-premise software in TallyPrime as well.
However, as per new TVU licensing policy changes, you can use Tally if deployed using virtualisation technologies like RDP, RDS, Citrix, etc. that are bought from Third Party Providers directly or through Partners.
We appreciate this feedback. We are sure there are certain features in the Audit & Compliance that are genuinely useful for the Chartered Accountants, and they may be using it extensively.
However, when seen as standalone features, these features make no sense as they are tightly connected in audit environment. We have removed Audit & Compliance from the product since we felt these features are rendering unusable due to various experience concerns. We will relook at all these aspects together in the future.
We have taken a conscious call to remove audit features from the product since we genuinely feel that the features and tool are not usable in their current form. We say that they are unusable because of their performance and design. Some of them are found to be outdated. We will relook at all these aspects in the future.
We haven’t kept pace with the changes applied by Government or Tax Authorities in relation to Tax and Stat Audits. The reports/tools provided in the product are outdated in that sense, though our customers have continued to use them since they were able to derive some value from these tools. However, at times, these tools become unusable for the purpose that they were expected to solve. Therefore, we have decided to deprecate these features from TallyPrime Release A. We will make them available in the future when we are in a position to take custody of it and provide up to date and most enriching experience of using Tax and Stat Audit features.
These facilities have always been available from the web. However, the experience on the web was different from the experience provided in the product/application.
To provide a uniform, seamless, and convenient experience, the activities can be performed from a Unified Account Portal through web.
Your customization might need a migration. We will be working with partners and ensure that your customization will be compatible with TallyPrime.
In the past, the TallyShop option was available in the application as well as on the website. However, the experience of the website was different from the experience provided in the product/application which was confusing.
To provide a uniform, seamless, and convenient experience, we have moved it to the web, the link of which is also available in the product.
There is no change in TCP compilation format. Hence, a re-compilation or migration would not be required. We have ensured for backward compatibility within TDL code wherever possible. However, to introduce new capabilities and experience in TallyPrime, minor changes have been implemented in the default code. Hence, there is a possible chance that the TDL would have to be re-vamped or re-coded. We would be providing complete assistance to partners for quick compatibility of customisation in TallyPrime.
It will continue to exist as it exists today for Tally.ERP 9.
Refer to the Deploy TDLs and Add-Ons topic for more information.
The existing customisations done on Tally.ERP 9 may require migration to TallyPrime. It is recommended that you kindly contact your Tally Partner.


