Manage Buying and Selling Prices | Price Lists and Price Levels
Every time there is a purchase or sale of goods, you need to record the same using the Purchase and Sales Voucher. While recording the vouchers you need to mention the rate of the goods, discount if any and so on. In TallyPrime you can manage such buying and selling prices of the goods by specifying the Standard Cost and Standard Price of the goods on a particular date or period. You can also set up a price list for selling goods to a specific type of customer.
Based on each stock item’s buying and selling prices, you may want to maintain the rates so that they automatically appear when you pass a transaction. You can do this in TallyPrime by providing the standard cost (for purchase) and standard price (for sales) for each stock item. You can maintain rates for the stock items daily or for a specific period based on your business needs. When you record the purchase and sales invoices, the standard cost and price automatically appear for that stock item. If you want to fix the selling price based on the type of customers, then you can create Price Levels in TallyPrime and create separate Price Lists for all the Price Levels. For example, you can create a price level for a regular customer or any walk-in customer and set the price list for them. You can also set a discount percentage for each price level.
Manage Buying (Purchase) Price Using Standard Cost
Standard Cost is an estimated cost which is derived from the historical analysis of data. Since it is not possible to know in advance the actual cost of any product, you can configure the item master with the standard cost for a particular date or even for a period. On a daily basis, you can enter the date and the price applicable on that date.
In this section
Specify Standard Cost for Stock Item
You can specify the standard cost daily by entering the date for a stock item. You can also specify the standard cost for a period.
- Open the stock item alteration screen, and configure it to enter standard rates.
- Press Alt+G (Go To) > Create Master > Stock Item > press Enter.
Alternatively, Gateway of Tally > Create > Stock Item > press Enter. - Press F12 (Configure) > set the option Provide Standard Buying and Selling Rates to Yes.
If you do not see the above option, set Show more configurations to Yes. - Set the option Alter standard rates to Yes.
- Enter the Standard Cost with the Applicable From date and Rate per unit.

- Press Ctrl+A to accept the Standard Rates screen.
- Press Alt+G (Go To) > Create Master > Stock Item > press Enter.
- As always, press Ctrl+A to save.
Record purchases with Standard Cost
When you specify the standard cost for a stock item based on the voucher date, the same appears when you select that stock item in the voucher, and you can record the purchases with the specified standard cost.
- Open the purchase voucher screen in Item Invoice mode.
- Press Alt+G (Go To) > Create Voucher > press F9 (Purchase).
Alternatively, Gateway of Tally > Vouchers > press F9 (Purchase). - Press Ctrl+H (Change Mode) > select Item Invoice.
- Press Alt+G (Go To) > Create Voucher > press F9 (Purchase).
- Specify the supplier details.
- Party A/c Name: Select Cash or Bank for cash purchase and the party name for credit purchase and press Enter.
You can create the Party A/c on the fly by pressing Alt+C.
The Receipt Details screen appears. - Receipt Details: Enter the Receipt Details, as needed and press Enter.
You can choose to enable the option for Order Details by pressing F12 (Configure).
The Party Details screen appears. - Party Details: You can update the seller details while recording the transaction.
- As always, press Ctrl+A to save and proceed.
- Party A/c Name: Select Cash or Bank for cash purchase and the party name for credit purchase and press Enter.
- In the Purchase ledger, select the common purchase ledger.
- Provide the stock item details.
- Name of Item: Select the stock item for which you have defined the standard cost.
- Enter the Quantity. Based on the voucher date, the Rate appears per the Standard Cost defined for the stock item.
- Select additional ledgers, like transportation charges, insurance, or discount, if any.
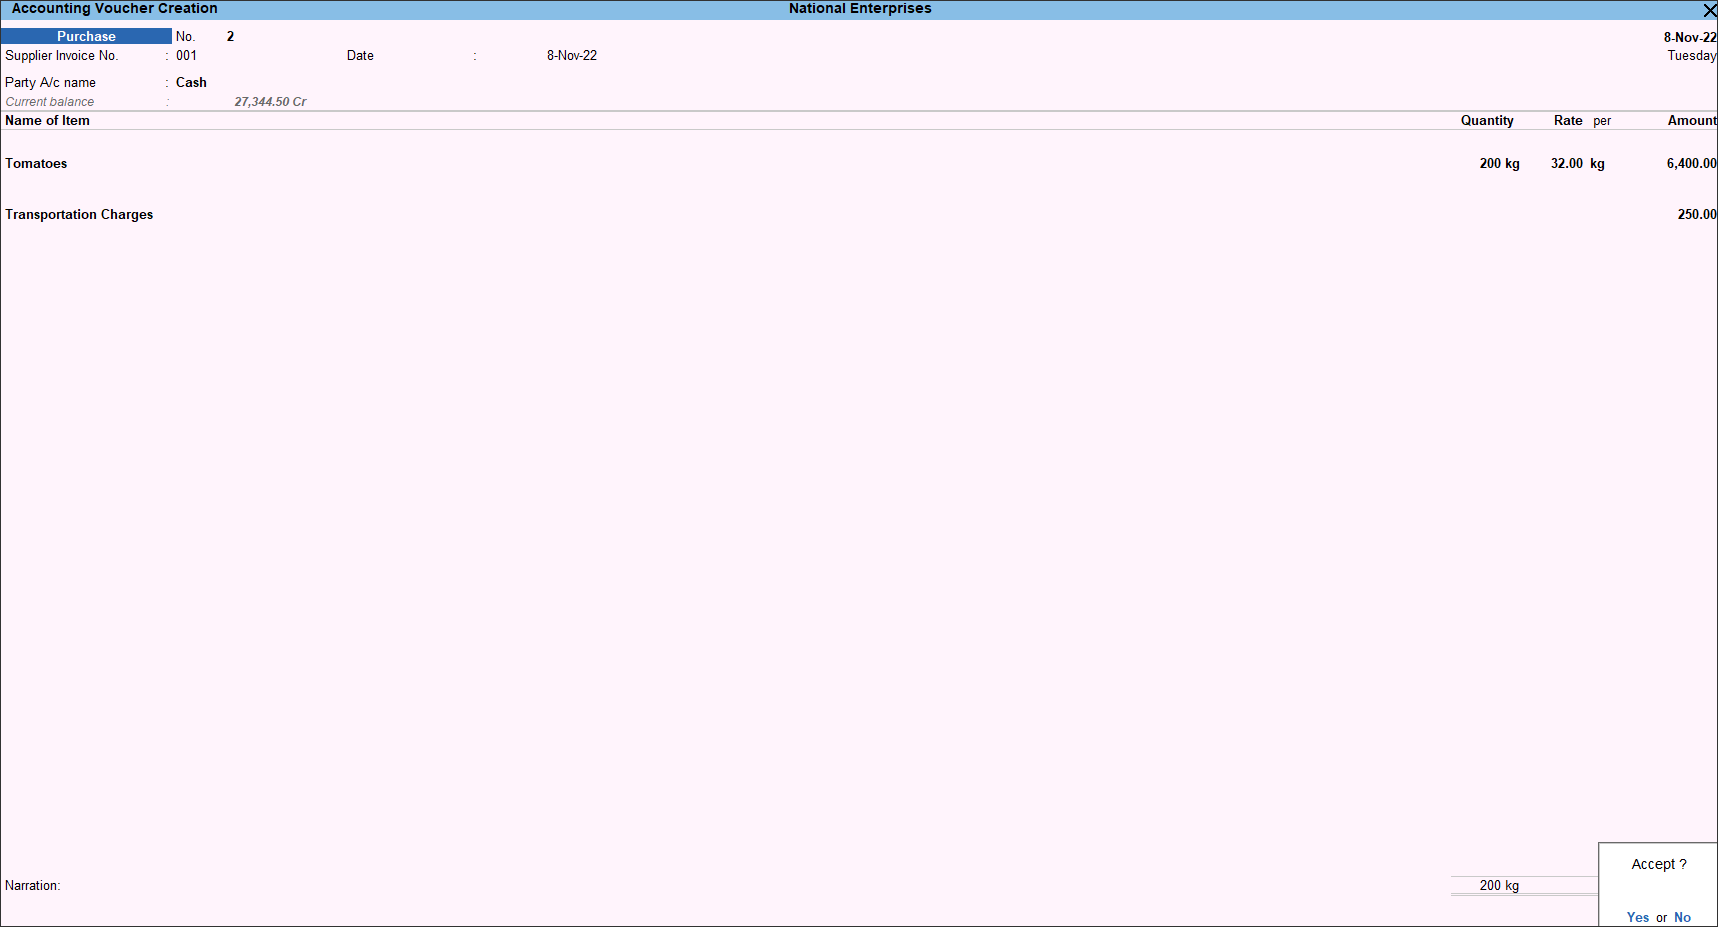
- Provide Narration, if needed. As always, press Ctrl+A to save.
Even if you have changed the rate per unit in the voucher based on the voucher date, the standard cost defined in the stock item appears in the subsequent vouchers.
Manage Selling Price Using Standard Price
The standard price is a predetermined price set for selling the goods. If you have set a standard cost for your stock items, you can also set the standard selling price. On a daily basis, you can enter the date and the price applicable on that date.
In this section
Specify Standard Selling Price for Stock Item
You can specify the standard selling price daily by entering the date for a stock item. You can also specify the standard price for a period.
- Open the stock item alteration screen, and configure it to enter the standard selling price.
- Press Alt+G (Go To) > Create Master > Stock Item > press Enter.
Alternatively, Gateway of Tally > Create > type or select Stock Item > press Enter. - Press F12 (Configure) > set the option Provide Standard Buying and Selling Rates to Yes.
If you do not see the above option, set Show more configurations to Yes. - Set the option Alter standard rates to Yes.
- Enter the Standard Selling Price with the Applicable From date and Rate per unit.

- Press Ctrl+A to accept the Standard Rates screen.
- Press Alt+G (Go To) > Create Master > Stock Item > press Enter.
- As always, press Ctrl+A to save.
Record sales with Standard Selling Price
When you specify the standard selling price for a stock item based on the voucher date, the same appears when you select that stock item in the voucher, and you can record the sales with the specified standard price.
- Open the sales voucher screen in Item Invoice mode.
- Press Alt+G (Go To) > Create Voucher > press F8 (Sales).
Alternatively, Gateway of Tally > Vouchers > press F8 (Sales). - Press Ctrl+H (Change Mode) > select Item Invoice.
- Press Alt+G (Go To) > Create Voucher > press F8 (Sales).
- Specify the buyer details.
- Party A/c name: Select Cash or Bank for cash sales and the party name for credit sales and press Enter.
You can create the Party A/c on the fly by pressing Alt+C.
The Dispatch Details screen appears. - Dispatch Details: Enter the Dispatch Details, as needed and press Enter.
You can choose to enable the option for Order Details by pressing F12 (Configure).
The Party Details screen appears. - Party Details: You can update the buyer details while recording the transaction and print the same in the invoice.
- As always, you can press Ctrl+A to save and proceed.
- Party A/c name: Select Cash or Bank for cash sales and the party name for credit sales and press Enter.
- In the Sales ledger, select the common sales ledger.
- Provide the stock item details.
- Name of Item: Select the stock item for which you have defined the standard selling price.
- Enter the Quantity. Based on the voucher date, the Rate appears per the Standard Selling Price defined for the stock item.
- Select additional ledgers, like transportation charges, insurance, or discount, if any.
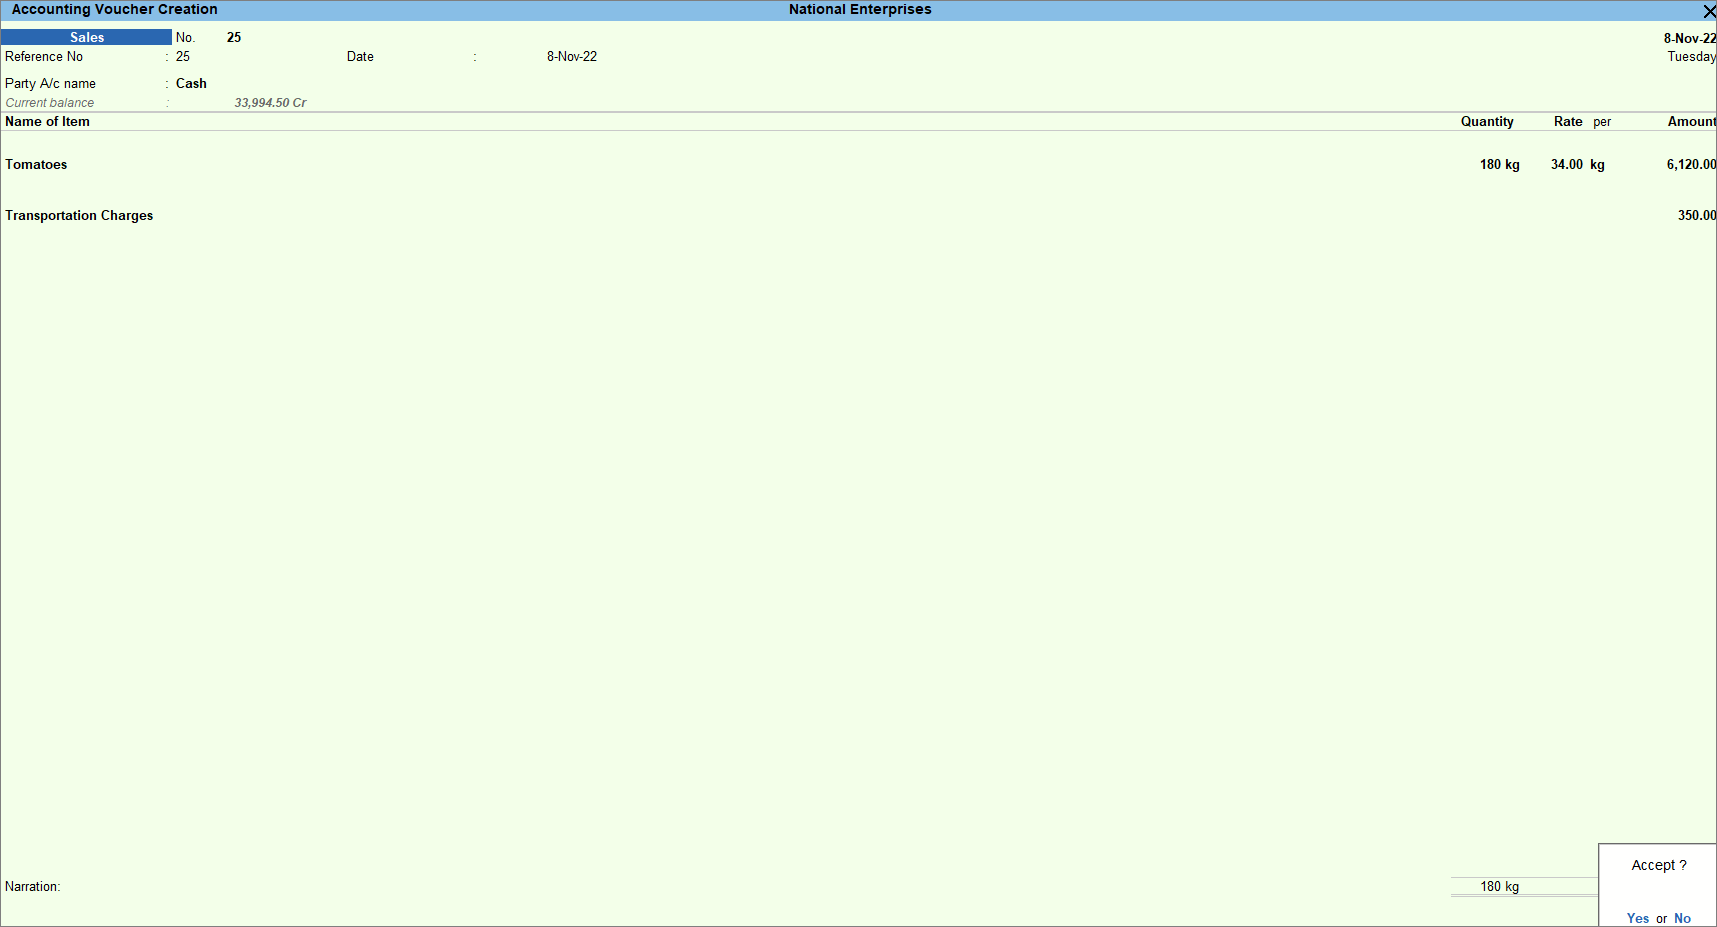
- Provide Narration, if needed. As always, press Ctrl+A to save.
Even if you have changed the rate per unit in the voucher, based on the voucher date, the standard selling price defined in the stock item appears in the subsequent vouchers. If you have selected a price level in the invoice, the rates provided in the price list appear.
Manage Selling Price Using Price List
While doing business, you deal with multiple levels of customers like Wholesalers, Retailers or Dealers. Due to such customers, you may want to fix the selling price of items at different rates based on the type of customer or your preferences. You can create different price levels and assign different price lists to these price levels.
For example, you can create Wholesaler, Distributor, and Customer as price levels and assign applicable price lists to these price levels, as per your requirements. While recording orders and invoices, the relevant prices and discounts automatically appear when you select a price level. You can revise the price list at any point in time for any stock item. Based on the voucher date, the prices are picked from the price list and applied to the transactions.
As price lists are applicable only for stock items and involve auto calculation, this feature is available only when the company is enabled to maintain inventory and invoicing. Once you create price levels, the price list option appears in the Inventory Info. Menu. You can:
- Create a price list for items grouped under a specific stock group.
- View the historical rates and discounts for a stock item along with the current rate and discount.
- View the cost price of the stock items.
- Revise the prices and discounts in the price list by entering a specific percentage or value, or update it one by one, per your business needs.
In this section
- Define a price list
- Use price list during voucher entry
- Revise price lists
- Change the names of price levels
Define a price list
You need to first create different price levels depending on the type of customers you have. Once the price levels are created you can fix the selling price and assign the applicable price list to the price levels. The price list is created based on the buyers and this is referred to at the time of making sales. In TallyPrime you can create multiple price levels and price lists. You can also view the Historical price list and discount along with the current price list and discount.
- Enable and create price level.
- F11 (Features) > set Enable multiple Price Levels to Yes.
If you do not see this option, set Show more features to Yes. - Press Alt+G (Go To) > Create Master > press Price levels.
Alternatively, Gateway of Tally > Create > type or select Price Level > press Enter. - Enter multiple Price Level depending on the type of customers such as Wholesaler, Retailer, Dealer and so on.
- Press Ctrl+A to accept the screen.
If you want to create a Price List consisting of all stock items falling under different Stock Categories, select Stock Categories from the Price List menu.
- F11 (Features) > set Enable multiple Price Levels to Yes.
- Create a price list.
- Press Alt+G (Go To) > Create Master > press Price Lists (Stock Group).
Alternatively, Gateway of Tally > Create > type or select Price Lists (Stock Group) > press Enter. - Select the Price Level, if available. Otherwise, Create > provide a name for the price level > press Enter.

- Enter the date from which the price list is applicable.
By default, stock items used in transactions appear. If you want to view all the stock items (including the ones that are not used in transactions) under the selected price level, press F12 (Configure) > set Show All Items for Price Level to Yes. - Select the stock item and enter the quantity range in From and Less than fields.
You can create a stock item on the fly using the Create option. - Enter the Rate and Disc. % and press Enter.
The Cost Price gets updated automatically based on the stock valuation method defined for the stock item. You can use this to define the appropriate sale price. If the prices or discounts are revised, the historical details appear. You can compare these details with the current price list.
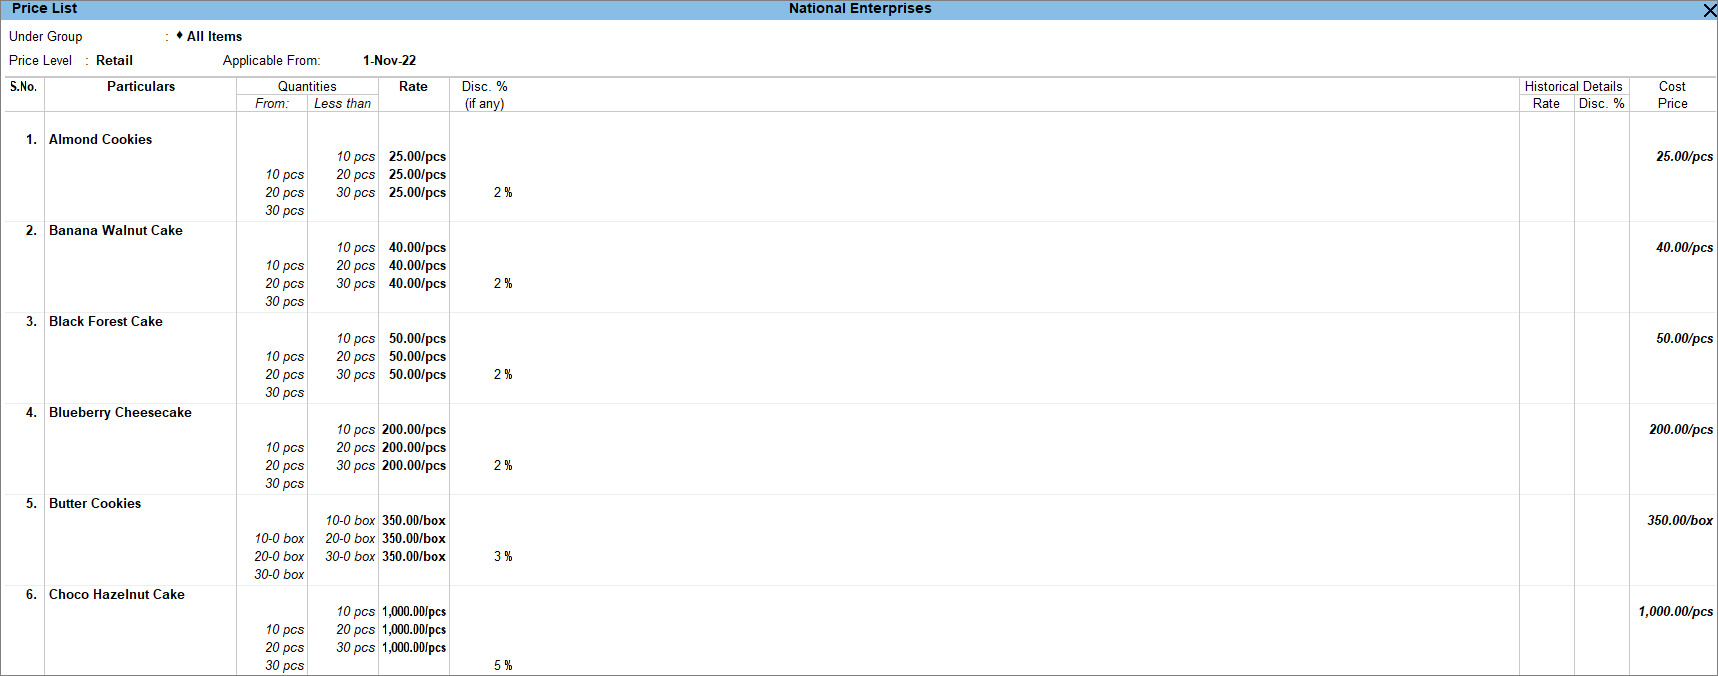
- As always, press Ctrl+A to save.
- Press Alt+G (Go To) > Create Master > press Price Lists (Stock Group).
After creating a price list for a stock group/category, you may have created new items by grouping them under the same stock group/category. When you open the price list by selecting the same stock group/category, the newly created stock items appear in such scenarios. You can enter the price range and/or discount for these stock items, if required, or else leave it blank.
You can alter a price list by overwriting the details entered in the Price List screen.
Use price list during voucher entry
While recording transactions, you can select the price level to use the required price list. If you have a specific price level for a particular customer, you can define it in the party ledger.
In this section
- Record sales voucher with Price List
- Select party ledgers predefined with Price Levels in sales voucher
Record sales voucher with Price List
You can select the price level in the voucher based on your requirement for price lists for a low or high volume of goods.
- Open the sales voucher screen in Item Invoice mode.
- Press Alt+G (Go To) > Create Voucher > press F8 (Sales).
Alternatively, Gateway of Tally > Vouchers > press F8 (Sales). - Press Ctrl+H (Change Mode) > select Item Invoice.
- Press Alt+G (Go To) > Create Voucher > press F8 (Sales).
- Specify the buyer details.
- Party A/c name: Select Cash or Bank for cash sales and the party name for credit sales and press Enter.
You can create the Party A/c on the fly by pressing Alt+C.
The Dispatch Details screen appears. - Dispatch Details: Enter the Dispatch Details, as needed and press Enter.
You can choose to enable the option for Order Details by pressing F12 (Configure).
The Party Details screen appears. - Party Details: You can update the buyer details while recording the transaction and print the same in the invoice.
- As always, you can press Ctrl+A to save and proceed.
- Party A/c name: Select Cash or Bank for cash sales and the party name for credit sales and press Enter.
- Select the Price Level for the voucher.
You can also predefine a price level for the party ledger. - In the Sales ledger, select the common sales ledger.
- Provide the stock item details.
- Select the stock item.
- Enter the Quantity. The Rate appears as defined in the price list linked to the price level.
To modify the rate per unit in the voucher, press F12 (Configure) and set the option Modify all fields during entry to Yes.
- Select additional ledgers, like transportation charges, insurance, or discount, if any.
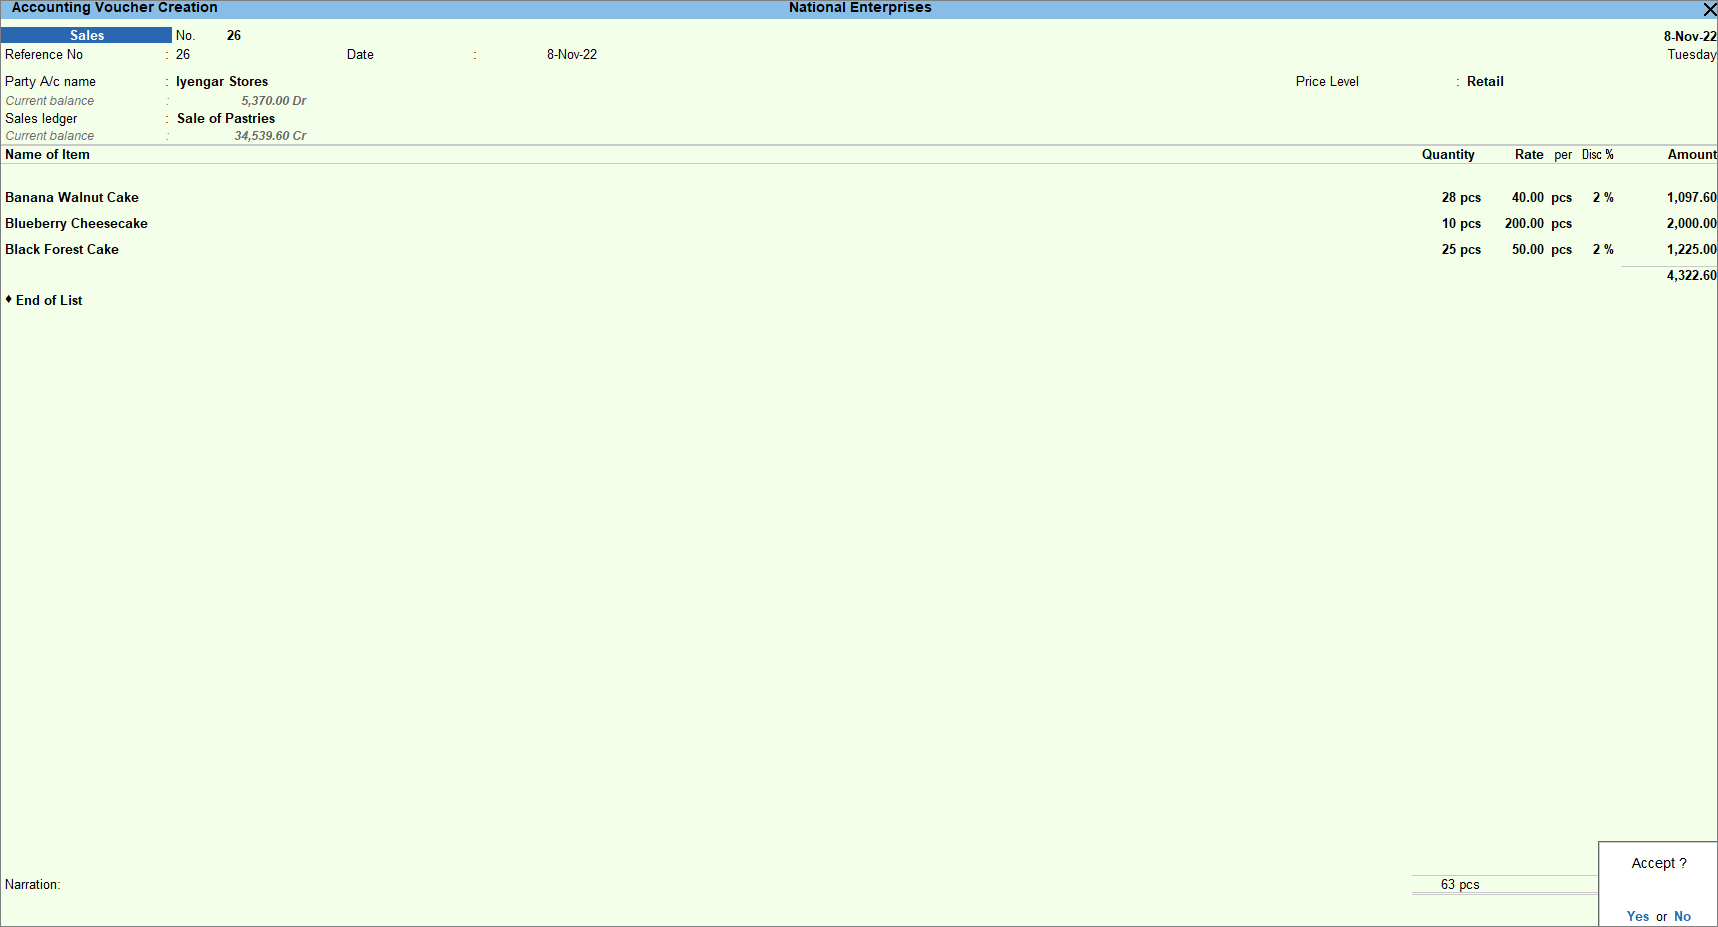
- Provide Narration, if needed. As always, press Ctrl+A to save.
You can record sales invoices by selecting the required price levels.
Select party ledgers predefined with Price Levels in sales voucher
While selecting the Price Level in the voucher, there is a possibility of selecting the wrong Price Level. To avoid selecting the wrong Price Level, you can predefine a party ledger with the correct Price level. Although the price list is applicable only for sales, TallyPrime provides the flexibility to select the price list for both groups, as the party supplying goods (sundry creditor) can be a buyer of goods (sundry debtor) as well. Hence, you can assign price levels for ledgers grouped under Sundry Debtors and Sundry Creditors.
- Open the party ledger screen and select the price level.
- Press Alt+G (Go To) > Create Master/Alter Master > Ledgers > select the party ledger > press Enter.
Alternatively, Gateway of Tally > Create/Alter > type or select ledgers > press Enter. - Press F12 (Configure) > set Use Price Levels for Party Ledgers to Yes.
- Ensure Sundry Debtors or Sundry Creditors are selected in the field Under.
- Select the Pricing level applicable.
You can assign only one price level for a ledger. However, you can select a different price level for the same ledger while recording the invoice.
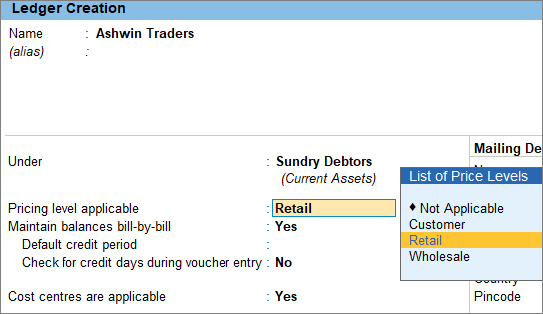
- As always, press Ctrl+A to save.
- Press Alt+G (Go To) > Create Master/Alter Master > Ledgers > select the party ledger > press Enter.
- Open the sales voucher and select this party ledger.
- Press Alt+G (Go To) > Create Voucher > press F8 (Sales).
Alternatively, Gateway of Tally > Vouchers > press F8 (Sales). - Select the party ledger predefined with price level as the Party A/c Name.
The Price Level appears as defined in the party ledger. - Select the Sales ledger to allocate the stock items.
- Press Alt+G (Go To) > Create Voucher > press F8 (Sales).
- Provide the stock item details.
- Select the stock item.
- Enter the Quantity. The Rate appears as defined in the price list linked to the price level.
To modify the rate per unit in the voucher, press F12 (Configure) and set the option Modify all fields during voucher entry to Yes.
- Select additional ledgers, like transportation charges, insurance, or discount, if any.
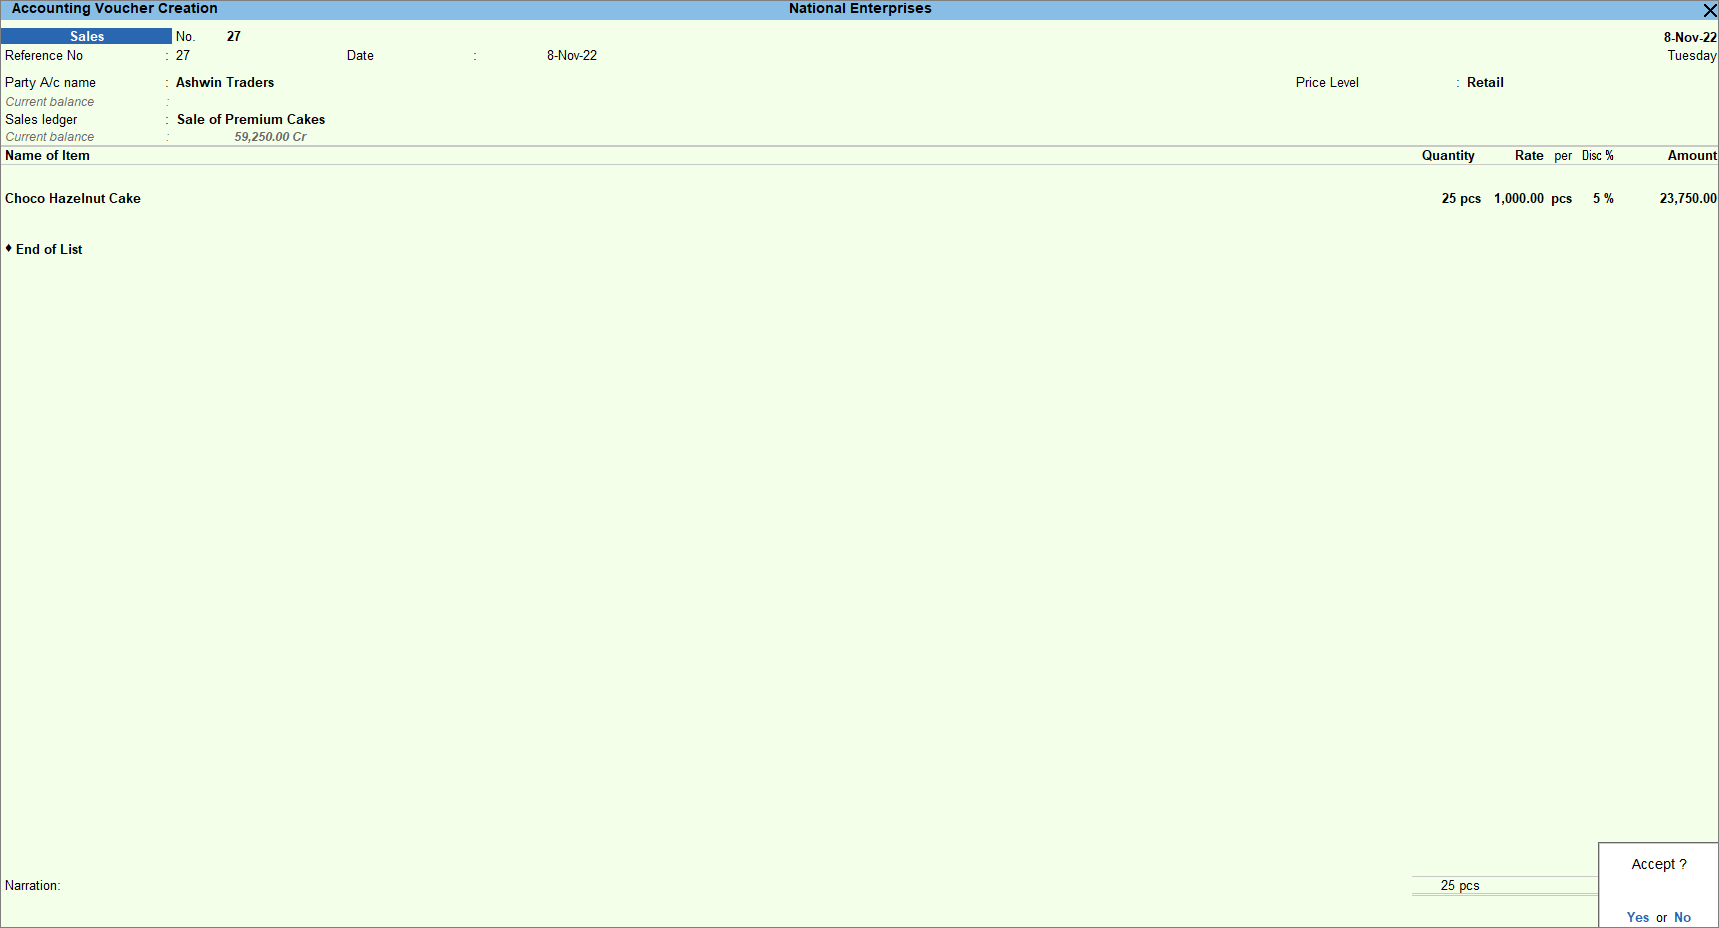
The field Disc. % appears only when the Use Discount column in invoices is set to Yes in the F11 (Features). If you do not see the Disc % column as an option, set Show more features to Yes.
- Provide Narration, if needed. As always, press Ctrl+A to save.
If you select the price list in the ledger, you need not select it again while recording an invoice. This makes the process of invoice entry faster.
Revise Price Lists
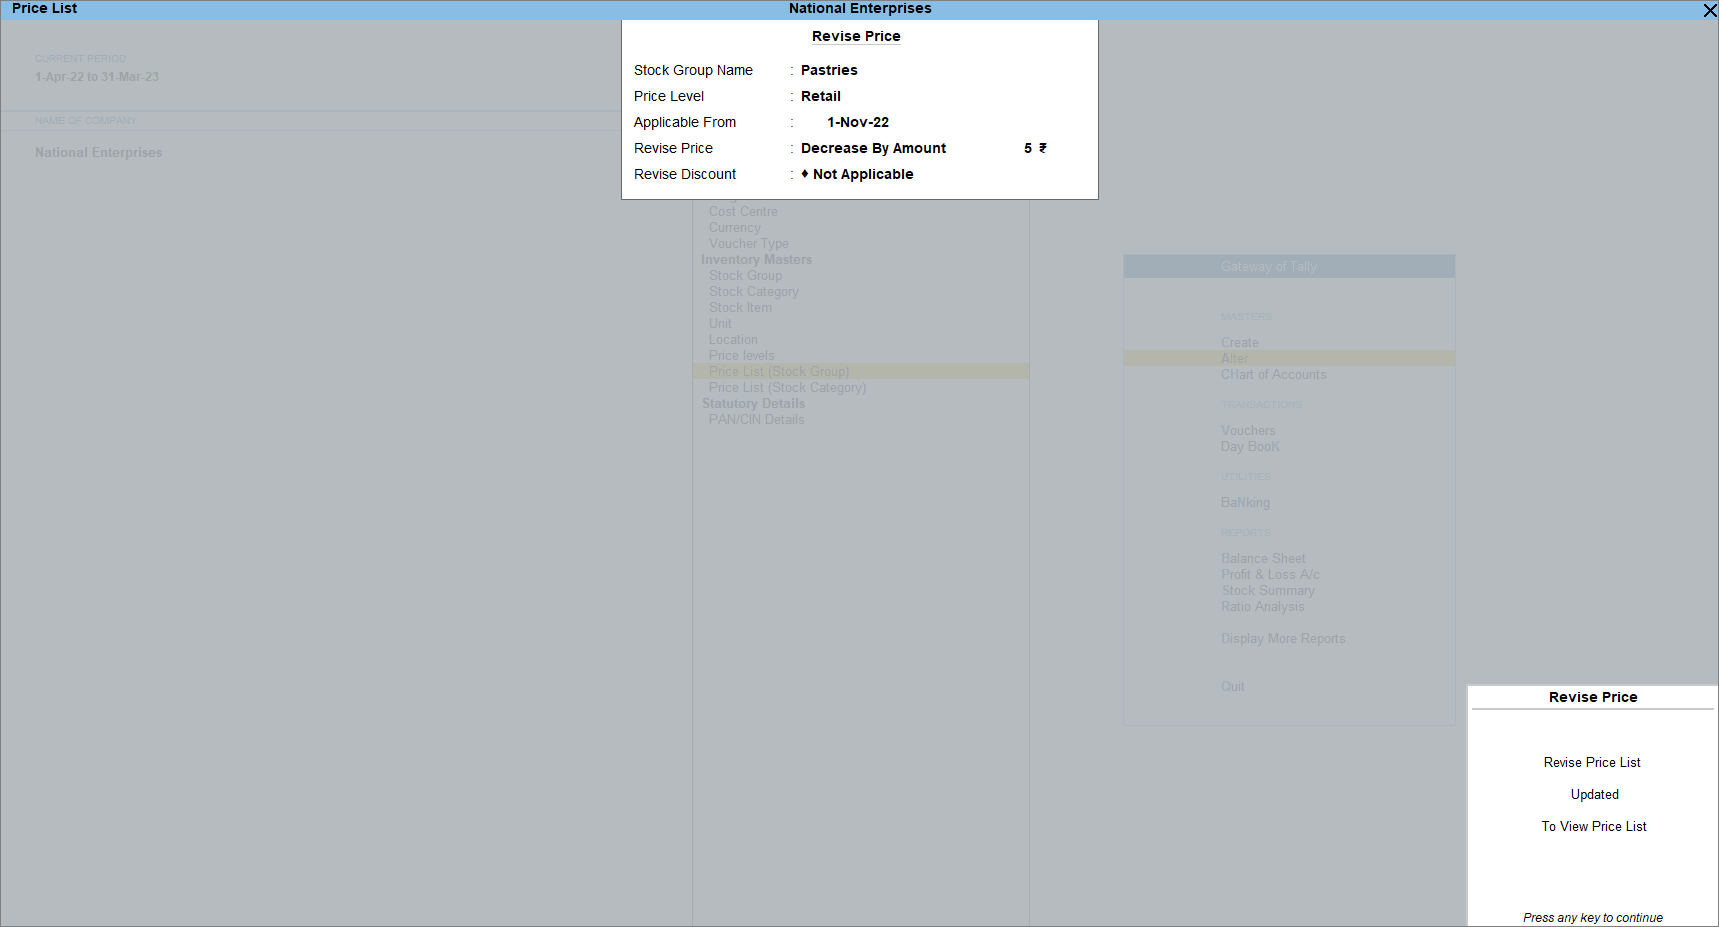
You may need to revise the prices and discounts in your price list. In TallyPrime, you can easily decrease or increase the prices and discounts for multiple stock items in one go. You can also view the price list defined earlier in a separate column.
- Open the price list and select the stock group or stock category.
- Press Alt+G (Go To) > Alter Master > Price List (Stock Group or Stock Category) > press Alt+R (Revise Price).
Alternatively, Gateway of Tally > Alter > type or select Price List (Stock Group or Stock Category) > press Alt+R (Revise Price). - Select the Stock Group Name > select the Price Level > enter the applicability date.
- Press Alt+G (Go To) > Alter Master > Price List (Stock Group or Stock Category) > press Alt+R (Revise Price).
- Update the price list by entering the amount and/or discount.
For any stock items, if you want to change the price that is auto-populated or remove it completely, you can accept the screen.
While recording the transactions with these stock items, the updated amount and discounts appears.
Change the names of price levels
You can change the name of the price levels as and when needed. For example, you may want to change the name of an existing price list from ‘Retail’ to ‘Retail for South Zone’.
- Press Alt+G (Go To) > Alter Master > type or select Price levels.
Alternatively, Gateway of Tally > Alter > type or select Price levels. - Change the names of the Price Levels and press Ctrl+A to save.
The modified names of the price levels appear in the relevant masters and transactions.
Starting from creating separate Price Lists for all the Price Levels to maintaining the rates of stock items daily, TallyPrime does it all. With the standard cost (for purchase) and standard price (for sales) preserved for each of your stock items, attending customers with TallyPrime by your side can certainly feel like a cakewalk.

