
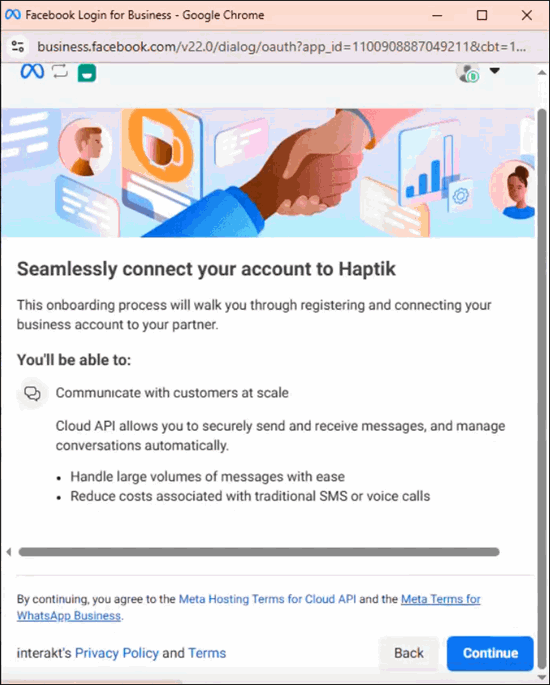
Sign Up for WhatsApp
For using TallyPrime with WhatsApp, you need to first sign up for WhatsApp, by registering your contact number with WhatsApp Business Account (WABA) through an Interakt account. This topic explains the sign up process so that you can start using TallyPrime with WhatsApp.
To begin with, contact your Tally Partner to discuss about this feature in details. Raise a request from your Customer Portal to initiate the sign-up process. Your Tally Partner will receive the request and get your Interakt account created. With the help of your Partner, you can then add your contact number to register with WhatsApp Business Account (WABA). Up on successful registration, your Partner will activate your WhatsApp subscription.
You can register with WABA through your company’s Facebook page and Meta Business Account. If you do not already have a Meta Business Account, you can create it during the sign-up process through the Interakt portal.
After you complete the sign-up process, it might take up to 24 hours for Meta to approve the predefined WhatsApp templates that you will require while sending invoices and reports.
Once you have signed up for WhatsApp, you are all set to use TallyPrime with WhatsApp for Business.
WhatsApp Trial: Before adding your contact number with WABA, you will also have the option to experience TallyPrime with WhatsApp using a Trial WhatsApp number assigned to you on Interakt. The trial number will be valid for 5 days from the date when your Interakt account is created. You can proceed with adding your contact number with WABA anytime during the trial period.
Before you begin | Prerequisites
- A valid phone number: To register with the WhatsApp Business Account (WABA)
We recommend using a new contact number which is not already in use with any WhatsApp Personal/Business Apps. - A Facebook account: To log in and proceed for creating/updating WABA.
- A GST registration certificate: To verify your business during the Business Verification processYou are recommended to provide your GST registration certificate to ensure a seamless sign-up experience. You can log in to the GST Portal and download your GST registration certificate.To verify your business while creating/updating WABA, if you don’t have your GST registration certificate.
- You can provide the URL of your business website.
- In case you do not have an active website, you can provide the URL of your Facebook business page. Ensure that the business page is updated with all relevant information about your business, to avoid chances of your account getting blocked by Meta. To know more, refer to Create a Facebook business page.
- A valid TSS (with at least one month validity): To get your WhatsApp business subscription
For more details, contact your Tally Partner.
Create a Facebook Page for Your Business
To ensure that you experience a hassle-free uninterrupted messaging experience with your parties, we recommend that you opt for the GSTIN/UIN option to sign up and get your business verification done right after signing up for WhatsApp.
If you are not opting to verify your business through your GST registration certificate, you can do the same through the URL of your Facebook business page and business website.
Facebook business page creation
While creating a Facebook business page, ensure the following:
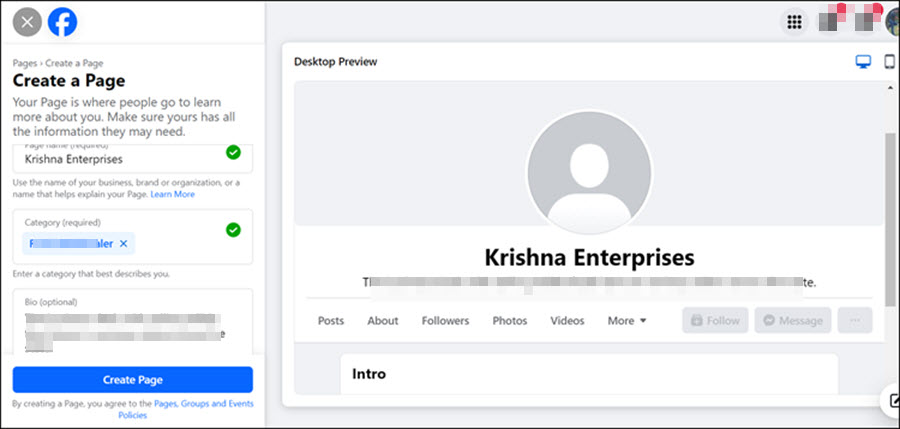
- In the Create a Page screen, ensure to fill in all the fields, and click Create the Page.
- Page name: Enter the full name of your company.
- Category: Select the appropriate category that accurately reflects your business.
- Page bio: It is highly recommended to enter a few lines that accurately describe your business.
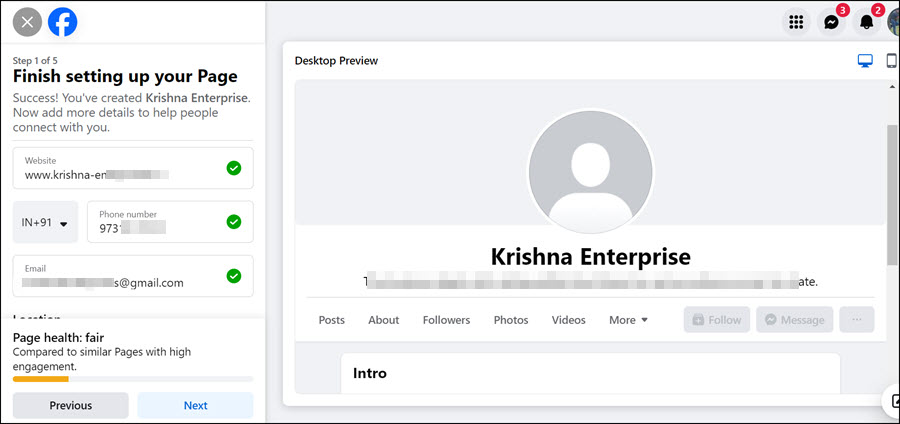
- In the Finish setting up your Page screen, enter details in all the fields, and click Next.
- Phone number: Enter a contact number where anyone can reach your business.
- Email: Enter the official e-mail address of your business.
- Location: Enter the complete official address of your business.
- Hours: Enter the business working hours when customers can reach out to your business.
- Customise your Page: Upload the relevant Profile Pic and Cover Pic that are related to your business, and click Next.
- Connect WhatsApp to your Page: Enter a WhatsApp No. if needed (optional, but recommended), and click Next.
- Build your page audience: Invite friends to your business (optional, but recommended), and click Next.
The Facebook page for your business gets created. The URL of the page appears in the browser, as shown in the following image.
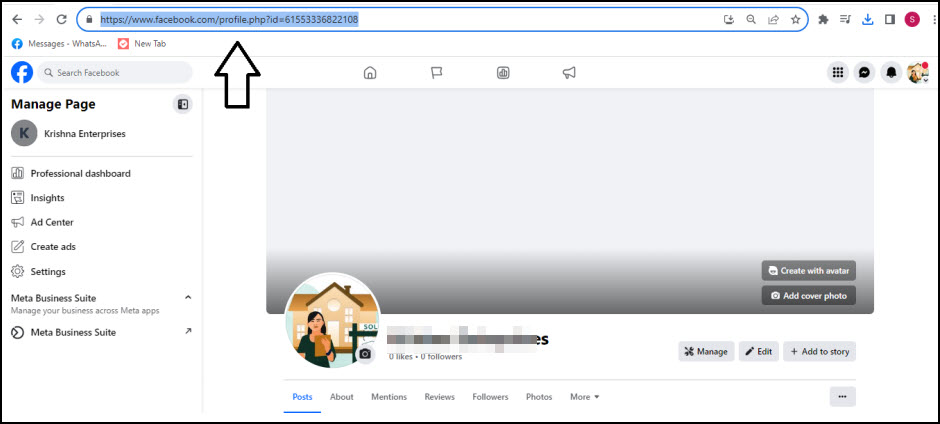
You will enter this URL while creating your Meta Business Account which is used to verify your business details.
Initiate Sign Up for WhatsApp
To use TallyPrime with WhatsApp, the first and foremost step is to initiate the sign-up process. Contact your Tally Partner to get a detailed understanding of the process and other related details and initiate the process by submitting a request with the Partner. Based on the details you provide, the Partner will take it forward for getting your account created with our BSP for WhatsApp – Interakt.
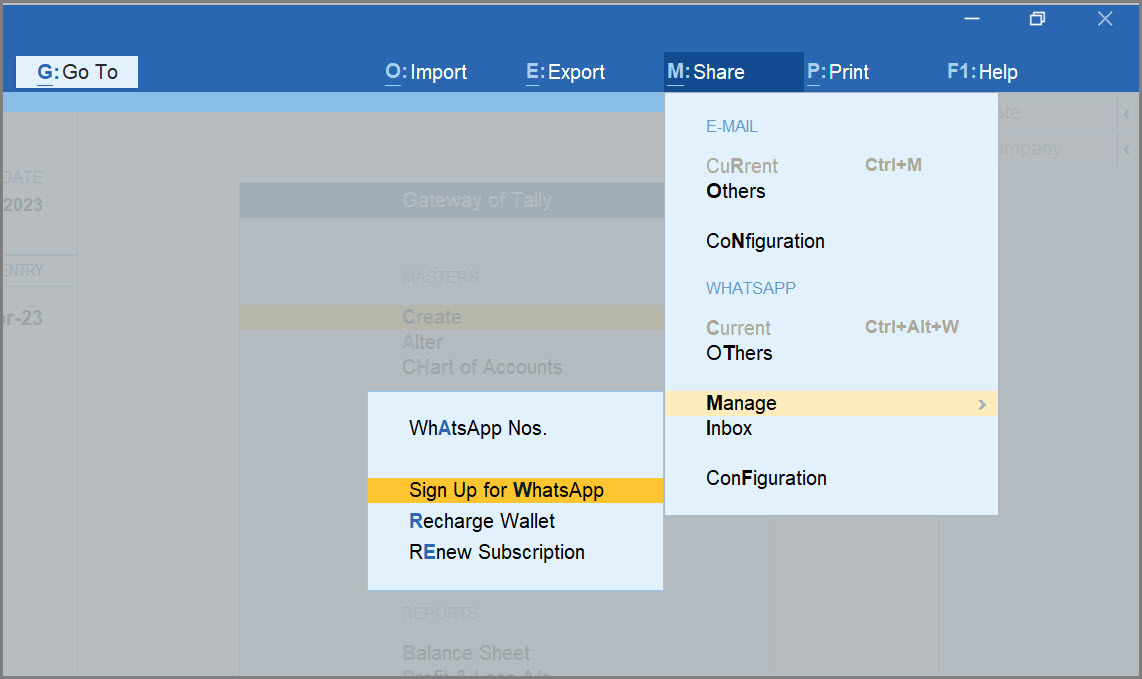
- In TallyPrime, press Alt+M (Share) > Manage > Sign Up for WhatsApp.
This action will open a webpage on TallyPrime with WhatsApp.- Go through the details on the page to understand the prerequisites before you proceed further.
- If any Tally Partner is already assigned to you, you can contact the Partner or click the Partner Locator button to find a nearby Partner and gather all the required information about signing up for WhatsApp.
- Submit a sign-up request with your Tally Partner from the Customer Portal.
- Log in to the Customer Portal from www.tallysolutions.com.
- Select WhatsApp for Business.

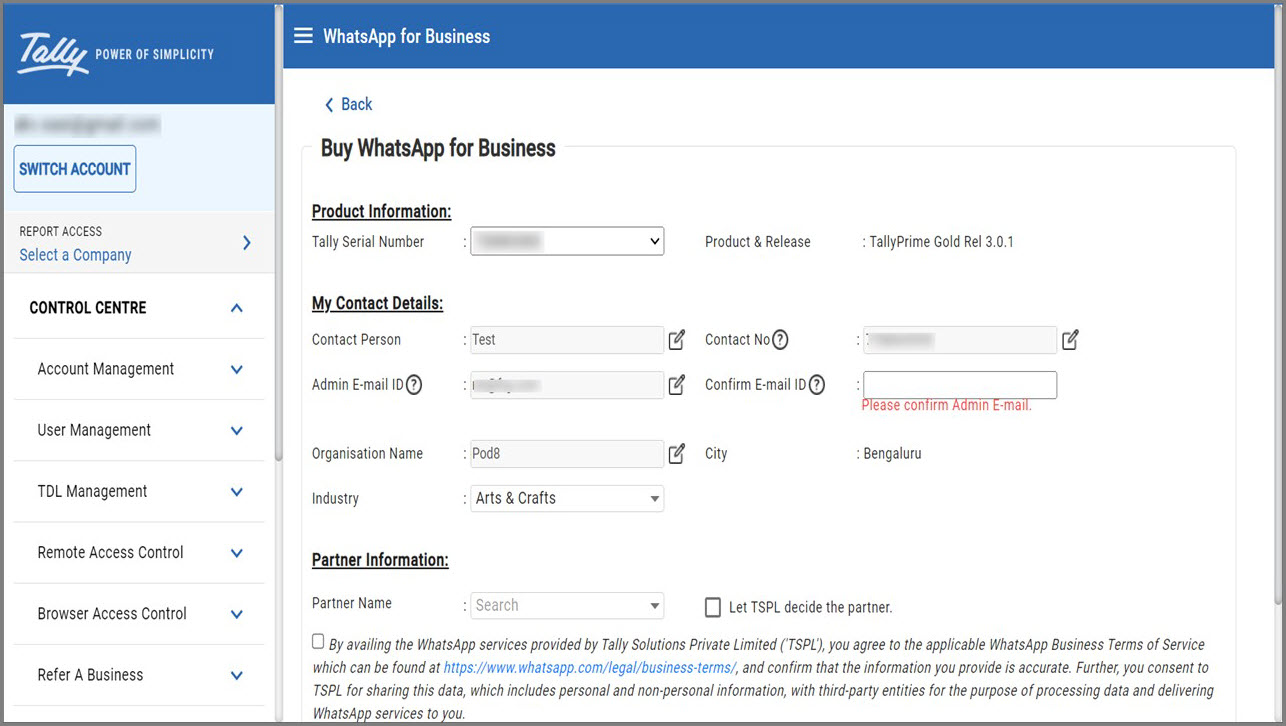
The Buy WhatsApp for Business screen appears, as shown below:
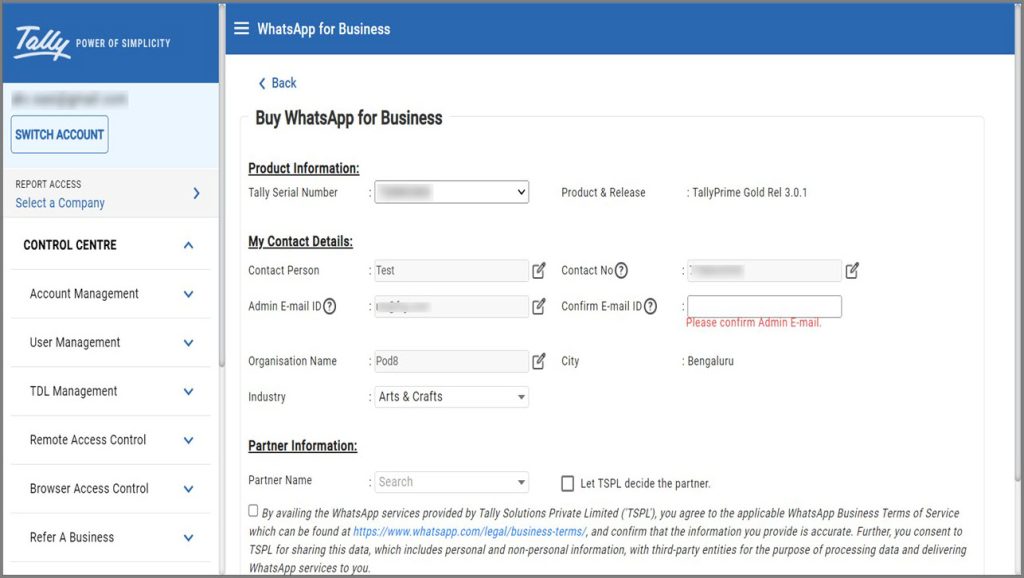
- Ensure that the details like Product Information and My Contact Details are filled with the correct details.
- Re-enter your e-mail ID in the Confirm E-mail ID field to ensure that it matches with the Admin E-mail ID field.
If a Tally Partner is assigned to you, the Partner Information > Partner Name field is prefilled. You can select the Partner that you have spoken to about the sign-up process. If not, select the Let TSPL choose a Tally Partner option. A Tally Partner will be assigned who will contact you to take things forward.
- Click Submit.
Once you have submitted the request, your Tally Partner will take it forward and get your Interakt account created. You will receive an e-mail with the login credentials of your Interakt account.
When you log in to your Interakt account, you can do one of the following:
Refer to the Additional Interakt Features for WhatsApp topic to know about the wide range of features available in your Interakt account.
Add Your Contact Number to WhatsApp Business Account (WABA)
To use TallyPrime with WhatsApp for your business, you have to add a contact number to your WhatsApp Business Account (WABA). You can add either your existing WhatsApp Business No. or a new number to your WhatsApp Business Account (WABA). This number will be used as your registered business WhatsApp No.
Before you begin | Prerequisites
It is recommended to keep the following ready:
- A digital copy of your GST Registration Certificate for upload.
- A valid mobile number: either your existing number already registered with the WhatsApp Business app, or a new number with SMS access to receive the OTP during the process.
- Facebook account credentials: preferably complete the sign-up on a computer where you are already logged in to your Facebook business account.
- Your business website URL or Facebook business page link (required only if you choose not to upload the GST certificate).
You can check a few other best practices for Facebook business page, as well.
For Business name, avoid the following:
- Any extra spaces or unnecessary punctuation between words.
- Emojis and symbols (such as ®).
- Consecutive non-alphanumeric characters
- Special characters (such as ~ ! @ # $ % ^ & * ( ) _ + : ; ” ‘ { } [ ] | < > , / ?)
- Contact person name or any geographic references (such as New York)
For business e-mail
- Ensure that the e-mail address is valid and accessible. You will receive all communication from Meta for your account, in the same e-mail address.
Add Your Existing WhatsApp Business App Number to WABA
If you have a mobile number that is registered for your WhatsApp Business Account, you can add the same number to your WhatsApp Business Account.
It is recommended to follow the sign-up process on a computer where you are already logged in to your Facebook business account.
If you wish to connect a new number for the WhatsApp API account, click here.
Step 1: Log in to the Interakt portal.
Log in to your Interakt portal and access your account.
Step 2: Verify the prerequisites and update your Business location.
- Select Add Contact No. for WhatsApp API Account.
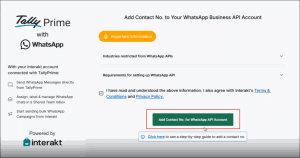
- Select Connect your WhatsApp Business App, if you already have a mobile number that is registered for your WhatsApp Business Account.
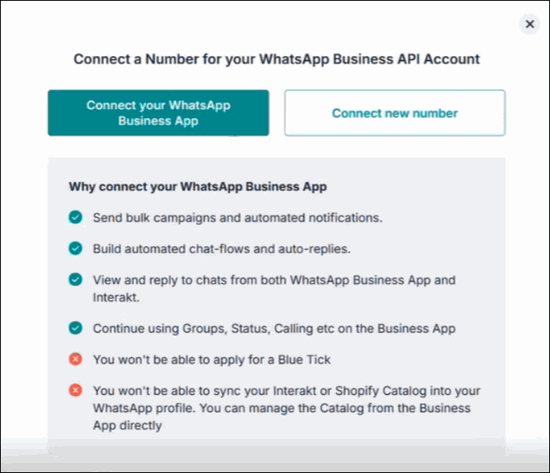
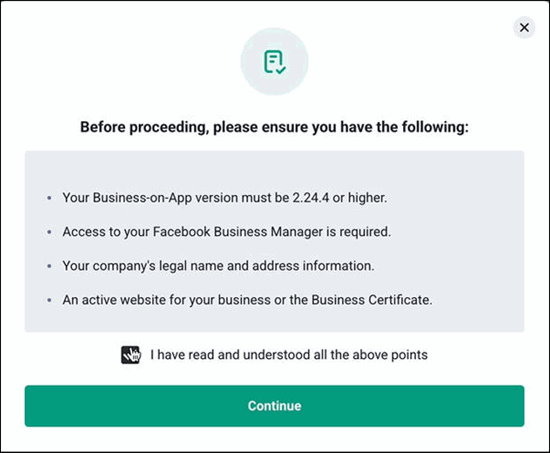
- In the pop-up screen, read the prerequisites, select the check box to confirm, and click Continue.
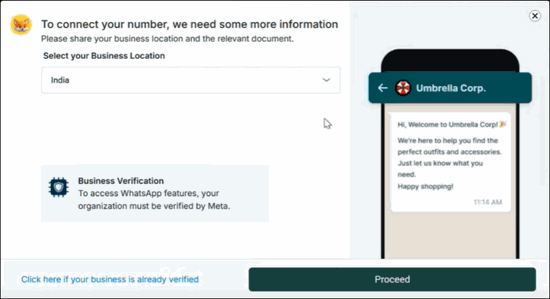
- Select your business location before proceeding for verification.

Step 3: Upload Your GST Certificate
If your business is based in India, we highly recommend uploading your GST certificate for a hassle-free approval by Meta.
However, if your business in located outside of India or if do not have a GST Certificate, click Continue Without GST Certificate, and move to step 4 directly.
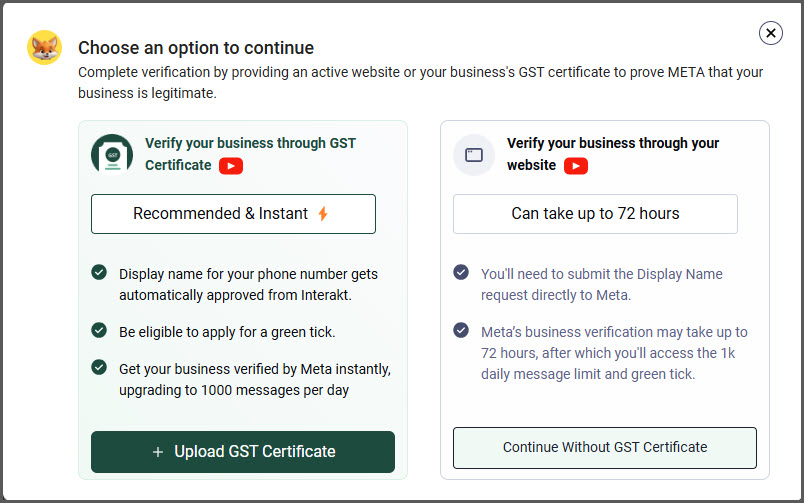
- Click Upload GST Certificate and select your GST certificate to upload.
- On successful upload, click Proceed.
Select Connect Number without FB Verification, if you have already completed the business verification.
Now, you have the following two options:
- Log in with WhatsApp business app
- Log in with Facebook
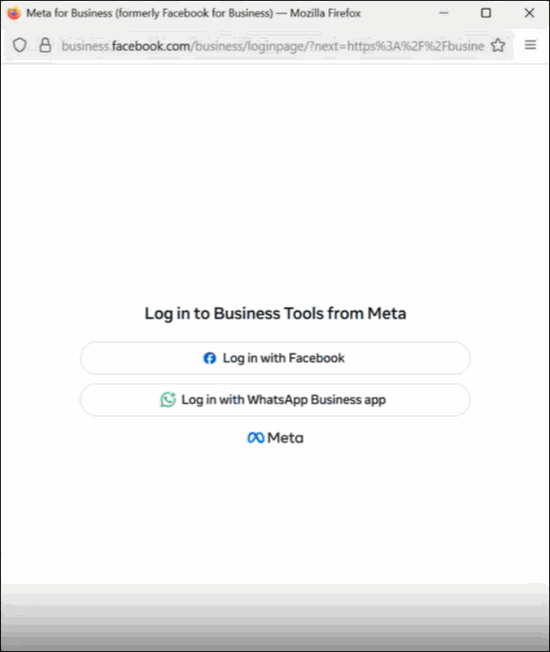
Step 4: Log in to Integrate your Existing WhatsApp Business Number with Meta
Log in with WhatsApp Business app
You can choose this login method if you do not have a Facebook account.
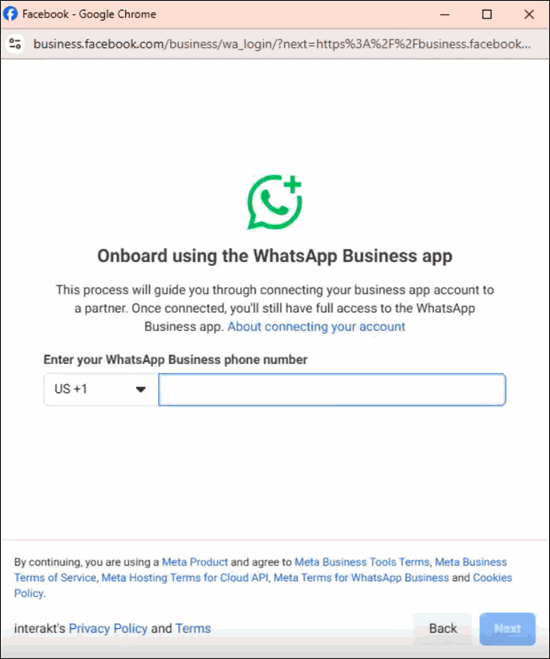
- Enter your WhatsApp Business phone number and click Next.
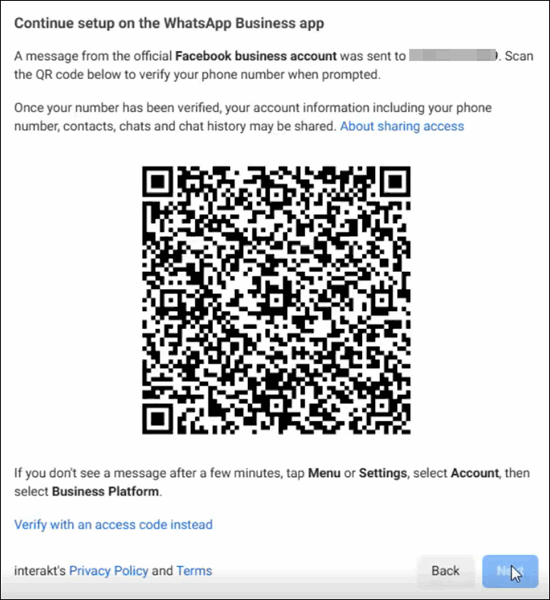
- Scan the QR code to verify your phone number and click Next.
- Select Continue.
-
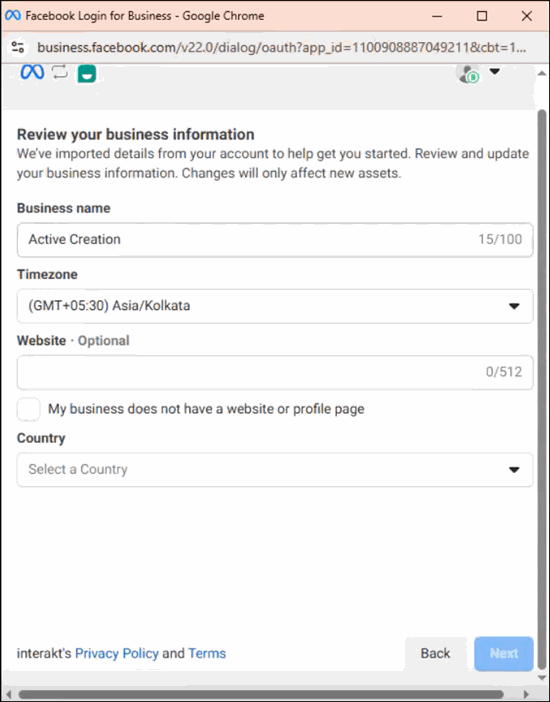
Review your business information.
-
Verify your Business name as per your GST certificate.
-
Verify the timezone or update the appropriate timezone, as per your business location.
-
Website or Profile Page: This is required only if you are an International customer and have not uploaded your GST Certificate. Enter your business website URL or Facebook page link.
-
Select the country as applicable, and click Next.
-
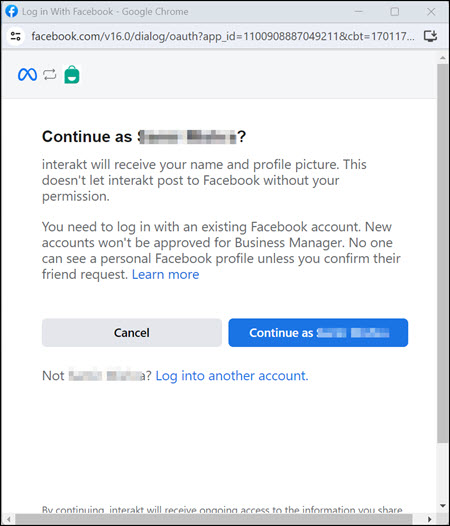
Log in with Facebook
If you are already logged in, you will be prompted to continue with the same log in.
- Enter your log in credentials in the Log in to use your Facebook account with Interakt screen, if not logged in.
Alternatively, click Continue as…
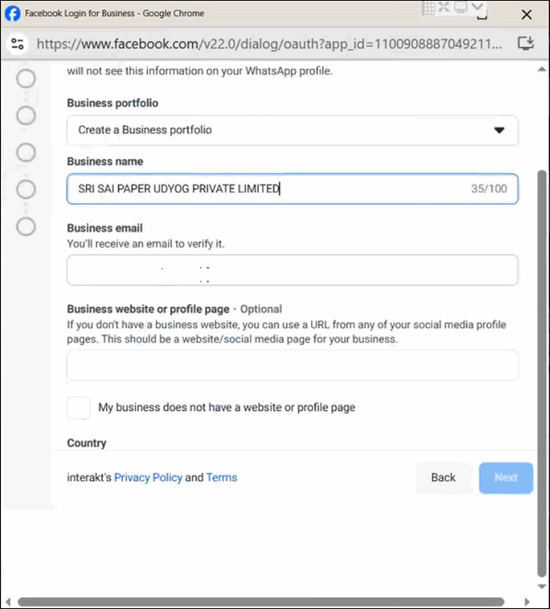
- Click Get Started and Fill in your Business information.
Follow on-screen instructions to complete the steps.
-
Select your Business Portfolio. If you don’t have one, select Create a Business Portfolio.
-
Business Name & Business Email: Enter your legal business name, and the email address for receiving communications from Meta.
-
Business Website or Profile Page: This is required only if you have not uploaded your GST Certificate. Enter your business website URL or Facebook page link.
The Facebook page or business website must reflect the Business Name correctly.
If you do not have a GST Certificate and a Facebook business page, refer to Create a Facebook business page. -
Select the country as applicable, and click Next.
-
- Select Connect your existing WhatsApp Business App and click Next.
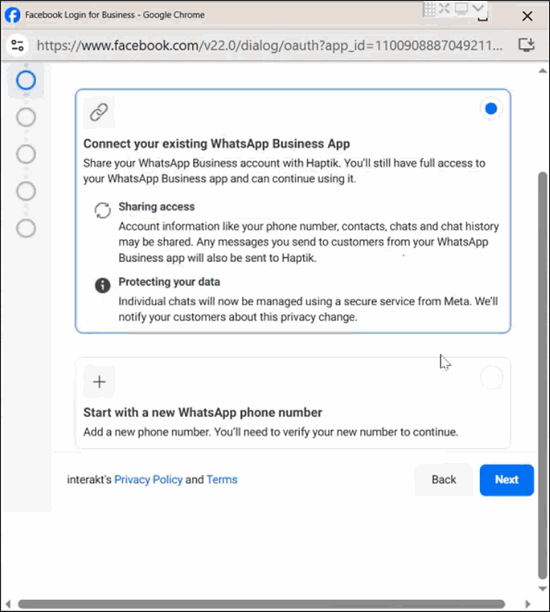
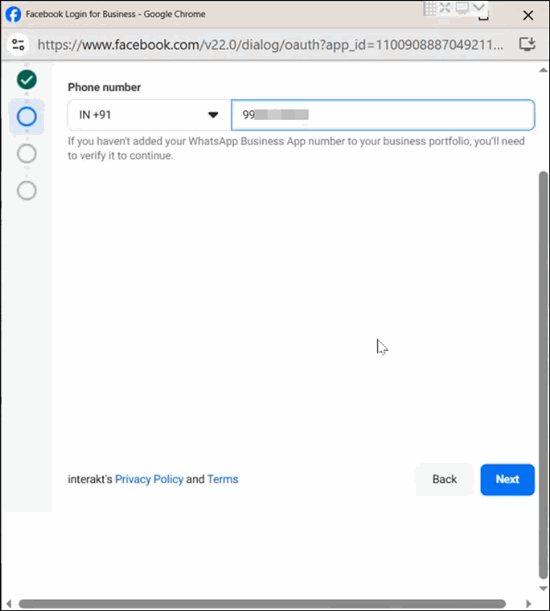
- Phone number: Enter the phone number that you want to add for the WhatsApp Business Account.
This number will be used for all your business communications, including sharing documents from TallyPrime, with your parties.
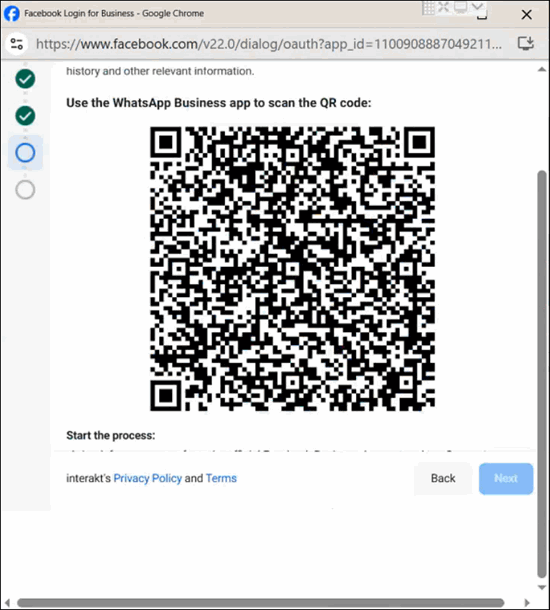
- Scan the QR code using the WhatsApp Business app.
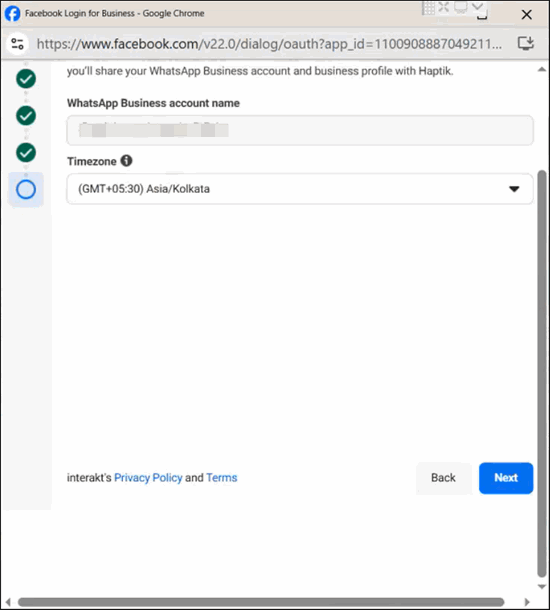
- Verify your WhatsApp Business account name, select the Timezone, and click Next.
Step 5: Complete adding your contact number to your WhatsApp Business Account.
- Click Confirm to allow Interakt to allow access permissions required for completion of onboarding.

- Click Finish.

On your Interakt account screen, you will see a congratulations message for successfully adding your contact number to your WhatsApp Business Account. If you do not see the congratulations message, just refresh the Interakt screen.
Now that you have successfully connected your contact no. to WABA, you can proceed for business verification.
Add a New Number to WABA
If you don’t have a mobile number that is registered for your WhatsApp Business Account, you can add a new contact number to your WhatsApp Business Account.
It is recommended to follow the sign-up process on a computer where you are already logged in to your Facebook business account.
If you wish to connect your existing WhatsApp Business App number for the WhatsApp API account, click here.
Step 1: Log in to the Interakt portal.
Log in to your Interakt portal and access your account.
Step 2: Verify the prerequisites and update your Business location.
- Select Add Contact No. for WhatsApp API Account.
- Select Connect new number.
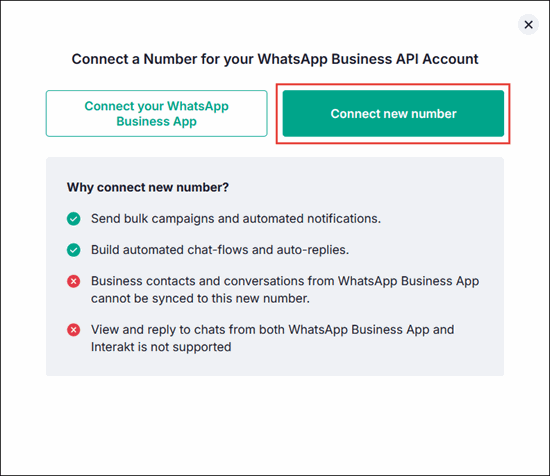
- In the pop-up screen, read the prerequisites, select the check box to confirm, and click Continue.
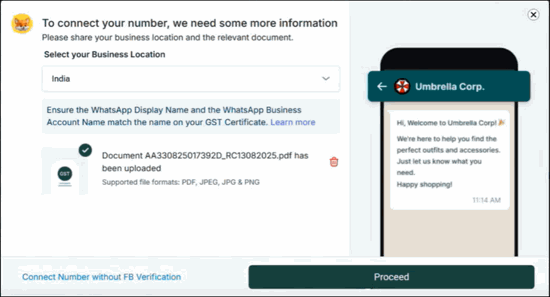
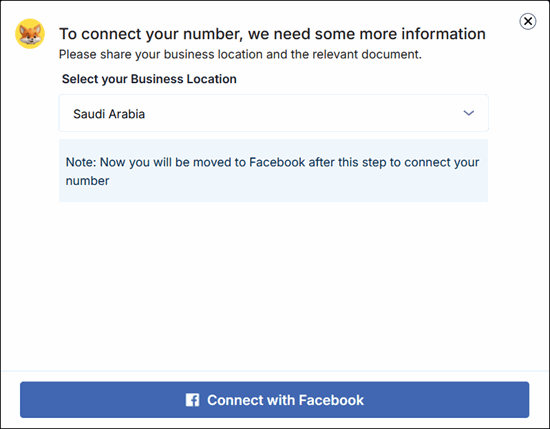
- Share your business location and the relevant document before proceeding for verification.
If your business location is outside India, you will see the option to connect your number using Facebook account.
Step 3: Upload Your GST Certificate
We highly recommend uploading your GST certificate for a hassle-free approval by Meta. However, if you do not have one, click Continue Without GST Certificate, and move to step 4 directly.
- Click Upload GST Certificate and select your GST certificate to upload.
- On successful upload, click Proceed.
Step 4: Log in with Your Facebook page
If you are already logged in to Facebook, you will be prompted to continue with the same log in.
- Enter your log in credentials in the Log in to use your Facebook account with Interakt screen, if not logged in.
Alternatively, click Continue as… - Fill in your Business Information.
- Verify your Business name as per your GST certificate.
- Verify the timezone or update the appropriate timezone, as per your business location.
- Website or Profile Page: This is required only if you are an International customer and have not uploaded your GST Certificate. Enter your business website URL or Facebook page link.
- Select the country as applicable, and click Next.
-
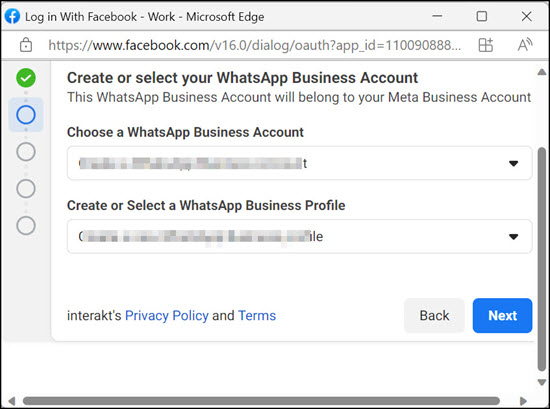
Create or select your WhatsApp Business Account.
-
Under Choose a WhatsApp Business Account, select Create a WhatsApp Business Account.
If you had already created an account, the Choose a WhatsApp Business Account and Create or Select a WhatsApp Business Profile fields are prefilled. -
Click Next.
-
Step 5: Create a WhatsApp Business Profile.
In this screen, you can enter or validate the following business information.
- WhatsApp Business Account Name: This is required for saving your profile details.
- WhatsApp Business Profile Display Name: The recipient will see this name on receiving the message from your WABA number. Therefore, it is recommended that the display name be the same as your Business Name.
- Select the Timezone, and the Category of your business.
- Enter a Business Description, and click Next.
Step 6: Add a phone number for WhatsApp.
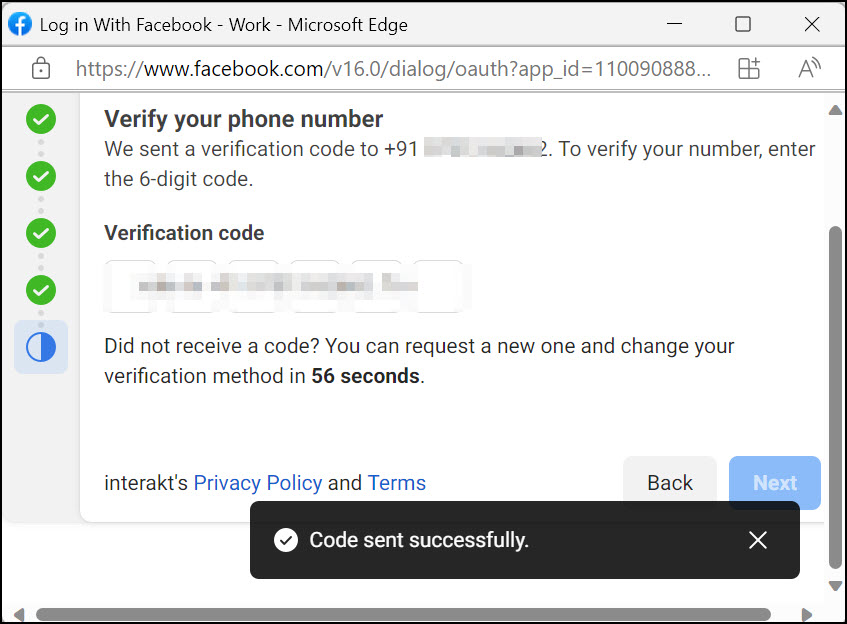
- Under Phone number, enter the phone number that you want to add for the WhatsApp Business Account.
This number will be used for all your business communications, including sharing documents from TallyPrime, with your parties. - Select the Text message or Phone call mode to receive the verification code, and click Next.
- In the Verify your phone number screen, enter the verification code, and click Next.
- On successful verification of your phone number, in the next screen, click Finish.
On your Interakt account screen, you will see a congratulations message for successfully adding your contact number to your WhatsApp Business Account. If you do not see the congratulations message, just refresh the Interakt screen.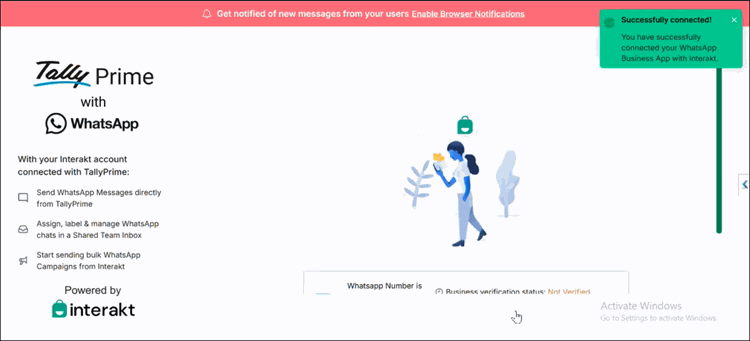
Now that you have successfully connected your contact no. to WABA, you can proceed for business verification.
Verify Your Business with Meta | Business Verification
After the initial onboarding, the business verification process starts automatically with Meta. However, you can proceed to do the following steps, if your Business verification is rejected or in Not Verified status.
- Select Verify Now to start the business verification.
- Select the Business vertical.
- Upload your GST registration certificate.
You can log in to the GST Portal and download your GST registration certificate. - Select Submit for verification.
If you don’t have a GST certificate for Business Verification, contact Tally Support for assistance.
After submitting the document, Meta starts the business verification process. It is expected to complete in a few minutes. However, in few instances, it is observed that it might take up to 12 hours for the verification process to get completed.
If you’ve tried verifying the GST document three times without success or 21 days have passed since the registration of contact number, you can go to your Facebook Business Manger and submit a review request.
If you have opted to sign up through GSTIN/UIN for business verification, you will receive a message confirming that your business verification is a success, as shown below:
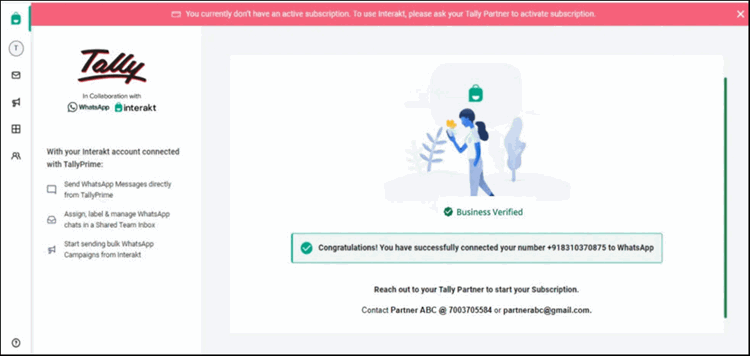
Once your business verification is done, you can start sending unlimited number of messages daily. Verification of your business with Meta will help in increasing your daily messaging limit from the default 250 messages to unlimited messaging.
If your business verification remains unsuccessful, you will have up to 20 days to do the verification again with the correct Legal Business Name and the address.
Next, you can contact your Tally Partner to activate your WhatsApp subscription. Your subscription will be in sync with your TSS expiry date, along with a wallet balance to get you started. You can renew your subscription at the end of the subscription, and recharge your wallet whenever your wallet balance is low.
This completes your sign-up process for WhatsApp. The number you registered with WABA will now be referred to as your Registered Business WhatsApp Number. You can add this number in TallyPrime and start sending documents to your parties and stakeholders, in no time. Refer to Send Documents Using TallyPrime with WhatsApp for more information.


