
Set Up Your Books For Tax Deducted at Source (TDS) in TallyPrime
You can enable the Tax Deducted at Source (TDS) feature in TallyPrime, provide surcharge details, and create the masters required to record transactions.
Enable TDS
You can enable the TDS feature, provide surcharge details, record transactions and generate the required reports and returns.
- Press F11 (Features) > set Enable Tax Deducted at Source (TDS) to Yes.
If you do not see this option:- Set Show more features to Yes.
- Set Show all features to Yes.
The TDS Deductor Details screen appears.
- Press F12 (Configure).
- Set the option Show All Deductor types to Yes, to view all the deductor types.
- Set the option Enable surcharge and cess details for TDS to Yes, to enter the surcharge and cess details.
- Set the option Provide alternate contact details to Yes, to enter the company’s STD Code, Phone No. and E-Mail.
- Press Ctrl+A to save.
- Enter the TAN registration number.
- Enter the Tax deduction and collection Account Number (TAN).
- Select the Deductor Type.
- Enter the details of Deductor branch/division.
- Enable the option Set/alter details of person responsible to display the Person Responsible Details screen. Enter the relevant details:
- Press Enter. The TDS Deductor Details screen appears.
- Set Ignore IT Exemption Limit for TDS Deduction to:
- Yes, if you don’t want to consider the IT exemption limit.
- No, if you want to consider the IT exemption limit.
- Set Activate TDS for stock items to:
- Yes, if you want to define TDS rate in stock item.
- No, if you do not want to define TDS rate in stock item.
- Set Provide surcharge and cess details to Yes.
- In the TDS Deductor Details screen, press F12 (Configure) > set Enable surcharge and cess details for TDS to Yes.
- .Enter the surcharge and cess details for each deductee status. You can enter the required surcharge slab details with the applicability date.
- Accept the screen. As always, you can press Ctrl+A to save.
TDS Nature of Payment
For payments attracting TDS, the relevant nature of payment is defined by the department with associated tax rate, section, payment code, and threshold limit. While creating a TDS Nature of Payment, you can press Alt+H (Helper) to select the required nature of payment.
To learn about the TDS Nature of Payment as per the Income Tax Act 2025, click here.
In this section
Create TDS Nature of Payment
- Gateway of Tally > Create > type or select TDS Nature of Payments > and press Enter.
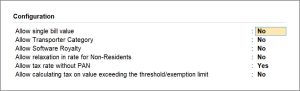
Alternatively, press Alt+G (Go To) > Create Master > TDS Nature of Payments > and press Enter. - Press F12 (Configure).
- Set Allow transporter category to Yes, to capture the value of transaction recorded with party having PAN, under Exempt in lieu of PAN available in Form 26Q.
- Set Allow tax rate without PAN to Yes, to enter the tax rates for Individuals/HUF for each nature of payment.
- Press Enter to save.
- Press Alt+H (Helper) to view the list of Nature of Payment.
- Select the required Nature of Payment. The Section and Payment code are displayed automatically.
- Enter the Rate of TDS for With PAN and Without PAN. The same appears in Rate for other deductee types.
- Enter the Threshold/exemption limit as applicable.
- Accept the screen. As always, you can press Ctrl+A to save.

To view the history of Rate and Exemption Limit Details provided for different dates,
If you need to use this option only for the current master, press Ctrl+I (More Details) > type or select TDS Details (History)> and press Enter.
The details will appear with the breakup of rate With PAN and Without PAN as shown below:

Create sub-section for TDS Nature of Payment Section 194J
The section 194J corresponding to Fees for Professional and Technical Services has been divided into 2 sub-sections, Fees for Technical Services (other than Professional Services) or Royalty and Fees for Professional Services, with payment codes 4JA and 4JB respectively. This change has been implemented in FVU (File Validation Utility) ver 6.8. You can create the nature of payments for these sub-sections in TallyPrime manually and use them for your TDS undertakings.
- Gateway of Tally > Create > type or select TDS Nature of Payments > and press Enter.
Alternatively, press Alt+G (Go To) > Create Master > TDS Nature of Payments > and press Enter. - Enter the name of the sub-section as Fees for Professional Services. You can give your own name but ensure that the section code and payment code are selected correctly.
- Select Section as 194J and Payment code as 4JB.
- Accept the screen. As always, you can press Ctrl+A to save.
Similarly, you can create nature of payment for the other sub-section as shown below:

TDS Ledger
A TDS ledger is used for recording duties in TDS related transactions.
- Gateway of Tally > Create > type or select Ledger > and press Enter.
Alternatively, press Alt+G (Go To) > Create Master > Ledger > and press Enter. - Enter the Name.
- Select Duties and Taxes as the group name in the Under field.
- Select TDS as the Type of duty/tax.
- Select a Nature of Payment from the List of Nature of Payments.
- Press Enter. The Ledger Creation screen appears.
- Accept the screen. As always, you can press Ctrl+A to save.
Expenses Ledger
An expenses ledger is used for booking expenses. It can be created by selecting the Nature of Payment during ledger creation.
- Gateway of Tally > Create > type or select Ledger > and press Enter.
Alternatively, press Alt+G (Go To) > Create Master > Ledger > and press Enter. - Enter the Name.
- Select Indirect Expenses as the group name in the Under field.
- Set Inventory values are affected to No.
- Enable the option Is TDS Applicable.
- Select the Nature of Payment from the List of Nature of Payments.
- Accept the screen. As always, you can press Ctrl+A to save.
Party Ledger
TDS will be deducted on the basis of the deductee type, which has to be defined in the party ledger.
- Gateway of Tally > Create > type or select Ledger > and press Enter.
Alternatively, press Alt+G (Go To) > Create Master > Ledger > and press Enter. - Press F12 (Configure) and set the option Allow advanced entries in TDS masters to Yes.
- Enter the Name and select Sundry Creditor in the Under field.
- Enable the option Maintain bill-by-bill, to track the TDS bills.
- Enable the option Is TDS Deductable, to allow TDS deduction for the ledger.
- Select a Deductee Type from the list.

- Enable Deduct TDS in Same Voucher, if required, and select the TDS Nature of Payment. You can also select to All Items.
- Set Use Advanced TDS Entries to Yes.
- You can set the ledger to ignore income tax and/or surcharge exemption limits.
- Enable the option Set/Alter Zero/Lower Deduction to Yes.

- If the Deductee type is a Resident, you can set the required Nature of Payment for Zero/Lower Rate, as shown below:
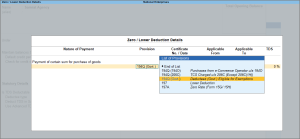
Based on the selection made, the transactions recorded using these ledgers will appear in the relevant sections of Form 26Q. - If the Deductee type is a Non-Resident, you can set the required Nature of Payment for Zero/Lower Rate/DTAA, as shown below:
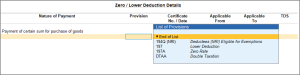
Based on the selection made, the transactions recorded using these ledgers will appear in the relevant sections of Form 27Q.
- Enter the Mailing Details. Enable Provide Bank Details, to enter the bank details for the ledger.
- Enter the PAN/IT No. under Tax Information. When the PAN is not available, enter one of the terms given below as the PAN/IT No., based on the corresponding reason:
- PANAPPLIED – If the party has given a declaration stating that he/she has applied for PAN, but are yet to receive the same.
- PANINVALID – If the PAN format provided by the party is incorrect.
- PANNOTAVBL – If the party has not given any declaration or PAN number.
- Enable the option Provide PAN Details, if required. The Ledger Creation screen appears.

- Accept the screen. As always, you can press Ctrl+A to save.


Fixed Asset Ledger
A Fixed Asset ledger is used for recording fixed assets and capital goods.
- Gateway of Tally > Create > type or select Ledger > and press Enter.
Alternatively, press Alt+G (Go To) > Create Master > Ledger > and press Enter. - Enter the Name.
- Select Fixed Assets as the group name in the Under field.
- Set Inventory values are affected to No.
- Set Is TDS Deductable to Yes.
- Set Treat as TDS Expenses to Yes.
- Select the required Nature of Payment.
- Enter the Mailing Details and Tax Registration Details, as required. The Ledger Creation screen appears.
- Accept the screen. As always, you can press Ctrl+A to save.
Stock Item
Stock items with TDS details can be created only if it is configured on the Company TDS Deductor Details page.
- Gateway of Tally > Create > type or select Stock Item > and press Enter.
Alternatively, press Alt+G (Go To) > Create Master > Stock Item > and press Enter. - Enter the Name.
- Select a stock group from the List of Stock Groups in the Under field.
- Select a unit of measurement in the Units field.
As always, press Alt+C, to create a master on the fly. Alternatively, press Alt+G (Go To) > Create Master > type or select Stock Items > press Enter. - Enable the option Set/alter TDS details.
In the Stock Item Creation screen, press F12 (Configure) > Set TDS Details to Yes.
If you do not see this option, ensure that Enable Tax Deducted at Source (TDS) is set to Yes in F11 for your company. - Select the Nature of Payment.
- Press Enter. The Stock Item Creation screen appears.
- Accept the screen. As always, you can press Ctrl+A to save.


