Local & Interstate Supply of Goods and Services with GST
You do business to earn revenue by selling goods or services and to track such revenue you need to record sales under GST in TallyPrime. If you are a registered dealer, then you need to pay tax for the goods or services sold. You can supply goods or services to both registered and unregistered consumers. After you have recorded the sales transactions, you can print the invoices, including the GST details.
The GST invoice must have details like the Name, address, and GSTIN of the supplier and registered buyer, Name of the item or service, Unique Tax Invoice Number, HSN/SAC codes, GST rates and more.
Tax for Local and Interstate sales: In TallyPrime, you can record taxable sales with GST using a sales voucher. Depending on the location of the supply, the sale of goods and services can be classified as either local or interstate. Central and State taxes (CGST and SGST) are applicable when you sell goods or services within the state, whereas Integrated tax (IGST) is applicable for interstate sales.
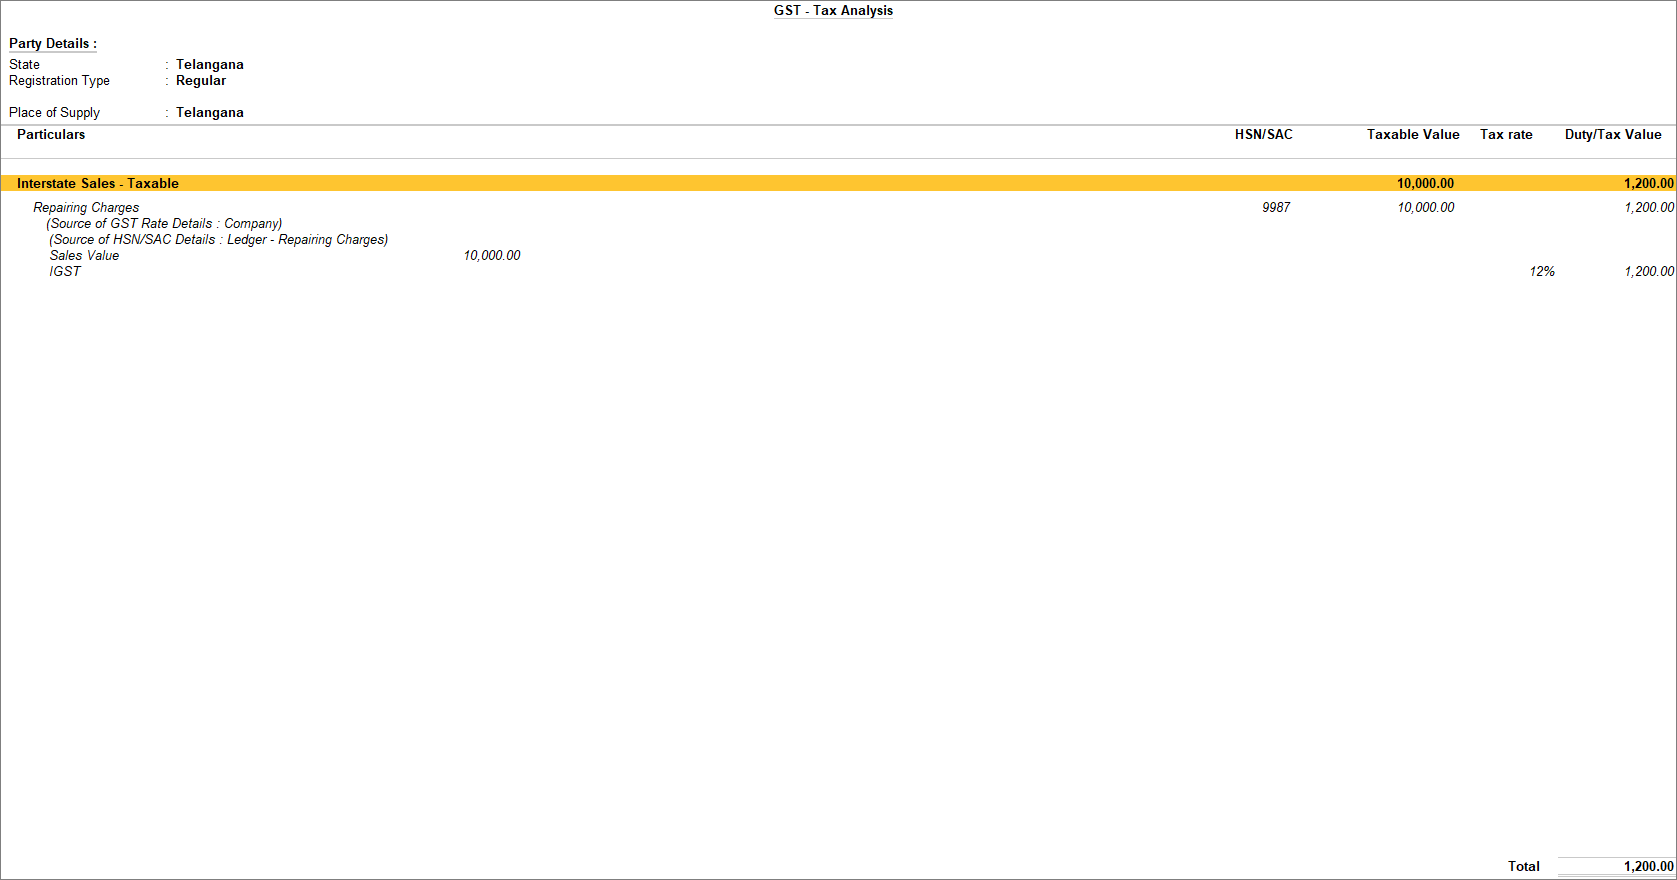
Calculate appropriate GST: GST is calculated based on the GST rates defined by you in the master. You can also define an HSN/SAC for your stock item. TallyPrime provides you with the option to view the tax analysis to see the accuracy of your entry.
Multi-GSTIN: If you have business in multiple locations, you may be assigned multiple GSTINs for each location. TallyPrime provides you with the facility to record the supply of goods or services for any specific GSTIN. This is not applicable for Rel 2.1 and earlier.
Record with multiple tax rates in a single invoice: In GST, different tax rates are applicable to different goods and services. If your business provides a mix of goods and services in a single invoice, then it may also have multiple tax rates applied to the invoice. In TallyPrime, you can record the supply of goods and services with multiple tax rates in a single invoice. You need to correctly define each item’s GST rates to calculate the tax amount.
Override assessable value: The assessable value of goods and services is the amount on which the GST payable is determined. You can override the assessable value in TallyPrime and calculate the GST amount on the overridden value. Along with the assessable value, you can also override the HSN/SAC of the stock item.
Sales to buyer, delivery to consignee: While recording the supply of goods and services, the buyer may ask you to deliver the goods or services to a different address or to a different person. In that case, you can mention in the party details in TallyPrime, the details of both buyer and consignee. You can also send the sales invoice to your buyer and delivery details to the consignee.
Use Voucher Class for sales: You can create a voucher class for sales with details like sales ledger, tax ledger along with their tax rates and additional ledger if any. Later you can use the same voucher class to record the supply of goods and services. You do not have to select the tax ledgers separately, as it automatically considers the ledger mentioned in the voucher class.
GST Portal View: TallyPrime Release 3.0 presents your GST-related data just as you can see it on the GST portal, which helps you visualise how the data appears on the portal when you upload at the end of the return cycle. You can check the GST Portal view of Invoice before exporting the transaction to the portal. This is not applicable for Rel 2.1 and earlier.
GST sales in reports and returns: Once you record the sales invoice with GST, you can see the transactions in GSTR-1.
Record Local Supply of Goods and Services
When you supply goods or services to a local party, such sales are a local supply of goods or services under GST. You identify the supply of goods or services as local based on the Place of Supply. If the Place of Supply is the same as your company address, then it is a local sale. TallyPrime enables the option to select the Place of Supply in the Party Details screen while creating the voucher. Once you select the right place of supply, the rest of the transaction remains the same for both local and interstate supplies. For local sales, you need to use CGST and SGST ledgers to determine the tax amount. You can also view the Tax Analysis while passing a voucher to have a detailed understanding of the taxation inferred in the voucher.
In this section
Local supply of goods | Item Invoice mode
When recording the sale of goods, choose cash or bank for cash sales and the party ledger for credit sales. In TallyPrime, you can record sales of goods or stock items using the Item Invoice mode, and specify the stock item details, quantity, and rate. In the Party Details screen, the Place of Supply is prefilled with the party ledger state. If the Place of Supply is the same as your company states then the sales transaction is recorded as a local supply of goods. To record the tax for local sales, you must use the CGST and SGST ledgers.
- Open the Sales Voucher in the Item Invoice mode.
- Press Alt+G (Go To) > Create Voucher > press F8 (Sales).
Alternatively, Gateway of Tally > Vouchers > press F8 (Sales). - Press Ctrl+H (Change Mode) > select Item Invoice.
If you have created multiple registrations in TallyPrime Release 3.0 or later, then to change the registration, press F3 (Company/Tax Registration) > type or select the Registration under which you want to create the voucher and press Enter.
- Press Alt+G (Go To) > Create Voucher > press F8 (Sales).
- Specify the buyer details.
- Party A/c name: Select Cash or Bank for cash sales and the party name for credit sales, and press Enter.
You can create the Party A/c on the fly by pressing Alt+C.
The Dispatch Details screen appears. - Dispatch Details: Enter the Dispatch Details, as needed and press Enter.
You can choose to enable the options for Order Details by pressing F12 (Configure).
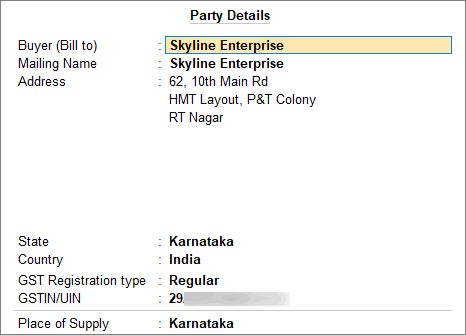
The Party Details screen appears. - Party Details: You can update the buyer details while recording the transaction and print the same in the invoice.
The Place of Supply field is prefilled with the party ledger state. You consider a sale as a local sale under GST if the buyer is from the same state as your company state.
Your regular customer may need specific details, such as the address with the landmark, alternative contact number, and so on, to appear in the printed invoice. In such cases, create the party account with the required details and select the same party account in the Buyers field.
- As always, you can press Ctrl+A to save and proceed.
- Party A/c name: Select Cash or Bank for cash sales and the party name for credit sales, and press Enter.
- In the Sales ledger, select the common sales ledger.
Ensure that GST applicability is set to Applicable and that no GST rate is defined. - Enter stock item details.
- Name of Item: Select the stock item.
For GST to be calculated in the voucher, ensure that the stock item is configured with the correct GST Rate. - Specify Quantity and Rate.
In case you do not see the required item in the list, you can create the stock item on the fly by pressing Alt+C. - To update stock item details like GST or HSN/SAC details, when needed:
- Press F12 (Configure) > Modify GST & HSN/SAC related details.
- Press Ctrl+I (More Details) > type GST Rate & Related Details or HSN/SAC Details and make the necessary changes for the stock item.
- Name of Item: Select the stock item.
- Select the tax ledgers CGST and SGST for local sales.
GST is calculated based on the tax rates defined in the stock item ledger.If you are selling goods with the same GST rate then you can define the GST rate at the time of creating the company. In such cases, the GST gets calculated based on the rate defined when creating the company.
- To view the Tax Analysis, press Ctrl+O (Related Reports) > GST Tax Analysis. Press Alt+F5 (Detailed) to view the detailed breakup of the tax.

- Provide Narration, if needed, and press Ctrl+A to save the sales voucher.
- Print the invoice.
- In the sales voucher, press Ctrl+P.
Alternatively, press Alt+P (Print) > Current. - In the Print screen, press C (Configure) to configure the print options for your invoice, if needed.
- To change the printer, C (Configure) > press F6 (Printer) > select a printer from the List of Printers > and press Enter.
- To print multiple copies of the invoice, press F5 (No. of Copies) and press Enter. You can also select the Type of Copy (for example, Original, Duplicate, or Triplicate, as needed).
- To view the GST breakup of each item, go to C (Configure) > set Show Item-wise GST details as Yes.
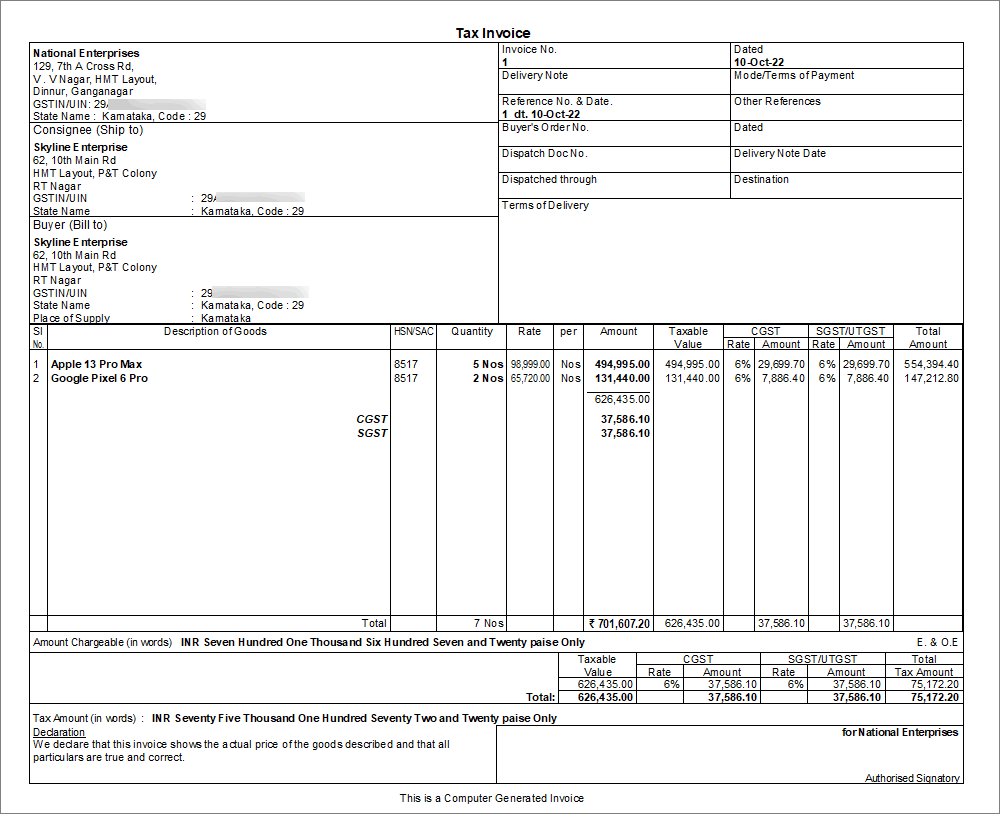
- Press I (Preview) to check the invoice before printing if needed.
- Press P (Print) to print the invoice.
- In the sales voucher, press Ctrl+P.
To know more, refer to Print GST Details in Invoice
You can also setup your e-mail profile to e-mail the invoice to the party.
You can generate an e-Invoice and e-Way Bill, if needed. To know more about e-Invoice and e-Way Bill, go to e-Invoice using TallyPrime and e-Way Bill using TallyPrime.
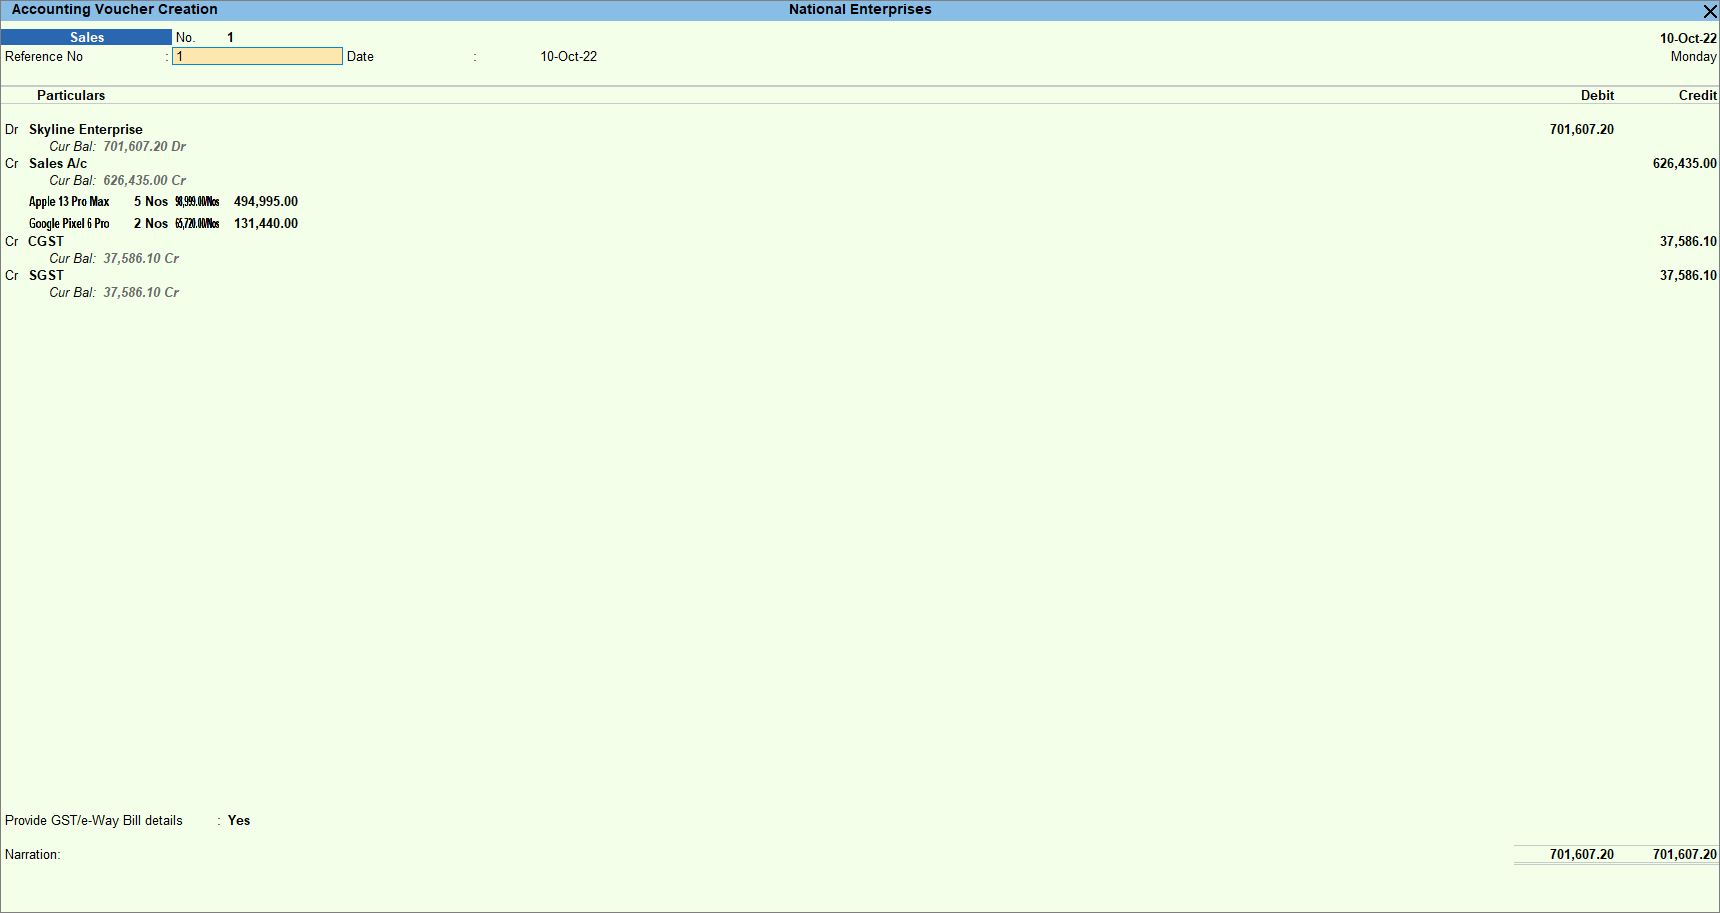
The same transaction you can record using As Voucher mode if you are familiar with the double entry mode of accounting. If you record the transaction in Voucher Mode, it appears as below.
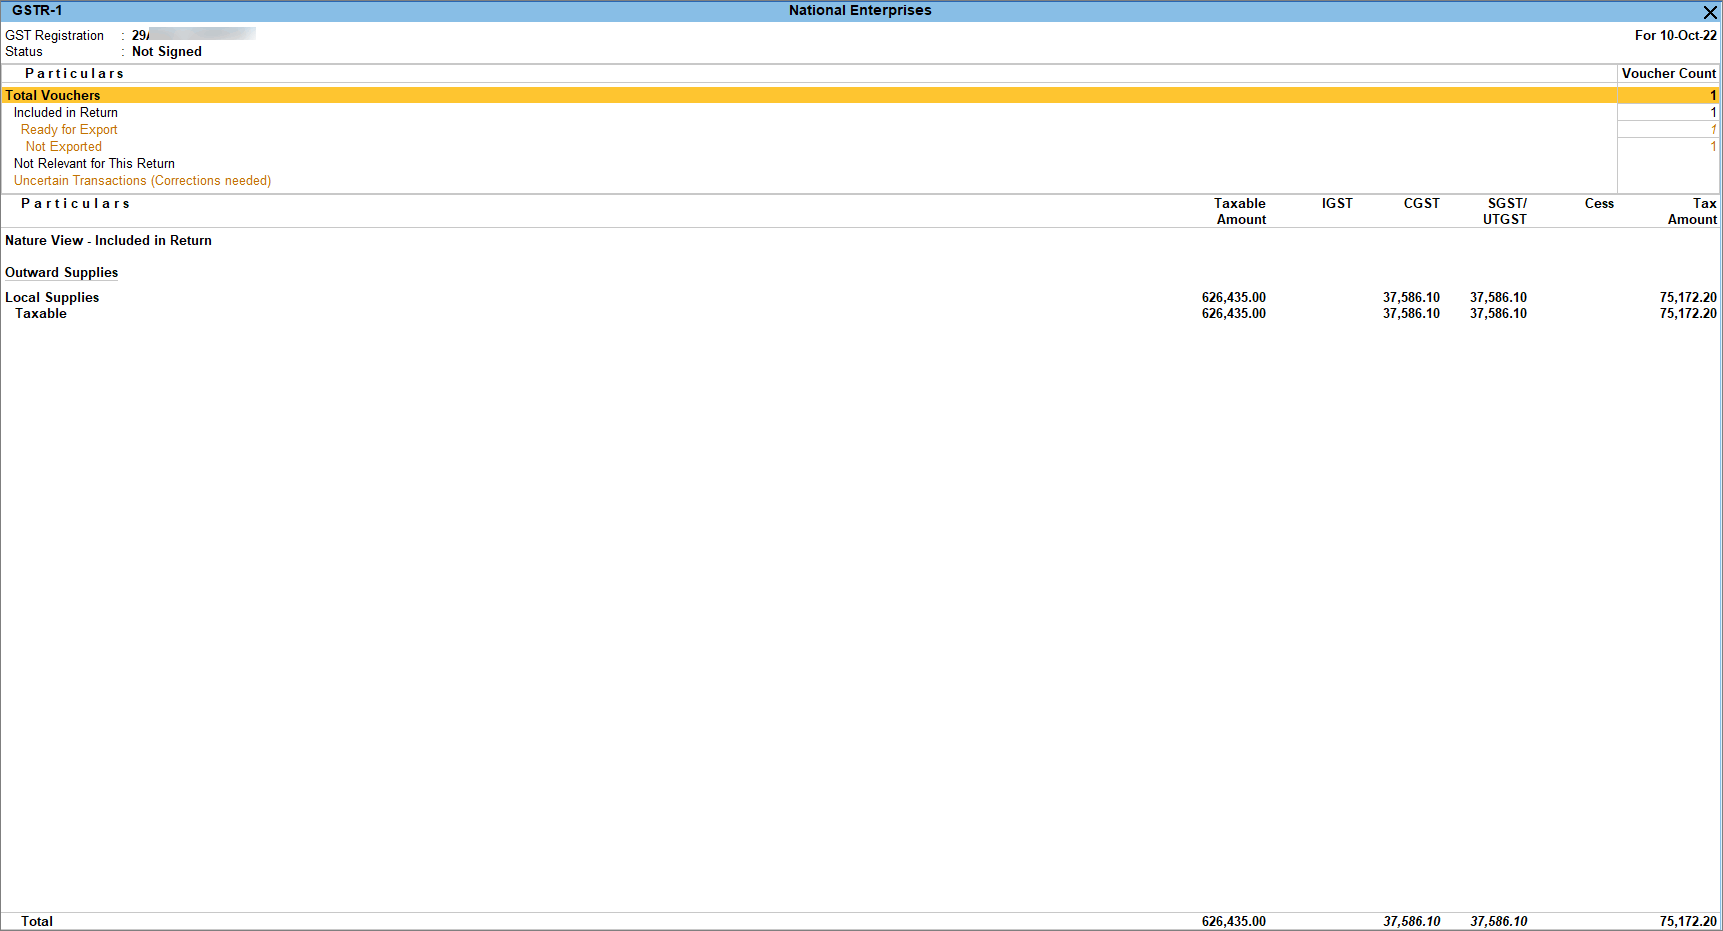
Now that you have recorded a local supply of goods with GST, you can see the transaction in the Local Supplies under Outward Supplies of GSTR-1. To know more about GST Returns, refer to GSTR-1.
If you are in Rel 2.1 and earlier, you can view the transaction in the Local Sales under Outward Supplies of GSTR-1.
Local supply of services | Accounting Invoice mode
When recording the sale of services, choose cash or bank for cash sales and party ledger for credit sales. In TallyPrime, record sales of services and the total amount using the Accounting Invoice mode. An accounting ledger is not required as there is no stock item to allocate. In the Party Details screen, the Place of Supply is prefilled with the party ledger state. If the Place of Supply is the same as your company states then the sales transaction is recorded as a local supply of services. To record the tax for local sales, you must use the CGST and SGST ledgers.
- Open the Sales Voucher in the Accounting Invoice mode.
- Press Alt+G (Go To) > Create Voucher > press F8 (Sales).
Alternatively, Gateway of Tally > Vouchers > press F8 (Sales). - Press Ctrl+H (Change mode) > select Accounting Invoice.
If you have created multiple registrations in TallyPrime Release 3.0 or later, then to change the registration, press F3 (Company/Tax Registration) > type or select the Registration under which you want to create the voucher and press Enter.
- Press Alt+G (Go To) > Create Voucher > press F8 (Sales).
- Specify the buyer details.
- Party A/c name: Select Cash or Bank for cash sales and the party name for credit sales, and press Enter.
You can create the Party A/c on the fly by pressing Alt+C.
The Dispatch Details screen appears. - Dispatch Details: Enter the Dispatch Details, as needed and press Enter.
You can choose to enable the options for Order Details by pressing F12 (Configure).
The Party Details screen appears. - Party Details: You can update the buyer details while recording the transaction and print the same in the invoice.
The Place of Supply field is prefilled with the party ledger state. You consider a sale as a local sale under GST if the buyer is from the same state as your company state.Your regular customer may need specific details, such as the address with the landmark, alternative contact number, and so on, to appear in the printed invoice. In such cases, create the party account with the required details and select the same party account in the Buyers field.

- As always, press Ctrl+A to save and proceed.
- Party A/c name: Select Cash or Bank for cash sales and the party name for credit sales, and press Enter.
- Enter Particulars details.
- Select the service ledger.
For GST to be calculated in the voucher, ensure that the service is configured with the correct GST Rate. - Specify the Amount.
Create the service ledger on the fly by pressing Alt+C.
- Select the service ledger.
- Select the tax ledgers CGST and SGST for local sales.
GST is calculated based on the tax rates defined in the service ledger.If you are selling services with the same GST rate then you can define the GST rate at the time of creating the company. In such cases, the GST gets calculated based on the rate defined when creating the company.
-
To view the Tax Analysis, press Ctrl+O (Related Reports) > GST Tax Analysis. Press Alt+F5 (Detailed) to view the detailed breakup of the tax.
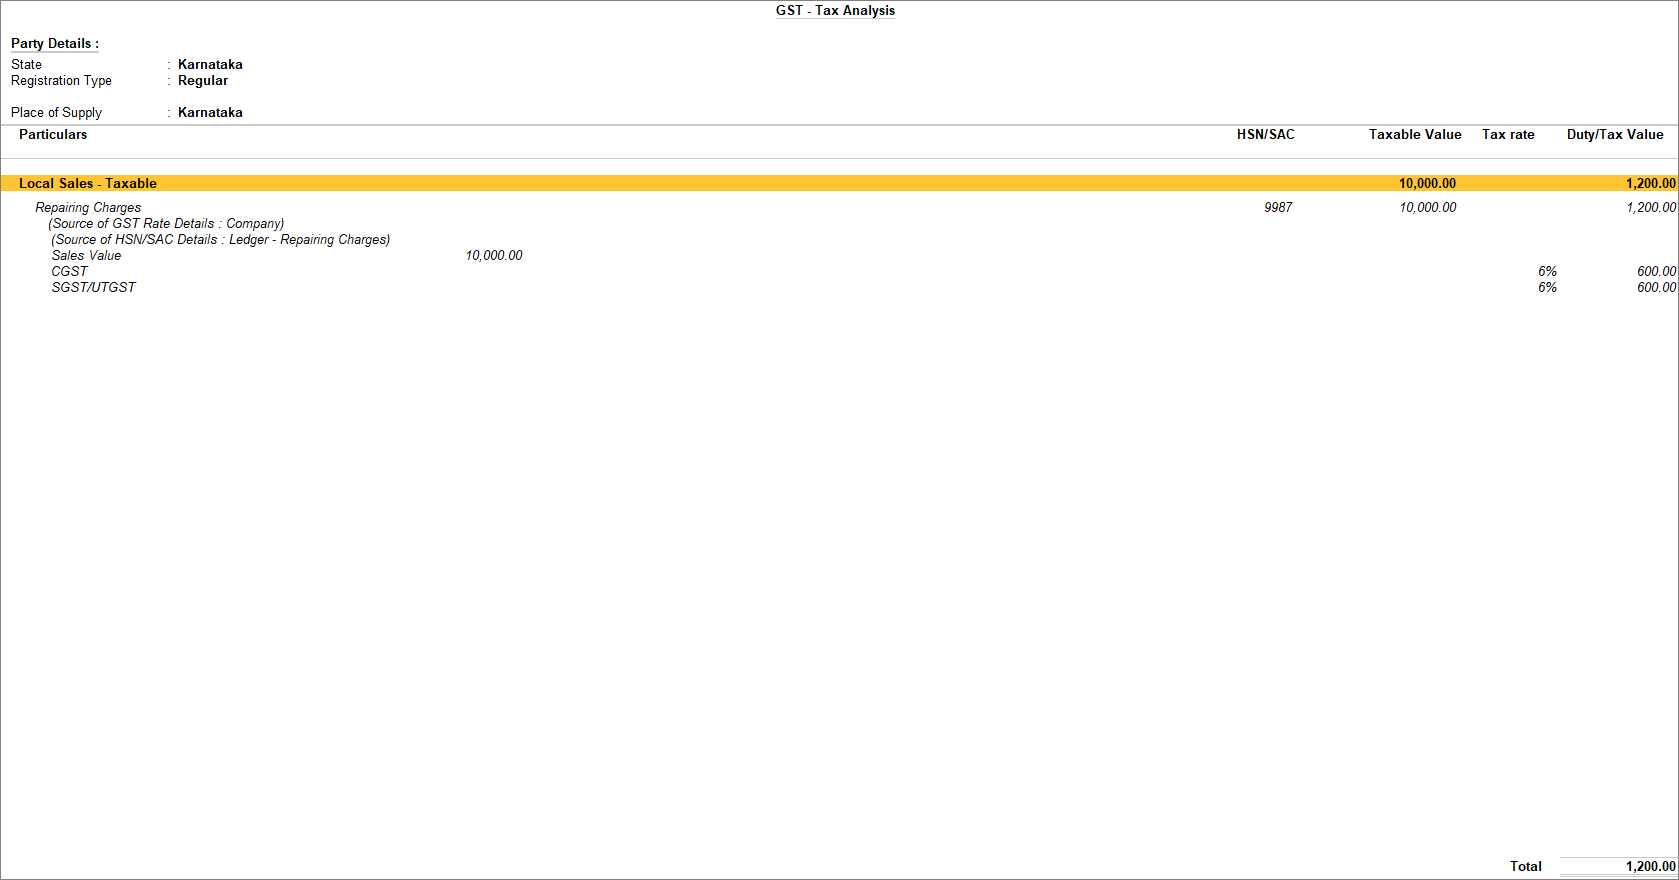
-
Provide Narration, if needed, and press Ctrl+A to save the sales voucher.
-
Print the invoice.
- In the sales voucher, press Ctrl+P.
Alternatively, press Alt+P (Print) > Current. - In the Print screen, press C (Configure) to configure the print options for your invoice, if needed.
- To change the printer, C (Configure) > press F6 (Printer) > select a printer from the List of Printers > and press Enter.
- To print multiple copies of the invoice, press F5 (No. of Copies) and Enter. You can also select the Type of Copy (for example, Original, Duplicate, or Triplicate, as needed).
- To view the GST breakup of each item, go to C (Configure) > set Show Item-wise GST details as Yes.
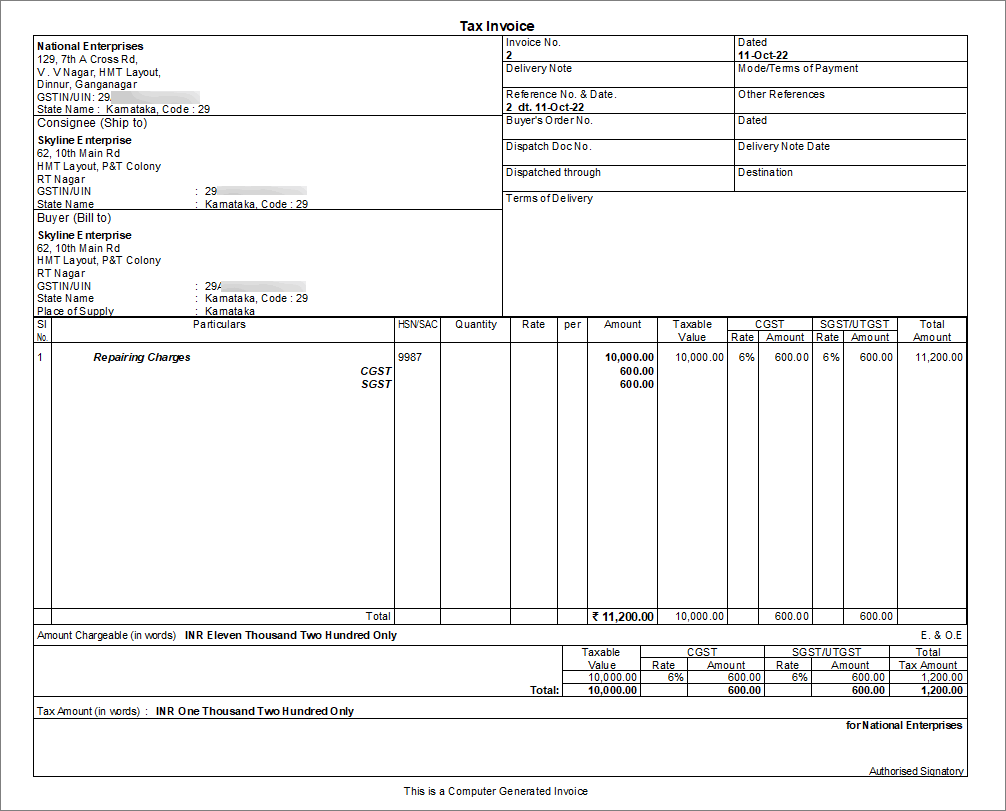
- Press I (Preview) to check the invoice before printing if needed.
- Press P (Print) to print the invoice.
- In the sales voucher, press Ctrl+P.
To know more, refer to Print GST Details in Invoice
You can generate an e-Invoice and e-Way Bill, if needed. To know more about e-Invoice and e-Way Bill, go to e-Invoice using TallyPrime and e-Way Bill using TallyPrime.
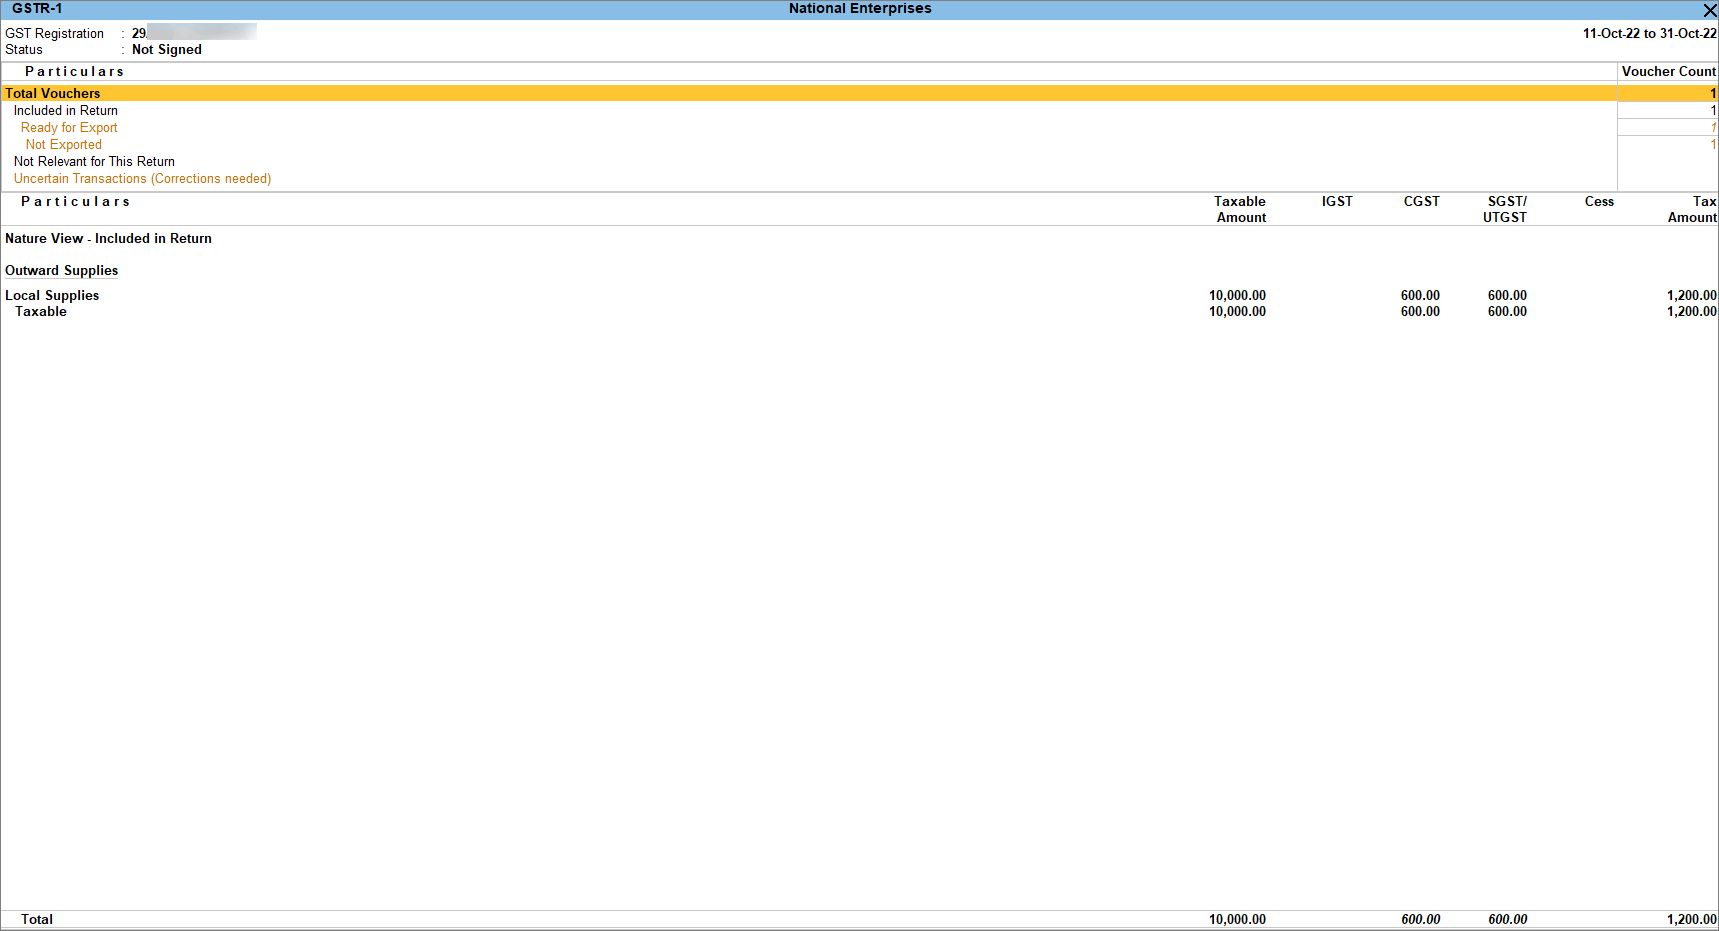
Now that you have recorded a local supply of services with GST, you can see the transaction in the Local Supplies under Outward Supplies of GSTR-1. To know more about GST Returns, refer to GSTR-1.
If you are in Rel 2.1 and earlier, you can view the transaction in the Local Sales under Outward Supplies of GSTR-1.
Record Interstate Supply of Goods and Services
You can supply goods or services to either a local party or a party from another state. The supply of goods or services is identified as local or interstate based on the Place of Supply. If the Place of Supply is different from your company address then it is an interstate sale. TallyPrime enables the option to select the Place of Supply in the Party Details screen while creating the voucher. Once the right place of supply is selected, the rest of the transaction remains the same for local and interstate supplies. For interstate sales, you need to use IGST ledgers to determine the tax amount. You can also view the Tax Analysis while passing a voucher to have a detailed understanding of the taxation inferred in the voucher.
In this section
- Interstate supply of goods | Item Invoice mode
- Interstate supply of services | Accounting Invoice mode
Interstate supply of goods | Item Invoice mode
When recording the sale of goods, choose cash or bank for cash sales and the party ledger for credit sales. In TallyPrime, you can record sales of goods or stock items using the Item Invoice mode, and specify the stock item details, quantity, and rate. In the Party Details screen, the Place of Supply is prefilled with the party ledger state. If the Place of Supply differs from your company states then the sales transaction is recorded as an interstate supply of goods. To record the tax for interstate sales, you must use the IGST ledgers.
- Open the Sales Voucher in the Item Invoice mode.
- Press Alt+G (Go To) > Create Voucher > press F8 (Sales).
Alternatively, Gateway of Tally > Vouchers > press F8 (Sales). - Press Ctrl+H (Change Mode) > select Item Invoice.
If you have created multiple registrations in TallyPrime Release 3.0 or later, then to change the registration, press F3 (Company/Tax Registration) > type or select the Registration under which you want to create the voucher and press Enter.
- Press Alt+G (Go To) > Create Voucher > press F8 (Sales).
-
Specify the buyer details.
- Party A/c name: Select Cash or Bank for cash sales and the party name for credit sales, and press Enter.
You can create the Party A/c on the fly by pressing Alt+C.
The Dispatch Details screen appears. - Dispatch Details: Enter the Dispatch Details, as needed and press Enter.
You can choose to enable the options for Order Details by pressing F12 (Configure).
The Party Details screen appears. - Party Details: You can update the buyer details while recording the transaction and print the same in the invoice.
The Place of Supply field is prefilled with the party ledger state. You consider a sale as an interstate sale under GST if the buyer is from a different state than your company state.Your regular customer may need specific details, such as the address with the landmark, alternative contact number, and so on, to appear in the printed invoice. In such cases, create the party account with the required details and select the same party account in the Buyers field.
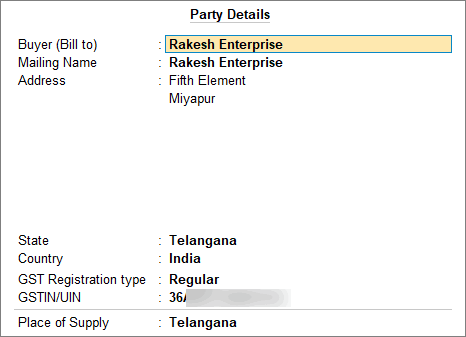
- As always, you can press Ctrl+A to save and proceed.
- Party A/c name: Select Cash or Bank for cash sales and the party name for credit sales, and press Enter.
- In the Sales ledger, select the common sales ledger.
Ensure that GST applicability is set to Applicable and that no GST rate is defined. - Enter stock item details.
- Name of Item: Select the stock item.
For GST to be calculated in the voucher, ensure that the stock item is configured with the correct GST Rate. - Specify Quantity and Rate.
If you do not see the required item in the list, you can create the stock item on the fly by pressing Alt+C.
- Name of Item: Select the stock item.
- Select the tax ledger IGST for interstate sales.
GST is calculated based on the tax rates defined in the stock item ledger.If you are selling goods with the same GST rate then you can define the GST rate at the time of creating the company. In such cases, the GST gets calculated based on the rate defined when creating the company.
- To view the Tax Analysis, press Ctrl+O (Related Reports) > GST Tax Analysis. Press Alt+F5 (Detailed) to view the detailed breakup of the tax.
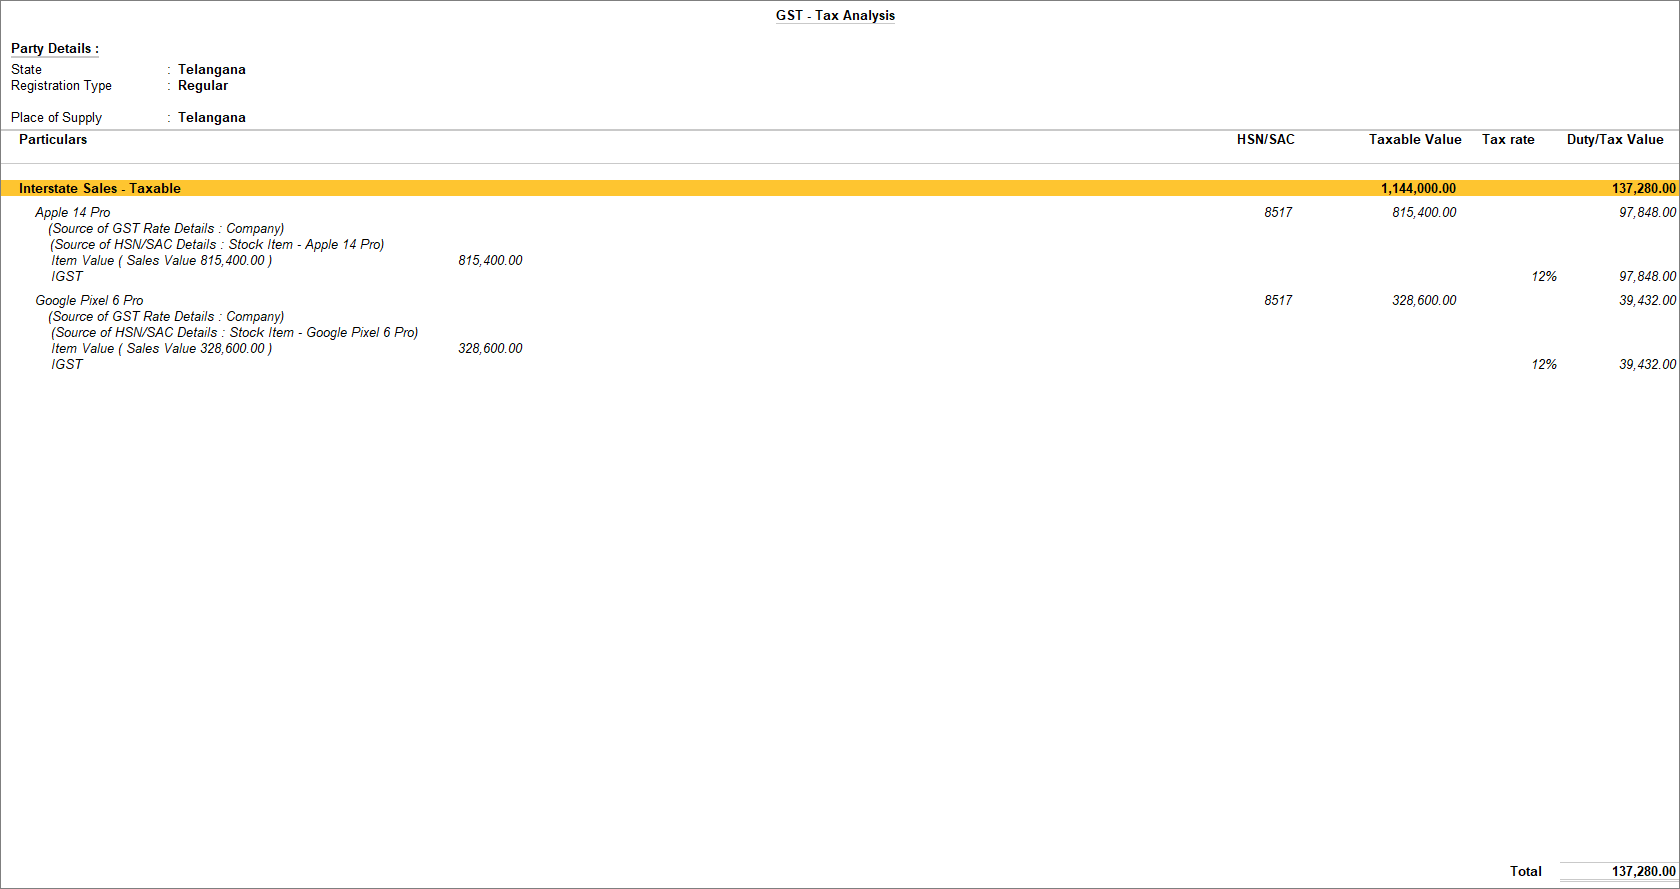
- Provide Narration, if needed, and press Ctrl+A to save the sales voucher.
- Print the invoice.
- In the sales voucher, press Ctrl+P.
Alternatively, press Alt+P (Print) > Current. - In the Print screen, press C (Configure) to configure the print options for your invoice, if needed.
- To change the printer, C (Configure) > press F6 (Printer) > select a printer from the List of Printers > and press Enter.
- To print multiple copies of the invoice, press F5 (No. of Copies) and Enter. You can also select the Type of Copy (for example, Original, Duplicate, or Triplicate, as needed).
- To view the GST breakup of each item, go to C (Configure) > set Show Item-wise GST details as Yes.
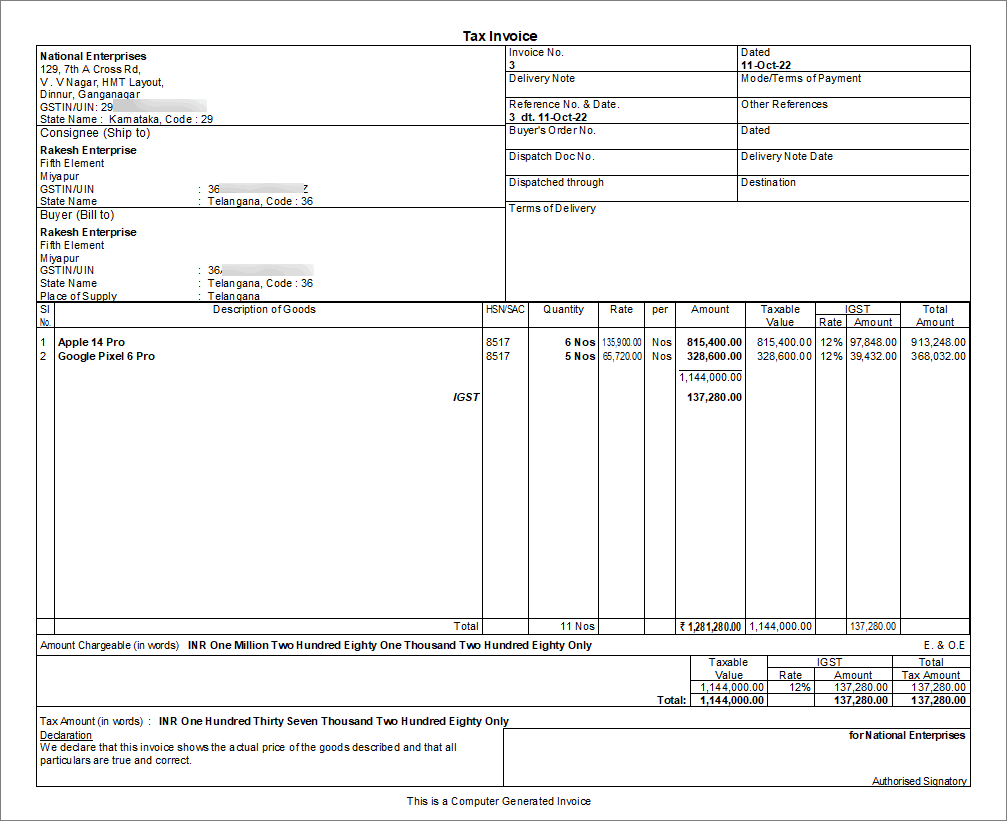
- Press I (Preview) to check the invoice before printing if needed.
- Press P (Print) to print the invoice.
- In the sales voucher, press Ctrl+P.
To know more, refer to Print GST Details in Invoice
You can generate an e-Invoice and e-Way Bill, if needed. To know more about e-Invoice and e-Way Bill, go to e-Invoice using TallyPrime and e-Way Bill using TallyPrime.
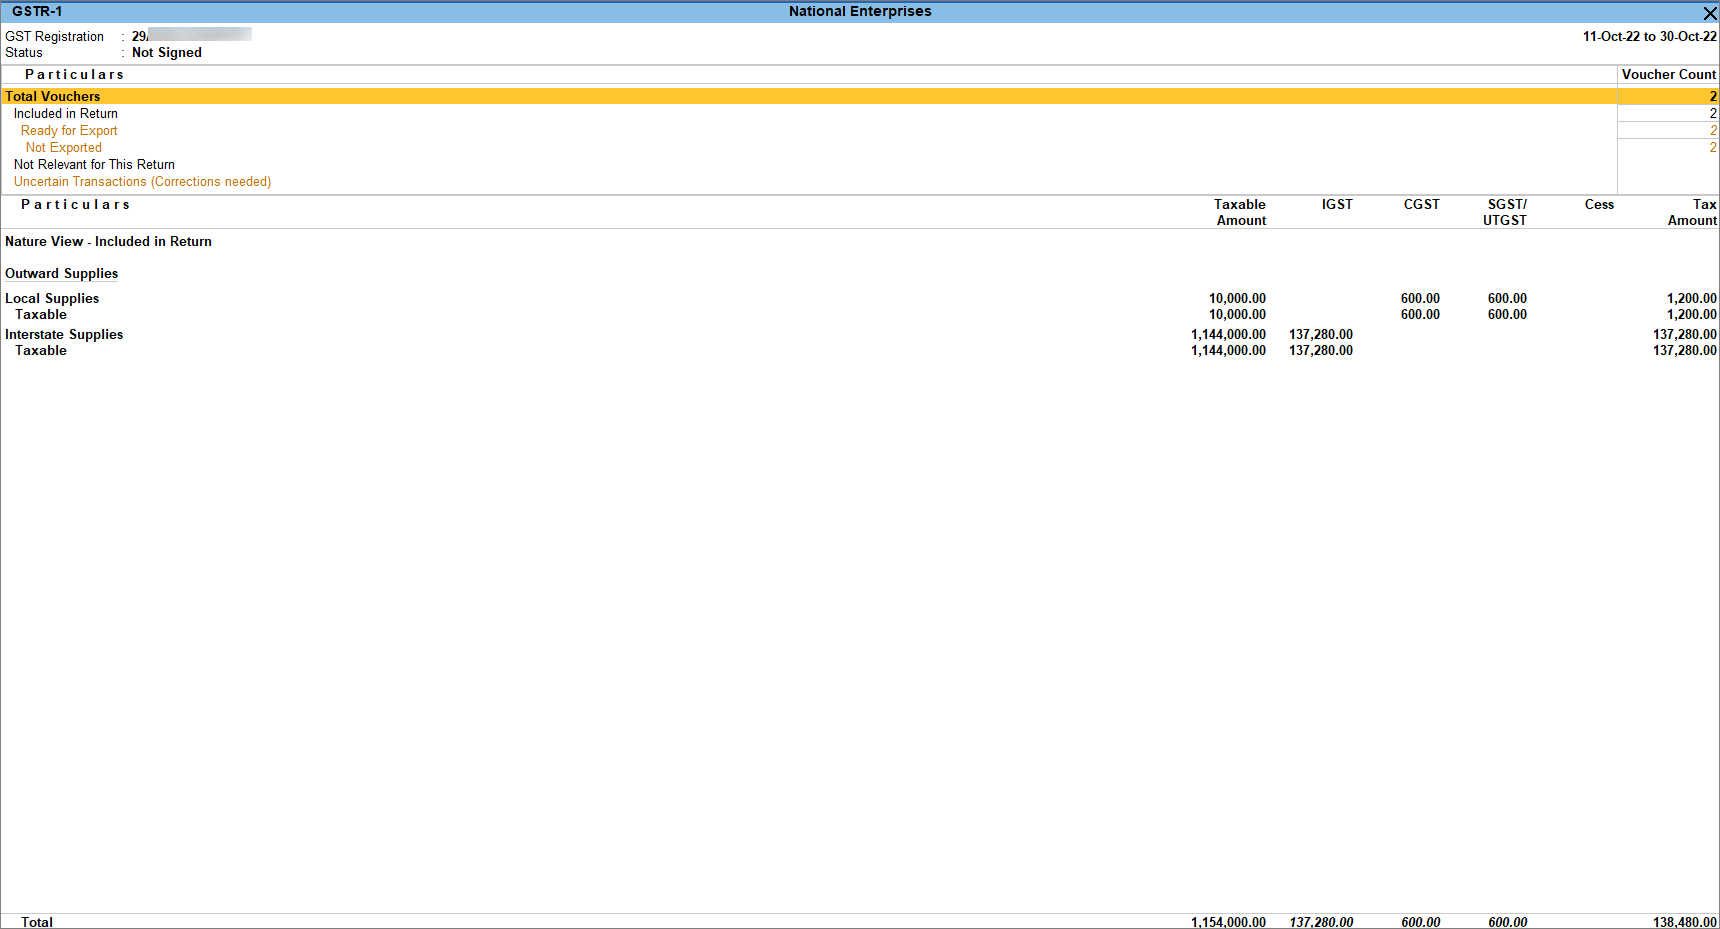
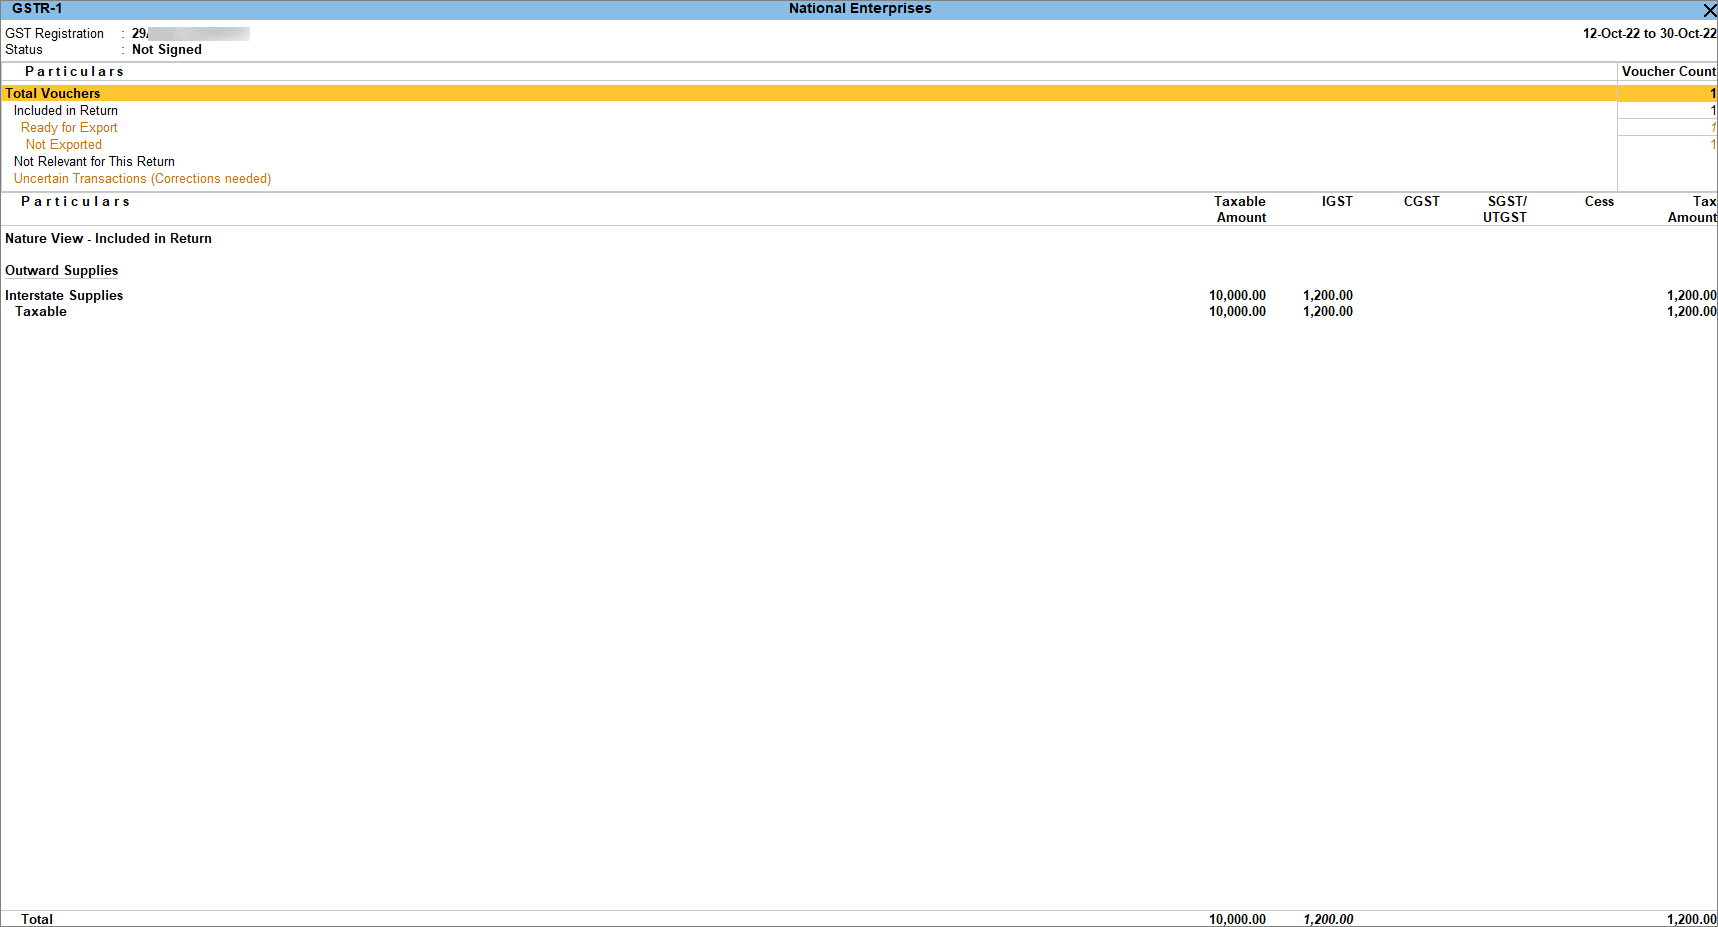
Now that you have recorded an interstate supply of goods, you can see the transaction in the Interstate Supplies under Outward Supplies of GSTR-1 in the Nature View. To know more about GST Returns, refer to GSTR-1.
If you are in Rel 2.1 and earlier, you can view the transaction in the Inter State Sales under Outward Supplies of GSTR-1.
Interstate supply of services | Accounting Invoice mode
When recording the sale of services, choose cash or bank for cash sales and party ledger for credit sales. In TallyPrime, record sales of services and the total amount using the Accounting Invoice mode. An accounting ledger is not required as there is no stock item to allocate. In the Party Details screen, the Place of Supply is prefilled with the party ledger state. If the Place of Supply differs from your company state then you need to record the sales transaction as an interstate supply of services. To record the tax for interstate sales, you must use the IGST ledgers.
- Open the Sales Voucher in the Accounting Invoice mode.
- Press Alt+G (Go To) > Create Voucher > press F8 (Sales).
Alternatively, Gateway of Tally > Vouchers > press F8 (Sales). - Press Ctrl+H (Change mode) > select Accounting Invoice.
If you have created multiple registrations in TallyPrime Release 3.0 or later, then to change the registration, press F3 (Company/Tax Registration) > type or select the Registration under which you want to create the voucher and press Enter.
- Press Alt+G (Go To) > Create Voucher > press F8 (Sales).
- Specify the buyer details.
- Party A/c name: Select Cash or Bank for cash sales and the party name for credit sales, and press Enter.
You can create the Party A/c on the fly by pressing Alt+C.
The Dispatch Details screen appears. - Dispatch Details: Enter the Dispatch Details, as needed and press Enter.
You can choose to enable the options for Order Details by pressing F12 (Configure).
The Party Details screen appears. - Party Details: You can update the buyer details while recording the transaction and print the same in the invoice.
The Place of Supply field is prefilled with the party ledger state. You consider a sale as an interstate sale under GST if the buyer is from a different state than your company state.Your regular customer may need specific details, such as the address with the landmark, alternative contact number, and so on, to appear in the printed invoice. In such cases, create the party account with the required details and select the same party account in the Buyers field.

- As always, press Ctrl+A to save and proceed.
- Party A/c name: Select Cash or Bank for cash sales and the party name for credit sales, and press Enter.
- Enter Particulars details.
- Select the service ledger.
For GST to be calculated in the voucher, ensure that the service is configured with the correct GST Rate. - Specify the Amount.
Create the service ledger on the fly by pressing Alt+C.
- Select the service ledger.
- Select the tax ledgers IGST for interstate sales.
GST is calculated based on the tax rates defined in the service ledger.If you are selling services with the same GST rate then you can define the GST rate at the time of creating the company. In such cases, the GST gets calculated based on the rate defined when creating the company.
-
To view the Tax Analysis, press Ctrl+O (Related Reports) > GST Tax Analysis. Press Alt+F5 (Detailed) to view the detailed breakup of the tax.
- Provide Narration, if needed, and press Ctrl+A to save the sales voucher.
- Print the invoice.
- In the sales voucher, press Ctrl+P.
Alternatively, press Alt+P (Print) > Current. - In the Print screen, press C (Configure) to configure the print options for your invoice, if needed.
- To change the printer, C (Configure) > press F6 (Printer) > select a printer from the List of Printers > and press Enter.
- To print multiple copies of the invoice, press F5 (No. of Copies) and Enter. You can also select the Type of Copy (for example, Original, Duplicate, or Triplicate, as needed).
- To view the GST breakup of each item, go to C (Configure) > set Show Item-wise GST details as Yes.
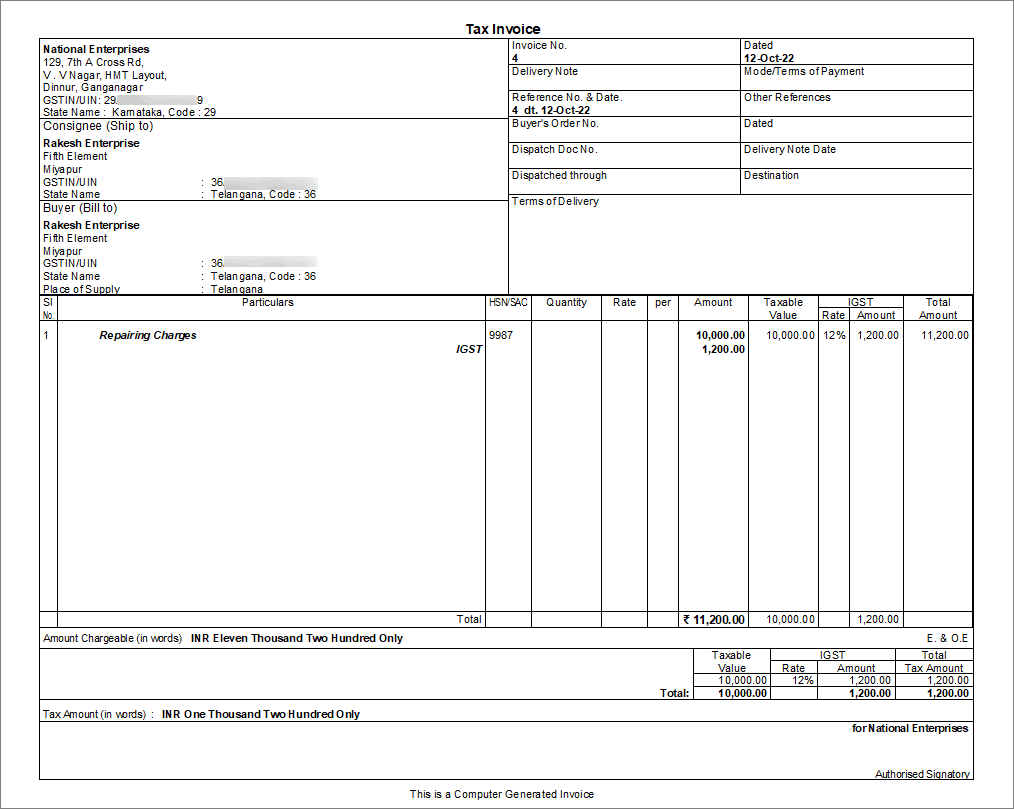
- Press I (Preview) to check the invoice before printing if needed.
- Press P (Print) to print the invoice.
- In the sales voucher, press Ctrl+P.
To know more, refer to Print GST Details in Invoice
You can generate an e-Invoice and e-Way Bill, if needed. To know more about e-Invoice and e-Way Bill, go to e-Invoice using TallyPrime and e-Way Bill using TallyPrime.
Now that you have recorded an interstate supply of services, you can see the transaction in the Interstate Supplies under Outward Supplies of GSTR-1. To know more about GST Returns, refer to GSTR-1.
If you are in Rel 2.1 and earlier, you can view the transaction in the Inter State Sales under Outward Supplies of GSTR-1.
Supplies to Consumers
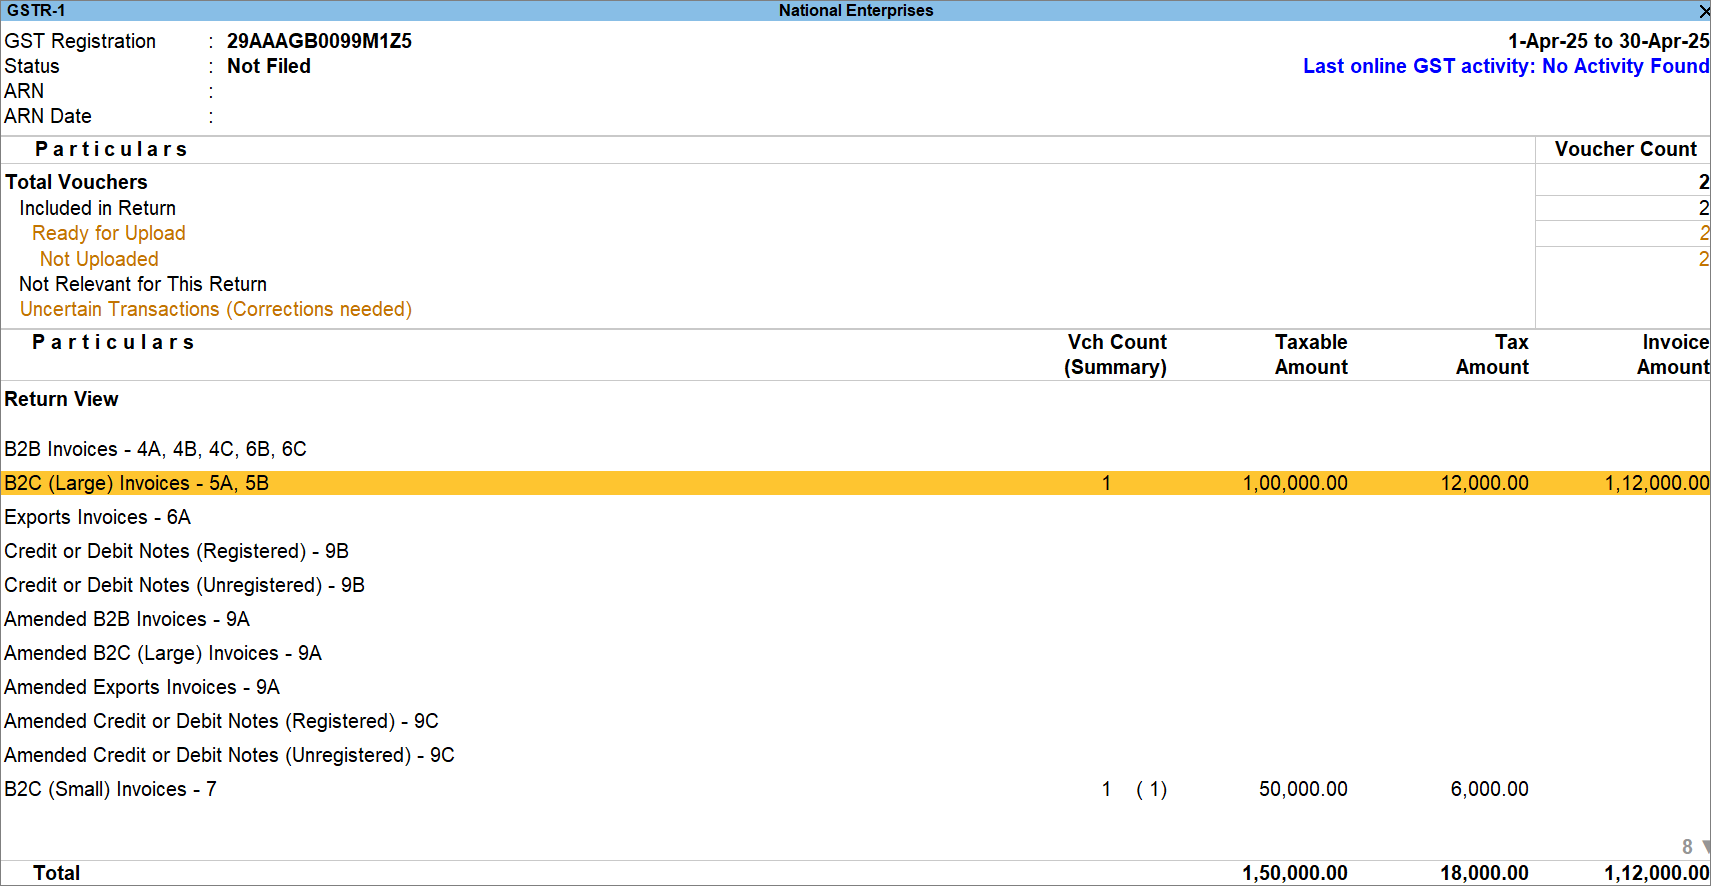
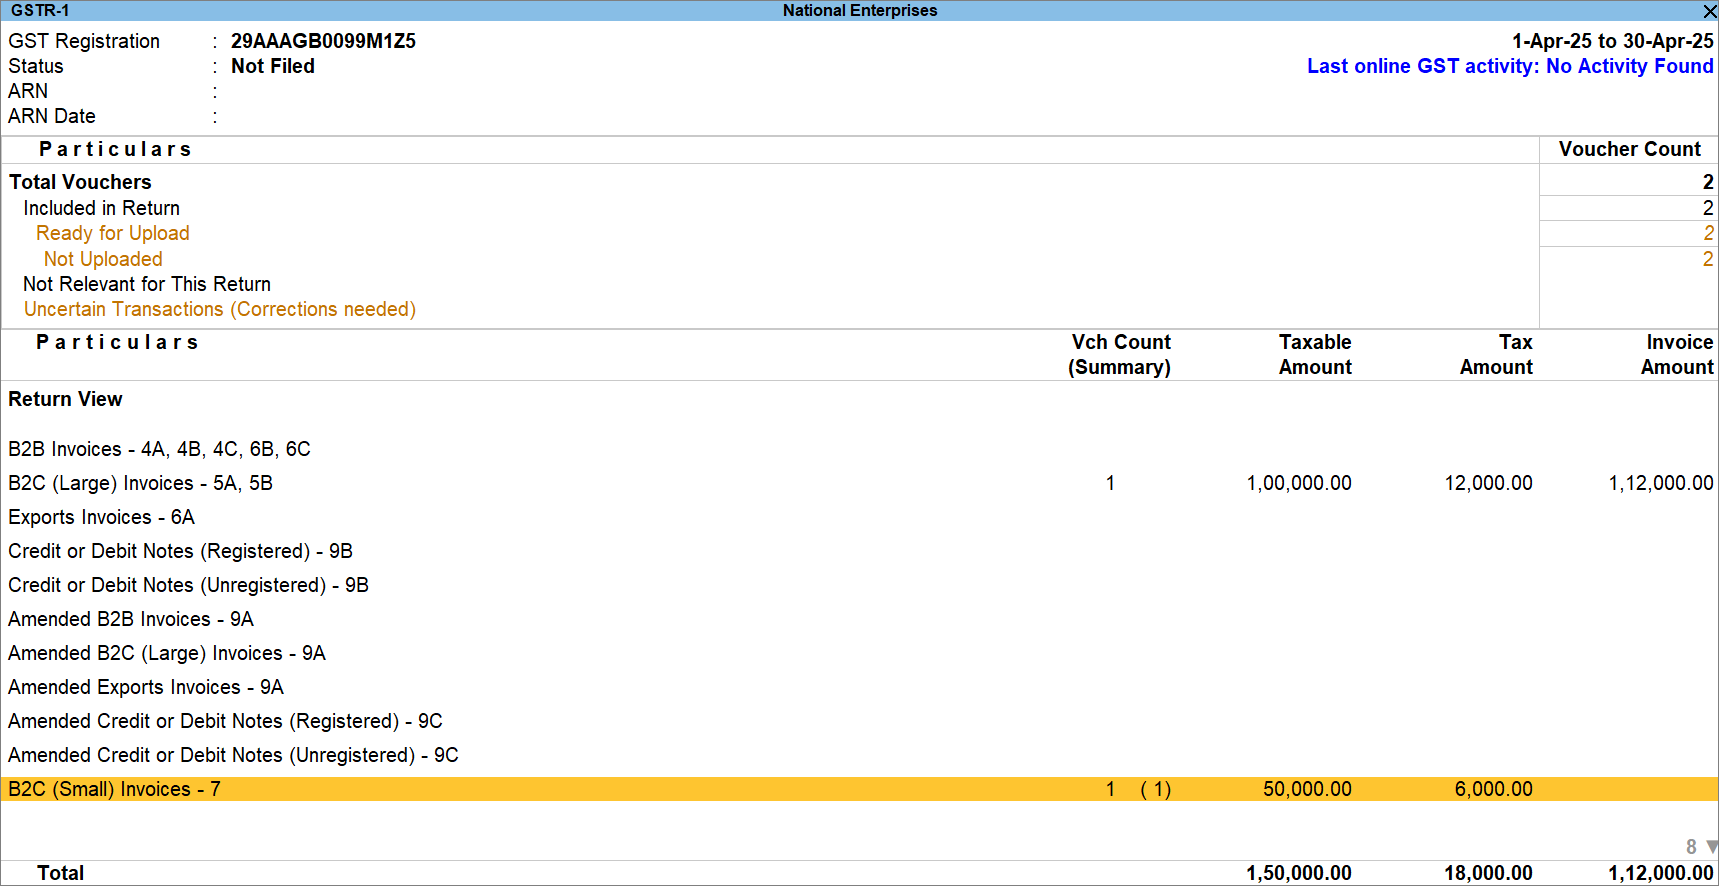
You might be selling to consumers in addition to providing goods or services to businesses. The supply can be local or interstate depending on the place of supply. Depending on the transaction value and the party’s location, you can find the transactions in GSTR-1 under the B2C (Large) Invoices or B2C (Small) Invoices heading.
In case of interstate sales of goods to consumers or unregistered dealers, you can find the transactions in GSTR-1 under:
- B2C (Large) Invoices where the value of interstate sales is more than 1 lakh
- B2C (Small) Invoices where the value of interstate sales in lesser than 1 lakh.
In this section
B2C (Large) Invoices
When the value of interstate sales is more than 1 lakh, the transaction gets into the B2C (Large) Invoices section.
While recording a sales voucher in Item Invoice mode,
- In the Party A/c name, select the unregistered customer ledger.
- Enter the stock item details.
- Name of Item – Select the stock item.
- Specify Quantity and Rate.
- Select the appropriate GST ledger based on the Place of Supply. CGST and SGST are applicable for sales within the state and IGST is applicable for interstate sales.
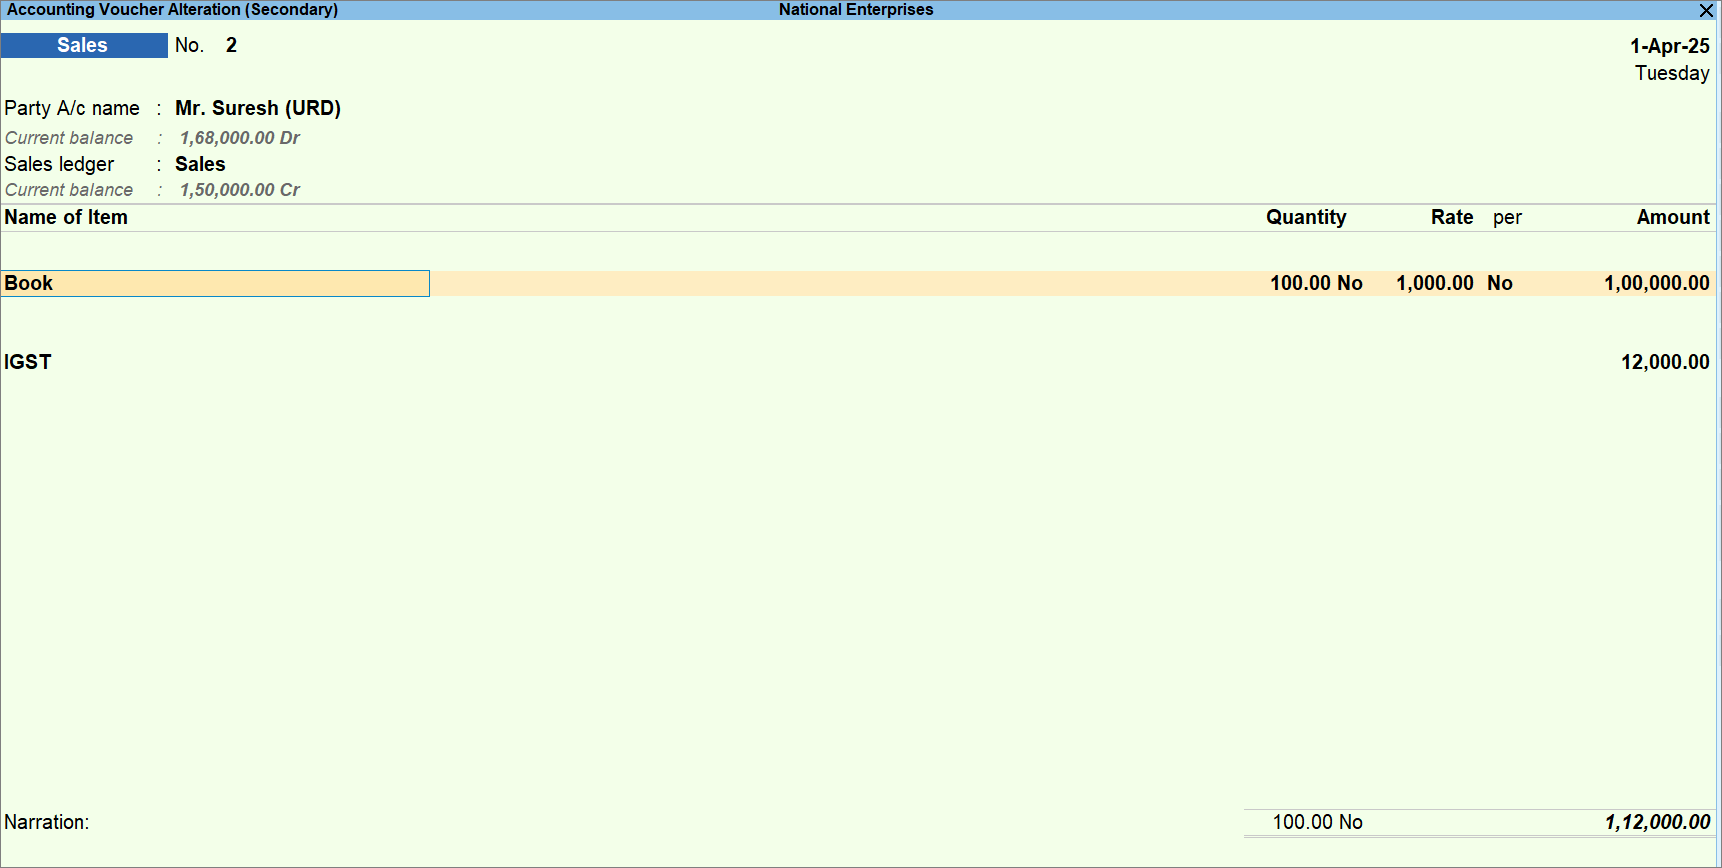
- As always, press Ctrl+A to save the sales voucher.
Now that you have recorded a supply to an unregistered consumer where the total value of sales is more than 2.5 lakhs, you can see the transaction in the B2C (Large) Invoices – 5A, 5B of GSTR-1. To know more about GST Returns, refer to GSTR-1.
B2C (Small) Invoices
When the value of interstate sales is less than 1 lakh, the transaction is captured as B2C (Small) Invoices along with all local sales.
While recording a sales voucher in Item Invoice mode,
- In the Party A/c name, select the unregistered customer ledger.
- Enter the stock item details.
- Name of Item – Select the stock item.
- Specify Quantity and Rate.
- Select the appropriate GST ledger based on the Place of Supply. CGST and SGST are applicable for sales within the state and IGST is applicable for interstate sales.
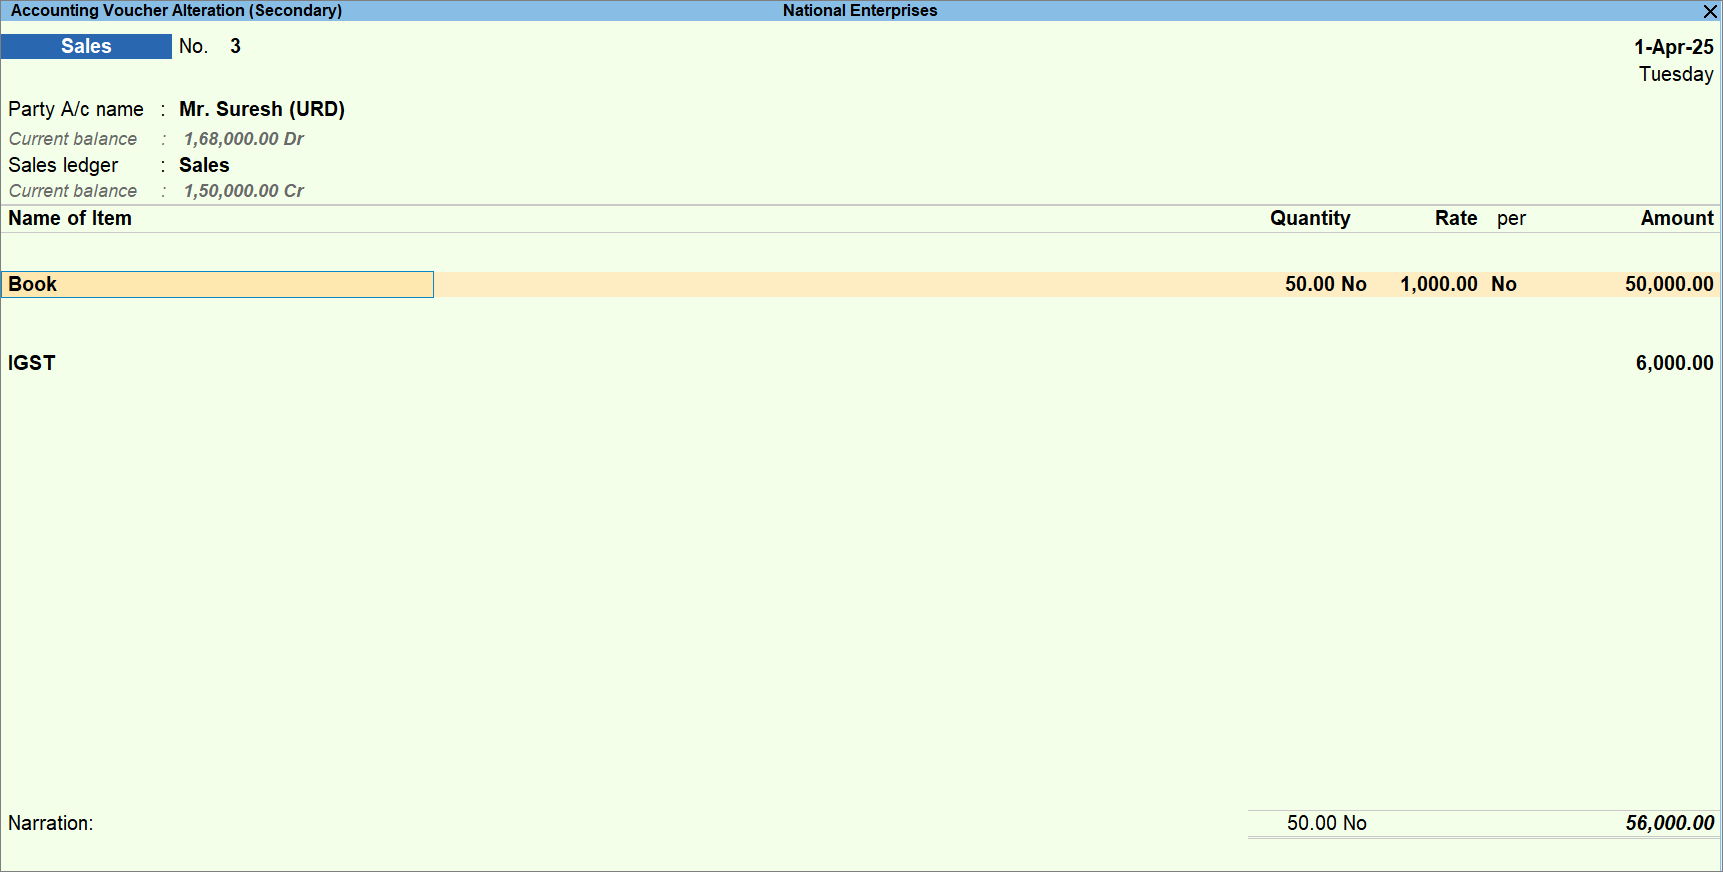
- As always, press Ctrl+A to save the sales voucher.
Now that you have recorded a supply to an unregistered consumer where the total value of sales is less than 2.5 lakhs, you can see the transaction in the B2C (Small) Invoices – 7 of GSTR-1. To know more about GST Returns, refer to GSTR-1.
To know more about GST Returns, refer to GSTR-1.
Supplies when Buyer and Consignee are Different
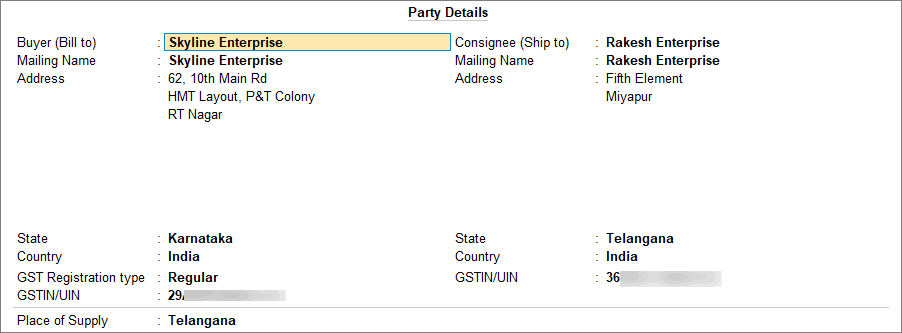
When you supply the goods or services, usually those are delivered to the buyer. However, sometimes the buyer may instruct you to deliver the goods or services to another party (Consignee). TallyPrime enables the option to update both buyer and consignee details in the party details while creating the voucher. The location of the supply determines whether the sale is local or interstate.
While recording a sales invoice,
- In the Party Details screen, press F12 (Configure) > set Provide separate Buyer and Consignee details to Yes.
The Consignee (Ship to) section appears in the Party Details screen. - Mention the specifics of Consignee details
- Provide other details, as needed, and press Ctrl+A to save the sales voucher.
- Print both buyer and consignee details.
- Press Alt+P (Print) in the invoice > press Enter on Current > press C (Configure).
- Set the option Show Consignee details to Yes.
Now, you can mention the consignee name and other details as well in your invoice and also print the same.
Note: While printing the invoice, if you have enabled the option Show Name and Address from Party Master in the Print configuration, then the Consignee Address will be displayed as per the address specified in the party master created for the buyer.
Print GST Details in Invoice
As per business practice, you need to print the sales invoice once you record the sales voucher. You can personalise your invoices and include GST details in the invoice in TallyPrime. A GST sales invoice, apart from other details, must include GST rates, the GSTIN numbers of the buyer and seller, an HSN/SAC code, and party contact details.
Print GST rate details in the Invoice
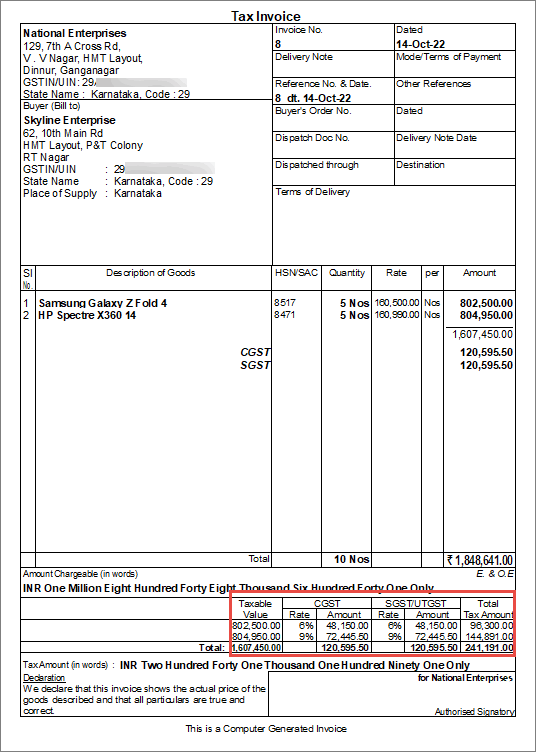
When printing the sales invoice, you can configure it to print the GST rates in the invoice in TallyPrime. You can configure it and print the GST rate item-wise or consolidated.
- In the sales voucher, press Ctrl+P.
Alternatively, press Alt+P (Print) > Current. - Press C (Configure) > Set Show GST Analysis as Yes.
- To view the GST breakup of each item, go to C (Configure) > set Show Item-wise GST details as Yes.
- Press I (Preview) to view the invoice before printing or press P (Print) to print the invoice.
Print HSN/SAC in the Invoice
When printing the sales invoice, you can configure it to print the HSN/SAC codes in the invoice in TallyPrime. You can configure it and print the HSN/SAC code item-wise or consolidated.
- In the sales voucher, press Ctrl+P.
Alternatively, press Alt+P (Print) > Current. - Press C (Configure) > set Show HSN/SAC details as Yes.
- Ensure that the HSN/SAC details are updated when creating the company.
If your company sells multiple products then update the HSN/SAC details at the stock item level.
Print the party’s contact details in the pre-printed format
In the pre-printed format, you can update the party contact details and print the same on the invoice in TallyPrime.
- In the sales voucher, press Ctrl+P.
Alternatively, press Alt+P (Print) > Current. - Select F9 (Pre-Printed Paper).
If you are in Rel 2.1 and earlier, ensure that Reduce space between Address and Name of Items/Particulars is set to No. - Update the party contact details in the ledger to print the same in the pre-printed format.
Record Supply of Goods with Different Tax Rates in the same Invoice
A single supply can have multiple items with different GST rates and HSN/SAC details when you supply goods or services. You can record the supply of goods with different tax rates in the same voucher. While creating the stock items, you can define the applicable GST rates. TallyPrime takes care of the tax computations based on the GST rates defined for each stock item. There is no change in the recording process of the sales voucher with multiple GST rates for stock items. You have to configure the correct GST rates and HSN/SAC details in the stock item so that the tax computation is done correctly which you can see in the tax analysis screen. To know more about the stock item’s GST setup, refer to the Apply GST Rate and HSN/SAC Details in the Stock Item section of Getting Started with GST in TallyPrime.
While recording a sales voucher in Item Invoice mode
- Provide different stock items with different tax rates defined in the stock item master.
- Select the tax ledgers CGST and SGST for local sales and IGST for interstate sales.
- To view the Tax Analysis, press Ctrl+O (Related Reports) > GST Tax Analysis. Press Alt+F5 (Detailed) to view the detailed breakup of the tax.

- Provide other details, as needed, and press Ctrl+A to save the sales voucher.
- Print the invoice.
Similarly, you can record services with different tax rates.
Record Vouchers and Adjust Allocation Difference using Voucher Class
In an Inclusive of All Tax voucher class, you can choose to round off the decimal places using the first ledger and last ledger.
Typically, in a sales invoice, your first ledger is the Sales ledger, and the last ledger can be one of the GST ledgers.
So, when you use an Inclusive of All Tax voucher class and round off the invoice amount with the last ledger or a GST ledger, the transaction shows a difference in the tax amount.
In such cases, when you have an amount in decimals, you will need to round off the value with the first ledger.
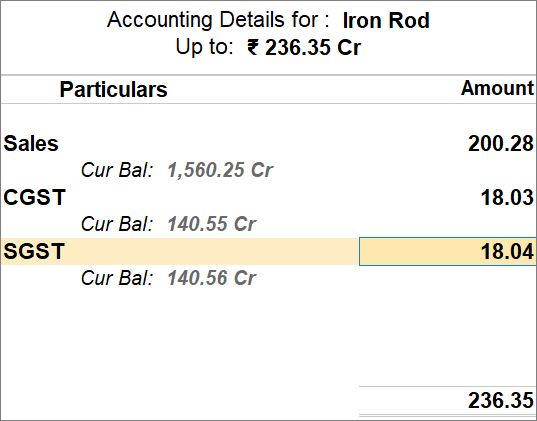
For example, the amount of the stock item is 236.35, and you round it off with the last ledger. As a result, there is a difference in values against both the GST ledgers, as shown below:
As a result of this, the transaction becomes a part of the Uncertain Transactions section in GSTR-1.
In order to avoid this, you need to round off the value using the first ledger.
- In the Voucher Type Alteration screen of Sales, press Enter on the Name of Class and add the voucher class name.

- Configure the Default Accounting Allocations.
- Set the option Enable default accounting allocations to Yes.
- Enable Set/Alter Default Accounting Entries. The Default Accounting Entries screen appears.
- Press F12 (Configure) > enable Allow to change default Accounting Allocation method.
- Press Ctrl+A to save.
- Under Adjust Allocation Difference (if any) to, select First Ledger and press Enter.
Once you set First Ledger under Adjust Allocation different (if any) to, you cannot apply Rounding Method to the First Ledger as the adjustment is already set to it. - Set up the sales and tax ledger with percentages.
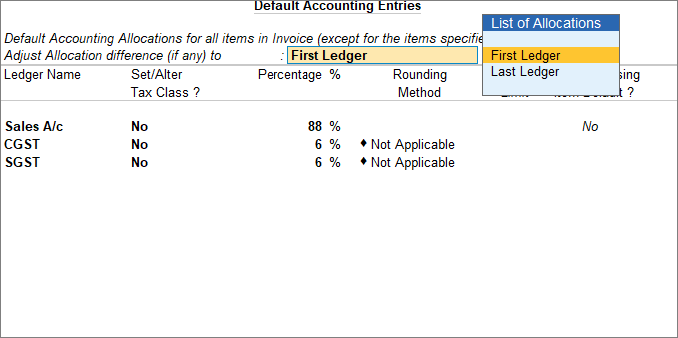
- Set the option Enable default accounting allocations to Yes.
- Press Ctrl+A to save the voucher class.
You can also follow the above steps in the Voucher Type or even Stock Item master if you have configured Accounting Allocations in those masters.
You can now record the sales voucher with the voucher class and if there is any difference in the decimal it adjusts to the First Ledger, as selected.
The change in configuration as demonstrated in the above procedure will not be applicable to the transactions you have already recorded. However, you can correct the tax calculation manually in the transactions.
GST Portal view of Invoice
TallyPrime Release 3.0 presents your GST-related data just as you can see it on the GST portal, which helps you visualize how the data appears on the portal when you upload at the end of the return cycle. You can check the GST Portal view of Invoice before exporting the transaction to the portal.
While recording a sales invoice,
To view the GST Portal view of Invoice, press Ctrl+O (Related Reports) and select GST Portal view of Invoice.

You can also check the GST Portal view of Invoice after recording a voucher, in the voucher alteration mode by simply pressing Ctrl+O (Related Reports) and selecting GST Portal view of Invoice.
If you are on TallyPrime Release 2.1 or earlier, this feature is not applicable.
Record Debit Note for GST Corrections in Sales
If you have recorded a Sales Invoice with incorrect GST details, you can record a Debit Note to make the necessary corrections.
In this section
-
Record Debit Note for GST Rate correction without change in Assessable Value
-
Record Debit Note for correction with change in Assessable Value and GST Amount
Record Debit Note for GST Rate correction without change in Assessable Value
If you have recorded a Sales Invoice with an incorrect GST rate and need to adjust only the tax difference (without changing the assessable value), you can record a Debit Note.
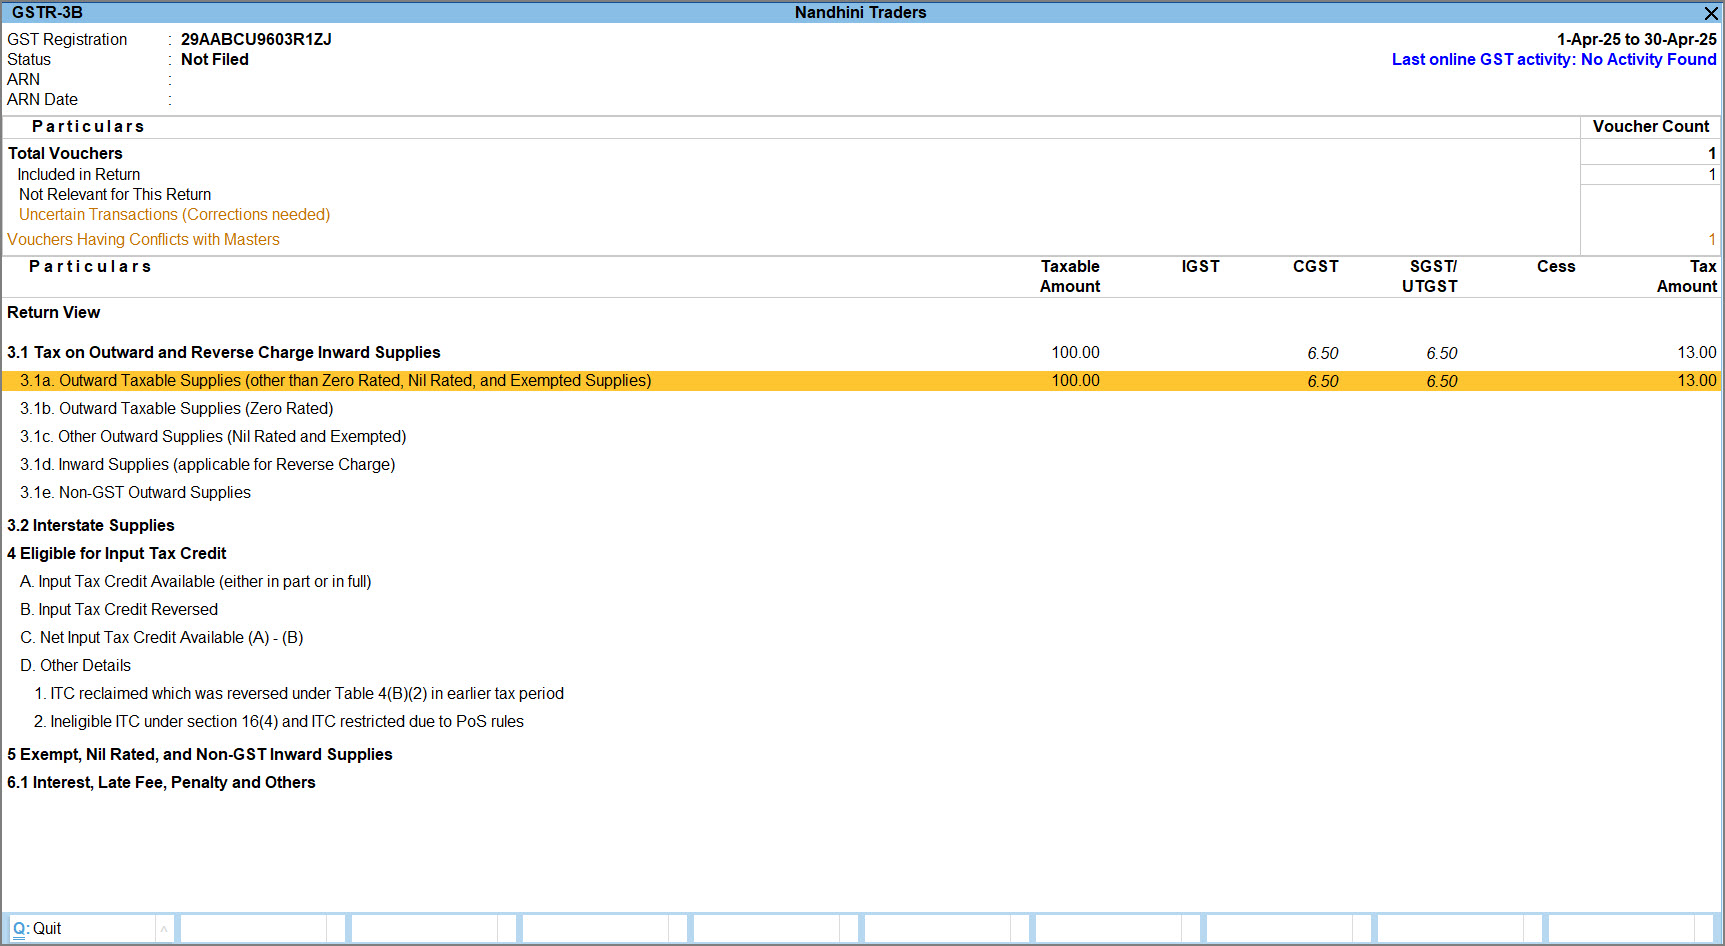
For example, you sold goods worth ₹100 and charged GST @5% instead of the correct 18%.
Now, you must collect the additional ₹13 GST from the buyer using a Debit Note.
-
Record a Debit Note.
-
Ensure that the following details are the same as you had used in the original Sales invoice:
– Party Ac/Name
– Ledger Account
– Stock Items or Service ledgers -
You can skip the Quantity and Rate fields, enter a minimum Amount (for example, ₹0.01) and press Enter.
-
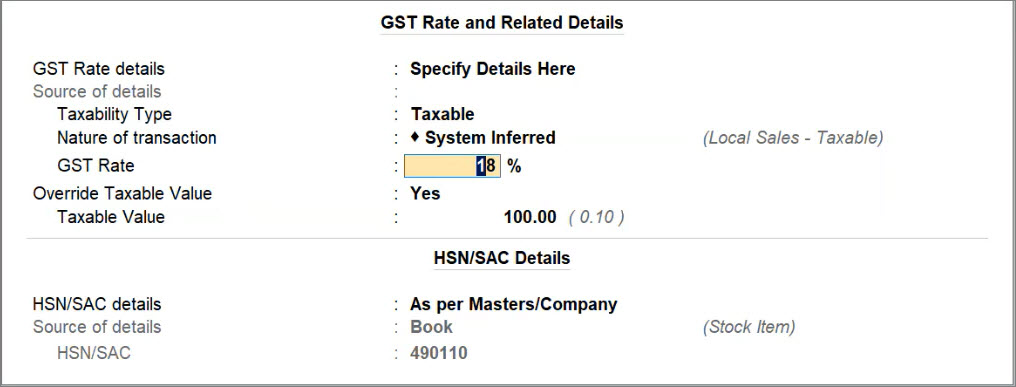
Press F12 (Configure) and set the option Modify GST and HSN details to Yes.
-
Update the GST Rate in the GST Rate and Related Details screen.
-
Enter the difference amount for CGST and SGST, and add the figures as applicable.
-
Set the option Provide GST details to Yes, and select the appropriate Reason for Issuing Note.
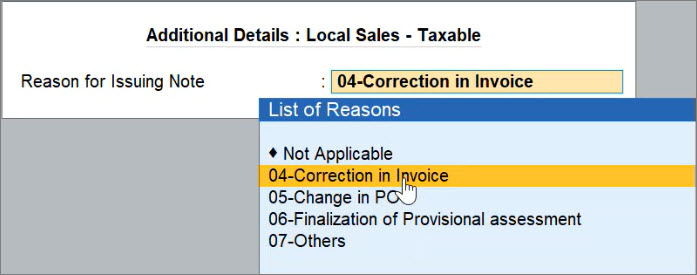
- As always, press Ctrl+A to save the Debit Note.
A message appears to confirm that the GST Rate and Related Details or HSN/SAC Details are modified.
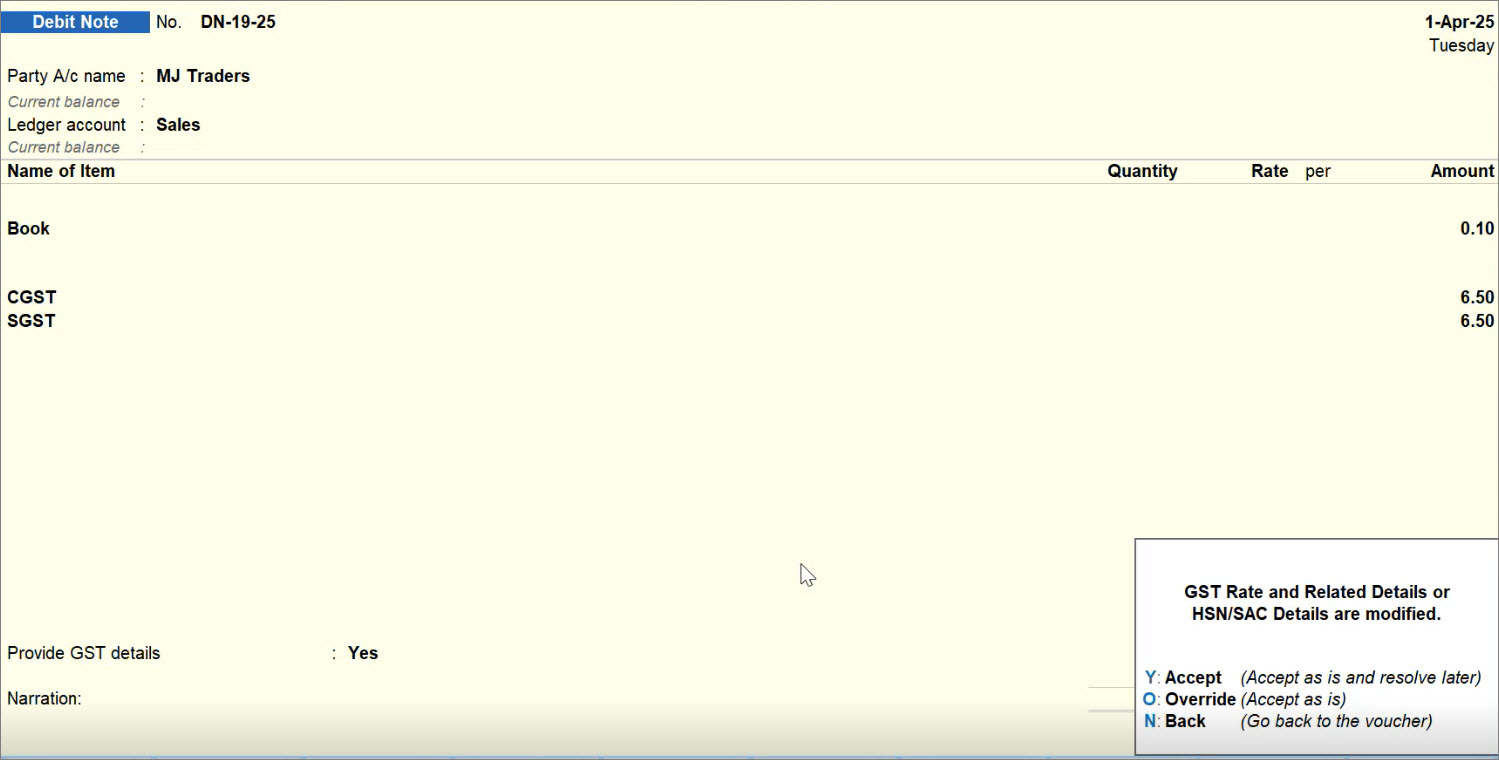
-
Press O (Override) to prevent the transaction from moving to the Uncertain bucket.
The Debit Note appears in the Outward Taxable Supplies (other than Zero Rated, Nil Rated, and Exempted Supplies) section in the GSTR-3B report.
Record Debit Note for correction with change in Assessable Value and GST Amount
If you have recorded a Sales Invoice with an incorrect assessable value, you can record a Debit Note to adjust both the value and tax amount.
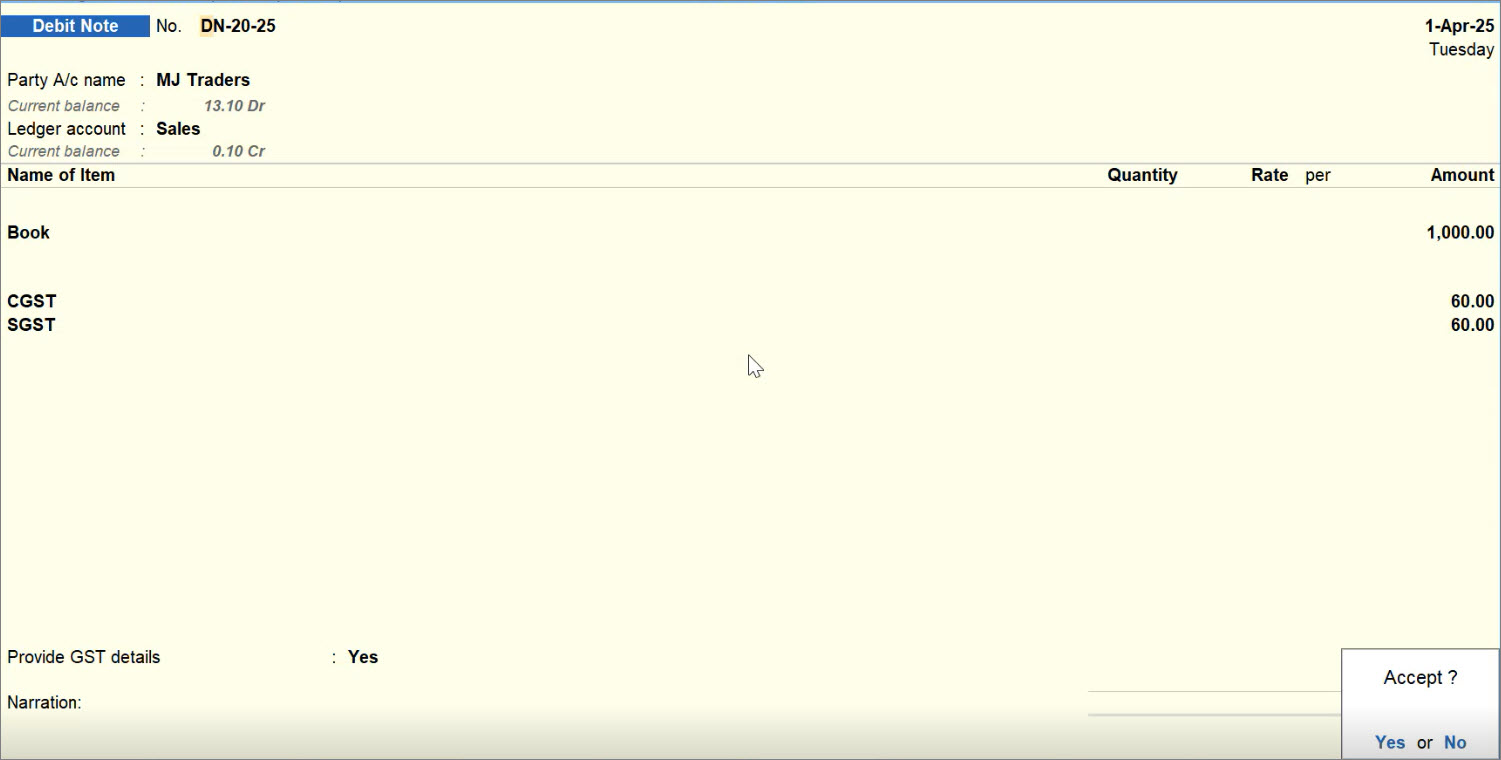
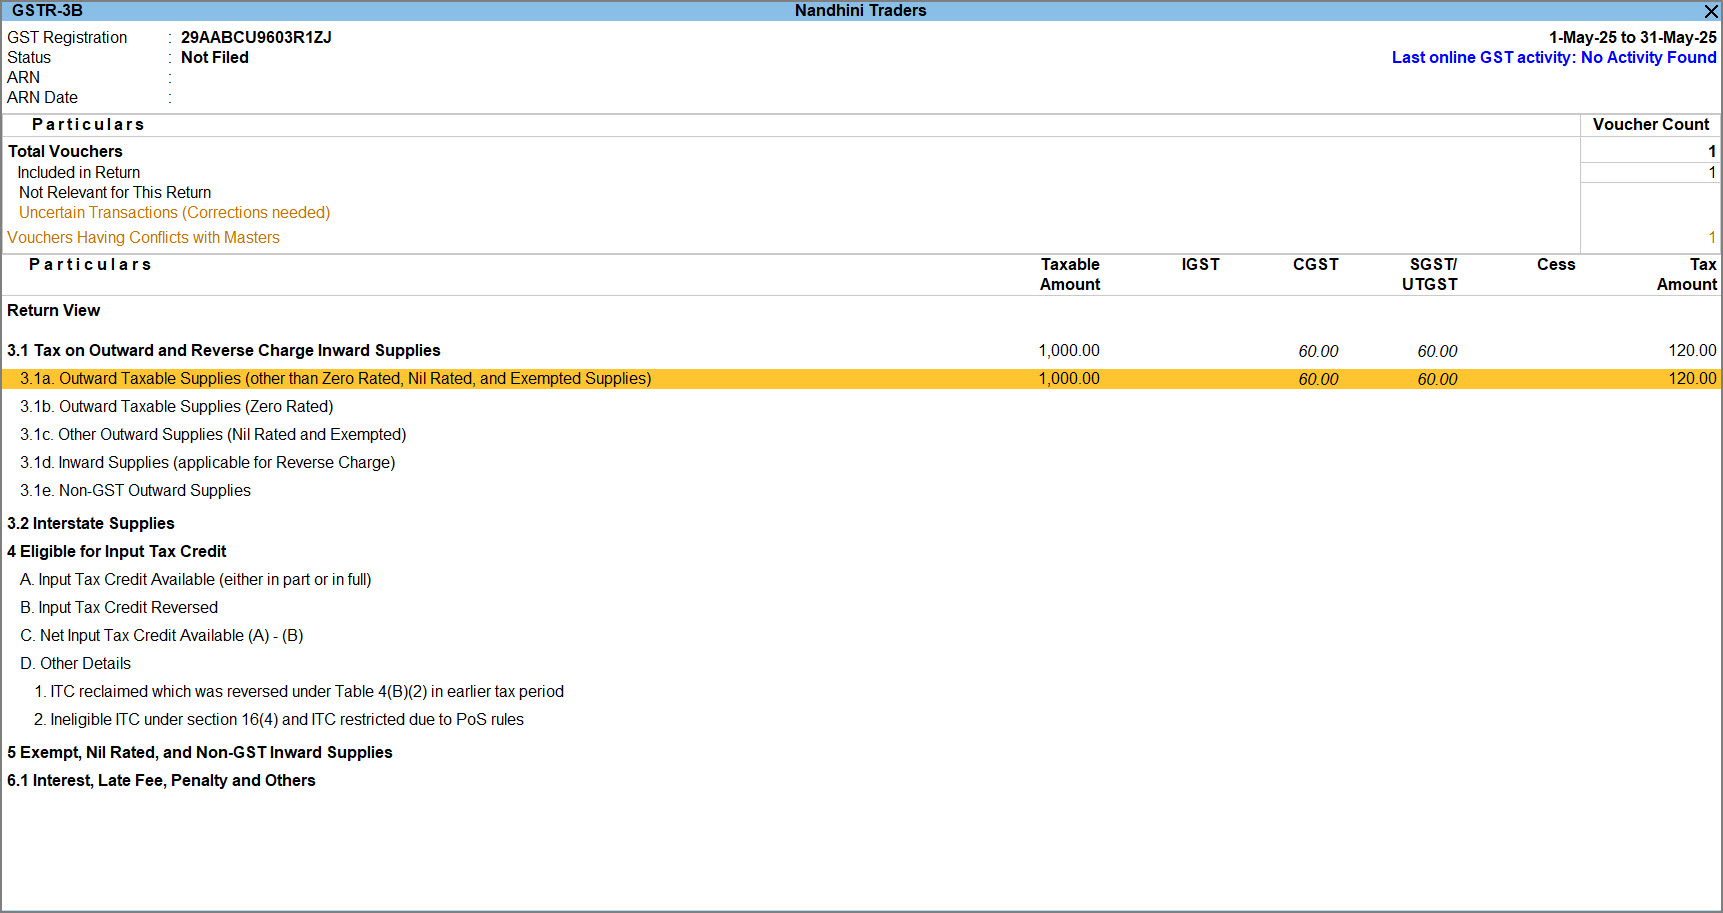
For example, you sold goods worth ₹5,000 but by mistake entered ₹4,000 in the invoice and collected 18% GST on ₹4,000 only. Now, there is a shortage of ₹1,000 in the taxable value. To correct this, record a Debit Note for ₹1,000 (along with the applicable GST) to increase both the taxable value and the tax amount accordingly.
-
Record a Debit Note.
-
Ensure that the following details are the same as you had used in the original Sales invoice:
– Party Ac/Name
– Ledger Account
– Stock Items or Service ledgers -
In the Amount field, enter the difference (₹1,000 in this case).
The GST Rate (for example, 18%) will remain the same as in the original invoice. -
Enter the difference amount for CGST and SGST, and add the figures as applicable.
-
Set the option Provide GST details to Yes, and select the appropriate Reason for issuing note.
The Debit Note appears in the Outward Taxable Supplies (other than Zero Rated, Nil Rated, and Exempted Supplies) section in the GSTR-3B report.

