
Data Migration & Data Corruption – FAQ
Data Migration – Release 7.0
Can I continue working on my data in the previous compatible version while migration is in progress?
If you are migrating from TallyPrime Release 2.1 or earlier or from Tally.ERP 9 Release 5.0 or later to the latest TallyPrime Release, you can continue working on your data in the previous compatible release.
Before starting the migration:
-
Press C to configure.
-
Set Allow working on data during migration: Yes to continue working on the previous compatible version when the migration is in progress.
If you have already started the migration process, you can opt for either of the following ways:
Option 1:
-
During migration, press Esc to stop the migration process.
-
Open the data in the previous compatible version, continue working and save your data.
In the Select Company screen, you will see your Company with Continue Migration status. -
Press Enter and select Yes to continue migration from the point you had stopped.
Option 2:
-
During migration, press Esc to stop the migration process.
-
In the Select Company screen, press Alt+Y (Data) > Configuration > Allow working on data during migration: Yes.
-
Select your Company with Continue Migration status, press Enter and select Yes to continue migration from the point you had stopped.
Once migration is complete, your data becomes compatible only with the latest TallyPrime release. If you try to save a transaction in the earlier version, TallyPrime will display an error message and automatically close the application to prevent data inconsistency. In such cases, you will need to record and save the transaction in the latest release.
If you are migrating from TallyPrime Release 2.1 or earlier or from Tally.ERP 9 Release 5.0 or later to the latest TallyPrime Release, you can continue performing most regular operations, such as:
-
Creating or modifying masters
-
Recording vouchers
-
Viewing and printing reports
However, avoid the following operations while migration is in progress, as they can cause data corruption or errors:
-
Data Split
-
Repair Data
-
Restore Data
These activities alter the data structure and may interfere with the migration process.
If you are migrating from TallyPrime Release 3.0 or later to the latest release of TallyPrime, wait for migration to get over and perform any activity only in the latest release.
If migration is cancelled or interrupted due to system restart or power failure, you can start the migration from where it stopped. In rare cases, if TallyPrime detects issues that prevent resuming from the same point, migration will restart.
If migration fails or continues to stop persistently, you may need to repair your company data in the previous compatible release before continuing with the migration process.
Data Migration from Release 2.1 or earlier to Release 6.0
It will convert all the sales voucher types that you have created under Sales voucher type, including the primary Sales voucher type.
To select a voucher type other than All Sales Voucher Types:
- Click on Configure from Migrate Company Data screen
- Move the cursor on Set ‘Numbering behaviour on insertion/deletion’ as ‘Retain Original Voucher No.’ for: and press Enter.
- From the list, you can select All Voucher Types or None instead of All Sales Voucher Types, depending on your needs.
If you are upgrading from TallyPrime 2.1 (or earlier) Non-EL versions to TallyPrime 5.1 Edit Log version, you will not have any access to the recent migration updates.
If you are upgrading from TallyPrime 2.1 (or later) Edit Log versions to TallyPrime 5.1 Edit Log version, you can access the recent migration updates.
After data migration:
- All the unreconciled GST transactions will get carried forward.
- All the unreconciled bank transactions, except those recorded before 180 days or more, will get carried forward.
The Opening BRS transactions dated prior to six months of the Reconciliation Beginning Date get deleted.
It is recommended to reconcile those transactions before migrating the data.
However, if you have already migrated the Company data, then you will need to add the Opening BRS transactions manually.
To know how to do it, refer to Set/Alter Opening BRS.
Data Migration – Release 3.0
This section lists some of the frequently asked question (FAQ) specific to Data Migration in TallyPrime Release 3.0.
The Company Number is 6 digits in TallyPrime Release 3.0 after migration to break the compatibility of of that data in the earlier TallyPrime release. However, data migration retains a copy of the 5 digit company data so that you can use the same in the supported earlier release of TallyPrime.
In a multi-user setup using TallyPrime, all client and server nodes must be updated to the latest release to ensure seamless data functionality and synchronization across all nodes. If you’re experiencing issues locating your company data, it’s advisable to upgrade your TallyPrime server license. For guidance on updating your server, please refer to the Update TallyPrime Server License topic.
In certain cases, after migrating company data from TallyPrime 2.1 to TallyPrime 3.0, you might encounter an issue where the data is not visible in TallyPrime 2.1. This occurs because TallyPrime 2.1 backs up the company data folder during migration, adding a suffix (migrated to 3.0) to the folder name. To make this data visible in TallyPrime 2.1, simply remove the added string (migrated to 3.0) from the data folder name.
-
- Gateway of Tally > F1 (Help) > About and press Enter.
About screen opens.
Under Data Information you can see Location of Company data.
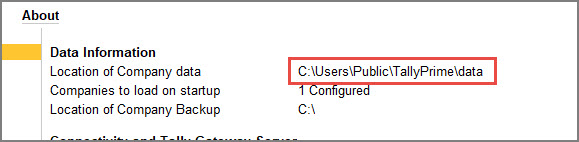
- Note down the company data location path and open it on the desktop.
- Rename the required company data folder by removing the string (migrated to 3.0).
- Gateway of Tally > F1 (Help) > About and press Enter.
Once removed, the company data will be visible in TallyPrime 2.1.
Yes. When you migrate your data to Release 3.0, TallyPrime retains a copy of the 5-digit company. You can continue to use this data in the compatible release of TallyPrime as you used to.
No, it is not mandatory to take a backup of the data while migrating to Release 3.0. Therefore, the option to take a backup before migration is set to No by default. However, as a recommended practice, TallyPrime allows you to also take a backup during migration. For more information, refer to the Data Migration topic.
By default, the company data is created under the same data folder that has the corresponding 5-digit company data.
Currently, TallyPrime does not allow setting or changing the path for the data during migration.
We are expecting an increase in the size of the migrated data in Release 3.0. Therefore, TallyPrime identifies the available disk space in your computer and analyses the required disk space for migration and backup. In case there is less disk space to migrate or backup the data, TallyPrime prompts you about the same during migration.
In this situation, you can ensure that the required disk space is available in your computer, before you migrate or back up the data. For more information, refer to the Low disk space during migration & backup section under the Data Migration topic.
Also refer to Recommendations for Data Migration for more information on recommended configuration,
Yes, all the existing edit logs for masters and transactions will be available in the migrated data. However, if TallyPrime identifies exceptions in any of the masters or transactions during migration, the edit log details for those masters and transactions are lost.
For more information on the impact on Edit Log due to migration, refer to the Impact of migration on Edit Log section under the Data Migration topic.
Yes. The experience of moving data from TallyPrime Release 3.0 to TallyPrime Edit Log Release 3.0 and vice versa remains the same as it was in TallyPrime Release 2.1.
Yes, TallyPrime allows you to migrate data also from Tally.ERP 9 and Tally 9 versions to TallyPrime Release 3.0. For more information, refer to the Migrate Company Data from Tally 5.4, 6.3 and 7.2 to TallyPrime section under the Data Migration topic.
During migration, the progress bar displays the count by considering deleted vouchers/masters, internal master types (such as Income Tax Classification) and so on, which are not part of the migration success screen.
The migration process creates some internal data, known as purpose data, for the company to ensure better performance of the GST-related reports and relevant Edit Log reports. Therefore, there is an increase in the size of the migrated data.
The process for migrating a group company is similar to how you migrated in the earlier releases. On migrating a group company, each member company gets migrated one after the other.
Depending on the total size of the member companies, it is recommended that you maintain sufficient disk space in your computer before migrating a group company.
This can happen due to the following reasons:
- One or more files from the company data folder is already in use. Ensure to close the files and check if the migration is progressing.
- One or more files from the company data folder are set as blacklisted for any antivirus software in your computer. Remove the files from the list, and check if migration is progressing.
- The company data folder has folder-level restrictions such as deletion, copy, read, and so on. Remove such folder-level restrictions from the company data folder and migrate the data again.
The latest release of TallyPrime makes your data migration experience seamless. Whenever you need to move from TallyPrime Release 3.0 to TallyPrime Edit Log Release 3.0, migrate your data similar to how you migrated from the earlier release of TallyPrime. For more information, refer to the Data Migration topic.
Once you have started migrating the data, you will not be able to stop the migration process. Attempting to force migration to stop during the process might damage the data.
If you are migrating to the latest release of TallyPrime, it is always recommended to take a backup of the data. It helps in accessing your backed up data, incase there is a problem while migrating the date.
If your company data is not opening in TallyPrime and some file extensions are appearing as 1800, it indicates that the data was accessed in a higher version of TallyPrime. This updated file format is incompatible with older versions.
To resolve this:
- Ensure Data Compatibility: Check the TallyPrime version that you are using. Ensure that you upgrade to TallyPrime Release 3.0 or later, to access and modify the data without altering its compatibility.
- Restore a Backup: If you have a backup of the company data taken before sharing it with the auditor, restore the backup and reopen it in your version of TallyPrime.
To avoid this issue in the future, ensure all users accessing the company data are using the same or compatible versions of TallyPrime.
No, the vouchers or masters that are part of the exceptions report do not participate in the books of accounts. Once you have resolved the exceptions in those masters and vouchers, they will start appearing in your books of accounts.
To capture any exception in data while importing or synchronising:
- Press Alt+O (Import) > Configuration > and set Behaviour of Import when Exceptions exist to Record Exceptions and Import.
Yes. In any of the exceptions report, press Ctrl+H (Change View) > select Exception-wise and press Enter.
- In the Sync Exceptions report, you can also press F4 (Rule) > select the Rule (such as Master Rule, Transaction Rule, or All Rule Types) to view the exceptions specific to the selected rule.
Vouchers and masters that are part of the exceptions report do not participate in your financial reports and Books of Account, until they are resolved.
No. Vouchers and masters that already are part of any exceptions report cannot be exported to another machine. The same is also applicable in case of data import.
What happens to my edit log data for a master/voucher after it becomes part of the exception report?
Once a master/voucher becomes part of the exception report, TallyPrime erases any previously available edit log information for the same. Once you resolve the exceptions, TallyPrime will create a log for resolving the master/voucher as Created due to Data Resolution.
Once a master/voucher becomes part of the exception report, TallyPrime erases any previously available edit log information for the same. Such masters/vouchers may no longer be authentic and reliable according to the company rules. Once you have resolved the exceptions, these masters/vouchers can continue to participate in the Books of Accounts with any new edit log, as and when applicable.
Recording of data exceptions are currently supported for the Repair, Migrate, Sync and Import features. We will consider recording data exceptions during Split in a future release.
TallyPrime will record all exceptions during Import, if the imported data does not follow the rules and configurations set for the Company, such as Books beginning date, Zero-valued transactions, and so on.
You can easily resolve this exception by addressing the mismatch in the voucher by altering the values as required and resaving the voucher.
- Gateway of Tally > press Alt+Y (Data) > All Exceptions > Repair/Migrate.
Repair/Migrate Exceptions screen opens. - Select Mismatch in total amount between Credit and Debit entries and press Enter.

- Drill down to the list of vouchers and open the required voucher.
- Address the mismatch in debit and credit entries and save the voucher.
The exception will be resolved.
If you are using older releases of Tally (such as 5.4, 6.3, and 7.2), you cannot migrate your data directly to TallyPrime. You will have to first migrate your data to Tally.ERP 9, and then migrate to TallyPrime.
To migrate the data from Tally 5.4/6.3/7.2 to Tally.ERP 9, and then to TallyPrime, follow the steps shown below:
- Take a backup of the Tally 5.4/6.3/7.2 data by following the required backup process.
- Copy the required company folder of 5.4 or 6.3 or 7.2 to Tally.ERP 9 data folder.
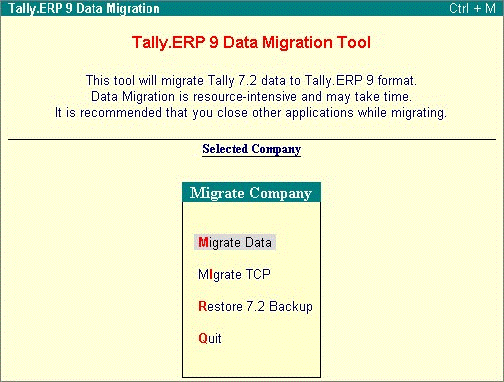
- Start the migration tool (tally72migration.exe) from the location where it is available. You need to download the tool from Tally Solutions website.
- Select Migrate Data in the Tally.ERP 9 Data Migration Tool.
- Enter the company data path in the Directory field, and select the company in the Name field.
- Press Enter when the Rewrite? message appears.
- Press Enter when the message Backup before rewriting? appears. The data is backed up before being rewritten to Tally 7.2 format for migration.
- Press Enter when the Migrate? message appears.
- On successful migration, the message Migration Completed, Check Statistics appears. Compare the statistics and ensure that data migration is complete.
Note: The migrated company number is prefixed with an additional 0 and appears in five digits. When you open the data in the latest release of Tally.ERP 9, you will be prompted to migrate to Release 6.x. Press Enter to migrate.
- Copy the data folder migrated to the latest release Tally.ERP 9, to the TallyPrime data folder.
- Open TallyPrime. Press Alt+F3 (Select Company) to open the List of Companies. You can see the status Migration Required against the migrated company folder, which you had copied from Tally.ERP 9 data folder.
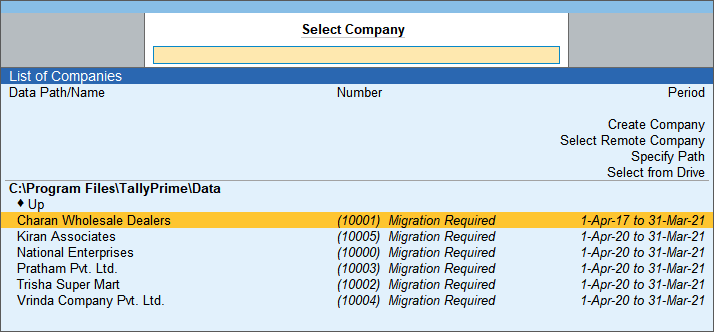
Alternatively, you can also migrate your data by pressing F1 (Help) > Troubleshooting > Migrate. - Select this company and press Enter. If the company has a username and password, you will be asked to enter the details.
- Press R (Migrate) to continue. If you want to alter the backup path and data location before migrating, then press C (Configure).
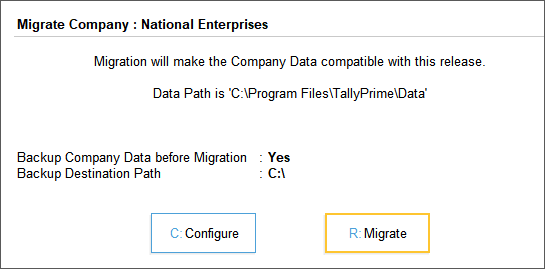
After migration is complete, your company data is ready to be used in TallyPrime.
A group company created in Tally 7.2 cannot be migrated to TallyPrime. It is suggested to migrate the individual companies to TallyPrime, and then group them once again in TallyPrime to create a group company. However, it is advised to take a backup of the data before migrating.
Customisation done in Tally 7.2 will not work in TallyPrime. You need to migrate the customized programs to a format that is compatible with TallyPrime. To migrate the program files (.tcp files) follow the steps given below:
- On installing TallyPrime in the existing folder the .tcp will automatically get converted to a format compatible with TallyPrime.
Or
Start TallyAdmin tool. - Click File Format Conversion.
- Select TCP (Tally Compliant Format).
- In the Source File(s) specify the path and filenames.
- Click Convert.
The specified file is converted to new format compatible with TallyPrime, and the original file is retained as backup with .bak extension.
Or
In case the customized programs have an extension .txt, it is suggested to mention the correct path in Load selected TDL files on startup in TDL Configuration screen.
Do the following before commencing data migration:
- Ensure that tally9.exe and tally72migration.exe are available in the same folder.
- Close all other applications that are open before commencing migration.
- Go to File menu in Internet Explorer and uncheck the option Work offline.
- Scan for virus on the system.
- In case the data size is too large it is advisable to use a system with higher configurations.
- Disable real time protection on your anti-virus software.
To resolve this problem, in the stock item alteration screen, select the costing method as FIFO Perpetual, also match the Unit of measure and Godown.
Reason
This error occurs when the Unit Symbol is altered to numeric/alphanumeric. For example, Nos to Nos1 or Kgs to KgsA (Gateway of Tally > Alter > Units).
Solution
Follow the steps given below to resolve this issue.
- Create a new company in Tally 5.4/6.3/7.2 (for the same financial year and with features similar to that of the migrating company).
- Export the Masters and Vouchers, and import them to the newly created company.
- Migrate the newly created company data to Tally.ERP 9 and then to TallyPrime.
Reason
This error might occur during data migration.
Solution
Increase the screen resolution by following the steps given below:
- Right click the desktop.
- Select Properties.
- In the Display Properties window, click Settings tab.
- Increase the Screen resolution to 1366 x 768.
The time taken to migrate the data depends on various factors such as the number of vouchers and masters, the RAM capacity and disk space on your computer, other applications running simultaneously during migration, and so on. If your data size is large, migration may take longer than usual. It is recommended that you migrate your data during non-working hours or over the weekends to avoid disruptions to your business operations during working hours. Refer to Recommendations for Data Migration for other best practices for migration.
To disable offline synchronisation in Microsoft Windows:
- Go to Control Panel > Sync Center.
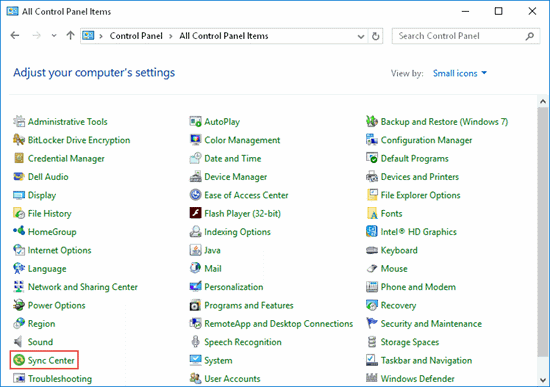
- Click Manage offline files.

- Click Disable offline files in the Offline Files.

- Click OK to save the settings.
Data path in client system can be changed when data path in server system is changed.
While loading Tally in client system, if no companies are available on disk:
- Check if data is shared from the server machine.
- Check whether the user in client system has rights to access the data folder.
- Check the data path configured in client system.
To configure the data path
- Share the data folder from the server system. Provide full permission to access the data folder. Click here to view the data sharing process.
- Go to Start > Run > type Server system name/ip followed by (i.e back slash) and press Enter. The folders which are shared from server machine will appear.
- Open respective Tally data folder and copy the address path.
- Load TallyPrime in client machine, and press Alt+F1 (Help) > About > under Data Information, select Location of Company data and press Enter.
- Change the data path by providing the new data path.
- Press Enter to view the updated data path.

- Press Esc to save.
If you have migrated your data to TallyPrime, you cannot open the same data using an earlier release of Tally. Therefore, it is recommended that before migrating your data, take a backup or copy of your data and open the backed-up data in the earlier release, if needed.
Cause
This error occurs when data from a higher release of TallyPrime is loaded in a lower release.
Solution
Load the data in the same release of TallyPrime that was used earlier. We recommend that you download the latest release of TallyPrime, install it in a new folder, reactivate, and restore the data backup.
Cause
This error appears while splitting company data when a third-party software is used for data backup, and .tsf files are saved by this third-party application for backup.
Solution
Add the .tsf files in the exclusion list of the data backup software.
Note: Contact your system administrator to add files to exclusion list.
Upgrade to TallyPrime and repair your data to resolve this issue.

The data may display Repair Required, as shown below:
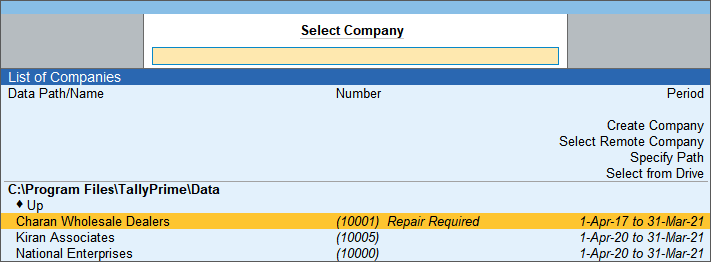
Press Enter on the data > click Yes, to Repair. The data will be repaired.
Solution
Backup the current company data and repair.
Data from Tally 4.5 has to be migrated to Tally 7.2, then to Tally.ERP 9, and then to TallyPrime. The tools required to convert data from 4.5 to 7.2 are available on the Tally website.
Procedure for converting data from Tally 4.5 to TallyPrime involves the following steps:
- Converting the data of Tally 4.5 to Tally 7.2 compatible data, using Tally 4.5 to Tally 7.2 data conversion utility.
To download data conversion utility: Go to Tally website from dropdown select ‘Data Conversion Utility – Tally 4.5 to Tally.ERP 9‘ and click on Install - Migrating the Tally 7.2 compatible data to Tally.ERP 9, using Tally 7.2 data migration utility.
To download migration utility: Go to Tally website click on Migration Tool under Download Support Files
Convert data from Tally 4.5 to Tally 7.2
- Download Tally 4.5 data converter utility.
- Run the Convert45to72.exe and extract the files (WCVTALLY.EXE, TW45250.DLL, and CNVTALLY.DAT) to Tally 4.5 application folder.
- Double-click the file WCVTALLLY.EXE (the icon will be identical to Tally Icon). The Company Info screen appears. (You can also execute this file from the command prompt click Start > Run > type C:WCVTally.EXE C:)).
- Select the company to be migrated.
- Click Yes in conversion confirmation message.
Note: The Conversion utility will run in black and white only (even if you have a colour monitor).
Migrate Tally 7.2 compatible data to TallyPrime Data
- Install Tally.ERP 9 and TallyPrime.
- Download the tally72migrate.exe from Tally website, copy it to the Tally.ERP 9 application folder.
- Double-click the tally72migrate.exe. The utility will launch the Tally Data Migration Tool and Tally.ERP 9.
- Select Migrate Data in the Migration Company screen.
- Specify the directory where Tally 7.2 compatible data (Tally 4.5 converted data) is located in the field Directory.
- Select the company to be migrated from the List of Companies.
- Click Yes in the message displayed to start migration. The status of migration from Tally 7.2 to Tally.ERP 9 is shown in the Migration Messages pane.
- Press any key in the Migration Completed Check Statistics message. A Congratulation message appears confirming completion of data migration.
Note: If any error occurs during migration, it gets logged into migration.err file, which is automatically generated in Tally.ERP 9 application folder.
The migrated company is by default saved in the directory which was specified in the directory field (refer point 5 above). The migrated data folder is prefixed with a 0 and appears as a 5-digit number. For example, if the company folder number before migration was 0099, after migration it would be 00099.
- Now your migrated data is ready to be migrated to TallyPrime.
Note: If you want to migrate Tally 4.5 data to Tally 9, the process is same. Instead of installing Tally.ERP 9, install Tally 9 and follow the above process.
- Copy the data folder migrated to Tally.ERP 9 to TallyPrime data folder. Migrate the data to TallyPrime.
Cause
While migrating data from 6.3 or earlier releases, this error may occur when you enter strings other than numerals in the Value Basis field under Additional Accounting Entries in the Voucher Type Class screen.
Solution
Open the company where this error occurs, and correct the data entered in the Value Basis field in the Voucher Type Class screen.
This will fix all the XML import errors that occur while importing, migrating, or synchronizing data.
This error appears on the client machine.
The tmessage.tsf error appears as shown below:
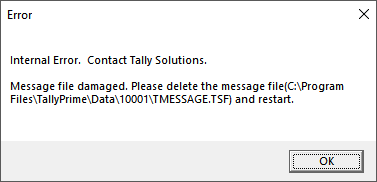
Solution
- Ensure that all the files/subfolders in the data folder are given full access to relevant users.
- Allow full access permission to all the users (working on TallyPrime).
- Check the network connectivity.
The table below shows the list of files which are part of the database structure used in TallyPrime, along with a brief description or function of the respective data file.
Company
| Tally 5.4/6.3/7.2 | Tally 9/Tally.ERP9/TallyPrime | TallyPrime 2.1 | TallyPrime 3.0 |
|---|---|---|---|
|
Company.500 CmpSave.500 |
Company.900 CmpSave.900 |
Company.900 AddlCmp.900 CmpSave.900 |
Company.1800 AddlCmp.1800 CmpSave.1800 |
| Company information, for example, Company profile Security control information and F11 features. |
Masters
| Tally 5.4/6.3/7.2 | Tally 9/Tally.ERP9/TallyPrime | TallyPrime 2.1 | TallyPrime 3.0 |
|---|---|---|---|
| Manager.500 | Manager.900 |
Manager.900 LinkMgr.900 |
Manager.1800 ExtMngr.1800 LinkMgr.1800 |
|
In TallyPrime 3.0, Manager file contains master accounting information. ExtMngr contains edit log information and also information to aid in dependency recomputation. Link masters information, such as, Bill wise details, Order reference, and so on. |
Transactions
| Tally 5.4/6.3/7.2 | Tally 9/Tally.ERP 9/TallyPrime | TallyPrime 2.1 | TallyPrime 3.0 |
|---|---|---|---|
|
Tr01263.500 Tr01264.500 Tr01265.500 Tr01266.500 TrnLots.500 TrnOrds.500 TrnRefs.500 TrnTNos.500 |
TranMgr.900 LinkMgr.900 |
TranMgr.900 TranInf.900 |
TranMgr.1800 |
|
Contain transactions information including purpose related info User and Third Party to aid in stat related reports. TranInf file contains information to voucher numbering history. |
Summary/Secondary Transactions
| Tally 5.4/6.3/7.2 | Tally 9/Tally.ERP9/TallyPrime | TallyPrime 2.1 | TallyPrime 3.0 |
|---|---|---|---|
| SumTran.900 | SecTran.1800 | ||
| In TallyPrime 3.0, SecTran file persists the records corresponding to Summary Transactions, Exchange Activity, Export Summary, and Return Transactions. | |||
Configured Reports
| Tally 5.4/6.3/7.2 | Tally 9/Tally.ERP9/TallyPrime | TallyPrime 2.1 | TallyPrime 3.0 |
|---|---|---|---|
| CfgRept.900 | CfgRept.1800 | ||
| Used to store Report Configurations (used when Save View is performed). | |||
Aggregates
| Tally 5.4/6.3/7.2 | Tally 9/Tally.ERP 9/TallyPrime | TallyPrime 2.1 | TallyPrime 3.0 |
|---|---|---|---|
| Aggr.1800 | |||
| Used for storing aggregate information (key and accumulated value used for precalculated values for stat related reports). | |||
Status
| Tally 5.4/6.3/7.2 | Tally 9/Tally.ERP9/TallyPrime | TallyPrime 2.1 | TallyPrime 3.0 |
|---|---|---|---|
|
VchStatus.1800 StatStatus.1800 |
|||
| Used for storing voucher status and statutory information status (for example applicability) for instant reports. | |||
Tally State Files
State File
| Tally 5.4/6.3/7.2 | Tally 9/Tally.ERP9/TallyPrime | TallyPrime 2.1 | TallyPrime 3.0 |
|---|---|---|---|
| MsgKeep.TSM | TSTATE.TSF | TSTATE.TSF | TSTATE.TSF |
| State of the Database. | |||
Message File
| Tally 5.4/6.3/7.2 | Tally 9/Tally.ERP9/TallyPrime | TallyPrime 2.1 | TallyPrime 3.0 |
|---|---|---|---|
| TMESSAGE.TSF | TMESSAGE.TSF | TMESSAGE.TSF | |
| Message queue for updating Database. | |||
Intent Message File
| Tally 5.4/6.3/7.2 | Tally 9/Tally.ERP9/TallyPrime | TallyPrime 2.1 | TallyPrime 3.0 |
|---|---|---|---|
| TINTMSG.TSF | |||
| Message Queue for special operations like recomputation. | |||
Access File
| Tally 5.4/6.3/7.2 | Tally 9/Tally.ERP9/TallyPrime | TallyPrime 2.1 | TallyPrime 3.0 |
|---|---|---|---|
| MsgRead.TSM | TACCESS.TSF | TACCESS.TSF | TACCESS.TSF |
| Provides access to synchronization among multiple clients. | |||
Exclusive Access File
| Tally 5.4/6.3/7.2 | Tally 9/Tally.ERP9/TallyPrime | TallyPrime 2.1 | TallyPrime 3.0 |
|---|---|---|---|
| Exclusv.TSM | TEXCL.TSF |
TEXCL.TSF TUPDATE.TSF |
TEXCL.TSF TUPDATE.TSF |
|
For synchronising access to data among multiple clients for exclusive operations (like migration/repair/split, and so on). Used for recovery when product terminates abruptly during any transaction (Rollback). |
|||
Query
Record Insertion Failure in database error occurred while loading a company/saving a voucher in TallyPrime. How to avoid this in future?
Solution
When this Record Insertion error is displayed, it is suggested that you follow the steps given below:
- Backup your data.
- Press Alt+F1 (Help) > Settings > Startup > set Load companies on startup to No.
- Perform a simple repair by pressing Ctrl+Alt+R.
Alternatively, you can press Alt+F1 (Help) > Troubleshooting > Repair. - In case the problem persists, it is suggested to perform a Zero command rewrite.
- We suggest an upgrade to latest release.
- In case the problem persists contact Tally Support.
Cause
This message is displayed while repairing the data.
Solution
While repairing the data, check if there is sufficient space in the hard disk or any external drive where the data is located.
Note:
The minimum free space required while repairing the data should be double the size of the data. For example: If the data size is 4 MB, then the free space available should be at least 8 MB.
It is recommended to repair the company data stored in a local disk, rather than the data stored in an external drive.
Accessing TallyPrime data from external drivers is very slow because there might be differences between the USB ports.
The USB ports USB 3.0 is 10 times (572 megabytes per second) the speed of USB 2.0 (57 megabytes per second). However, in order to get better speed, plug your USB 3.0 device into a USB 3.0 port. If the port is 2.0, and the device 3.0, than the speed will go down from 572 MBps, to 57MBps (and vice versa). This means USB 2.0 and USB 3.0 are compatible with each other, but you will just get slower speed when you are using a combination of them, and not just 3.0.
The speed of USB 3.0 also provides more power to devices that require higher amount of power to operate. It can provide 50% more power than USB 2.0 does through the cable itself. USB 3.0 reduces the time required for data transmission. Hence, the data processing becomes faster compared to the USB 2.0, and may differ from one to another i.e. USB 2.0 and 3.0, in terms of power and speed.
For more information on USB 3.0 visit https://www.usbgear.com/
Query
How to handle the error – Data path specified for more than one Tally.ini, displayed on clicking the tally72migration tool?
Solution 1
The error may be due to multiple data paths in the file, Tally.ini. Steps to remove additional data paths:
- Go to Tally application folder.
- Open the file, Tally.ini (file type is Configuration settings).
- Delete the second data path/location of data files, if any (not the primary data path).
- Save the Tally.ini file.
Solution 2
Change the settings for Default Companies in the file, Tally.ini. Steps to change the settings:
- Go to the Tally application folder.
- Open the file, Tally.ini.
- Set Default Companies to No.
- Save the Tally.ini file.
- Load the migration tool again.
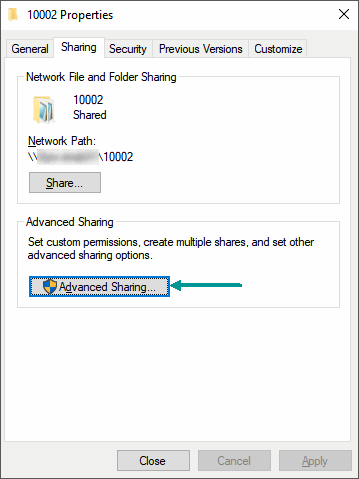
To ensure data is not shared with client systems in offline mode, you can disable caching of shared folders.
- Right-click the data folder and select Properties.
- Navigate to the Sharing tab, and click Advanced Sharing in the data Properties window as shown below:
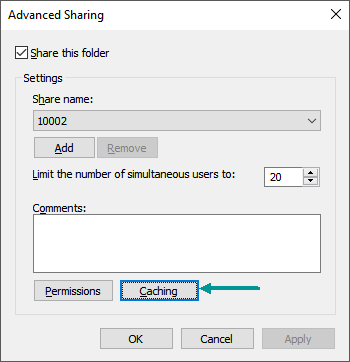
- Click Caching in the Advanced Sharing window as shown below:
- Select the option No files or programs from the shared folder are available offline in the Offline Settings window as shown below:
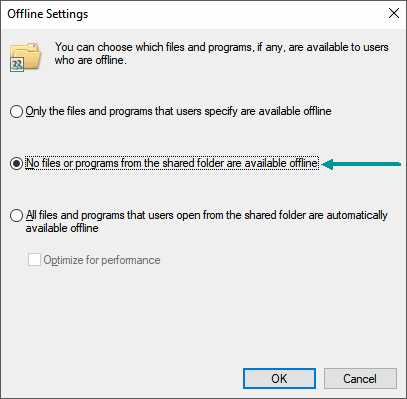
- Click OK to accept the settings.
Cause
This message appears if you try to split the company data when TallyPrime is in Educational Mode.
Solution
Configure your existing license or reactivate your license.
Cause
This error occurs when the backup process is not completed properly, leading to a partial or incomplete backup file, or when the disk (external drive) containing the backup file is corrupted. Further, due to limited space on the external drive, only a part of the backup may be saved on the file.
Solution
Click Yes in the error message to recover data. In case the recovery process is not successful,
- Restore an earlier backup file and re-enter any missing data.
- Contact Tally Solutions with the data. In case the data is recoverable, the recovered data will be sent to you.
Malware slows down your computer and corrupts the data. Such data cannot be recovered. If you have the system backup, you can restore it, and check if it can be used.
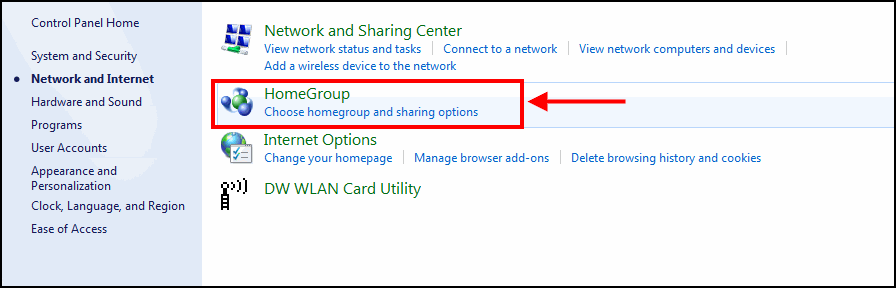
In one particular system data is not getting shared/displayed. The system could be a laptop which has not been configured to the same domain. If there is mismatch between the domain, the data won’t get shared. To resolve this:
- From desktop, click on Start > Control panel > Network and Internet.

- Click on Home Group.
- Click on Change advanced sharing settings.
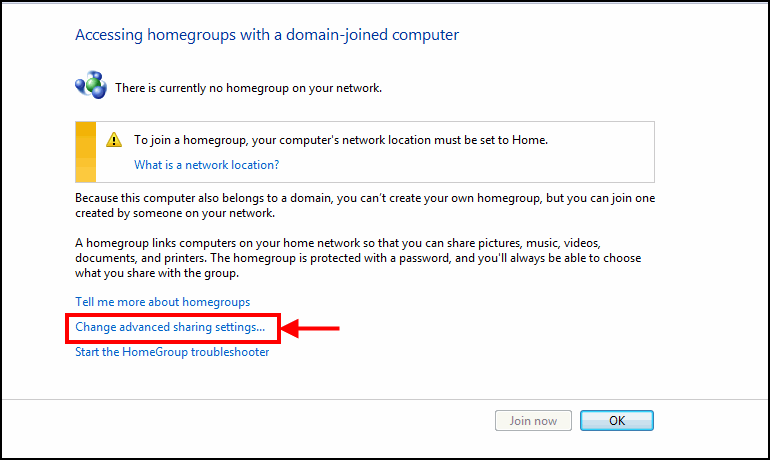
- Under Domain, select Turn off the password protected sharing.
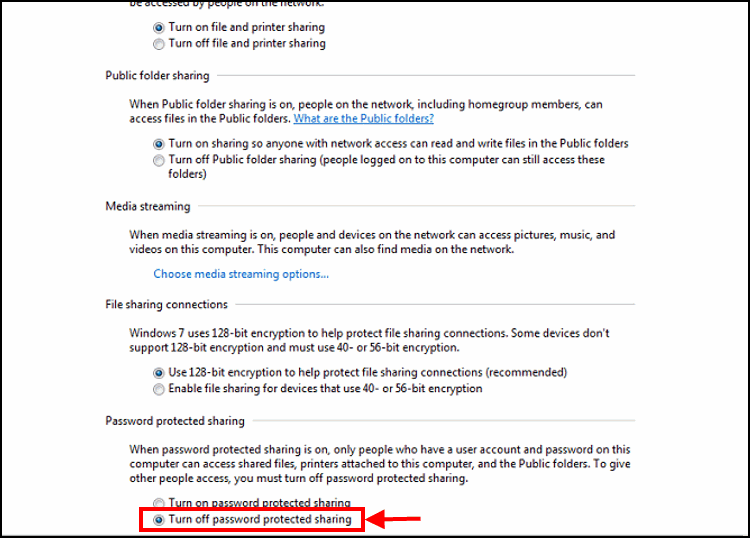
- Click on Save Changes and re-login to system. Now you will be able to share/display the data.
It is suggested to restore the earlier data backup and continue working. In case the backup restored is up to an older date, the data until the current date needs to be updated manually. In case you do not have a backup, we recommend that you start taking a backup every day.
Checking for bad sectors on hard disk helps you identify sections of hard disk that are not being utilised for storing data, and is wasted. Proper data on hard disk space usage will help you manage your data better and system to perform read write functions effectively.
- Open command prompt.
- Enter chkdsk on the command prompt screen.
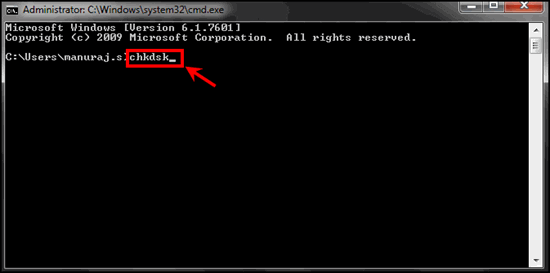
- Check the amount of space (KB) in bad sectors.
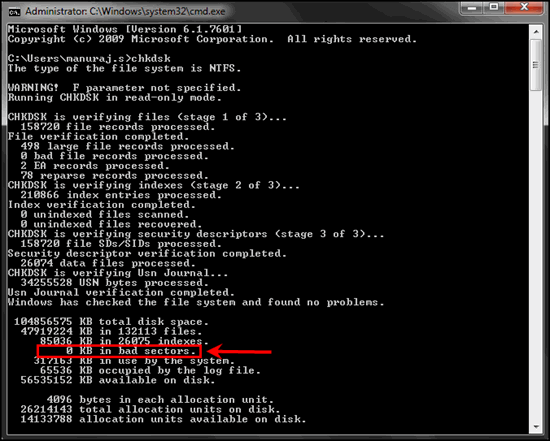
- De-fragment the hard disk based on the results in the report, if required.
Note: Ensure system backup is created before performing de-fragmentation.
Cause
This error appears during data backup process if the destination hard disk or drive is affected with virus.
Solution
Scan the hard disk or drive and check.
Cause
This error appears while opening a company, if the file size of TranMgr.900 is 1 KB.
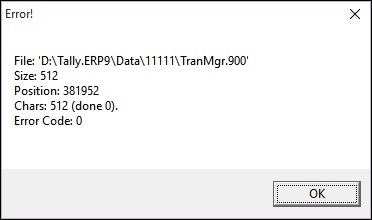
You will not be able to use this data.
Solution
The company will open only when the file size of TranMgr.900 is more than 1 KB, depending on the data entered.
Restore the data backup taken earlier and check the file size of TranMgr.900. If it is more than 1 KB based on the data entered, you can open the company. If not, try to restore the data backup taken prior to that.
Deletion of Files in Data Folder
Cause
- A system process is deleting data files.
- Virus.
- Manual deletion by a user.
Solution
The solution for this issue is to enable system audit, which will help the system admin to identify the reason for deletion.
- Open Control Panel in the system, and navigate to Administrative Tools.
- Open the Local Security Policy.

- Expand Local Policies appearing on the left side > click Audit Policy.
- Double click the Audit object access which appears on the right side.
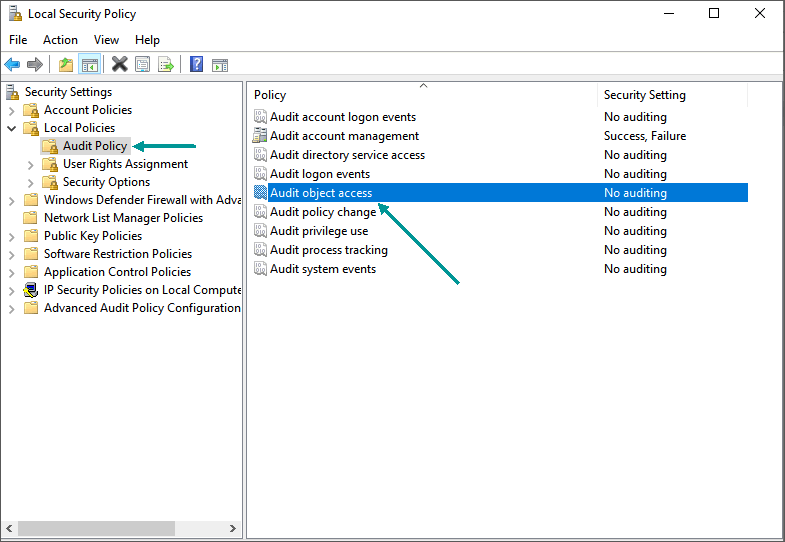
- Enable Success and Failure as shown below.

- Click OK to save the changes.
- Right-click the TallyPrime data folder. Select Properties. Go to Security tab and click Advanced as shown below:
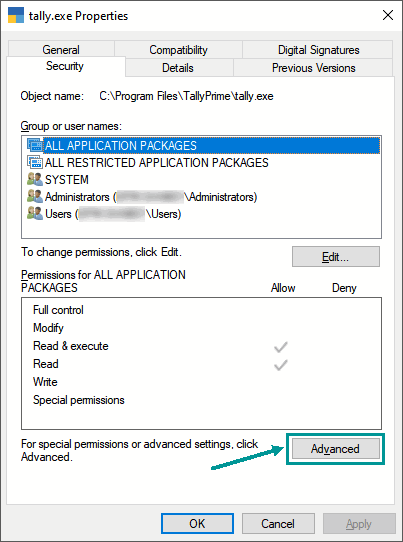
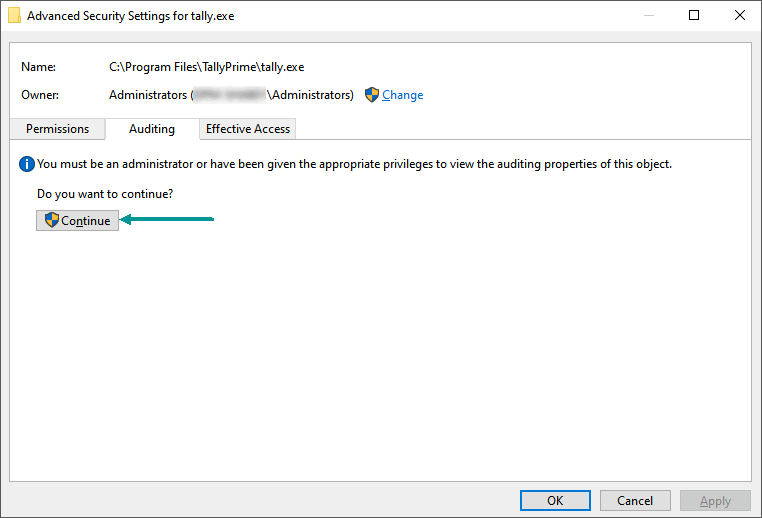
- Go to Auditing tab, and click Continue as shown below:
- Click Add.

- Click Select a principal.

- Type Everyone > click Check names. You will see that the word Everyone will get underlined.

- Click OK.
- Auditing entry for data screen opens. Click Show advanced permissions.
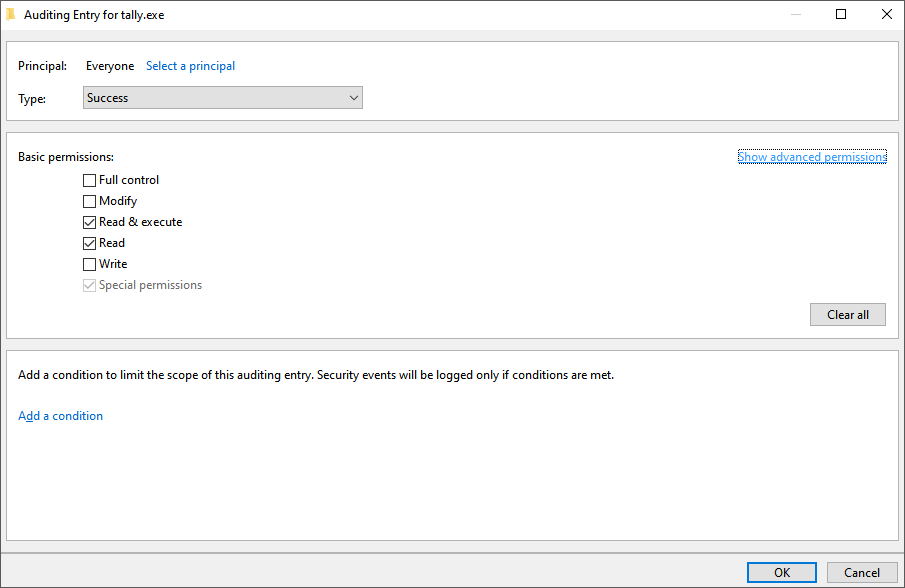
- Select the options as shown below:
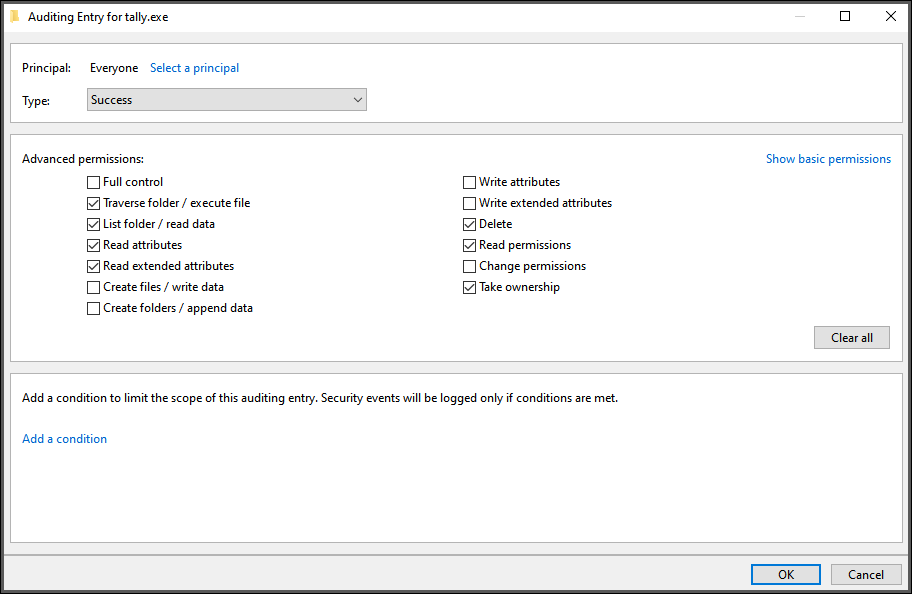
With this configuration, all the users will be disallowed from deleting the data files.
Further, to find out the reason for deletion of any data file, right click on My computer. Click Manage. Expand Event Viewer appearing on the left side. Select Windows Logs > under Windows Logs select Security as shown below:
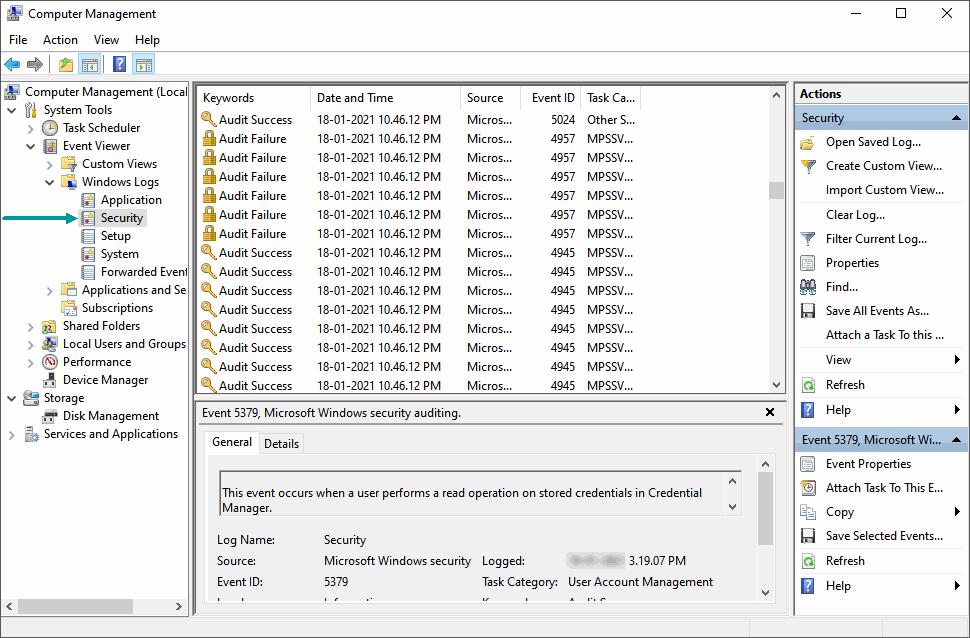
You can keep the cursor on the bottom part of the screen and press Ctrl+F. In the Find window that opens, paste the data path for which you have enabled audit and click on Find Next as shown below:

The search result will display the details of deletion.


