Banking – FAQ
This topic provides few FAQ related to Banking, e-Payments, and Post-Dated Cheque management in TallyPrime.
General
You can enter the details of more than one beneficiaries while creating a party ledger.
- In the bank ledger, set Provide bank details to Yes.
- In the Bank Details for party, press F12: Configure > enable Allow multiple beneficiary details.
- Enter multiple beneficiary details by specifying the Ref. ID with other details.
- Accept the master.
TallyPrime currently does not support adding details of more than one bank for a party in a party ledger.
Yes, you can change the bank details of the party while creating the voucher. For example, you can change the IFS code.
During voucher creation, in the Bank Allocations for screen, press F12: Configure.
- To enable the Inst. no. field, set Show inst. No. during voucher creation to Yes.
- To enable the Ref. ID field, set Show Ref. ID to Yes.
The Inst. no. and Ref. ID fields appear in the Bank Allocations for screen.
Restart Tally Gateway Services, if TallyPrime does not respond, slows down, or has performance issues while recording receipt or payments using bank ledger.
- Take a backup of your Company data.
- Remove tally.oif file from the capsule folder that is available in the TallyPrime installation folder.
- Edit the name of the existing bank ledger.
In TallyPrime, there is no feature to automatically generate a list of banks when entering a receipt voucher. The available bank names in a receipt voucher are sourced from the bank ledgers that have been created under the Bank Accounts Group. These bank names are available as a list to support features such as cheque printing, Automatic Bank Reconciliation (BRS), e-Payments, and more.
Bank Ledger Configuration
While altering a bank ledger, the cursor skips the Bank Details section as the required information is available. However, if you want to make changes to the bank details, press Backspace to move to the respective bank details fields and make the required change.
- Press Alt+G (Go To) > Create Master > type or select Ledger > and press Enter.
- Set/Alter Bank configuration: Yes.
- In the Bank Configuration screen, Set/Alter Auto Reconciliation configuration: Yes.
- Set the Default Voucher Type for voucher creation from Bank Statement.
- Deposits: Receipt.
- Withdrawals: Payment.
- Provide separate default voucher type for Cash/Interbank transactions.
To set a default voucher numbering series, follow the steps given below:
- Press Alt+G (Go To) > Create Master > type or select Ledger > and press Enter.
Alternatively, Gateway of Tally > Create > type or select Ledger > and press Enter. - Set/Alter Bank configuration: Yes.
- In the Bank Configuration screen, Set/Alter Auto Reconciliation configuration: Yes.
- Voucher numbering series: Specify the voucher number series that should be used for recording payment transactions, if needed.
To know more, refer to Voucher Numbering.
To set the transfer mode limits for e-Fund transfers:
- Press Alt+G (Go To) > Create Master > type or select Ledger > and press Enter.
Alternatively, Gateway of Tally > Create > type or select Ledger > and press Enter. - Set/Alter Bank configuration: Yes.
- In the Bank Configuration screen, Set/Alter Transfer Mode details for e-Fund Transfer: Yes.
- Enter the From and To amounts against each mode.
Based on the entered amounts, the transfer mode will get applicable when you record e-Payments. - Preferred Mode: Select the preferred transfer mode.
This option is useful in case of overlap in the From and To amounts entered against the transfer modes.
So, when more than one transfer modes are applicable to a specific amount, then the preferred transfer mode gets selected.
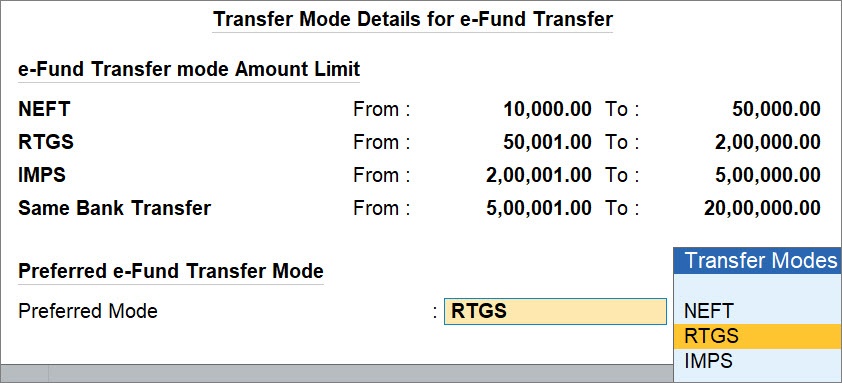
- Press Ctrl+A to save the configuration.
To configure auto-reconciliation with Exact Matches:
- Press Alt+G (Go To) > Create Master > type or select Ledger > and press Enter.
Alternatively, Gateway of Tally > Create > type or select Ledger > and press Enter. - Set/Alter Bank configuration: Yes.
- In the Bank Configuration screen, Set/Alter Auto Reconciliation configuration: Yes.
- Identify Exact Matches for Reconciliation:
- While Importing statement: Yes.
The exact matches will be identified when you import the statement. - While Importing statement as well as Saving Voucher: Yes.
The exact matches will be identified when you import the statement. Moreover, if the statement is already imported and you are creating a voucher that matches one of the transactions in the imported, then the exact match will be identified.
- While Importing statement: Yes.
- Automatically Reconcile Exact Matches found: Yes.
In the Ledger Creation/Alteration screen, you can view transactions that are a part of your opening BRS. Moreover, while altering a ledger, you can add a transaction to the opening BRS, or even alter a transaction that is a part of the opening BRS.
- Set/Alter Bank configuration: Yes.
- Set/Alter Opening BRS: Yes.
This option is available only during ledger alteration. - Press Alt+L (Update Opening BRS).

- Enter the details of the transaction.
- Date: Enter the date of transaction.
This date should be before the Reconciliation Beginning date. - Particulars: Enter the ledger name.
- Nature of Transaction: Select Deposit or Withdrawal, as applicable.
- Transaction Type: Select from the list of transaction types.
- Remarks: Enter the remark, if needed.
- Deposit/Withdrawal: Enter the Amount.
- Instrument No.: Enter the Instrument No., as applicable.
- Instrument Date: By default, this is prefilled, based on the entered Date.

- Date: Enter the date of transaction.
- Press Ctrl+A to save the configuration.
Import Bank Statement
You might not be able to import a Bank Statement for several reasons.
However, there are few steps that you can follow to resolve the issue:
- Ensure that you have selected a Bank Name in the respective bank ledger.
- If your Bank Statement is in the CSV format, then try to resave it. If you have any version of CSV, which is different than CSV (Comma delimited) like CSV UTF-8, CSV Macintosh, or CSV MS-DOS, then try to resave it into the CSV (Comma delimited) format.
- If your Bank Statement is in the Excel format, then try to resave it or if the file is in an older format of Excel like Excel 97-2003 workbook (.xls), .xlsb, .xlsm, then try to resave it in the Excel workbook (.xlsx) format.
- If you are getting an error that the bank statement is already open, then follow the steps given below:
- At the end of your file name, add -imp, and then import.
For example: If your file name is file.csv, then rename it as file-imp.csv. - While selecting the file, click on Show More to view and select the file.
This is because, as you have added -imp to the file name, TallyPrime will consider it as an already imported bank statement.
- At the end of your file name, add -imp, and then import.
If the above methods do not work or you get the error, “Not a valid format”, then your bank statement might not be configured. In such scenarios, contact Tally Solutions to configure your bank statement. To configure the statement, you need to share the Bank Statement with Tally Solutions.
To view Imported Bank Data:
- Press Alt+G (Go To) > type or select Imported Bank Data, and press Enter.
Alternatively, Gateway of Tally > Banking > Imported Bank Data. - Press F2 (Period) to change the period for which you want to view the imported data.
You can drill down from any of the rows to view transactions for a specific day.
You can reset the bank statement data.
- Press F1 (Help) > Troubleshooting.
- Select Reset Bank Statement Data and press Enter.
- In the Reset Bank Statement Data screen, select the Bank Ledger.
- Retain Reconciliation Status: Yes/No.
- Enter the From and To dates.
The Bank Statement data will get cleared for the specified status.
To know more, refer to Reset Bank Statement Data.
Yes, once you reconcile your book transactions, you can delete the corresponding bank statements from your Company data.
- Press F1 (Help) > Troubleshooting.
- Select Reset Bank Statement Data and press Enter.
- In the Reset Bank Statement Data screen, select the Bank Ledger.
- Retain Reconciliation Status: Yes.
- Enter the From and To dates.
The Bank Statement data will get cleared for the specified status, while the reconciliation status gets retained.
To know more, refer to Reset Bank Statement Data.
You can delete transactions for a specific date. However, you cannot delete only a few transactions for a specific date.
You can import bank statements that are CSV, Excel, and MT940 format, downloaded from the bank portal.
You cannot import bank statements in the following format:
- CSV/Excel converted from PDF or any third party software
To view transactions in the imported bank statement, you need to ensure the following:
- The statement is within the report period.
- The bank statement date is later than the Reconciliation Beginning Date.
Since you had already reconciled the transactions in the books manually, after the import, the transactions in the Bank Statement do not get considered for reconciliation. Therefore, the transactions are appearing as unreconciled.
In order to resolve this, you can do one of the following:
- Select the relevant bank transactions, press F9 (Set Status) > Reconciled and press Enter.
- Reset the bank statement data.
You cannot delete specific bank transactions from a previous imported bank statement. However, you can reset the bank statement data.
No, you cannot sycnhronise the imported bank transactions between the source and the destination company.
Bank Reconciliation
On importing bank statements to TallyPrime, some transactions might appear in the Amounts not reflected in Company Books section of the Bank Reconciliation screen.
Cause
- The Bank Statement does not have the correct instrument number.
- Instrument number is not specified in the Payment/Receipt voucher.
- The transaction is not recorded in the books of accounts. For example, Bank Charges.
Solution
- Check if the correct instrument number is mentioned in the bank allocation screen of the Payment/Receipt voucher.
- In Bank Reconciliation screen, press Alt+Q (Reconcile Unlinked) to view the list of transactions with matching amounts.
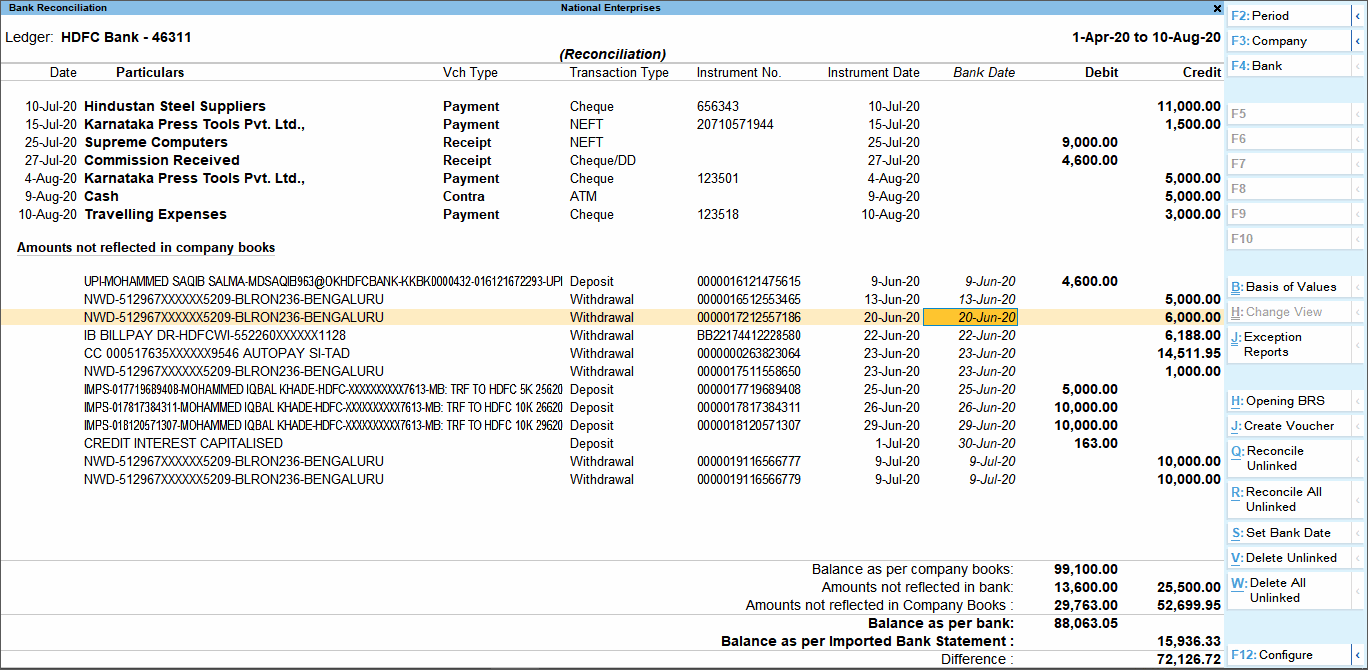
- Select the transaction using Spacebar and press Enter. The transaction will get reconciled.

- Create a new Payment/Receipt voucher for the transaction (if a voucher for the same has not been recorded earlier in TallyPrime). Press Alt+J (Create Voucher) by placing the cursor on the respective transaction.
If a transaction of the same details exist in the books, a message appears as shown below:

If you click Yes, voucher creation screen appears. You can record the required transaction.
If you click No, the existing transaction will appear in the Unreconciled Transaction. You can select the transaction and press Enter to reconcile it. - If a transaction of the same details does not exist, the voucher creation screen appears. Enter the transaction details.

- Accept the screen. As always, you can press Ctrl+A to save.
Note: Pending list is generated as Bills recd. but Goods not recd.
Yes, you can ensure auto-reconciliation of Exact Matches after importing a bank statement.
- Press Alt+G (Go To) > Create Master > type or select Ledger > and press Enter.
Alternatively, Gateway of Tally > Create > type or select Ledger > and press Enter. - Set/Alter Bank configuration: Yes.
- In the Bank Configuration screen, Set/Alter Auto Reconciliation configuration: Yes.
- Identify Exact Matches for Reconciliation:
- While Importing statement: Yes.
The exact matches will be identified when you import the statement. - While Importing statement as well as Saving Voucher: Yes.
The exact matches will be identified when you import the statement. Moreover, if the statement is already imported and you are creating a voucher that matches one of the transactions in the imported, then the exact match will be identified.
- While Importing statement: Yes.
- Automatically Reconcile Exact Matches found: Yes.
The Banking Activities report contains actionable information on e-payments and bank reconciliation both. You can view the counts of action items for both the activities under the e-Payments and Bank Reconciliation columns.
Under e-Payments, you can view transactions that are pending to be sent to bank and those sent to bank but are yet to be reconciled.
Under Bank Reconciliation, you can view the counts of transactions Available Only in Books and Available Only in Bank.
You can also view the report Amount-wise by pressing F5 (Amount View).
The Bank Reconciliation report is designed in the format that is globally used across businesses and auditors.
The report contains details such as:
- Balance as per Company Books and balance available as per bank, which enables comparison.
- Transactions unreconciled in Books and Bank.
You can drill down and match the transactions between Books and the imported Bank transactions and reconcile.
This report also helps you to identify any discrepancies between the Book and Bank balances, such as errors, unrecorded transactions, and fraud.
You can perform reconciliation in the following ways:
You can easily reconcile the partially reconciled transactions and even unlink the linked transactions.
To know how to do it, refer to Reconcile transactions with partial match and Unlink transactions in the Bank Reconciliation topic.
In the Bank Reconciliation report, you can perform any of the following to reconcile exact matches:
- Press F6 (Show Exact Matches) > press Ctrl+Spacebar to select all the transactions > press F8 (Reconcile).
- Press Ctrl+B (Basis of Values) > set Include Exact Matches to Yes and all other options as No. > press Ctrl+A to save the report > press Ctrl+Spacebar to select all the transactions > press F8 (Reconcile).
- In the report, press Shift+Enter on Partially Reconciled, Available Only in Books, and Available Only in Bank > press Ctrl+Spacebar to select the Exact Matches > press F8 (Reconcile).
- Select all the transactions under Exact Matches one by one using Spacebar and press F8 (Reconcile).
Yes, you can do so.
In the Potential Matches report, press Alt+S (Potential Match Configuration).
- Show unique Amount matches: No.
- Show unique Instrument no. matches: No.
- Show only Amount matches: No.
- Show only Instrument no. matches: No.
- Show Amount & Instrument no. matches: No.
You can do so by configuring Potential Matches.
To ignore zeroes prefilled in the imported bank transactions:
- Press Alt+S (Potential Matches).
- Press Alt+S (Potential Match Configuration).
- Ignore zeroes prefixed in References: Yes.
Similarly, you can also ignore special characters in the references.
Ignore special characters in References: Yes.
Press spacebar on the required transaction rows from Available Only in Books and Available Only in Bank and press F8 (Reconcile).
Note:
You need to select one transaction from Available Only in Books/Bank and one or more transactions from Available Only in Bank/Books to reconcile.
If the sum of the amounts between the books and bank transactions matches, then the transactions will be fully reconciled and get displayed in the Reconciled report.
However, if the amounts d not match, then the transactions will be linked and get displayed under Partially Reconciled.
The screen that appears is the Bank Reconciliation – Find Match screen in which you can see the selected transactions in the Matching (top) section, while the bottom section displays the corresponding transactions. If you select a single book transaction, the bottom section will be listed with bank transactions under Potential Matches and Available Only in Bank.
To know more refer to the Find Match section in the Reconciliation topic.
In the Modify Match screen, book transactions are considered as the basis for matching. Therefore, you cannot remove book transaction.
In the Bank Reconciliation report, press Alt+U (Manual Recon) to reconcile transactions manually. When you select the required transaction from Bank Reconciliation and then press Alt+U (Manual Recon), the report will display only those selected transactions.
You can select the transaction from the Bank Reconciliation report and press F9 (Set Status) and select Reconciled from the List of Statuses.
Yes, for a specific ledger, you can reconcile transactions in both the ways.
If you want to view the count and amount of the transactions as Reconciled and Unreconciled, then press F5 (Recon View) to change the view. Drill down from this report to view the transactions along with the Recon Status.
Alternatively, in the Bank Reconciliation Summary, press Ctrl+H (Change View) > View Reconciled and press Enter.
To know how to unlink transactions, refer to Unlink Transactions in the Reconciliation topic.
To know how to modify a match, refer to Modify Match in the Reconciliation topic.
The unreconciled transactions prior to more than six months of splitting don’t get displayed in the split company. So, in this scenario, you will be able to view Opening BRS updated with unreconciled transactions from October-2023 onwards only.
However, if you are using TallyPrime Release 6.1, all the unreconciled transactions will get updated as Opening BRS.
Open the company in TallyPrime Release 6.0 and import the bank statement for the period from which the book transactions are pending for reconciliation.
If the book transactions were reconciled in prior releases and their corresponding bank transactions are imported in TallyPrime Release 6.0, mark them as Reconciled using Set Status.
To know more, click here.
All the reconciled transactions will be available in the Reconciled report.
- From the Bank Reconciliation Summary screen, press F5 (View Reconciled)
- Select the month, and drill down to Bank Reconciliation – Reconciled
You can see all your transactions that were reconciled in the previous TallyPrime version under the header Reconciled Manually.
In TallyPrime Release 6.0, if you are using Bank Reconciliation for the first time, you need to set the Opening BRS and Reconciliation Beginning Date for your bank ledger:
- Open Banking Activities and press Alt+H (Opening BRS).
- Select the bank ledger.
- Press Alt+R (Set Recon Beginning Date), set the date, and press Enter.
- Press Alt+L (Update Opening BRS) to add any unreconciled transactions before this date.
- Press Ctrl+A to accept the Opening BRS screen.
Now, import bank statements to reconcile transactions by linking them to bank data or manually reconcile by entering the Bank Date.
To know more, click here.
This issue has been noted and will be resolved in TallyPrime Release 6.0.
It happens due to the large number of Opening BRS transactions in the Bank Reconciliation report.
You can set the following to avoid the error:
- Set Reconciliation Beginning date and add transactions that are unreconciled as on the date.
- If there are no unreconciled transactions prior to the Reconciliation Beginning Date, then delete the transactions.
In the Ledger Creation/Alteration screen,- Set/Alter Bank configuration: Yes.
- Set/Alter Opening BRS: Yes.
This option is available only during ledger alteration. - Press Alt+L (Update Opening BRS).
- Press Alt+J (Delete All).
- Press Ctrl+A to save the Opening BRS.
There might be one more transaction with the same instrument number. You need to delete the extra transaction so that both the matching transactions will appear under Exact Matches.
TallyPrime suggests exact matches and automatically reconciles transactions only when both the Amount and Instrument No. match with those in the corresponding bank transaction.
If the book transactions are manually reconciled, then they will not appear in the Potential Matches or the Bank Reconciliation report.
To reconcile via linking, you need to change the manual status of the book transactions.
- Press F10 (Set Status).
- Set the status as System Inferred.
You can then reconcile the transactions.
You can reconcile any transaction which is a part of the bank statement and your books.
To know how to reconcile your transactions, refer to Reconcile Transactions Automatically | Auto-reconciliation.
No, you cannot synchronise the opening BRS transactions between the source and the destination companies.
This happens because the destination company does not have the bank transactions that were used for linking during reconciliation in the source company. Since the bank transactions are not available in the destination company, the reconciliation via reconciliation is not retained during synchronisation. As a result, the transactions are marked as Reconciled Manually in the destination company.
In the Bank Reconciliation – Reconciled report, follow the steps:
- Press F12 (Configure).
- Format of Report: Condensed.
- Press Ctrl+A to save the configuration.
- In the report, press Shift+Enter on the Reconciled via Linking header.
The report will list only the primary book transactions. - Print/export/e-mail the report, as needed.
Press Ctrl+B (Basis of Value) > select Include transactions Available Only in Books and/or Include transactions Available Only in Bank, as needed.
Voucher Creation using Bank Statements
From the Bank Reconciliation report, press Ctrl+J (Exception Reports) and select Optional Vouchers (Bank Data) from the List of Exception Reports.
The Optional Voucher Register – Bank Data appears.
Select the required transactions and click Mark as Regular and Reconcile.
Yes, you can do so.
Under Common Ledger, select the required ledger from the List of Ledger Accounts.
Yes, you can do so.
Select End of List from the List of Ledger Accounts and press Enter.
Once the optional vouchers are linked to the bank transaction, in the Bank Reconciliation – Optional Vouchers screen, you can drill down from the voucher to open it in the Voucher Alteration mode, and then provide the Bill-wise and Cost Centre details, as needed.
To know how to do so, refer to Create consolidated voucher in the Reconciliation topic.
To set the default voucher type as Contra for Interbank/Cash transactions, follow the steps given below in the Ledger Creation/Alteration screen.
- Set/Alter Bank configuration: Yes.
- In the Bank Configuration screen, set/Alter Auto Reconciliation configuration: Yes.
- Use a different Voucher Type for Interbank/Cash transactions: Yes, if you want to use the Contra or Journal voucher type for such transactions.
You can refer to Contact Details for e-Payments to know if TallyPrime supports e-Payments for your bank.
In the page, you will also get an idea about the complete e-Payments process for your bank.
From the e-payment report, when you drill down to the Transactions sent to bank (unreconciled) category, select the failed transactions and click the Reset Status button.
The transactions will be moved to Ready for sending to bank. Then you can rectify the issues, if any, before sending them to the bank (in case of DBS) or exporting them (in case of banks supported for e-payments).
Transactions that have the mandatory bank details of the payee fall under the Ready for sending to bank category, in the e-Payments report. For example, for e-fund transfer (NEFT, RTGS) A/c no. and IFSC are necessary. Additionally, you can update the transactions under Transactions with incomplete information and Transactions with information mismatch (with master) categories and move them to the Ready for sending to bank category.
If you have recorded payment transactions with a bank ledger and a party ledger without necessary bank details, such transactions are displayed under the Transactions with incomplete information category. Necessary details are account number and IFS code. You can drill down to this category, provide the missing details for the transactions, and then move the transactions to the Ready for sending to bank category.
What transactions are shown under the Transactions with information mismatch (with master) category?
If you have recorded payment transactions with a bank ledger and a party ledger without necessary bank details, such transactions are displayed under the Transactions with incomplete information category. Necessary details are account number and IFS code. You can drill down to this category, provide the missing details for the transactions, and then move the transactions to the Ready for sending to bank category.
The Transactions sent to bank (unreconciled) category includes all transactions exported or sent to bank from the voucher creation screen and from the e-Payments report.
By default, the e-payment feature is available for Kotak Mahindra Bank (India). If the option is not available for you, then the capsule file in the TallyPrime folder might be corrupted.
- Edit the bank ledger.
- Select the Bank Name from List of Banks.
- Press Ctrl+A to save the ledger.
If still the option is not available, then delete the tally.oif files from the Capsules folder available in the TallyPrime folder.
Thereafter, you can resave the bank ledger.
No, you do not need to configure Tally.NET ID for enabling e-payments. If you are an account holder in DBS bank, and you wish to send transactions to bank from TallyPrime, you must log in to your company with your Tally.NET ID, which is registered with the bank.
The e-Payments feature in TallyPrime allows you to make electronic fund transfer from one bank to another. You can choose to make payments through e-Fund Transfer. Under the Banking module, you can enable e-payments in the ledger creation screen for bank master.
Using the e-Payments feature you can simplify your payment process with utmost security of your financial data. e-Payments in TallyPrime is supported for both vendor and payroll payments
Scenario: I want to enable the e-Payments feature for my bank. Whom do I contact for the same?
Contact your relationship manager from the bank. For contact details refer to Contact Details of Banks.
Yes, you can use the e-Payments feature. Contact your relationship manager from the bank. For contact details refer to Contact Details of Banks for e-Payments.
Yes, you can use the e-Payments feature. Contact your relationship manager from the bank. For contact details refer to Contact Details of Banks for e-Payments.
There is are no additional charges from Tally. You need to upgrade TallyPrime to Release 1.1 or later to avail this feature.
Regarding charges from the bank’s side, contact your relationship manager.
You need to have a valid TSS to avail the e-Payments feature.
Regarding charges from the bank’s side, contact your relationship manager.
Regarding charges from the bank’s side, contact your relationship manager.
We suggest you contact your bank relationship manager again. In case, you do not get a response, please visit your bank branch office.
Yes, you can activate e-Payments from all banks that Tally supports. Contact the relationship manager of your bank.
Yes. You can activate e-Payment feature for multiple banks (of the same or different bank) in TallyPrime. However, to activate e-Payments for multiple accounts of the same bank, contact your relationship manager from the bank. For contact details refer to Contact Details of Banks for e-Payments.
Tally Partners will look into your specific requirements, and do customisation after doing a feasibility study. However, they will charge for the customisation.
Yes. You may de-activate this feature in TallyPrime in case you do not want to use this further. And also re-activate when required. However, your bank has also activated this feature at their end. We suggest you contact your relationship manager regarding de-activation of e-Payments.
TallyPrime supports online and offline payment integration with DBS Bank (India).
TallyPrime supports offline payment integration with the following:
- Standard Chartered Bank (India)
- Standard Chartered Bank (UAE)
- Kotak Mahindra Bank (India)
- YES Bank (India)
- ICICI Bank (India)
- Federal Bank (India)
- Tokyo & Mitsubishi (India)
- HDFC Bank (India)
- Bank of Baroda (India)
- Citibank (India)
- RazorpayX (India)
- Axis Bank (India)
- AU Small Finance Bank
- IDFC First Bank
- South Indian Bank (India)
- Bandhan Bank
- Indian Bank
We will support more banks in the future. For more information on e-Payments, refer to How to Use e-Payments in TallyPrime.
Until TallyPrime Release 1.0 and during Tally.ERP 9 Releases, the users using this feature had activated based on the request received from bank – specific to their respective serial numbers of Tally.ERP9 / TallyPrime.
However, e-Payment feature is now made available as a default feature in the product from TallyPrime Release 1.1 onwards. Therefore, please contact your bank relationship manager. For contact details refer to Contact Details of Banks for e-Payments.
Scenario: In the bank ledger master, the Bank Name field is selected as ‘Not Applicable’
Select the ‘e-Payment Supported Bank’ under ‘Bank Name’ field.
Scenario: My bank ledger master is already selected with ‘e-Payment Supported Bank’ under ‘Bank Name’ field.
Select ‘Not Applicable’ at the ‘Bank Name’ field > Save the bank ledger master and Select the ‘e-Payment Supported Bank’ again.
Scenario: My bank account is ‘Other Bank’ (which is not supported for e-Payments).
We have not supported for e-Payments for your bank yet. Please contact Tally Solutions Pvt. Ltd.
To know how to do it, refer to Bank-specific configurations for e-Payments.
You will find all such vouchers in the e-Payments report.
To know to to export e-Payments, refer to Export/Upload Payment Instructions to the Bank in the e-Payments topic.
You can import the Payment Reverse File to update the payment status.
To now how to do so, refer to Import Payment Reverse File for e-Payment Reconciliation.
If you are a DBS Bank user, then you can just select the transactions sent to bank and press F10 to get the latest payment status.
If you have not entered the mandatory client code for your bank, then your e-Payment will be under Incomplete/Incorrect Bank Ledger Master Details.
Drill down from the section and then press Enter on a transaction.
Enter the Client Code and press Ctrl+A to save.
As a result, based on the other details entered in the transaction, it will move to the relevant section in the e-Payments report.
Yes, during voucher creation, you can open to Bank Allocations screen to add/change prefilled bank account details.
- Open the Sent to Bank (Unreconciled) section in the e-Payments report.
- Select the transaction that you want to re-export or resend.
- Press F8 (Reset Pymt Status).
When you do not have the required bank details such as Account No. and IFS Code in the bank ledger, the transaction with the ledger is found in the Incomplete/Incorrect Bank Ledger Master Details section in the e-Payments report.
The Incomplete/Incorrect Transaction Details section in the e-Payments report contains transactions with missing or incorrect Account No. or IFS Code. You can drill down further and correct the transaction details.
If the bank details in the transaction does not match with that specified in the ledger, then the transaction is found in the Mismatch in Bank Details (With Masters) section in the e-Payments report.
Once the transactions are reconciled or exact matches are found in the import bank data, the transactions are removed from the e-Payments report.
- Select the required transaction.
- Press F9 (Set Status).
- Set the status of the transaction to mark them as Processed.
To know more, refer to Set Status of e-Payments.
- Select the required transaction.
- Press F9 (Set Status).
- Select System Inferred from the List of Statuses.
To know more, refer to Set Status of e-Payments.
To enable e-Payments in TallyPrime, there are no additional charges applied by Tally.
To enjoy the benefits of e-payments in TallyPrime, you first have to contact your bank to enable the bulk upload/payment facility for your account.
You can find the Contact Details of Banks for e-Payments.
In TallyPrime, you can then configure the Bank Ledger. To know how to do it, refer to Bank-specific configurations for e-Payments.
TallyPrime Release 6.0 onwards, the e-Payment transactions don’t get reconciled when you import the Payment Reverse File.
When you import the file, the appropriate statuses get updated against the respective e-Payments.
You can reconcile the transactions either after importing a Bank Statement or manually.
The Intermediate File option under the Import menu is now renamed as Payment Reverse File with the shortcut key I.
To know how to import the Payment Reverse File, which was previously named as the Intermediate File, refer to Import Payment Reverse File to Update e-Payment Status.
In TallyPrime Release 6.0, you will not be able to exclude transactions from the e-Payments report.
However, you can set the status of transactions as On Hold, Processed, or Reconciled, as applicable.
Payment Advice
Currently, this is supported only for Kenya.
The Payment Advice supports only one party/ledger account.
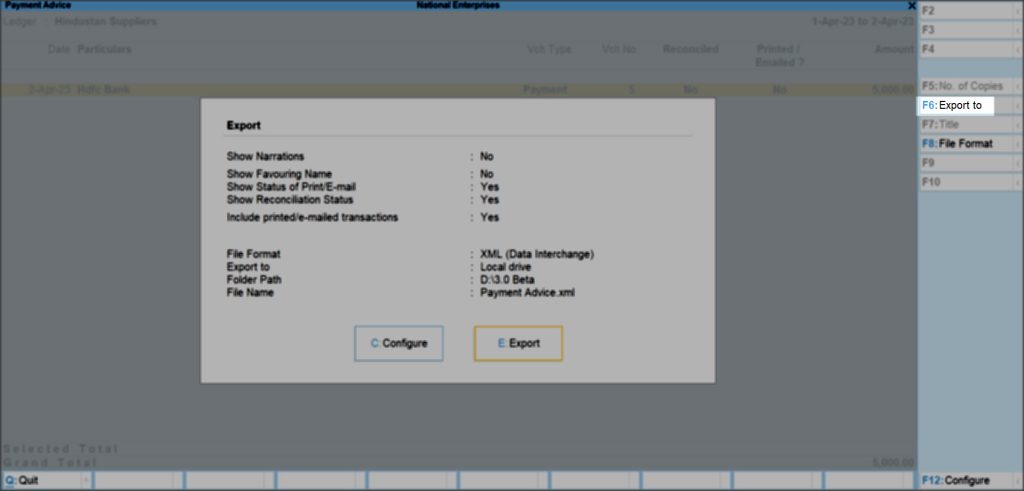
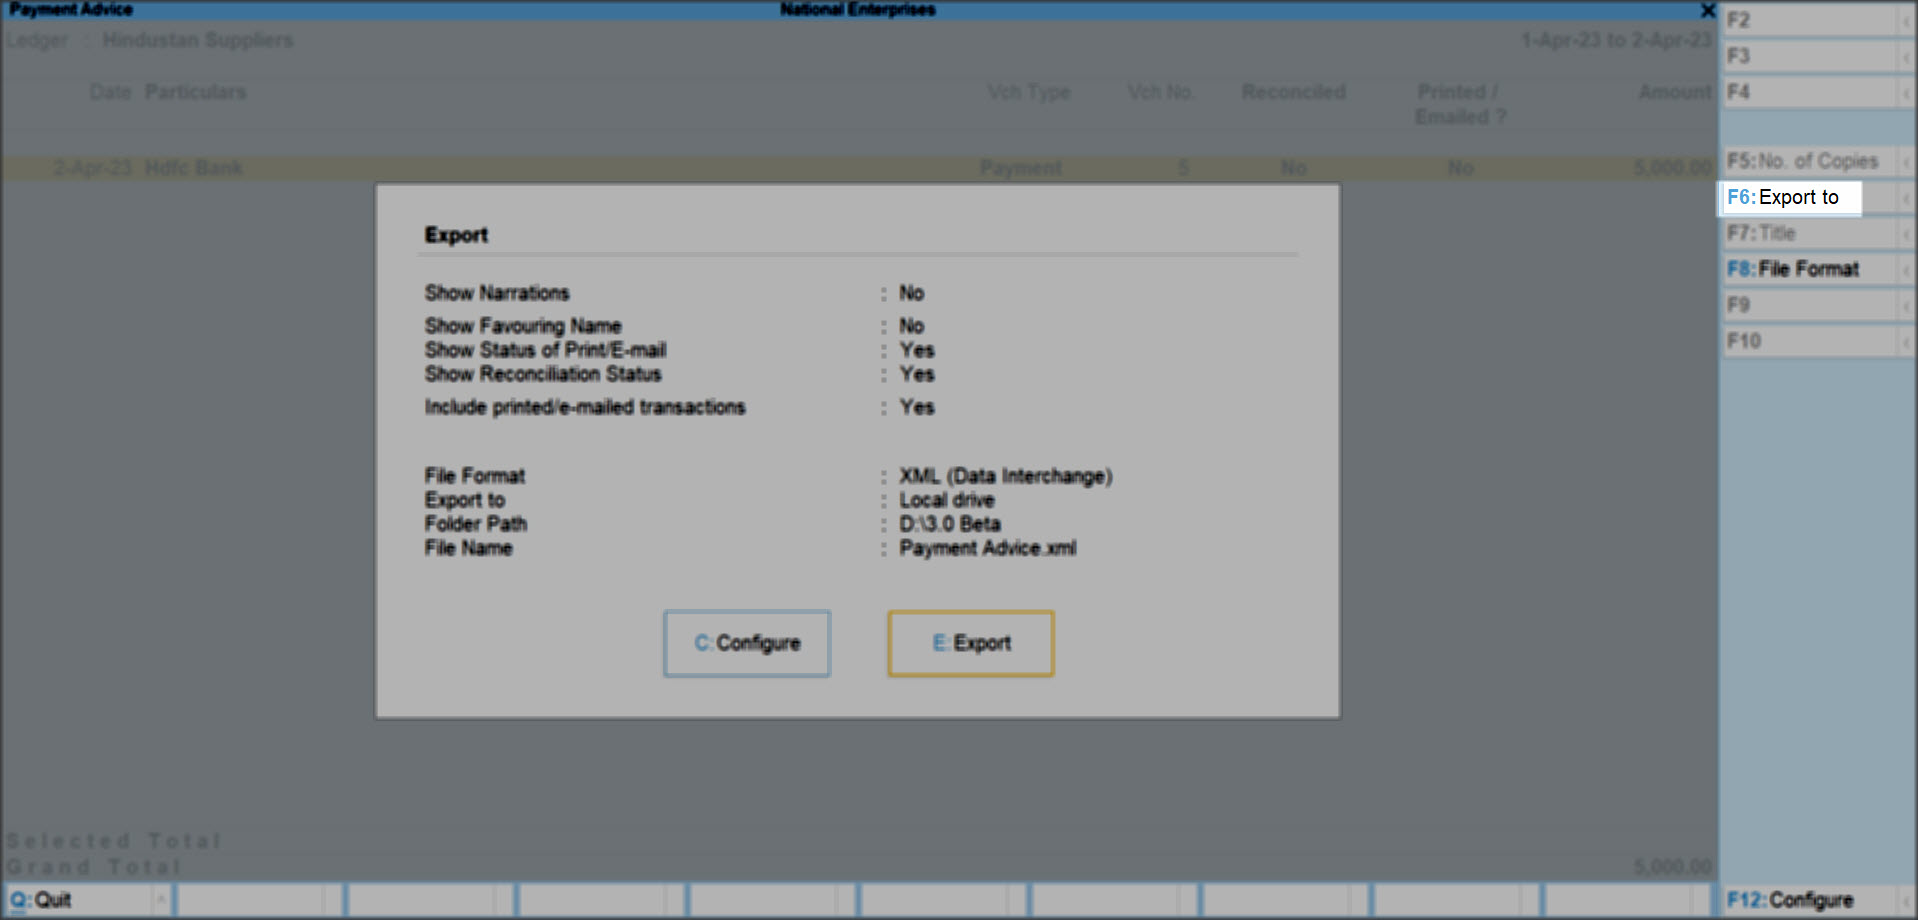
To print the Payment Advice:
- Gateway of Tally > Banking > Payment Advice.
Alternatively, press Alt+G (Go To) > type or select Payment Advice > and press Enter. - Select the required Ledger account. The Payment Advice screen appears with list of payment vouchers.
- Press Spacebar to select the required payment row(s).
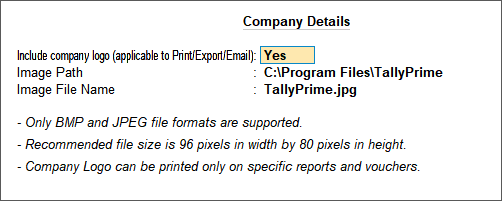
- Press Alt+P (Print) > Configuration > select Show More and press Enter.
- Type or select Include company logo (applicable to Print/Export/Email), and press Enter.
- Set it to Yes, enter the Image Path and Image File Name.
We have taken a note of this and will be solving it soon.
Meanwhile, while exporting the Payment Advice in TallyPrime Release 3.0, it is recommended to use the F6 (Export to) right button to configure the path, instead of using C (Configure).
- In the Payment Advice > Export screen, press F6 (Export to).
- In the Export Settings screen,
- Select the desired export location for saving the file from the List of Export Locations.
- Select the Folder Path, enter the required File Name, and press Enter.
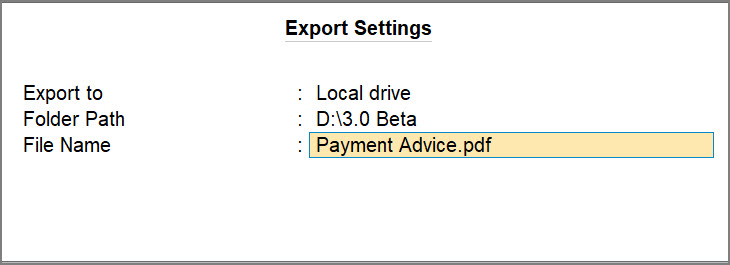
-
- In the Export screen, press E (Export).
Your Payment Advice will get exported to the selected location with the desired file format.
No, to configure cheque printing in a Bank Ledger, a valid TSS is not required. You need to update the latest capsule build update. You will then be able to access the latest banks and cheques that are configured in TallyPrime.
Yes, an internet connection is required for configuring cheques in TallyPrime, in order to avail the latest list of banks, and their corresponding cheque formats.
You cannot alter the existing cheque formats in TallyPrime. However, you can use the existing formats to configure a new cheque with the required dimensions.
If you want a new format to be included, send a cancelled cheque to Tally Solutions. The cheque format will be configured correctly in TallyPrime after receipt of the cancelled cheque. You can also Set the required cheque printing configuration manually.
No, you don’t have to configure anything for PDC. The PDC (Post Dated Cheque) feature is enabled in the company by default.
The transactions made for Notional Banks need to be regularized manually. However, accounts will be updated irrespective of status update. To keep track of each PDC (Post Dated Cheque) received, it is advisable to link one unreal bank (Notional/Control Bank) under Notional Bank.
You have the freedom to choose. Transactions pertaining to Banks linked for Notional banks need to be regularized manually. However, accounts will be updated irrespective of the cheque status.
Any banking transactions (Receipt or Payment) made marking as Post-Dated will get regularized automatically when Date of Last Entry crosses PDC date (regular vouchers).
By default, the system date is taken. However, it can be altered.
The date field remains blank if data is migrated from an older release or version.
You can record multiple PDC transactions from the Post Dated Summary.
- Go to Gateway of Tally > Banking > Post Dated Summary > Select Respective Bank
- Take cursor to Received or Issued & Press Enter.
- Create vouchers by pressing Alt+C.
By default, the Books of Accounts will be updated on the basis of the Date of Last Entry. However, the projected balances include PDC.
For example, Balance Sheet and Trial Balance always show balance as on date (Date of Last Entry). Projected balance can be viewed with PDC value.
- Go to Balance Sheet/Trial Balance > Press Alt+C
- In Type of Value, select Actual with Post-Dated.
By default this report shows Pending PDC transactions for specific period. If there is no PDC, then it appears blank. However, by clicking F6: Show All, you can view the status of each PDC.
You can do the following from Post-Dated Transactions report:
- A: Alter Date – Even if Receipt or Payment transactions are going to regularize today, due to some reason you may require to change the PDC to later dates. Click this button to change the date to any future date. Those transactions will appear under later dates.
- F4: Alter Bank – This is specifically applicable for ‘PDC Receipt’. In a business, when you receive a PDC from a party and if you are unclear as to which bank to deposit it to, group it under the concept of Notional Bank. Change the bank later on as per your needs.
- F6: Show All/Show Pending – By default PDC summary shows pending transactions. Use this option to view Pending as well as Regularized transactions.
- K: Enter Note – click this to specify any remarks for any PDC transaction, for internal purpose.
- S: Quick Search – click this to search specific PDC transaction by Instrument Number, Date, Bank, Party & Amount.
Data Synchronisation
You cannot synchronise the Company data of TallyPrime Release 6.0 with the data of an earlier release.
TallyPrime Release 1.1.3 provides support for the new file format, Delimited (|) – Corporate Net Banking, introduced by Yes Bank. This format is for bulk upload to generate payment advice along with payment file.
To use this format,
- In the bank ledger for Yes Bank, under Set/Alter e-Payment configuration, select Delimited (|) – Corporate Net Banking from List of File Formats under Format of Payment Instruction file for Export
Since you had been using Fixed Width – Corporate Net Banking earlier, the setting is retained.
Contact your relationship manager from Yes Bank to know more about the features of the format Delimited (|) – Corporate Net Banking.
The Export Payment Instruction screen would display the File Format as follows:
- Delimited (|) – For new format
- Fixed Width – For old format
These appear based on the format you selected in the Yes Bank ledger.
- Under Set/Alter e-Payment configuration, from List of File Formats under Format of Payment Instruction file for Export, if you have selected
- Delimited (|) – Corporate Net Banking – Will show Delimit (|)
- Fixed Width-Corporate Netbanking – Will show Fixed Width
No, it is not possible to schedule payouts for a future date using TallyPrime. The uploaded transactions will be processed on the date of authorisation.
Yes, the RazorpayX bank portal accepts transactions in the same file multiple times. However, if you upload the same file containing processed transactions, then the payments will be made to the parties again. It is recommended to not upload the same file unless you take a conscious call to do the same.
This message appears when the character count of the favoring name is less than 4. Ensure that the character count of the favoring name provided is more than 4.
This message appears when the IFS Code is not provided. Before uploading, you need to specify the IFS Code in case of transfer within the same bank.