
Record Purchases Under GST
Creating purchase vouchers in TallyPrime is easy. Be it local or interstate purchases of goods or services, you can record it in a few simple steps.
The topic Purchases with GST in TallyPrime further showcases the business scenarios that TallyPrime handles with ease.
Let us proceed using the sample company, National Electronics, which purchases appliances from manufacturers.
Before you begin | Prerequisites
- Make sure that GST details are configured for your Company. If you have multiple GST registrations, you may configure all registrations in the same Company.
- Though you can create masters in the flow of your transactions, it is recommended that you set up masters to ensure consistency in GST details.
- Configure GST details in party masters.
- Configure GST applicability in Purchase ledger.
- Create Stock Items and Service ledgers with GST details.
- Configure HSN/SAC details and GST rates at the appropriate level for your company. If necessary, you may override the tax rates in the transaction.
- Create necessary tax ledgers – CGST, SGST/UTGST, IGST and Cess.
Create Purchase Voucher with GST
- Press Alt+G (Go To) > Create Voucher > F9 (Purchase), and press Ctrl+H to choose the voucher mode.
This procedure shows the steps in Item Invoice and Accounting Invoice. - If you have multiple registrations, press F3 (Company/Tax Registration) and select the Registration under which you want to create the voucher.
- Enter the Supplier Invoice No. and Date.
Use the invoice number as provided by the supplier. - Enter the Supplier details.
- Party A/c name: Supplier from the same state, different state, or cash/bank ledger.
You can also enter Receipt Details, Order Details, and Import Details. - Place of Supply (in Party Details screen): The location where the goods got delivered.
- Dispatch Details: Enter any details about the transport or logistics, such as the name of the transporter or the tracking number.
- Party A/c name: Supplier from the same state, different state, or cash/bank ledger.
- Select the Purchase ledger marked as GST applicable.
- Add Stock Item/Service details.
- Item Invoice: Under Name of Item, select the stock items. Enter the Quantity and Rate.
- Accounting Invoice: Under Particulars, select the service ledger. Enter the Amount.
- Select the relevant GST ledgers – CGST & SGST/UTGST, or IGST (and Cess, if required).
- To see the GST calculation, press Alt+A to view the Tax Analysis, and Alt+F5 for a detailed tax breakup.
For TallyPrime Release 2.1 or earlier: Press Ctrl+I to view the Tax Analysis. - Save the voucher by pressing Ctrl+A.
In TallyPrime, you can see the portal view of your GST invoice and even set the GST Status and IMS Action Status directly from the voucher.
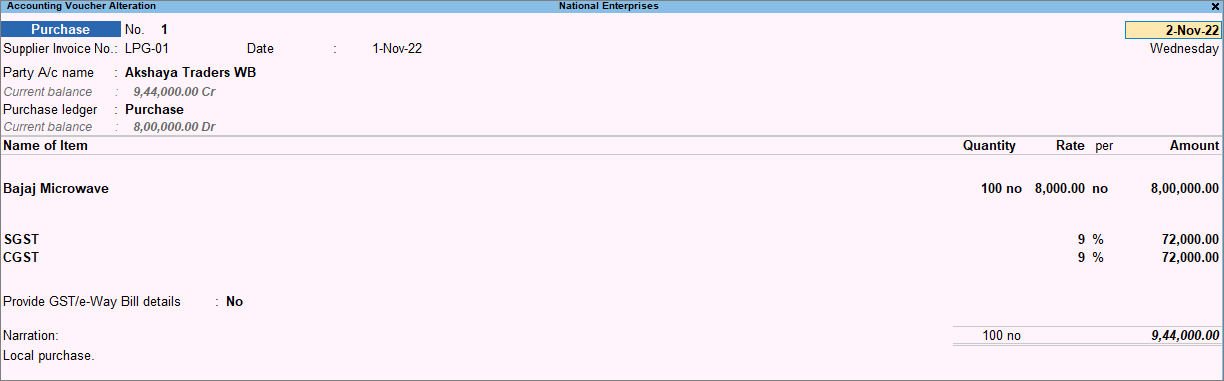
Create Voucher for Local Purchase of Goods with GST
If the location of the supplier and the Place of Supply are in the same State, then create a purchase voucher for local purchase.
![]()
In the Purchase voucher:
- In Party A/c Name, select a supplier ledger or cash/bank ledger. The State in the supplier ledger must be the same as the State in the Place of Supply.
- Choose the Place of Supply.
- Select the CGST and SGST ledgers. Add the Cess ledger, if any.
Create Voucher for Interstate Purchase of Goods with GST
If the location of the supplier and the Place of Supply are in different States, then create a purchase voucher for interstate purchase.
![]()
In the Purchase voucher:
- In Party A/c Name, select a supplier ledger. The State in the ledger must be different from the State in the Place of Supply.
- Choose the Place of Supply.
- Select the IGST ledger. Add the Cess ledger, if any.
Create Voucher for Local Purchase of Services with GST
If the location of the supplier and the Place of Supply are in the same State, then create a purchase voucher for local purchase.
![]()
In the Purchase voucher:
- In Party A/c Name, select a supplier ledger or cash/bank ledger. The State in the supplier ledger must be the same as the State in the Place of Supply.
- Choose the Place of Supply.
- Select the CGST and SGST ledgers. Add the Cess ledger, if any.
Create Voucher for Interstate Purchase of Services with GST
If the location of the supplier and the Place of Supply are in different States, then create a purchase voucher for interstate purchase.
![]()
In the Purchase voucher:
- In Party A/c Name, select a supplier ledger. The State in the ledger must be different from the State in the Place of Supply.
- Choose the Place of Supply.
- Select the IGST ledger. Add the Cess ledger, if any.
Good to know
- Learning to create a Purchase voucher helps you understand how to create other types of vouchers in TallyPrime, as all voucher types follow a similar pattern.
- TallyPrime offers three modes for voucher creation: Item Invoice, Accounting Invoice, and Voucher Mode.
GST Portal view of Invoice
Applicable to TallyPrime Release 3.0 & later versions
With TallyPrime, you can view your GST-related data just as you can see it on the GST portal, which helps you visualise how the data will appear on the portal when you upload at the end of the return cycle. You can check the GST Portal view of Invoice before exporting the transaction to the portal.
![]()
- Open the voucher for which you want to check the GST Portal view of Invoice.
- Press Ctrl+O (Related Reports) and select GST Portal view of Invoice.

- Press F5 (GSTR-2A) to view the GSTR-2A portal view of the invoice.
- Press F7 (IMS) to view the IMS portal view of the invoice.
- Press F6 (GSTR-2B) to view the GSTR-2B portal view of the invoice.
You can also check the GST Portal view of Invoice while recording a voucher, by simply pressing Ctrl+O (Related Reports) and selecting GST Portal view of Invoice.
If you are on TallyPrime Release 2.1 or earlier, this feature is not applicable.
Setting GST Status
Applicable to TallyPrime Release 3.0 & later versions
TallyPrime Release 3.0 enables you to set the GST Status of transactions from a list of statuses. For example, a transaction can be marked as Exported if it has been exported, or a transaction can be marked as Mismatched if it does not match with the data on portal.
![]()
- Open the required GST report and drill down to the transaction for which you want to set the GST Status.
- Select the required transaction.
- Keep the cursor on the required transaction and press Spacebar (Select). You can do this for multiple transactions if you want to Set GST Status of more than one transaction.
- After selecting the transaction, press Alt+S (Set GST Status).
- Select the GST Status from the List of Statuses.
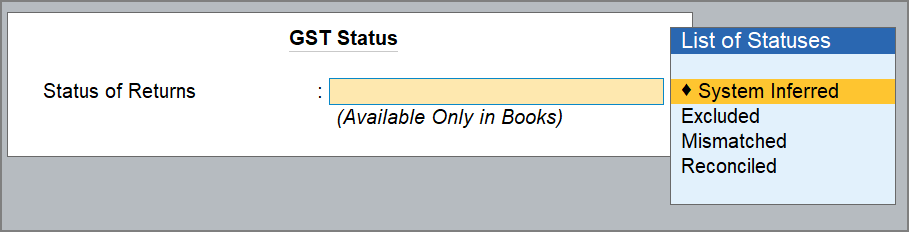
System Inferred: To mark the transaction to be automatically updated by the system for the returns.
Excluded: To exclude the transaction from GST returns.
Mismatched: To mark the transaction that does not match with the portal.
Reconciled: To mark the transaction that matches the data on the portal.
You can also set the GST Status and IMS Reconciliation Status from the voucher itself.
Open the required purchase voucher, and press Ctrl+I (More Details) > type or select GST Status and set the status.
Setting IMS Action Status
Applicable to TallyPrime Release 6.1 & later versions
With TallyPrime, you can set the IMS Action Status for the purchase vouchers directly from the voucher itself. Based on the IMS Action status set, ITC will be reflected in GSTR-2B and considered while generating GSTR-3B.
- Open the required purchase and press Ctrl+I (More Details) > type or select IMS Status.
- Select the IMS Action from the List of Statuses.

-
-
Accept: The invoice will be accepted, and ITC will be included in GSTR-2B.
-
Reject: The invoice will be rejected, and ITC will be excluded from GSTR-2B. It will appear in the ITC Rejected section of GSTR-2B.
Note that while rejecting an invoice, you can exclude it from GSTR-3B of your book data. -
Pending: If you set the Action status as Pending, the invoice will be kept pending for you to review later. It will appear in the Inward Supplies report until you accept or reject it.
Note that while keeping an invoice as pending, you can set the effective date for GSTR-2B and GSTR-3B of your book data. -
No Action: If you set the Action status as No Action, the invoice will be auto-accepted when GSTR-2B is generated.
-
Once you have acted on the invoices, you can view the IMS – ITC Summary report for a detailed view of your ITC.
Q&A
- What will happen if I provide a wrong Supplier Invoice No.?
To claim ITC, the Supplier Invoice No. must match the one uploaded by the supplier on the GST portal. If you create the purchase voucher before receiving the supplier’s invoice, make sure to update it later with the correct invoice number. - Will there be any issue in the purchase voucher if I provide a wrong Place of Supply?
Your transaction is classified as local, interstate, SEZ, or from other territory based on the Place of Supply. Hence, if the place of supply is wrong, then the wrong nature of transaction would be applied. - Can I create purchase vouchers by downloading GSTR-2B?
No. Currently, you can use GSTR-2B only for reconciliation. - When I have multiple GST registrations, do I need to select the company every time I create a purchase voucher?
You can specify the default company in the Voucher Type, which will enable you to create vouchers for that company always. Still, you can press F3 to create vouchers for other companies when needed.
If you need the flexibility to create vouchers for any registration in the flow of voucher creation, then do not set a company as default. - Why should I select a purchase ledger in every purchase invoice?
A purchase ledger will help you in keeping a track of the overall value of your purchases.


