
Record Sales Under GST
Creating sales vouchers in TallyPrime is easy. Be it local or interstate sales of goods or services, you can record them in a few simple steps.
- Make sure that GST details are configured for your Company.
For TallyPrime 3.0 & later: If you have multiple GST registrations, you may configure GST details for all registrations under the same company. - Configure GST details in party masters.
- Configure GST applicability in sales ledger.
- Create stock Items and service ledgers with GST details.
- Configure HSN/SAC details and GST rates at the appropriate level for your company. If necessary, you may override the tax rates in the transaction.
- Create necessary tax ledgers – CGST, SGST/UTGST, IGST and Cess.
Create Sales Voucher with GST
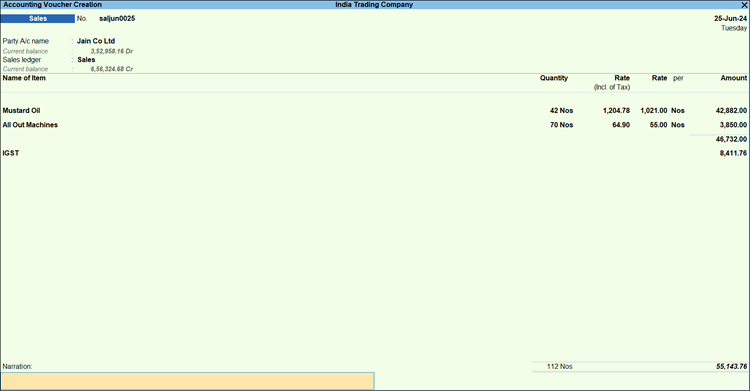
- Press Alt+G (Go To) > Create Voucher > F8 (Sales), and press Ctrl+H to choose the Item Invoice mode.
For TallyPrime 3.0 & later, if you have multiple registrations, press F3 (Company/Tax Registration) and select the registration under which you want to create the voucher.
For TallyPrime 2.1 or earlier, multiple registrations under the same company are not supported. - Enter the Voucher No. and Date.
- Enter the Buyer Details.
- Party A/c name: Select a buyer from the same state or different state. You can also select a cash or bank ledger.
- Enter Dispatch Details & Order Details as applicable.
- Place of Supply (in Party Details screen): The location where the goods are delivered.
- Dispatch Details: Enter any details about the transport or logistics, such as the name of the transporter or the tracking number.
- Select the Sales ledger marked as GST applicable.
- Add Stock Item/Service details.
- Item Invoice: Under Name of Item, select the stock items. Enter the Quantity and Rate.
- Accounting Invoice: Under Particulars, select the service ledger. Enter the Amount.
You can select more than one stock item or service ledger in the same invoice.
- Select the applicable GST ledgers – CGST & SGST/UTGST for local sales, or IGST for interstate sales (and Cess, if required).
- To see the GST calculation, press Alt+A to view the Tax Analysis, and Alt+F5 for a detailed tax breakup.
In case you have entered multiple stock items or service ledgers, the GST details for each entry will appear accordingly. If HSN/SAC and tax rates are defined in the sales or purchase ledger, the same HSN/SAC appears for each item.
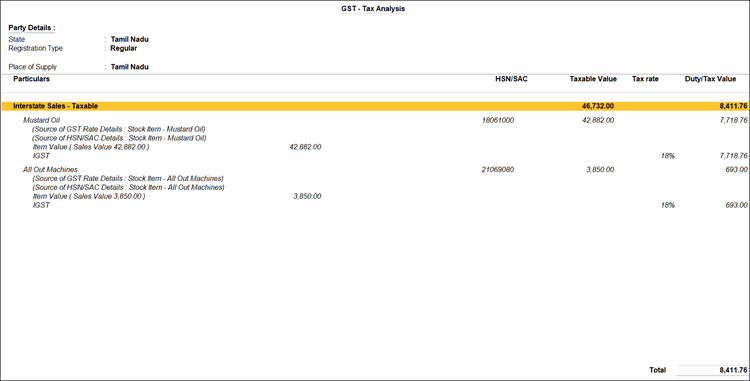
For TallyPrime 2.1 & earlier, press Ctrl+I to view the Tax Analysis.
The HSN code appears in parentheses, next to the stock item, instead of being displayed in a separate column. - Press Ctrl+A to save the voucher.
Create Voucher for Local Sales of Goods/Services with GST
If the location of the supplier and the Place of Supply are in the same State, create a sales voucher for local sales.
In the sales voucher:
- In Party A/c name, select a party ledger with the State same as the Company’s State (Place of Supply).
You can also select Cash/Bank ledger. - In the Party Details screen, choose the Place of Supply.
- Provide item or service details.
- Stock Items: Select the stock items and enter Quantity and Rate.
- Service: Select the service ledger and enter the amount for the service provided.
- Select the CGST and SGST ledgers. Add the Cess ledger, if any.
Create Voucher for Interstate Sales of Goods/Services with GST
If the location of the buyer and the Place of Supply are in different States, create a sales voucher for interstate sales.
In the sales voucher:
- Under Party A/c name, select a party ledger with State different from the Company’s State (Place of Supply).
You can also select Cash/Bank ledger. - In the Party Details screen, choose the Place of Supply.
- Provide item or service details.
- Stock Items: Select the stock items and enter Quantity and Rate.
- Service: Select the service ledger and enter the amount for the service provided.
- Select the IGST ledger. Add the Cess ledger, if any.
Create Voucher for Supply to Unregistered Consumers
In a sales voucher with Item Invoice mode:
- Under the Party A/c name, select the party ledger configured as Unregistered.
- Enter the stock item details, such as Name of Item, Quantity, and Rate.
- Select the appropriate GST ledger based on the Place of Supply. CGST and SGST are applicable for sales within the state and IGST is applicable for interstate sales.
- Provide other necessary details, and press Ctrl+A to save the voucher.
Such transactions with a sale value of more than 1 lakh are considered B2C (Large Invoices). Transactions to unregistered consumers with a sale value of less than or equal to 1 lakh are considered B2C (Small Invoices).
Questions & Answers
Does TallyPrime support recording transactions where the buyer and consignee are different?
Yes. TallyPrime allows you to capture both buyer and consignee details in a sales voucher. This ensures accurate documentation and compliance when goods or services are delivered to a third party. In the sales invoice, under Party Details:
- Press F12 (Configure) > set Provide separate Buyer and Consignee details to Yes.
- Under the Consignee (Ship To) section, provide the detailed address where the goods need to be delivered.
- Press Ctrl+A to save the voucher.
You can print the invoice with the consignee address along with buyer address, making the delivery of goods hassle-free.
How is the nature of the sale (local or interstate) determined when both buyer and consignee addresses are provided?
The location of supply determines whether the sale is treated as a local (intra-state) or interstate (inter-state) transaction, even when the buyer and consignee are different.
How can I record sale of multiple stock items with different tax rates in a single invoice?
You can record sale of multiple stock items in the Item Invoice mode.
- In the sales invoice, enter the details of each stock items, such as Item Name, Quantity, & Rate, in separate rows.
- Select the tax ledgers CGST and SGST for local sales and IGST for interstate sales.
- Provide other necessary details, and press Ctrl+A to save the voucher.
When you print the invoice, it displays a proper breakup of the tax rates for each stock item.
How can I see the GST portal view of the invoice?
With TallyPrime 3.0 & later, you can view your GST-related data just as you can see it on the GST portal. This helps you visualise how the data will appear on the portal when you upload at the end of the Return cycle. You can check the GST Portal view of Invoice before exporting the transaction to the portal.
- Open the voucher for which you want to check the GST Portal view of Invoice.
- Press Ctrl+O (Related Reports) and select GST Portal view of Invoice.
You can also check the GST Portal view of Invoice while recording a voucher, by simply pressing Ctrl+O (Related Reports) and selecting GST Portal view of Invoice.


