Import Data – FAQ
This page lists the frequently asked questions (FAQ) related to the importing data in TallyPrime.
Import Data – From Excel
This section lists the FAQ related to importing data from Excel in TallyPrime Release 4.0.
Currently, TallyPrime does not support importing bank transactions via the Import Data from Excel feature.
Currently, TallyPrime does not support exporting masters selectively from one company to another company.
However, you can go for the following workaround to export the selected masters from one company to another company in TallyPrime.
- Export the masters from TallyPrime into an Excel sheet.
- In the Excel sheet, manually remove the masters that you do not wish to export into another company, and save the Excel sheet.
- Import the Excel sheet into another company in TallyPrime.
You can follow the same process to export and import other masters, such as Stock Items, Stock Groups, and so on.
Yes, you can save the mapping template for All Companies in your TallyPrime. The same mapping template can be used by different companies provided the excel file and sheet names are the same.
Yes, you can share mapping templates across multiple systems. All the mapping templates saved under All Companies will be saved as. tsf (Tally Source File) files.
- Go to the application folder where you have installed TallyPrime.
- Select the userconfig folder and open excelmaps.
- Find and select the .tsf file of the mapping template that you want to share. You can then share this file with others, allowing them to import the mapping template into their TallyPrime systems and save time in data entry.
Yes, irrespective of whether you have a licensed or un-licensed version of MS Office you will be able to use this feature for importing data from Excel into TallyPrime.
Yes, LibreOffice is supported for importing data from Excel. CSV is also supported for importing. You will have to convert the CSV file into an Excel format by saving it as .xls or .xlsx file from MS Excel application. However, Google Sheet is not supported right now but the roundabout is you can download it is as an Excel Sheet and use it to import data.
Bank statements are used for reconciliation purpose. Therefore,
- Open the Bank Reconciliation report in TallyPrime.
- Go to Alt+O (Import)> Bank Statements.
You can easily import data from Bank Statements into TallyPrime.
No, they will not be displayed in the Exceptions report. The value will be rounded off according to the decimal places set in the currency. If you require 4 decimal places, you must specify this before importing the data.
Yes, since language is supported for importing masters, your data will be successfully imported into TallyPrime.
Price list is supported as a part of stock item not as a separate master.
TallyPrime follows the most commonly followed data entry practices. Fox example, if the entire column is used for credit amount, then there is an option in mapping configuration to treat the column as Credit amount or vice-versa. So, if your data is available otherwise, it is recommended that you update it before importing the data.
After importing your data, open the Chart of Accounts for viewing the masters and Day Book for viewing the vouchers that have been successfully imported into TallyPrime.
During the import process, there is no way to abandon it. However, before you start importing, a pre-import summary will be displayed that includes the name of the Excel file you’ve selected. At this point, you have the option to either proceed with the import or go back and change the selected Excel file. This allows you to ensure that you have the correct file before importing, minimizing the impact of potential errors.
However, it is recommended that you take backup of your data before importing so that the same can be restored, in case of an unintended import.
Yes, the Preview Import Summary is auto-enabled in the feature. However, you can disable it in the Import Masters/ Import Transactions screen by setting the option Preview Import Summary as No.
If the GST Registration Type and GSTIN are missing after import, it is possible that your Excel data does not have the Country and State specified for the company.
Even if the GSTIN is imported, it will not be displayed in the ledger unless these location details are provided.
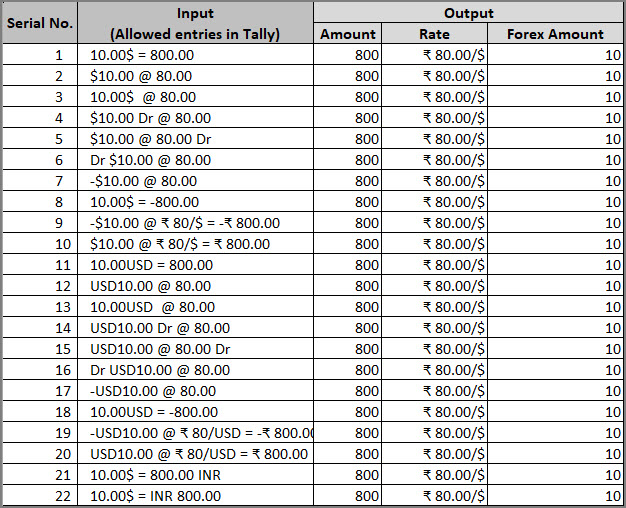
All formats of values entered for forex amount in TallyPrime is supported for import. For instance:
To import Stock items under the default Primary group, you can leave the field Parent Group Name blank, and the system will automatically create the Stock items under the default Primary group. The same is applicable for importing Cost Centres, Stock Group, Stock Category, Godown/Location, Employee, Employee Group, Attendance/Production Type.
Voucher numbers are imported based on the configuration set in the respective Voucher Type master. For example, if Method of voucher numbering in Voucher Type is set to Automatic then the voucher numbers will be created by system, as it happens during manual entry. To know more, click here.
Yes, Price Lists can be imported as a part of Stock Item masters. However, updating a Price List is not supported currently.
To know more, click here.
No, you cannot import masters into multiple companies at once.
The fields that are not present in the first sheet of the Sample Excel File can be found in the Read Me worksheet. You can copy the field names from the Read Me worksheet and add the same to the Sample Excel File.
No, only one worksheet can be imported at one go.
To specify the Sales or Purchase ledgers in Order Vouchers and Delivery Notes,
- You can use the fields Accounting Allocations – Ledger and Accounting Allocations – Amount.
- However, a Sales or Purchase Order can be imported without the accounting allocations, by setting the option Provide Accounting Allocations for Order/Delivery Note to No in the voucher entry configuration screen. Refer to the sample data for more information.
This error appears when the total of Debit and Credit amount is not equal in a voucher. Ensure that the total of the Debit and Credit amount is equal while making ledger entries.
In the Mapping screen, select the option Ledger Details from multiple rows to import the transactions with multiple Sales Ledgers or Tax Ledgers. Refer to the sample data for more information.
Yes, you can import a transaction without a Voucher Number. Delete the Voucher Number Column from the Excel sheet and then proceed with import.
- In case of user defined formats, you can alter the range of import by changing the values ‘Import data from row and to ‘ and ‘Import data from column and to’ in the mapping configurations.
- In case of Sample Excel File, create different sheets for different periods if you are maintaining a single Excel file.
Multiple bill details can be entered one after the other in multiple rows in excel as shown below:

To know more, click here.
To map a Sales ledger or other Expense ledgers in case of ledgers in fixed columns, you have to select the option Bottom Ledgers (Tax, Discount, & so on) while creating a map for horizontal format.
If you are facing difficulties while saving the mapping template, ensure that all the mandatory fields have been mapped in the template.
- For instance, if you are creating a mapping template for Ledgers, the Name and Group Name of the ledgers are mandatory fields that need to be mapped.
- Similarly, if you are creating a mapping template for Vouchers, Voucher Type Name, Voucher Date, Ledger Name and Ledger Amount are mandatory fields that need to be mapped.
The address can be entered in multiple Excel rows under one Address column and imported. In case, you have addresses in multiple columns like Address1, Address2, Address3 then these can be mapped with Address field in Tally and imported.
In the Mapping Template Creation screen,
- Under Field (TallyPrime) select Address and map with the corresponding Address columns in your Excel file.
Yes, importing 2 Lakh+ transactions at one go using Import Data from Excel is feasible. However, for optimal efficiency in TallyPrime, it is recommended that you import 50,000 to 1 Lakh transactions at a time.
When the cell value is negative it is imported as debit and if it is positive, it is imported as credit. If there is a mismatch in these values while you are importing them, you can do either of the following:
- If all values are in positive, mention Debit or Credit in the Excel column for the values, respectively.
- Use the Compute Value option in the Mapping Template and proceed.
Check if the Cell is in a text or a number format. If it is in a number format, change the format to text by following the steps given below:
- Add a new column in the Excel sheet.
- In the first cell of the new column, enter the formula =CONCAT(“”,cell number) <here cell number is of the corresponding column you want to import>.
- Apply the same formula in the remaining cells of the new column or simply drag your cursor till the cell you want to import.
- Now map this new column with the corresponding field in TallyPrime and proceed with the import process.
While importing vouchers with Multicurrency, you will have to provide the Amount in Base Currency and proceed with importing the Cost Centre Allocation.
While importing data from an Excel file, TallyPrime has the ability to detect duplicate entries only for the fields that must be unique, such as the name of Masters and Groups. However, TallyPrime does not consider duplicate GSTIN/UIN as exceptions, because it’s possible for multiple branches to have the same GSTIN while maintaining separate ledgers.
No, currently, TallyPrime only supports horizontal mapping for data import. Vertical mapping is not possible.
No, TallyPrime does not apply automatic rounding off after import. If rounding off is required, you must add a separate column for rounding adjustments in the Excel file before importing.
Transactions may appear in the “Uncertain Transactions” bucket if essential Buyer/Supplier details are missing while importing sales transactions. To ensure accurate classification in the GSTR report, make sure to provide complete Buyer/Supplier details for each voucher during the import process.
Reset GSTN | Clear Imported Returns Data
This section list the FAQ related to resetting GSTN data from TallyPrime.
The Reset GSTN Data feature in TallyPrime can be used in the following situations, without affecting your books:
- The data you have imported or downloaded from the GST portal to TallyPrime is corrupted.
- You have accidentally imported GSTR-1 fetched into GSTR-2A (or vice-versa).
While you reset GSTN data in TallyPrime Release 3.0, the To date is prefilled with the date of last statutory voucher entry. You can select the From date, as needed, and reset the GSTN data.
Once you have completed resetting the GSTN data, you can open the GSTR-1 and GSTR-3B reports as applicable to you company, and verify if the data that you had imported earlier is completely erased as expected.
Import Data – General
This section includes some general FAQ related to importing and exporting data.
In TallyPrime, you can export and import the entire data to a newly created company. You have to export the masters first and then the transactions. Ensure that company features (F11) of the exporting and the importing company are the same.
Note: The price lists of the old company mentioned in F11 features can be imported and exported in a similar manner to the new company.
Export Masters
- Press Alt+G (Go to) > type or select List of Accounts > select Ledgers and press Enter.
Alternatively, Gateway of Tally > Chart of Accounts > Ledgers.
- Press Alt+F12 (Range) to select the masters you want to export. Skip this step if you want to export all the masters.
- Press Alt+E (Export) > press Enter on Current.
- In the Export screen, press C (Configure) > select the File Format as XML (Data Interchange)
- The Folder Path will be set to C:\Program Files\TallyPrime. You can change this, if needed.
- The File Name will be set to Master.XML. You can change this, if needed.
- Set the Type of Master to All Masters.
- Press Esc to return to the Export screen.
- Press E (Send) to export.
Export Transactions
- Press Alt+G (Go to) > type or select Day Book.
Alternatively, Gateway of Tally > Day Book. - Press Alt+F2 (Period) and provide the required From and To dates.
- Press Alt+F12 (Range) to select the masters you want to export. Skip this step if you want to export all the transactions.

- Press Alt+E (Export) > press Enter on Current.
- In the Export screen, press C (Configure).
- Select Narration and press Enter to set it to Yes. Similarly, set the required options to Yes.
- Set the Type of Vouchers to All Vouchers.
- Select the File Format as XML (Data Interchange).
- The Folder Path will be set to C:\Program Files\TallyPrime. You can change this, if needed.
- The File Name will be set to DayBook.xml. You can change this, if needed.
- Press Esc to return to the Export screen.
- Press E (Send) to export.
Import Masters
- Select the required company.
- Press Alt+O (Import) > Masters.
- In File to import (XML) select the filename containing the exported masters.
- In Behaviour of import if masters already exists, select Modify with new data.
- Press Enter to import the masters.
- Once the import process is complete, compare the statistics of both importing and exporting company.
- To view these details, press Alt+G (Go To) > type or select Statistics > and press Enter.
Alternatively, go to Gateway of Tally > Display More Reports > Statements of Accounts > Statistics.
Import Vouchers
- Select the required company.
- Press Alt+O (Import) > Transactions.
- In File to import (XML) select the filename containing the exported transactions.
- Press Enter to import the transactions.
- Once the import process is complete, compare the statistics of both importing and exporting company.
- To view these details, press Alt+G (Go To) > type or select Statistics > and press Enter.
Alternatively, go to Gateway of Tally > Display More Reports > Statements of Accounts > Statistics.
- Press Alt+O (Import) > select Configuration and press Enter.
- Set the option Ignore errors during import to Yes.
This will avoid programming conflicts that may occur while the data is being imported. Setting this option to ‘No’ will ignore the error message and continue with the import of data.
Note: However, errors while importing data will be logged into the Tally.Imp file that is generated in the TallyPrime folder.
Scenario 1: While merging multiple company data, transactions are getting overwritten or deleted on importing data of another company.
Scenario 2: While importing third party xml data to Tally, transactions available in Tally database are getting deleted or overwritten.
Reason
- If multiple copies of a single company are copied in different locations rather than creating from Tally application, then vouchers will hold same Voucher ID at all the locations.
- Consolidation of all the company vouchers using export and import feature will lead to overwriting or deletion of the vouchers as Voucher ID is same in all the companies.
- If third party application is generating same Voucher ID for all vouchers, then the above-mentioned problem will occur while importing the xml files.
Solutions
Scenario 1: Create the company from Tally application and import the data by removing the voucher ID with the help of Notepad++.
Scenario 2: For third party software’s, you need to generate unique Voucher ID for each and every voucher.
Below is the XML TAG LINE which should be altered:
<VOUCHER REMOTEID=”Unique id has to be provided” VCHKEY=”01ae33cc-833c-479e-913c-c5079b964709-0000a46e:00000008″ VCHTYPE=”Purchase” ACTION=”Create” OBJVIEW=”Invoice Voucher View”>
Additional information
To merge all the current data and to overcome the overwriting or deletion problem, Voucher ID must be removed from daybook.xml files. This can be done using XML editors. Below is the procedure followed for “NOTEPAD++” software.
Note: There are multiple XML editor software, but procedure might vary from one software to another.
Following is the procedure for replacing Voucher remote ID using Notepad++ software.
Step 1
- Download the Notepad++ software.
- Load the XML file using NOTEPAD++ software.
- Press Ctrl+F button -> in Find what field, mention Remoteid=*.*vchtype and in Replace field, mention VCHTYPE. In Search Mode box, enable the option Regular expression and click on Replace All.

- After selecting Replace All option, the Voucher ID will be removed from all the Vouchers & message will be displayed as shown below:

- Once replacement is completed, you will find the difference in below mentioned tag line:
- Before replacement:
- After replacement:
Step 2: Import this daybook.xml to Consolidation Company, so that complete data will get imported.
Note: Ensure to import this xml file only once. If import is done again and again, transactions will get duplicated.
You can export the closing balances of the ledger or item or both on any given date and import the same as opening balances to newly created companies. This facility is provided in TallyPrime.
Export closing balance in old company
- Gateway of Tally > Chart of Accounts > Ledgers.
Alternatively, press Alt+G (Go To) > type or select List of Accounts > select Ledgers and press Enter. - Press Alt+E (Export) > Current.
- In Chart of Accounts screen, press C (Configure).
- Select the required Type of master or select All Masters to export all the masters to the respective company.
- Set the option Export closing balances as opening balance to Yes, to export the closing balances.
- Select the File Format as XML (Data Interchange) or SDF (SDF format appears only when TDL is loaded).
- In the Export to field, select the path to which the file needs to be exported.
- In the File Name field enter the required output file name or accept the default file name.
- Press Enter on Show More displayed at the top of the list > set the option Open Folder after export to Yes.
- In the Closing balance as on field, press Enter and change the date, as needed.
- Press Esc to return to the export screen.

- Press E (Send) to export the file.
Import as Opening Balance in New Company
Open new company to import the exported closing balances as opening balance.
- Press Alt+O (Import) > Masters.
- In File to import (XML) select the filename containing the exported masters.
- In Behaviour of import if masters already exists, select Modify with new data.
- Press Enter to import the masters.
On successfully importing the data you can view the balances for ledgers and stock items.
Use ODBC feature to export customer’s/supplier’s details to Excel.
- Start TallyPrime.
- Press F1 (Help) and ensure ODBC Services and port number are displayed.
Note: Ensure that TallyPrime is open till you complete the process of exporting ledgers details to Excel.
- Open Microsoft Excel on your computer.
- Click Data > Get External Data > From Other Sources > From Microsoft Query, as shown below:

- Click Browse > select TallyODBC64_9000, as ODBC is enabled on the server 9000.
- Click OK. The Query Wizard – Choose Columns screen appears as shown below:
- Click Ledger and expand the list to select the required fields.
- Click Next. The Query Wizard – Filter Data screen with the column names appears as shown below:

- Click Next. The Query Wizard – Sort Order screen appears as shown below:
- Select Ascending or Descending for each drop down list under Sort by, as required.
- Click Next. The Query Wizard – Finish screen appears as shown below:
- Select the option Return Data to Microsoft Office Excel.
- Click Finish. The Import Data screen appears as shown below:

- Click OK. The Microsoft Excel sheet with the imported data appears as shown below:

It is advisable that you do not alter the predefined masters in TallyPrime. If you require groups to be displayed in various reports, create new groups instead of altering the predefined masters.
To enable SDF format for export/import:
- Open the Tally.ini file and set the option User TDL to Yes.
- In the next line, remove the semicolons (;;) in TDL and enter the name of the TCP file (i.e., tdl = SDFExportImport.tcp)
- Save Tally.ini and start TallyPrime. You can now view the SDF format while performing an Export/Import.
To view this option, press Alt+O (Import) > Configuration.
You can set the option Overwrite voucher when a voucher with same GUID exists to Yes/No, while importing vouchers into TallyPrime.
Impact of this option is given below:
| Configuration | Export & Import of voucher in the same company | Exported from one company & imported to another company |
| Overwrite voucher when a voucher with same GUID exists is set to No | If a voucher is exported and imported back to the same company, a duplicate voucher gets created. The subsequent import of the same voucher will overwrite the previously duplicated/created voucher. | The voucher gets imported once irrespective of whether the option is Yes or No. |
| Overwrite voucher when a voucher with same GUID exists is set to Yes | If a voucher is exported and imported back to the same company, the existing voucher gets overwritten. |
Reports exported in HTML, PDF, and JPG formats support company logo.
You can merge two companies, say company A and company B, in TallyPrime by exporting the data from both the companies and importing it to a new company C.
The companies to be merged should have the same financial period.
On the other hand, the new company must have:
- F11 features of both the companies
- The financial period of both the companies.
Both the companies should have the same financial period, say, 1-Apr-2022 to 31-Mar-2023. The new company that you create must also have the financial period 1-Apr-2022 to 31-Mar-2023.
Follow the steps given below.
- From company A:
- Export the masters.
- Export the vouchers.
Similarly, export the masters and vouchers from company B.
To know how to export masters and transactions, refer to the Export Masters and Transactions section in the Export Data in TallyPrime
- Create a new company C with F11 features of both the companies.
To know how to create a company, refer to the Create a Company to Record Business Transactions section in the Set Up Your Company - Enter Financial year beginning from as the date in both the companies to be merged.
This ensures that the new company has the financial period same as the companies to be merged. - From company A to company C:
- Import the masters.
- Import the vouchers.
Similarly, import the masters and vouchers from company B to company C.
To know how to import masters and vouchers to a company, refer to the Import Masters and Import Transactions sections in the Import Data in TallyPrime
After importing the masters and transactions in the company C, you can check the same in Chart of Accounts and Day Book respectively.
You can also track the import of masters and transactions with a detailed log.
To enable the detailed log:
- Press Alt+O (Import) > Configuration.
- Type or select Enable detailed log (tally.imp) and press Enter.
- Press Ctrl+A to save the setting.
Cause
When the E-mail from mentioned is wrong.
Solution
Verify the email id entered in E-mail from field, ensure it is correct and then proceed with emailing.
For computer in which the operating system installed is Windows XP or a higher version:
- Right-click the TallyPrime icon, and select Run as administrator.
- The Select Company screen appears. Select the required company from which you want to extract the data. The About page displays the Client/Server with ODBC Services. If the port number is not configured, you can configure it by following the steps given below:
- Press Alt+F1 (Help) > About > select Client/Server and ODBC Services and press Enter.
- Enter the Port number. By default the port is set to 9000, as shown below:
Note: In case the port number mentioned is occupied by another application, you need to provide another port number.