Understanding Import Data from Excel
Manually entering data into TallyPrime can be time-consuming, especially when large volumes of transactions or masters details are stored in Excel files. To simplify this process, TallyPrime provides a seamless Import feature that allows you to bring in data from Excel files with just a few clicks.
Sample Excel File vs User-Defined Excel File | Pre-defined vs User-Defined
-
Sample Excel File: A ready-to-use template provided by TallyPrime, structured with predefined columns that align perfectly with TallyPrime’s data format. Since the structure is already set, no additional mapping is required—simply enter your data and import it directly.
-
User-Defined Excel File: Import data from any Excel file. You can create a Mapping Template to map the columns in your Excel file with the corresponding fields in TallyPrime, making it adaptable to different data structures.
Choosing the right approach depends on your business needs—use the Sample Excel File for a quick, hassle-free import or the create a Mapping Template when working with your own Excel formats.
What are Sample Excel Files? | Pre-defined Excel Files
The Sample Excel File enables you to keep record of your data in the way similar to how you would enter data in TallyPrime. Using Sample Excel Files helps in easily importing data into TallyPrime without the need to do any manual entry.
TallyPrime follows a defined structure when importing data from Excel. The Sample Excel File provides a template for entering data correctly before importing it into the system.
The Sample Excel File consists of the following key sheets:
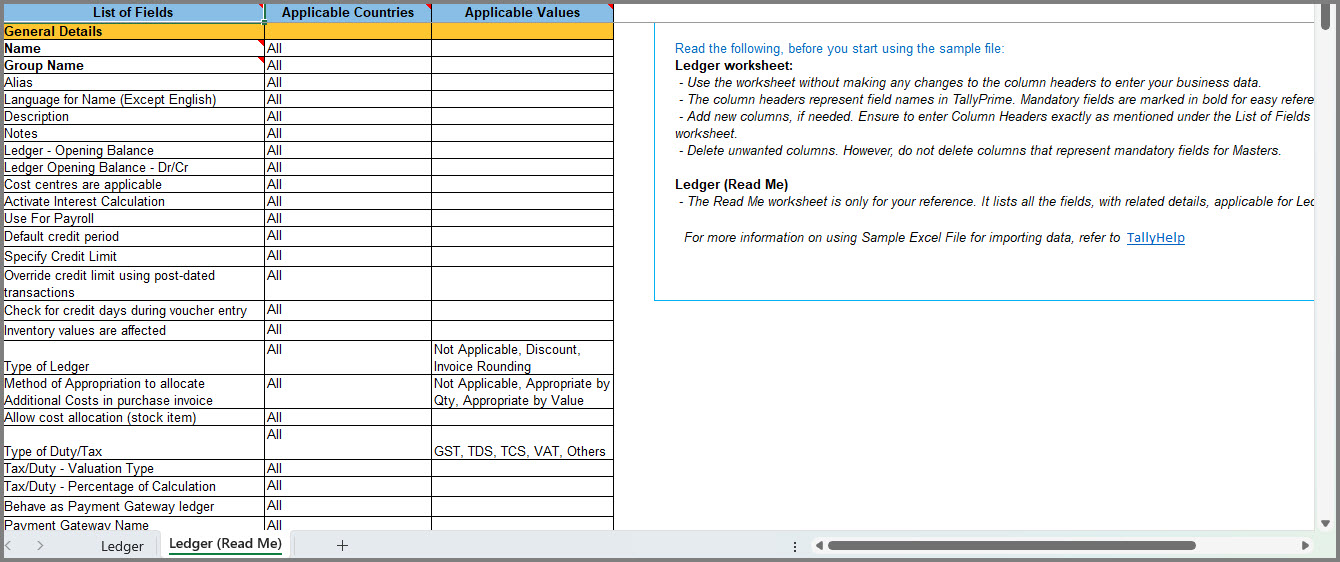
Data Entry Sheet
The Data Entry Sheet is the first main worksheet for entering master or transaction details. It includes predefined columns, sample entries, and validation rules to ensure that all information adheres to the required format.
- Enter relevant details; for example, for ledgers, enter details like Name, Group, Mailing Details, GSTIN/UIN, as needed.
Column headers with bold font indicate that those are mandatory for importing the data. - Do not edit any column headers, as they are mapped internally for ease of importing data.
- Add or remove columns as needed for data entry. Refer to the Read Me worksheet for adding new column names as mentioned.
ReadMe Sheet
This sheet provides detailed instructions on how to use the Sample Excel File, including data format requirements, mandatory fields, and best practices for successful data import.
- Do not make any data entry in this worksheet.
- Use the different columns as reference for ease of data entry in the main worksheet.
- List of Fields: Contains all the fields in TallyPrime, related to the ledger master.
- Applicable Countries: Indicates the countries that the ledger fields are applicable for.
- Applicable Values: Contains values that are applicable for the ledger fields in TallyPrime.
User-Defined Excel Files and Mapping Templates
TallyPrime allows you to import data from any Excel file, making it adaptable to different data structures. Using a Mapping Template, you can map the columns in your Excel file with the corresponding fields in TallyPrime, ensuring seamless and accurate data import.
Understanding Data in Multiple Rows and Multiple Columns
Some data structures require multiple rows or columns for a single transaction or master. Handling these formats correctly ensures accurate data import.
-
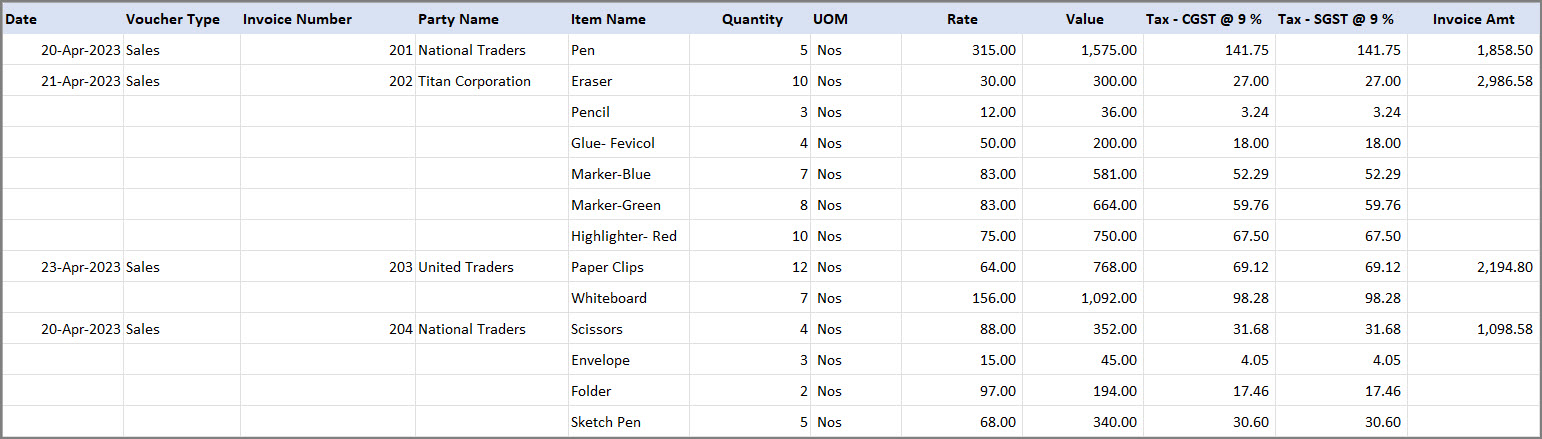
Multiple Rows: Your data might be spread across multiple rows, where details like party ledger, sales/purchase ledger, and tax ledgers appear in a single column but across different rows.
A sample image of Excel data entered in multiple rows: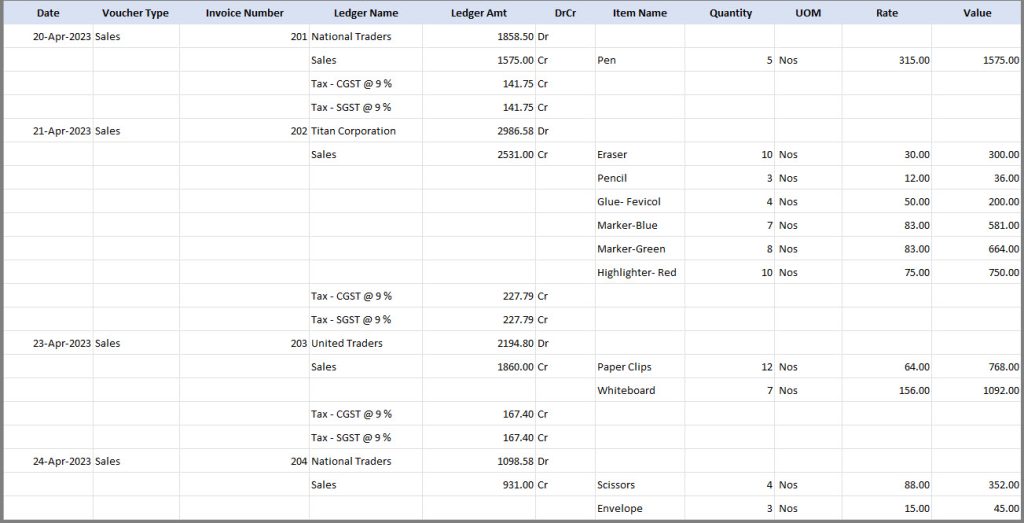
-
Multiple/Fixed Columns: Your data might be spread across multiple columns, with details like party name and taxes (CGST, SGST, IGST) recorded in separate columns.
A sample image of Excel data entered in multiple columns: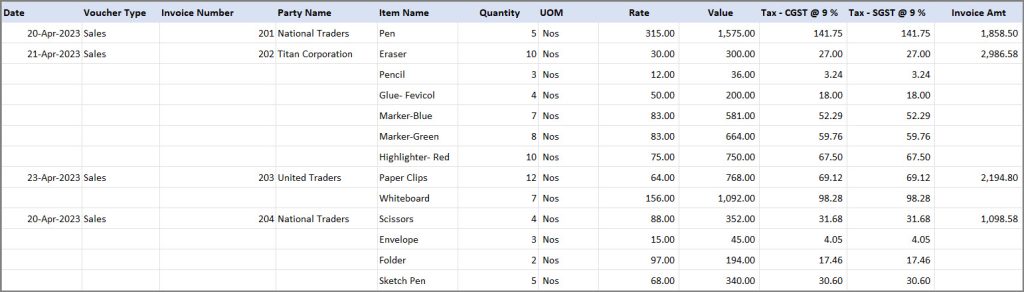
Components of a Mapping Template
A mapping template in TallyPrime helps define how data should be imported from an Excel file. It includes various fields that allow precise mapping of information.
When you click Create > Mapping Template > Master/Transactions, this sub-form appears before the Mapping Template Creation screen.

- File Path: Specify the location of the Excel file containing master details.
- File to Import: Select the desired Excel file from the available list.
- Worksheet Name: Choose the worksheet from which data needs to be imported.
Once the Mapping Template Creation screen appears, you can configure the template by providing the necessary details.
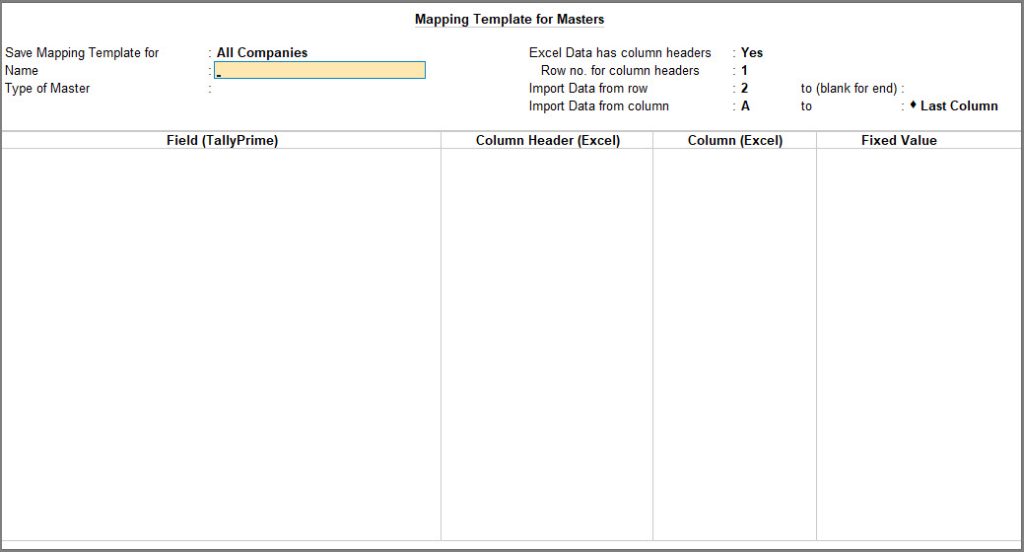
- All Companies: Saves the template in the TallyPrime application folder, making it accessible across all companies loaded in the same application.
- This Company: Saves the template at the company level, allowing access across different computers. Ensure security by restricting editing or deletion.
- Name: Assign a name to the mapping template.
- Type of Master or Type of Voucher: Select the appropriate master or voucher category based on the Excel data.
- Excel Data Structure:
- Excel Data has column headers: If the data includes column headers, set this to Yes.
If your Excel data does not have column headers, set this option to No. - Row no. for column headers: Enter which row of the Excel has the column headers. This helps the template to identify the header row while importing data.
- Import Data from row to (blank for end): Enter the starting row number and the ending row number that should be considered for importing data.
- blank for end represents the last row until which the data is available in the worksheet.
- Import Data from column to: Enter the starting column and ending column details that should be considered for importing data.
- Last Column represents the column until which the data has been entered in the Excel file. TallyPrime considers importing data from Excel up to 702 columns.
- Map Field (TallyPrime) with Column Header (Excel) or Column (Excel). Depending on the way you have maintained data, you can start mapping the field names with the data in the Excel file.
- Excel Data has column headers: If the data includes column headers, set this to Yes.
When mapping ledger details using fixed columns, users can choose to map with either the Top Ledger or Bottom Ledgers.
- Top Ledger: Typically includes ledgers such as Party/Supplier, Bank, and Cash.
- Bottom Ledger: Primarily mapped with ledgers like Expenses, Sales, Purchases, and taxes such as SGST, CGST, and IGST.
The mapping template is saved in the config > excelmaps folder within the TallyPrime installation directory. It can be reused for future imports, ensuring a seamless data migration process.
Best Practices for Importing Data into TallyPrime
Follow these best practices to minimise import errors and ensure that the imported data is complete and accurate.
- Enable and set up the required import configurations, and define the required data format and structure.
- Ensure that all mandatory fields required for the data type are available and correctly mapped in the Excel file.
Some common mandatory fields include:- Ledgers: Ledger Name, Under Group
- Vouchers: Date, Voucher Type, Debit/Credit Amount
- The masters or other dependent data required for the import already exist in the company data. For example, Parent Group, Units of Measurement, and so on.
- Verify Dependent details in the Excel File.
Depending on the type of data you are importing, ensure that the relevant details are included in the Excel file.
Below are the key mandatory and dependent fields for different data types:- Ledger with Bill-wise Details
Ensure that the following fields are available:- Bill Name
- Bill Date
- Bill Amount
- Bill Amount Dr/Cr
- Stock Items with BOM Details
Before importing stock items with BOM details, ensure that BOM (Bill of Materials) is enabled in TallyPrime and the following fields are available:- Name of BOM
- Unit of Manufacture
- BOM Component – Item Name
- BOM Component – Quantity
- BOM Component – Godown/Location
- BOM Component – Type of Item
- BOM Component – Rate (%)
- Price List Using Stock Item Master
Before importing a price list, ensure that the required price levels are created in the company data.- Mandatory Fields: Price Level, Price List – Date
- Optional Fields:
- Item Quantities – From
- Item Quantities – Less Than
- Price List Rate
- Price List Discount
- Payment Vouchers with Bank Allocations
To ensure that payment vouchers appear correctly in the Bank Reconciliation report, include the following fields in the Excel file:- Bank Date
- Ledger Amount
- Bank Name
- Sales Vouchers and GSTR Compliance
To prevent sales invoices from appearing as Uncertain in the GSTR report, ensure that the following buyer/supplier details are available in the Excel file:- Buyer/Supplier – Bill To/From
- Buyer/Supplier – Address Type
- Buyer/Supplier – Mailing Name
- Buyer/Supplier – Address
- Buyer/Supplier – Country
- Buyer/Supplier – State
- Buyer/Supplier – GST Registration Type
- Buyer/Supplier – Assessee of Other Territory
- Buyer/Supplier – GSTIN/UIN
- Buyer/Supplier – Is Bill of Entry Available
- Buyer/Supplier – Place of Supply
- Buyer/Supplier – Pincode
- Ledger with Bill-wise Details
- To import Bill-wise details for ledgers,
- Press F11 (Company Features) > set Enable Bill-wise entry to Yes.
- Open the party ledger and set Maintain balance bill-by-bill to Yes.
- Use the correct Currency symbols and ensure that the required currency is created in the company data before importing multi-currency transactions.
If the Excel file was generated using legacy currency identifiers for AED (UAE Dirham) and SAR (Saudi Riyal) (applicable only for TallyPrime 7.0 & later), and replace them with the appropriate currency symbols before importing.
- Copy the symbol from the Currency alteration screen and replace the existing symbol in your Excel file.
- Use the formula =UNICHAR(8387) for AED.
- Use the formula =UNICHAR(8385) for SAR.
These symbols may appear as question marks or boxes in Excel.
Configure TallyPrime for Importing Data
You can configure the import feature in TallyPrime based on your requirements. This includes selecting the right import format, setting up error handling to ensure data is correctly placed.
Under Import Configuration (Alt+O > Import > Configuration), you can set up the following configurations:
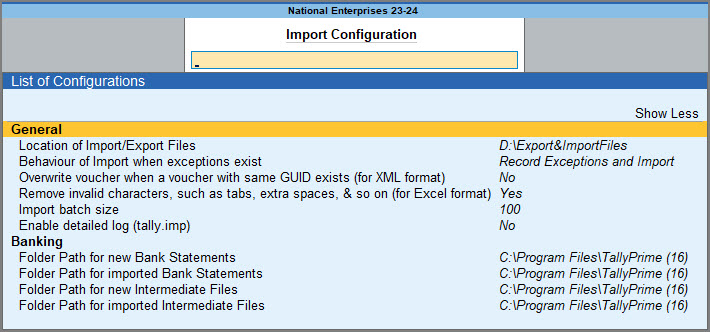
- Location of Import/Export Files: Define the folder path where imported or exported files should be stored.
- Behaviour of Import when exceptions exist: If the data contains issues like missing masters or invalid values, you can decide how TallyPrime should process it.
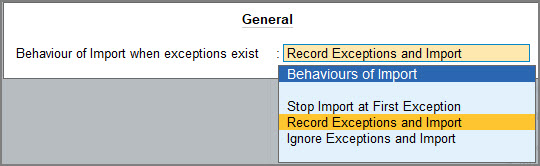
- Stop Import at First Exception: The import process stops if any error is detected.
- Record Exceptions and Import: The import continues while recording exceptions in the Exceptions Report for review.
- Ignore Exceptions and Import: Data is imported without considering any exceptions.
- Overwriting Vouchers (XML format): If a voucher with the same GUID exists, enabling this option ensures that it is overwritten instead of creating a duplicate. If importing into a different company, vouchers are overwritten regardless.
- Removing Invalid Characters (Excel format): Eliminates extra spaces, tabs, and special characters from the Excel file to prevent duplication or errors. (Available from Release 3.0.2 onward.)
- Import Batch Size: Set the number of records to be processed in each batch during import.
- Enable Detailed Log: Capture a detailed event log to identify and rectify import errors efficiently.