
Supplies with Discount, MRP Inclusive of GST, Slab Rate
In your business, you might sell goods or services with discounts. Additionally, you can set the slab rates of stock items based on MRP or Item rates before recording the sales voucher. Later, you can record the sales transaction with the defined slab rates. You can also sell goods and services with an MRP Inclusive of tax. MRP stands for Maximum Retail Price and it is the highest price that can be charged for a product as decided by the manufacturer. If MRP is listed as Inclusive of Tax, it means the price of the product already includes the applicable taxes and the customer does not have to pay the tax separately.
While selling goods or services, you might want to give discounts to your customers as part of your business policy. Such discounts can be either for each item separately or on the total invoice amount. In both cases, the tax is calculated after deducting the discount amount.
You can also create a voucher class and include the tax details. Going forward, when you record the sales transaction, with the voucher class, the total amount is calculated including the tax. From the voucher alteration screen, you can view the breakup of your total amount, displaying the sales and tax ledgers. You can create slab rates based on MRP or item rates even before recording the transactions. You might be selling a product whose tax rate depends on the product rate. In such cases, you can set up a slab rate and define the slab-wise item rate along with the tax rate for each slab. Once you start recording the transaction, depending on the rate you select for the item, the tax gets calculated based on the rate defined in the slab rate.
In TallyPrime, you can record all the above-mentioned transactions using a sales voucher. You just need to configure your Sales ledger and your stock items, and you can record the transactions with ease.
GST Sales of Goods and Services with Item Level Discount
While selling goods or services, you might want to give discounts to your customers as part of your business policy. Such discounts can be either item level-wise or even on the total amount. In both cases, the tax is calculated after deducting the discount amount.
In this section
Sale of goods with discount
You can record the sale of goods after giving a discount at the item level and the tax gets calculated after considering the discount.
![]()
- While creating the discount ledger under Indirect Expenses, ensure the Type of Ledger is selected as Discount.
- While recording sales of goods with the discount ledger.
- In the sales voucher, press F12 (Configure) > set Provide Cash/Trade Discount to Yes.
- Enter the stock item details along with Quantity and Rate.
- Below each stock item, in the Discount field, enter the discount rate or the discount amount applicable for the stock item.
- Select the Discount ledger. The total discount amount is displayed.
You can alter the total discount amount if required. For example, if you want to allow a maximum discount of Rs 50,000 on a bill, and your total discount amount exceeds this amount, you can alter the final amount. The discount will be apportioned according to the discount given at the item level.
- Select the appropriate GST ledgers. CGST and SGST for local sales and IGST for interstate sales.
- To view the Tax Analysis, press Ctrl+O (Related Reports) > GST Tax Analysis. Press Alt+F5 (Detailed) to view the detailed breakup of the tax.
- Press Esc to return to the sales invoice.
- As always, press Ctrl+A to save the sales voucher.
- Print the invoice.
- In the sales voucher, press Ctrl+P.
Alternatively, press Alt+P (Print) > Current. - Press I (Preview) to preview the invoice before printing or press P (Print) to print the voucher.
- In the sales voucher, press Ctrl+P.
You have recorded a sales voucher for the sale of goods with a discount.
Sales of services with discount
You can record the sale of services after giving a discount and the tax gets calculated after considering the discount.
![]()
- Create a discount ledger for services under Indirect Expenses.
- In the Ledger Alteration screen, set Include in assessable value calculation to GST.
- Select Services in the Appropriate to field.
There are 3 options in Include in assessable value calculation for Appropriation.- Goods
- Goods and Services
- Service.
When you select Services and Goods and Services, the Method of calculation is automatically set to Based on Value.However, for Goods, the user needs to choose the Method of calculation.- Based on Quantity: Apportions the expense value based on quantity of the stock item. More quantity means more share of expense value.
- Based on Value: Apportions the expense value based on value of each stock item/service ledger more value means more share of expense value.
- As always, press Ctrl+A to save the ledger creation.
-
While recording sales of services with the discount ledger.
- Select the service ledger and enter the Amount.
- Select the Discount ledger and enter the discount in percentage with a minus sign.
The discount gets calculated under Amount.
- Select the appropriate GST ledgers. CGST and SGST for local sales and IGST for interstate sales.
- To view the Tax Analysis, press Ctrl+O (Related Reports) > GST Tax Analysis. Press Alt+F5 (Detailed) to view the detailed breakup of the tax.
- Press Esc to return to the sales invoice.
- As always, press Ctrl+A to save the sales voucher.
- Print the invoice.
- In the sales voucher, press Ctrl+P.
Alternatively, press Alt+P (Print) > Current. - Press I (Preview) to preview the invoice before printing or press P (Print) to print the voucher.
- In the sales voucher, press Ctrl+P.
You have recorded a sales voucher for the sale of services with a discount.
Sales of Goods/Services with discount using Discount column
You can also enter the discounted amount using the Discount column in TallyPrime.
- Press F11 (Features) > set Use Discount column in invoices to Yes.
- While recording a sale voucher, enter the stock item details, like quantity and rate per unit.
- In the Discount column, enter the percentage of discount.

- Provide other necessary details as needed, and press Ctrl+A to save.
The invoice value is computed considering the discounted amount.
Invoices with MRP Inclusive of Tax
MRP stands for Maximum Retail Price and it is the highest price that can be charged for a product as decided by the manufacturer. If MRP is listed as Inclusive of Tax, it means the price of the product already includes the applicable taxes and the customer does not have to pay the tax separately. In your business, you can supply goods at MRP Inclusive of Tax by creating a voucher class. Once you have created or altered a voucher class with the necessary configurations, you can record sales with MRP Inclusive of Tax in TallyPrime. When you select the voucher class, there is no need to select the tax ledgers separately.
In this section
- Create/Alter voucher class for MRP inclusive of tax
- Configure accounting allocations in the stock item master
- Record sales with MRP inclusive of GST
![]()
Create/Alter voucher class for MRP inclusive of tax
In order to record the supply of goods at MRP Inclusive of Tax, you need to create the voucher class in the Sales Voucher type.
- In the Voucher Type Alteration screen of Sales, press Enter on the Name of Class and add the voucher class name.
- Configure the Default Accounting Allocations.
- Set the option Enable default accounting allocations to Yes.
- Enable Set/Alter Default Accounting Entries. The Default Accounting Entries screen appears.
- Press F12 (Configure) > enable Allow to change default Accounting Allocation method.
- Press Ctrl+A to save.
- Under Adjust Allocation Difference (if any) to, select First Ledger and press Enter.
Once you set First Ledger under Adjust Allocation different (if any) to, you cannot apply Rounding Method to the First Ledger as the adjustment is already set to it. - Set up the sales and tax ledger with percentages.
- Press Ctrl+A to save the voucher class.
The change in configuration as demonstrated in the above procedure will not be applicable to the transactions you have already recorded. However, you can correct the tax calculation manually in the transactions.
- Set the option Enable default accounting allocations to Yes.
Configure accounting allocations in the stock item master
Before you start recording the sales voucher, you need to configure the accounting allocation in the stock item master.
- Open the stock item alteration screen.
- Enable Set/modify default ledgers for invoicing.
If this option is not visible, press F12 (Configure) > enable Set default Accounting Allocations for Stock Items (in Invoice Mode).
- In the Default Accounting Allocations for Sales Invoice screen, press F12 (Configure) > set Allow to change default Accounting Allocation method to Yes and press Enter.

- Under Adjust Allocation difference (if any) to, select First Ledger and press Enter.
Once you set First Ledger under Adjust Allocation different (if any) to, you cannot apply Rounding Method to the First Ledger as the adjustment is already set to it. - Set up the sales and tax ledger with percentages.
- Press Ctrl+A to save the voucher class.
- Enable Set/modify default ledgers for invoicing.
Record sales with MRP inclusive of GST
After the voucher class is created and the stock item master is configured, you can record the sales with MRP Inclusive of GST after selecting the voucher class in the sales voucher.
- Record the sales voucher with the Voucher Class created.
- In the sales voucher, select the Voucher Class.
- Provide the stock item details along with Quantity and Rate.
There is no need to select the GST ledgers.

- To view the tax calculation, open the invoice in alteration mode.
Press Enter on the Amount column.
You can view the auto-calculated value for the default ledgers along with the tax breakup.
You now know how to create voucher class, make configurations for accounting allocations and finally record the sales.
Record sales using Rate (Incl. of Tax) column
You can also record sales with MRP inclusive of GST for the required sales transaction, without the need for creating the voucher class or configuring the stock item for account allocations.
- In the sales invoice, press F12 (Configure) > set Provide Rate Inclusive of Tax for Stock Items to Yes.
- Enter the stock item details, like Quantity and Rate.
- Enter the amount under Rate (Incl. of Tax) column. Ensure that the amount is including the tax applicable per unit.
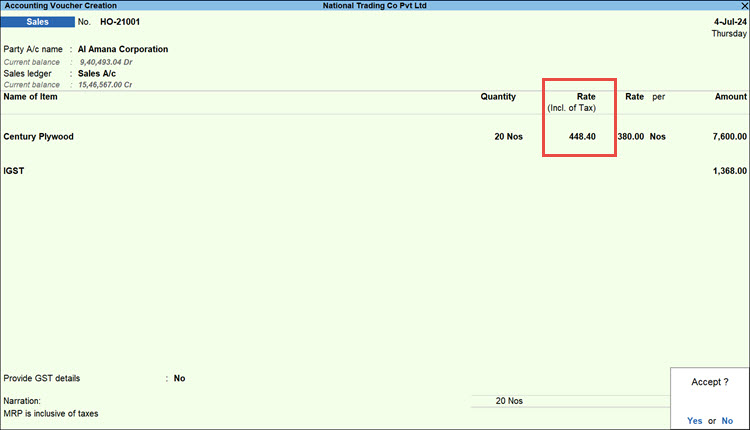
- Provide other necessary details, as needed, and press Ctrl+A to save.
Sales of Stock Items with Slab-wise Tax Rates
In your business, you might be selling goods whose tax rate depends on the rate of the goods. In such cases, you can set up a slab rate and define the slab-wise item rate along with the tax rate for each slab. Once you start recording the transaction, depending on the rate you select for the item, the tax gets calculated based on the rate defined in the slab rate. You can create slab rates based on MRP or item rates even before recording the transactions.
You can also choose the applicability of the slab rate based on MRP in the item master. For example, the tax rate of 5% is applicable to an item if the price is less than Rs.500, and 12% when the price is Rs.500 or above. If you have two different prices for the item—the MRP and the rate manually entered in the invoice, you can choose to apply the slab rate based on the MRP or the item rate. TallyPrime allows you to sell stock items at a slab rate based on MRP, item rate, and price range.
In this section
- Slab rate based on MRP
- Slab rate based on Item rate
- Slab rate based on price range – same item of different price per unit
- Tax rate calculation for change in slab rate
- Slab rate with apportioned additional ledger value/calculation based on including expenses
- Slab rate without apportioned additional ledger value/exclude apportion value
Slab rate based on MRP
The MRP is the highest price at which a product is sold in the market. The MRP of a stock item is considered for GST rate calculation when slab rates are applicable. However, the tax amount still gets calculated on the selling price of the item. In the highlighted case, the rate per unit is the MRP of Rs 550, which appears in the slab range of Rs. 500 and above. Therefore, GST gets calculated at 12%. The slab rate needs to be set in the stock item master.
![]()
- Set up the slab rates based on MRP rates in the stock item.
- In the Stock Item Alteration screen, press F12 (Configure) > set Provide MRP Details to Yes.
- Set the option Set/Alter MRP details to Yes.
- Set Allow MRP modification in voucher as Yes.
- Update the MRP Rate per unit.
- Set the option GST applicability to Applicable.
- Under GST Rate & Related Details, select Specify Slab-Based Rates.
- In the Slab-Based Tax Rate Details screen, update the slab rates.
Press F12 (Configure) and enable Consider MRP while calculating slab-based tax rate.

- As always, press Ctrl+A to accept the stock item.
- While recording the sales voucher, press F12 (Configure) > set Modify MRP in vouchers to Yes.
- Select the stock item, and enter the MRP/Marginal price and Quantity.
- Select the appropriate tax ledgers.
- To view the Tax Analysis, press Ctrl+O (Related Reports) > GST Tax Analysis. Press Alt+F5 (Detailed) to view the detailed breakup of the tax.
- Press Esc to return to the sales invoice
- Press Ctrl+A to save the sales voucher.
If you are in TallyPrime Rel 2.1 or earlier, click here.
- Set up the slab rates based on MRP rates in the stock item.
- In the Stock Item Alteration screen, press F12 (Configure) > set Provide MRP Details to Yes.
- Set the option GST applicability to Applicable.
- Enable Set/Alter GST Details to update the GST and HSN/SAC details.
- Select the Calculation type as On Item Rate.
- On the Tax on Item Rates screen, update the slab-based tax rate details.
- Set the option Set/Alter MRP details to Yes.
- Set Allow MRP modification in voucher as Yes.
- Set Consider MRP while calculating slab-based tax rate as Yes.
- Update the MRP Rate per unit.
- As always, press Ctrl+A to accept the stock item.
- While recording the sales voucher, press F12 (Configure) > set Modify MRP in vouchers to Yes.
- Select the stock item, and enter the MRP/Marginal price and Quantity.
- Select the appropriate tax ledgers.
- To view the Tax Analysis, press Ctrl+O (Related Reports) > GST Tax Analysis. Press Alt+F5 (Detailed) to view the detailed breakup of the tax.
- Press Esc to return to the sales invoice
- Press Ctrl+A to save the sales voucher.
Slab rate based on Item rate
Item rate is the price at which a particular item is offered for sale. At the time of creating the stock item, you can set up the slab rate based on the item rate and set up the tax rate against the item rates. While recording the sales voucher the tax is calculated as per the tax rate defined for the item rate.
![]()
- Set up the slab rates based on item rates in the stock item.
- In the Stock Item Alteration screen, press F12 (Configure) > set Provide MRP Details to Yes.
- Set the option Set/Alter MRP details to Yes.
- Set Allow MRP modification in voucher as Yes.
- Update the MRP Rate per unit.
- Set the option GST applicability to Applicable.
- Under GST Rate & Related Details, select Specify Slab-Based Rates.
- In the Slab-Based Tax Rate Details screen, update the slab rates.
Ensure Consider MRP while calculating slab-based tax rate is set to No.
- As always, press Ctrl+A to accept the stock item.
- While recording the sales voucher, press F12 (Configure) > set Modify MRP in vouchers to Yes.
- Select the stock item, and enter the MRP/Marginal price and Quantity.
- Select the appropriate tax ledgers.
- To view the Tax Analysis, press Ctrl+O (Related Reports) > GST Tax Analysis. Press Alt+F5 (Detailed) to view the detailed breakup of the tax.

- Press Esc to return to the sales invoice.
- Press Ctrl+A to save the sales voucher.
If you are in TallyPrime Rel 2.1 or earlier, click here.
- Set up the slab rates based on MRP rates in the stock item.
- In the Stock Item Alteration screen, press F12 (Configure) > set Provide MRP Details to Yes.
- Set the option GST applicability to Applicable.
- Enable Set/Alter GST Details to update the GST and HSN/SAC details.
- Select the Calculation type as On Item Rate.
- On the Tax on Item Rates screen, update the slab-based tax rate details.
- Set the option Set/Alter MRP details to Yes.
- Set Allow MRP modification in voucher as Yes.
- Set Consider MRP while calculating slab-based tax rate as No.
- Update the MRP Rate per unit.
- As always, press Ctrl+A to accept the stock item.
- While recording the sales voucher, press F12 (Configure) > set Modify MRP in vouchers to Yes.
- Select the stock item, and enter the MRP/Marginal price and Quantity.
- Select the appropriate tax ledgers.
- To view the Tax Analysis, press Ctrl+O (Related Reports) > GST Tax Analysis. Press Alt+F5 (Detailed) to view the detailed breakup of the tax.
- Press Esc to return to the sales invoice
- Press Ctrl+A to save the sales voucher.
Slab rate based on price range – same item of different price per unit
You can set the slab rate based on the price range. If you are selling the same stock item at a different price per unit depending on the stock available, you can select the same stock item twice in the invoice and enter the applicable rate per unit. The tax gets calculated as per the slab rate set for the different price ranges.
![]()
- Set up the slab rates based on the price range of the stock item.
- In the Stock Item Alteration screen, press F12 (Configure) > set Provide MRP Details to Yes.
- Set the option Set/Alter MRP details to Yes.
- Set Allow MRP modification in voucher as Yes.
- Update the MRP Rate per unit.
- Set the option GST applicability to Applicable.
- Under GST Rate & Related Details, select Specify Slab-Based Rates.
- In the Slab-Based Tax Rate Details screen, update the slab rates.
- As always, press Ctrl+A to accept the stock item.
- While recording the sales voucher, press F12 (Configure) > set Modify MRP in vouchers to Yes.
- Select the same stock item twice and enter the Quantity.
Enter different Rate per unit for both stock items. - Select the appropriate tax ledgers.
- To view the Tax Analysis, press Ctrl+O (Related Reports) > GST Tax Analysis. Press Alt+F5 (Detailed) to view the detailed breakup of the tax.
- Press Esc to return to the sales invoice.

- Press Ctrl+A to save the sales voucher.
If you are in TallyPrime Rel 2.1 or earlier, click here.
- Set up the slab rates based on MRP rates in the stock item.
- In the Stock Item Alteration screen, press F12 (Configure) > set Provide MRP Details to Yes.
- Set the option GST applicability to Applicable.
- Enable Set/Alter GST Details to update the GST and HSN/SAC details.
- Select the Calculation type as On Item Rate.
- On the Tax on Item Rates screen, update the slab-based tax rate details.
- Set the option Set/Alter MRP details to Yes.
- Set Allow MRP modification in voucher as Yes.
- Set Consider MRP while calculating slab-based tax rate as No.
- Update the MRP Rate per unit.
- As always, press Ctrl+A to accept the stock item.
- While recording the sales voucher, press F12 (Configure) > set Modify MRP in vouchers to Yes.
- Select the same stock item twice and enter the Quantity.
Enter different Rate per unit for both stock items. - Select the appropriate tax ledgers.
- To view the Tax Analysis, press Ctrl+O (Related Reports) > GST Tax Analysis. Press Alt+F5 (Detailed) to view the detailed breakup of the tax.
- Press Esc to return to the sales invoice
- Press Ctrl+A to save the sales voucher.
Tax rate calculation for change in slab rate
If the slab rates of stock items change due to any applicable discounts, you can override the tax rates at the transaction level.
![]()
- While recording the sales voucher, press F12 (Configure) > set Modify GST & HSN/SAC related details to Yes.
- Select the Party A/c name and the Sales ledger.
- Select the stock item, and enter quantity and rate.
- In the GST Rate and Related Details screen, enter the tax rate applicable based on the slab rate of the stock item.
- Select the appropriate tax ledgers.
- To view the Tax Analysis, press Ctrl+O (Related Reports) > GST Tax Analysis. Press Alt+F5 (Detailed) to view the detailed breakup of the tax.
- Press Esc to return to the sales invoice.
- Press Ctrl+A to save the sales voucher.
If you are in TallyPrime Rel 2.1 or earlier, click here.
- While recording the sales voucher, press F12 (Configure),
- Set Modify Tax Rate details of GST to Yes.
- Set Select common Ledger Account for Item Allocation to Yes.
- Select the Party A/c name and the Sales ledger.
- Select the stock item, and enter quantity and rate.
- In the Tax Classification Details screen that appears after selecting the stock item, press F12 (Configure) > set the option Override tax rate to Yes, and press Enter.
- In the GST Details screen, enter the tax rate applicable based on the slab rate of the stock item.
- Select the appropriate tax ledgers.
- To view the Tax Analysis, press Ctrl+O (Related Reports) > GST Tax Analysis. Press Alt+F5 (Detailed) to view the detailed breakup of the tax.
- Press Esc to return to the sales invoice.
- Press Ctrl+A to save the sales voucher.
Slab rate with apportioned additional ledger value/Calculation based on including expenses
While recording the sale of goods, if there is any additional ledger then the slab rate can be set by including the additional ledger. Hence the GST gets calculated after considering the additional ledger value.
![]()
- Provide slab rate in the stock item.
- In the Stock Item Alteration screen, under GST Rate & Related Details, select Specify Slab-Based Rates.
- In the Slab-Based Tax Rate Details screen, update the slab rates.
Press F12 (Configure) and enable Include GST expenses/incomes to calculate the slab-based tax rate.
- As always, press Ctrl+A to accept the stock item.
If you are on Rel 2.1 and earlier, click here.If you want to consider the additional expenses or incomes as part of item value, to arrive at the applicable slab rate, set the option Consider additional expense/income ledger for slab rate calculation to Yes. Based on the slab rate in which the calculated amount falls, the corresponding GST rate will appear in your invoice.
- While recording the sales voucher with the additional ledger.
- Select the stock item, and enter the quantity and rate.
- Select the additional ledger enabled for apportionment based on quantity, and enter the amount.
- Select the appropriate GST ledgers. The taxes are calculated on the slab rate arrived at by considering the value of apportioned additional ledger to the stock item rate.
- To view the Tax Analysis, press Ctrl+O (Related Reports) > GST Tax Analysis. Press Alt+F5 (Detailed) to view the detailed breakup of the tax.

- Press Esc to return to the sales invoice.
- Press Ctrl+A to save the sales voucher.
Slab rate without apportioned additional ledger value/Exclude apportion value
While recording the sale of goods, if there is any additional ledger and you don’t want to include that value while the slab rate is set, you can still record the sales voucher in TallyPrime. In such a case, the GST gets calculated after excluding the additional ledger value.
![]()
- Provide slab rate in the stock item.
- In the Stock Item Alteration screen, under GST Rate & Related Details, select Specify Slab-Based Rates.
- In the Slab-Based Tax Rate Details screen, update the slab rates.
Press F12 (Configure) and disable Include GST expenses/incomes to calculate slab-based tax rate.
If you are on Rel 2.1 and earlier, you can see the option as Consider additional expense/income ledger for slab rate calculation. - As always, press Ctrl+A to accept the stock item.
- While recording the sales voucher with the additional ledger.
- Select the stock item, and enter the quantity and rate.
- Select the additional ledger enabled for apportionment based on quantity, and enter the amount.
- Select the appropriate GST ledgers. The taxes are calculated on the slab rate arrived at by excluding the value of apportioned additional ledger.
- To view the Tax Analysis, press Ctrl+O (Related Reports) > GST Tax Analysis. Press Alt+F5 (Detailed) to view the detailed breakup of the tax.
- Press Esc to return to the sales invoice.
- Press Ctrl+A to save the sales voucher.


