Create Party Ledgers for GST
You can now create or alter your party ledgers at the click of a button. With the help of the Fetch Details Using GSTIN/UIN button, you can instantly fetch the party details available on the GST portal and update it directly in the party ledger.
However, you also have the flexibility to create your party ledgers offline or manually, as per your business preferences.
Directly Create Party Ledgers Using GSTIN/UIN
The Fetch Details Using GSTIN/UIN feature will significantly save your time and effort, as you don’t have to manually type any of the details of the party, apart from the GSTIN/UIN at the beginning.
You won’t have to worry about the correctness or recency of the information, as it is being fetched in real time from the portal. You will be able to view and update all the available information about your party, starting from the name to the address details, such as state, area and pincode, and also the PAN.
- Press Alt+G (Go To) > Create/Alter > Ledger.
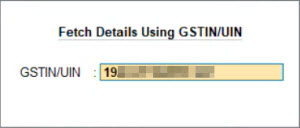
- Press Alt+L (Fetch Details Using GSTIN/UIN).
- Enter the GSTIN/UIN of the party.
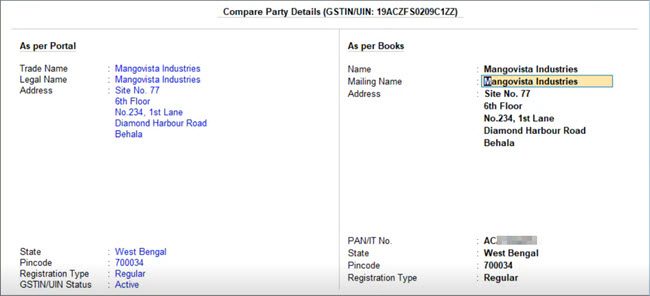
The Compare Party Details screen appears, where you can view the party details, such as address, PAN, and registration type & status, as available in real-time on the portal.
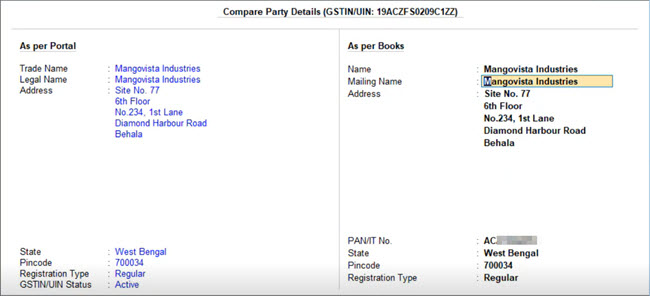
You can make any changes in the above details, if needed. For example, if the GST registration of the party was cancelled, then you can set the Registration Type as Unregistered/Consumer. - Press Alt+S (Filing History), if you want to view additional details about the party.
- Press Ctrl+A to save the details.
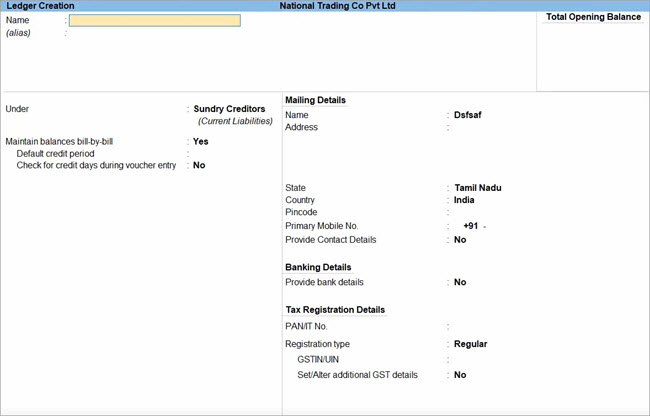
In the Ledger Creation/Alteration screen, you can see the fetched details are filled in the respective fields.
You only have to select the relevant group (such as Sundry Creditors/Debtors) and enter the phone number.
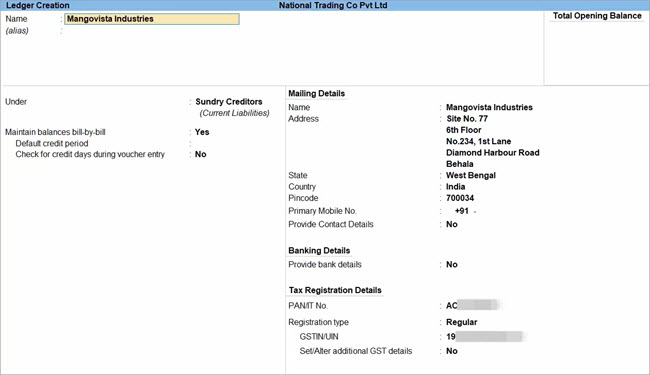
- Press Ctrl+A to save the party ledger.
Similarly, you can update the details of an existing party by just entering the GSTIN/UIN and saving the fetched details.
You are all set to pass your transactions using this newly created or updated party.
View the Filing History of a Party
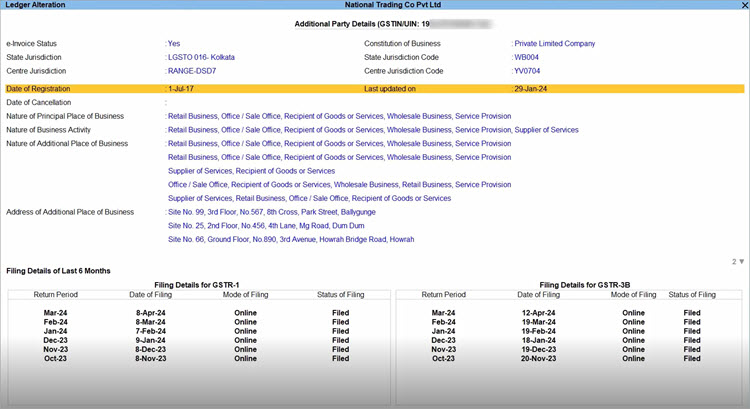
TallyPrime also provides you with the flexibility to view the filing details of the party, while creating or updating ledgers using GSTIN/UIN. You can view additional details of the party such as e-Invoice applicability, the jurisdiction, the nature of business, and any additional place of business.
Further, you can view the filing details of the last six months, which covers the Return Period as well the date, the mode and the status of return filing. The best part is that the filing details will be fetched based on the party’s registration type. For example, if the party is a Regular dealer, then you can see the filing details for GSTR-1 and GSTR-3B. On the other hand, if the party is a Composition dealer, then you can see the filing details for CMP-08.
In this way, the detailed information about the party will help you in taking key compliance and business decisions, and also foster better communication and understanding with other businesses in your network.
- Press Alt+G (Go To) > Create/Alter > Ledger.
- Press Alt+L (Fetch Details Using GSTIN/UIN).
- Enter the GSTIN/UIN of the party.

- In the Compare Party Details screen, press Alt+S (Filing History).
The Additional Party Details screen appears, where you can view the filing details of the party, such as e-Invoice applicability, the jurisdiction, the nature of business, and the filing details of the last six months.
In this way, you can refer to the detailed information about the party and take accurate business decisions.
Create Party Ledgers in Bulk Using GSTIN/UIN
As a thriving business, you might have tens and hundreds of parties in your network. Accordingly, TallyPrime has just the trick where you can create one or even a hundred party ledgers in just a couple of clicks.
With the help of the Create Party Using GSTIN/UIN report, you can fetch the party details available on the GST portal and instantly create a whole bunch of party ledgers.
This report will significantly save your time and effort, as you no longer have to manually type numerous party details, apart from the GSTIN/UIN at the beginning. You also won’t have to worry about the correctness or recency of the information, as it is being fetched in real time from the portal. You will be able to view and update all the available information about your party, starting from the name to the address details, such as state, area and pincode, and also the PAN.
- Press Alt+G (Go To) > Create Party Using GSTIN/UIN.
Alternatively, you can open the same report from Chart of Accounts > Alt+H (Create Party Using GSTIN/UIN) > Create Party Using GSTIN/UIN. - Enter the GSTIN/UIN of the parties for which you want to create ledgers.
However, if you have stored the list of GSTINs/UINs, then you can easily import them.
- Press Alt+L (Import GSTIN/UIN from Excel).
If you are in Rel 6.2 or below, press Alt+F (Import GSTIN/UIN from Excel). - Specify the File Path and the File to Import.
- Specify the Worksheet Name as well as the name of the column that contains the GSTIN/UIN.
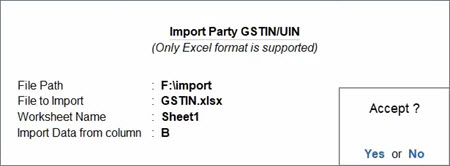
- Press Ctrl+A to import the GSTIN/UIN.
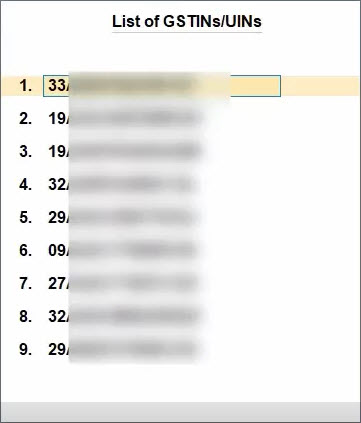
- Press Alt+L (Import GSTIN/UIN from Excel).
- Press Ctrl+A to fetch the details for the specified GSTINs/UINs.
You can view all the relevant details of the parties, such as Address, GSTIN/UIN Status, and Registration Type.
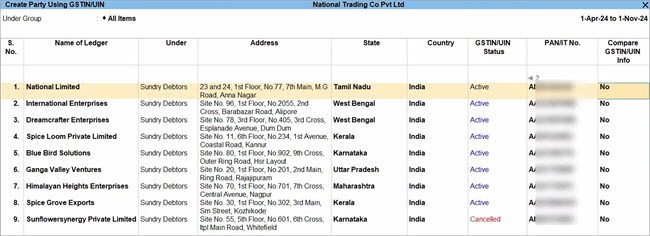
If you want to delete any of the fetched entries, then select the ledger and press Ctrl+D.
- Under the Compare GSTIN/UIN Info column, set the option to Yes for the required party.
The Compare Party Details screen appears, where you can view the party details, such as address, PAN, and registration type & status, as available in real-time on the portal. You can make any changes in the details, if needed.
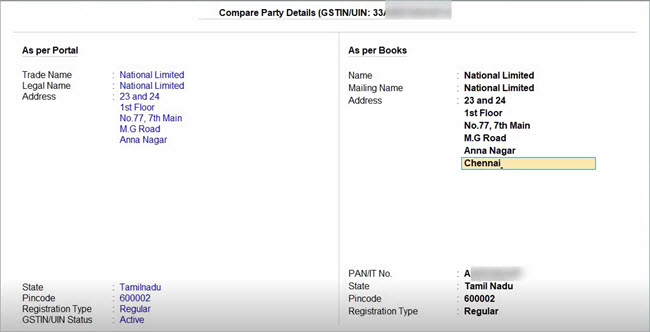
- Press Alt+S (Filing History), if you want to view the additional details of a party.
The Additional Party Details screen appears, where you can view the filing details of the party, such as e-Invoice applicability, the jurisdiction, the nature of business, and the filing details of the last six months.
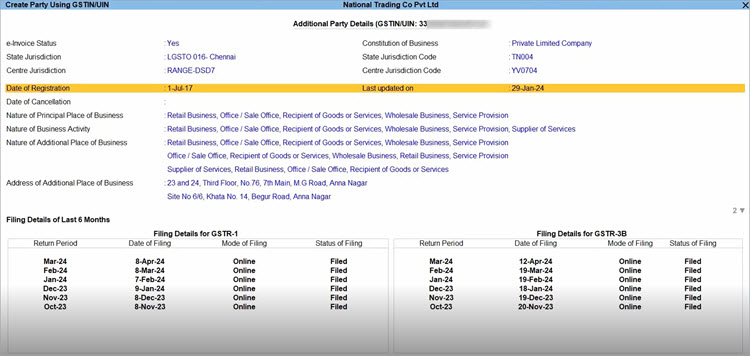
Based on the above details, you can further update any details for a party in the Create Party Using GSTIN/UIN screen.
For example, if the GSTIN/UIN of a party is cancelled, then you can update the Registration Type as Unregistered/Consumer.

- Press Ctrl+I (More Details), if you want to update further details of a party, such as Contact Details or Bank Details.
- Press Ctrl+A to save the details of all the party ledgers in one go.
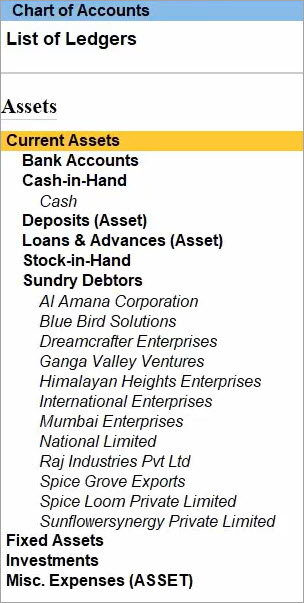
You can view the newly created ledgers in Chart of Accounts, under Sundry Debtors/Creditors.
Manually Create Party Ledgers for GST
You can create party ledgers for GST in TallyPrime for the parties with whom you purchase and sell goods and services, with the GST registration details.
You can create supplier Ledger, customer Ledger and enter the GSTIN/UIN based on the party type.
You can set GST rates in the ledger grouped under non-revenue accounts, for example, Current Assets and Current Liabilities. If you have created the party ledgers under groups other than Sundry debtors, Sundry creditors, Bank, Cash, and Branch/divisions:
Create Supplier Ledgers
- Gateway of Tally > Create > type or select Ledger > and press Enter.
Alternatively, press Alt+G (Go To) > Create Master > Ledger > and press Enter. - Enter the Name of the supplier’s ledger.
- Select Sundry Creditors in the Under field.
- Set the option Maintain balances bill-by-bill to Yes.
If you do not see this option, press F12 (Configure) > set Maintain balances Bill-by-Bill to Yes. - Enter the Default credit period, if any.
- Select the party Registration type, and enter the GSTIN/UIN.
- Enable the option Set/Alter GST Details to open the GST Details screen.
- Accept the screen. As always, you can press Ctrl+A to save.
The Ledger Creation screen appears as shown below:
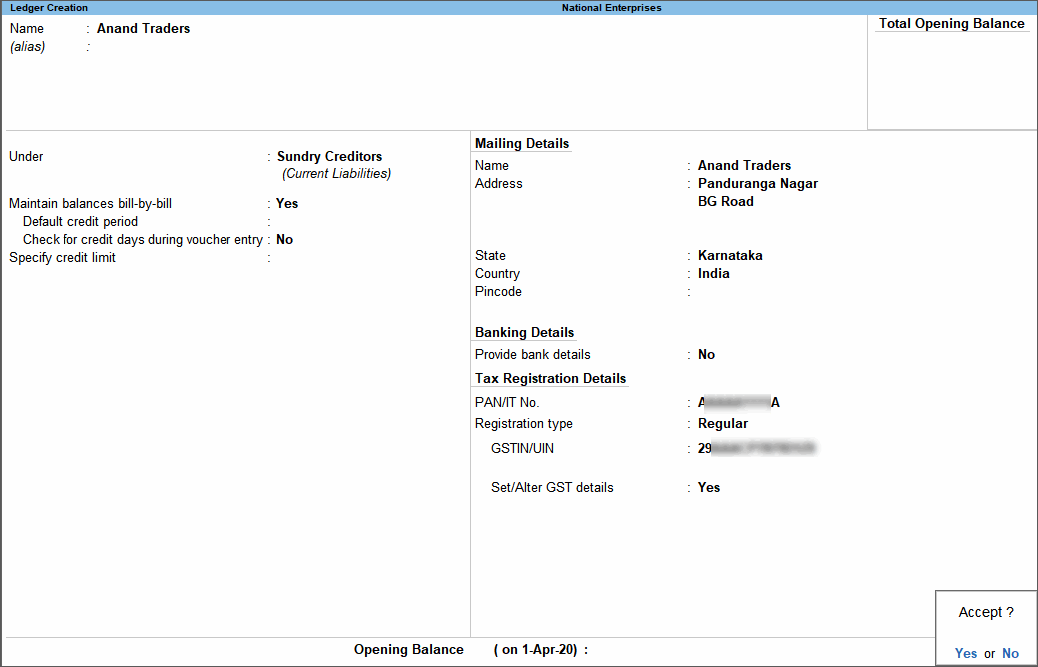
- Accept the screen. As always, you can press Ctrl+A to save.
Create Customer Ledgers
- Gateway of Tally > Create > type or select Ledger > and press Enter.
Alternatively, press Alt+G (Go To) > Create Master > Ledger > and press Enter. - Enter the Name of the customer’s ledger.
- Select Sundry Debtors from the List of Groups in the Under field.
- Set the option Maintain balances bill-by-bill to Yes.
- Enter the Default credit period, if any.
- Select the party Registration type, and enter the GSTIN/UIN.
- Enable the option Set/Alter GST Details to open the GST Details screen.
- Set the option Assessee of Other Territory to Yes if the party is belongs to Exclusive Economic Zone (other territory).
- If the supplier is an e-commerce operator, then enable the option Is e-commerce operator.
The GST Details screen appears as shown below:

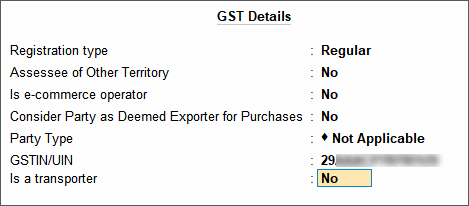
- Accept the screen. As always, you can press Ctrl+A to save.
The Ledger Creation screen appears as shown below:

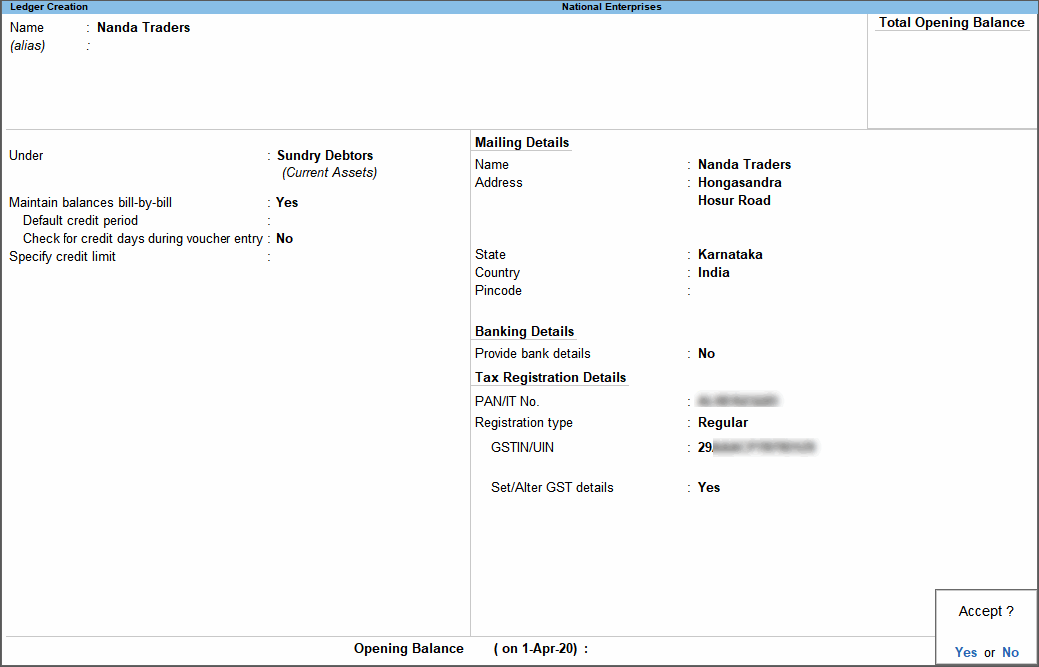
- Accept the screen. As always, you can press Ctrl+A to save.
GSTIN/UIN Format
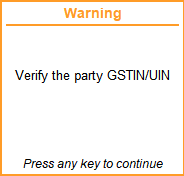
The GSTIN/UIN entered in party ledger gets validated by considering the formats prescribed for all the party types. If a GSTIN/UIN does not fall in the supported formats, a warning message appears as shown below:
If you have provided a valid GSTIN/UIN (the format that is newly introduced by the department), you can ignore this message and save the ledger. The transactions recorded using this ledger will appear as exceptions in the Information required for generating table-wise details not provided section of GSTR-1, GSTR-2, GST CMP-08.
You can do the following to include such transactions in the returns.
- Press Alt+V (Accept GSTIN/UIN)
- Press Enter to skip the GSTIN/UIN validation and accept the voucher.
To move the voucher back to exceptions, press Alt+V (Accept GSTIN/UIN) in the Vouchers Accepted without Party GSTIN/UIN Validation screen.


